

Overview
Microsoft Outlook is a data source type in Integration Designer that provides native Outlook connectivity through the Microsoft Graph API. Unlike the Email Trigger (IMAP) and Email Sender (SMTP) data sources, Microsoft Outlook uses Azure AD authentication and the MS Graph API for a unified read and send experience. Use cases include:- Email-triggered workflows: Automatically start processes when emails arrive in an Outlook mailbox
- Customer communication: Send emails and replies directly from business processes
- Document processing: Trigger workflows when emails with attachments are received
- Unified inbox management: Read and send from the same data source configuration
Microsoft Outlook supports three scope modes:
- Read Emails — monitor a mailbox and trigger processes
- Send Emails — send emails from processes via notification templates
- Read & Send Emails — both capabilities in a single data source
When to use Microsoft Outlook vs Email Trigger / Email Sender
FlowX.AI offers two ways to connect to email: Microsoft Outlook (MS Graph API) and Email Trigger / Email Sender (IMAP/SMTP). Choose based on your mail provider and requirements.How it works
1
Register an Azure AD app
Create an app registration in Azure AD with the required MS Graph permissions for your scope.
2
Create a Microsoft Outlook data source
Configure the connection in Integration Designer with your Azure AD credentials and select the desired scope.
3
Connect to processes
For Read scope: link to a Message Start Event node and activate from Manage Triggers.
For Send scope: link to a notification template and use the Send Notification action.
4
Process emails
FlowX.AI monitors the mailbox (Read) or sends emails (Send) through the MS Graph API.
Creating a Microsoft Outlook data source
Prerequisites
Before configuring a Microsoft Outlook data source, ensure you have:- Access to Integration Designer with appropriate permissions
- An Azure AD app registration with the required MS Graph API permissions:
- Azure AD credentials: Tenant ID, Client ID, and a Client Secret (or, starting with 5.9.1, a certificate — see Step 2)
Step 1: Access Integration Designer
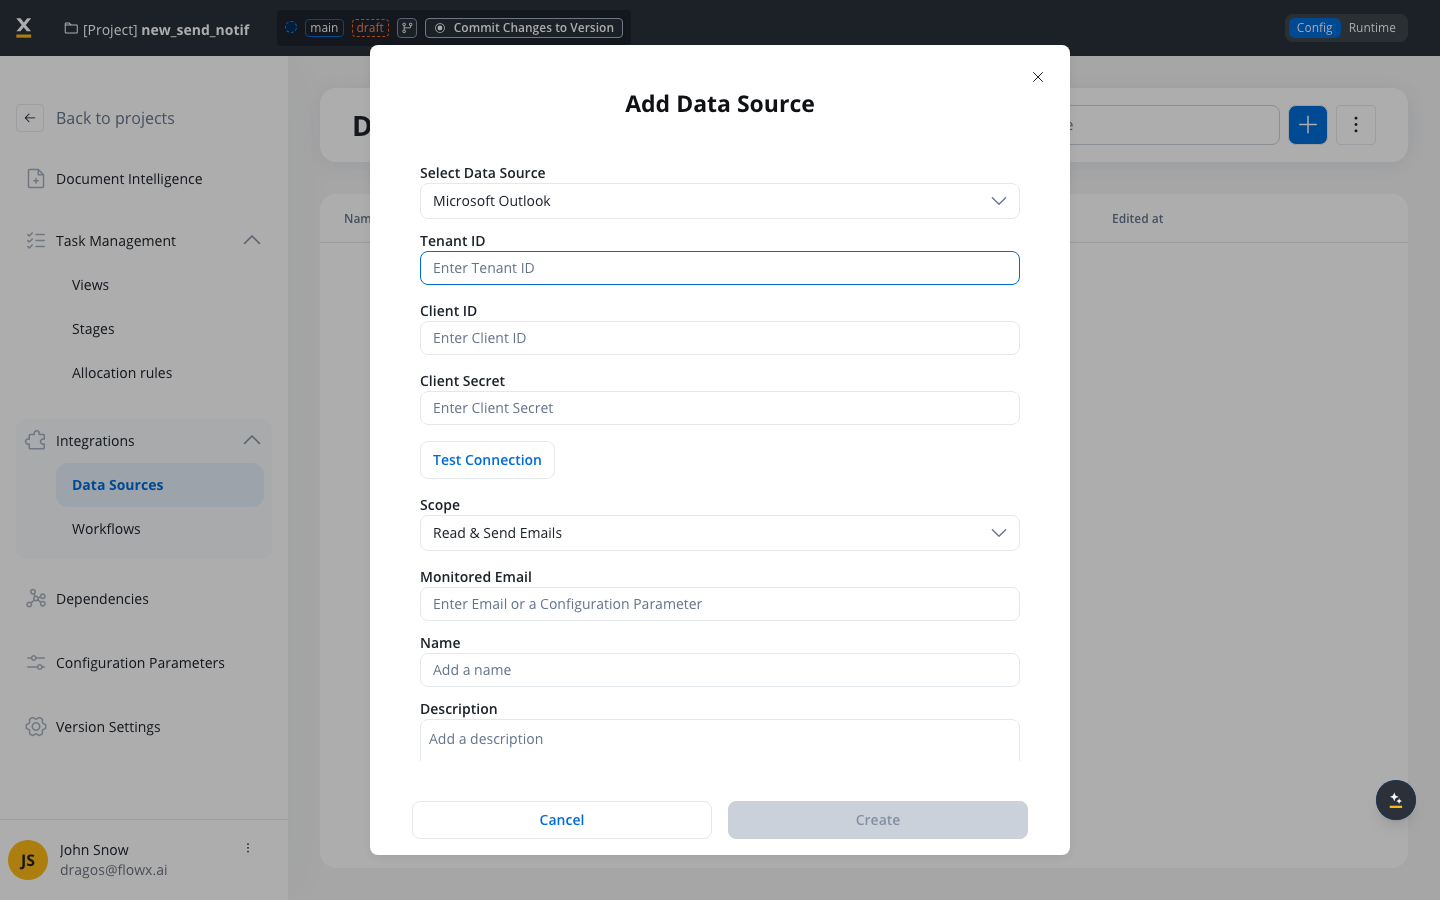
- Navigate to FlowX Designer → Your workspace → Projects → Your project → Integrations → Data Sources
- Click the + button to open the Add Data Source dialog
- Select Microsoft Outlook as the data source type
Step 2: Configure authentication
string
required
The Azure AD tenant ID for your organization.
string
required
The application (client) ID from your Azure AD app registration.
string
required
The client secret generated in your Azure AD app registration.
boolean
Available starting with FlowX.AI 5.9.1. Authenticate to Microsoft Graph with a certificate instead of a client secret. When you turn this ON, the Client Secret above is ignored and the certificate is used to authenticate. Configure:
- Certificate type — how the certificate is provided: Base64 (paste the encoded certificate content) or Path (a path to the certificate file reachable by the integration).
- Format — the certificate format: PEM or PKCS12.
- Password — the certificate password. Required only when the format is PKCS12.
Step 3: Test the connection
Click the Test Connection button to verify your Azure AD credentials:The data source can be created even if the test connection fails. If the test fails on creation, you will be redirected to the Authorization tab with a failed connection message instead of the Settings page.
Step 4: Configure scope and email
select
required
The email capabilities for this data source:
string
required
The email address of the mailbox to monitor or send from.Validation: Must be a valid email format.
Step 5: Name and description
string
required
A unique, descriptive name for the Microsoft Outlook data source.Validation rules:
- Required field
- Must be unique within the project
- Only letters, numbers, and these characters allowed:
[],(),.,_,- - Minimum 3 characters, maximum 50 characters
string
Optional description explaining the purpose of this data source.
Settings page
After creating the data source, configure monitoring and validation settings in the Settings tab. The available settings depend on the selected scope.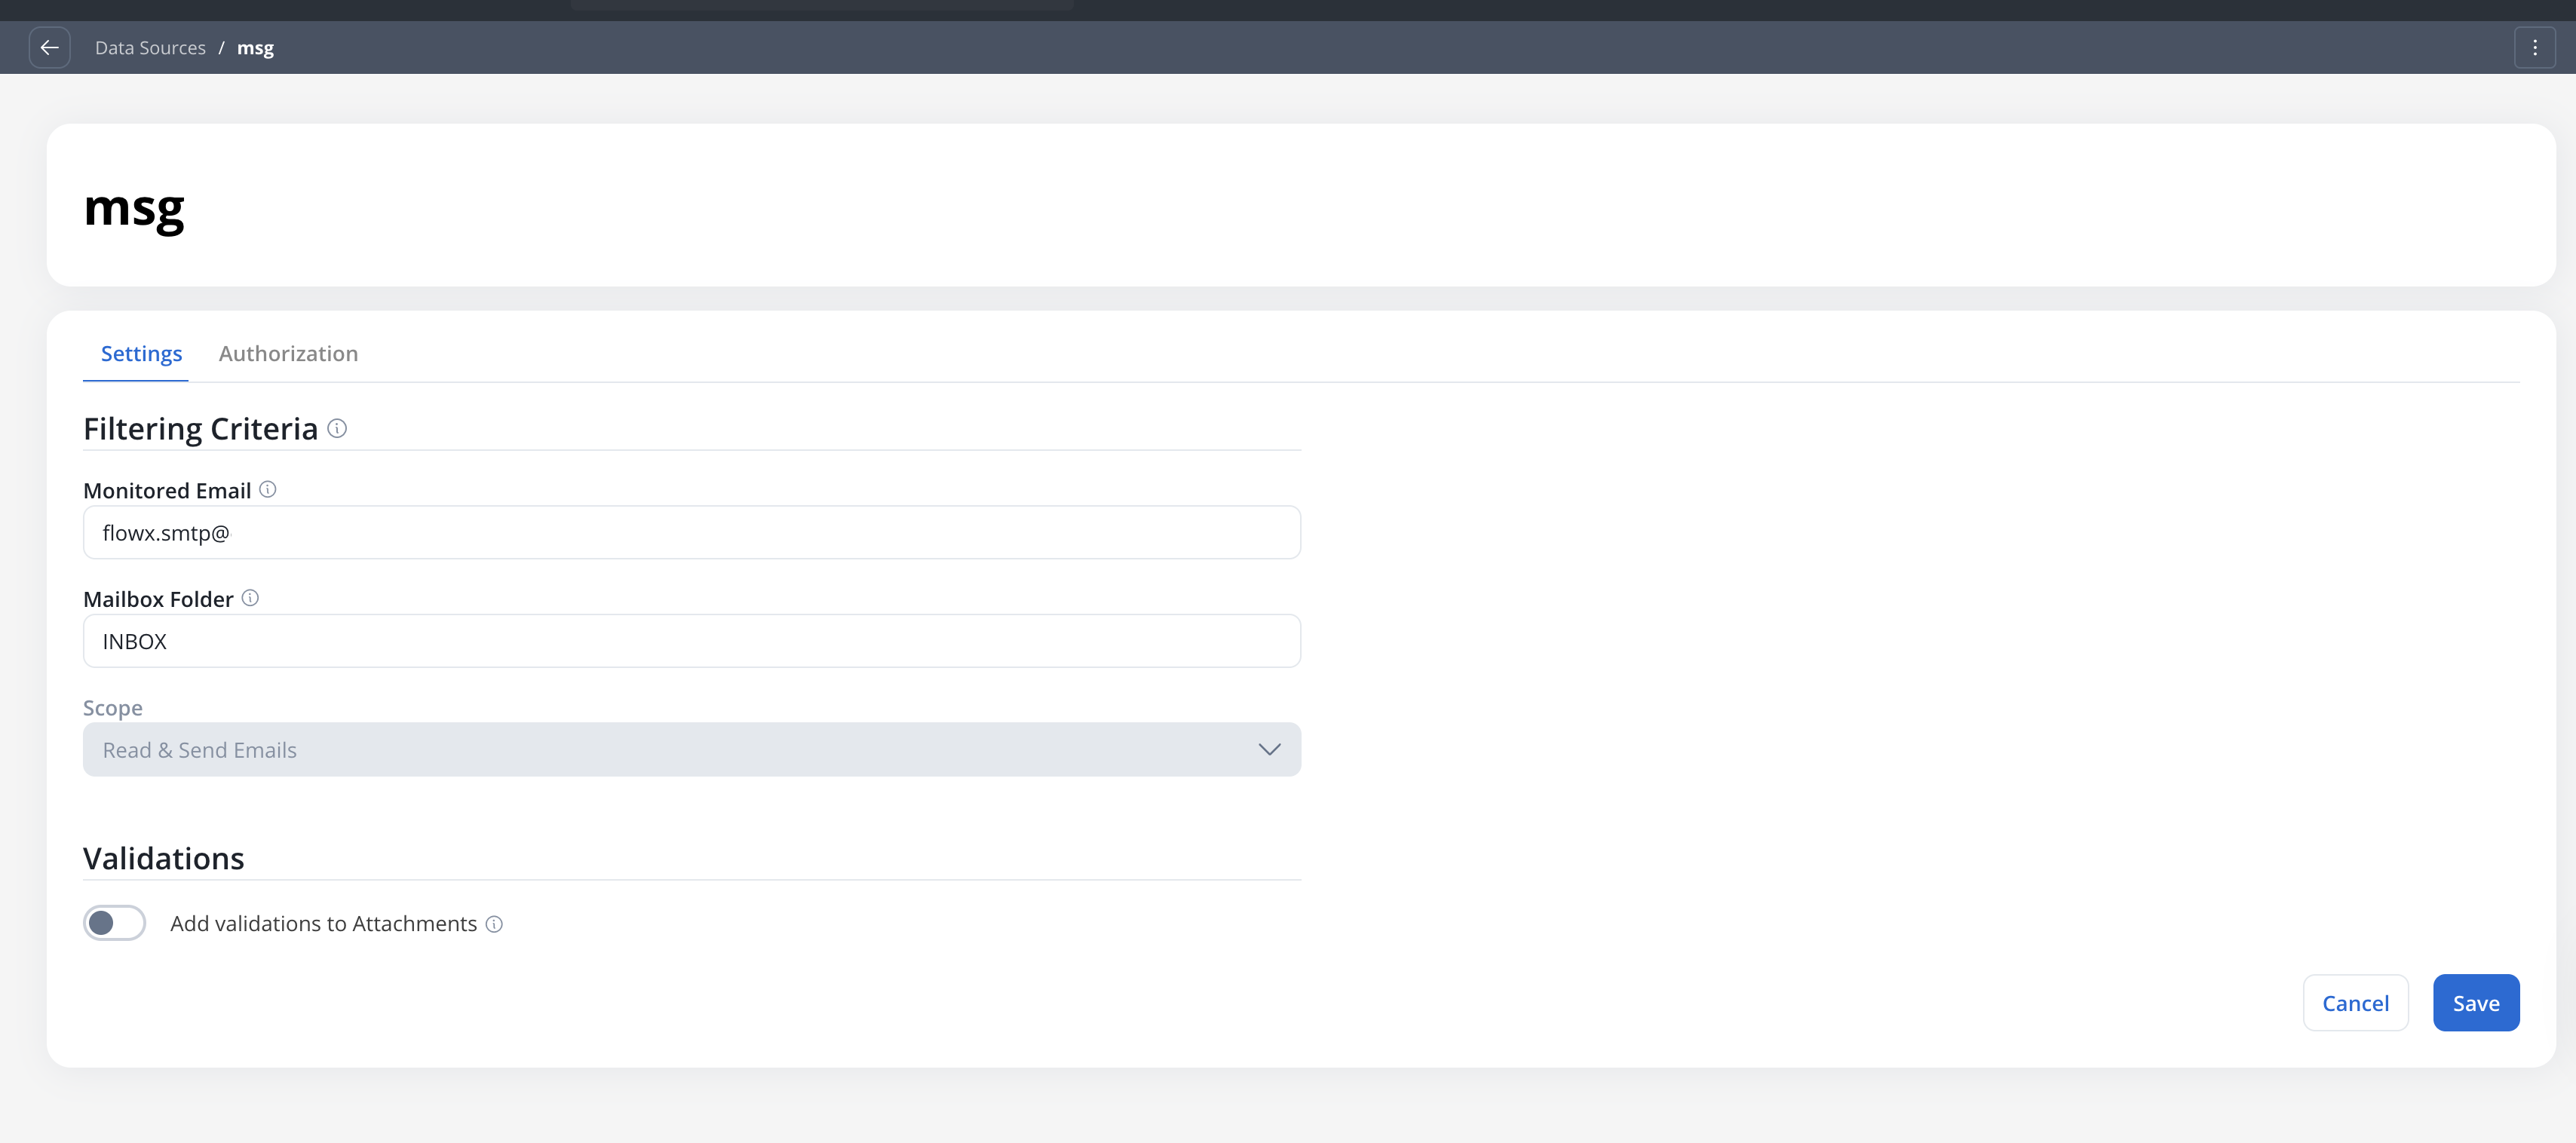
Read scope settings
For data sources with Read Emails or Read & Send Emails scope:Filtering criteria
string
The email address that will be monitored. Editable after creation.
string
The mailbox folder to monitor for incoming emails.Default:
InboxSupported well-known folder names:Inbox,Sent,Drafts,Deleted,Junk,Archive,Outbox
string
Displays the scope selected during creation. This field is read-only.
Attachment validations
Toggle ON the Add validations to Attachments option to configure validation rules for incoming email attachments.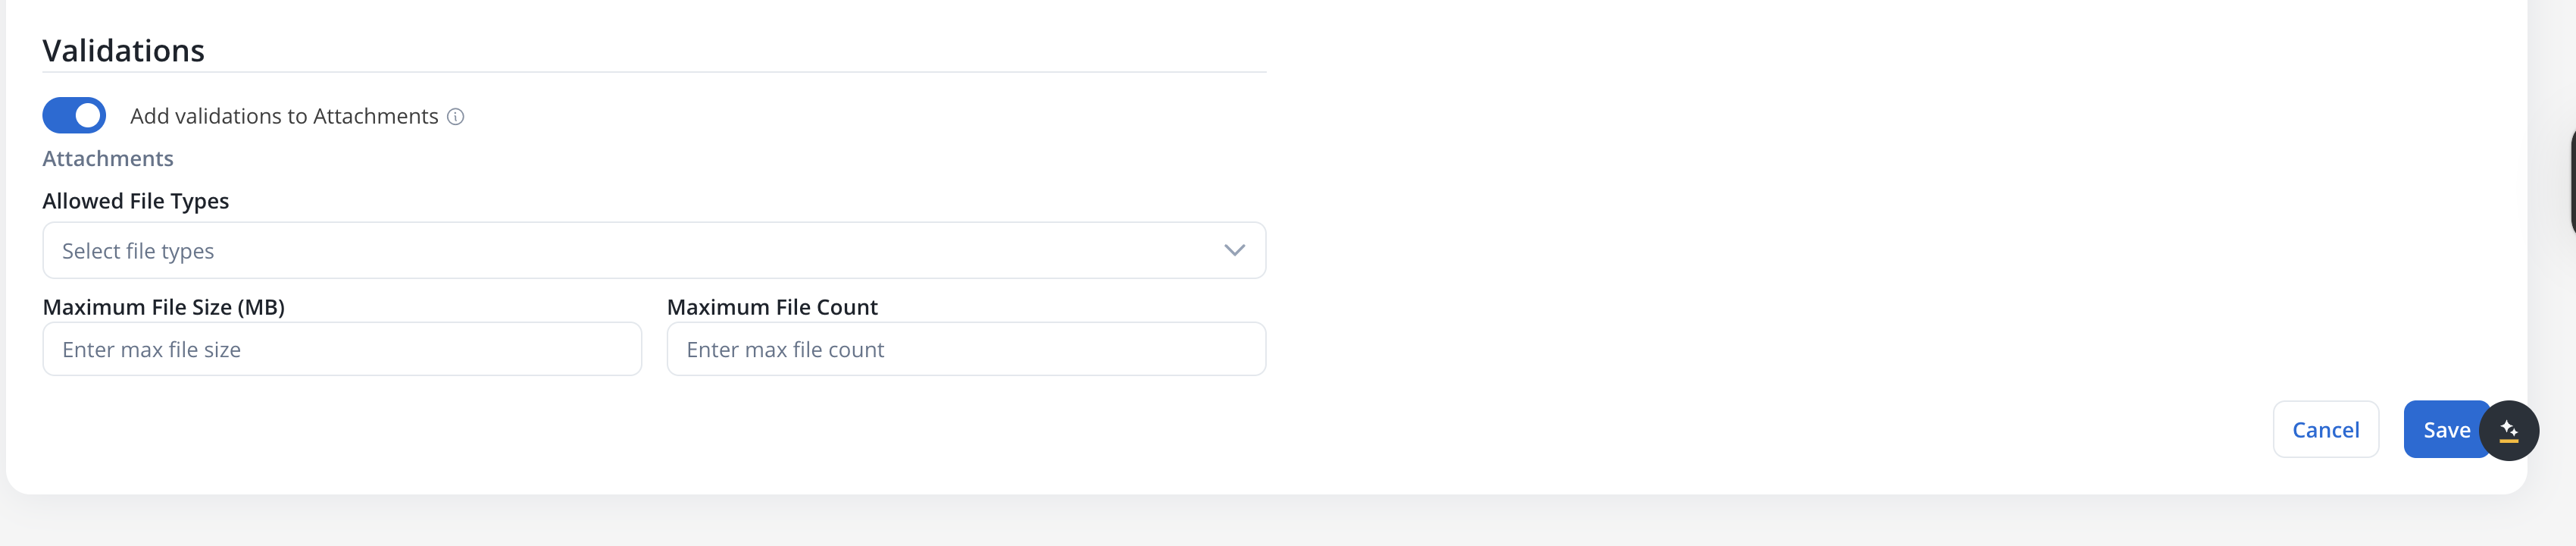
If any validation fails, the email will not be processed and a warning will appear in the Failed Triggers section in Runtime.
array
Restrict which attachment file types are accepted:On 5.9.x, you select allowed types from the file type categories below.
Leave empty to accept all file types.
Individual file extensions (SaaS · 5.11)Allowed File Types selects individual file extensions instead of these categories. The categories no longer exist in the runtime, so the table above serves only as a reference for what each one used to cover.Selected extensions are stored as bare uppercase values without a leading dot (
PDF, DOCX). Input is tolerant of case and of a leading dot, and existing data sources are migrated automatically, with each stored category expanded into the individual extensions it covered.number
Maximum allowed size per attachment file.Maximum: 25 MB
number
Maximum number of attachments allowed per email.
Send scope settings
For data sources with Send Emails scope only, the Settings tab shows a simplified view:string
The email address used as the sender (“From” address) for outgoing emails.
string
Displays the scope selected during creation. This field is read-only.
Send-only data sources do not display the Mailbox Folder or Attachment Validations fields, since those apply only to the Read scope. Sent emails are automatically saved to the Sent Items folder.
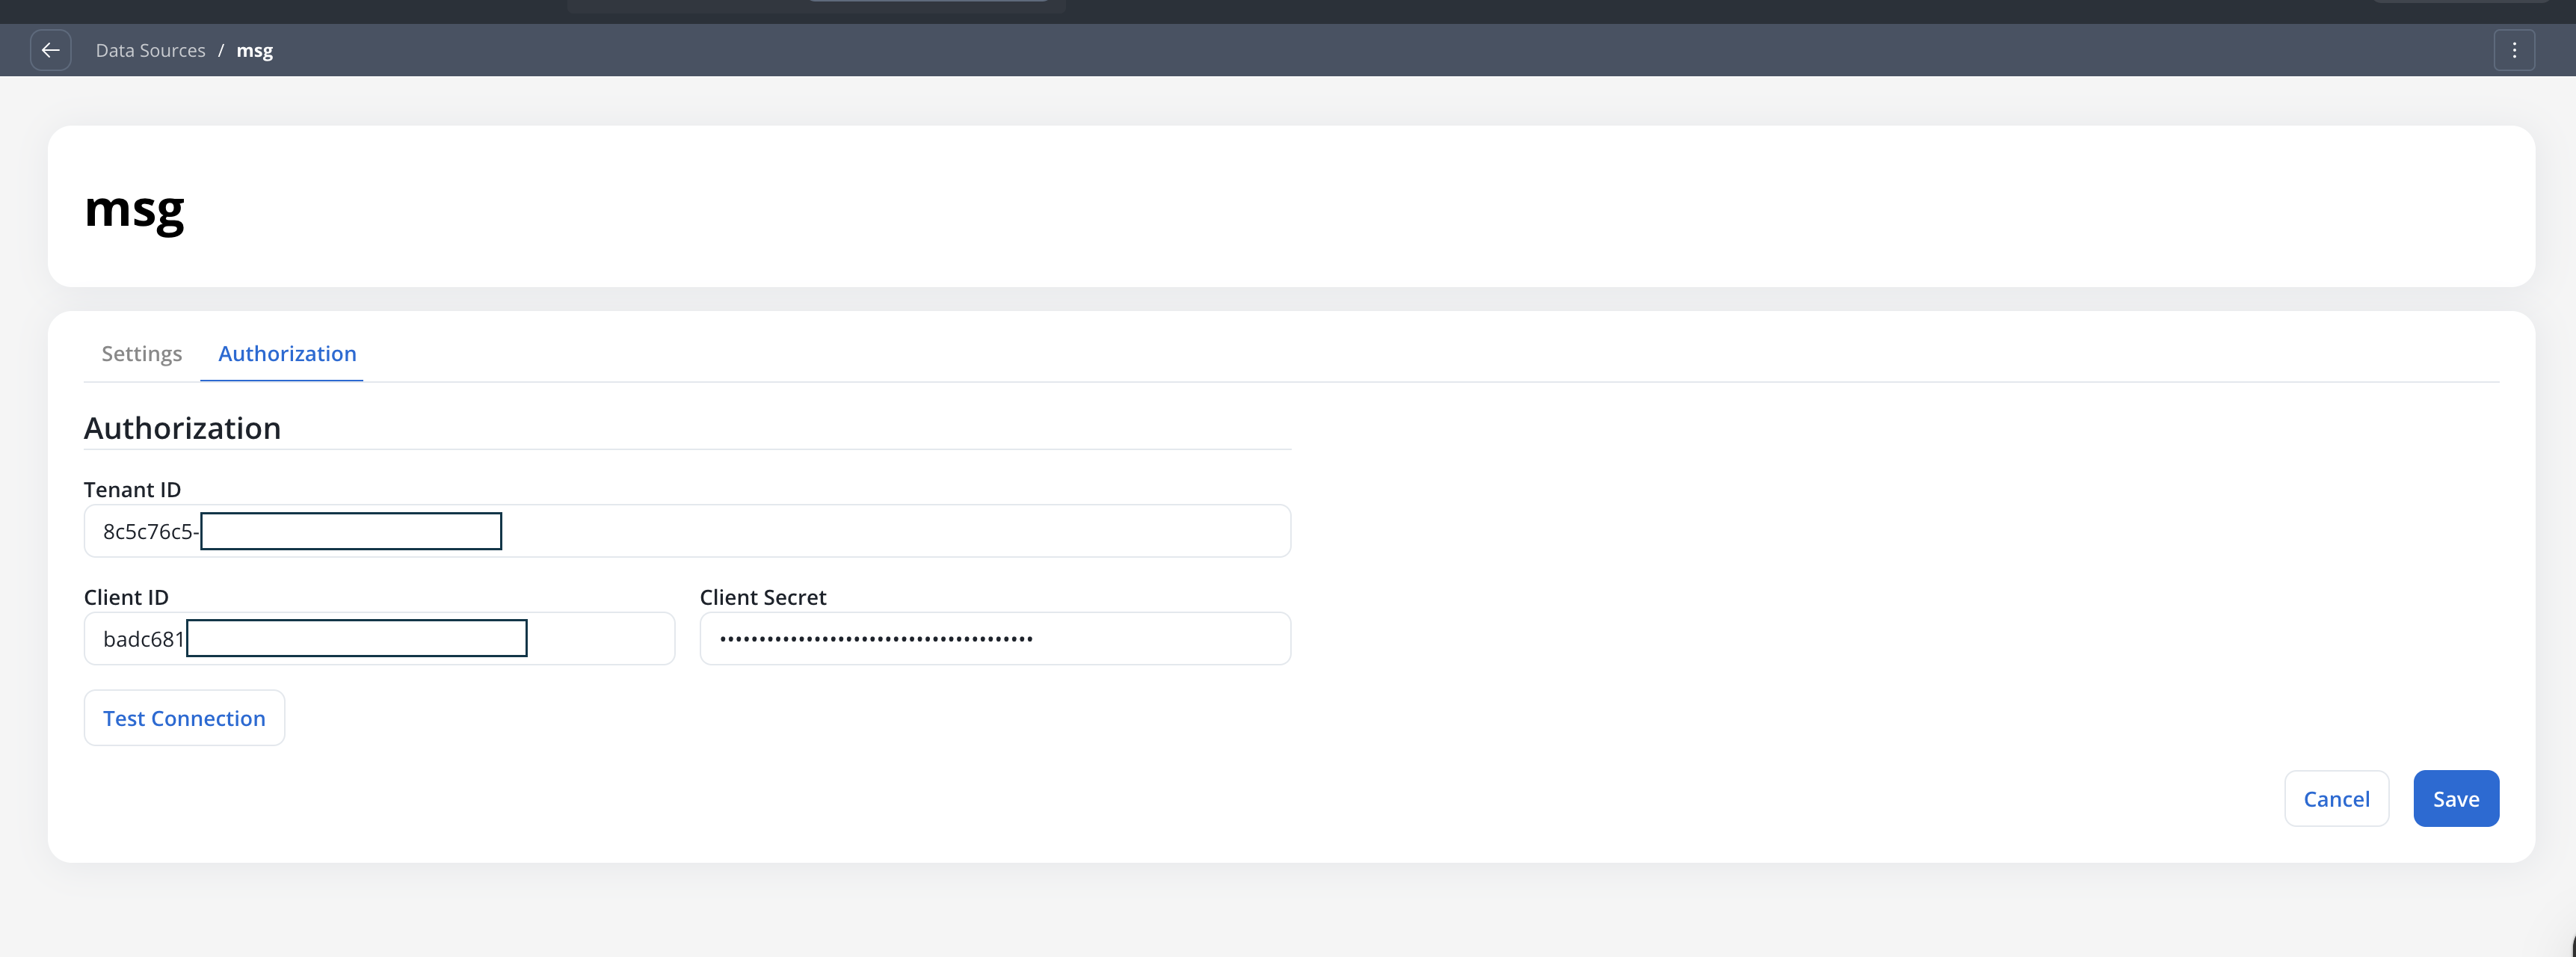
Authorization page
string
required
Azure AD tenant ID.
string
required
Azure AD application (client) ID.
string
required
Azure AD client secret.
boolean
Available starting with FlowX.AI 5.9.1. Use a certificate instead of the client secret. When turned ON, the Client Secret is ignored. Set the Certificate type (Base64 or Path), the Format (PEM or PKCS12), and, for PKCS12, the certificate Password. See Step 2: Configure authentication for details.
Connecting to processes
Reading emails (process trigger)
To trigger processes when emails arrive:1
Configure the Message Start Event
Open your process definition and add a Message Start Event (Start Catch Message) node.
2
Select Microsoft Outlook as trigger type
In the node configuration, set Trigger Type to Microsoft Outlook. Then select the Microsoft Outlook data source (only data sources with Read or Read & Send scope are shown).
3
Activate the trigger
Navigate to Runtime Settings → Manage Triggers and activate the trigger.
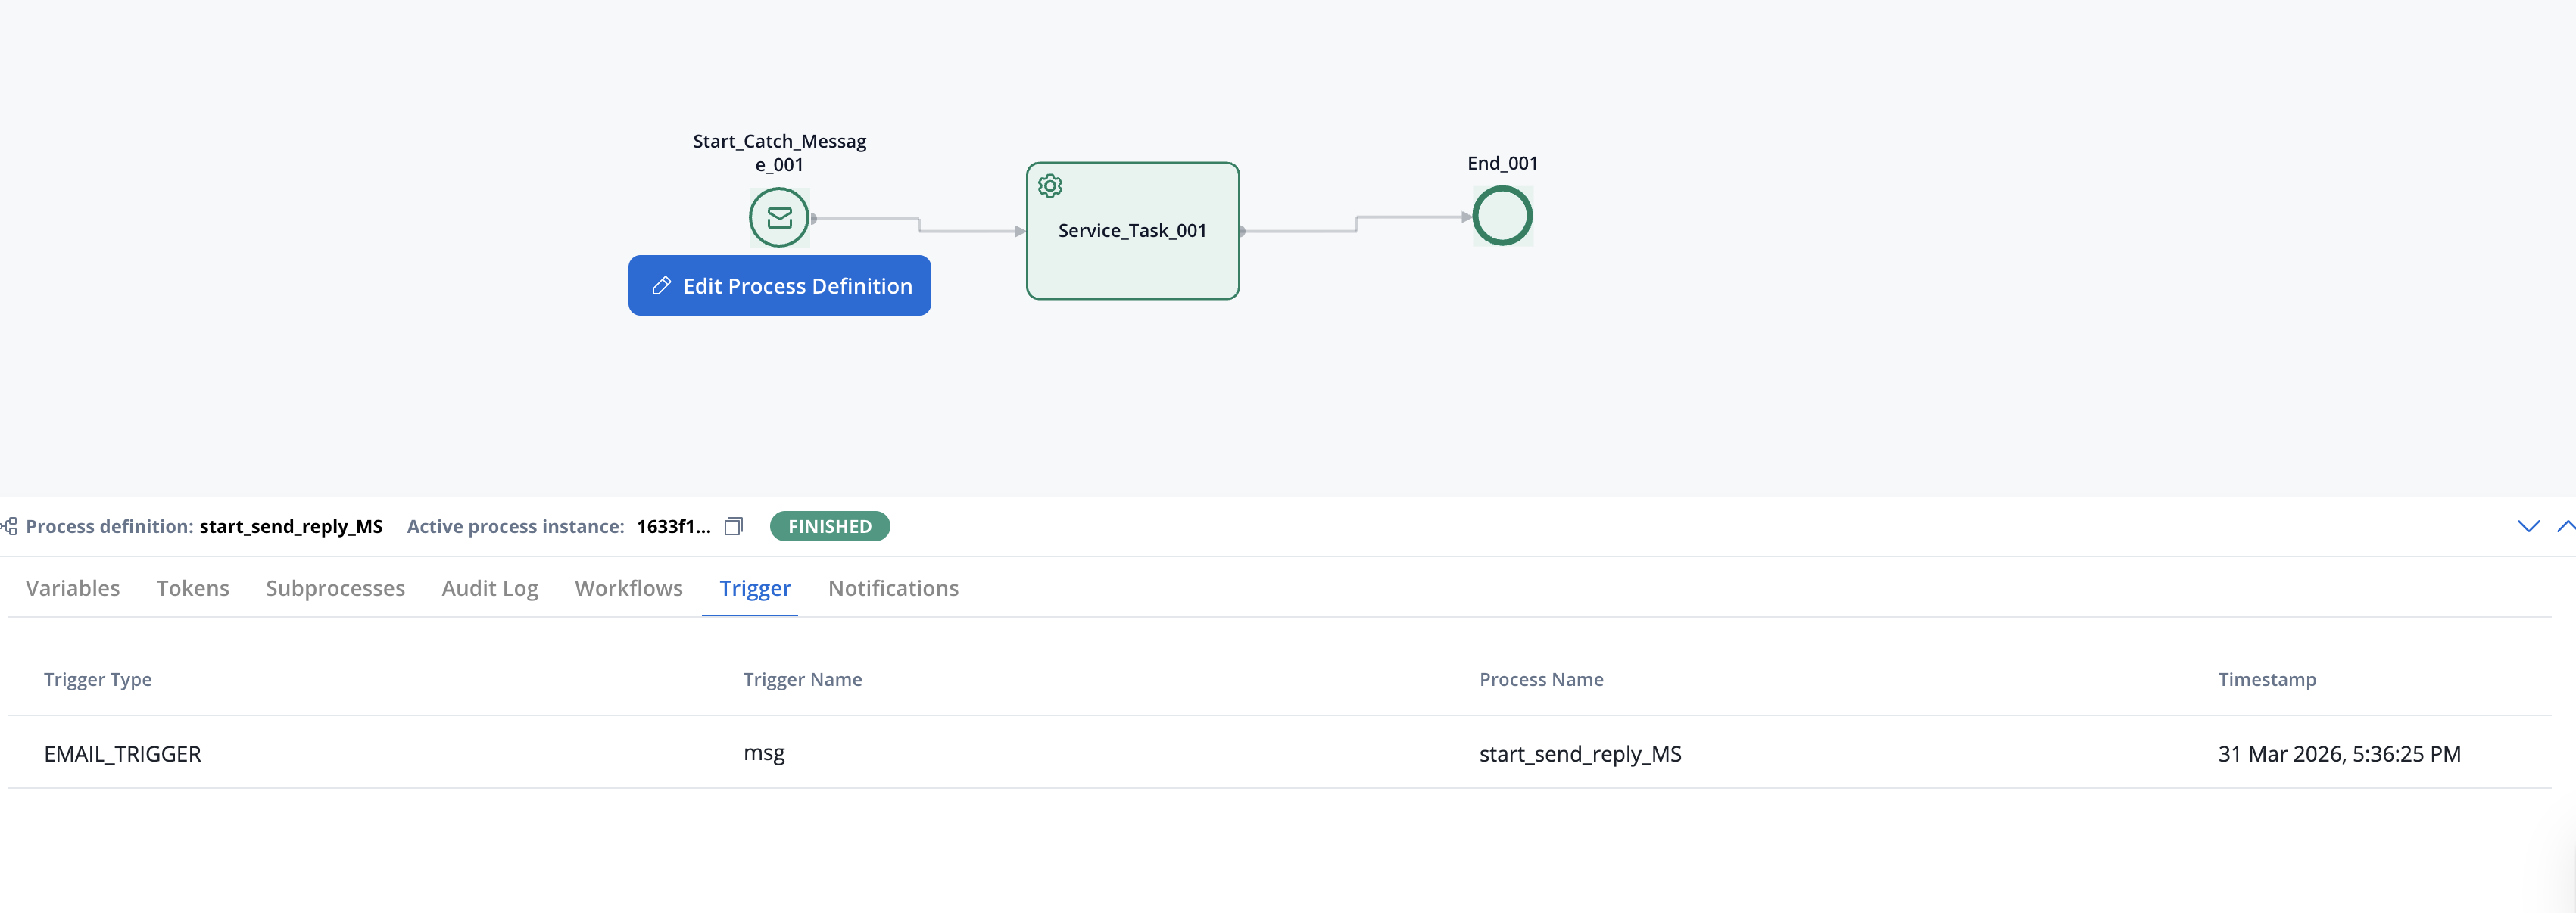
The Microsoft Outlook data source polls for new emails every 30 seconds by default, using the same polling scheduler as the Email Trigger (configurable via
EMAIL_GATEWAY_IMAP_POLLING_INTERVAL). Each polling cycle processes up to 50 messages (configurable via EMAIL_GATEWAY_MS_GRAPH_MAX_MESSAGES_PER_POLL). Emails with the same timestamp as the last processed email are deduplicated automatically using their internet message ID.Sending emails (notification template)
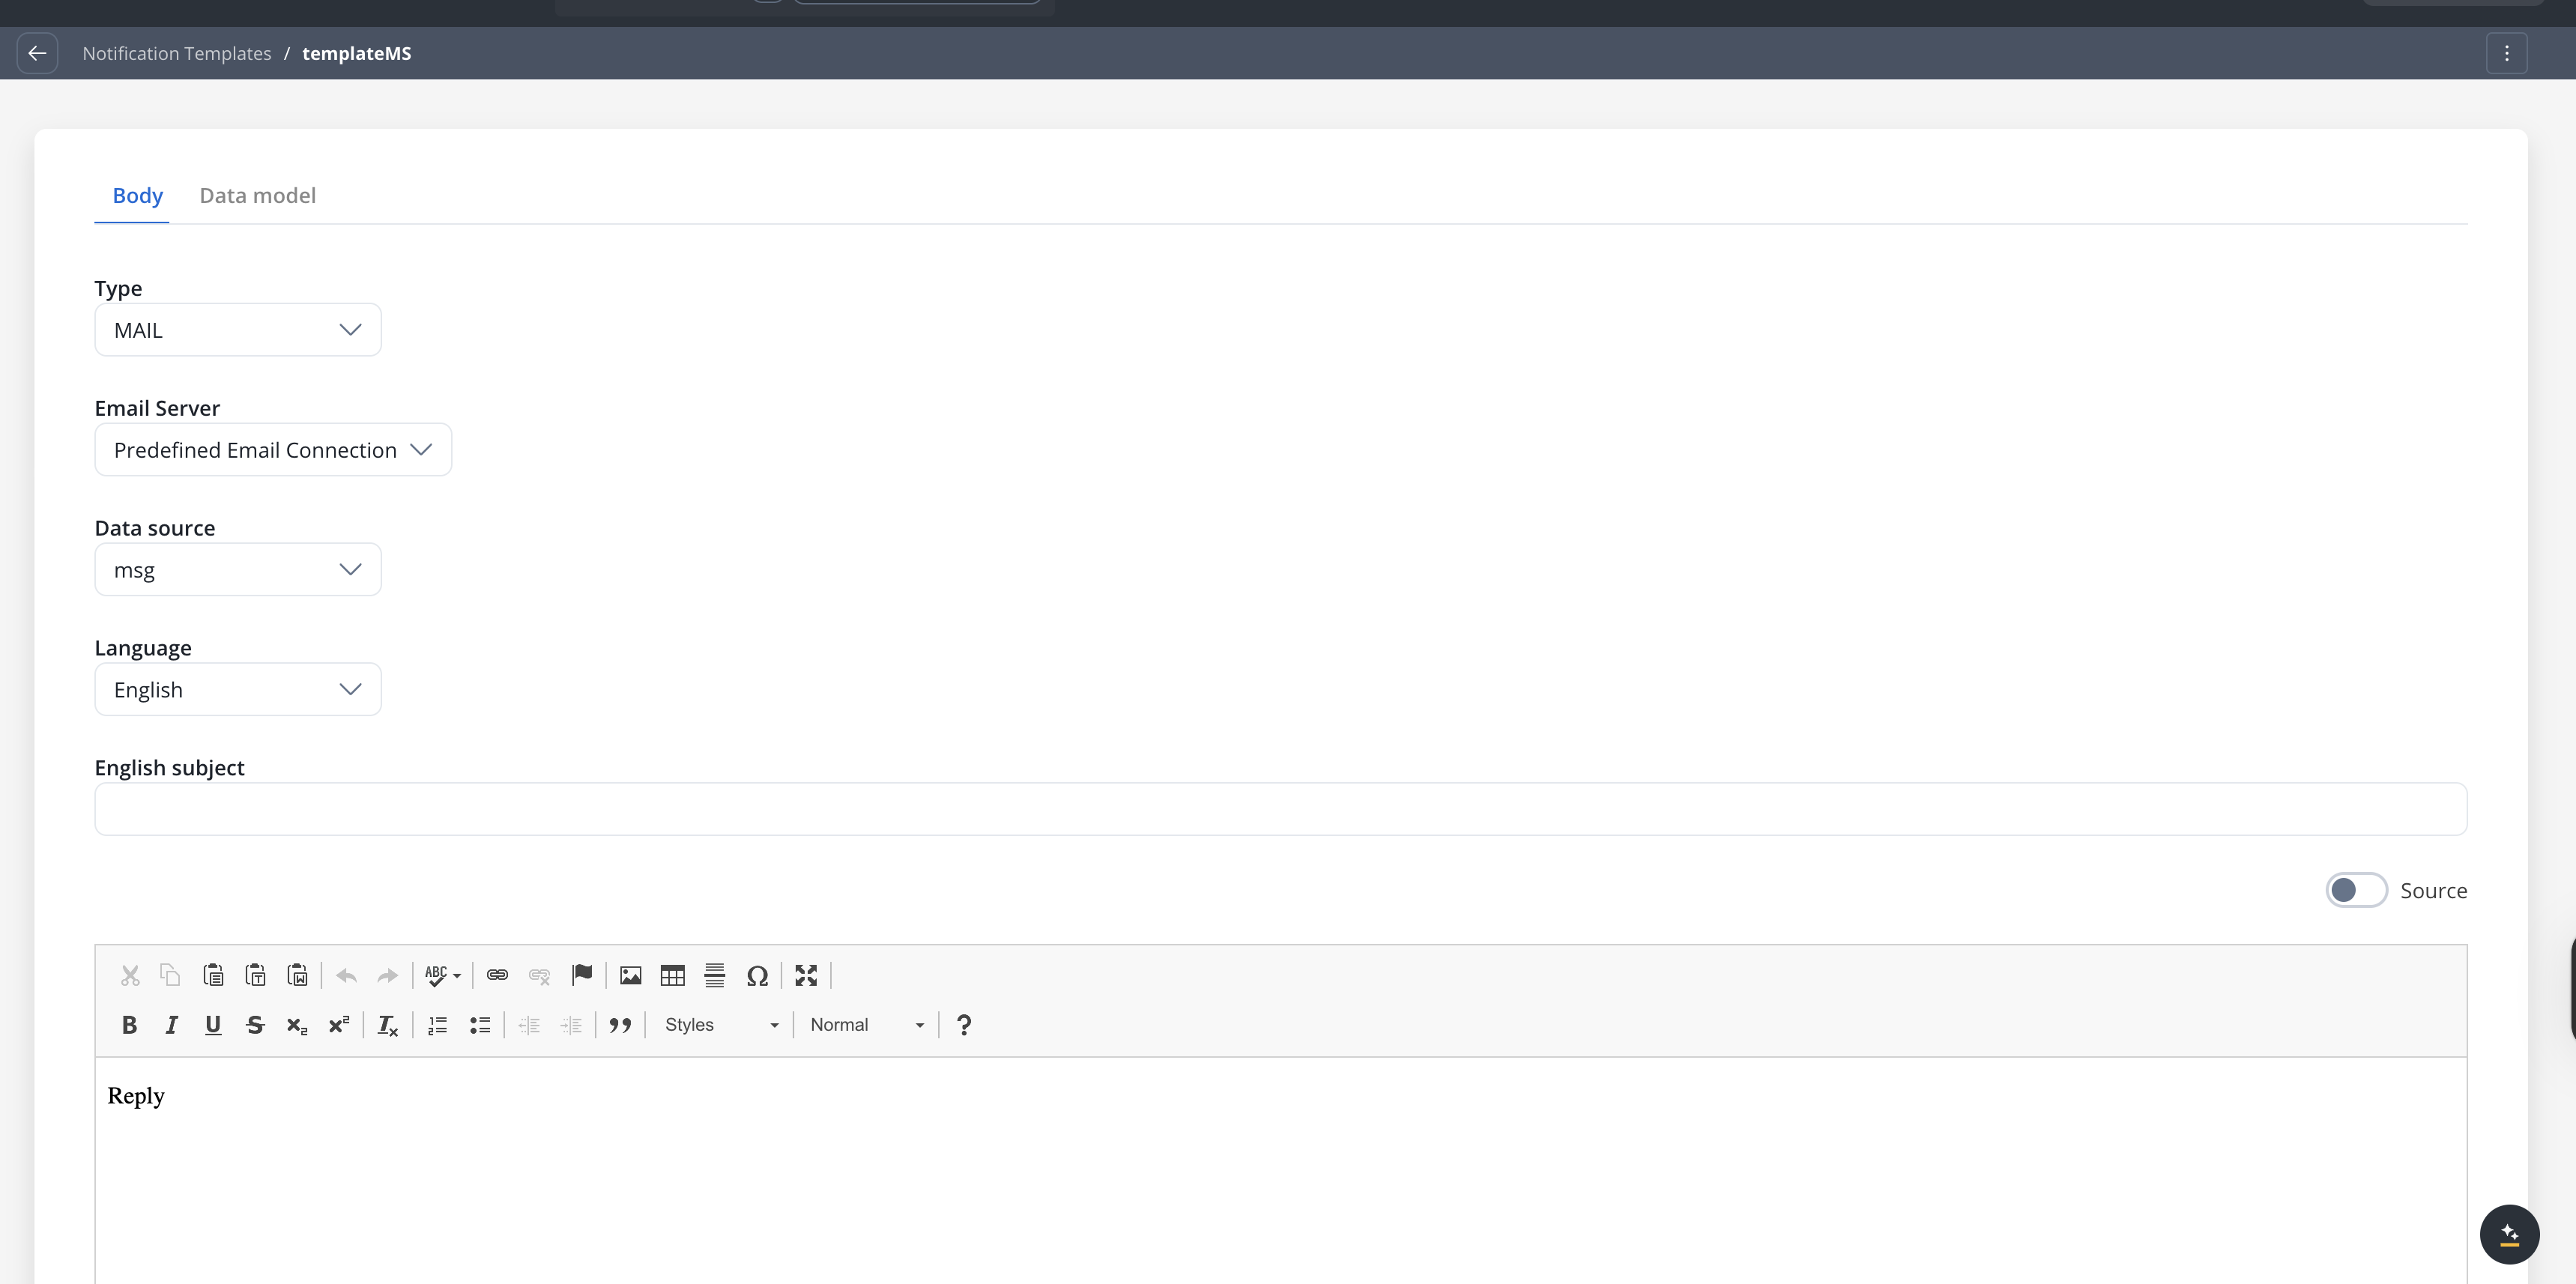
To send emails from processes:1
Link to a notification template
Open a notification template and set Email Server to Predefined Email Connection. Select the Microsoft Outlook data source (only data sources with Send or Read & Send scope are shown).
2
Add a Send Notification action
Add a Send Notification action to a process node and select the notification template.
Replying to received emails
Microsoft Outlook supports replying to emails received via the Read scope, maintaining the original conversation thread in the recipient’s inbox.1
Configure the Send Notification action
Add a Send Notification action to a process node. In the action configuration, turn on the Reply to received emails toggle.
2
Set the Reply to Email Header
Specify the process key that holds the original email’s header parameters (e.g.,
emailMessage.headerParams). This is required when the reply toggle is on.3
Configure recipients (optional)
By default, the reply is sent to the original sender. You can override this by adding explicit Receivers, CC, or BCC addresses. Duplicate recipients are automatically removed.
The reply mechanism uses the
x-ms-graph-message-id header from the original email to thread the reply correctly. If this header is not available, the system falls back to the standard Message-ID header and looks up the original message via the MS Graph API. Sent replies are automatically saved to the Sent Items folder.Email data schema
When an email triggers a process, the following data structure is available in your process variables:Schema fields
Managing triggers at runtime
Manage Triggers
Navigate to Runtime → Runtime Settings → Manage Triggers to view and control Microsoft Outlook email triggers.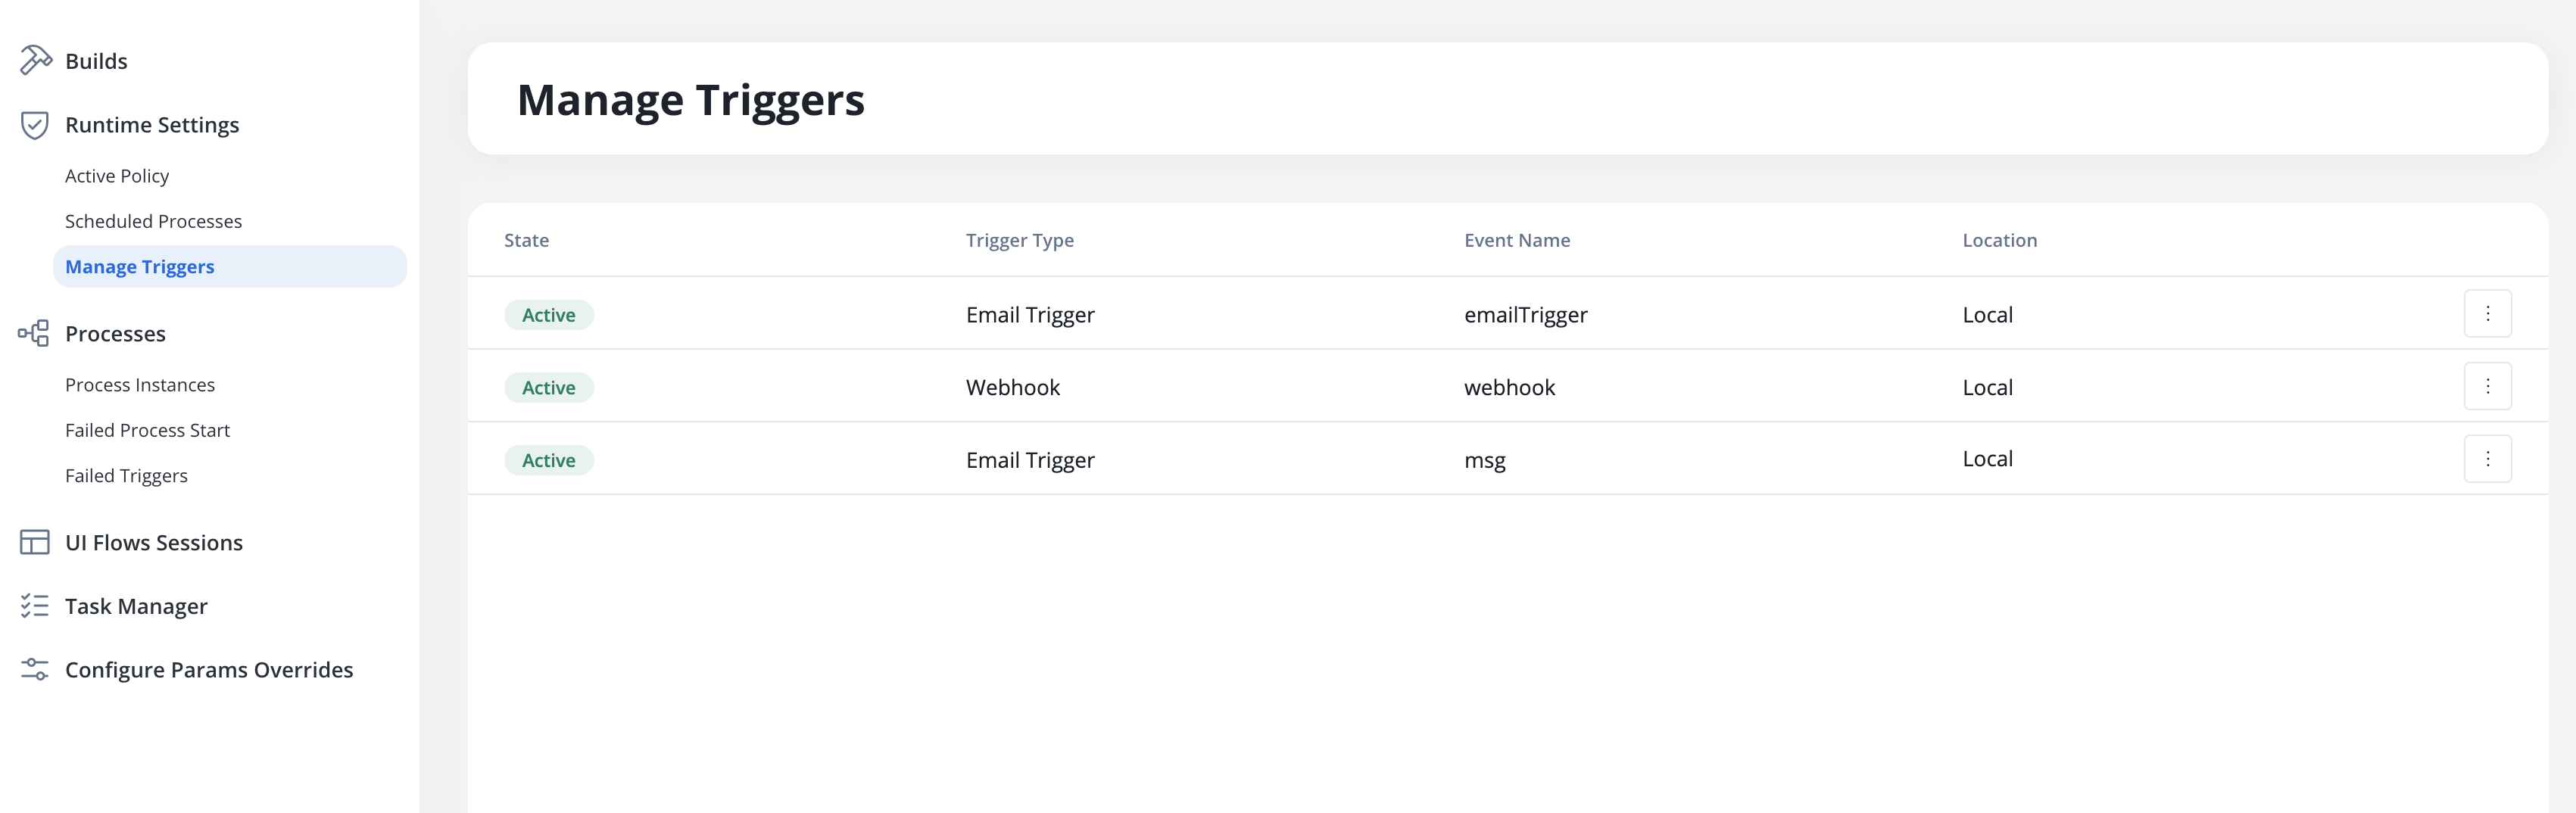
Activation requirements
For a Microsoft Outlook trigger to appear in Manage Triggers:- Microsoft Outlook data source must be created with Read or Read & Send scope
- Data source must be linked to a Message Start Event node
- The process must be part of a build in the Active Policy
Failed Triggers
When emails fail validation or processing errors occur, they appear in the Failed Triggers section under Runtime Settings. Failed triggers display the timestamp, trigger name, cause type, context (e.g., sender address), and detailed error messages. Click a row to open the details page with full diagnostic information.Common failure causes
- File type not permitted
- File size exceeded
- File count exceeded
- Authentication failure
- Missing permissions
Message: “The file
{filename} could not be uploaded because it is not on the list of permitted file types.”Resolution: Update the Allowed File Types in the data source Settings tab, or ask the sender to use an accepted format.Use case: document processing with auto-reply
This example walks through a complete email-triggered workflow: an email with an attachment arrives, the process extracts and classifies the document, then replies to the sender with a confirmation.1
Create a Microsoft Outlook data source
Configure a data source with Read & Send Emails scope, pointed at your intake mailbox (e.g.,
documents@company.com). Set attachment validations to accept PDF and DOCUMENT types with a 25 MB size limit.2
Design the process
Create a process with a Message Start Event node configured to trigger from the Outlook data source. The email data is available in process variables under
emailMessage.3
Access email data in downstream nodes
Use the email schema fields in Script or Business Rule nodes to route the process:
4
Process the attachment
Use the
fileAttachments[].downloadPath to retrieve the file from the Document Plugin for classification, data extraction, or storage.5
Reply to the sender
Add a Send Notification action with the Reply to received emails toggle turned on. Set the reply header to
emailMessage.headerParams. The reply is threaded under the original email in the sender’s inbox.6
Activate the trigger
Navigate to Runtime Settings → Manage Triggers and activate the trigger to begin monitoring.
Best practices
Use configuration parameters
Store Azure AD credentials (Tenant ID, Client ID, Client Secret) in configuration parameters for secure, environment-specific management.
Set appropriate validations
Configure file type, size, and count limits for Read scope to prevent processing of unwanted or oversized attachments.
Monitor failed triggers
Regularly review the Failed Triggers section to identify issues with email processing or connection problems.
Use least-privilege permissions
Grant only the minimum required MS Graph permissions for your scope. Use
Mail.Read instead of Mail.ReadWrite if you only need read access.Troubleshooting
Connection test fails
Connection test fails
Common causes:
- Invalid credentials: Verify Tenant ID, Client ID, and Client Secret in Azure AD
- Missing permissions: Ensure the app registration has the required MS Graph application permissions
- Permissions not consented: Admin consent may be required for application permissions
- Expired client secret: Generate a new client secret in Azure AD
Emails not triggering processes
Emails not triggering processes
Check:
- Does the data source have Read or Read & Send scope?
- Is the trigger Active in Manage Triggers?
- Is the correct mailbox folder configured?
- Do incoming emails pass attachment validation rules?
- Review Failed Triggers for error details
Emails not sending
Emails not sending
Check:
- Does the data source have Send or Read & Send scope?
- Is the data source linked to a notification template?
- Is the notification template’s Email Server set to Predefined Email Connection?
- Does the Azure AD app have
Mail.Sendpermission? - Review process instance logs for error details
Permission errors
Permission errors
Required MS Graph application permissions by scope:
Ensure:
- Permissions are set as Application (not Delegated)
- Admin consent has been granted
- The app registration is in the correct Azure AD tenant
Related resources
Email Trigger
Configure IMAP connections to trigger processes from incoming emails
Email Sender
Configure SMTP connections to send emails from processes
Send Notification Action
Send emails and reply to received emails from process nodes
Message Start Event
Configure message-based and email-based process triggers
Integration Designer
Learn about other data source types and workflow creation
Configuration Parameters
Use environment variables for flexible configurations