

Overview
- Replying to incoming emails: Continue email conversation threads started by an Email Trigger
- Sending outbound notifications: Send emails directly from business processes
- Customer communication: Automated responses, confirmations, and follow-ups
Email Sender handles outbound SMTP connections for sending emails. For inbound IMAP connections that trigger processes when emails arrive, see Email Trigger.
How it works
1
Create an Email Sender data source
Configure an SMTP connection in Integration Designer with your mail server credentials.
2
Link to a notification template
Select the Email Sender in a notification template’s Email Sender field.
3
Add a Send Notification action
Add a Send Notification action to a process node and select the notification template.
4
Send emails from your process
When the action executes, the email is sent directly through the configured SMTP server.
Creating an Email Sender data source
Prerequisites
Before configuring an Email Sender, ensure you have:- Access to Integration Designer with appropriate permissions
- SMTP server credentials (host, port, username, password)
Access Integration Designer
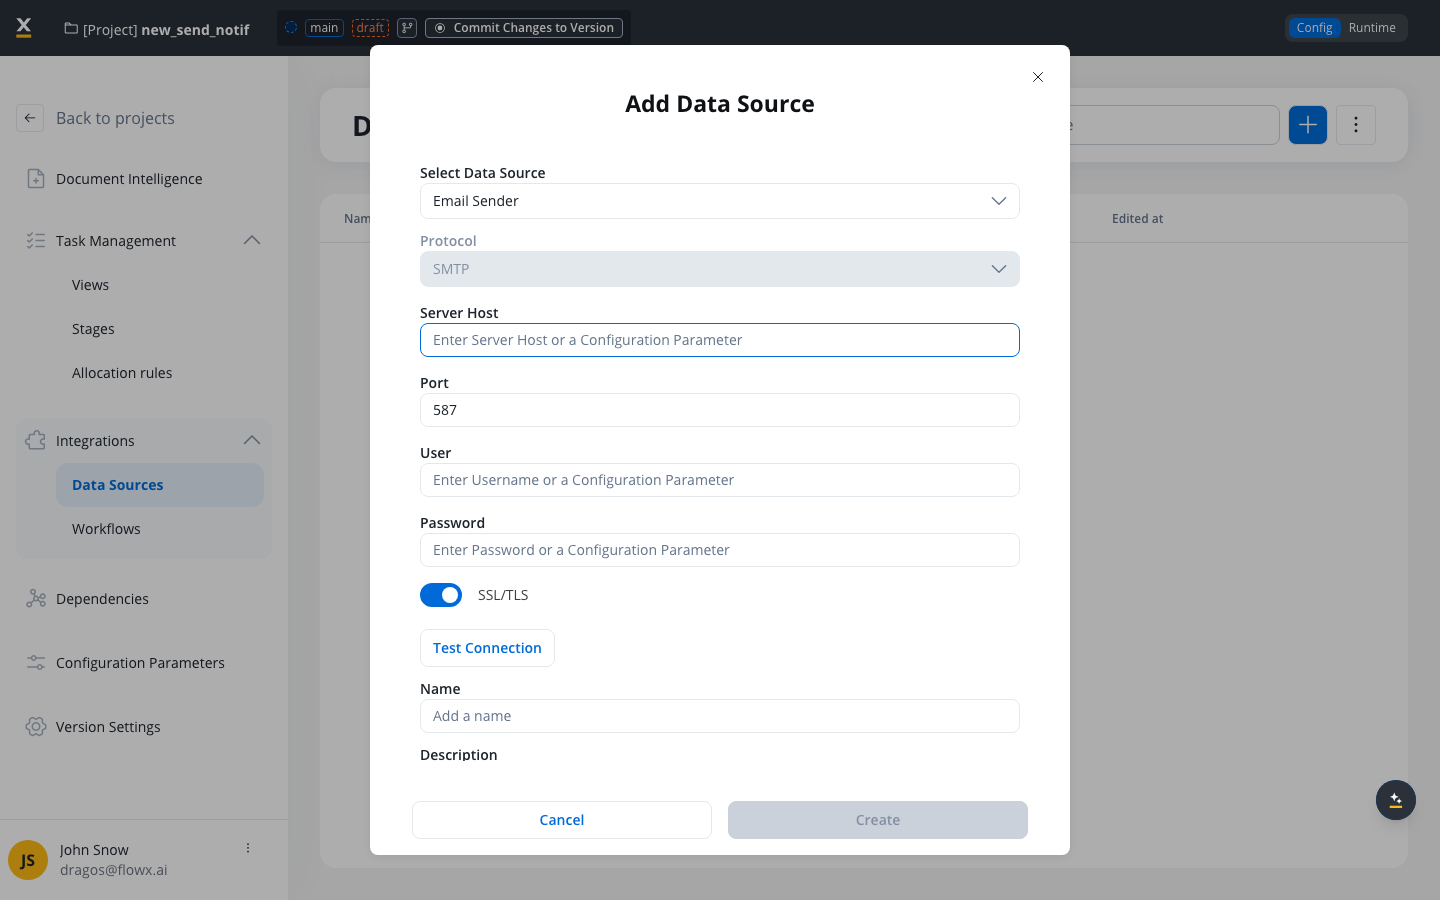
Navigate to FlowX Designer → Your workspace → Projects → Your project → Integrations → Data Sources and click the + button to open the Add Data Source dialog.Configuration fields
Select Email Sender from the Select Data Source dropdown. The dialog displays all configuration fields in a single view:select
required
The email protocol to use. Only SMTP is available for Email Sender data sources.
string
required
The hostname or IP address of your SMTP server.Placeholder: “Enter Server Host or a Configuration Parameter”Examples:
smtp.gmail.comsmtp.office365.commail.yourcompany.com
number
required
The port number for the SMTP connection. The default value updates automatically based on the SSL/TLS setting.
string
required
The email account username or full email address used for authentication.Placeholder: “Enter Username or a Configuration Parameter”
string
required
The password or app-specific password for the email account.Placeholder: “Enter Password or a Configuration Parameter”
boolean
Turn on secure connection using SSL/TLS encryption. Recommended: on.
Toggling SSL/TLS updates the default port value automatically.
Test the connection
Click the Test Connection button to verify your settings before creating the data source:When you click Create, another authentication test is performed. If the test fails, you’ll be redirected to the Authorization tab with an error message, but the Email Sender will still be created.
Name and description
string
required
A unique, descriptive name for the Email Sender.Placeholder: “Add a name”Validation rules:
- Required field
- Must be unique within the project
- Only letters, numbers, and these characters allowed:
[],(),.,_,- - Minimum 3 characters, maximum 50 characters
- Cannot be “Default Server” (this is a reserved name)
string
Optional description explaining the purpose of this Email Sender.Placeholder: “Add a description”
Using with notification templates
After creating an Email Sender data source, you can link it to notification templates:- Open a notification template in Notification Templates
- Set Email Server to Predefined Email Connection
- In the Email Sender field, select your Email Sender data source (or leave as Default Server to use the environment-level default)
Troubleshooting
Connection test fails
Connection test fails
Common causes:
- Incorrect credentials: Verify username and password
- Wrong port: Use
587for SMTP with SSL/TLS,465without - Firewall: Ensure outbound connections to the SMTP server are allowed
- 2FA enabled: Generate an app-specific password for the email account
Emails not being sent
Emails not being sent
Check:
- Is the Email Sender linked to a notification template?
- Is the notification template’s Email Server set to Predefined Email Connection?
- Is the Send Notification action configured correctly on the process node?
- Review process instance logs for error details
'Default Server' name validation error
'Default Server' name validation error
The name “Default Server” is reserved for the environment-level default connection. Choose a different name for your Email Sender data source.
Related resources
Send Notification Action
Configure the Send Notification action to send emails from process nodes
Email Trigger
Configure IMAP connections to trigger processes from incoming emails
Microsoft Outlook
Connect to Outlook via MS Graph API for reading and sending emails
Notification Templates
Create and manage email and SMS notification templates
Integration Designer
Learn about data source types and integration workflows