Tested · October 2026
Built and run by the FlowX docs team on a live FlowX environment. The workflow ran on its own, then the UI Flow validated the form, started the workflow, showed the result on both pages, and kept it in the session data.
In this tutorial you build your first UI Flow: a small two-page app where a user enters a loan amount and a term, clicks Calculate, and sees the monthly payment and a repayment breakdown. A workflow does the math. By the end, you’ll know how to:
  • Create a UI Flow with two pages and choose which one opens first
  • Build a form with required fields and bind it to the UI Flow data model
  • Start a workflow from a button and pass it the form values
  • Show the workflow’s output on a page and navigate between pages
  • Run the UI Flow and inspect its session data
Available starting with FlowX.AI 5.9.0Everything in this tutorial works on FlowX.AI 5.9.0 and later releases. The screenshots come from a later release, so some panels can look slightly different on 5.9.x.
Time required: about 25 minutesPrerequisites:
  • Access to FlowX Designer
  • A workspace and project set up (create one here)
A UI Flow is a standalone user interface with its own pages, navigation, and data model, separate from any process. A workflow is integration logic built in the Integration Designer. In this tutorial the UI Flow collects input and shows results, and the workflow computes them. See the Glossary if any term here is new.

What you’ll build

A loan estimator for Acme Bank. The estimateForm page holds a form with two fields. Its Calculate button validates the form and starts the calculateLoanEstimate workflow with the two values. The workflow returns a loanEstimate object, and the page shows the monthly payment from it. A second page, estimateBreakdown, shows the total repayment and the total interest from the same object. This is the finished first page at runtime, after a calculation:
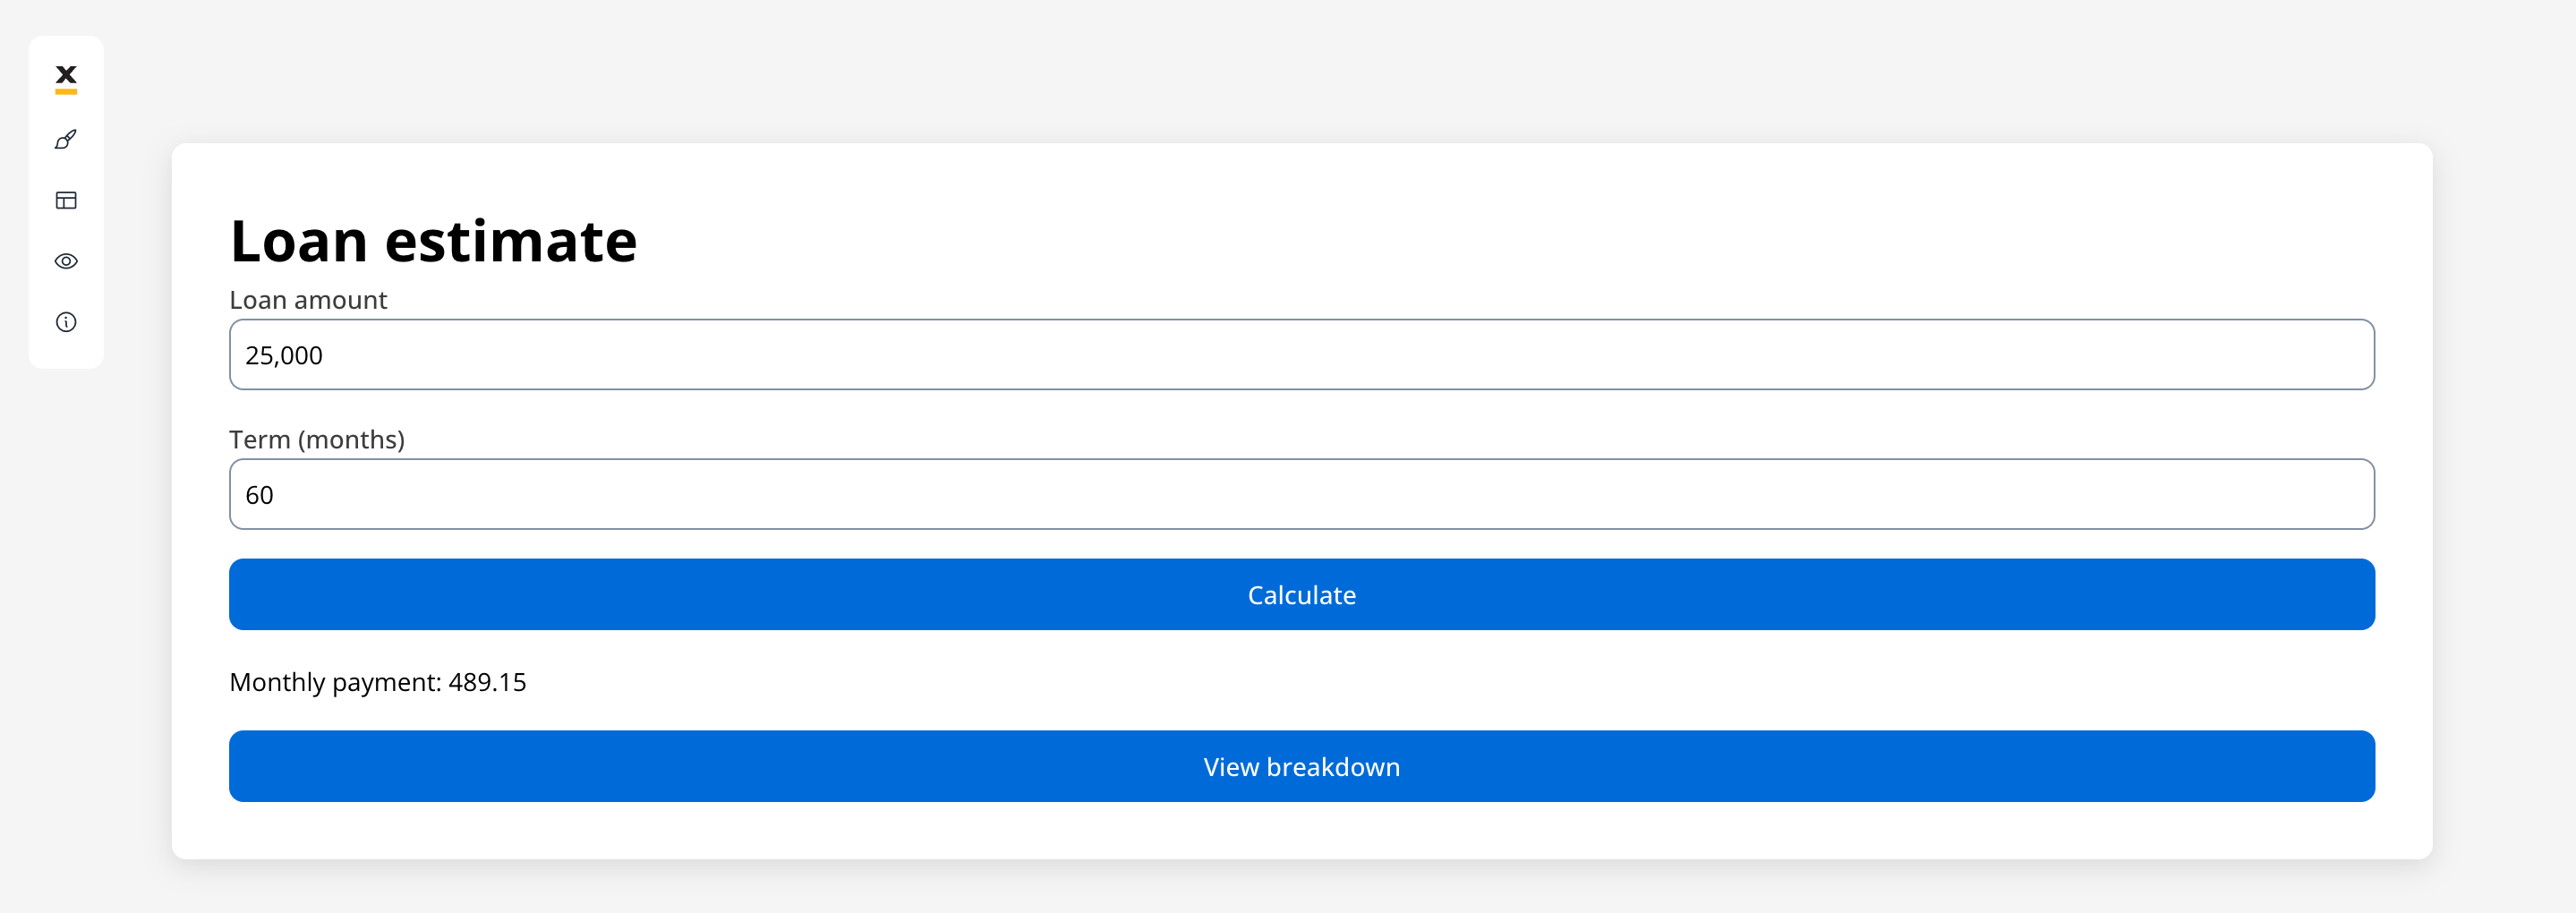
The Loan estimate page at runtime with Loan amount 25,000 and Term (months) 60 filled in, a Calculate button, the text Monthly payment: 489.15, and a View breakdown button

Step 1: Build the workflow

The UI Flow needs something to call, so start with the workflow. It takes an amount and a term, applies a fixed annual interest rate of 6.5%, and returns three amounts ready to display. If you haven’t built a workflow before, Build your first workflow covers each of these screens in detail.
1

Create the workflow

Go to Projects → your project → Integrations → Workflows and click Add Workflow. Set the Name to calculateLoanEstimate. The workflow editor opens with a Start node already on the canvas.
2

Declare the input and output

Open the workflow’s Data Model page from the left rail and add these attributes:
  • amount: Number, Floating Point
  • termMonths: Number, Integer
  • loanEstimate: an object with three String attributes, monthlyPayment, totalRepayment, and totalInterest
Add amount and termMonths under Input Parameters. On the Output Parameters tab, select loanEstimate; its three fields are selected with it.
The three results are String, not Number, so they keep exactly two decimals. An output parameter of type Number (Floating Point) is stored with single precision, so 489.15 would reach the page as 489.1499938964844.
3

Set the Start node sample input

Back in the editor, set the Start node’s JSON to:
At runtime the UI Flow supplies these values. The sample is what Run Workflow uses inside the editor.
4

Add the Script node

Drag a Script node after Start, connect the two, and name it Calculate payment. Keep the JS language tab and paste:
The script reads the workflow input from input and publishes its result by assigning output.loanEstimate. Number() makes the math work whether the values arrive as numbers or as numeric strings.
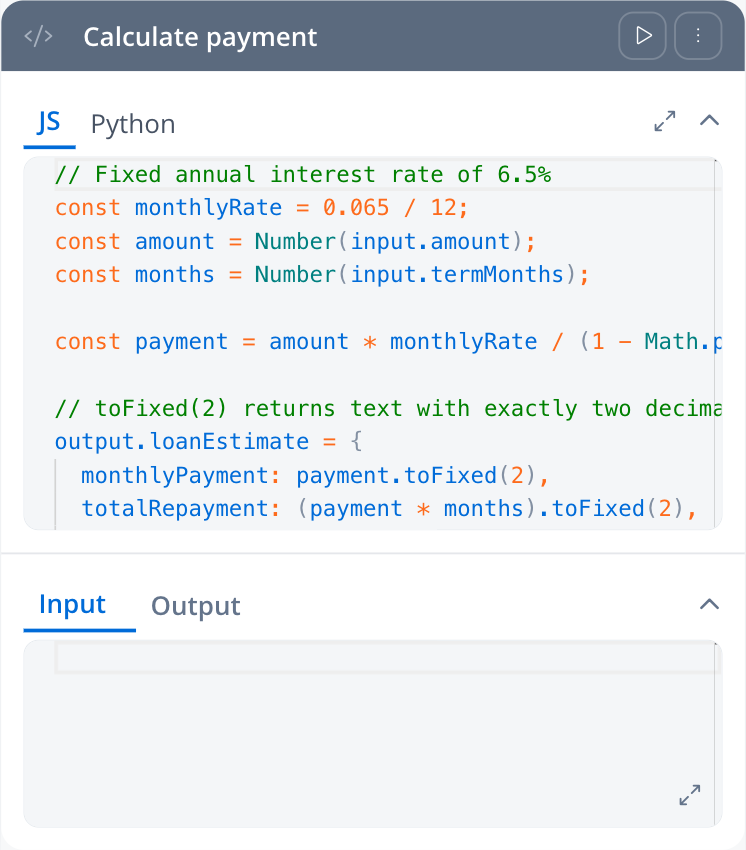
The Calculate payment Script node with the JS tab selected, showing the interest-rate script that assigns output.loanEstimate using toFixed(2)
5

Add the End node

Drag an End Flow node after the script and connect it. Its Output Schema shows loanEstimate and its three fields, taken from the output parameters you selected. This is what the UI Flow receives.
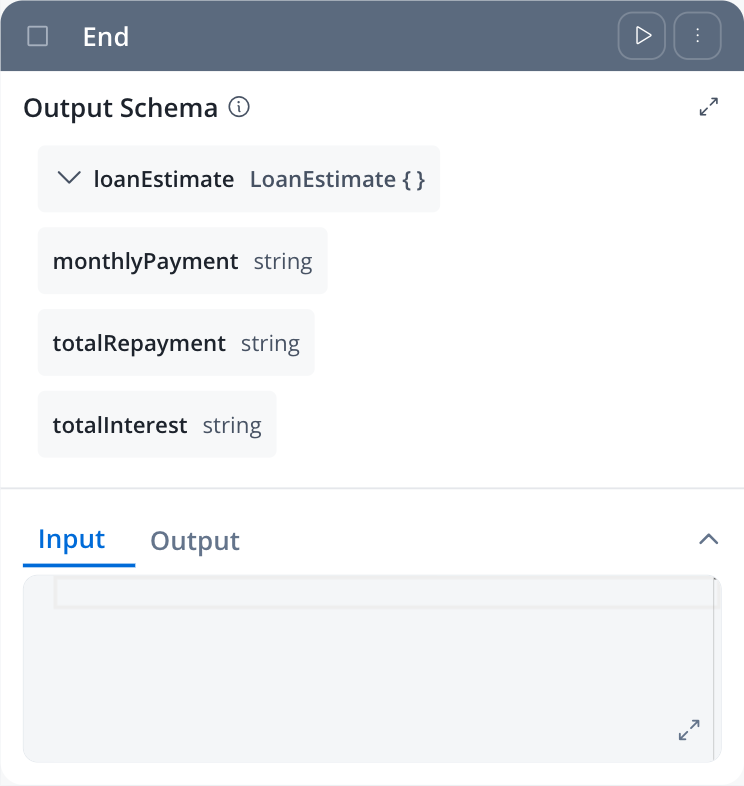
The End node with its Output Schema listing loanEstimate and its three string fields: monthlyPayment, totalRepayment, and totalInterest
6

Run the workflow

Click Run Workflow and open the Output tab of the Run Logs panel:
The run finishes with no errors and the Output tab shows the three values above. The workflow is ready for the UI Flow.

Step 2: Create the UI Flow and its pages

1

Create the UI Flow

Go to Projects → your project → UI Flows and click +. In the Create UI Flow dialog, fill in:
  • Name: LoanEstimator
  • Platform: Web
  • Experience Type: Flow-Based
Click Create. The UI Flow editor opens.
Platform and experience type can’t be changed after creation. Chat-Driven UI Flows are built around an AI conversational workflow and are out of scope for this tutorial.
2

Define the data model

In the left rail, open Data Model. On the Data Model tab, click Create Attribute and add:
  • loanAmount: Number, Floating Point
  • termMonths: Number, Integer
These are the keys the form fields bind to. Define them before you add the fields, because the field’s Data key setting searches the data model.
3

Add the two pages

In the left rail, open Designer, then the Navigation tab of the left panel. Click + (Add Root Component) and pick Page. Do it twice, so the tree holds two pages.Select the first page and, in the Settings tab on the right, set Component Identifier to estimateForm. Select the second page and set it to estimateBreakdown. The identifier is the name you pick later as a navigation destination.
4

Set the home page

Right-click estimateForm in the tree and choose Set as Home. The home page is the one the UI Flow opens on when it starts.
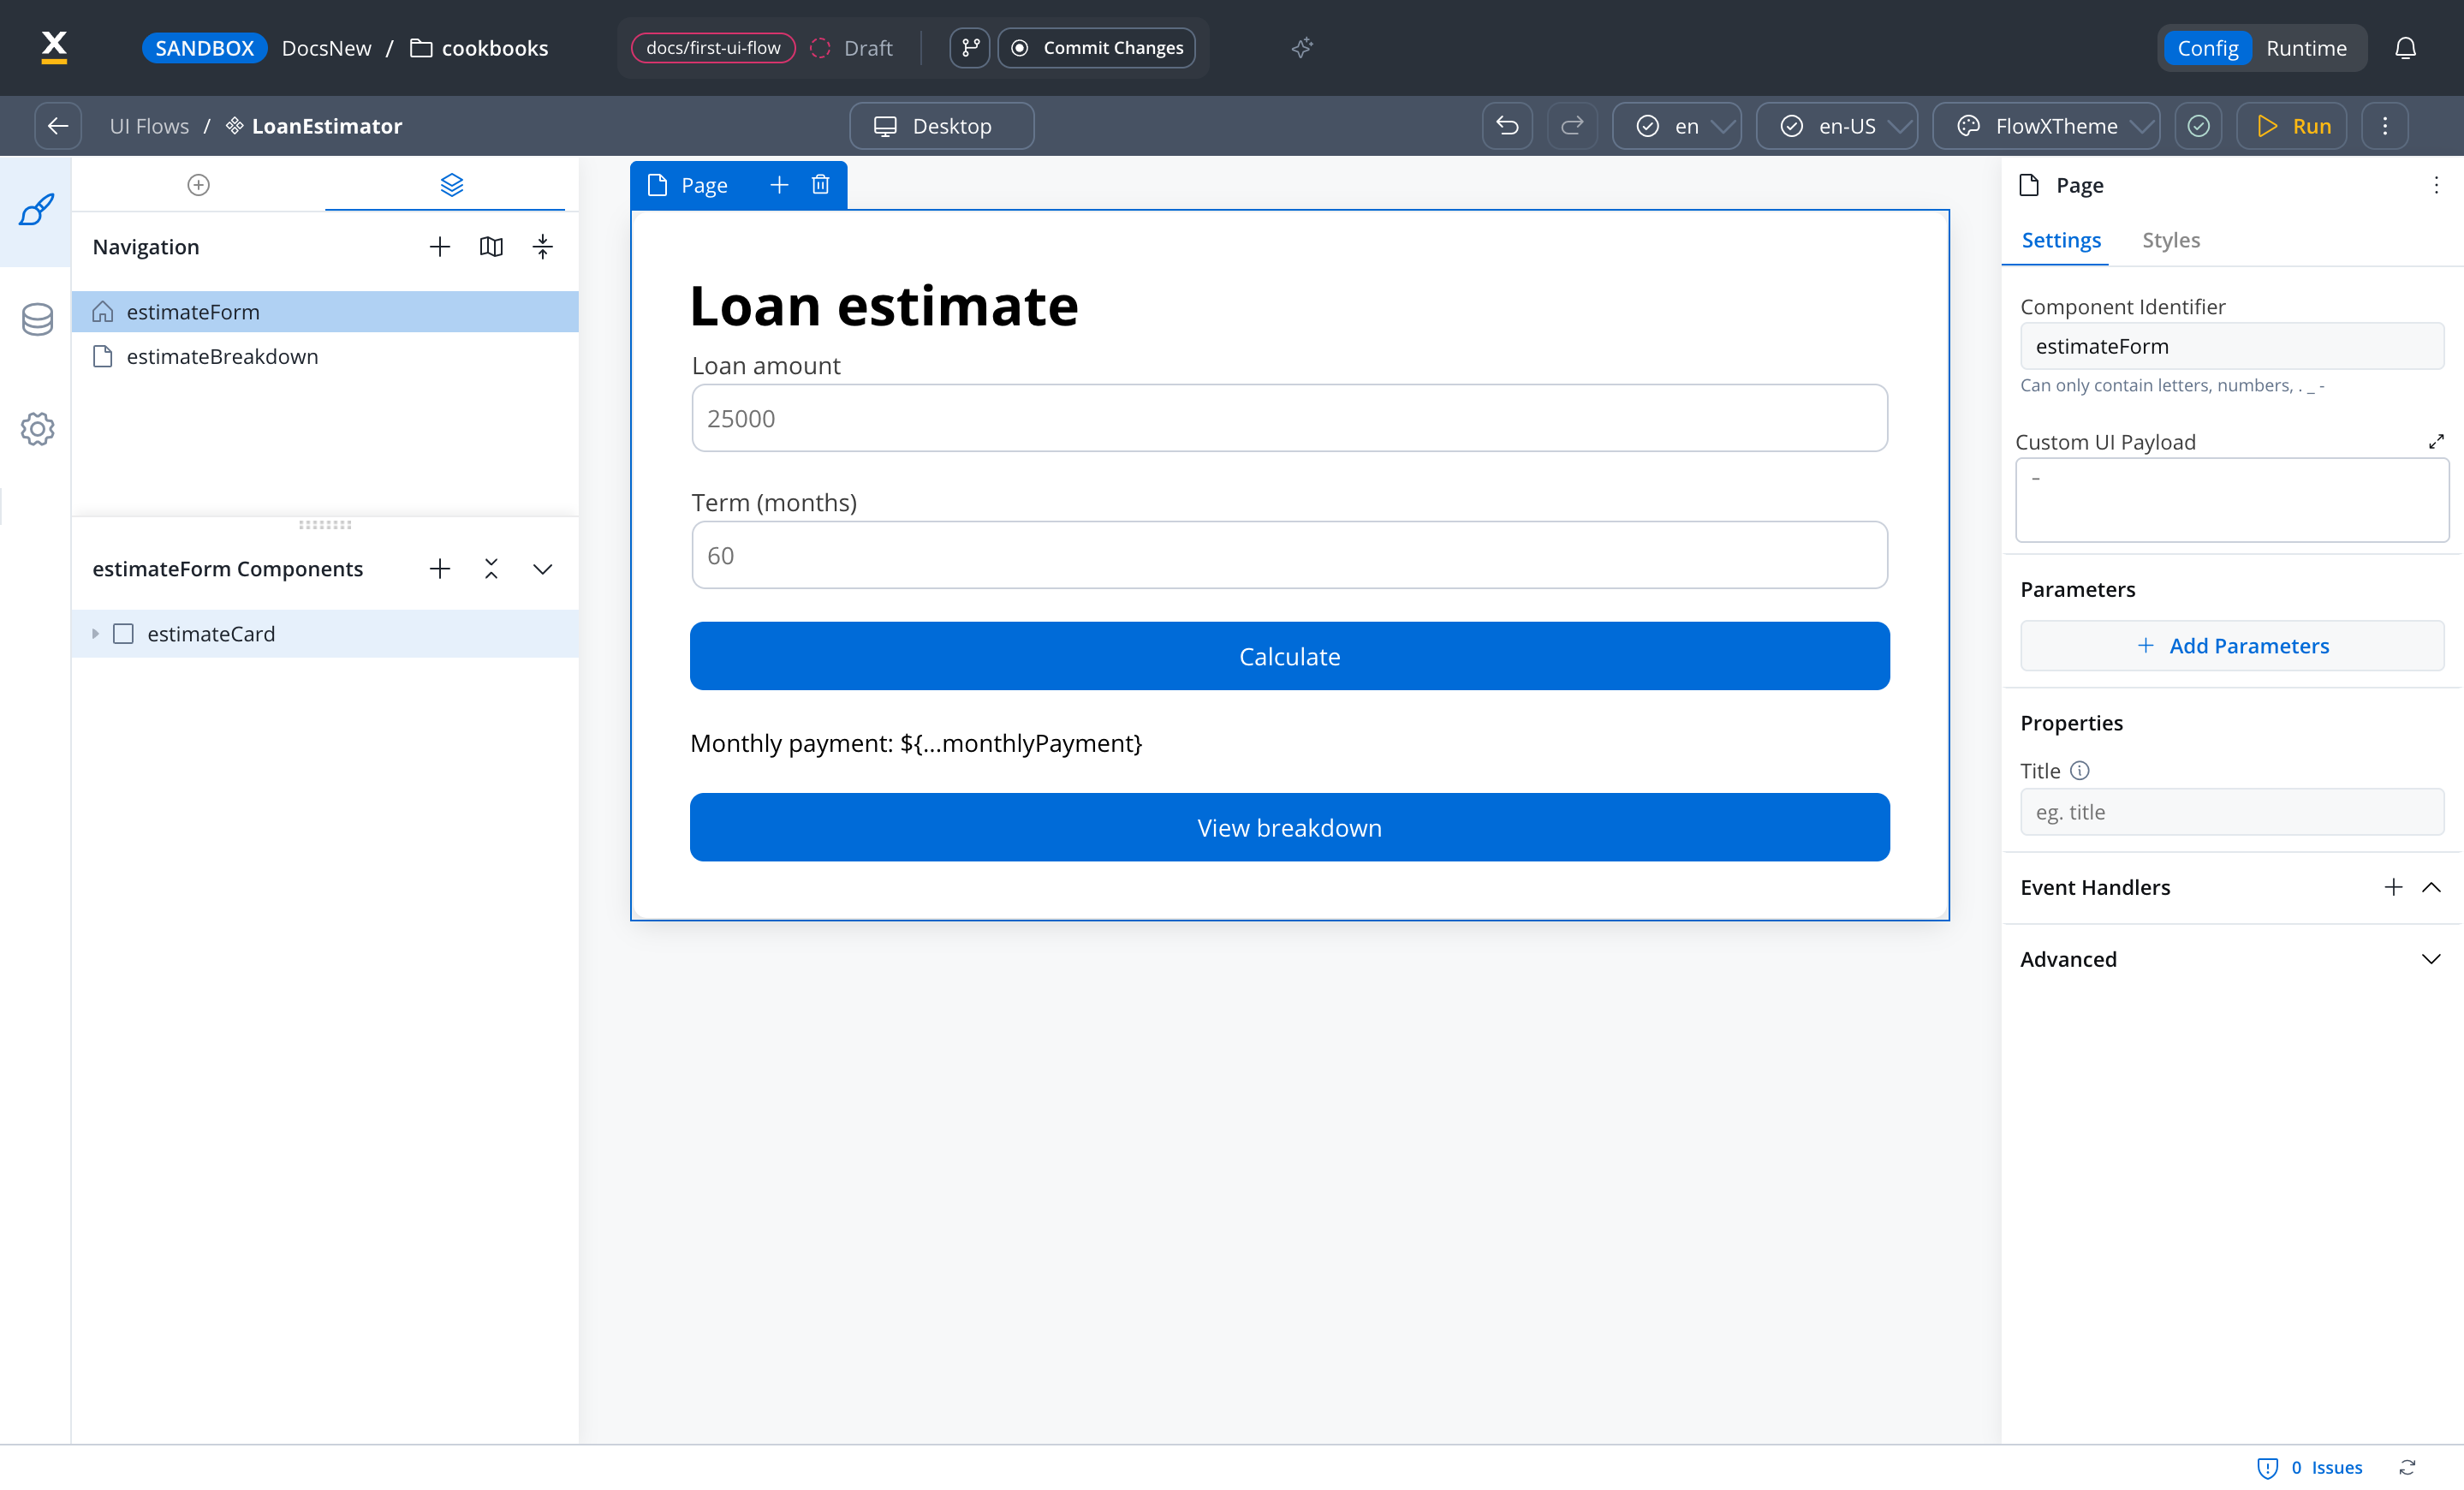
The LoanEstimator UI Flow editor with the Navigation tab listing estimateForm, marked with a home icon, and estimateBreakdown, and the Settings panel showing Component Identifier estimateForm
The Navigation tab lists estimateForm and estimateBreakdown, with estimateForm marked as home.

Learn more about UI Flows


Step 3: Build the form page

Components are added from the UI Assets tab of the left panel (UI Components), by dragging them onto a node in the tree. You can also right-click a node and choose Add UI components. A page holds layout components such as cards, and a card holds the form, the buttons, and the text.
1

Add a card

From Layout, drag a Card onto estimateForm. In Settings, set its Title to Loan estimate.
2

Add the form and its fields

From Form Components, drag a Form into the card. Set its Component Identifier to loanForm, and leave Validate on at submit.Drag two Input components into the form and configure them in Settings:In the Data key field, type at least three characters and pick the key from the data model. To add the validator, click Add a validator in the Validators section, set Validator type to required, and fill in the Error Message.
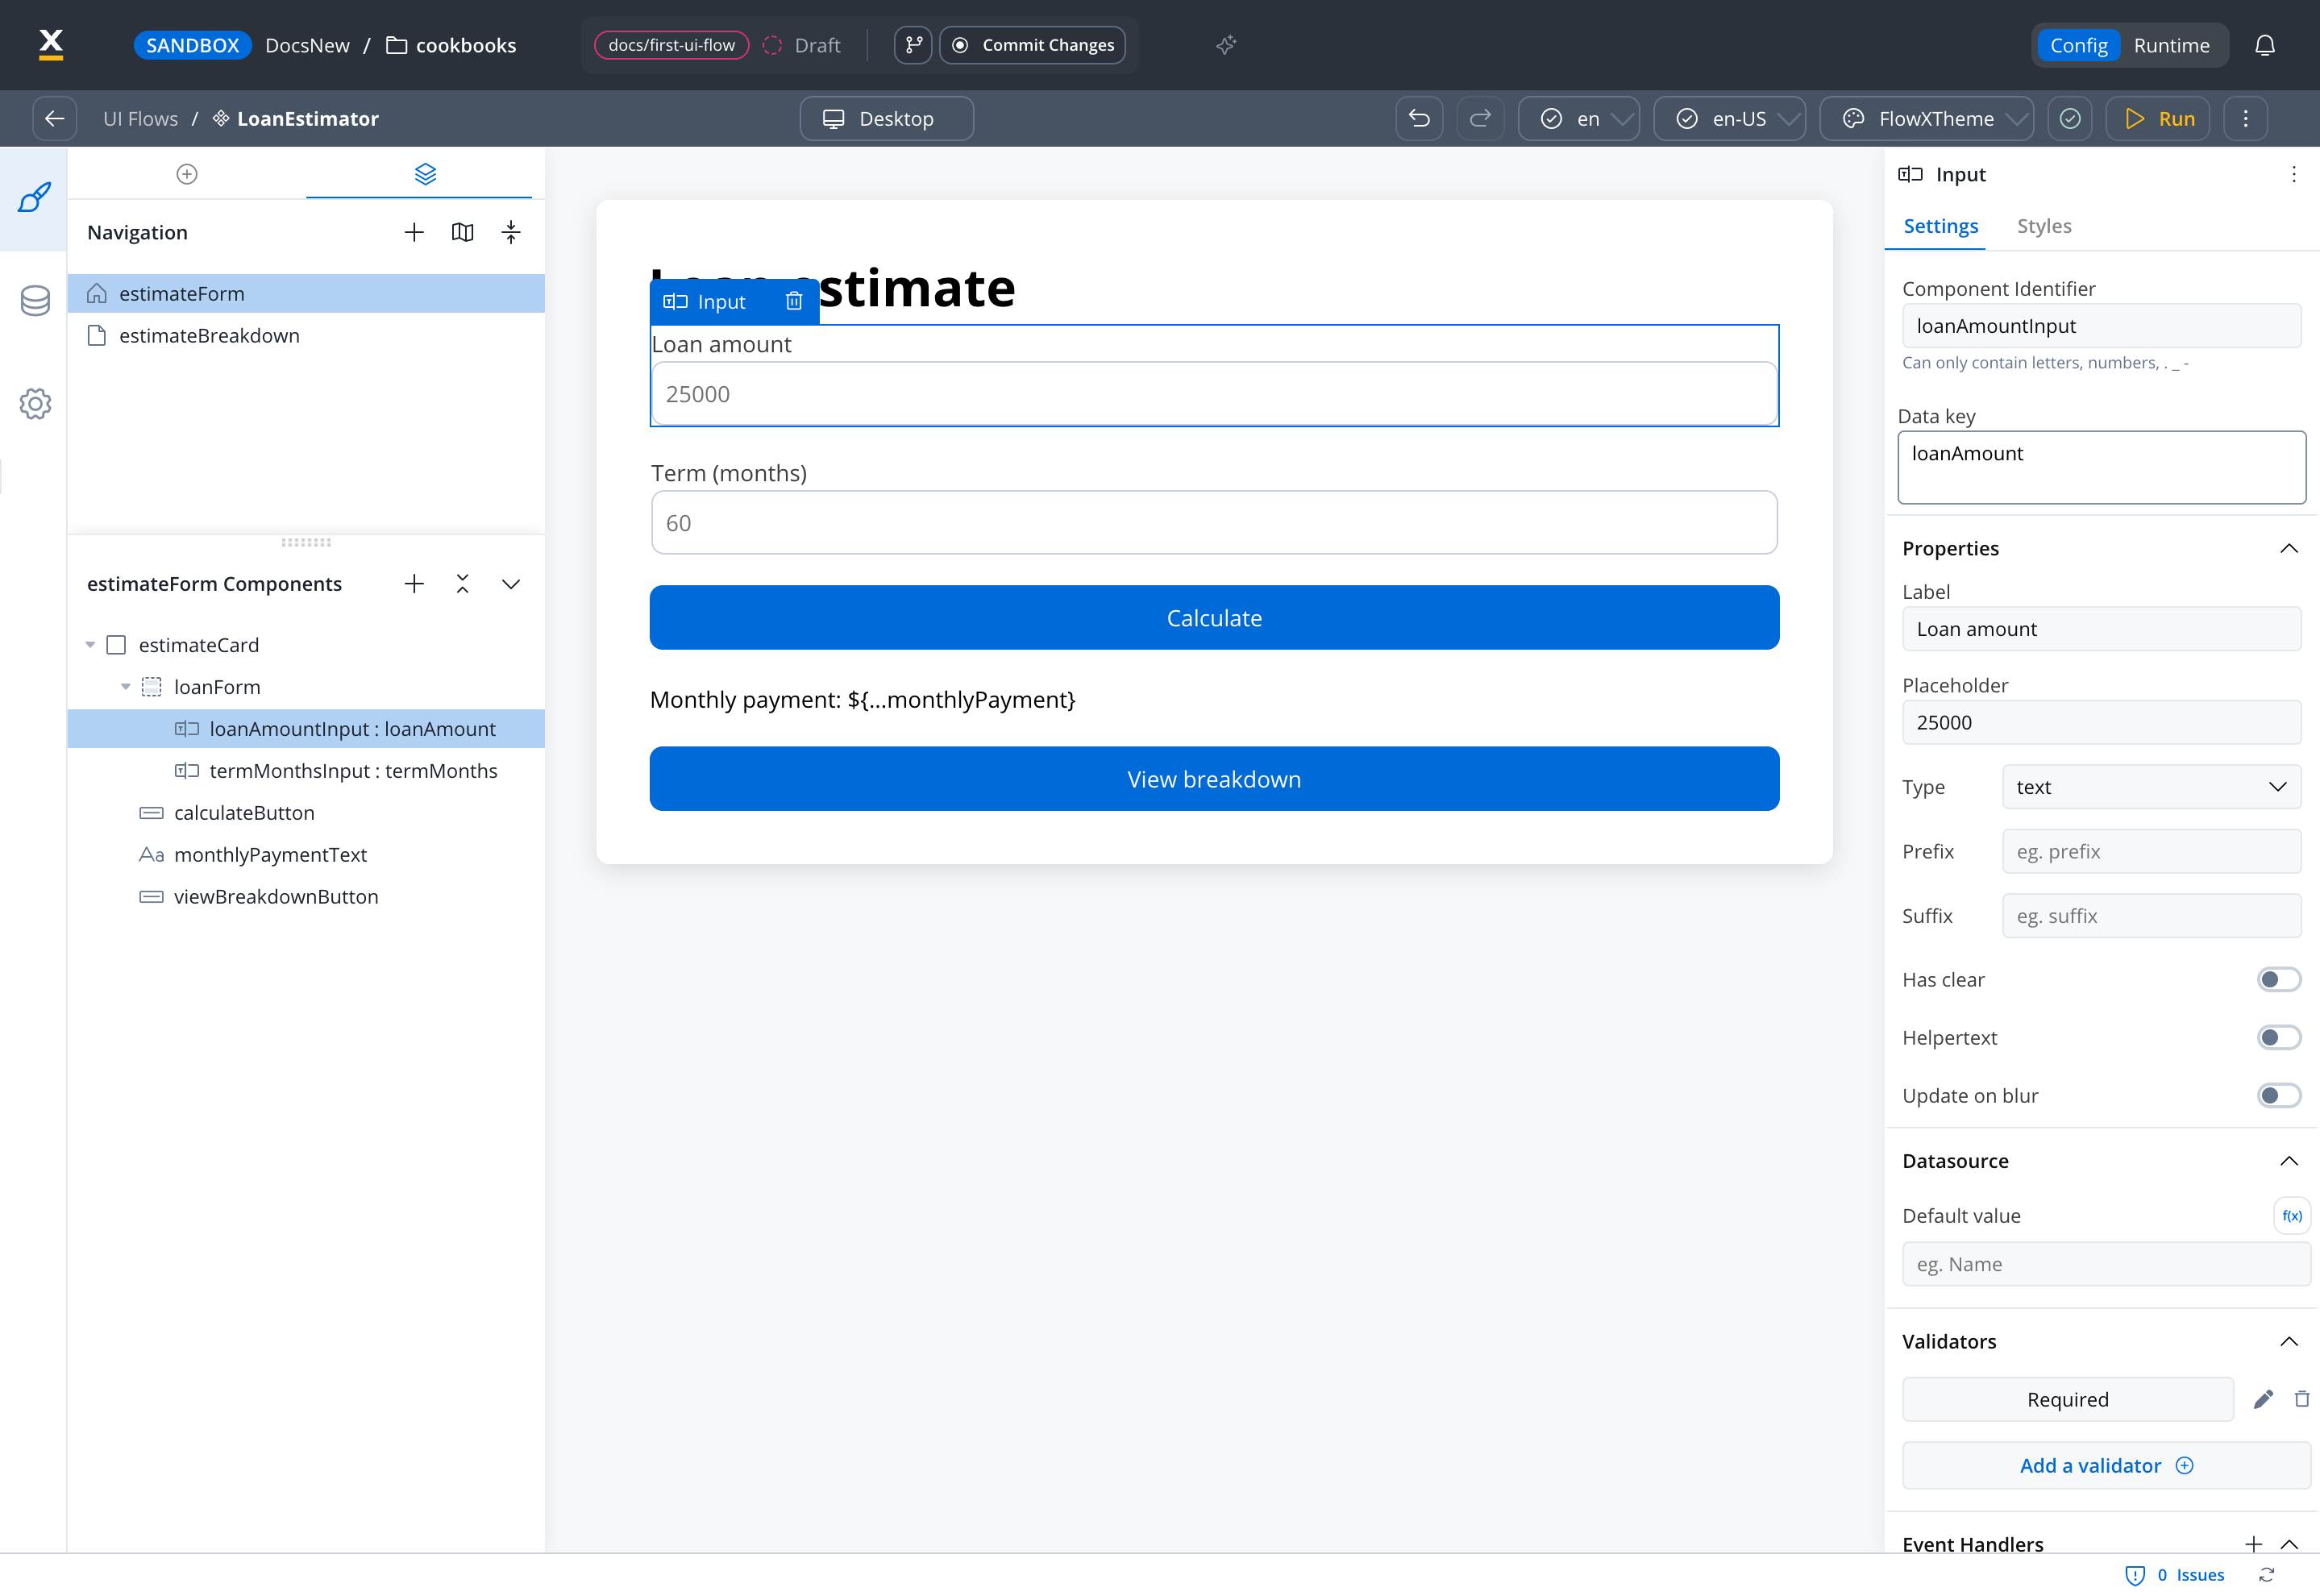
The estimateForm component tree with estimateCard, loanForm, the two inputs, calculateButton, monthlyPaymentText, and viewBreakdownButton; the Loan amount input is selected and its Settings show Data key loanAmount, Label Loan amount, Placeholder 25000, and a Required validator
3

Add the Calculate button

From Basic, drag a Button into the card, below the form and outside it. Set its Label to Calculate. You wire it to the workflow in Step 4.
Keep buttons as siblings of the form, not inside it. The button’s action decides which forms to validate.
4

Add the result text

From Basic, drag a Text component into the card, below the button. Set its Text to:
${...} reads a value from the UI Flow session data. loanEstimate doesn’t exist until the workflow returns it, and you don’t have to declare it in the data model: workflow output is added to the session data when it arrives.
5

Add the View breakdown button

Drag a second Button into the card, below the text, and set its Label to View breakdown.

Learn more about input fields

Learn more about validators


Step 4: Start the workflow from the Calculate button

Actions on UI Flow components are configured as event handlers: a trigger, such as a click, and an action that runs when it fires.
1

Add a click handler

Select the Calculate button. On the Settings tab, find the Event Handlers section, click +, and choose On Click.
2

Pick the workflow

Set Action Type to Start Workflow, and in Workflow pick calculateLoanEstimate.
3

Validate the form

In the Functional section, tick Add forms to validate and pick loanForm. The handler then runs only when both required fields hold a value.
4

Pass the form values as start params

Tick Add start params and enter:
The keys on the left are the workflow’s input parameters; the ${...} expressions read the form values from the session data. Don’t put quotes around ${...}: each value is inserted already JSON-encoded.
In a UI Flow, validating a form doesn’t send its values anywhere. Start params are how the workflow receives them. If you leave start params empty, the workflow starts with no input.
5

Save the handler

Click Save. Optionally, tick Show loader in the UX section first, to show a loading indicator while the workflow runs.
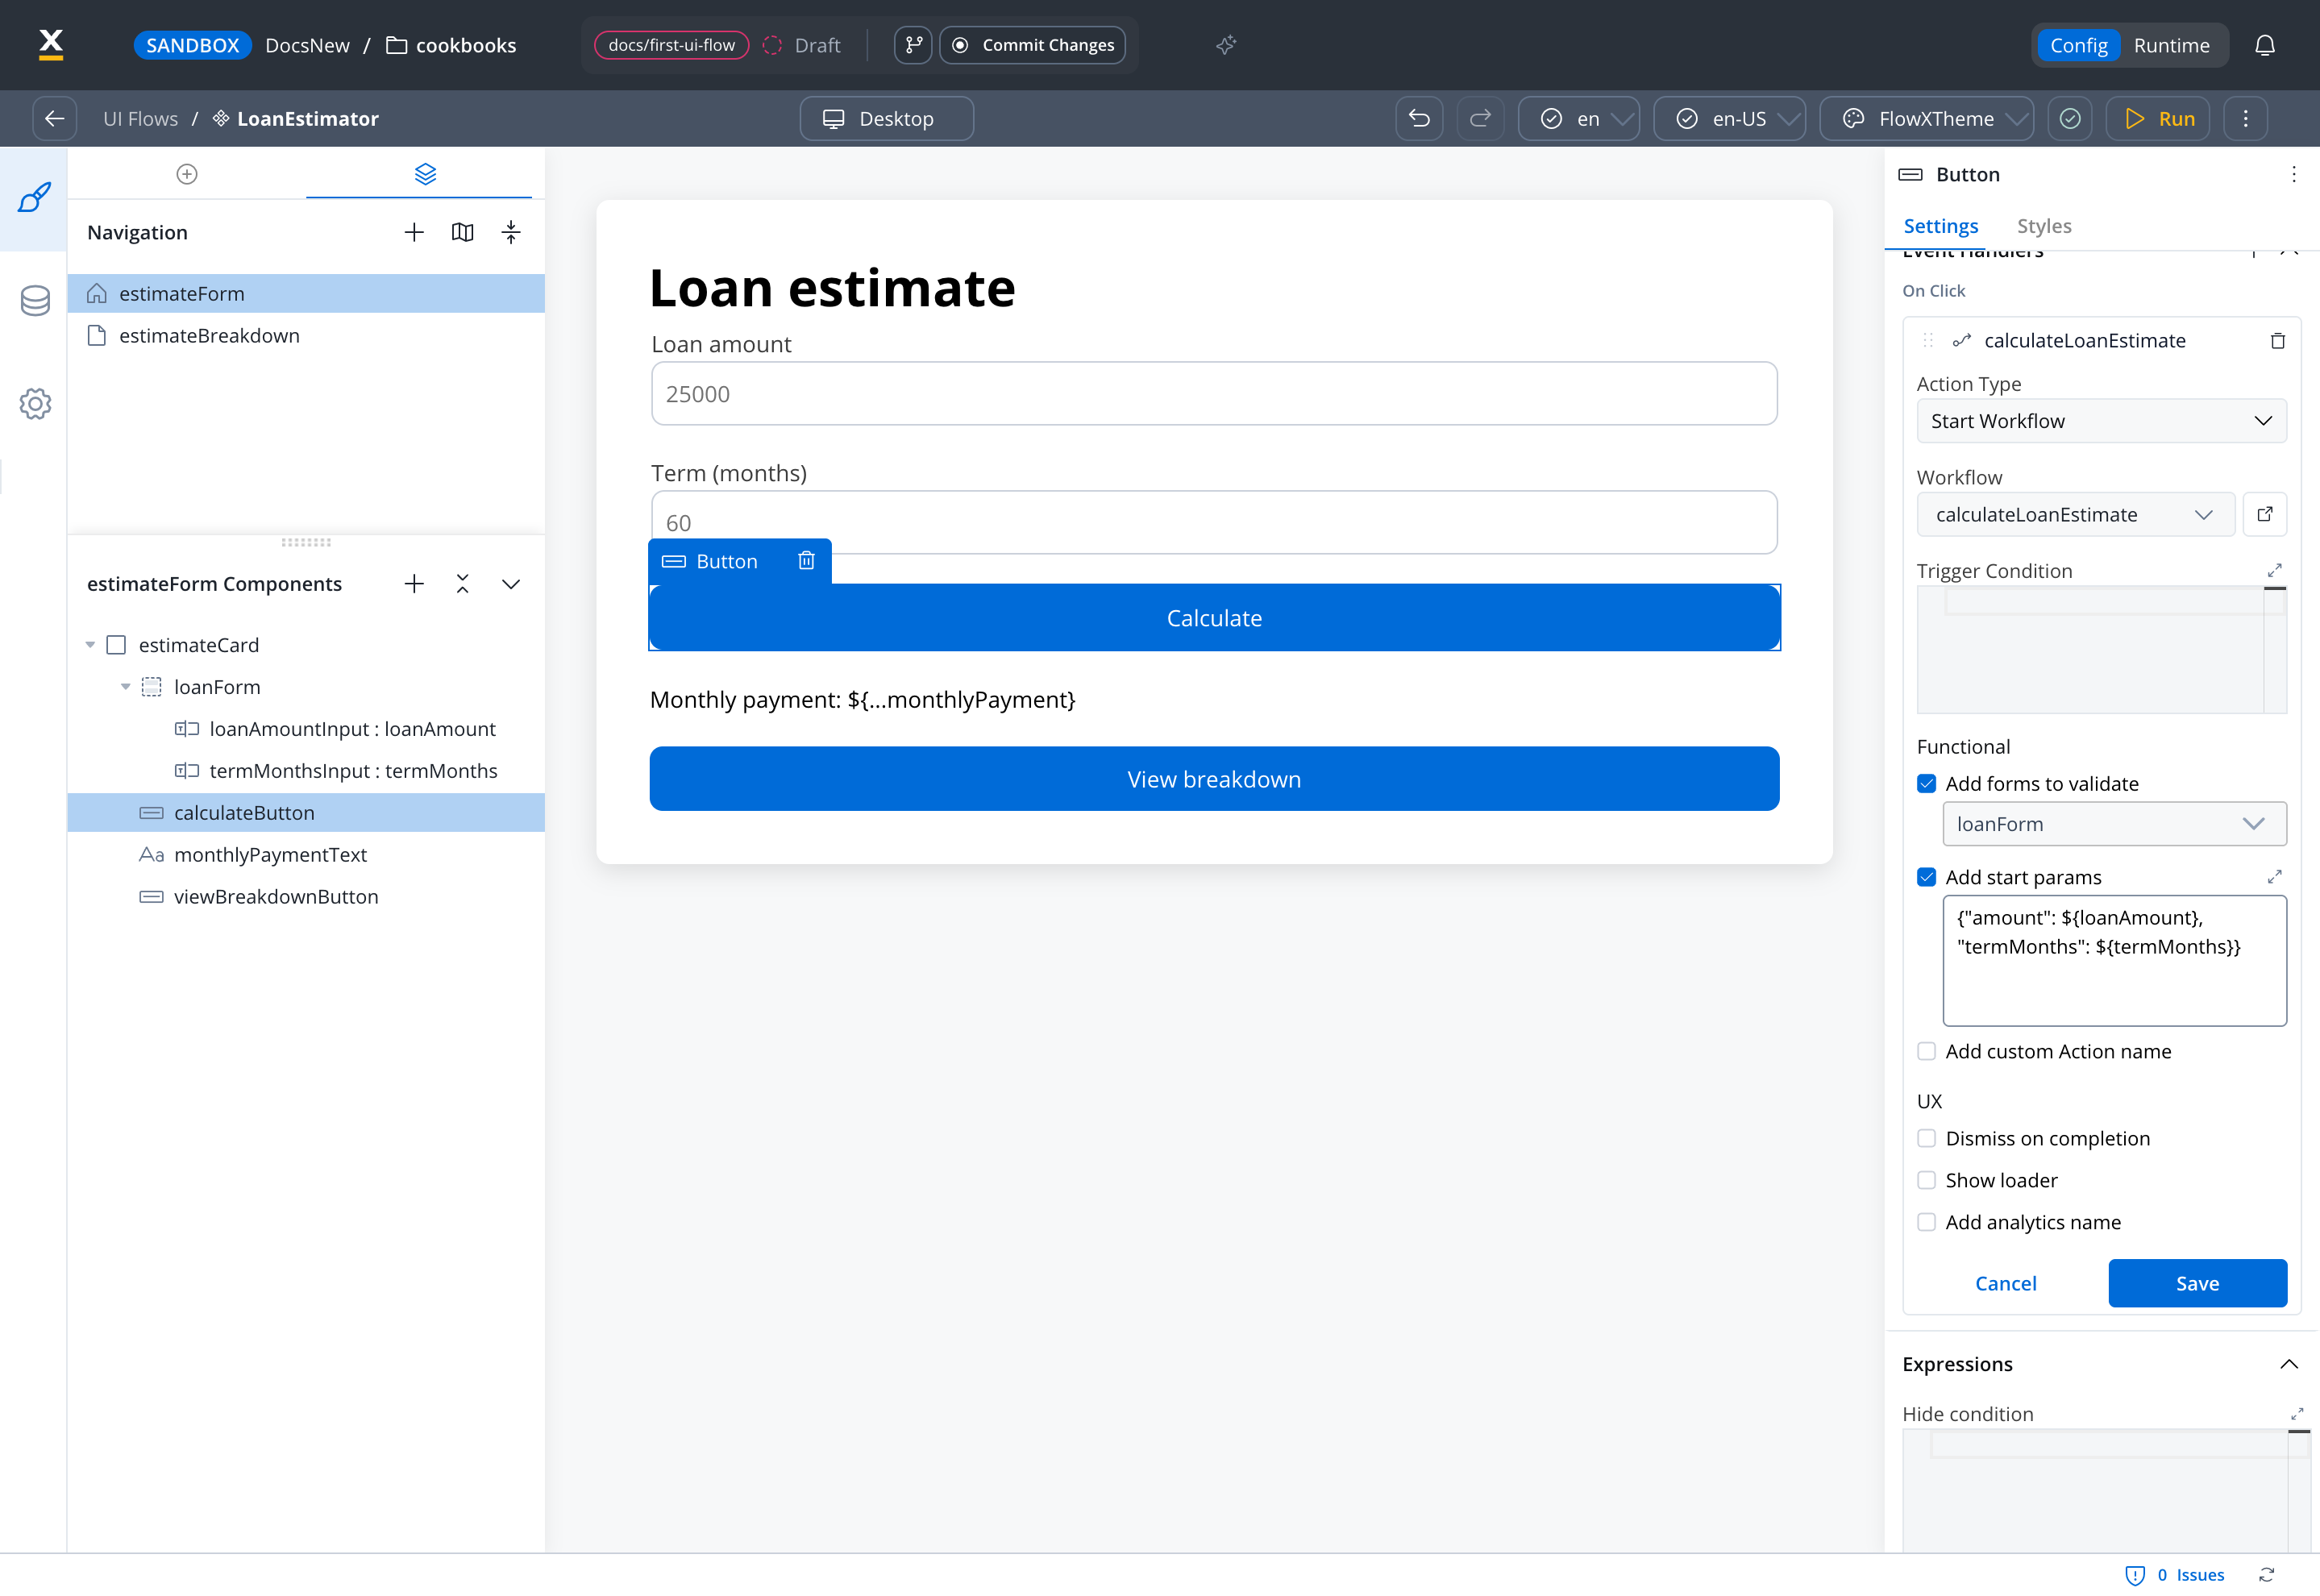
The On Click event handler of the Calculate button: Action Type Start Workflow, Workflow calculateLoanEstimate, Add forms to validate ticked with loanForm, and Add start params ticked with the amount and termMonths JSON
When the workflow finishes, its output (loanEstimate) is added to the UI Flow session data, and the Monthly payment text updates.

Learn more about the Start Workflow action

Learn more about event handlers


Step 5: Build the breakdown page and connect the pages

1

Build the breakdown page

Drag a Card onto estimateBreakdown and set its Title to Repayment breakdown. Inside it, add two Text components:
Then add a Button below them with the Label Back.Both pages read the same session data, so the breakdown page shows the result the first page received without calling the workflow again.
2

Navigate to the breakdown

Select the View breakdown button on estimateForm. Under Event Handlers, click +, choose On Click, set Action Type to Navigate To, and in Destination pick estimateBreakdown. Click Save.
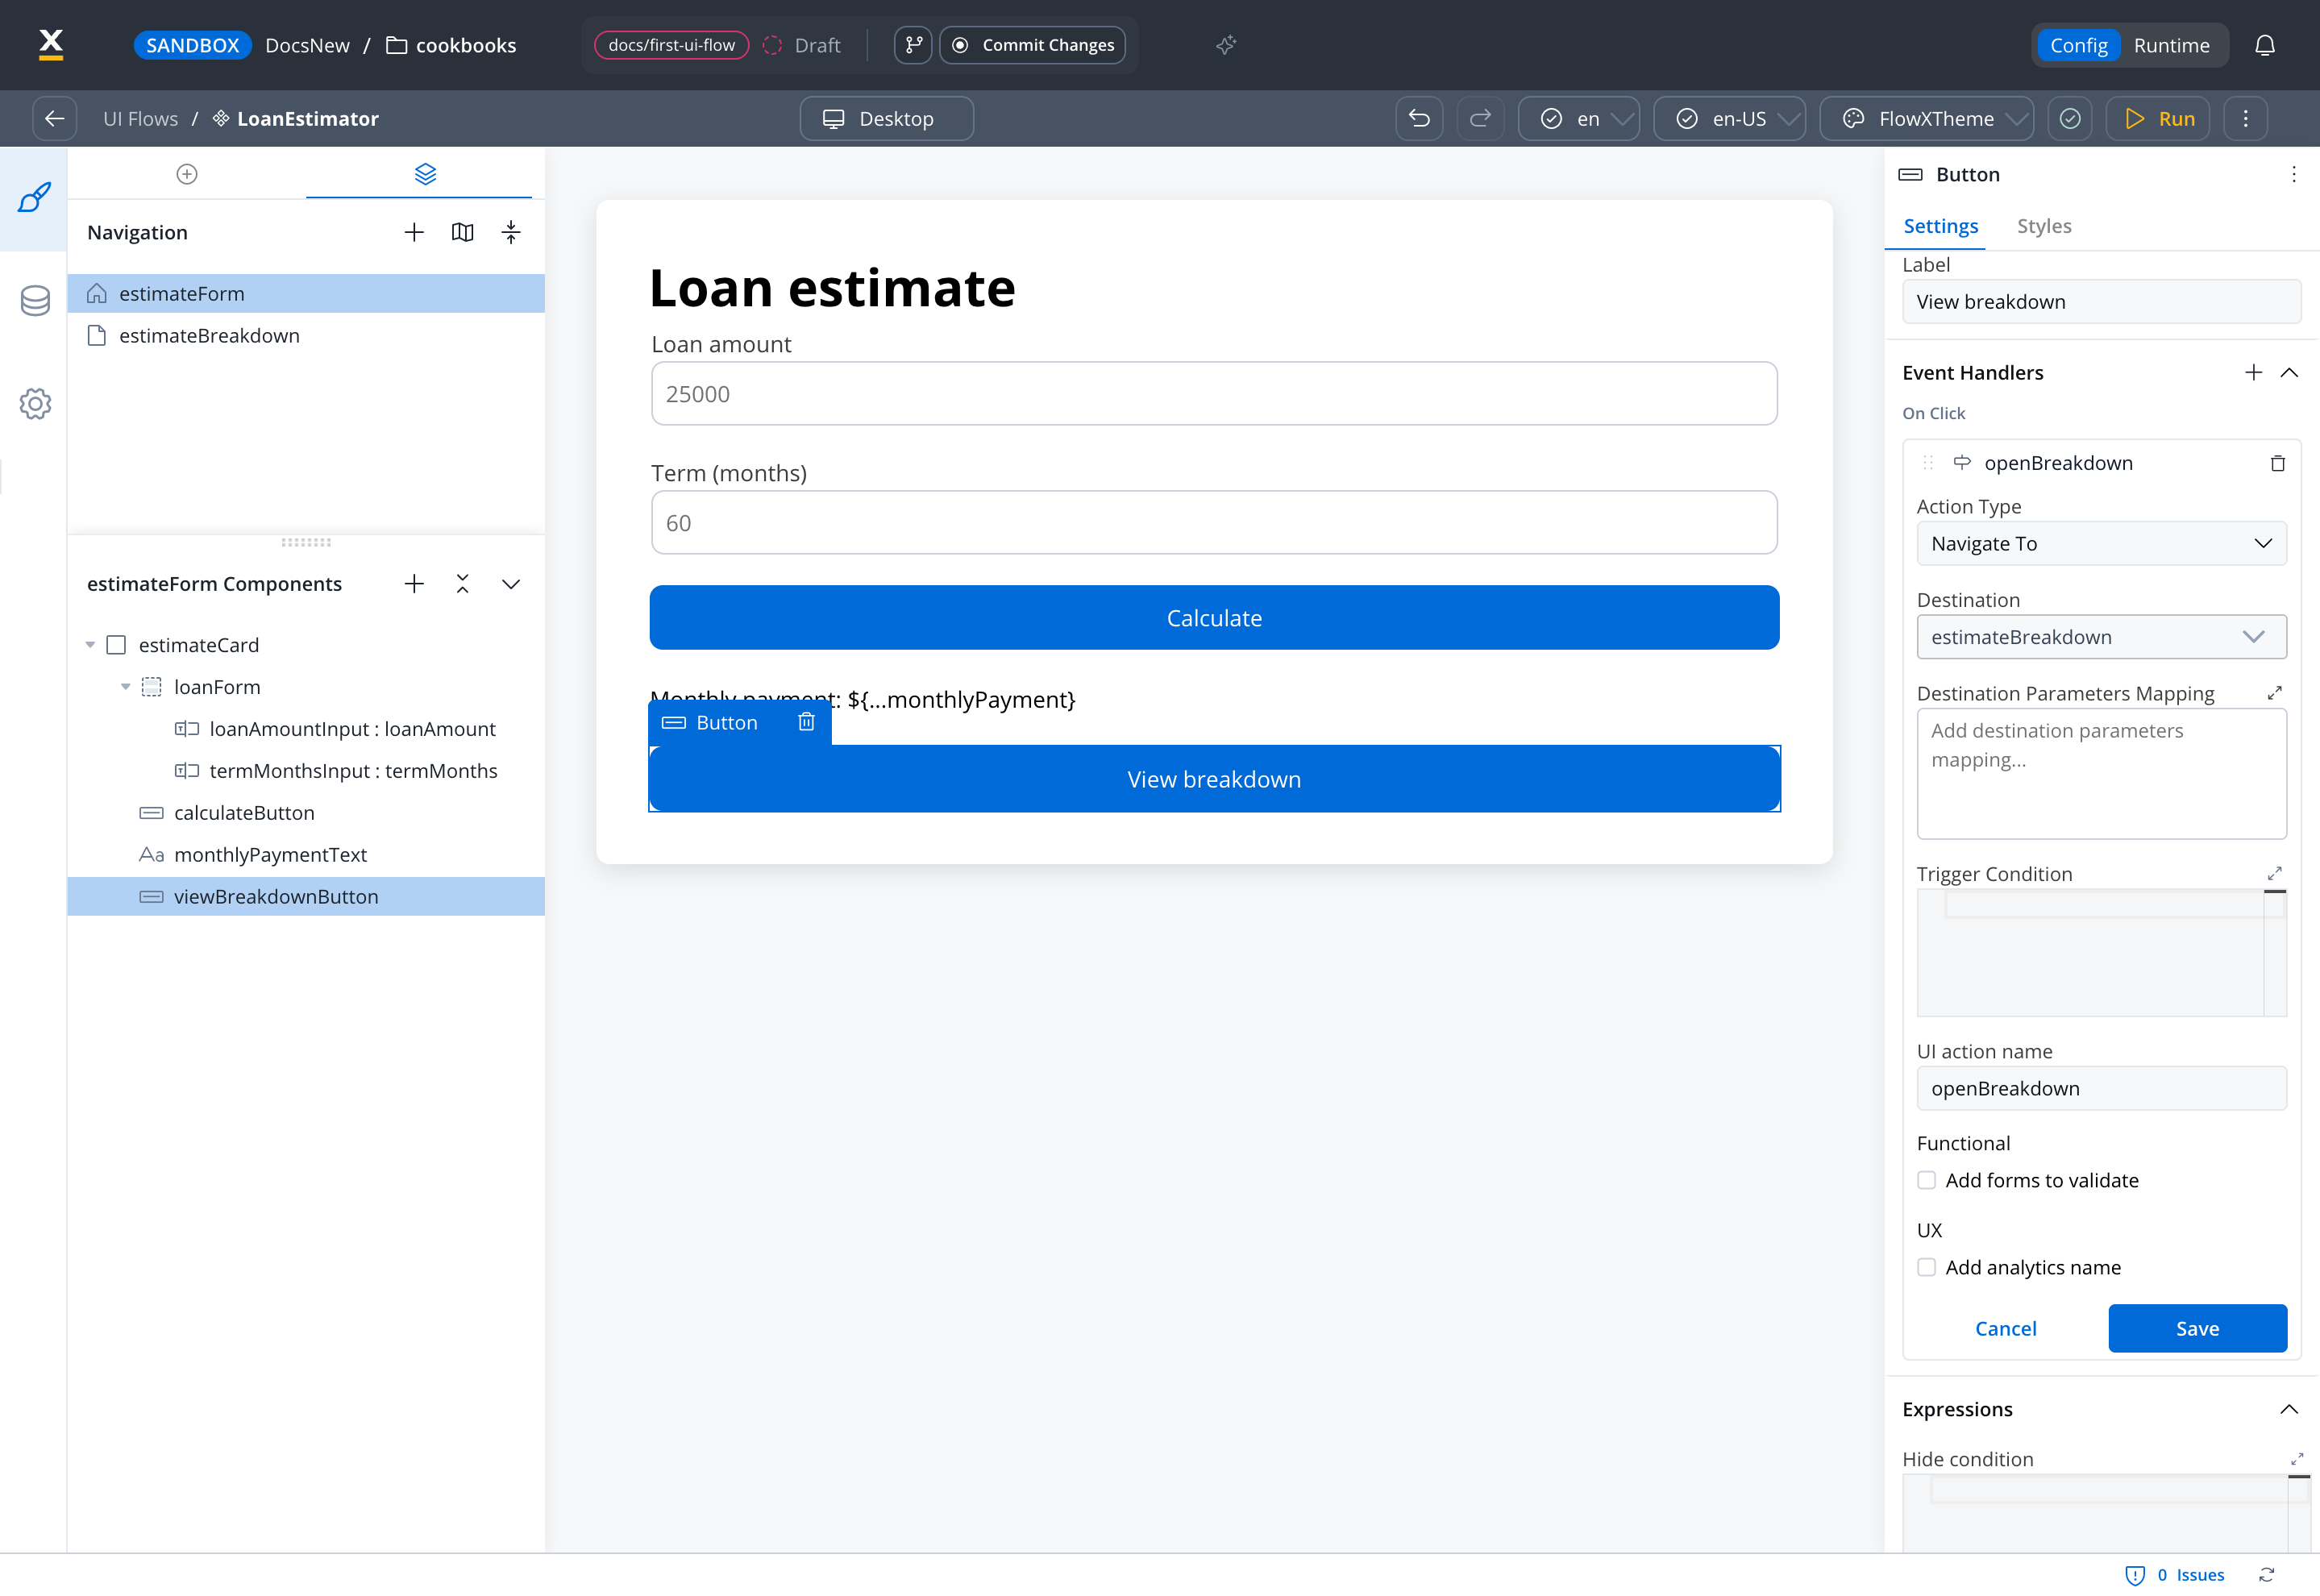
The On Click event handler of the View breakdown button with Action Type Navigate To and Destination estimateBreakdown
3

Navigate back

Select the Back button on estimateBreakdown and add the same kind of handler, with Destination set to estimateForm. Click Save.

Learn more about the Navigate To action


Step 6: Run it and inspect the session

1

Run the UI Flow

Click Run in the top-right corner of the UI Flow editor. The Run Ui Flow dialog opens. Input Parameters holds the variables the UI Flow expects at start; this one expects none, so leave {}. Keep the default Theme and click Run.
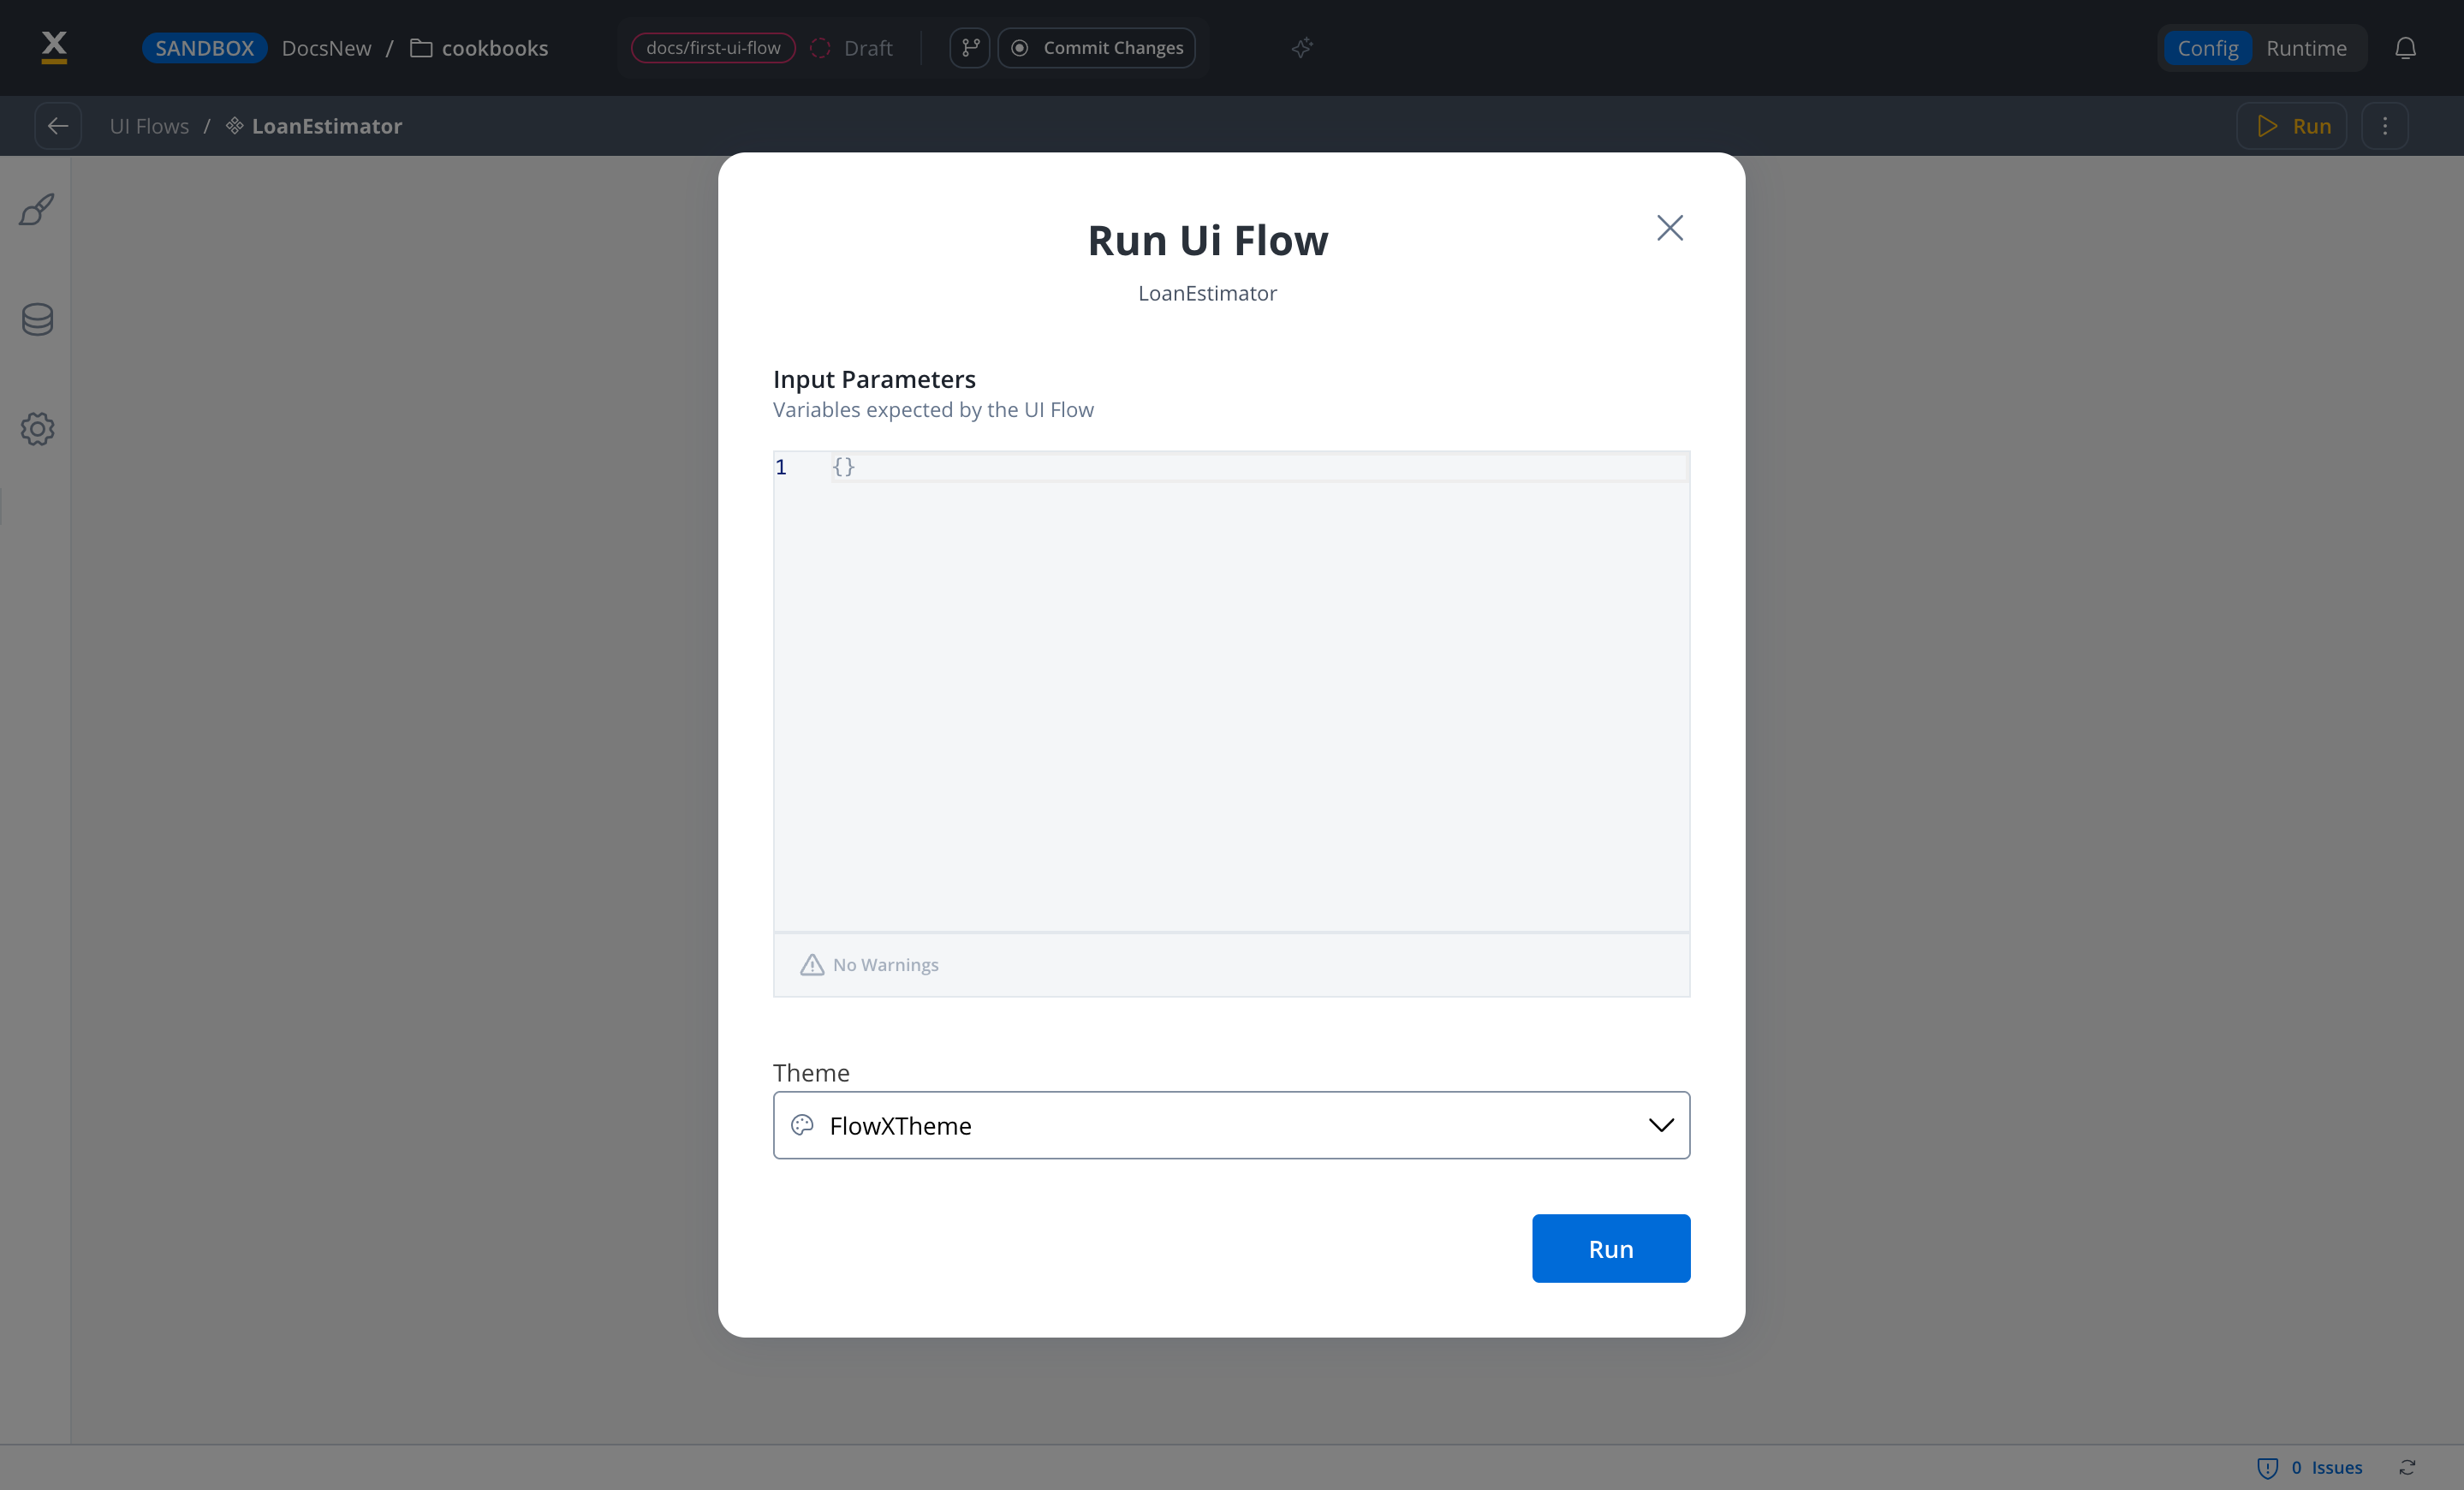
Run Ui Flow dialog for LoanEstimator with an empty Input Parameters JSON editor, the Theme dropdown set to the default theme, and a Run button
The UI Flow opens on estimateForm, the home page.
2

Check the validation

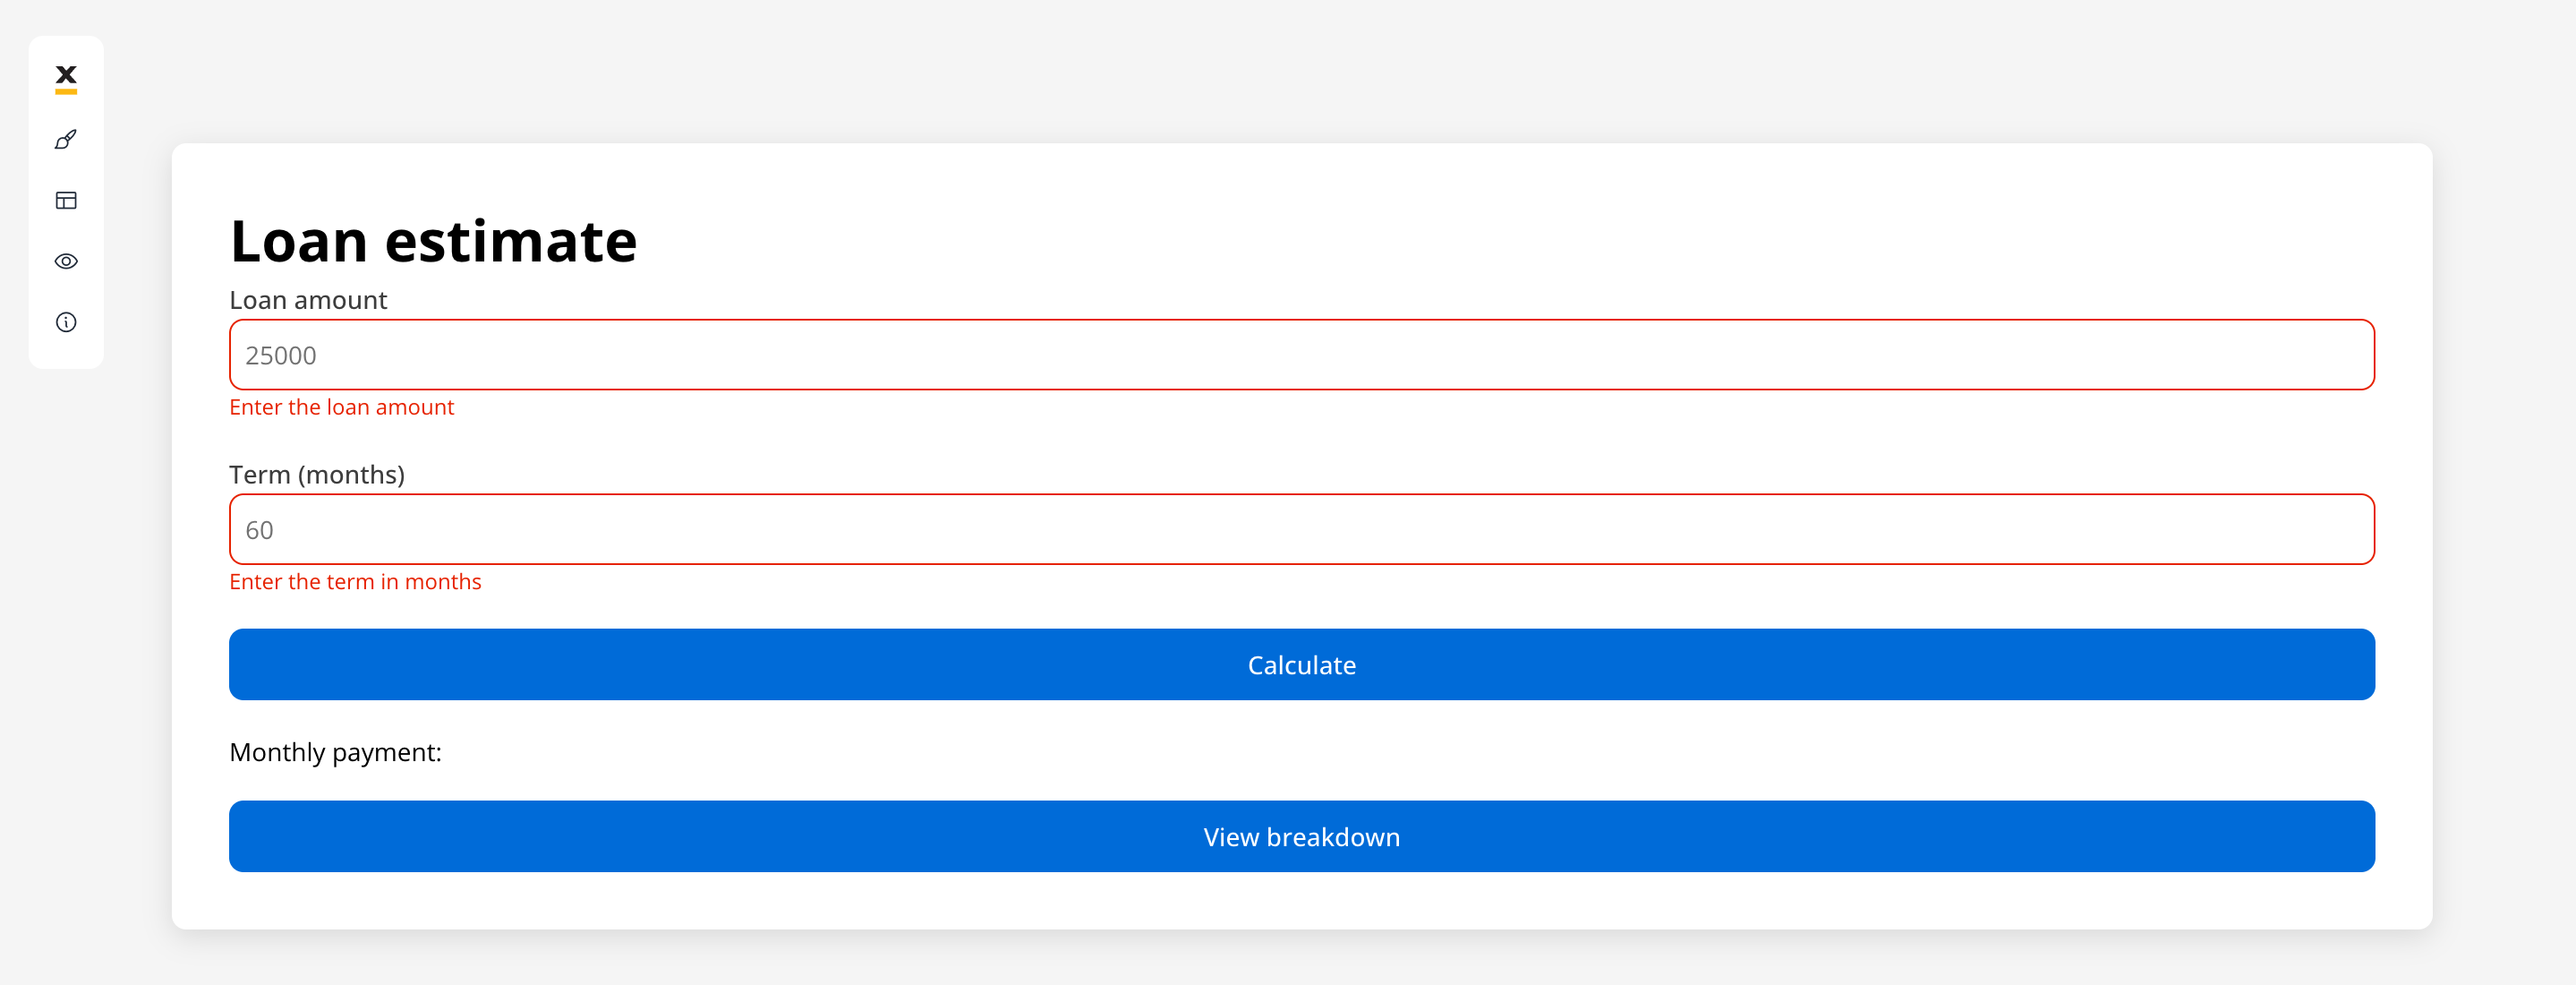
Click Calculate with both fields empty. The workflow doesn’t start, and each field shows its required message.
The Loan estimate page with both fields empty after clicking Calculate: the fields have red borders, the messages Enter the loan amount and Enter the term in months appear under them, and the Monthly payment text is still empty
3

Calculate an estimate

Enter 25000 and 60 and click Calculate. The page shows Monthly payment: 489.15.
4

Open the breakdown

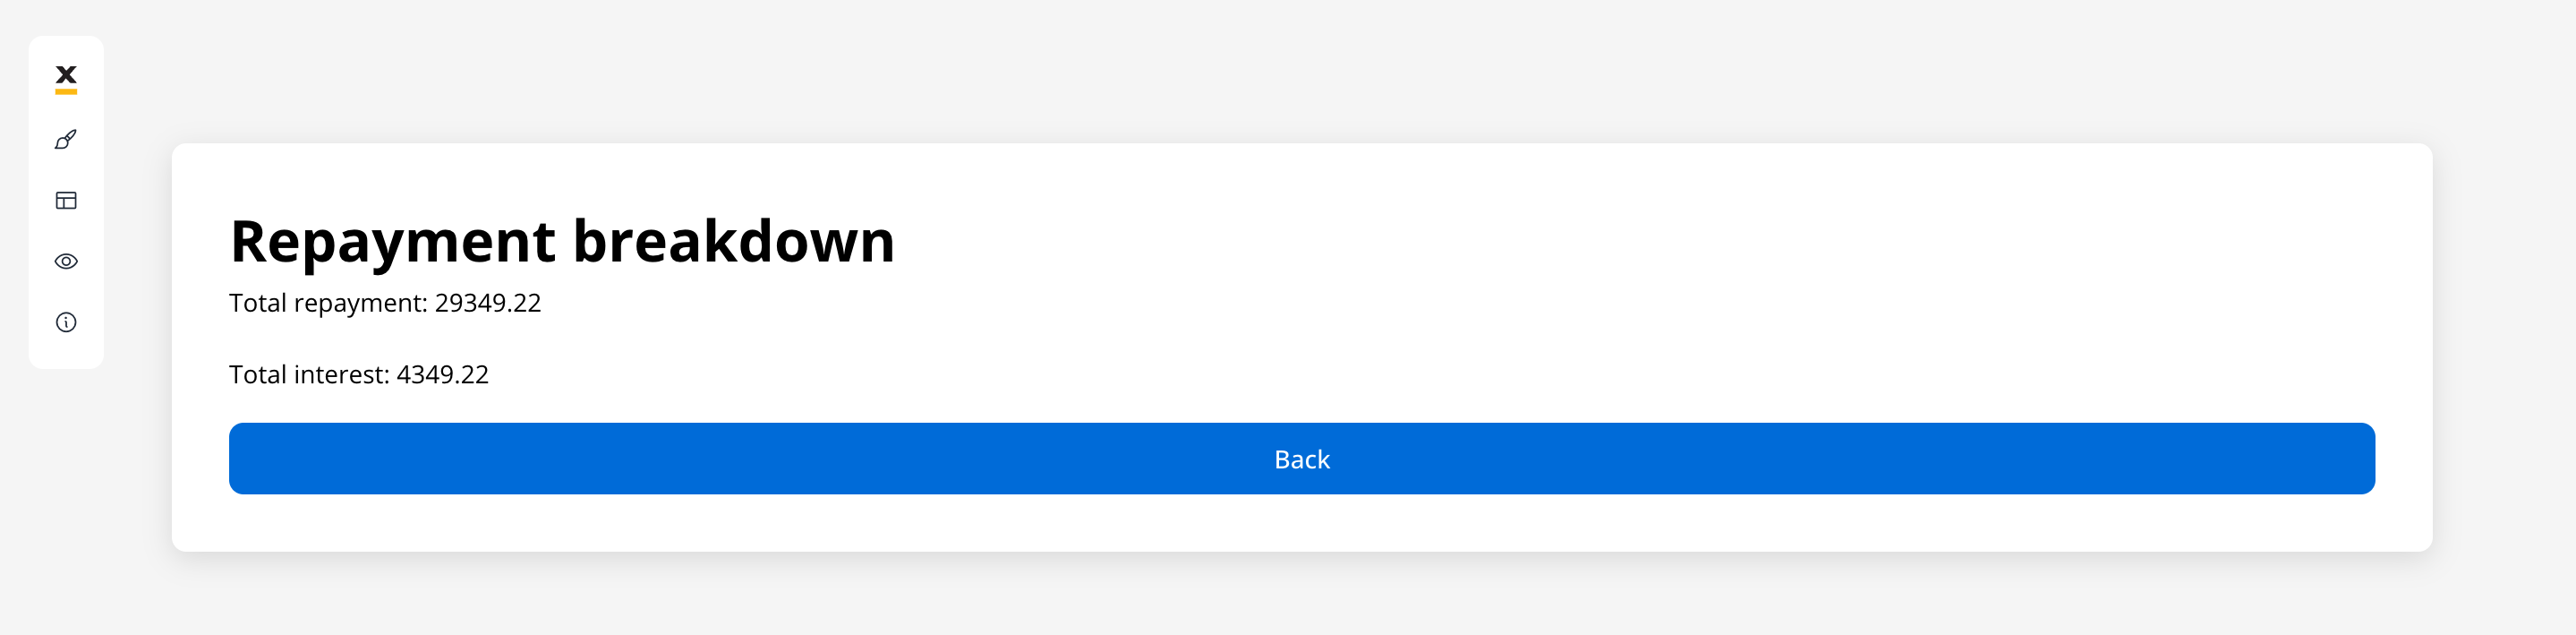
Click View breakdown. The second page shows the totals from the same result:
The Repayment breakdown page at runtime showing Total repayment: 29349.22, Total interest: 4349.22, and a Back button
Click Back. The first page still shows the monthly payment.
5

Inspect the session data

In the toolbar on the left of the running UI Flow, click the eye icon (View UI Flow instance). A panel opens with the UI Flow name, the session ID, its status, and the tabs Variables, Audit Log, Processes, and Workflows. The Variables tab shows loanEstimate with the three values the workflow returned.
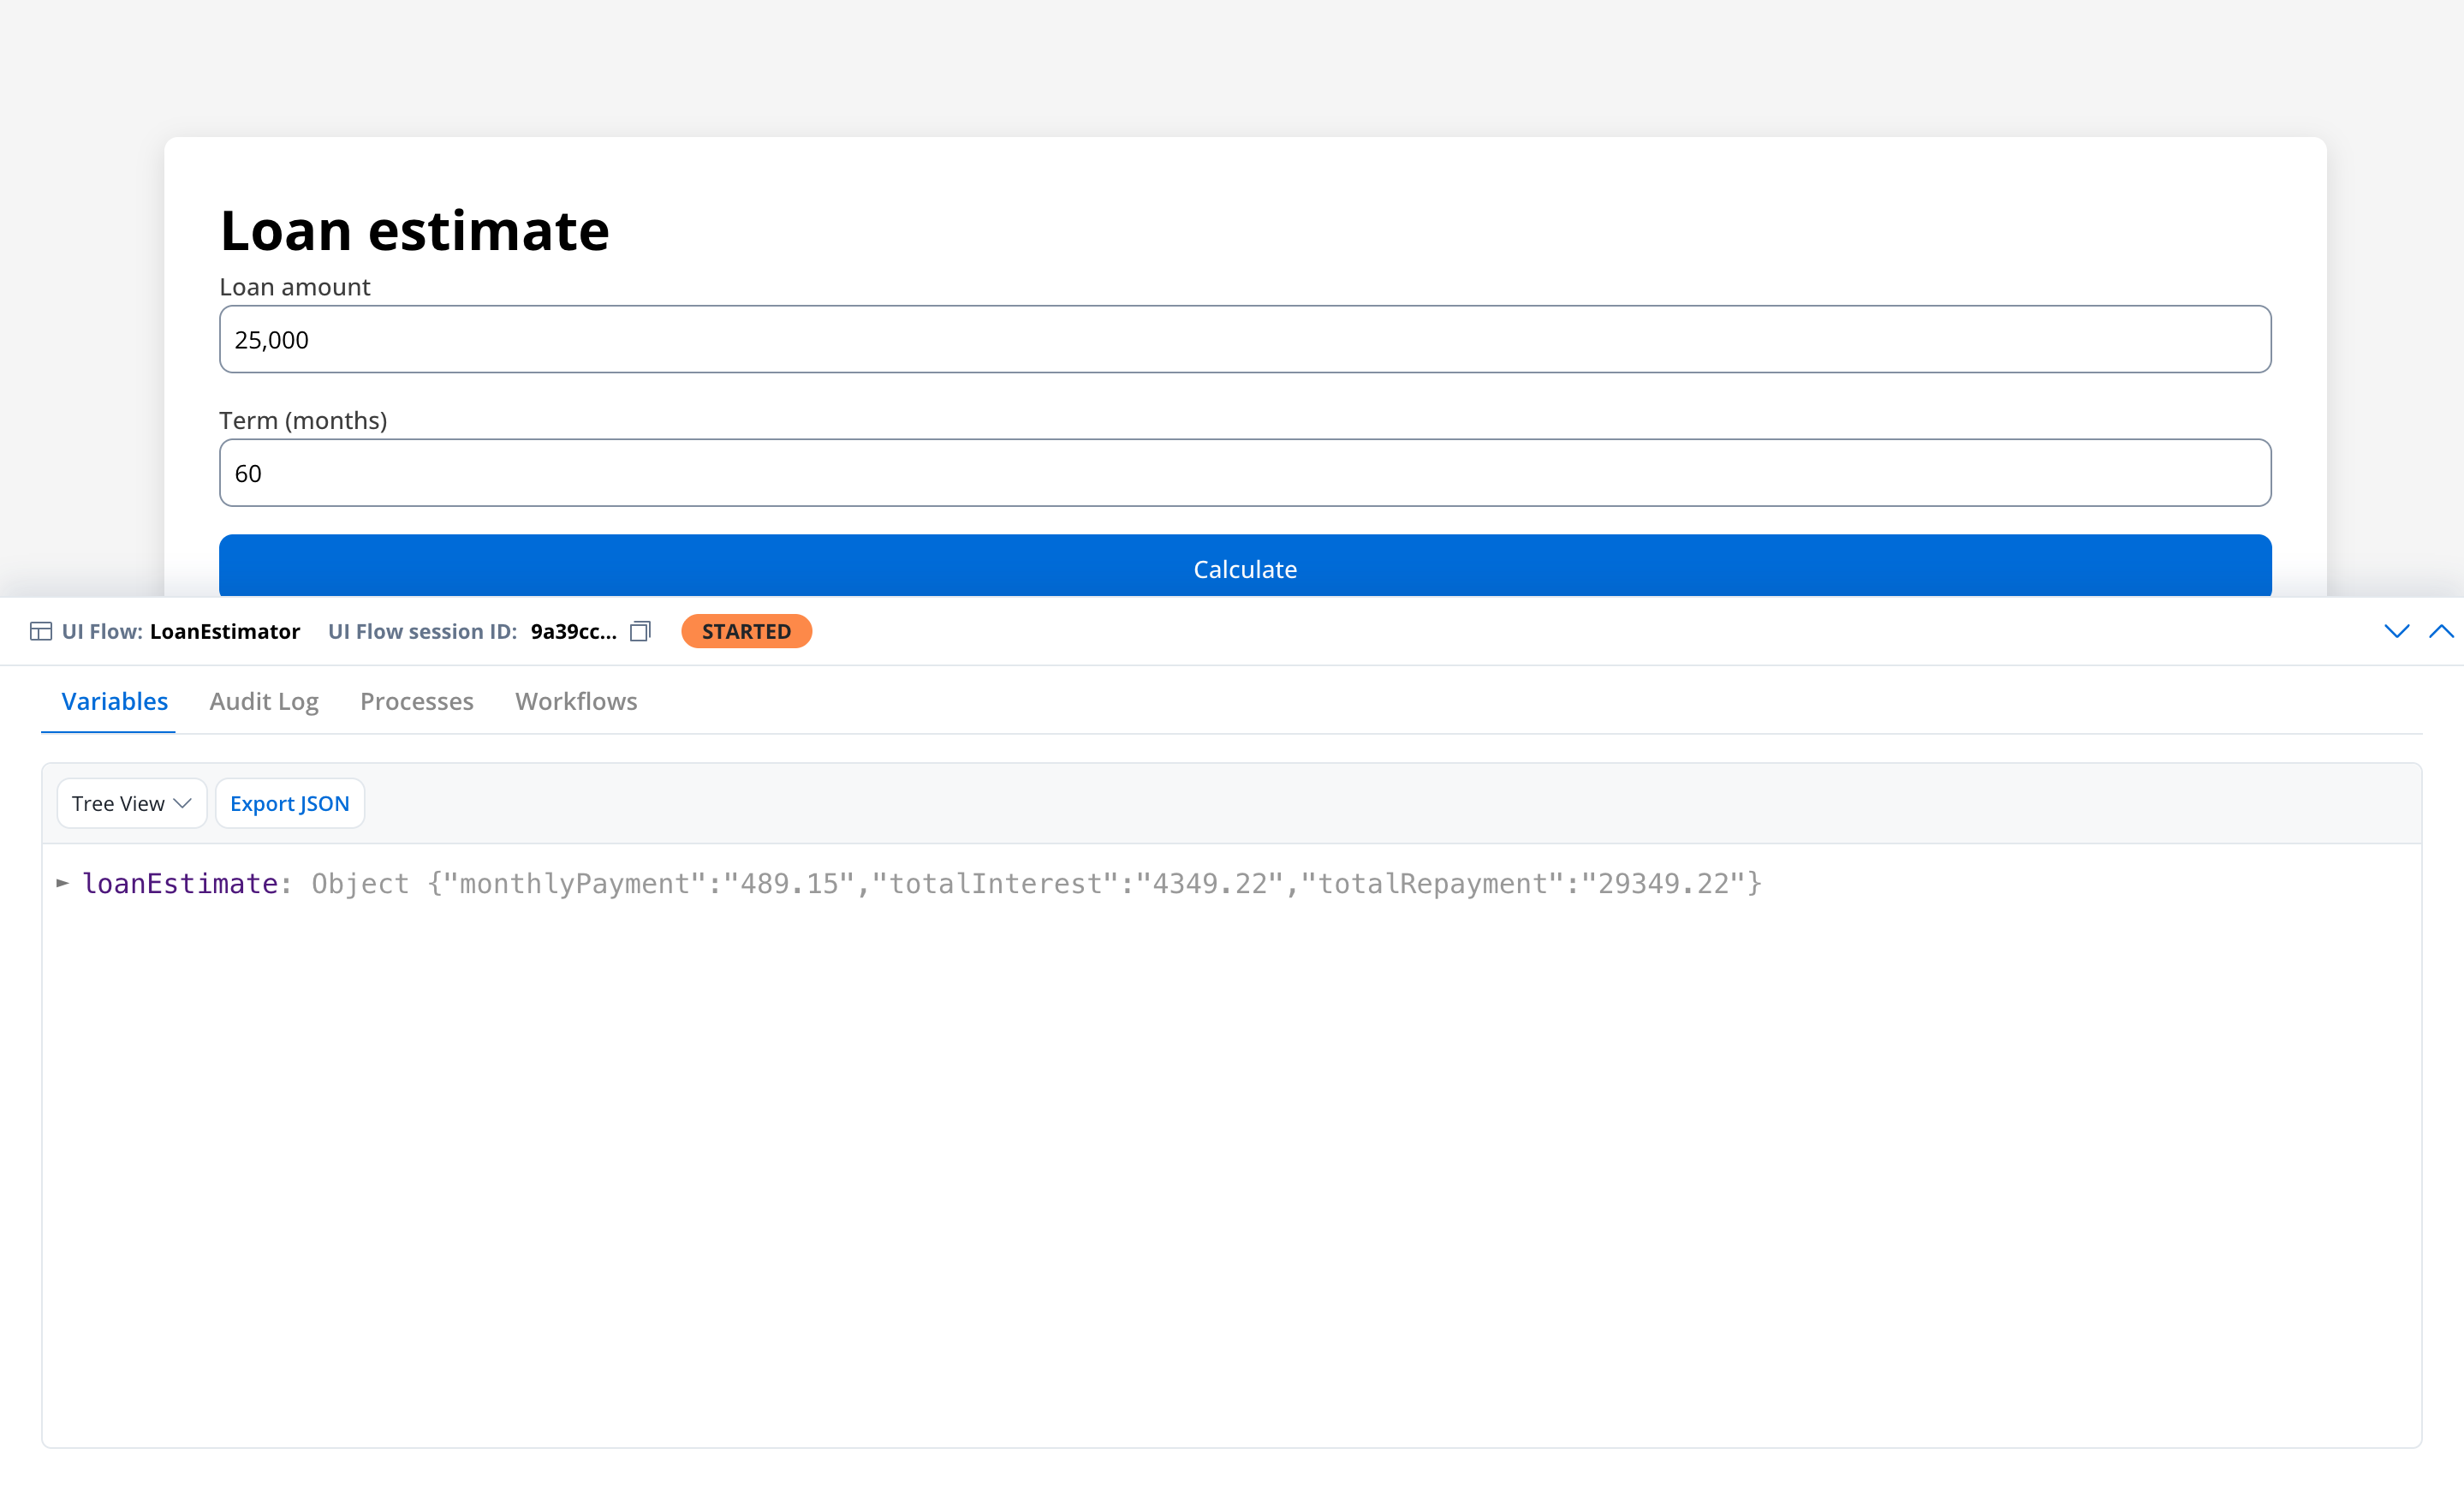
The UI Flow instance panel for LoanEstimator with status STARTED and the Variables tab open in Tree View, showing loanEstimate as an object with monthlyPayment 489.15, totalRepayment 29349.22, and totalInterest 4349.22
Use Export JSON to copy the whole session data, for example when comparing two runs.
The form refuses empty input, Calculate shows 489.15, the breakdown page shows 29349.22 and 4349.22, and the Variables tab holds loanEstimate. That loop, page to workflow and back into the session data, is the pattern behind most UI Flow screens.

Troubleshooting

The workflow ran without the values it needs, or its output didn’t reach the UI Flow. Check, in order:
  • The start params keys are exactly amount and termMonths, the workflow’s input parameter names.
  • The ${...} expressions name the form’s data keys, loanAmount and termMonths, and have no quotes around them.
  • The workflow’s End Flow node lists loanEstimate in its Output Schema.
  • The Text reads ${loanEstimate.monthlyPayment}, with the same spelling as the script’s output.
Open the Workflows tab of the View UI Flow instance panel to see whether the workflow ran.
The loanEstimate fields are typed Number (Floating Point) in the workflow’s Data Model. Change all three to String and return them with toFixed(2), as in the Calculate payment script.
That’s expected. In a UI Flow, Add forms to validate only validates the form; the values reach the workflow through the start params. The Variables tab shows what was stored in the session, such as the workflow output.
estimateBreakdown is the home page. Right-click estimateForm in the Navigation tab and choose Set as Home, then run the UI Flow again.
The key isn’t in the UI Flow’s data model yet. Open Data Model, add loanAmount and termMonths with Create Attribute, and pick the key again. The search starts after three characters.
The dropdown lists the workflows of the project you’re working in. Create calculateLoanEstimate in the same project as the UI Flow.

What you learned


Where to go next

UI Flows

The full reference: experience types, navigation, Start Process and Start Workflow actions, and embedded processes.

Event handlers

Every trigger and action type you can attach to a UI component.

Validators

Built-in and custom validators for form fields.

Build your first workflow

Call a real REST API from a workflow and start it from a process.
Last modified on October 8, 2026