

What is a process definition?
A process definition is the core building block of the FlowX.AI platform, serving as the blueprint for a business process. It’s composed of nodes linked by sequences that define the path and logic of your application’s workflow.Executable Blueprint
Process definitions can be instantiated, executed, and monitored within the platform
Business Logic Container
Houses all actions, decisions, user interfaces, and integrations for your business process
Event-Driven Flow
Nodes and sequences create a path for process tokens to follow based on conditions and events
Multi-Platform Support
Process definitions can generate interfaces for web, mobile, and other platforms
Creating a process definition
1
Access the Process Definitions Section
- Open FlowX.AI Designer and navigate to your project
- Go to the Processes section within your project
You must have already created a project before creating process definitions. Process definitions belong to projects and inherit project settings.
2
Create a New Process Definition
- Click the + New Process button in the top-right corner
- Enter a unique name for your process definition that clearly describes its purpose
- Optionally, add a description to provide context about what this process does
- Click Create to create the new process definition
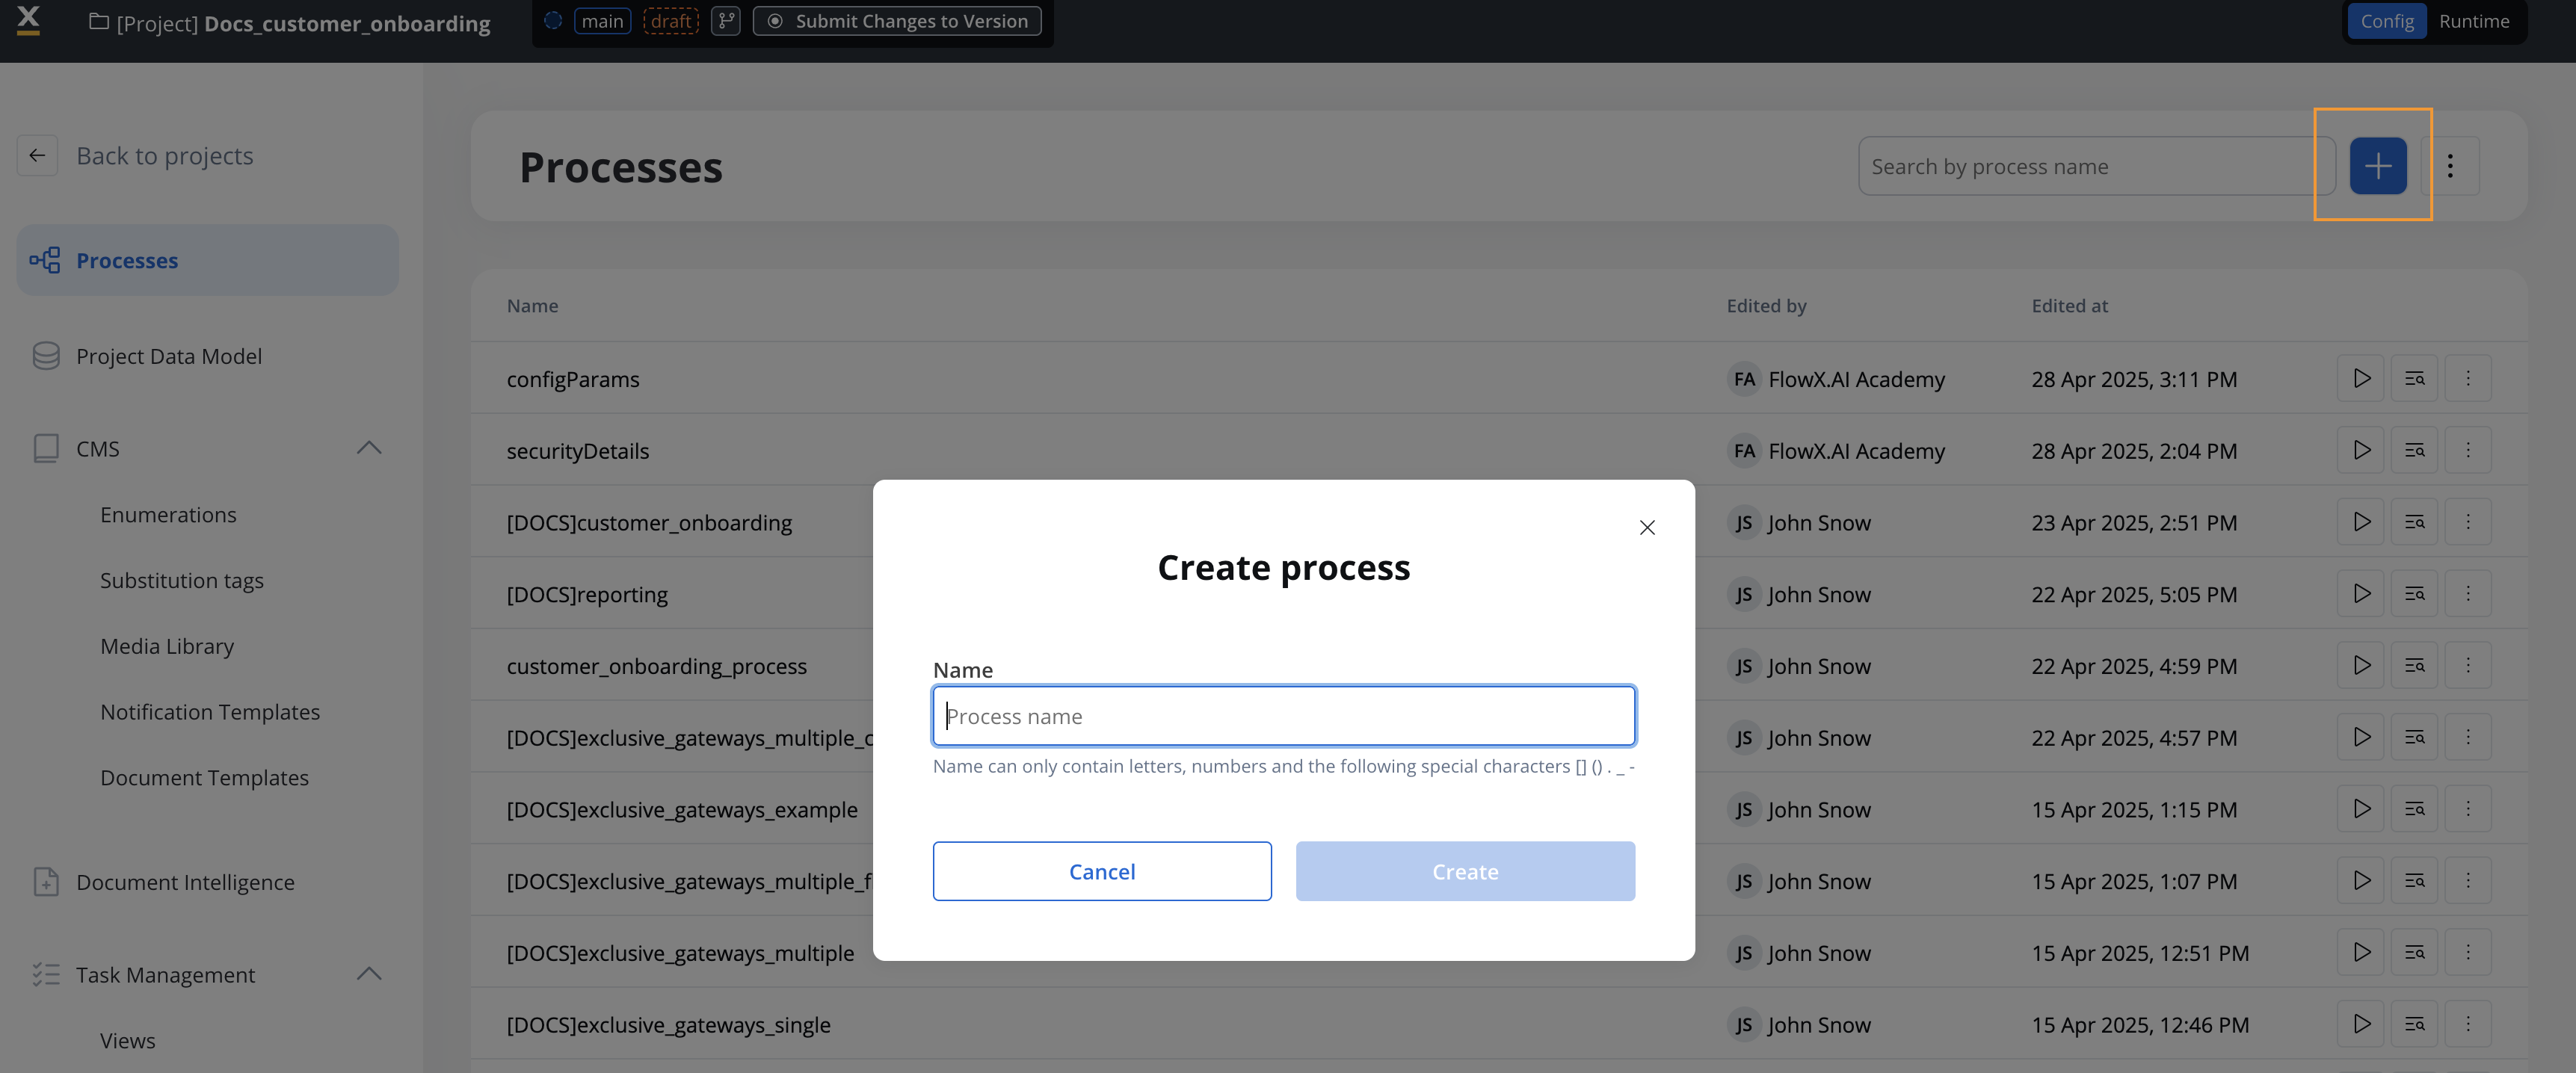
3
Configure the Process Definition
After creating the process definition, you’ll be automatically directed to the FlowX.AI Process Designer editor where you can start building your process flow.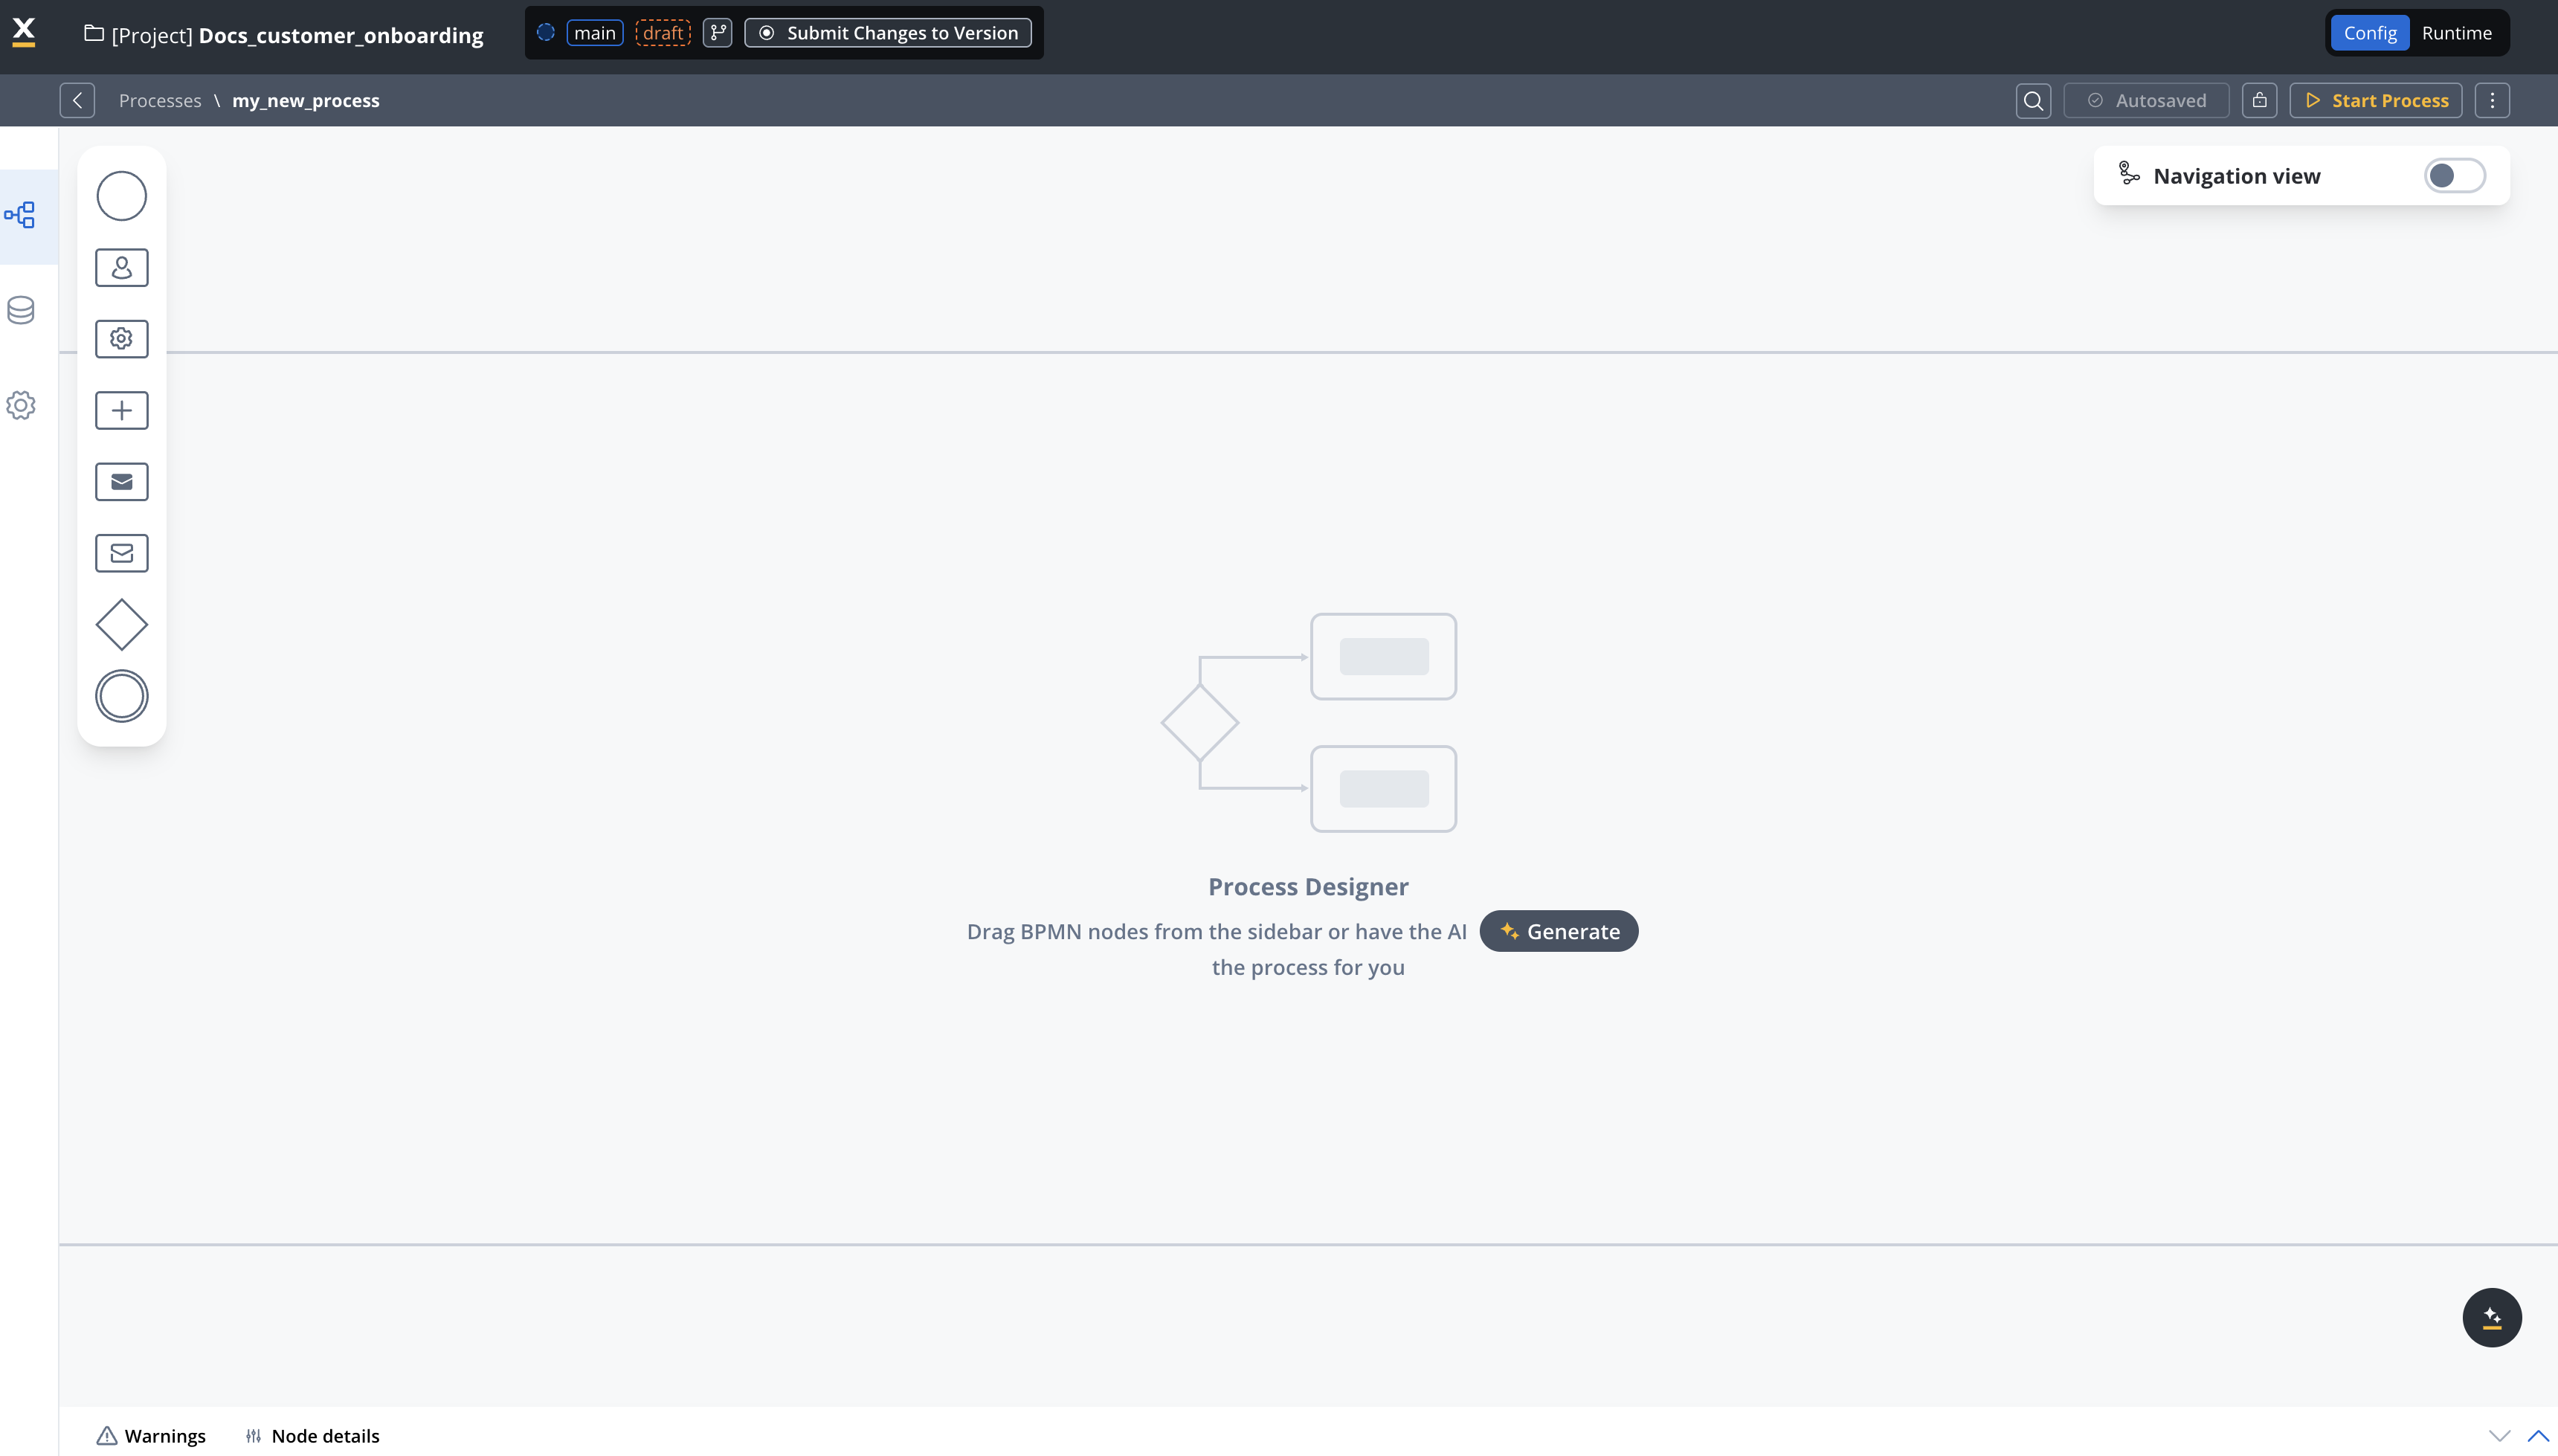
4
Add Start and End Nodes
Every process definition must have at least one START node and one END node:
- From the node palette on the left, drag a START node onto the canvas
- Configure the START node properties in the panel that appears
- Drag an END node onto the canvas
- Connect the nodes by clicking on the START node, selecting the arrow command, and then clicking on the END node
5
Build Your Process Flow
Expand your process by adding additional nodes between the START and END nodes:
- Drag the appropriate node types from the palette onto the canvas
- Configure each node’s properties and actions
- Connect nodes in the sequence they should execute
- Add conditions and gateways to create branching logic
Task Nodes
For business rules and automated actions
User Task Nodes
For user interactions and UI components
Gateways
For decision points and parallel flows
6
Save Your Process Definition
Regularly save your work by clicking the Save button in the editor toolbar.
Process definitions are saved within your project but need to be included in a project version and build to be deployed to environments.
Key node types
When building your process definition, you’ll use various node types to model your business logic:Start and End Nodes
Start and End Nodes
Start Node: Marks the beginning of a process flow, defining how a process instance is initiated.End Node: Marks the conclusion of a process flow, ensuring proper cleanup and completion.
A process can have multiple START nodes (with different conditions) and multiple END nodes depending on the possible outcomes.
Task Nodes
Task Nodes
Task Node: Used for executing automated actions without user interaction.User Task Node: Configures the UI components and collects data from users.Send/Receive Message Tasks: Used for communication with external systems and services.
Gateway Nodes
Gateway Nodes
Exclusive Gateway: Creates decision points where the flow follows only one path based on conditions.Parallel Gateway: Splits the process into multiple parallel branches that execute simultaneously.
Special Nodes
Special Nodes
Subprocess Run Node: Enables you to run a subprocess within the main process.Timer Events: Schedule actions to occur at specific times or after delays.Message Events: Handle message-based communication between processes.
Adding actions to nodes
Nodes can have actions associated with them to perform specific operations:Business Rules
Execute logic, validate data, and make decisions
Data Operations
Save, retrieve, and manipulate process data
Integration
Connect with external systems and services
UI Interactions
Send data to and receive data from users
Actions can only be added to certain node types: task nodes, user task nodes, and send/receive message tasks.
Managing process definitions
After creating process definitions, you can manage them using the contextual menu available in the Processes list. Access this menu by clicking the three-dot icon (⋮) next to any process entry.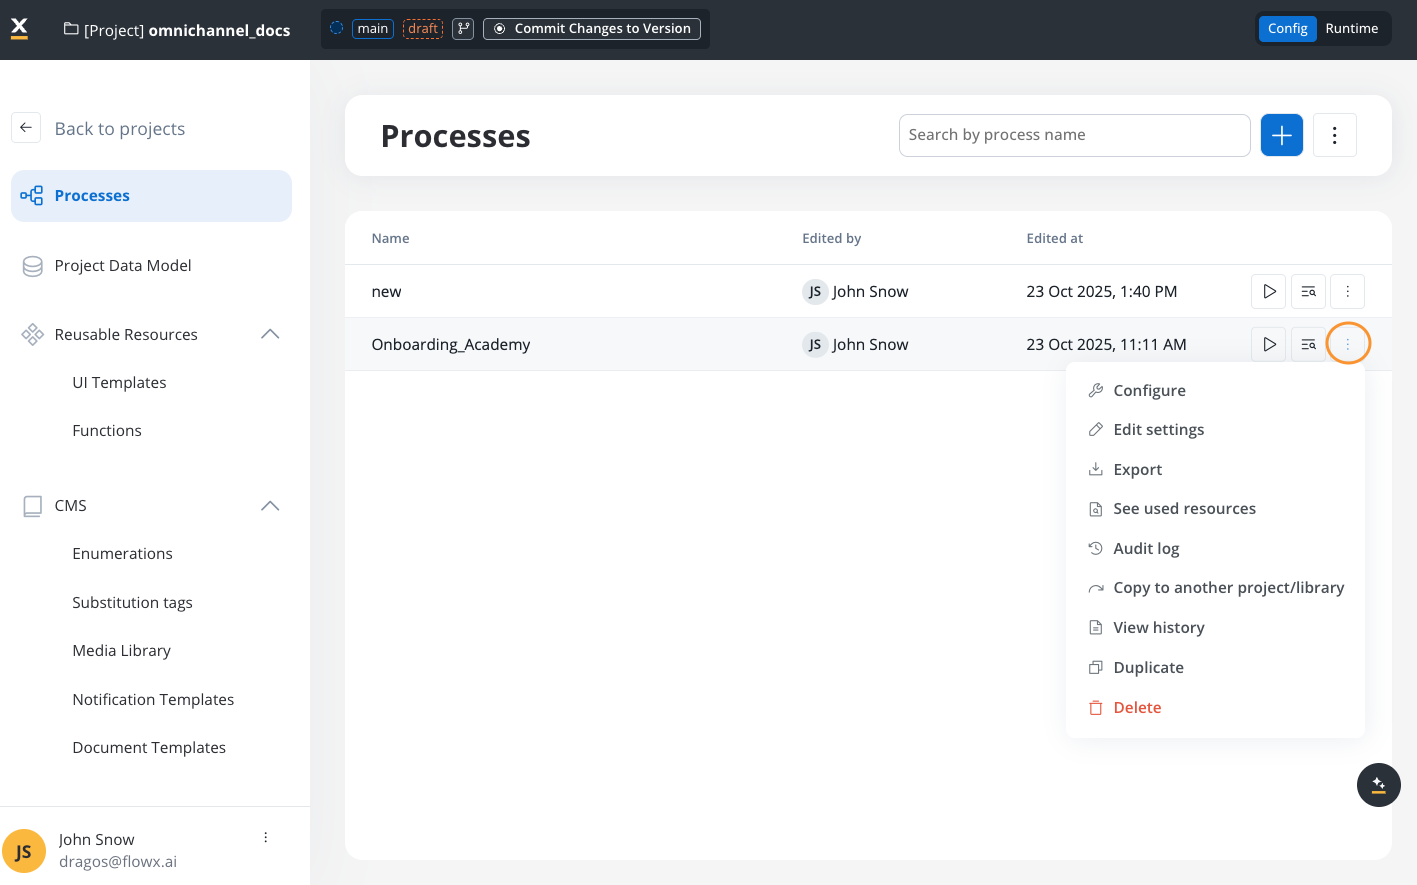
Process contextual menu with management options
Two contextual menus available:This menu is accessible from the Processes list view (before opening a process). There’s also a separate contextual menu available when you’re inside a process definition that provides operations like Clear Cache, Audit Log, View History, and Delete.
Operations inside process definitions
Learn about the contextual menu available while editing a process definition
Configure process settings
Open the process settings interface to configure process-level options including permissions, platform selection, task management integration, and data search indexing. To configure a process:- Click the three-dot menu (⋮) next to the process name
- Select Configure from the menu
- The settings panel opens, where you can modify:
- Process name and general settings (on SaaS 5.13, rename the process from the ⋮ menu → Details instead)
- Platform selection (Web, Mobile, Omnichannel)
- Permissions and swimlane access control
- Task management integration
- Data search and indexing
Process settings
Complete guide to all process configuration options
Export a process
Export a process definition to transfer it between environments, create backups, or share it with other teams. To export a process:- Click the three-dot menu (⋮) next to the process name
- Select Export
- The system generates a downloadable package containing:
- Process definition JSON
- Process metadata and manifest files
- Version information
- Save the export file to your local system
- Root export folder with unique identifier
- Process subfolder with
manifest.jsonandmetadata.json - Version subfolder with the process definition JSON file
Export and import guide
Learn about importing exported processes
Duplicate a process
Create a copy of an existing process definition within the same project. This is useful when you want to create a variant of a process or use an existing process as a template. To duplicate a process:- Click the three-dot menu (⋮) next to the process name
- Select Duplicate
- Enter a name for the duplicated process
- Click Confirm to create the copy
- Complete process flow with all nodes and sequences
- All node configurations and actions
- UI Designer configurations
- Data model structure
- Process settings (permissions, platform selection, etc.)
- Process instances and runtime data
- Audit history
- Version history
The duplicated process is created in the current work-in-progress (WIP) version of your project. Remember to commit your changes when ready.
Copy to another project or library
Transfer a process definition to a different project or library within your FlowX.AI environment. This enables sharing reusable processes across multiple projects. To copy a process to another project:- Click the three-dot menu (⋮) next to the process name
- Select Copy to another project/library
- Choose the destination project or library from the list
- Optionally adjust the process name for the destination
- Click Confirm to complete the copy operation
- Create reusable components: Move common processes to a shared library
- Share across teams: Copy processes to other team projects
- Promote to production projects: Transfer tested processes to production-ready projects
- Create process templates: Build a library of standard process templates
Copying a process creates an independent copy. Changes to the original won’t affect the copied version and vice versa.
See used resources
View all resources and dependencies that the process definition uses. This helps you understand the process’s connections to other components and identify potential impacts when making changes. To view used resources:- Click the three-dot menu (⋮) next to the process name
- Select See used resources
- Review the list of dependencies, which may include:
- Subprocesses and workflows
- UI templates and components
- Data model types
- Integration connectors
- Business rules and scripts
- Document templates
- Notification templates
- Impact analysis: Understand what will be affected by changes
- Dependency tracking: Ensure all required resources are available before deployment
- Documentation: Map relationships between processes and resources
- Troubleshooting: Identify missing or misconfigured dependencies
View audit log
Access the comprehensive change history for the process definition, showing who made changes, when, and what was modified. To view the audit log:- Click the three-dot menu (⋮) next to the process name
- Select Audit log
- Review the audit entries, which include:
- Timestamp of each change
- User who made the change
- Application version
- Event type and subject
- Change status
- Filterable entries: Search and filter by date, user, or event type
- Complete audit trail: Maintain compliance with regulatory requirements
- Change tracking: Identify when specific modifications were introduced
- Troubleshooting: Trace issues back to specific changes
Audit documentation
Learn more about audit logging capabilities
View history
Access the version history of the process definition to see how it evolved across different committed versions. To view version history:- Click the three-dot menu (⋮) next to the process name
- Select View history
- Review the list of versions
- Select two versions to compare changes side-by-side
- Version comparison: See exactly what changed between any two versions
- Change tracking: Identify when specific features were added or modified
- Rollback reference: Understand previous configurations if you need to revert changes
- Documentation: Track the evolution of your process over time
Version history shows committed versions only. Changes in the current work-in-progress version appear after you commit the project version.
Project versioning
Complete guide to version management
Delete a process
Remove a process definition from your project when it’s no longer needed. To delete a process:- Click the three-dot menu (⋮) next to the process name
- Select Delete
- Confirm the deletion in the dialog that appears
- ✓ Check for dependencies: Use “See used resources” to identify processes that reference this one
- ✓ Review running instances: Verify no critical process instances are currently active
- ✓ Backup if needed: Export the process definition before deletion if you might need it later
- ✓ Update documentation: Remove references to the deleted process from your documentation
Deleted processes can be recovered by accessing previous committed versions through version history, but any uncommitted changes will be lost.
Best practices
Next steps
After creating your process definition, you can:Add Nodes to Your Process
Learn how to add and configure different node types
Create User Interfaces
Build interactive UIs for your process
Process Definition Deep Dive
Comprehensive guide to process configuration and settings
Export and Import
Transfer processes between environments
Frequently asked questions
Can a process have multiple START nodes?
Can a process have multiple START nodes?
Yes, a process definition can have multiple START nodes, each with different starting conditions as long as they are on different swimlanes. This allows the same process to be initiated in different ways depending on the context.
Process definition cannot contain multiple start nodes on the same swimlane.
How do I modify an existing process definition?
How do I modify an existing process definition?
To modify an existing process, navigate to the Processes section in your project, find the process you want to edit, and click on it. Then click the “Edit Process” button to open it in the Process Designer.
Can I reuse parts of a process definition?
Can I reuse parts of a process definition?
Yes, you can create reusable components as subprocesses, which can then be called from multiple main processes. This promotes reusability and maintainability. You can also duplicate existing processes or copy them to other projects using the contextual menu operations described in the Managing process definitions section above.
Can I export or import process definitions?
Can I export or import process definitions?
Yes, FlowX.AI allows you to export and import process definitions. Use the Export option from the process contextual menu to create a downloadable package. The export includes the process definition JSON, metadata, and version information in a structured format. See the Export a process section above for detailed instructions.
How do I see what resources my process uses?
How do I see what resources my process uses?
Use the See used resources option from the process contextual menu to view all dependencies including subprocesses, UI templates, data model types, integrations, and more. This helps with impact analysis before making changes and ensures all dependencies are available when exporting or deploying the process.