Documentation Index
Fetch the complete documentation index at: https://docs.flowx.ai/llms.txt
Use this file to discover all available pages before exploring further.
Available starting with FlowX.AI 5.6.0The Intent Classification node is a dedicated workflow node introduced in 5.6.0. For earlier versions, see the intent classification and routing pattern using TEXT_UNDERSTANDING + Condition nodes.
Overview
The Intent Classification node is a specialized Integration Designer workflow node that combines AI-powered message classification with workflow branching in a single node. It analyzes a user message, classifies it into one of your defined intents using an LLM, and automatically routes the workflow to the matching branch — replacing the previous two-node pattern (TEXT_UNDERSTANDING + Condition).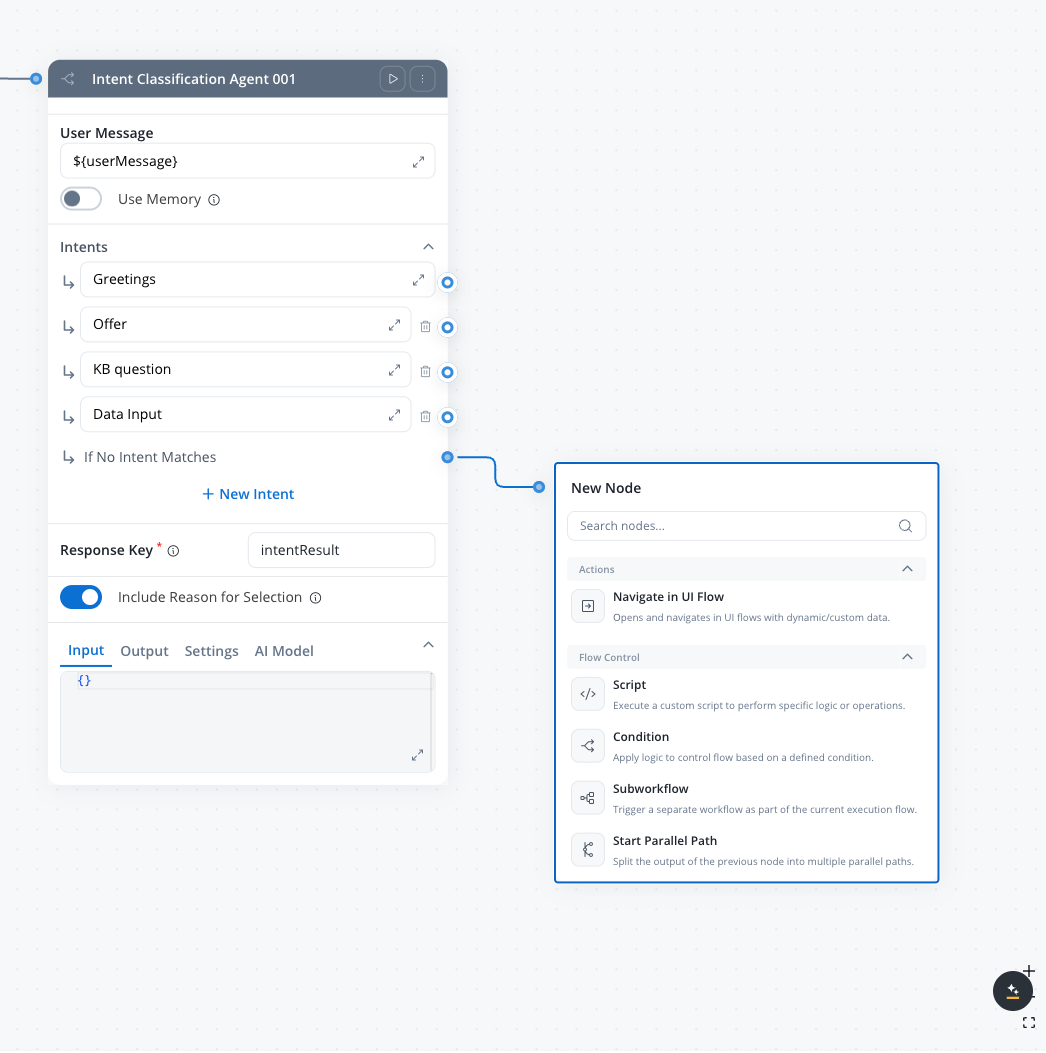
AI + routing in one node
Combines LLM classification and conditional branching — no separate Condition node needed
Natural language conditions
Define intents as plain-text descriptions instead of code expressions
Conversation memory
Optionally use past conversation context for more accurate classification
Built-in fallback
Automatic “If No Intent Matches” branch handles unrecognized inputs
How it compares to the pattern approach
| Aspect | Pattern (TEXT_UNDERSTANDING + Condition) | Intent Classification node |
|---|---|---|
| Nodes required | 2 (classify, then route) | 1 (classify and route) |
| Conditions | Python/JavaScript expressions | Natural language descriptions |
| Max branches | Unlimited | 10 intents + fallback |
| Response schema | Manual JSON schema | Automatic (handled internally) |
| Rationale | Must be added to prompt manually | Built-in toggle |
Configuration
Configure the user message
Set the User message field to the input text that should be classified. Use
${} syntax to reference workflow data keys.User message
The text input to classify. Use
${} syntax to reference workflow data keys.Example: ${userMessage}Use memory
When turned on, the node sends the session ID to the AI platform and appends conversation history to the LLM call. This provides context from past messages for more accurate classification. See Memory Capabilities for details on how memory retrieval and summarization work.Default: OFF
Intents
A list of intent descriptions that define the classification categories. Each intent becomes an output branch on the node.
- Minimum: 1 intent + fallback
- Maximum: 10 intents + fallback
- Each intent description can be up to 3 lines of text
- The If No Intent Matches fallback branch is always present and cannot be removed
| Intent | Description |
|---|---|
| Intent 1 | The user is asking about product features, pricing, or availability |
| Intent 2 | The user wants to update their personal information or submit documents |
| Intent 3 | The user is greeting or making small talk |
| Fallback | If No Intent Matches |
For best accuracy, classify up to 10 intents per node. If you need more intents, chain multiple Intent Classification nodes to narrow down in stages.
Response key
The key where the classification result is stored in the workflow data.Example:
classificationResultInclude Reason for Selection
When turned on, the agent includes a rationale explaining why it chose this intent in its response.Default: OFF
Output
The node stores its classification result under the configured Response key in the workflow data. The output contains:| Field | Type | Description |
|---|---|---|
selected_intent | string | The description text of the matched intent |
selected_branch | number | The branch number (1–11) corresponding to the matched intent |
rationale | string | Explanation of why the LLM chose this intent (only when Include Reason for Selection is ON) |
Workflow routing
After classification, the node routes the workflow token to the matching branch:- Intent branches — the workflow continues along the branch whose intent description matched the user message
- If No Intent Matches — the fallback branch activates when the LLM response doesn’t match any defined intent
Examples
Customer support routing
Customer support routing
Scenario: Route customer messages to specialized support handlers.Intents:
- The customer is reporting a technical issue or bug
- The customer is asking about billing, payments, or invoices
- The customer wants to cancel or modify their subscription
- The customer is asking a general question about the product
Banking chatbot
Banking chatbot
Scenario: Classify banking customer requests in a conversational workflow.Intents:
- The user wants to check their account balance or transaction history
- The user wants to transfer money or make a payment
- The user is asking about loan or mortgage options
- The user is greeting or making small talk
- Use memory: ON (to understand context in multi-turn conversations)
- Include Reason for Selection: OFF (production deployment)
Email triage pipeline
Email triage pipeline
Scenario: Classify incoming emails and route to appropriate processing.Intents:
- The message is a complaint or escalation requiring urgent attention
- The message is a new business inquiry or sales lead
- The message is a support request with a reference to an existing ticket
- The message is informational (newsletter reply, out-of-office, automated notification)
- Use memory: OFF (each email is independent)
- Include Reason for Selection: ON (for audit trail)
Best practices
Write specific intent descriptions
Describe each intent clearly and distinctly. Vague or overlapping descriptions reduce classification accuracy.
Chain nodes for complex taxonomies
For more than 10 categories, use a first node to classify into broad groups, then a second node to classify within each group.
Always handle the fallback
Connect the fallback branch to meaningful handling — a clarification prompt, a human handoff, or a default response.
Use rationale for debugging
Turn on Include Reason for Selection during development to understand why the LLM routes to unexpected branches.
Related resources
Integration Designer
Learn about Integration Designer workflows and all available node types
AI node types
Overview of all AI node types in Agent Builder
Intent classification pattern
Alternative approach using TEXT_UNDERSTANDING + Condition nodes
Conversational workflows
Multi-turn chat with session memory
Custom Agent node
AI agents with MCP tools in Integration Designer workflows
Conversational workflows
Build multi-turn chat experiences with intent routing