Did you know?
Overview
Integration Designer facilitates the integration of the FlowX platform with external systems, applications, and data sources.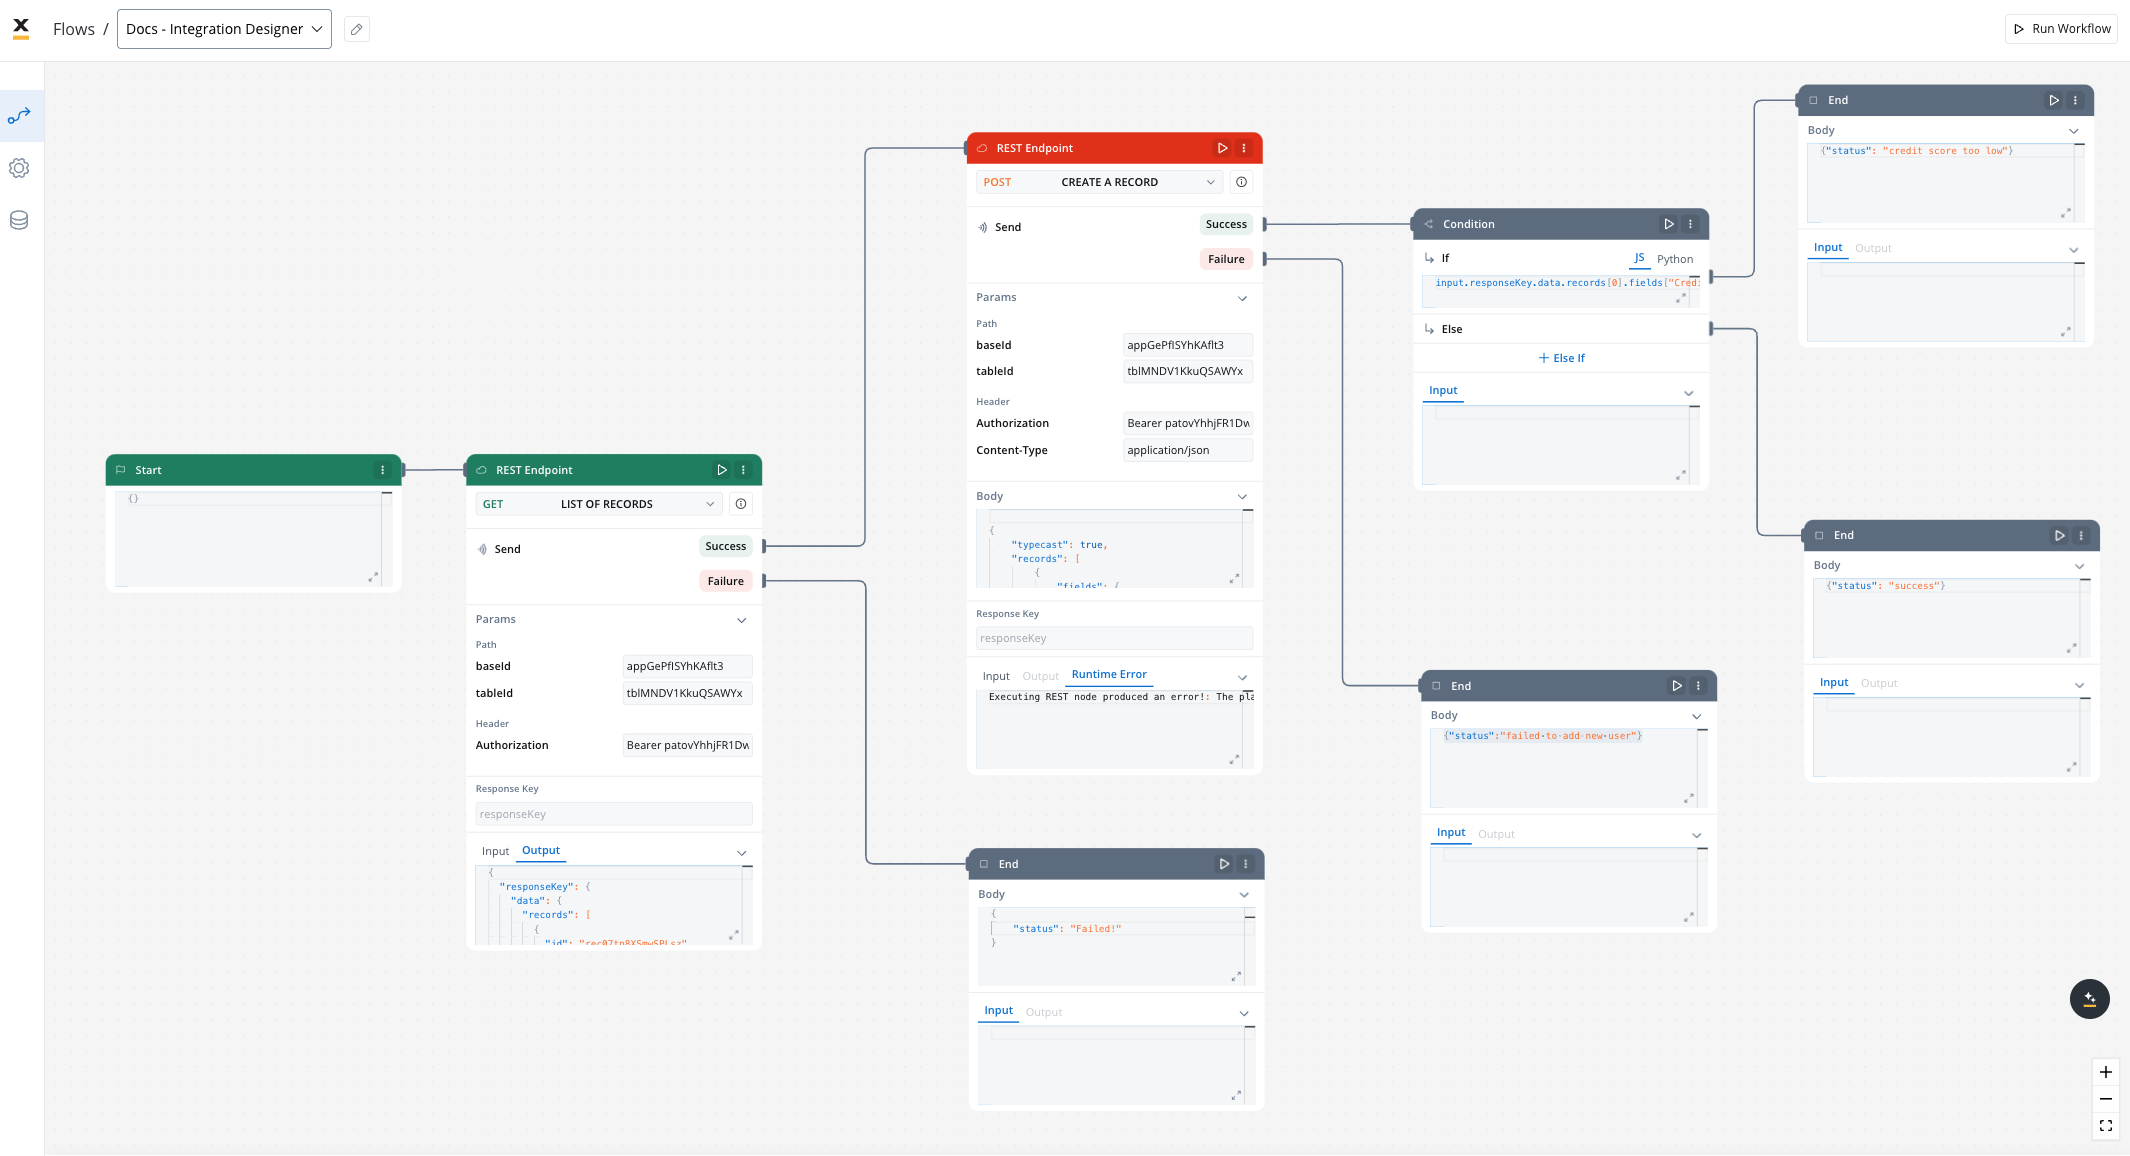
Key features
Drag-and-Drop Simplicity
Visual REST API Integration
Real-Time Testing and Validation
Managing integration endpoints
Data Sources
A data source is a collection of resources—endpoints, authentication, and variables—used to define and run integration workflows.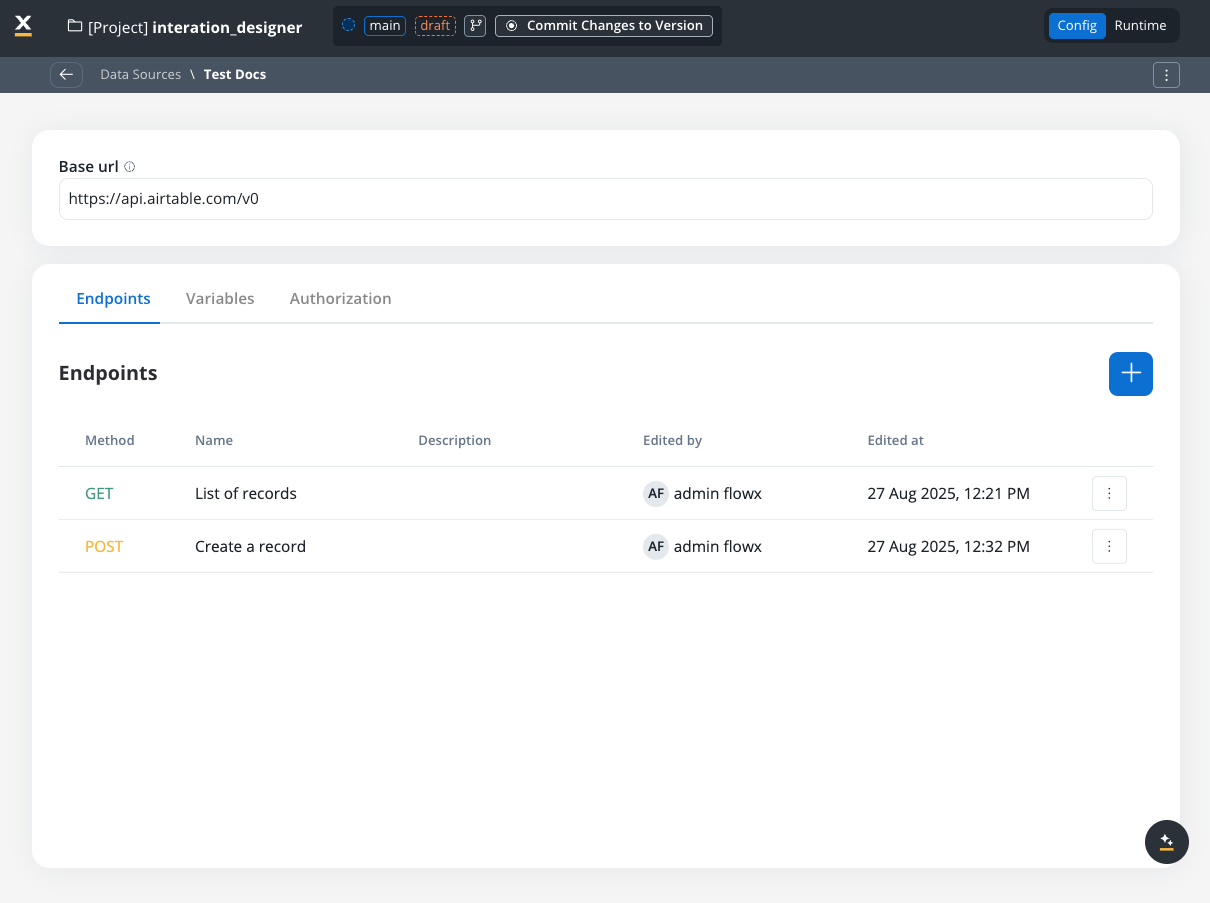
Creating a new data source definition
With Data Sources feature you can create, update, and organize endpoints used in API integrations. These endpoints are integral to building workflows within the Integration Designer, offering flexibility and ease of use for managing connections between systems. Endpoints can be configured, tested, and reused across multiple workflows, streamlining the integration process. Go to the Data Sources section in FlowX Designer at Workspaces -> Your workspace -> Projects -> Your project -> Integrations -> Data Sources.Data sources types
There are multiple types of data sources available: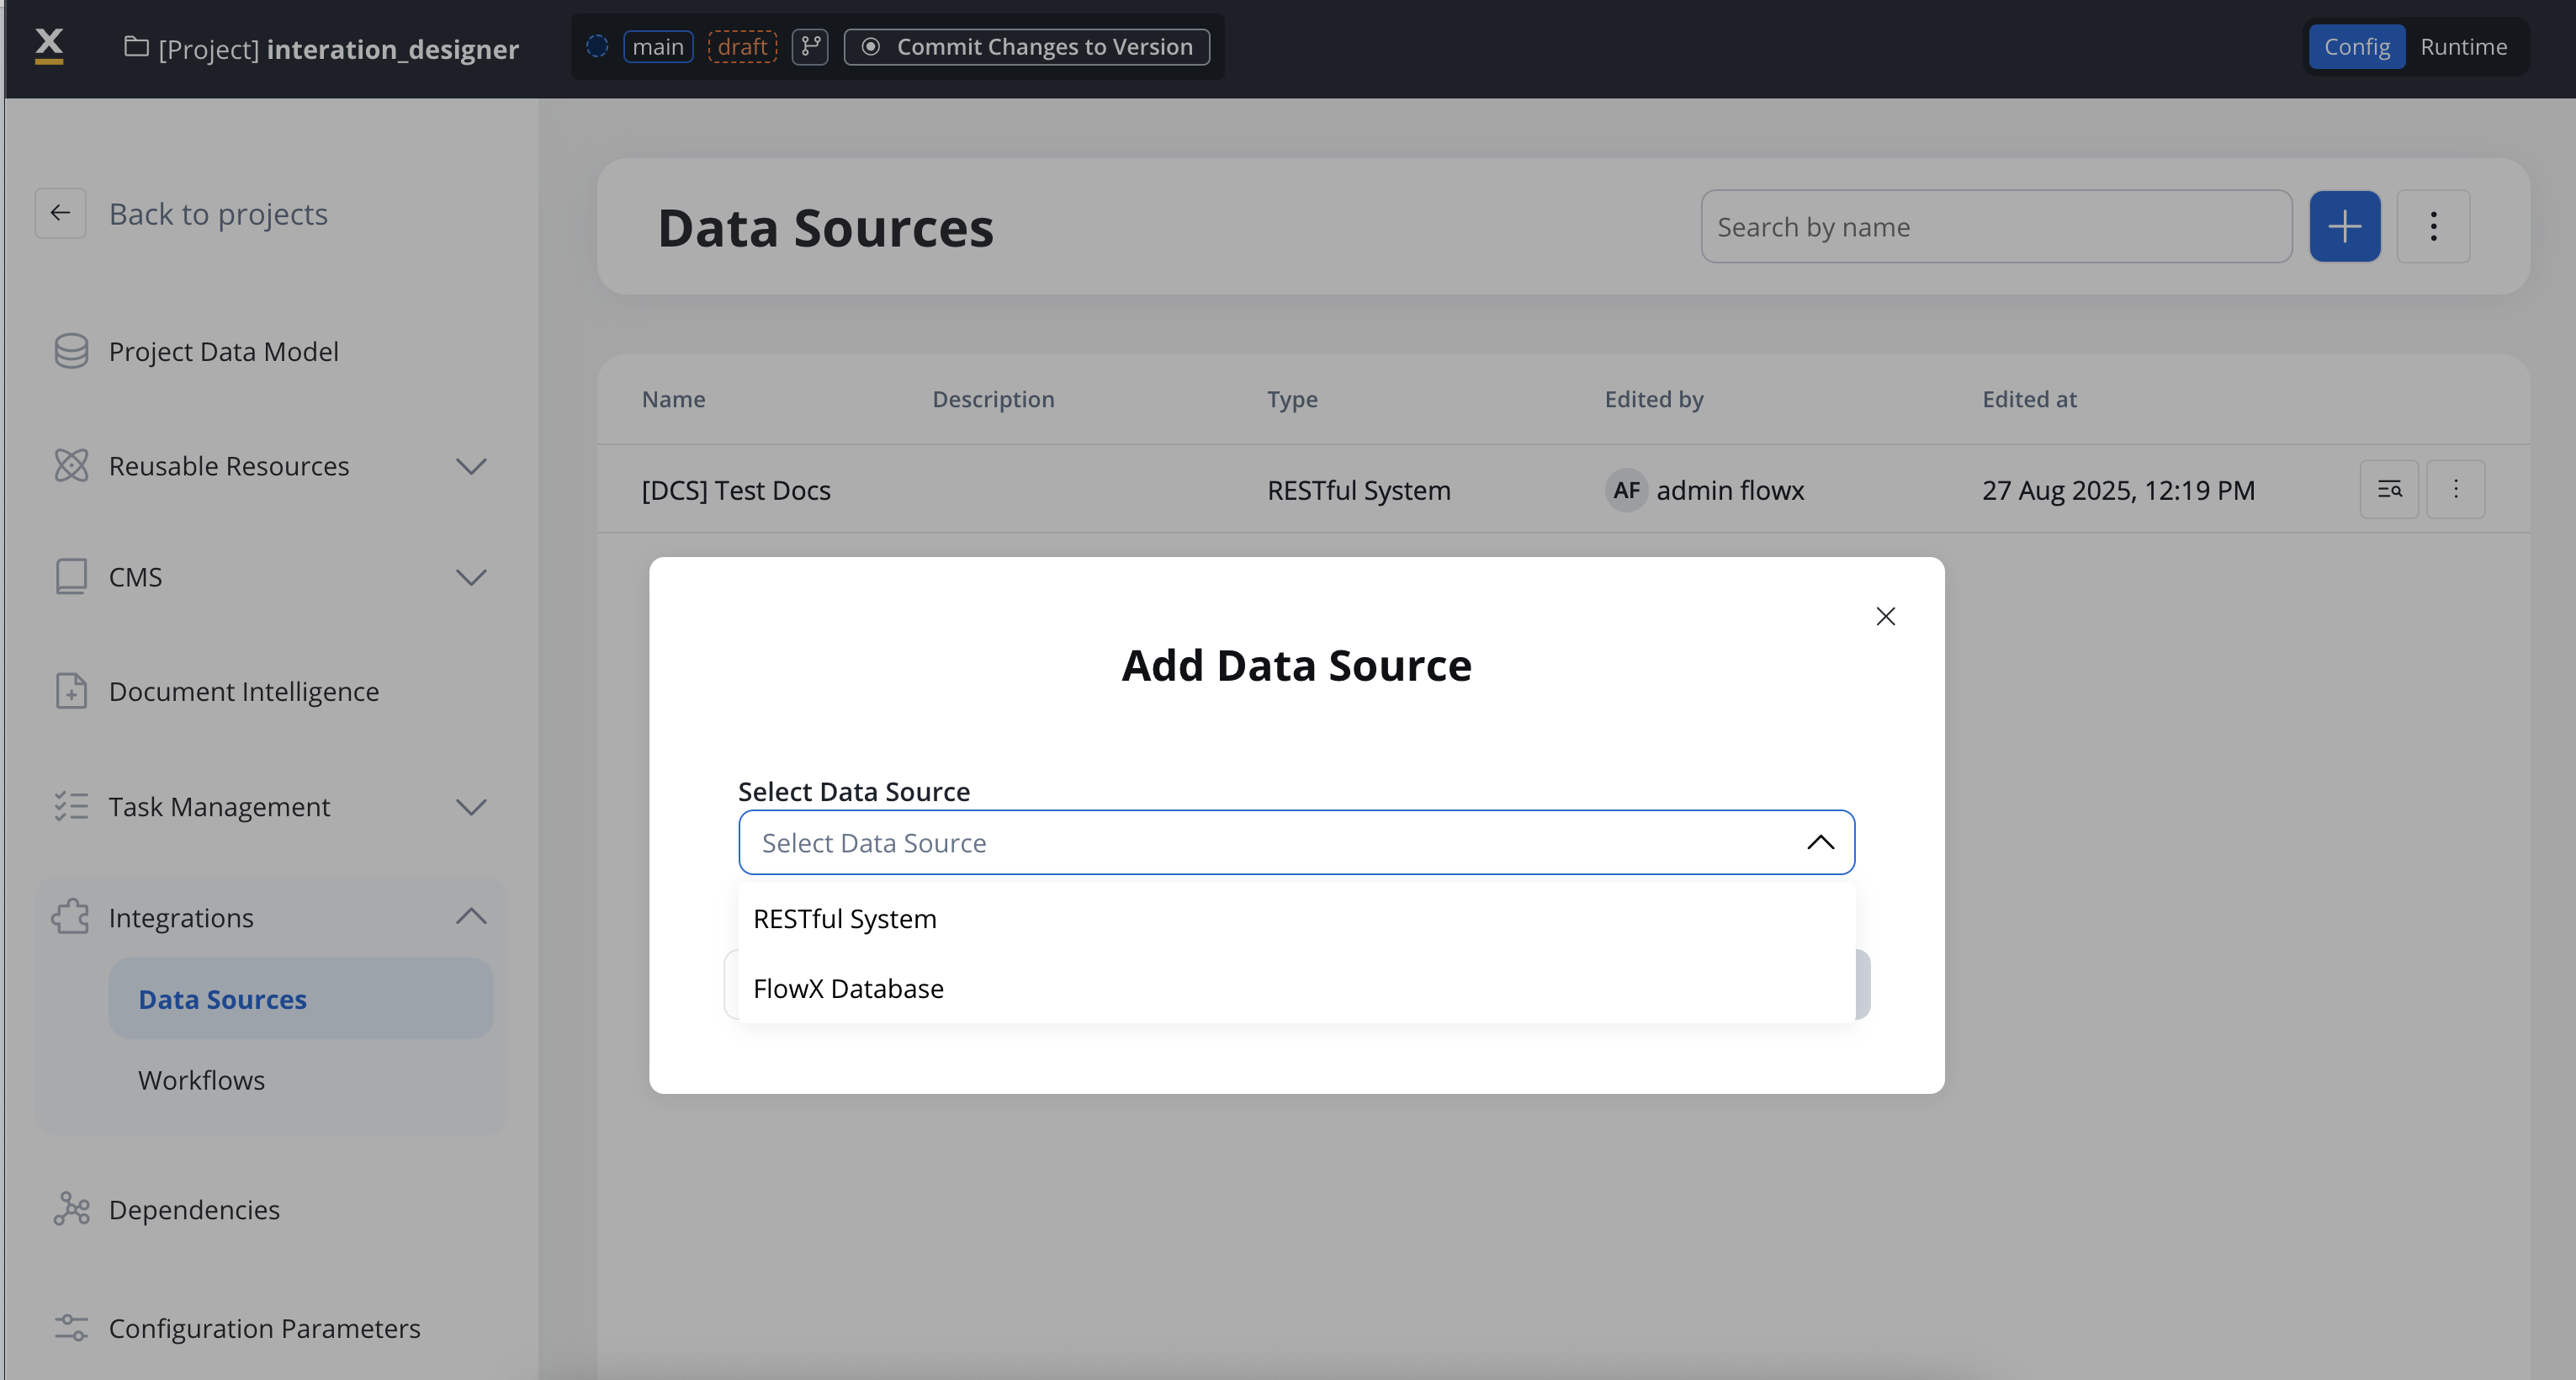
RESTful System
FlowX Database
MCP Integration
FlowX Knowledge Base
RESTful System
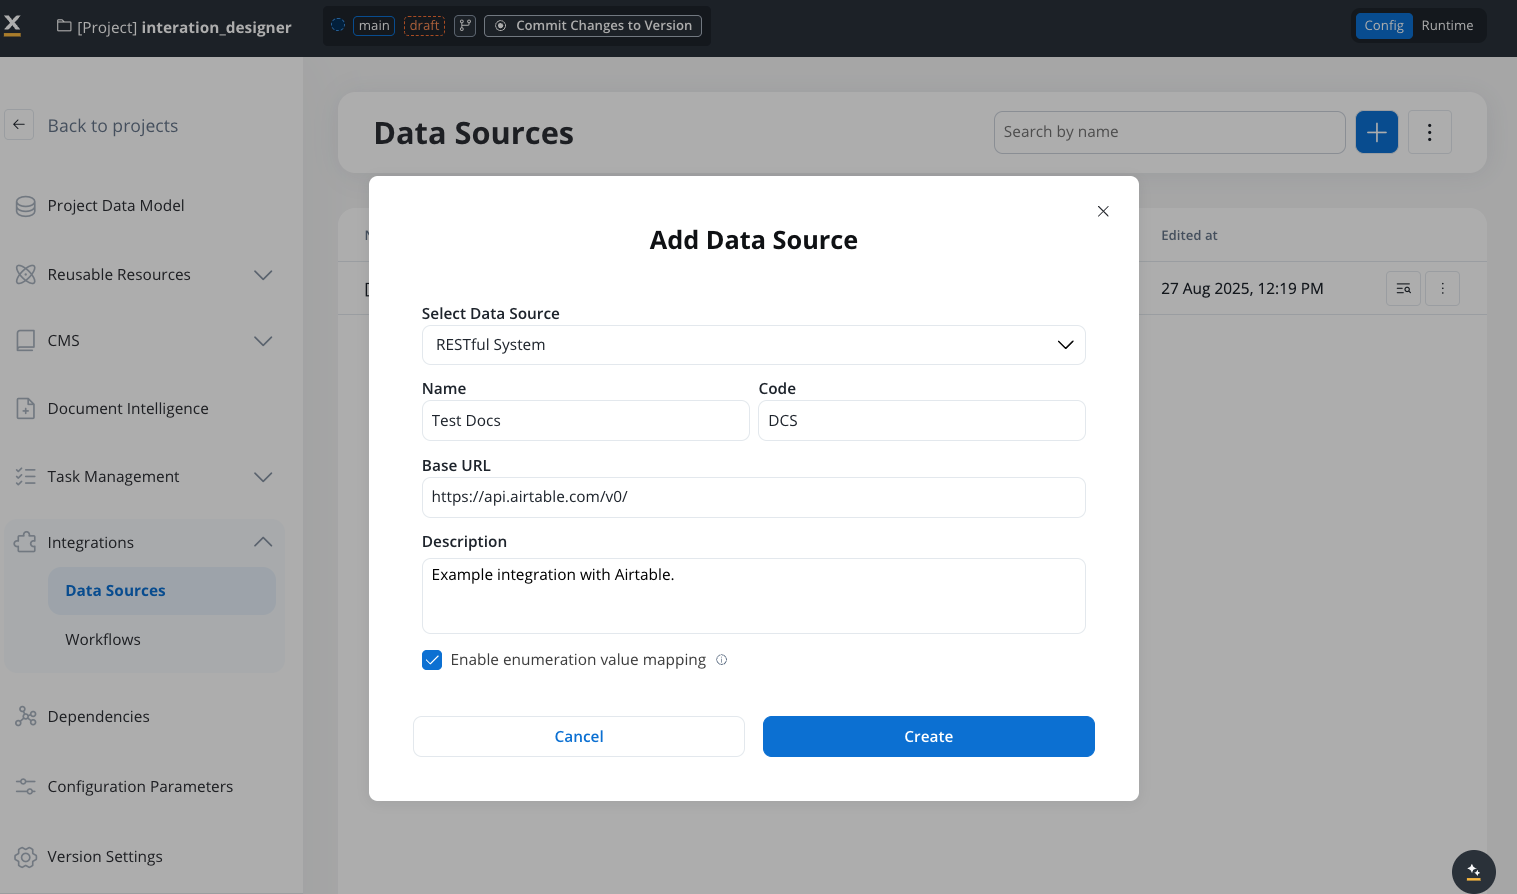
Add a New Data Source, set the data source’s unique code, name, and description:- Select Data Source: RESTful System
- Name: The data source’s name.
- Code: A unique identifier for the external data source.
- Base URL: The base URL is the main address of a website or web application, typically consisting of the protocol (
httporhttps), domain name, and a path. - Description: A description of the data source and its purpose.
- Enable enumeration value mapping: If checked, this system will be listed under the mapped enumerations. See enumerations section for more details.
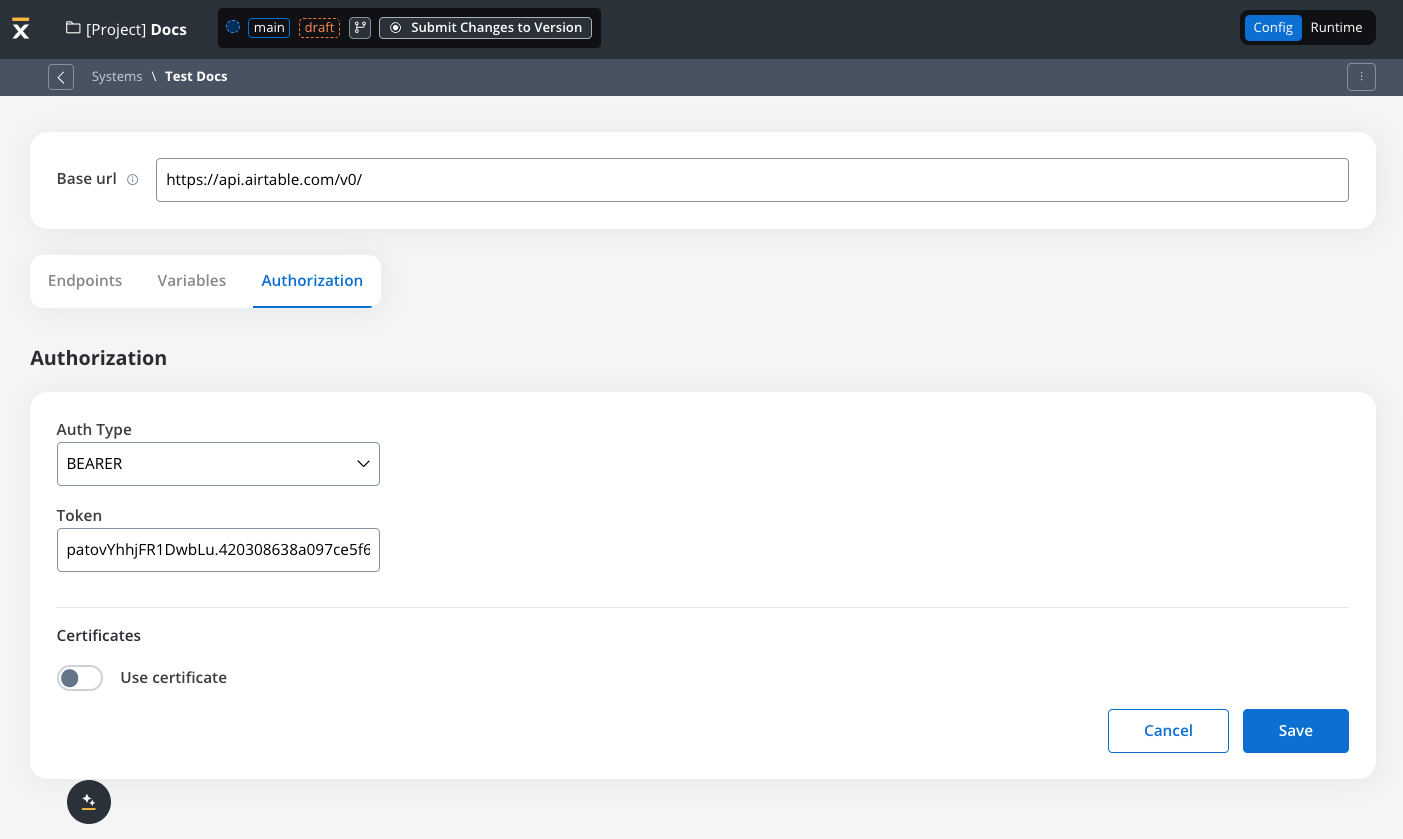
- Set up authorization (Service Token, Bearer Token, or No Auth). In our example, we will set the auth type as a bearer and we will set it at system level:
Defining REST integration endpoints
In this section you can define REST API endpoints that can be reused across different workflows.- Under the Endpoints section, add the necessary endpoints for system integration.
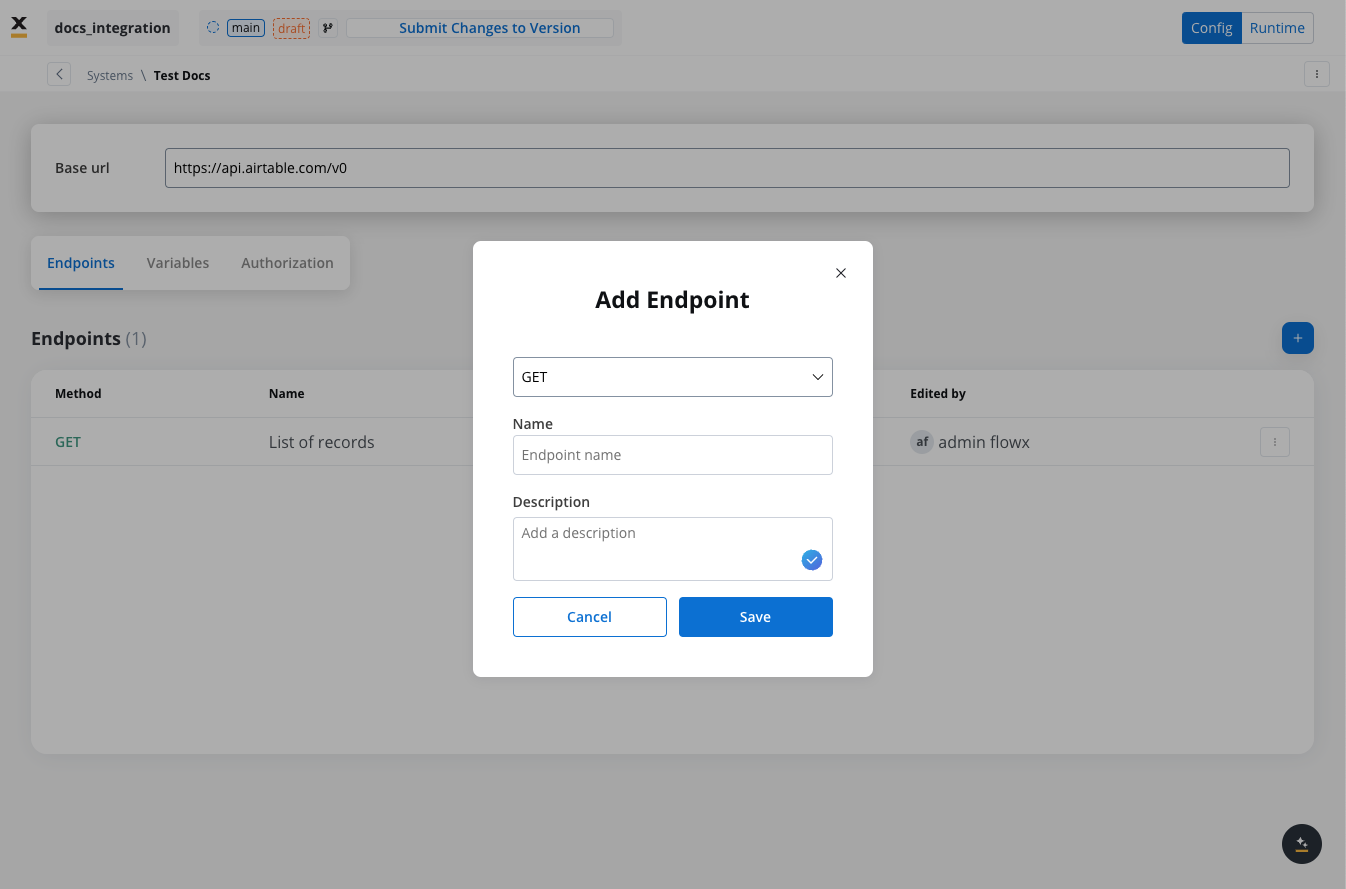
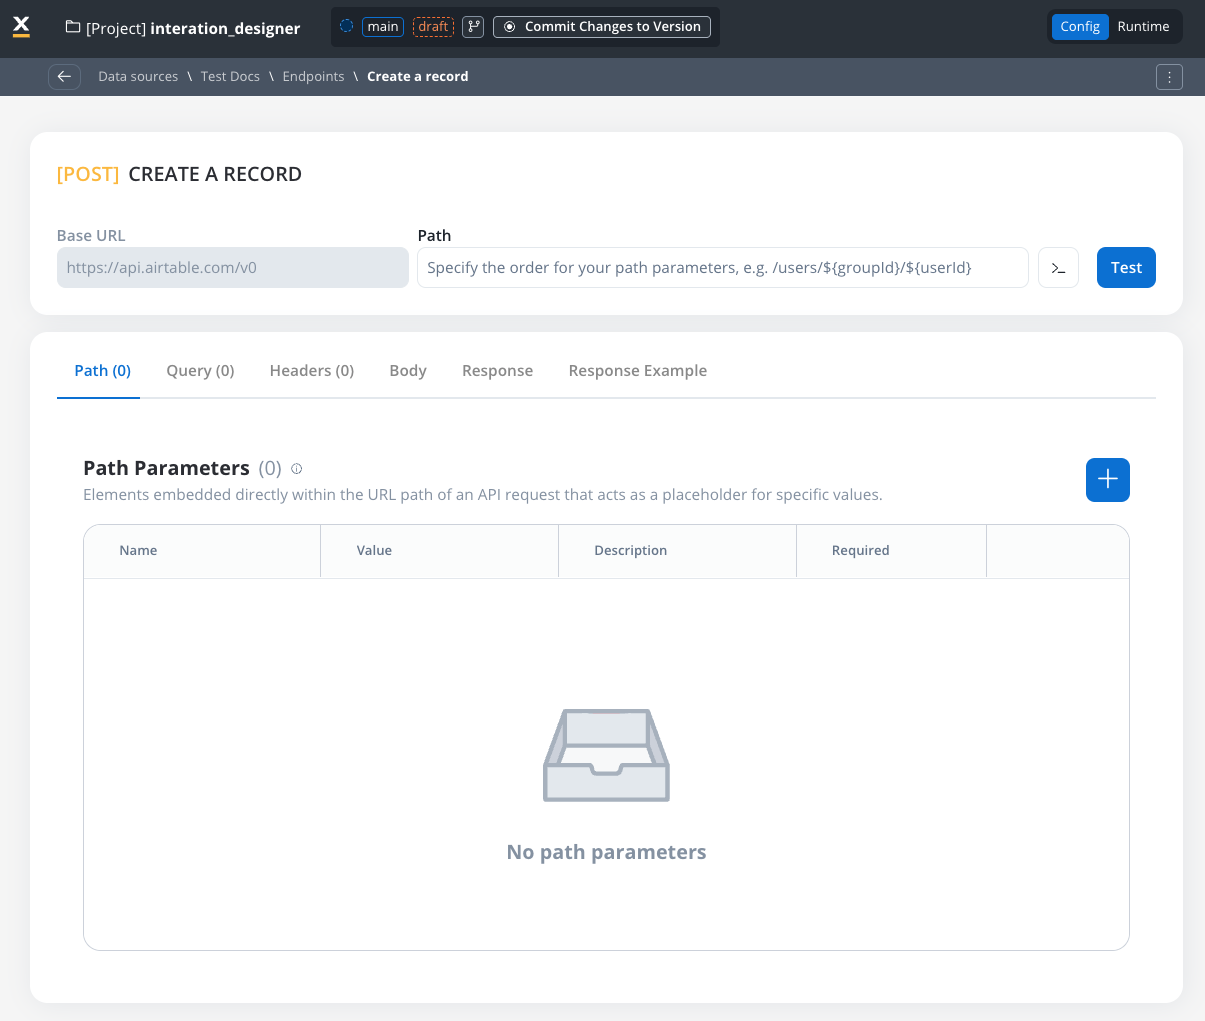
- Configure an endpoint by filling in the following properties:
- Method: GET, POST, PUT, PATCH, DELETE.
- Path: Path for the endpoint.
- Parameters: Path, query, and header parameters.
- Body: JSON, Multipart/form-data, or Binary.
- Response: JSON or Single binary file.
- Response example: Body or headers.
REST endpoint caching
Configuring cache Time-To-Live (TTL)
Choose between two TTL policies based on your use case:- Expires After (Duration-Based)
- Expires At (Time-Based)
- ISO Duration: Use ISO 8601 duration format
PT1H- Cache for 1 hourPT30M- Cache for 30 minutesP1D- Cache for 1 dayP1W- Cache for 1 week
- Dynamic Duration: Reference configuration parameters using
${myConfigParam} - Default:
R/P1D(1 day)
Cache visibility and management
Testing Modal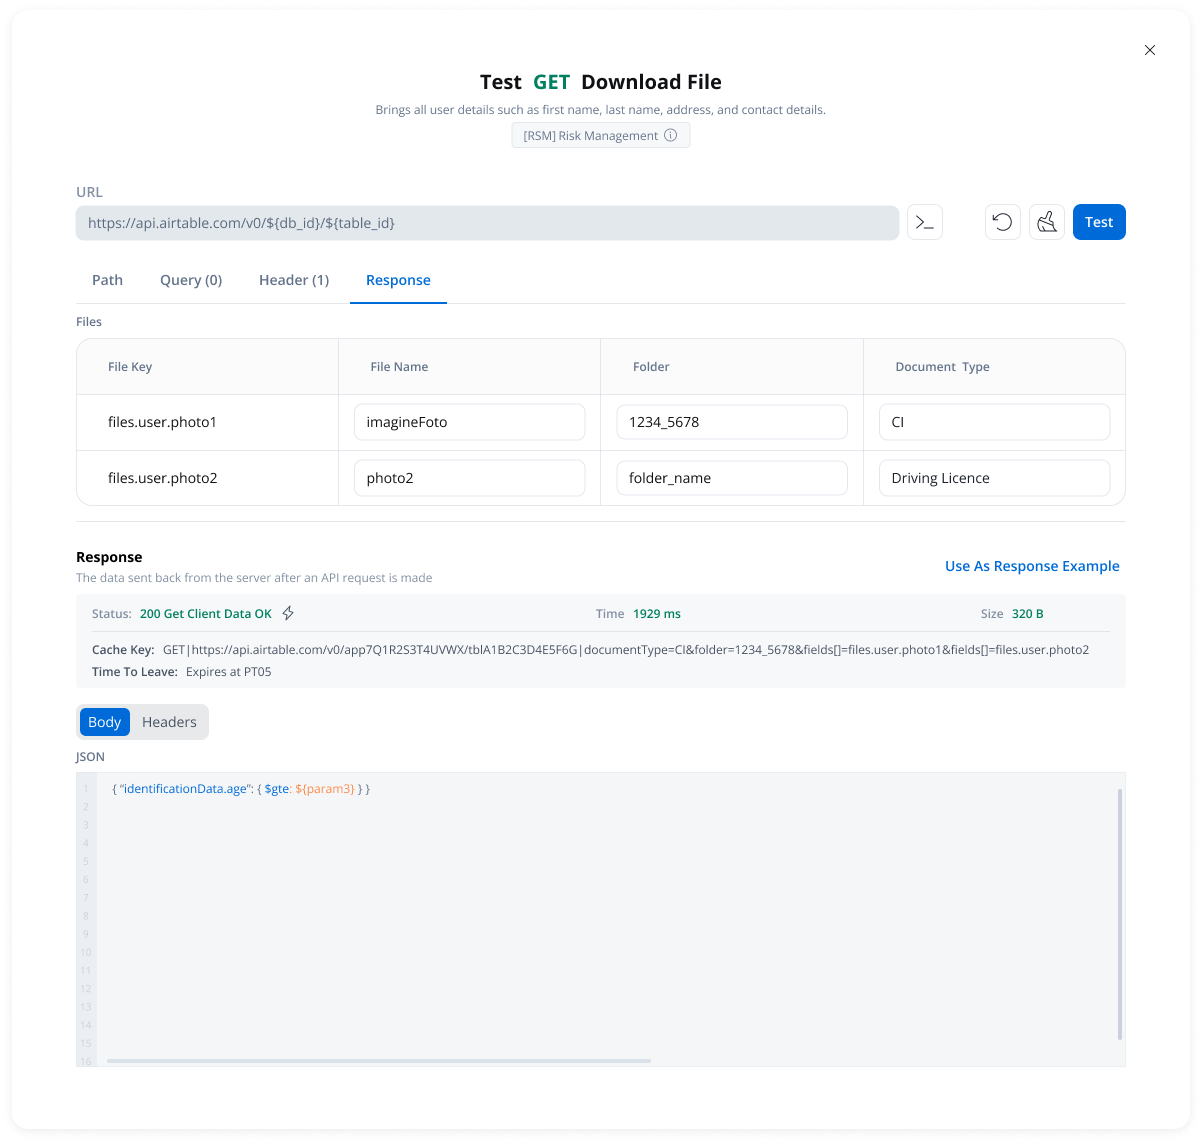
- Cache Status: Whether results came from cache (hit) or external API (miss)
- Cache Key: Unique identifier for the cached response
- TTL Information: When the cache will expire
- Duration-based: “Expires after PT10M” (10 minutes)
- Time-based: “Expires at 23:00 on 2025-11-04”

- Available in the endpoint testing modal
- Available from the endpoint definition page
- Only visible when caching is configured
How caching works
First Request
- Calls the external API
- Stores the response in cache with the configured TTL
- Returns the response to the workflow
Subsequent Requests
- FlowX.AI returns the cached response immediately
- No external API call is made
- Response time is significantly faster
Cache Expiration
- Next request fetches fresh data from the external API
- Cache is updated with the new response
- New TTL period begins
Error handling
Automatic fallback scenarios:- Cache service unavailable → Direct API call
- Cache corruption or invalid data → Direct API call
- Cache storage failure → Direct API call (with warning logged)
Use cases
Reference Data
Rate Limit Compliance
Cost Optimization
Performance
Defining variables
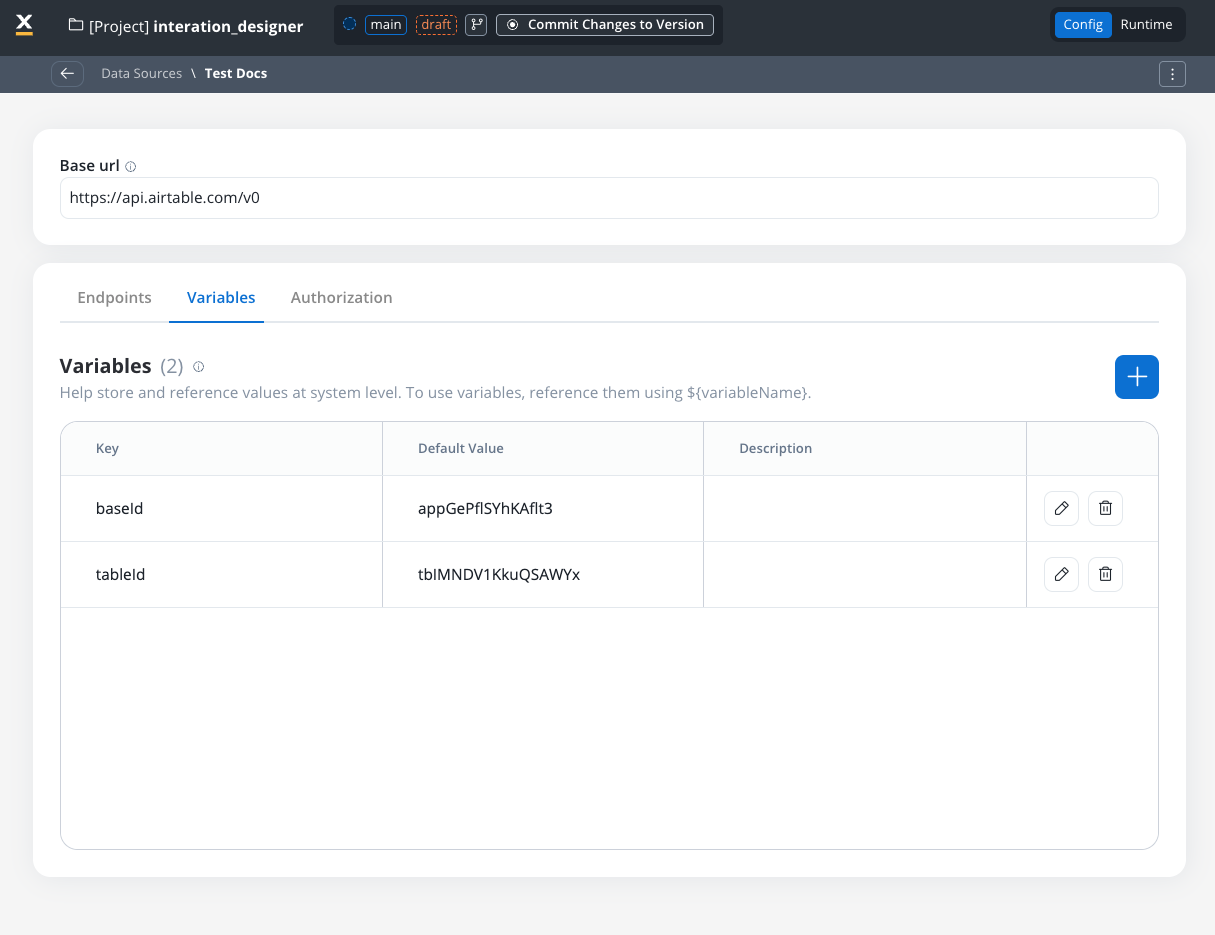
The Variables tab allows you to store system-specific variables that can be referenced throughout workflows using the format${variableName}.
These declared variables can be utilized not only in workflows but also in other sections, such as the Endpoint or Authorization tabs.
Endpoint parameter types
When configuring endpoints, several parameter types help define how the endpoint interacts with external systems. These parameters ensure that requests are properly formatted and data is correctly passed.Path parameters
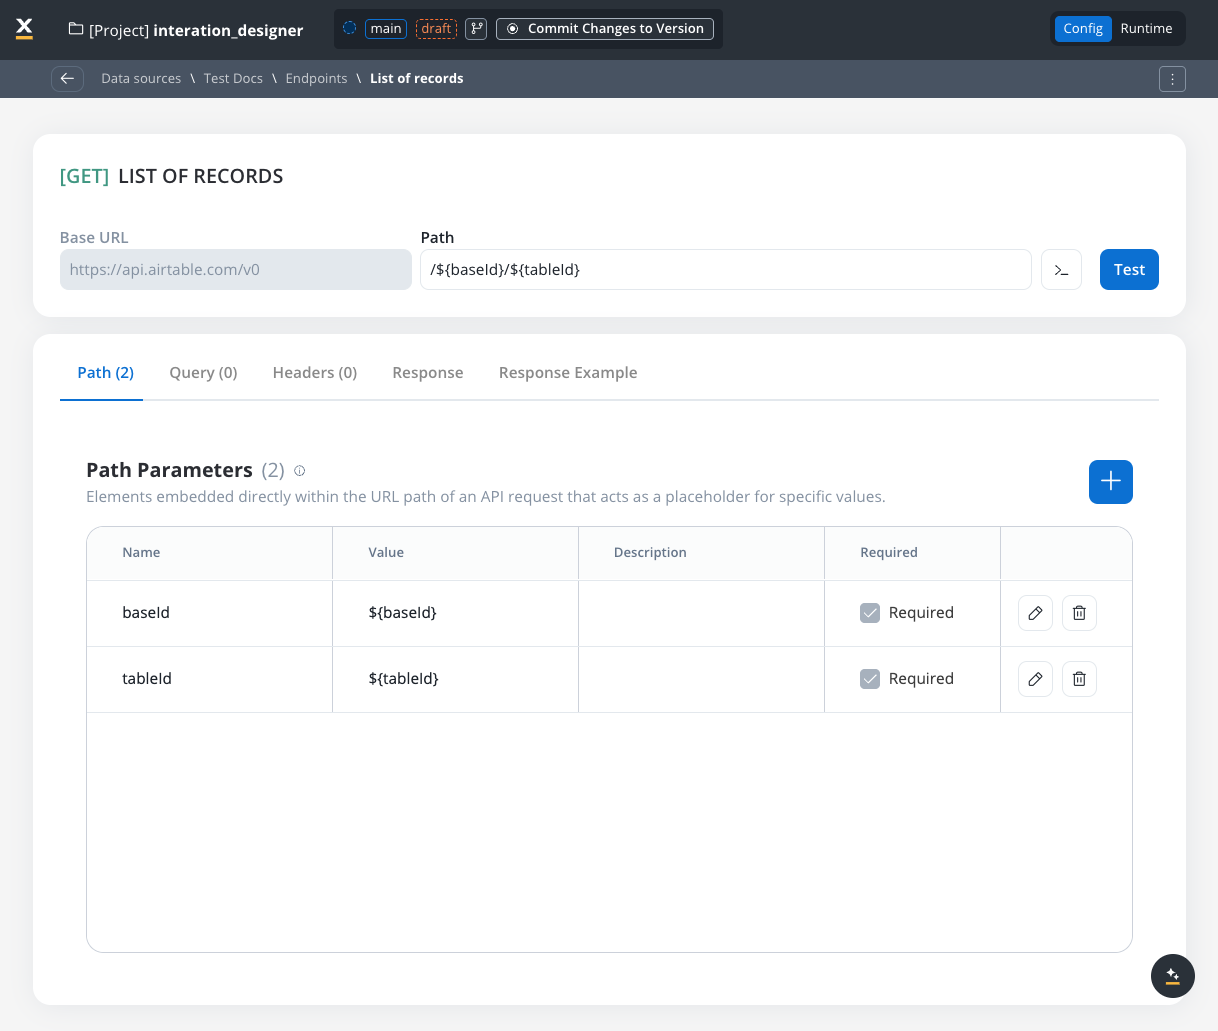
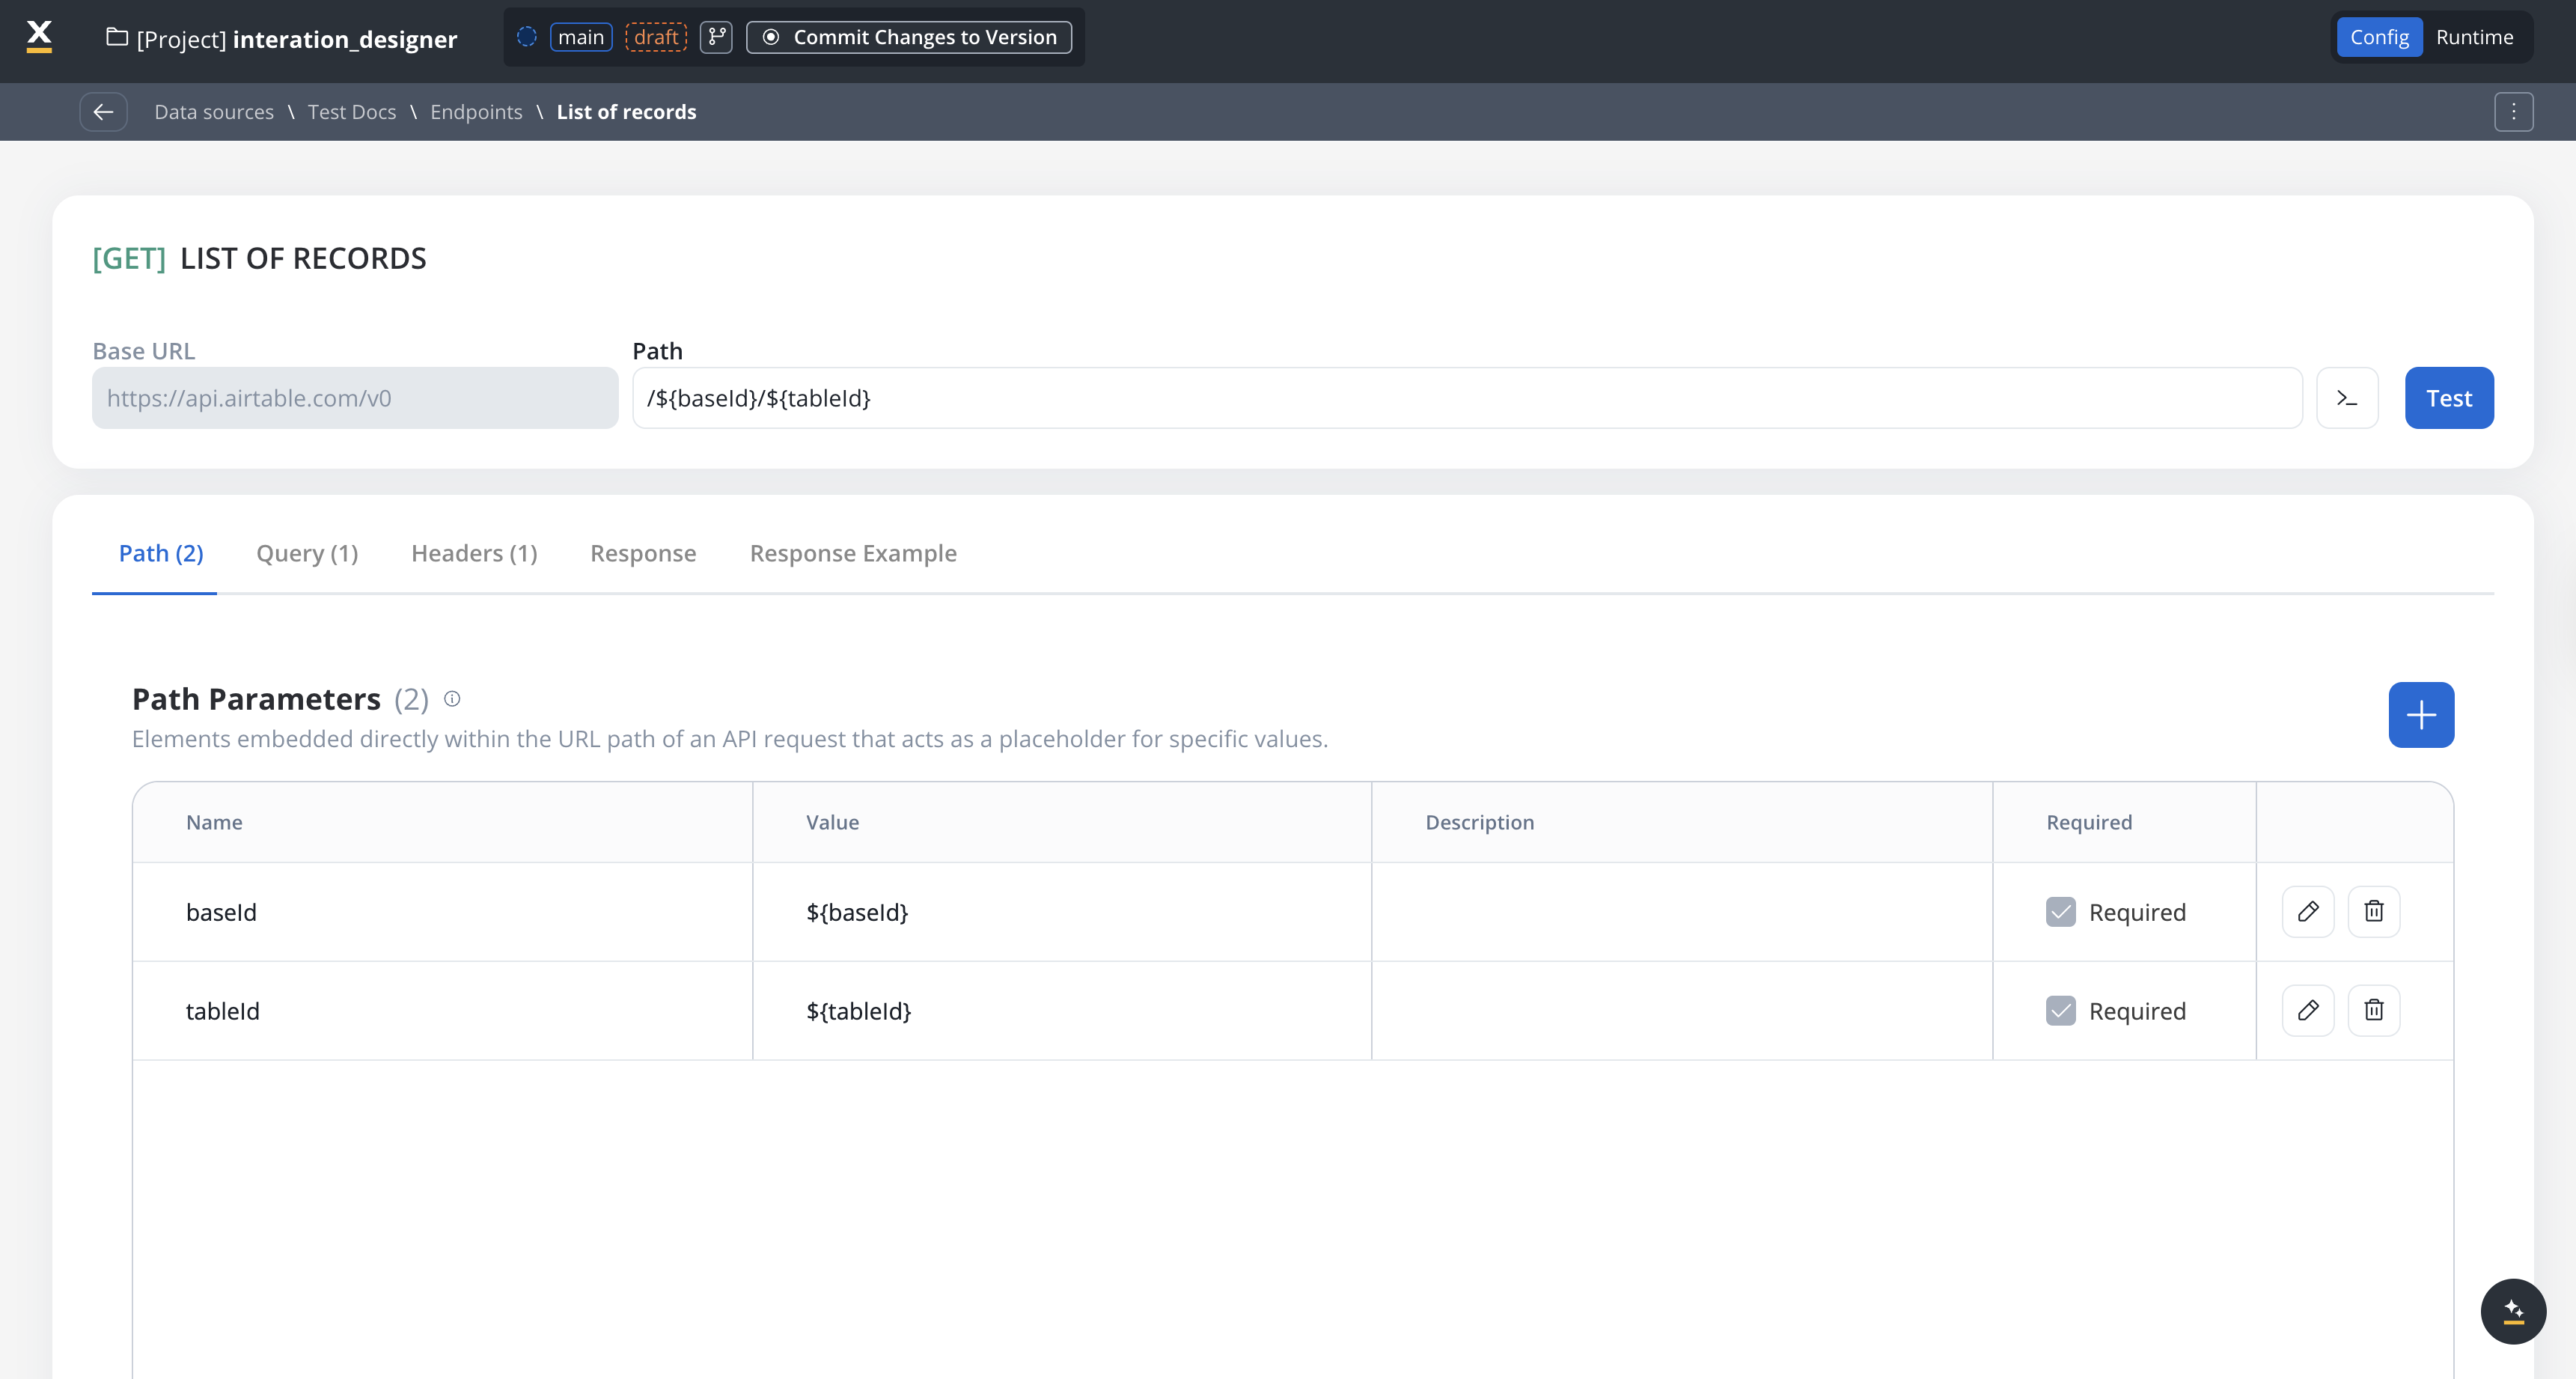
Elements embedded directly within the URL path of an API request that acts as a placeholder for specific value.- Used to specify variable parts of the endpoint URL.
- Defined with
${parameter}format. - Mandatory in the request URL.
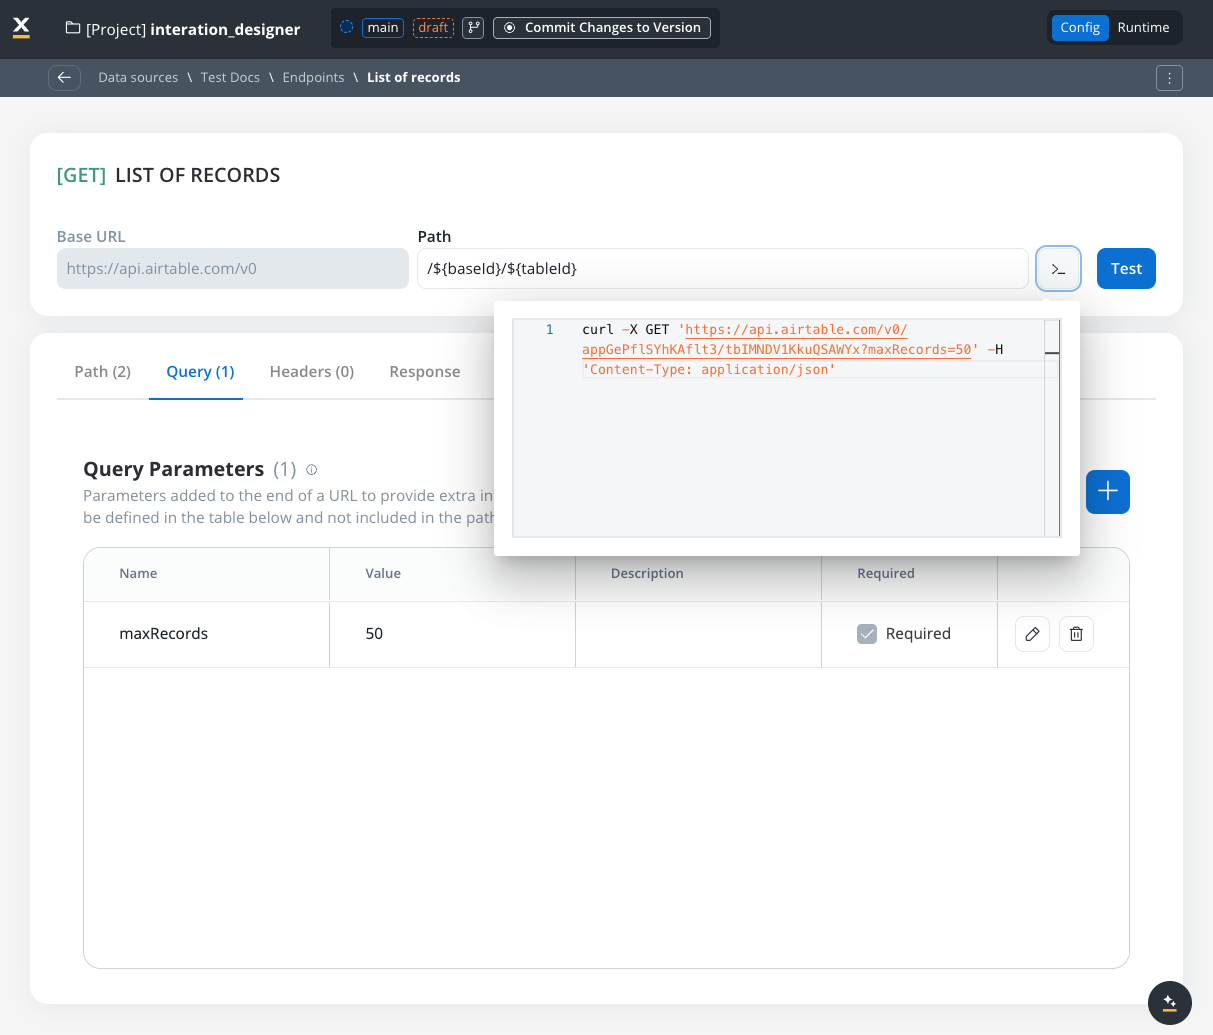
Query parameters
Query parameters are added to the end of a URL to provide extra information to a web server when making requests.- Query parameters are appended to the URL after a
?symbol and are typically used for filtering or pagination (e.g.,?search=value) - Useful for filtering or pagination.
- Example URL with query parameters: https://api.example.com/users?search=johndoe&page=2.
Header parameters
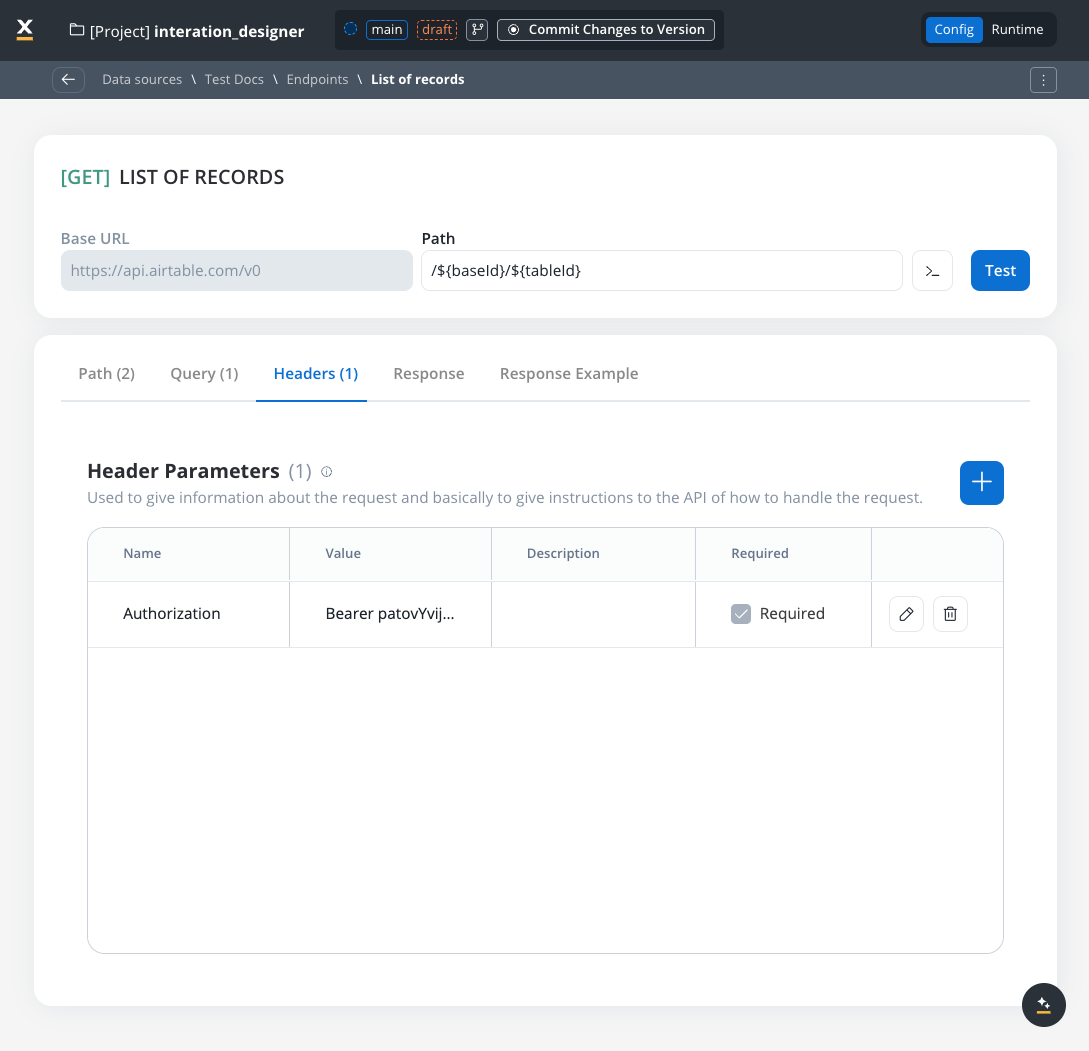
Used to give information about the request and basically to give instructions to the API of how to handle the request- Header parameters (HTTP headers) provide extra details about the request or its message body.
- They are not part of the URL. Default values can be set for testing and overridden in the workflow.
- Custom headers sent with the request (e.g.,
Authorization: Bearer token). - Define metadata or authorization details.
Body parameters
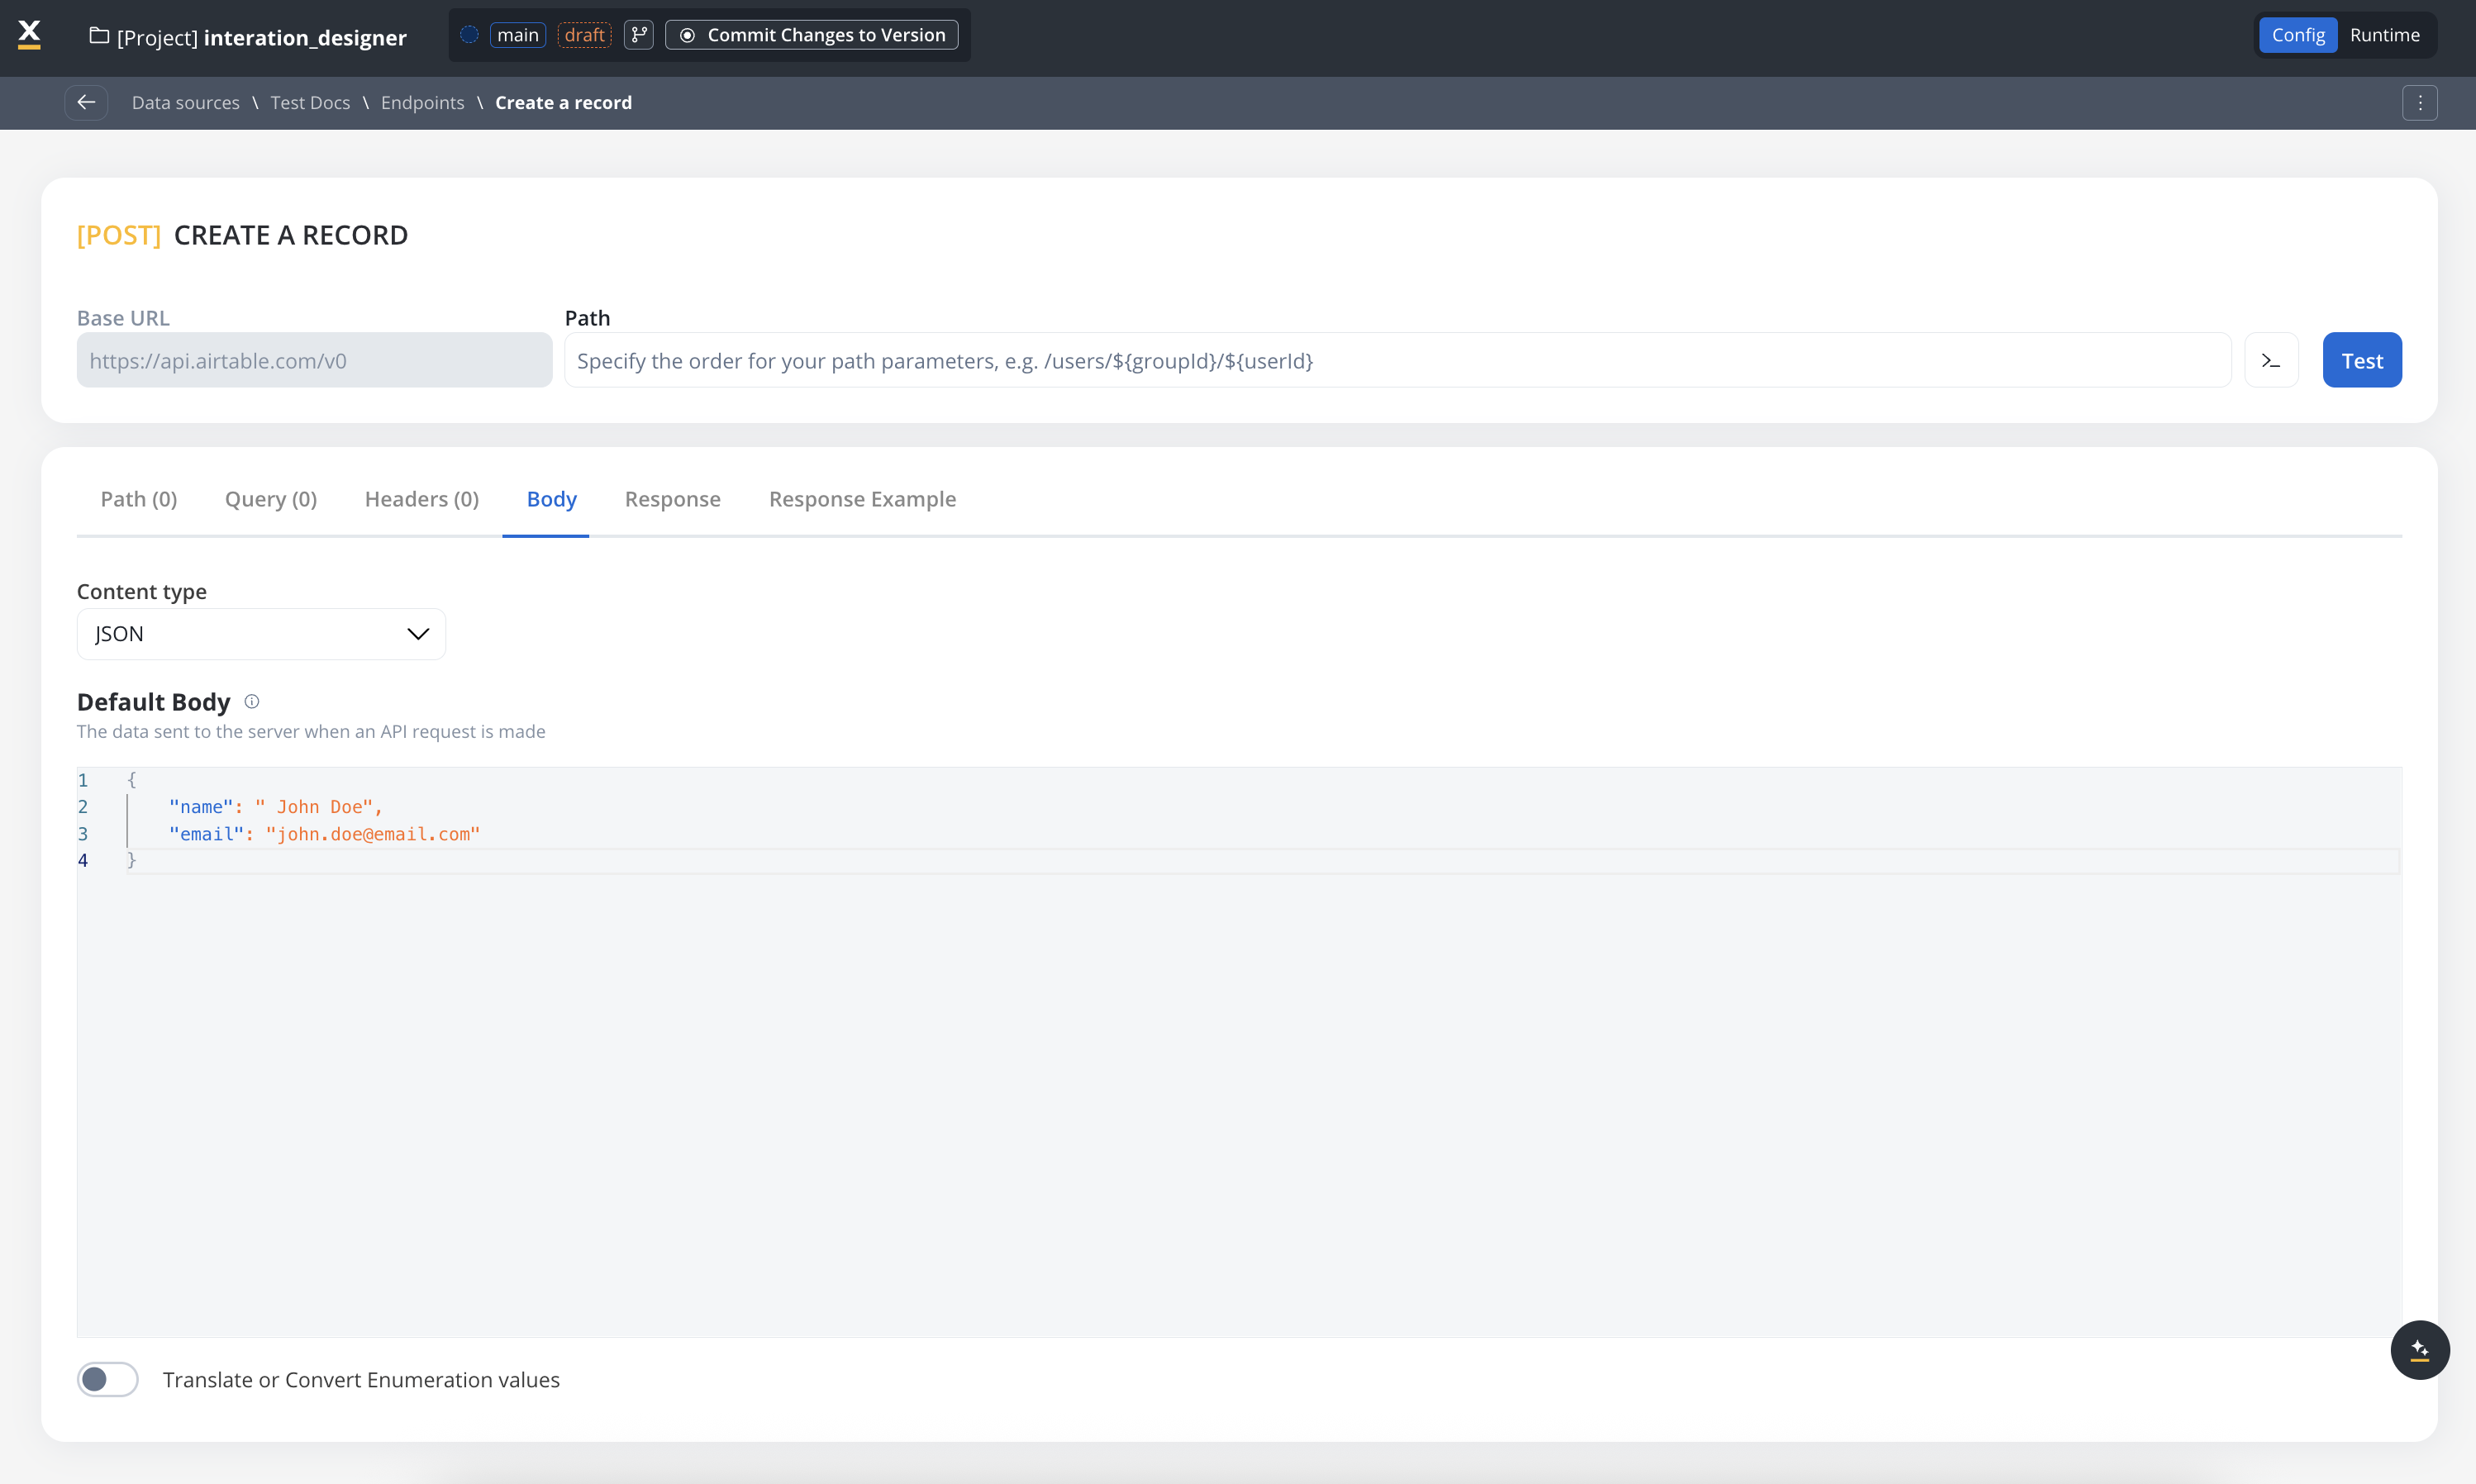
The data sent to the server when an API request is made.- These are the data fields included in the body of a request, usually in JSON format.
- Body parameters are used in POST, PUT, and PATCH requests to send data to the external system (e.g., creating or updating a resource).
Response body parameters
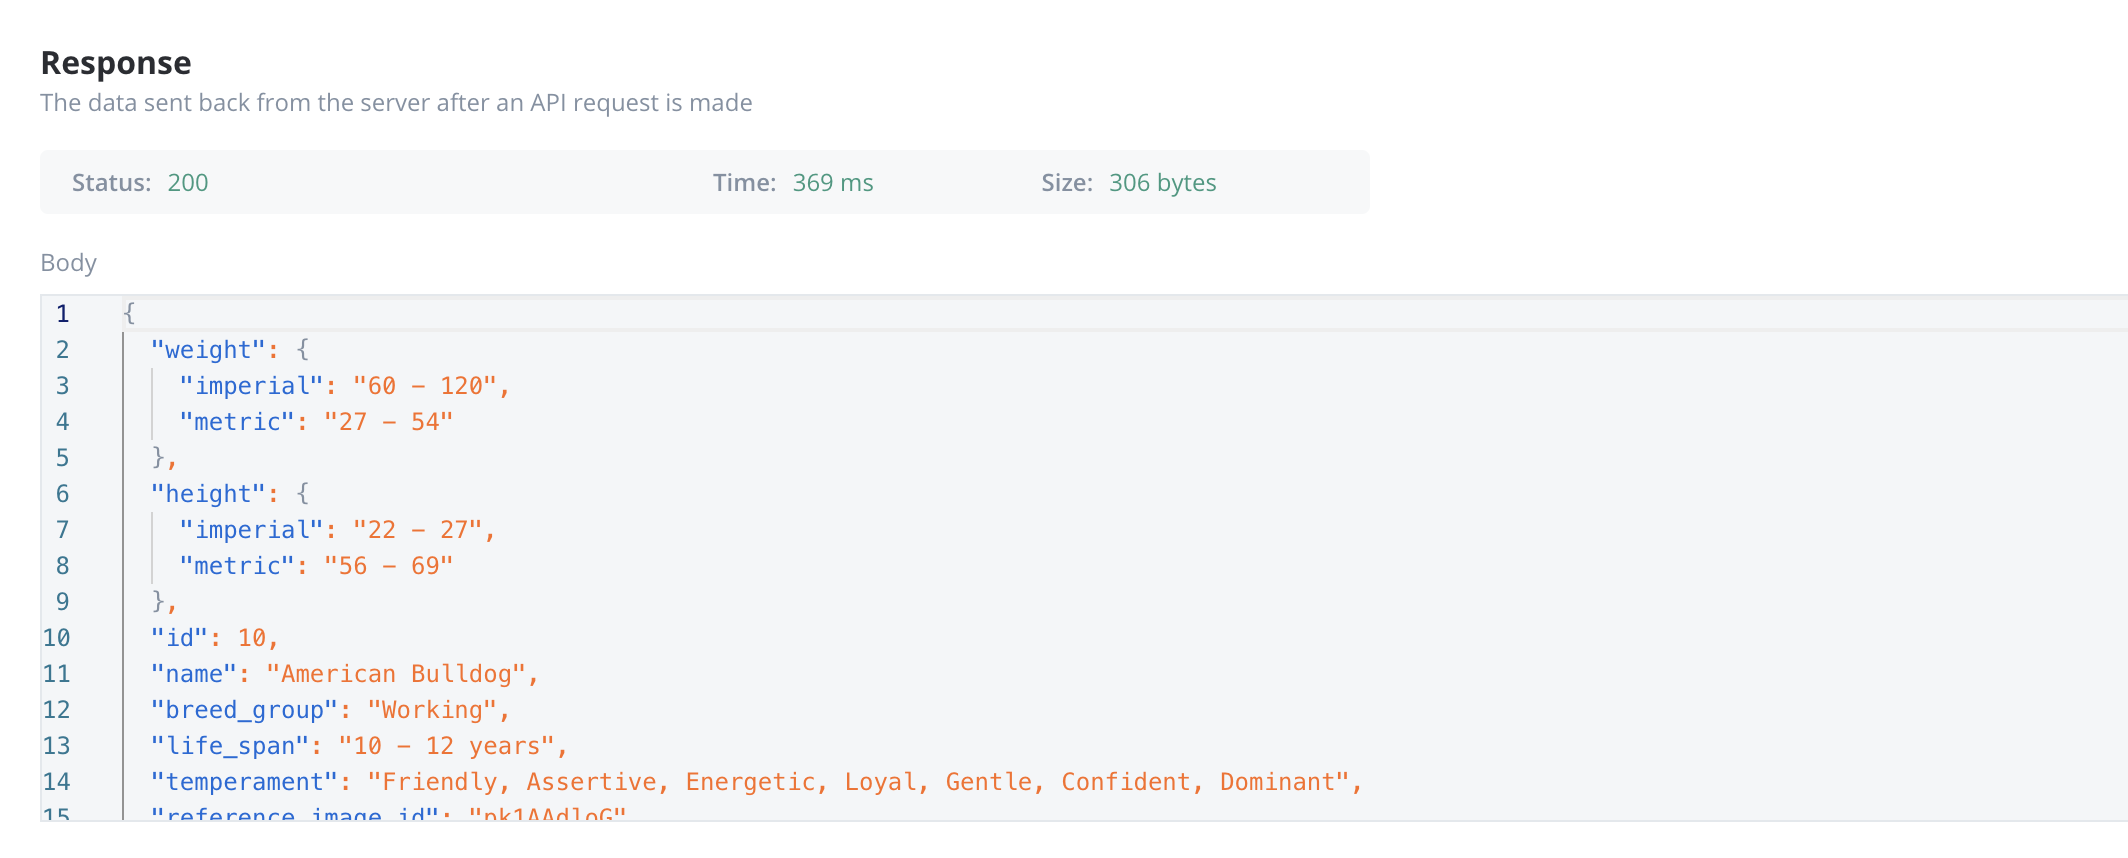
The data sent back from the server after an API request is made.- These parameters are part of the response returned by the external system after a request is processed. They contain the data that the system sends back.
- Typically returned in GET, POST, PUT, and PATCH requests. Response body parameters provide details about the result of the request (e.g., confirmation of resource creation, or data retrieval)
Enum mapper
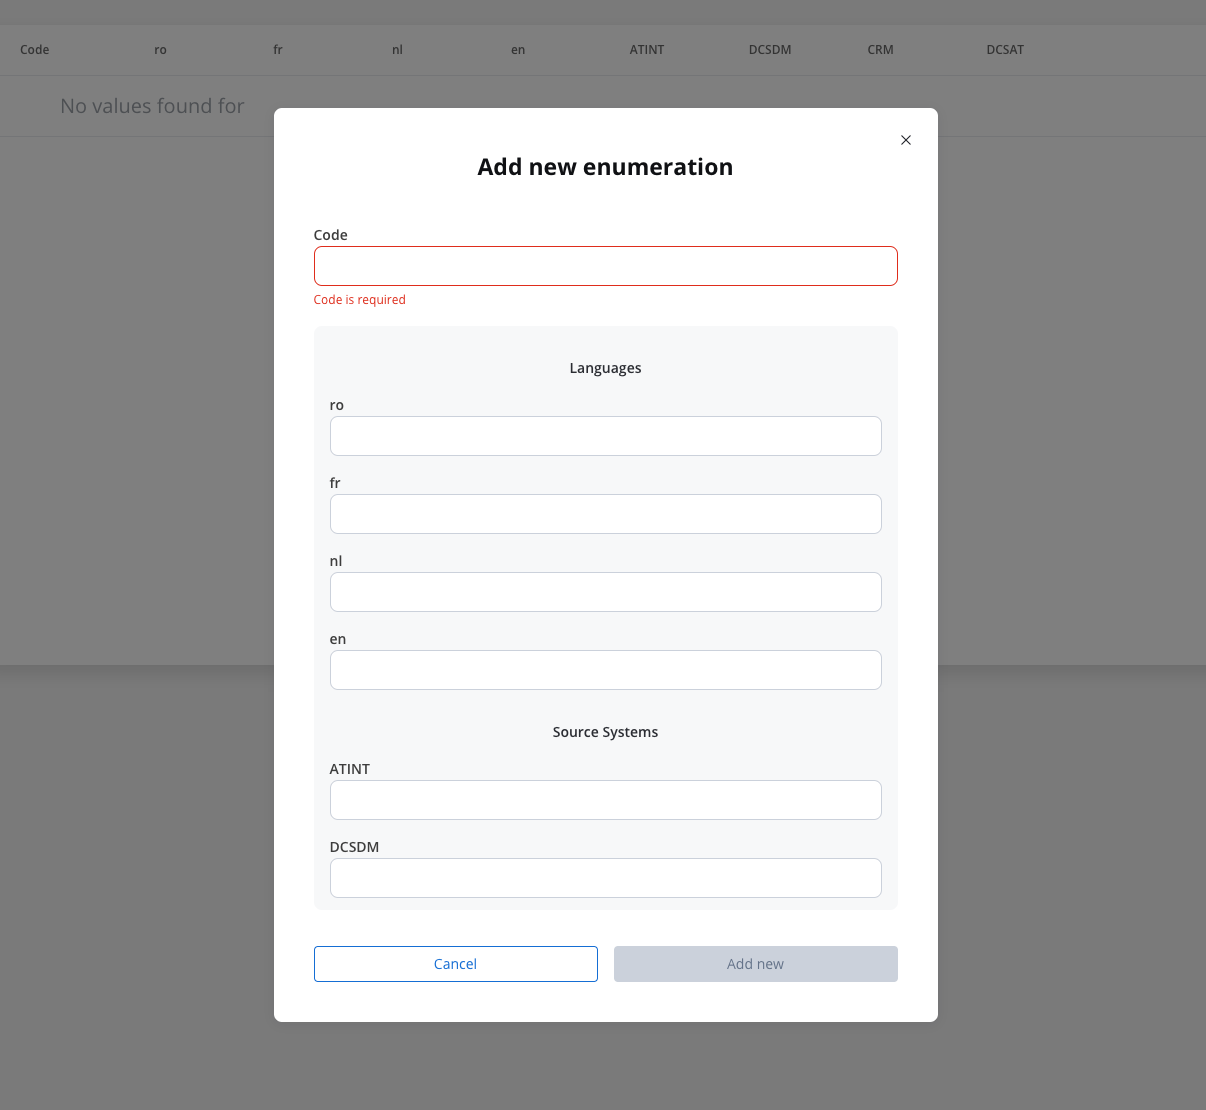
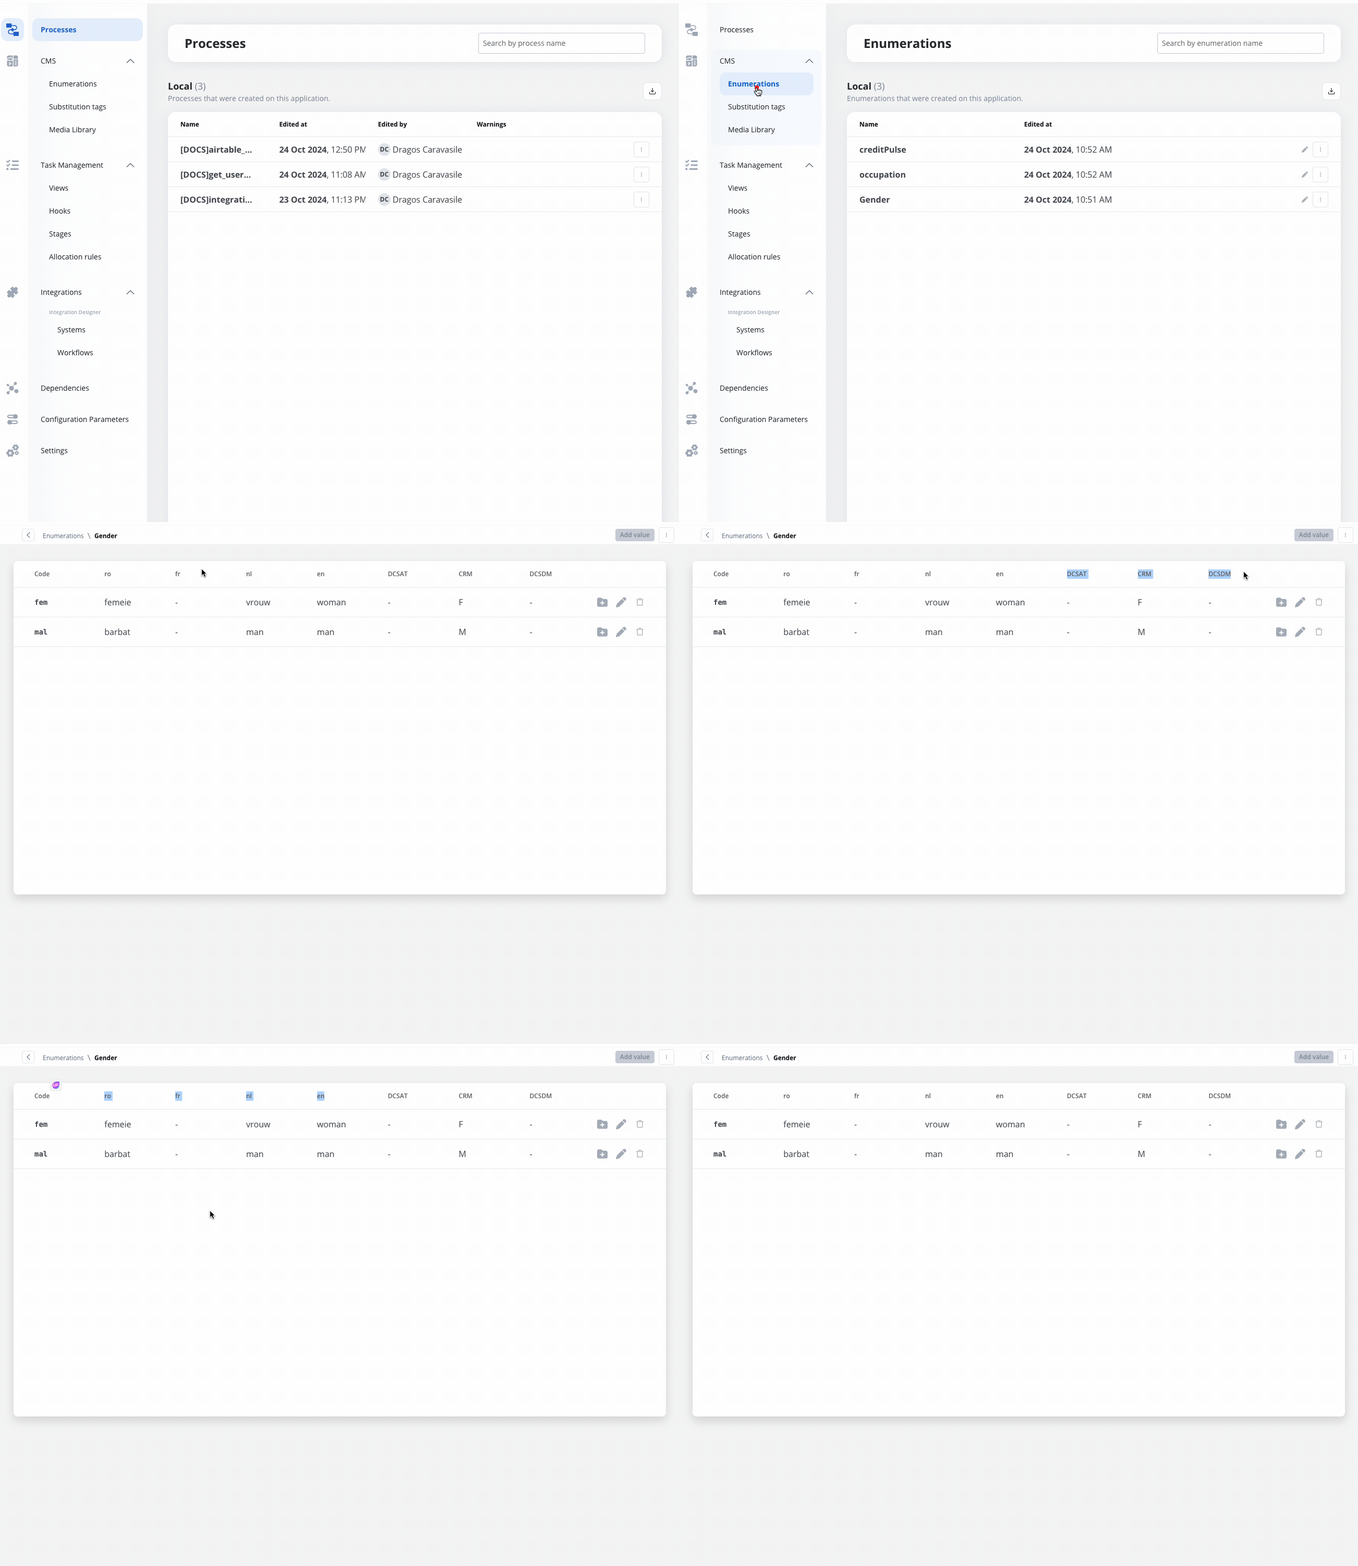
The enum mapper for the request body enables you to configure enumerations for specific keys in the request body, aligning them with values from the External System or translations into another language.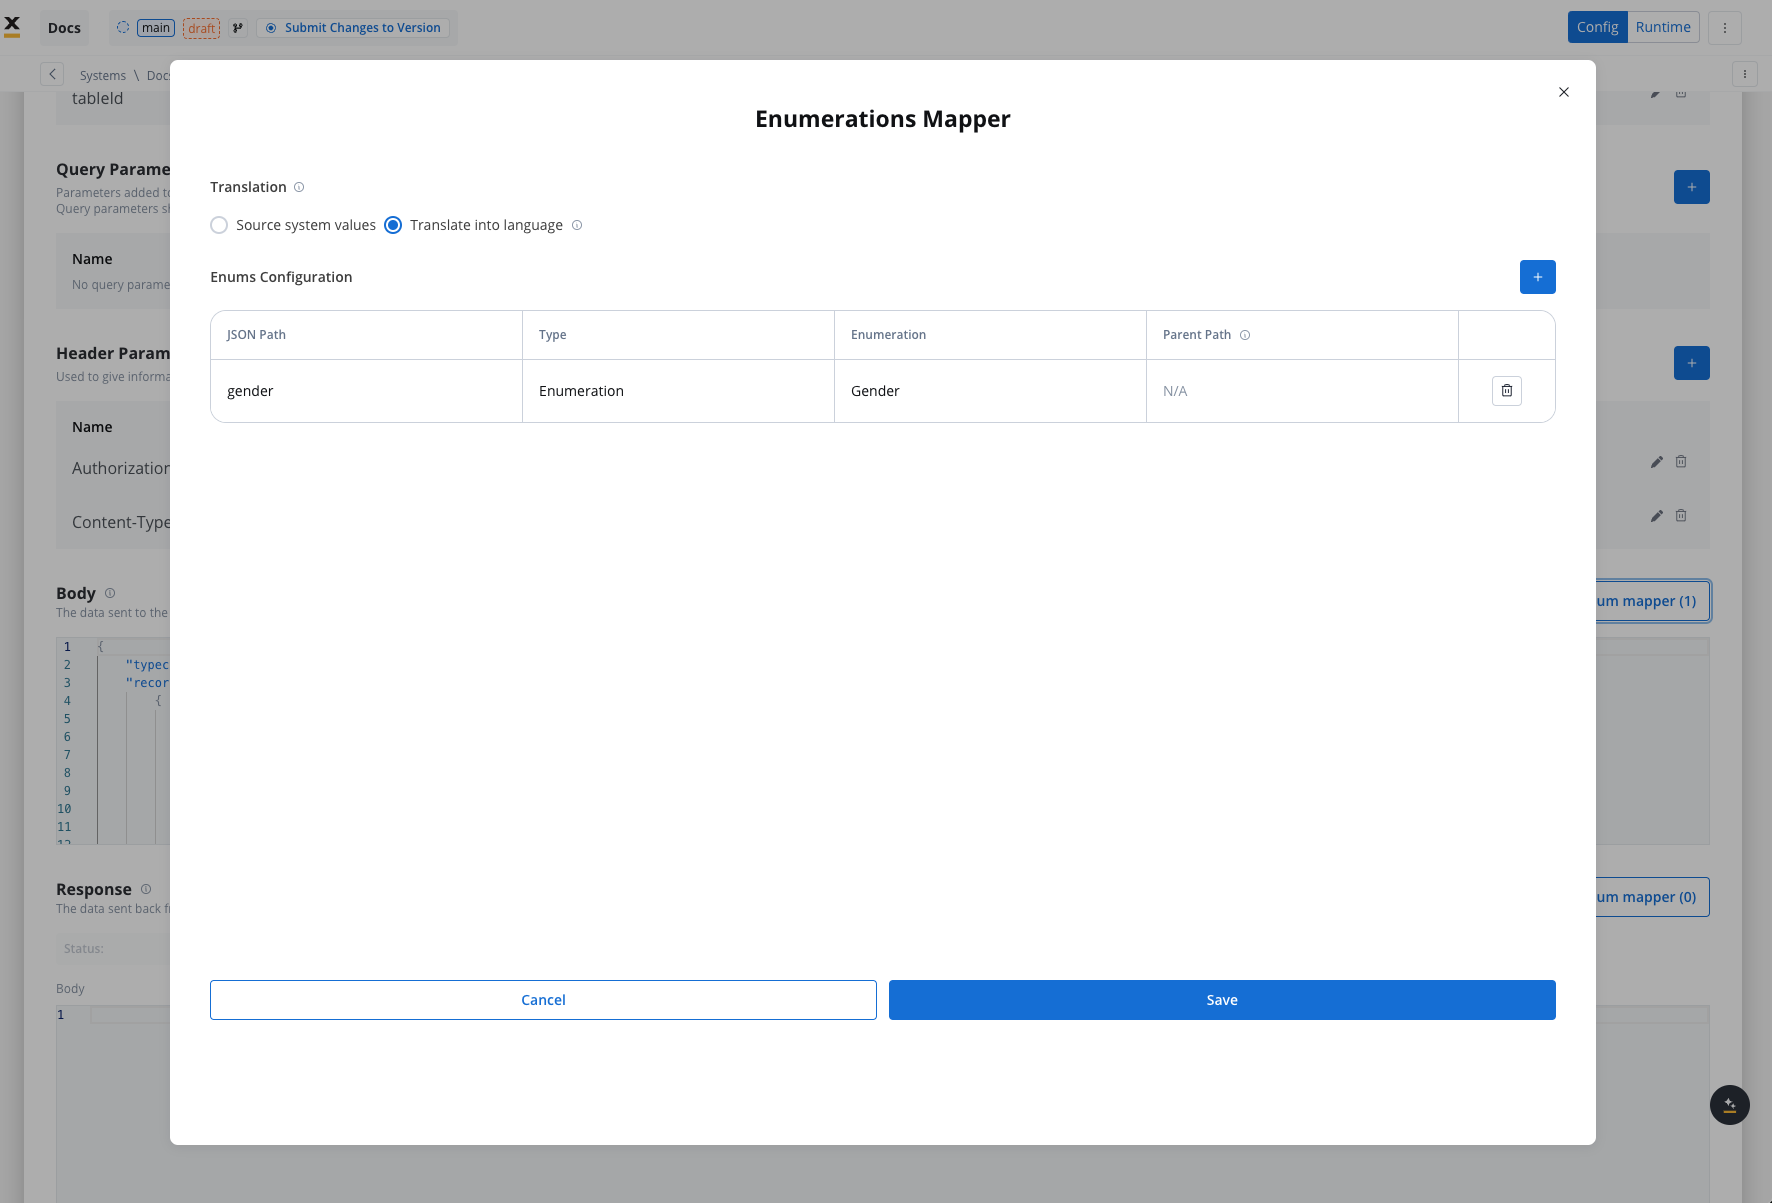
Configuring authorization
- Select the required Authorization Type from a predefined list.
- Enter the relevant details based on the selected type (e.g., Realm and Client ID for Service Accounts).
- These details will be automatically included in the request headers when the integration is executed.
Authorization methods
The Integration Designer supports several authorization methods, allowing you to configure the security settings for API calls. Depending on the external system’s requirements, you can choose one of the following authorization formats: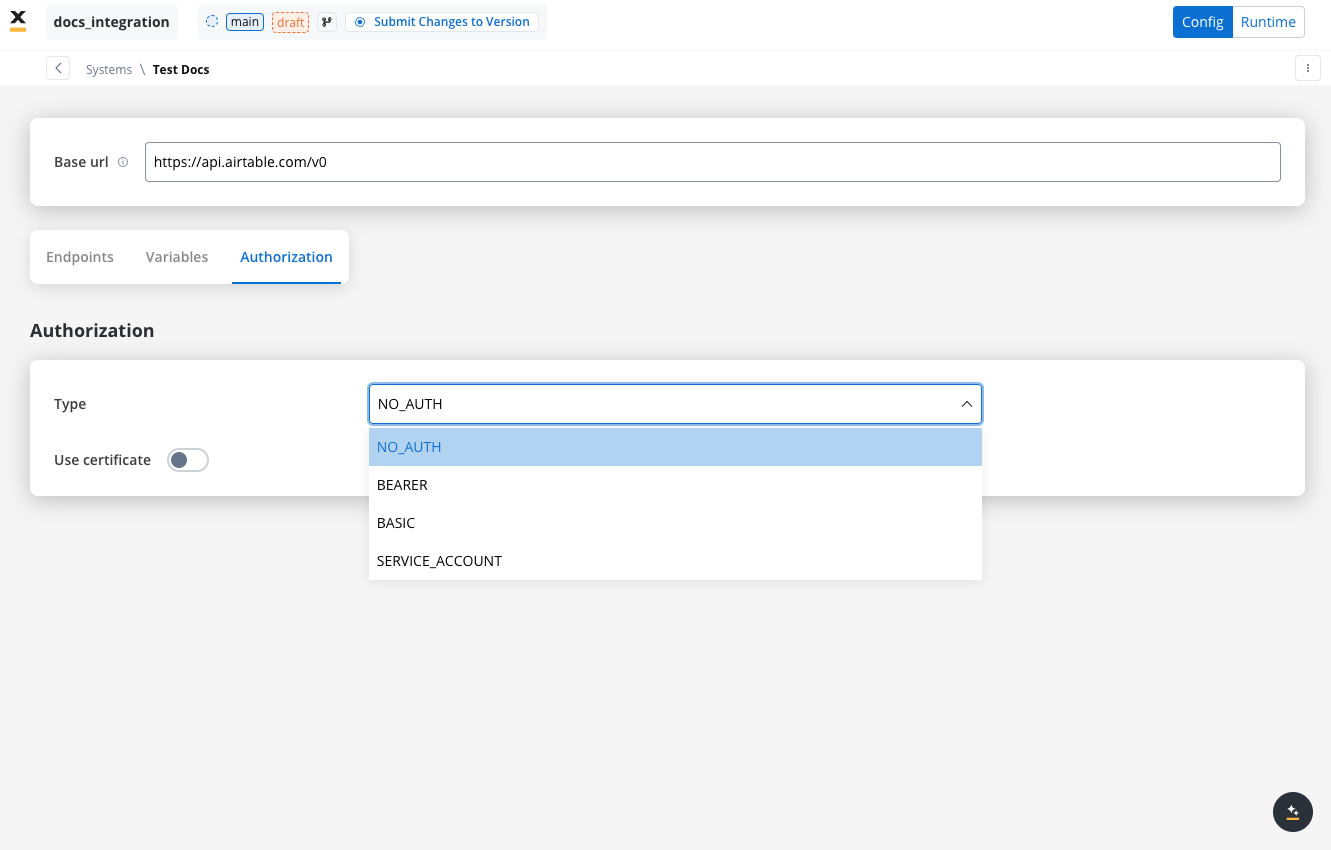
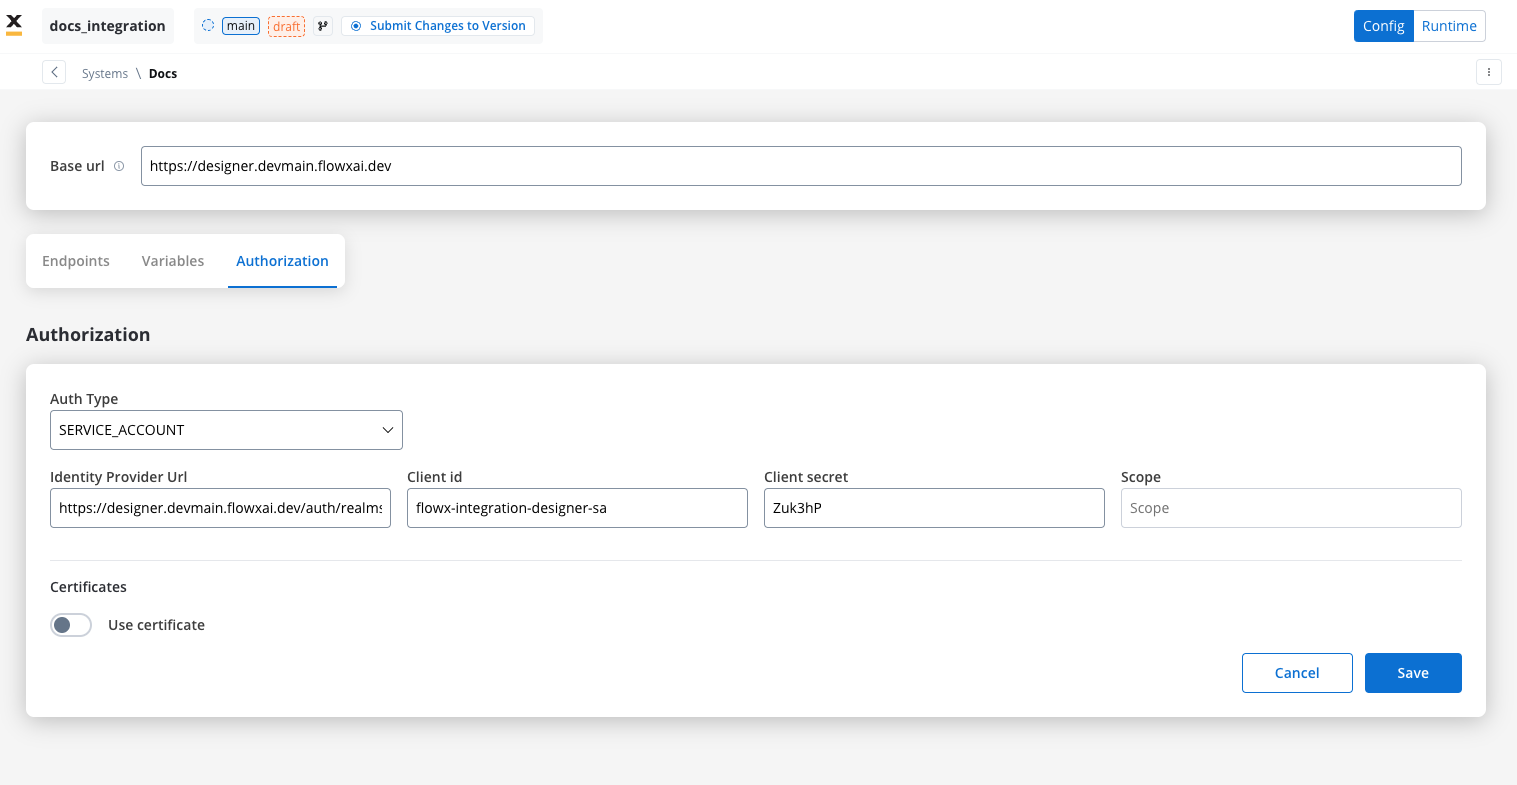
Service account
Service Account authentication requires the following key fields:- Identity Provider Url: The URL for the identity provider responsible for authenticating the service account.
- Client Id: The unique identifier for the client within the realm.
- Client secret: A secure secret used to authenticate the client alongside the Client ID.
- Scope: Specifies the access level or permissions for the service account.
Basic authentication
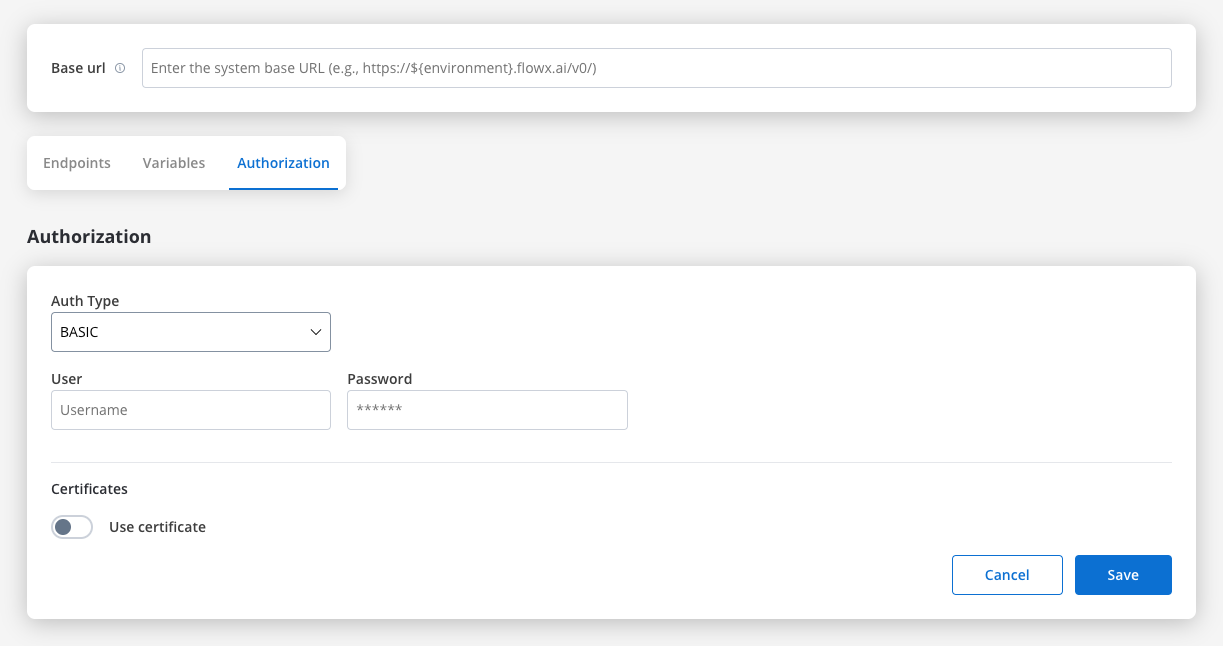
- Requires the following credentials:
- Username: The account’s username.
- Password: The account’s password.
- Suitable for systems that rely on simple username/password combinations for access.
Bearer
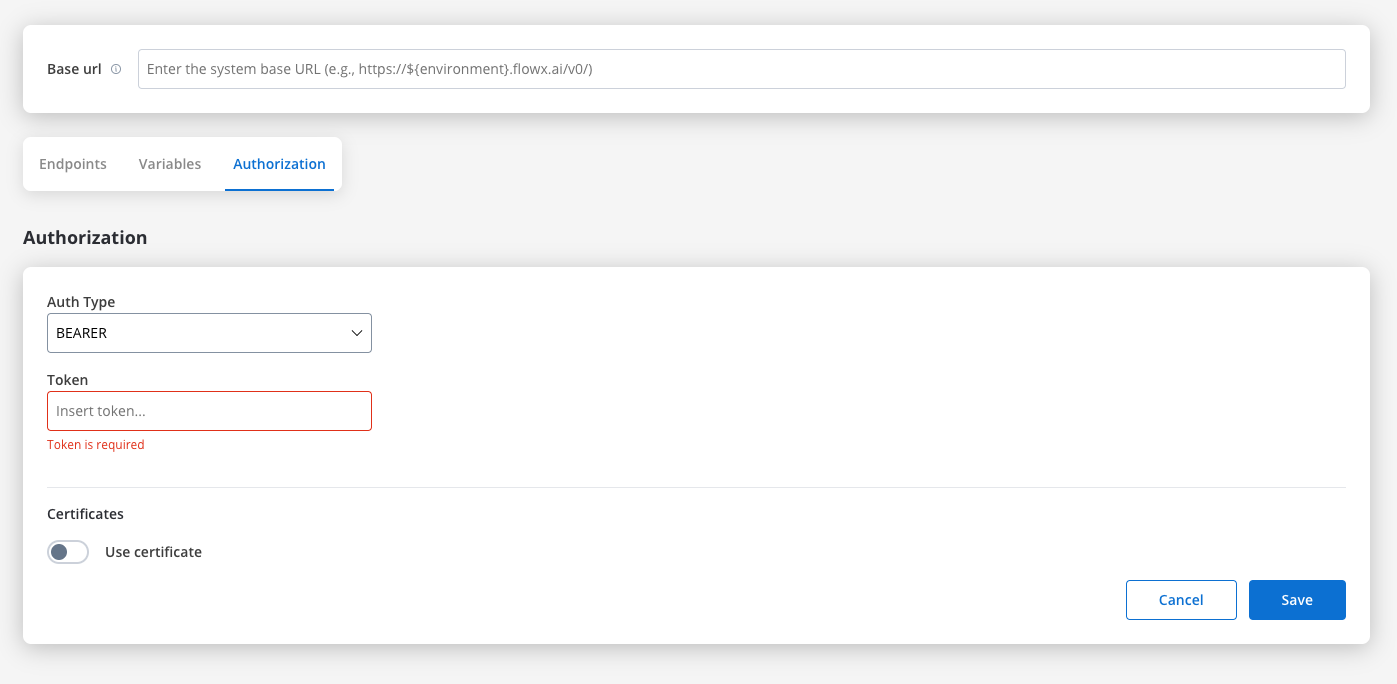
- Requires an Access Token to be included in the request headers.
- Commonly used for OAuth 2.0 implementations.
- Header Configuration: Use the format
Authorization: Bearer {access_token}in headers of requests needing authentication.
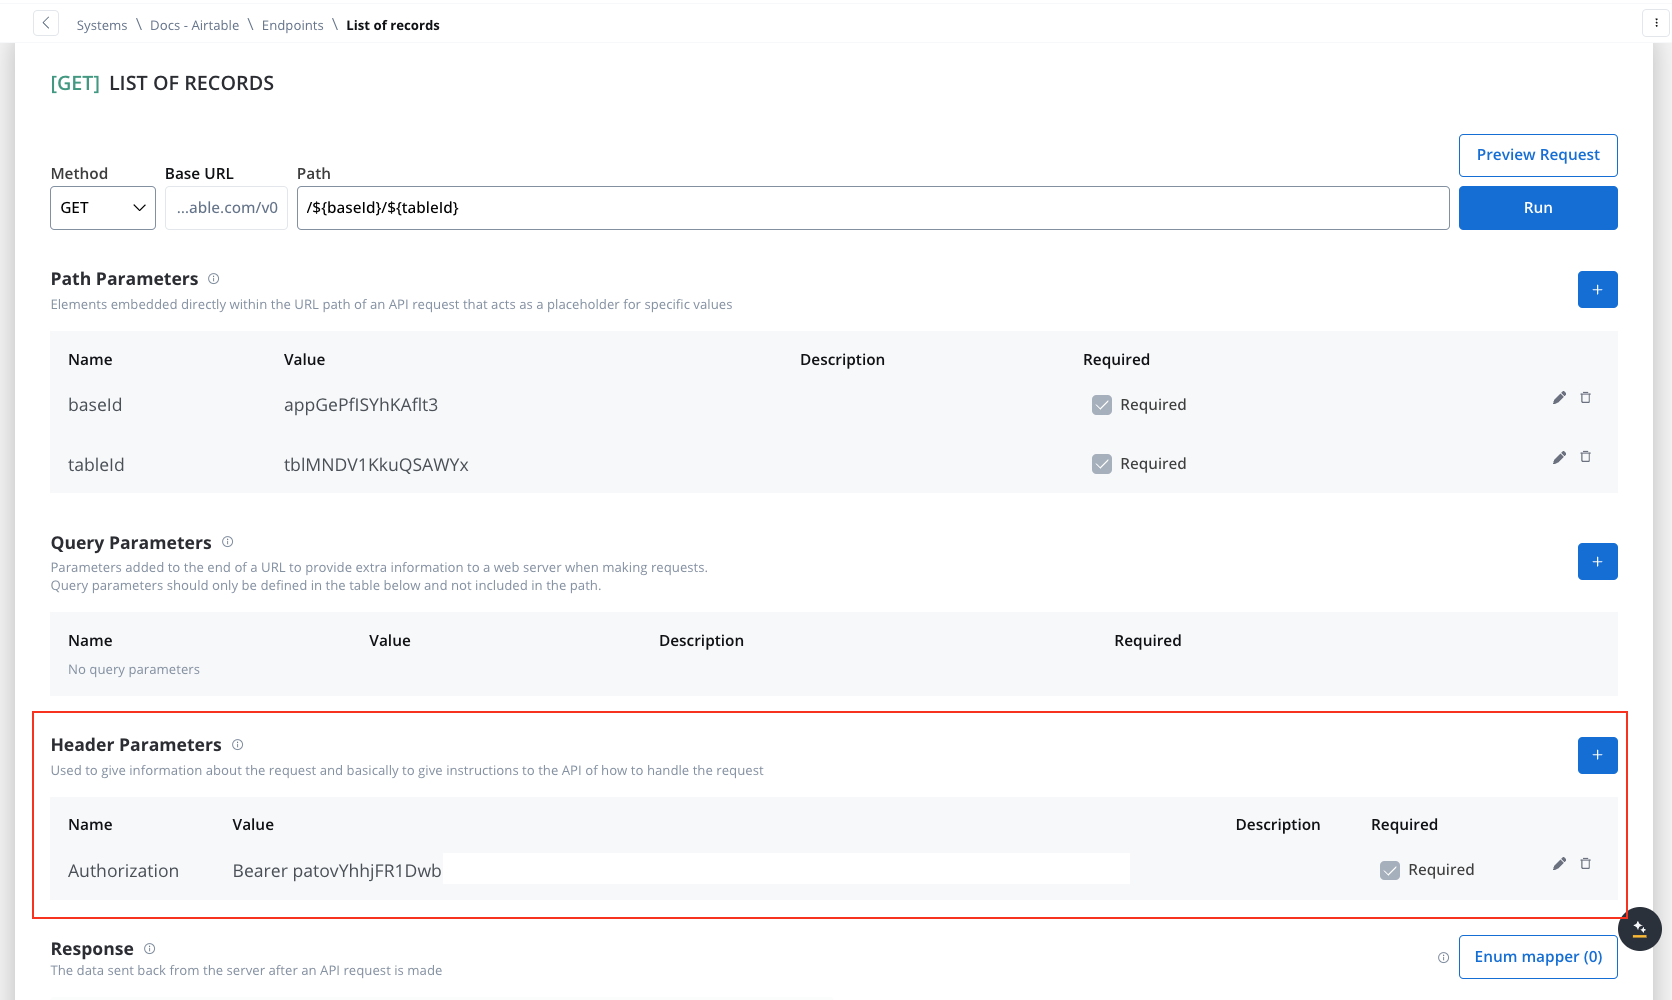
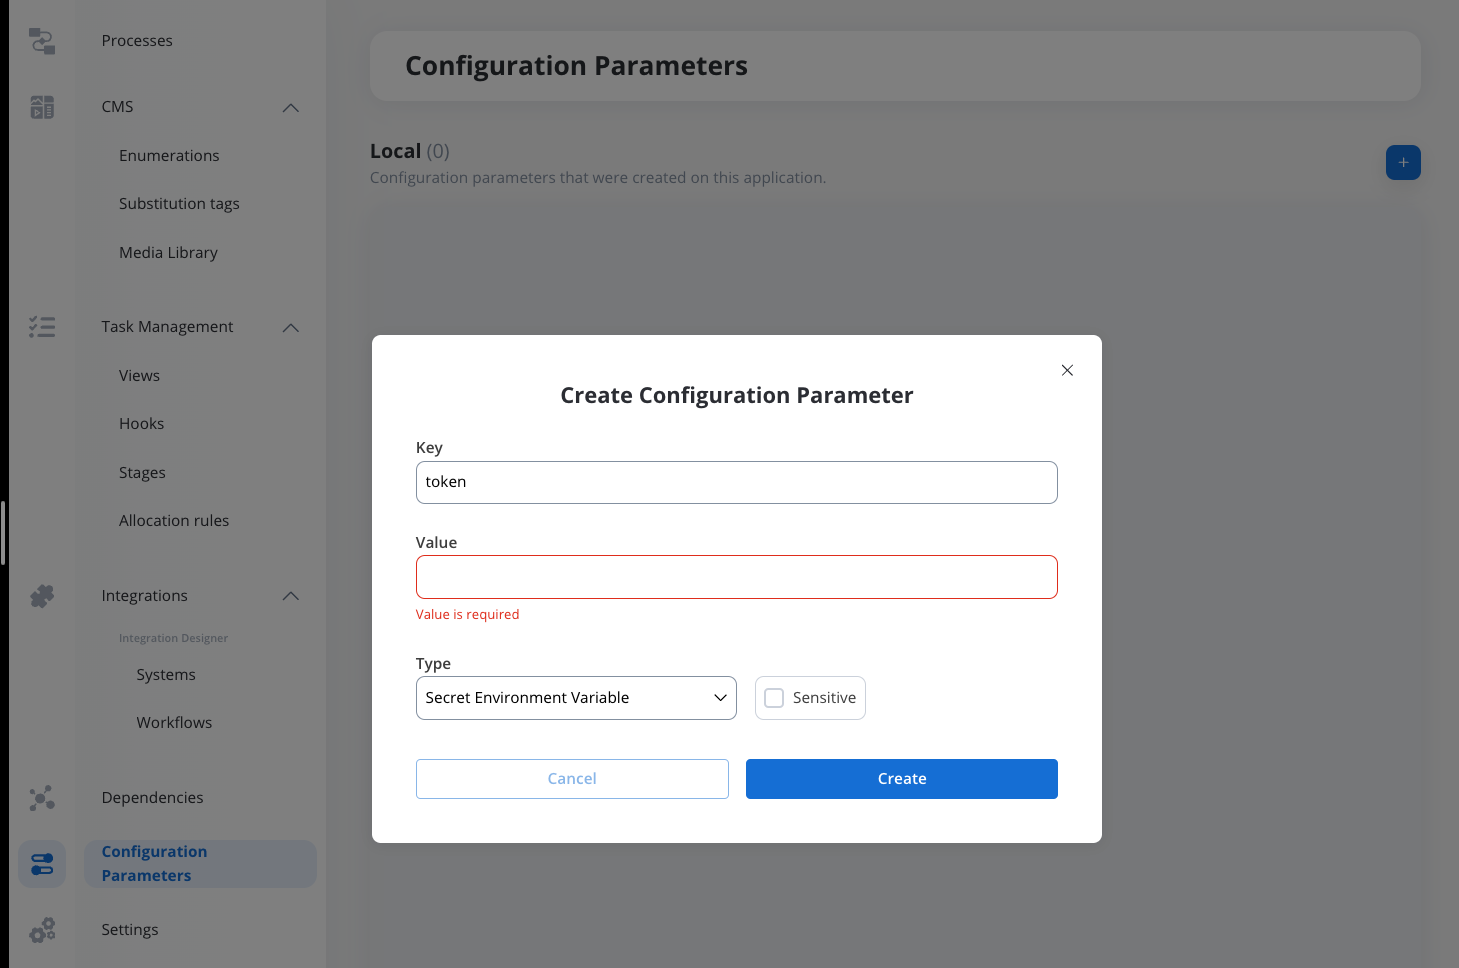
- System-Level Example: You can store the Bearer token at the system level, as shown in the example below, ensuring it’s applied automatically to future API calls:
Certificates
You might want to access another external system that require a certificate to do that. Use this setup to configure the secure communication with the system. It includes paths to both a Keystore (which holds the client certificate) and a Truststore (which holds trusted certificates). You can toggle these features based on the security requirements of the integration.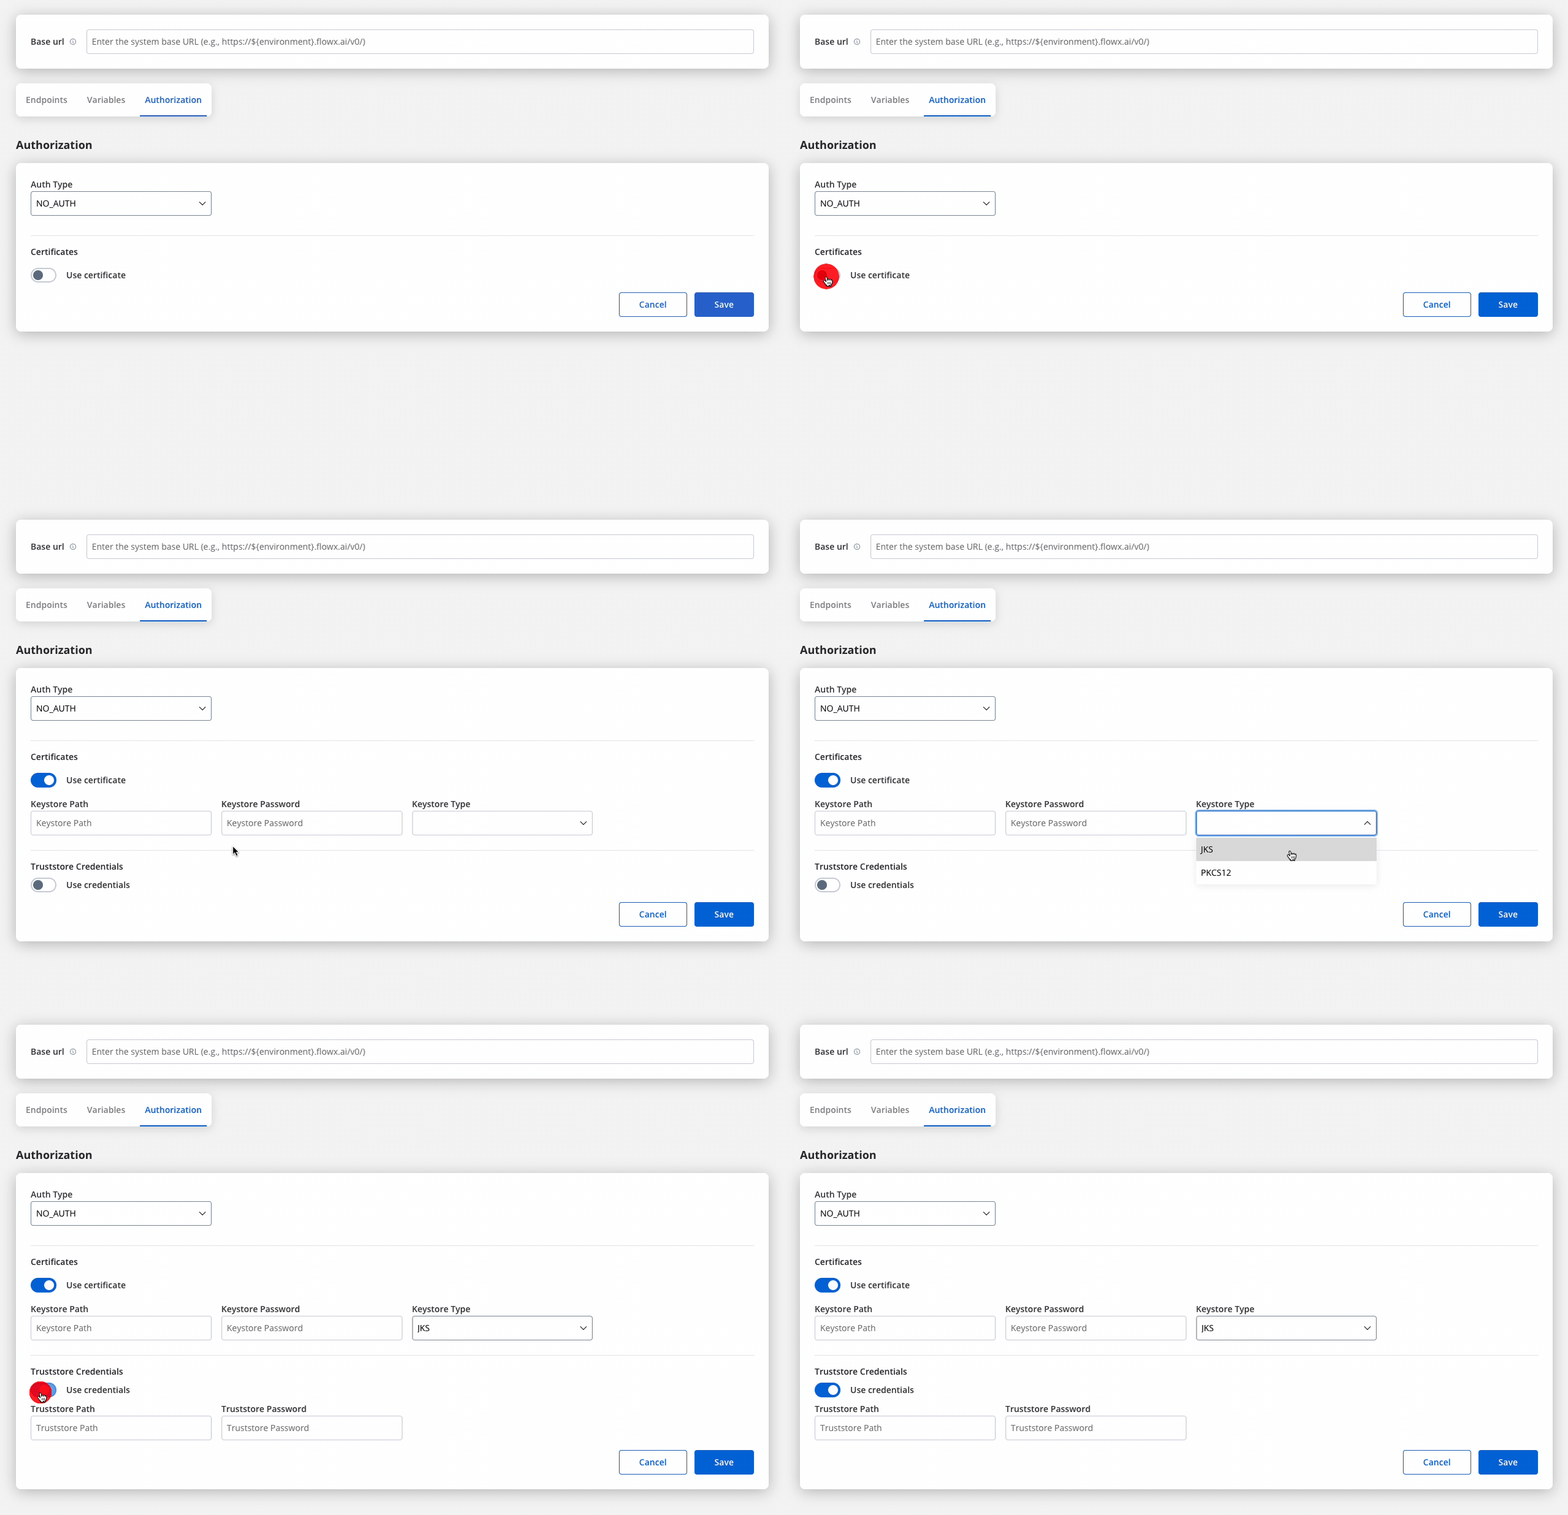
- Keystore Path: Specifies the file path to the keystore, in this case,
/opt/certificates/testkeystore.jks. The keystore contains the client certificate used for securing the connection. - Keystore Password: The password used to unlock the keystore.
- Keystore Type: The format of the keystore, JKS or PKCS12, depending on the system requirements.
- Truststore Path: The file path is set to
/opt/certificates/testtruststore.jks, specifying the location of the truststore that holds trusted certificates. - Truststore Password: Password to access the truststore.

File handling
You can now handle file uploads and downloads with external systems directly within Integration Designer. This update introduces native support for file transfers in RESTful connectors, reducing the need for custom development and complex workarounds.Core scenarios
Integration Designer supports two primary file handling scenarios:Downloading Files
GET or POST) and receives a response containing one or more files. Integration Designer saves these files to a specified location and returns their new paths to the workflow for further processing.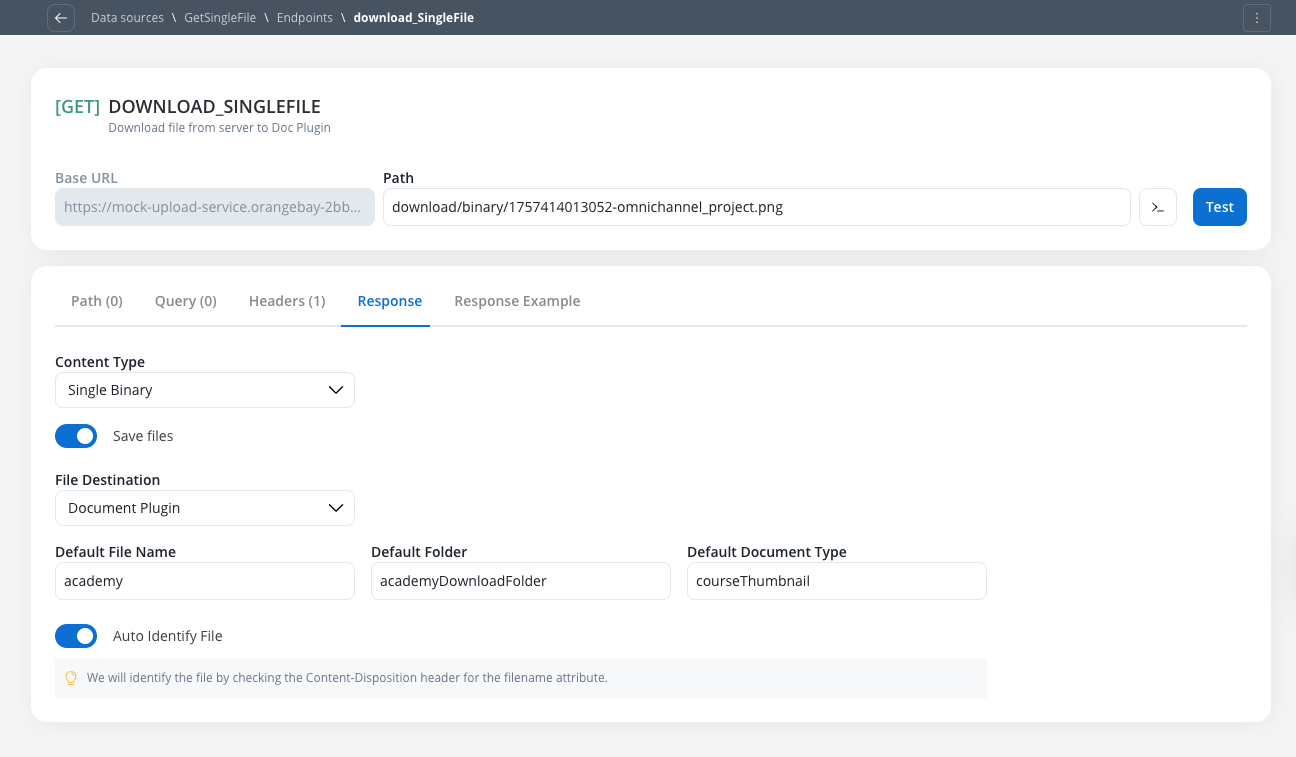
Uploading Files
POST request. The workflow transmits the file path, enabling file transfer without manual handling.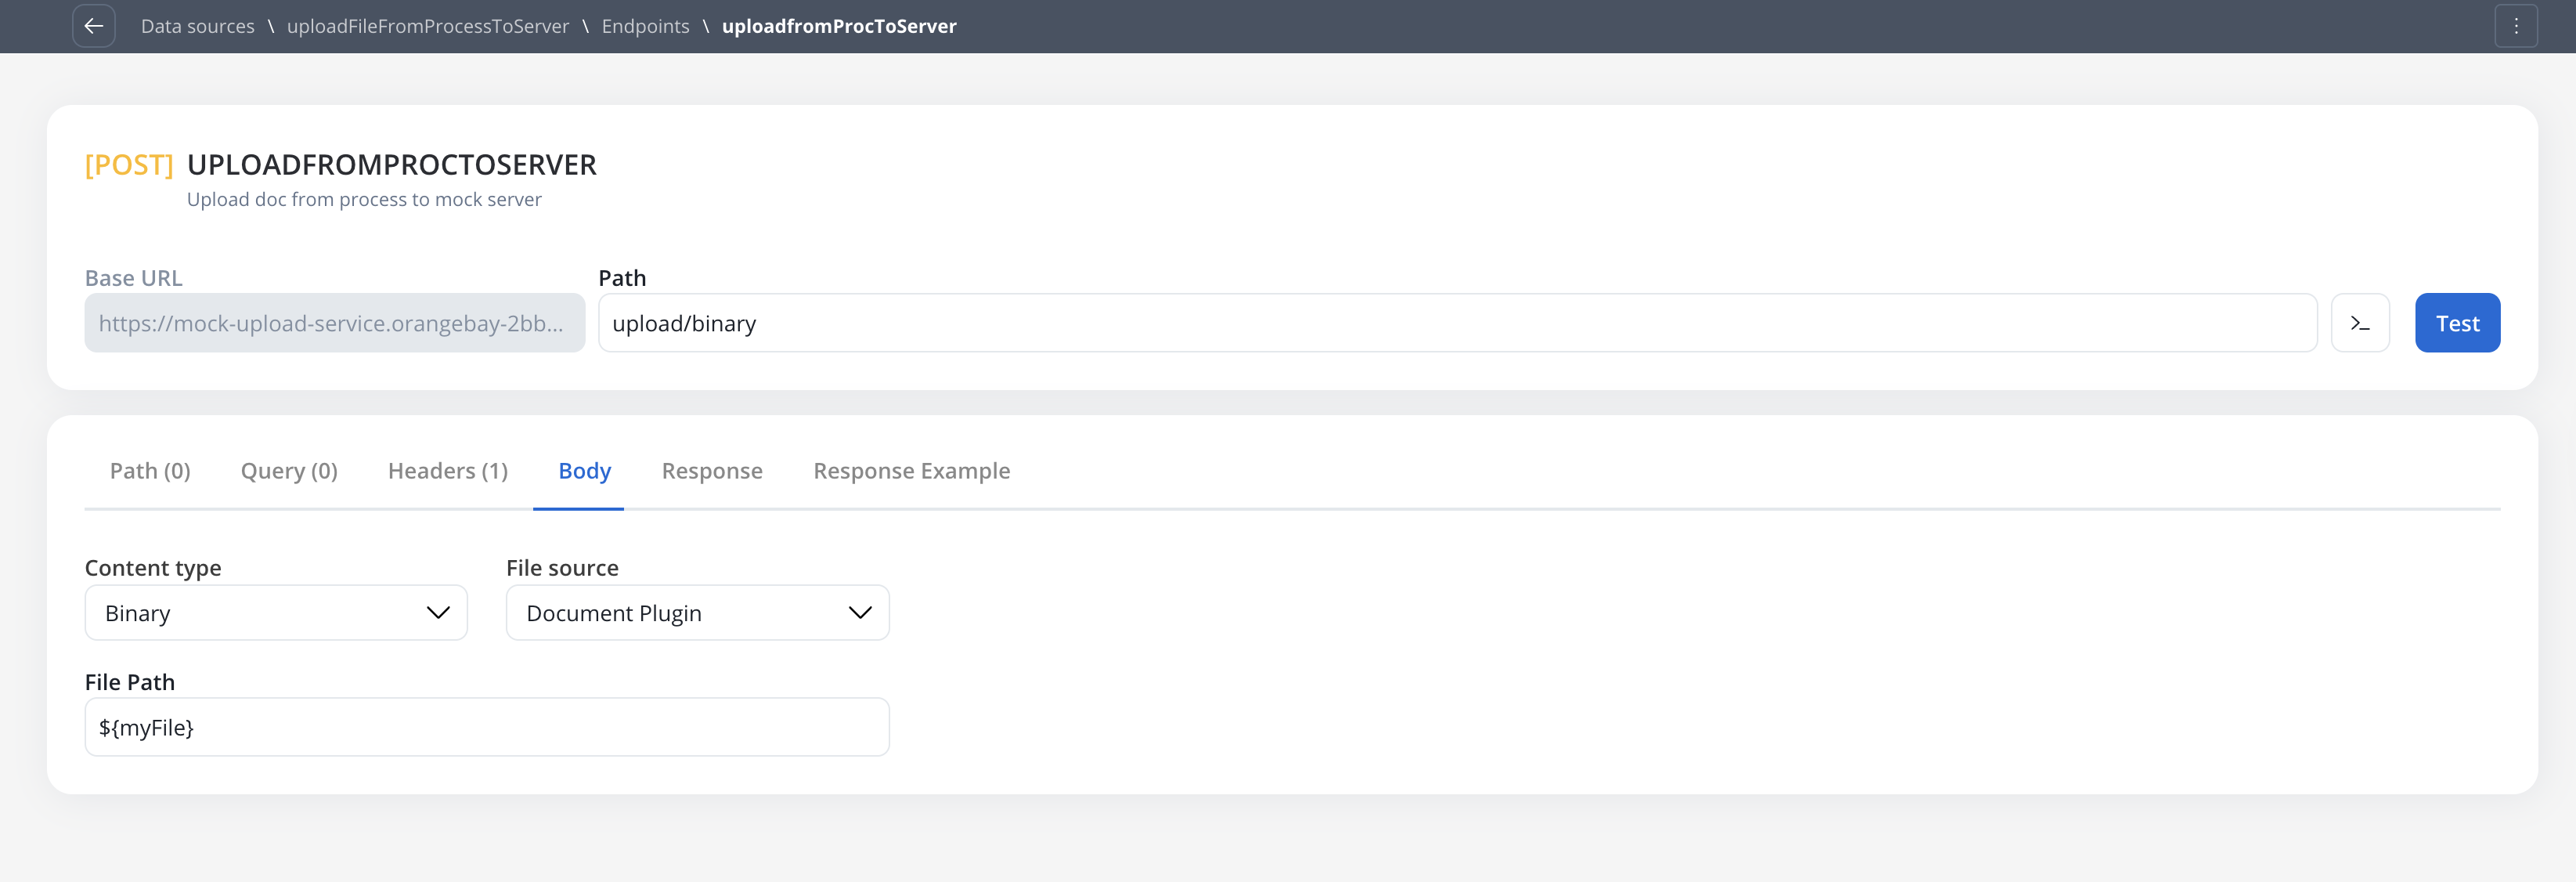
Receiving files (endpoint response configuration)
To configure an endpoint to handle incoming files from an external system, navigate to its Response tab. This functionality is available for bothGET and POST methods.
Enabling and configuring file downloads
Activate File Processing
Configure Content-Type
JSON(Default): For responses containing Base64 encoded file dataSingle Binary: For responses where the body is the file itself
Handling JSON content-type
This option is used when the API returns a JSON object containing one or more Base64 encoded files. File Destination Configuration:- Document Plugin
- S3 Protocol
${processInstanceId} to be mapped dynamically at runtime.| Column | Description | Example |
|---|---|---|
| Base 64 File Key | The JSON path to the Base64 encoded string | files.user.photo |
| File Name Key | Optional. The JSON path to the filename string | files.photoName |
| Default File Name | A fallback name to use if the File Name Key is not found | imagineProfil |
| Default Folder | The business-context folder, such as a client ID (CNP) | folder_client |
| Default Doc Type | The document type for classification in the Document Plugin | Carte Identitate |
Translate or Convert Enumeration Values toggle can be used in conjunction with the Save Files feature.Handling Single Binary content-type
This option is used when the entire API response body is the file itself. The Single Binary content-type is ideal for endpoints that return raw file data directly in the response body.Configure Content-Type
- Enable the Save Files toggle
- Select Single Binary from the Content-Type dropdown
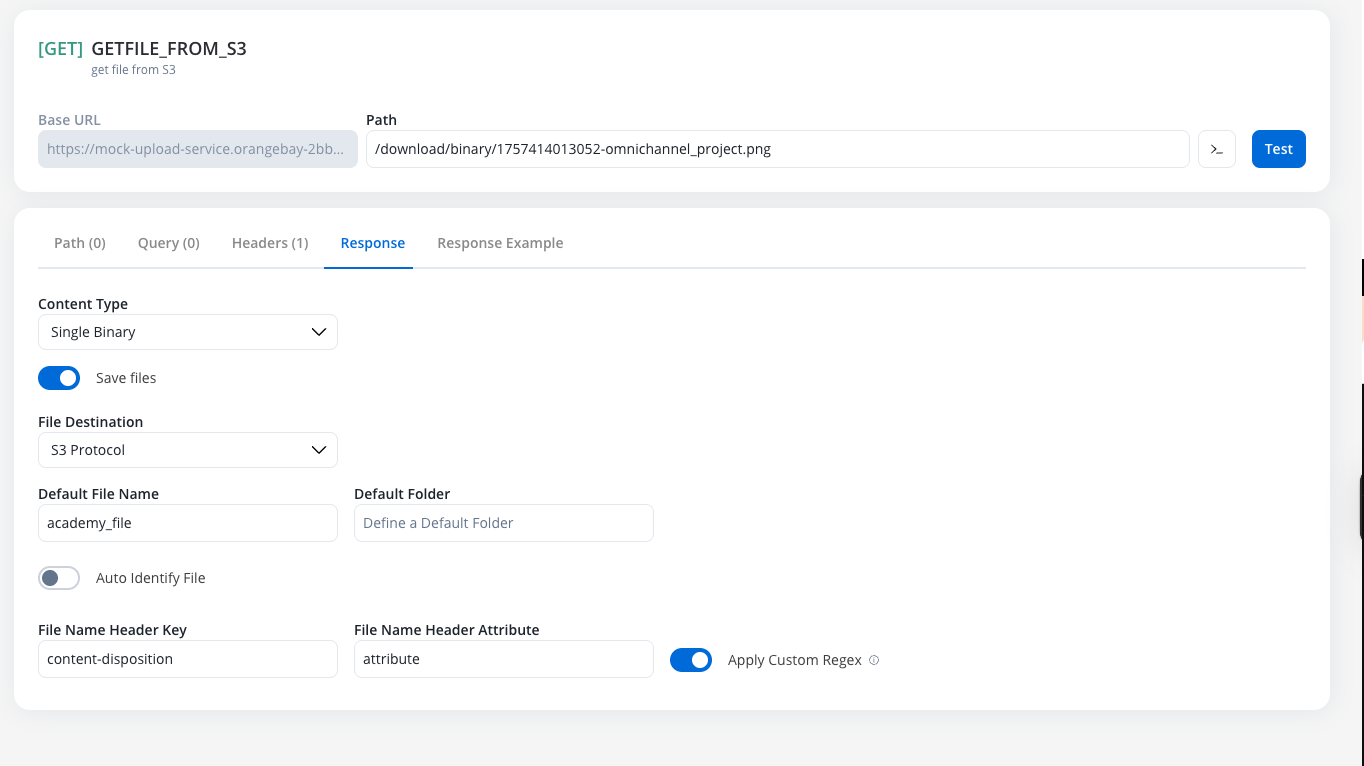
Choose File Destination
- S3 Protocol
- Document Plugin
Configure File Name Identification
- Auto Identify (Recommended)
- Manual Configuration
Content-Disposition HTTP header to extract the filename attribute. This is the standard approach for most file download endpoints.Content-Disposition header.document.pdf as the filename.- Document Plugin
- S3 Protocol
Sending files (endpoint POST body configuration)
To configure an endpoint to send a file, navigate to the Body tab and select the appropriate Content Type.Content Type: Multipart/Form-data
Use this to send files and text fields in a single request. This format is flexible and can handle mixed content types within the same POST request.Configure File Source
Document PluginS3 Protocol
Define Form Parts
- Key Type: Choose
FileorText - Value:
- For files: Provide the
filePath(Minio path for S3 or Document Plugin reference) - For text: Provide the string value or variable reference
- For files: Provide the
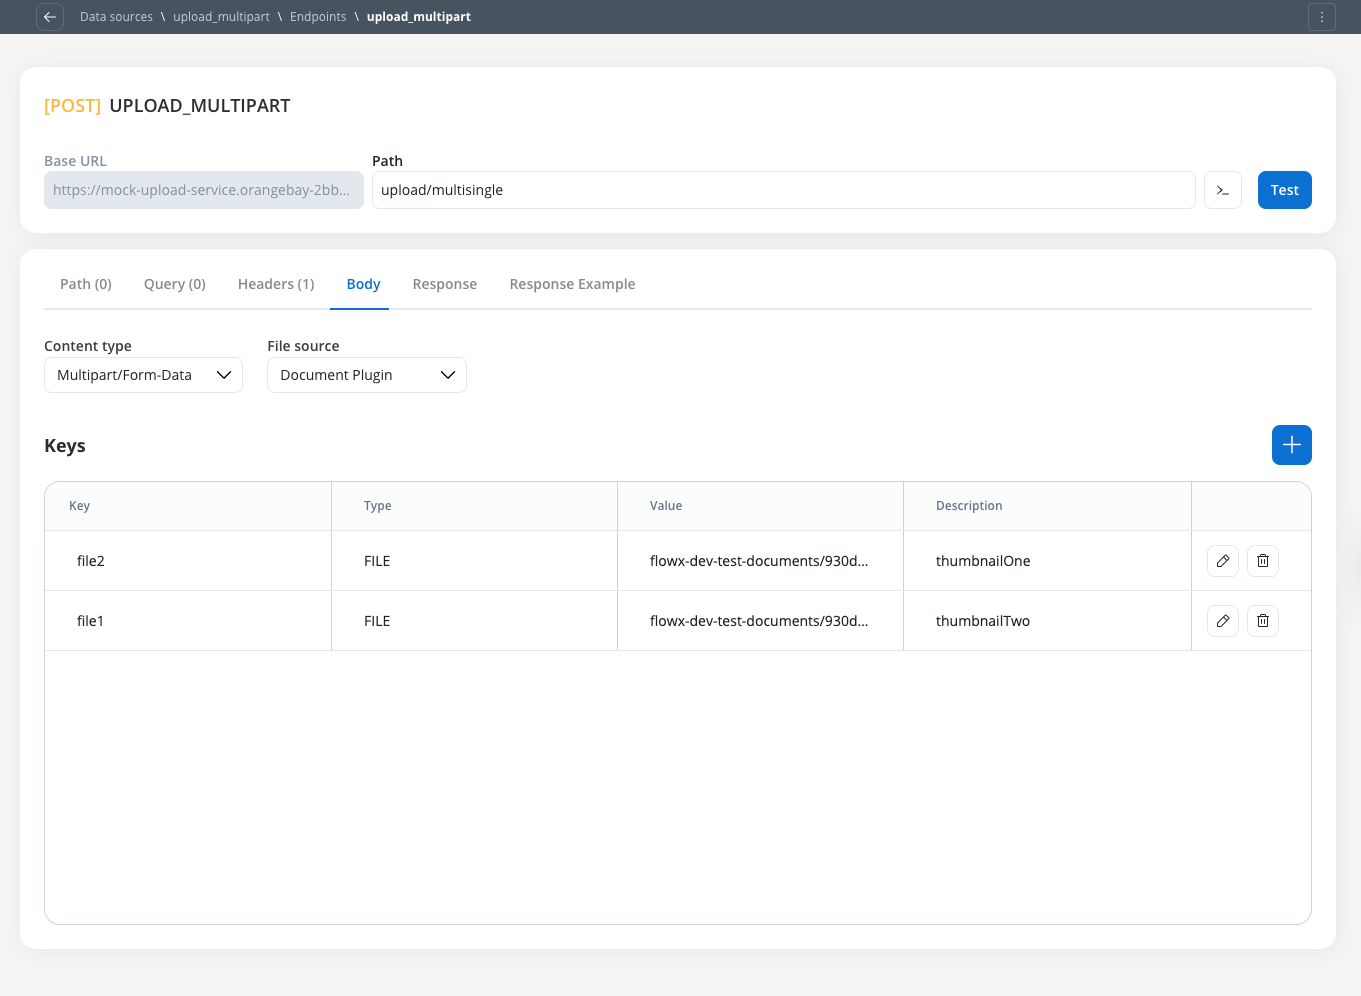
Text. The difference between content types is primarily in how data is packaged for transmission to the target server.Content Type: Single binary
Use this to send the raw file as the entire request body. This method sends only the file content without any additional form data or metadata.Document Plugin or S3 ProtocolContent Type: JSON
Runtime behavior & testing
Workflow node configuration
All configured file settings (e.g.,File Path, Folder, Process Instance ID) are exposed as parameters on the corresponding workflow nodes, allowing them to be set dynamically using process variables at runtime.
Response payload & logging
filePath to the stored file, not the raw Base64 string or binary content.filePath, not the raw file content.Error handling
If a node is configured to receive aSingle Binary file but the external system returns a JSON error (e.g., file not found), the JSON error will be correctly passed through to the workflow for handling.
Testing guidelines
Body and Headers sections for better clarity.Example: sending files to an external system after uploading a file to the Document Plugin
Upload a file to the Document Plugin
- Configure a User Task node where you will upload the file to the Document Plugin.
- Configure an Upload File Action node to upload the file to the Document Plugin.
- Configure a Save Data Action node to save the file to the Document Plugin.
Configure the Integration Designer
- Configure a REST Endpoint node to send the file to an external system.
Workflows
A workflow defines a series of tasks and processes to automate system integrations. Within the Integration Designer, workflows can be configured using different components to ensure efficient data exchange and process orchestration.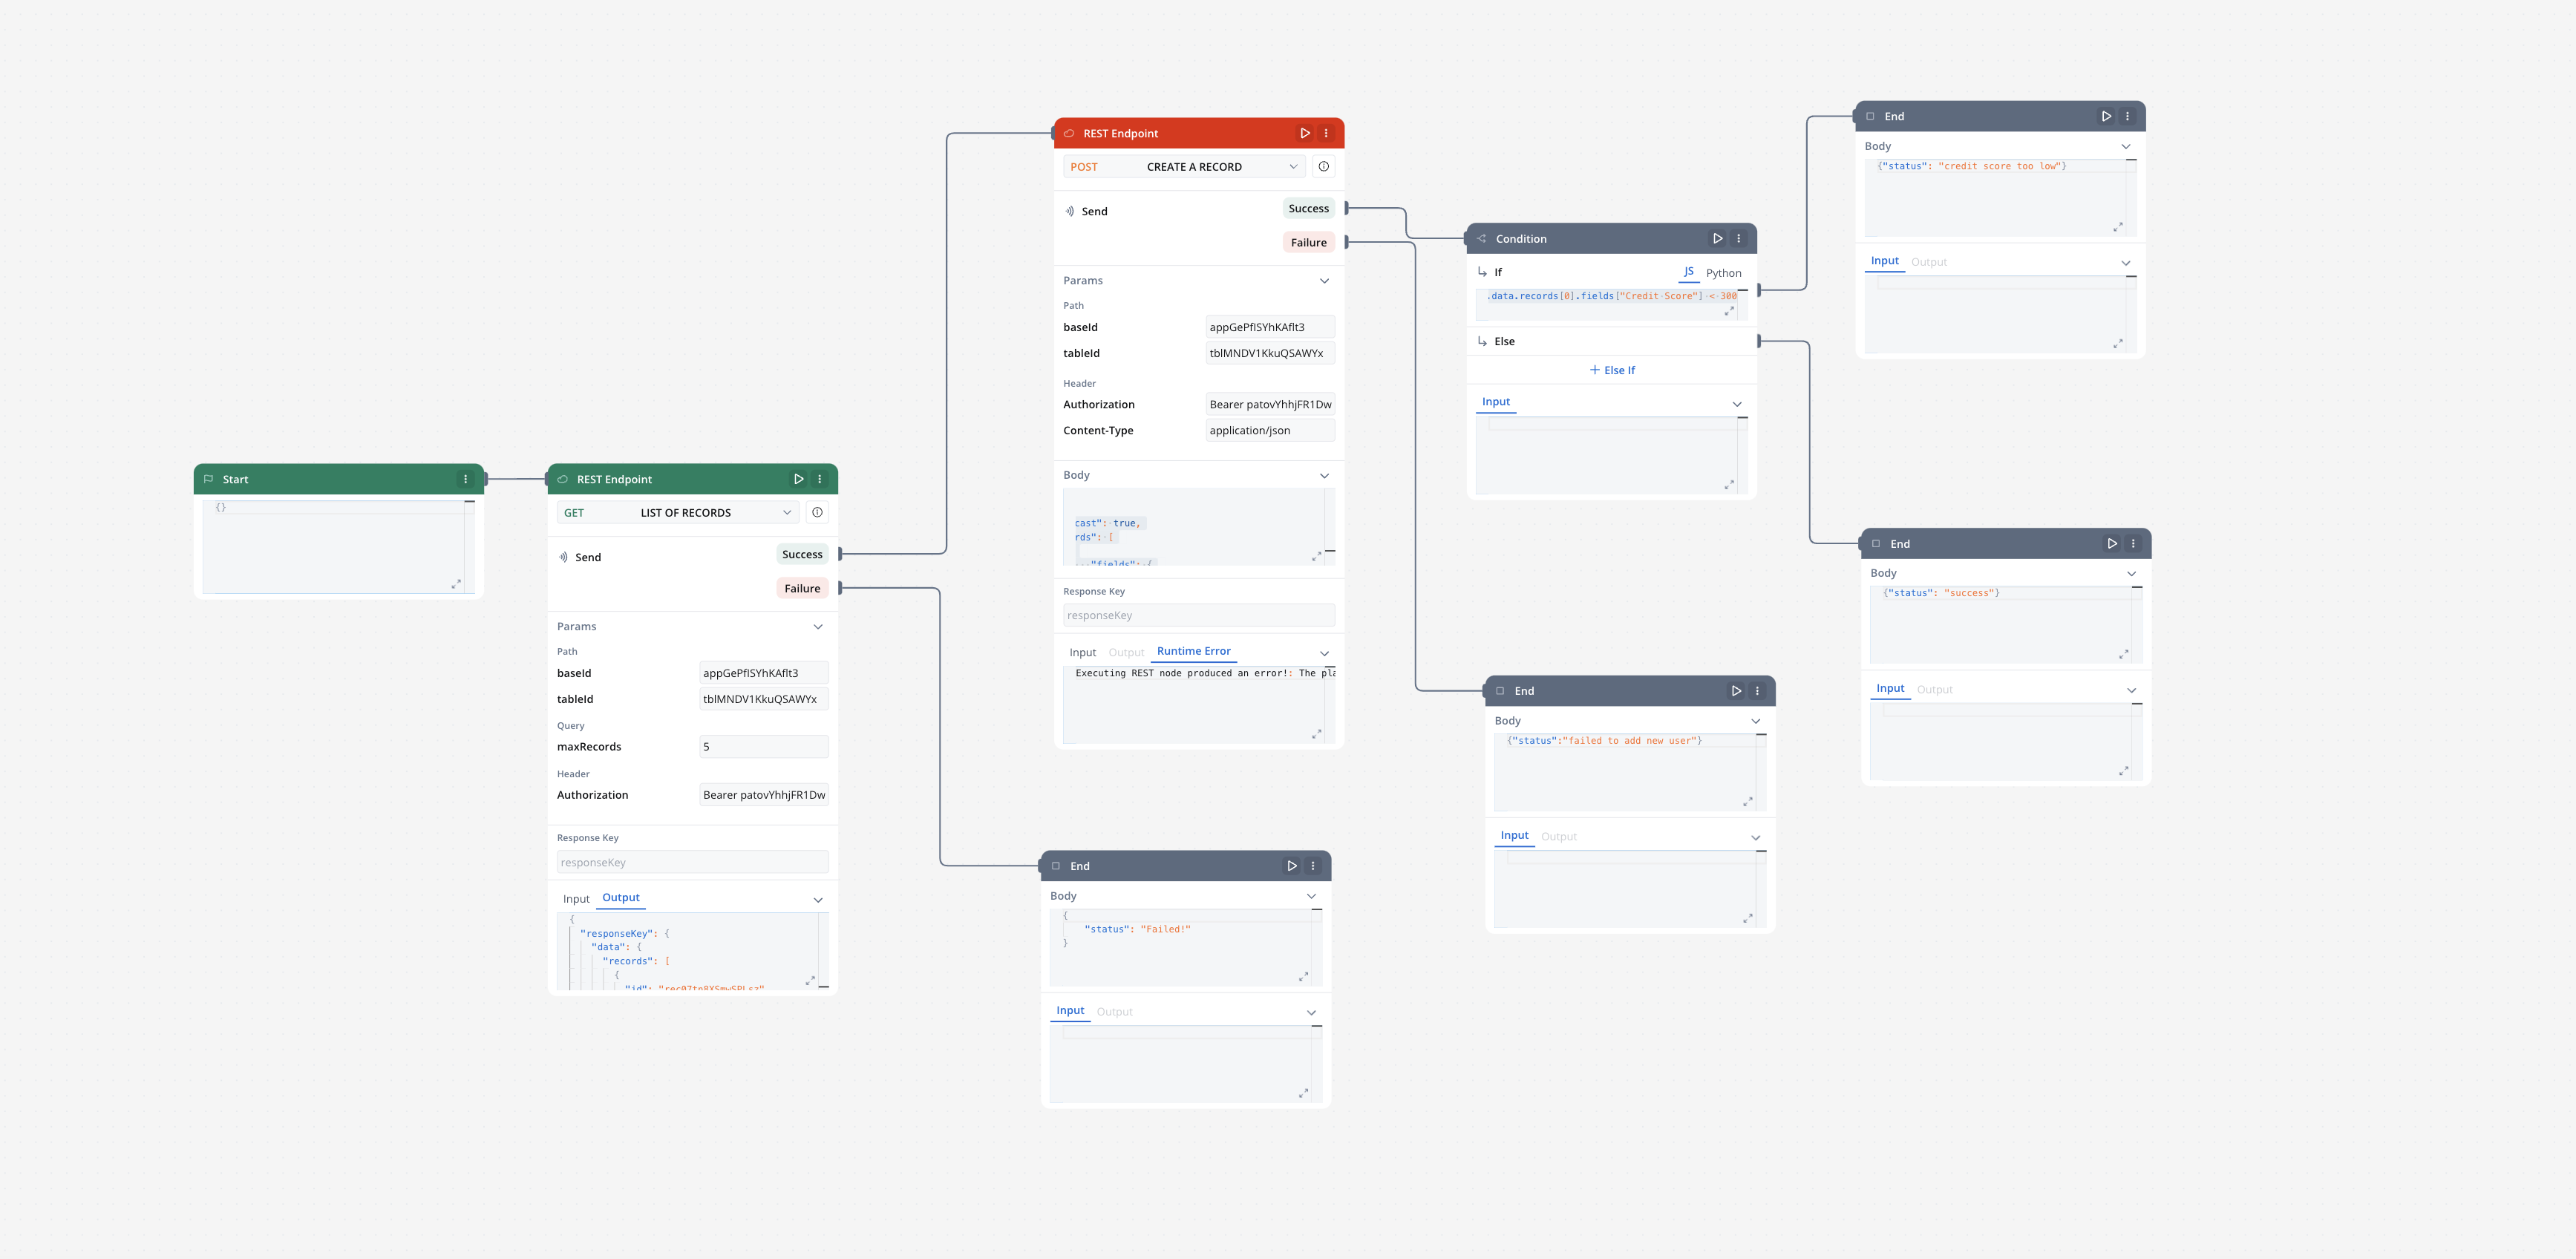
Creating a workflow
- Navigate to Workflow Designer:
- In FlowX.AI Designer to Projects -> Your application -> Integrations -> Workflows.
- Create a New Workflow, provide a name and description, and save it.
- Start to design your workflow by adding nodes to represent the steps of your workflow:
- Start Node: Defines where the workflow begins and also defines the input parameter for subsequent nodes.
- REST endpoint nodes: Add REST API calls for fetching or sending data.
- FlowX Database nodes: Read and write data to FlowX Database collections.
- Custom Agent nodes: Enable AI agents to use MCP tools for intelligent task automation.
- Fork nodes (conditions): Add conditional logic for decision-making.
- Data mapping nodes (scripts): Write custom scripts in JavaScript or Python.
- Subworkflow nodes: Invoke other workflows as reusable components.
- End Nodes: Capture output data as the completed workflow result, ensuring the process concludes with all required information.
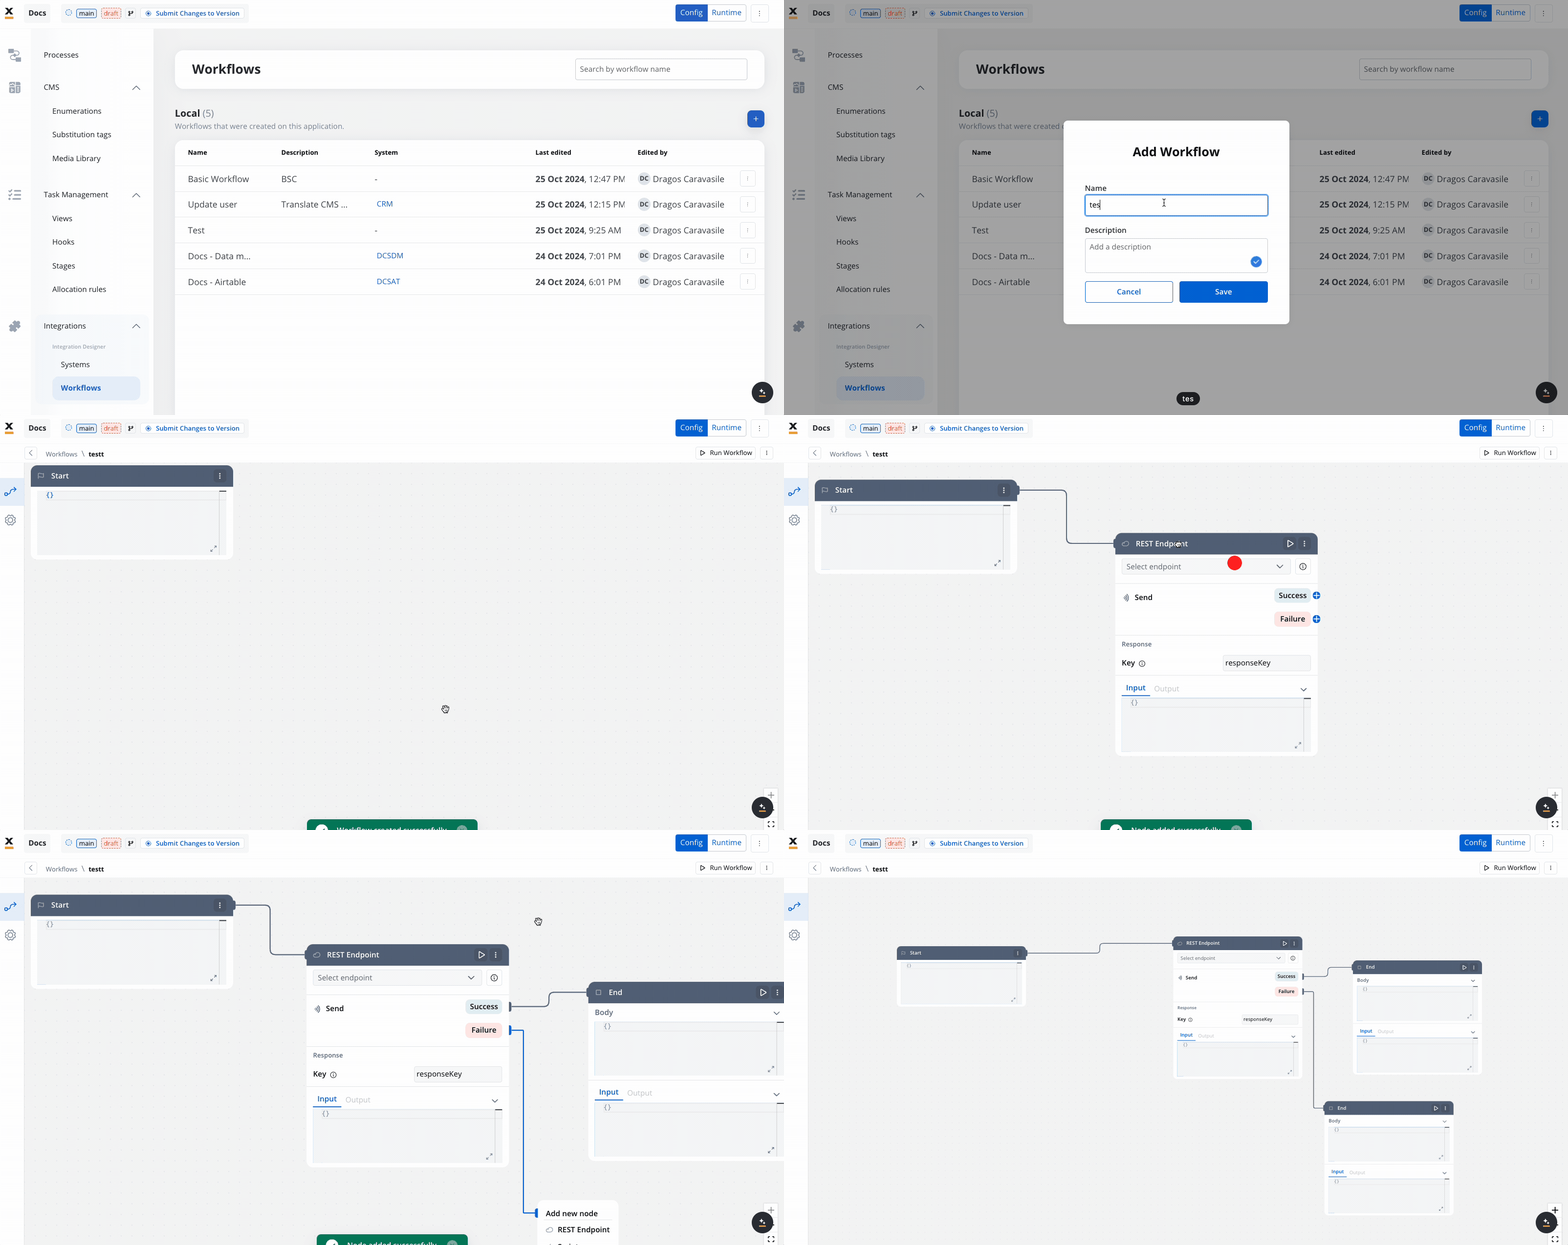
Workflow nodes overview
| Node Type | Purpose |
|---|---|
| Start Node | Defines workflow input and initializes data |
| REST Endpoint Node | Makes REST API calls to external systems |
| FlowX Database Node | Reads/writes data to the FlowX Database |
| Custom Agent Node | Enables AI agents to use MCP tools for intelligent automation |
| Condition (Fork) | Adds conditional logic and parallel branches |
| Script Node | Transforms or maps data using JavaScript or Python |
| Subworkflow Node | Invokes another workflow as a modular, reusable subcomponent |
| End Node | Captures and outputs the final result of the workflow |
Workflow data models
Key benefits
Automatic Input Management
Consistent Data Lineage
Type Safety
Better Integration
Quick start
Define Data Model
Configure Input Parameters
Automatic Pre-fill
Map to Processes
Complete Workflow Data Models Guide
Start node
The Start node is the mandatory first node in any workflow. It defines the input data model and passes this data to subsequent nodes.REST endpoint node
Enables communication with external systems via REST API calls. Supports GET, POST, PUT, PATCH, and DELETE methods. Endpoints are selected from a dropdown, grouped by system.- Params: Configure path, query, and header parameters.
- Input/Output: Input is auto-populated from the previous node; output displays the API response.
FlowX database node
Allows you to read and write data to the FlowX Database within your workflow.FlowX Database Documentation
Custom Agent node
Enables AI agents to perform intelligent, autonomous tasks using Model Context Protocol (MCP) tools within your workflow. Custom Agent nodes apply ReAct (Reasoning and Acting) to decide which tools to use and execute multi-step operations. Key capabilities:- Access external systems through MCP servers
- Execute complex, multi-step operations autonomously
- Make intelligent decisions based on available tools
- Return structured responses for downstream processing
- Customer support automation with CRM integration
- Data analysis across multiple systems
- Dynamic integration orchestration
- Autonomous problem-solving workflows
Custom Agent Node Documentation
Condition (Fork) node
Evaluates logical conditions (JavaScript or Python) to direct workflow execution along different branches.- If/Else: Routes based on condition evaluation.
- Parallel Processing: Supports multiple branches for concurrent execution.
Parallel workflow execution
Parallel Workflows
Key concepts
Start Parallel Node
End Parallel Node
Path Visualization
Runtime Monitoring
How to use parallel workflows
Design Parallel Paths
Configure Branch Logic
Merge Paths
Runtime Execution
Use cases
Multiple API Calls
Data Enrichment
Notification Broadcasting
Document Processing
Runtime behavior
Path Timing
Path Timing
- Path Time: Sum of all node execution times within that branch
- End Parallel Time: Node processing time + maximum time across all parallel paths
- Example: If Branch A takes 2s and Branch B takes 5s, the End Parallel node completes after 5s (plus its own processing time)
Console Logging
Console Logging
- Start Parallel Node: Displays Input tab showing data split across branches
- End Parallel Node: Displays Output tab showing merged results from all branches
- Path Grouping: Nodes within each parallel path are grouped for easy monitoring
Error Handling
Error Handling
- If any branch fails, the workflow handles it according to standard error handling rules
- End Parallel node waits for all non-failed branches before continuing
- Runtime validation ensures parallel branches are configured correctly
Limitations and considerations
- Array Processing: Arrays aren’t merged across parallel branches. When multiple branches modify the same array path, the last branch to complete determines the final array value. Cannot process individual objects from the same array in different parallel branches (for example, first element in branch 1, second element in branch 2). To preserve data from all branches, save to different keys and merge manually using a script before the end node
- Proper Branch Closure: All start parallel branches must be properly closed with end parallel nodes. Nodes following a start parallel node must merge into the same end parallel node (except those terminating with end workflow nodes)
Benefits
Performance Gains
Better Resource Utilization
Clearer Design
Enhanced Monitoring
Script node
Executes custom JavaScript or Python code to transform, map, or enrich data between nodes.Subworkflow node
The Subworkflow node allows you to modularize complex workflows by invoking other workflows as reusable subcomponents. This approach streamlines process design, promotes reuse, and simplifies maintenance.Add a Subworkflow Node
Configure the Subworkflow Node
- Workflow Selection: Pick the workflow to invoke.
- Open: Edit the subworkflow in a new tab.
- Preview: View the workflow canvas in a popup.
- Response Key: Set a key (e.g.,
response_key) for output. - Input: Provide input in JSON format.
- Output: Output is read-only JSON after execution.
Execution logic and error handling
- Parent workflow waits for subworkflow completion before proceeding.
- If the subworkflow fails, the parent workflow halts at this node.
- Subworkflow output is available to downstream nodes via the response key.
- Logs include workflow name, instance ID, and node statuses for both parent and subworkflow.
Console logging, navigation, and read-only mode
- Console shows input/output, workflow name, and instance ID for each subworkflow run.
- Open subworkflow in a new tab for debugging from the console.
- Breadcrumbs enable navigation between parent and subworkflow details.
- In committed/upper environments, subworkflow configuration is read-only and node runs are disabled (preview/open only).
Use case: CRM Data Retrieval with subworkflows
Suppose you need to retrieve CRM details in a subworkflow and use the output for further actions in the parent workflow.Create the Subworkflow
Add a Subworkflow Node in the Parent Workflow
Use Subworkflow Output in Parent Workflow
responseKey.Monitor and Debug
End node
The End node signifies the termination of a workflow’s execution. It collects the final output and completes the workflow process.- Receives input in JSON format from the previous node.
- Output represents the final data model of the workflow.
- Multiple End nodes are allowed for different execution paths.
Integration with external systems
This example demonstrates how to integrate FlowX with an external system, in this example, using Airtable, to manage and update user credit status data. It walks through the setup of an integration system, defining API endpoints, creating workflows, and linking them to BPMN processes in FlowX Designer.Integration in FlowX.AI
Define a System
- Name: Airtable Credit Data
- Base URL:
https://api.airtable.com/v0/
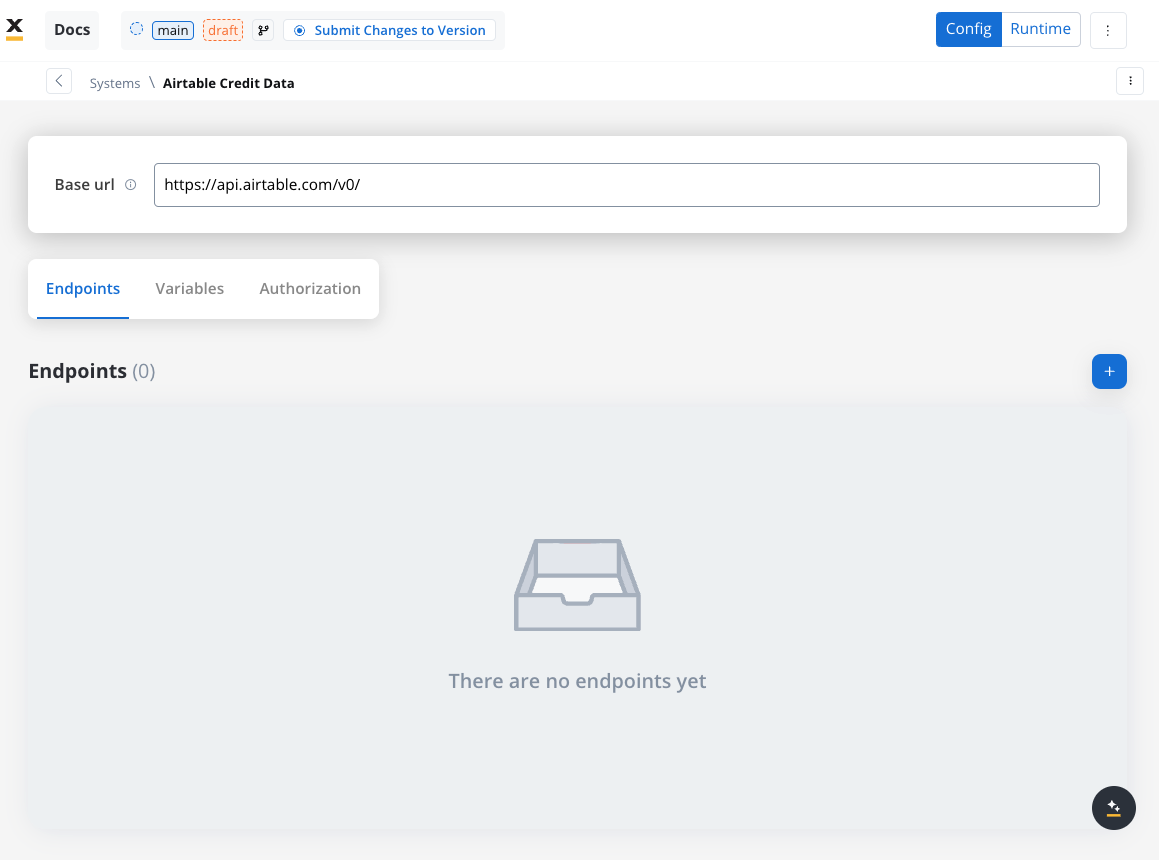
Define Endpoints
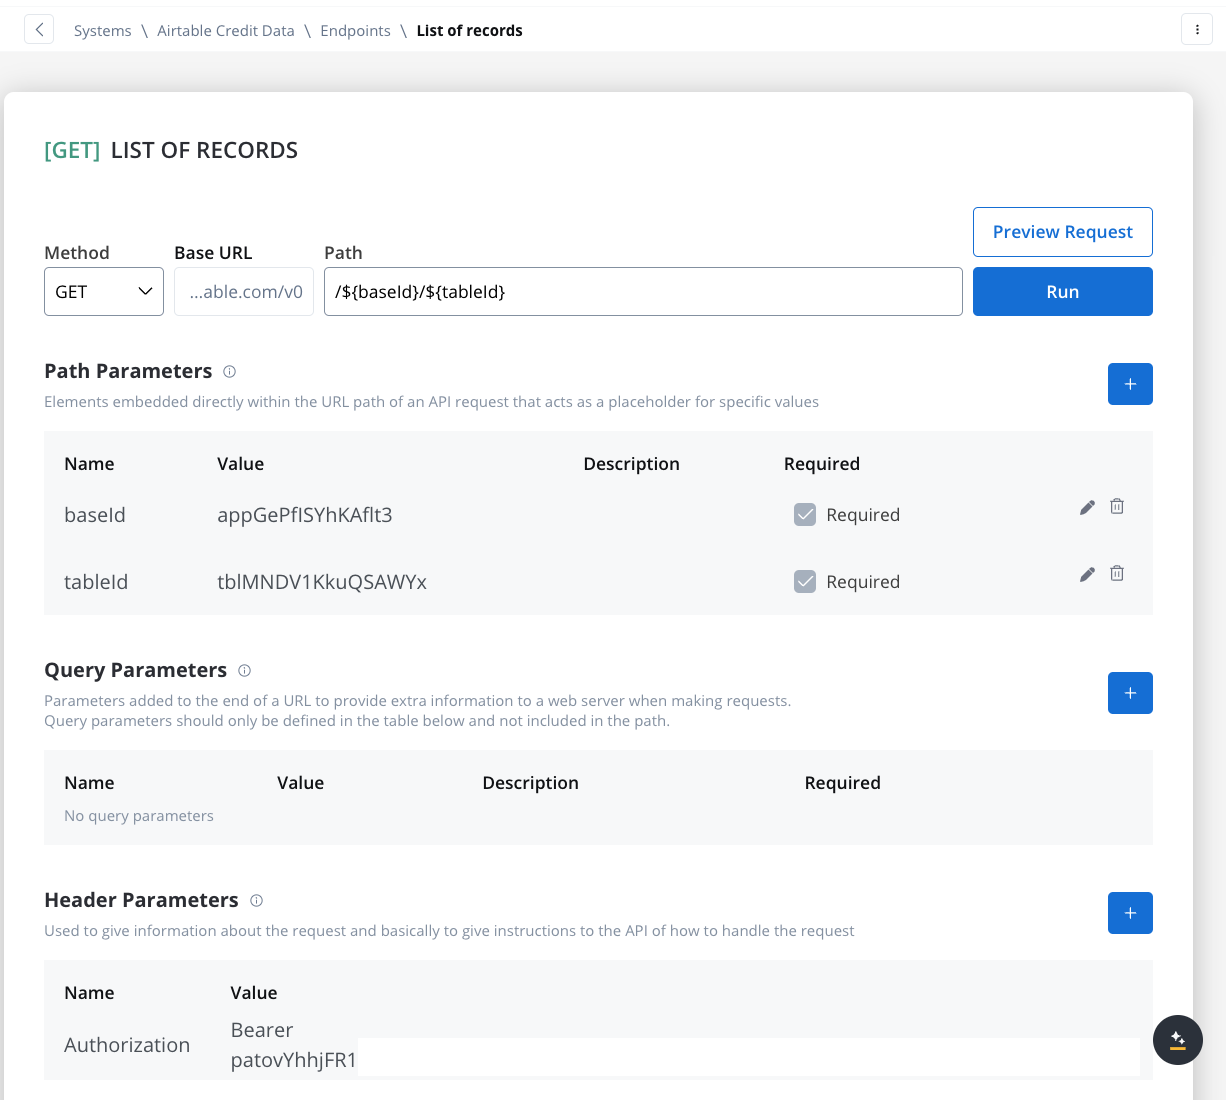
- Get Records Endpoint:
- Method: GET
- Path:
/${baseId}/${tableId} - Path Parameters: Add the values for the baseId and for the tableId so they will be available in the path.
- Header Parameters: Authorization Bearer token
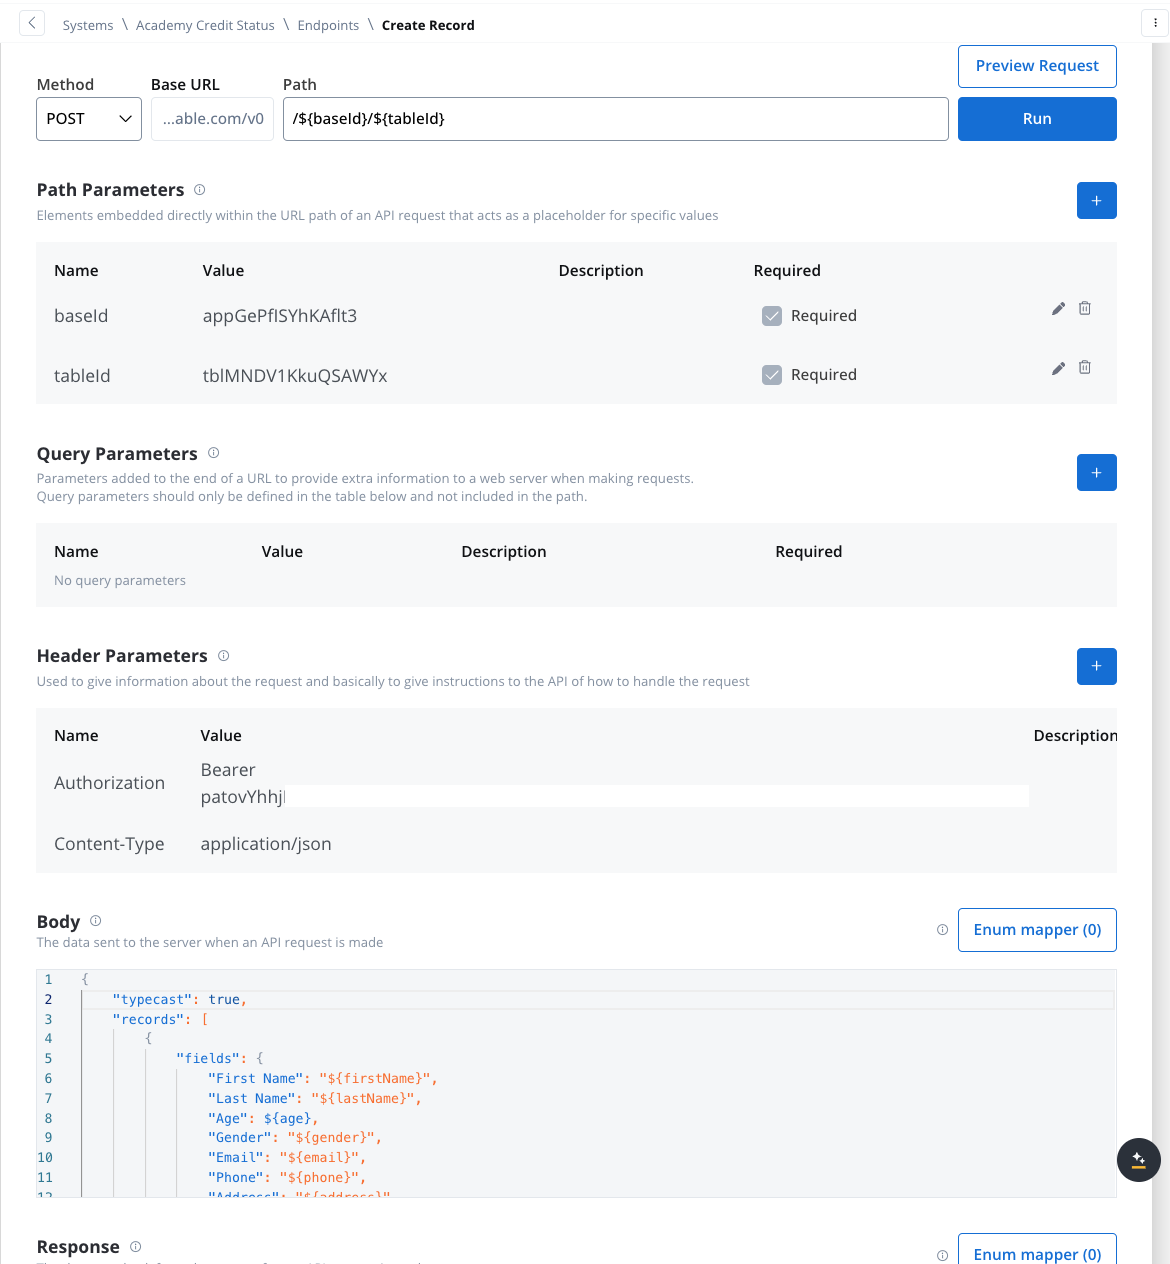
- Create Records Endpoint:
- Method: POST
- Path:
/${baseId}/${tableId} - Path Parameters: Add the values for the baseId and for the tableId so they will be available in the path.
- Header Parameters:
Content-Type: application/json- Authorization Bearer token
- Body: JSON format containing the fields for the new record. Example:
Design the Workflow
- Open the Workflow Designer and create a new workflow.
- Provide a name and description.
- Configure Workflow Nodes:
- Start Node: Initialize the workflow.
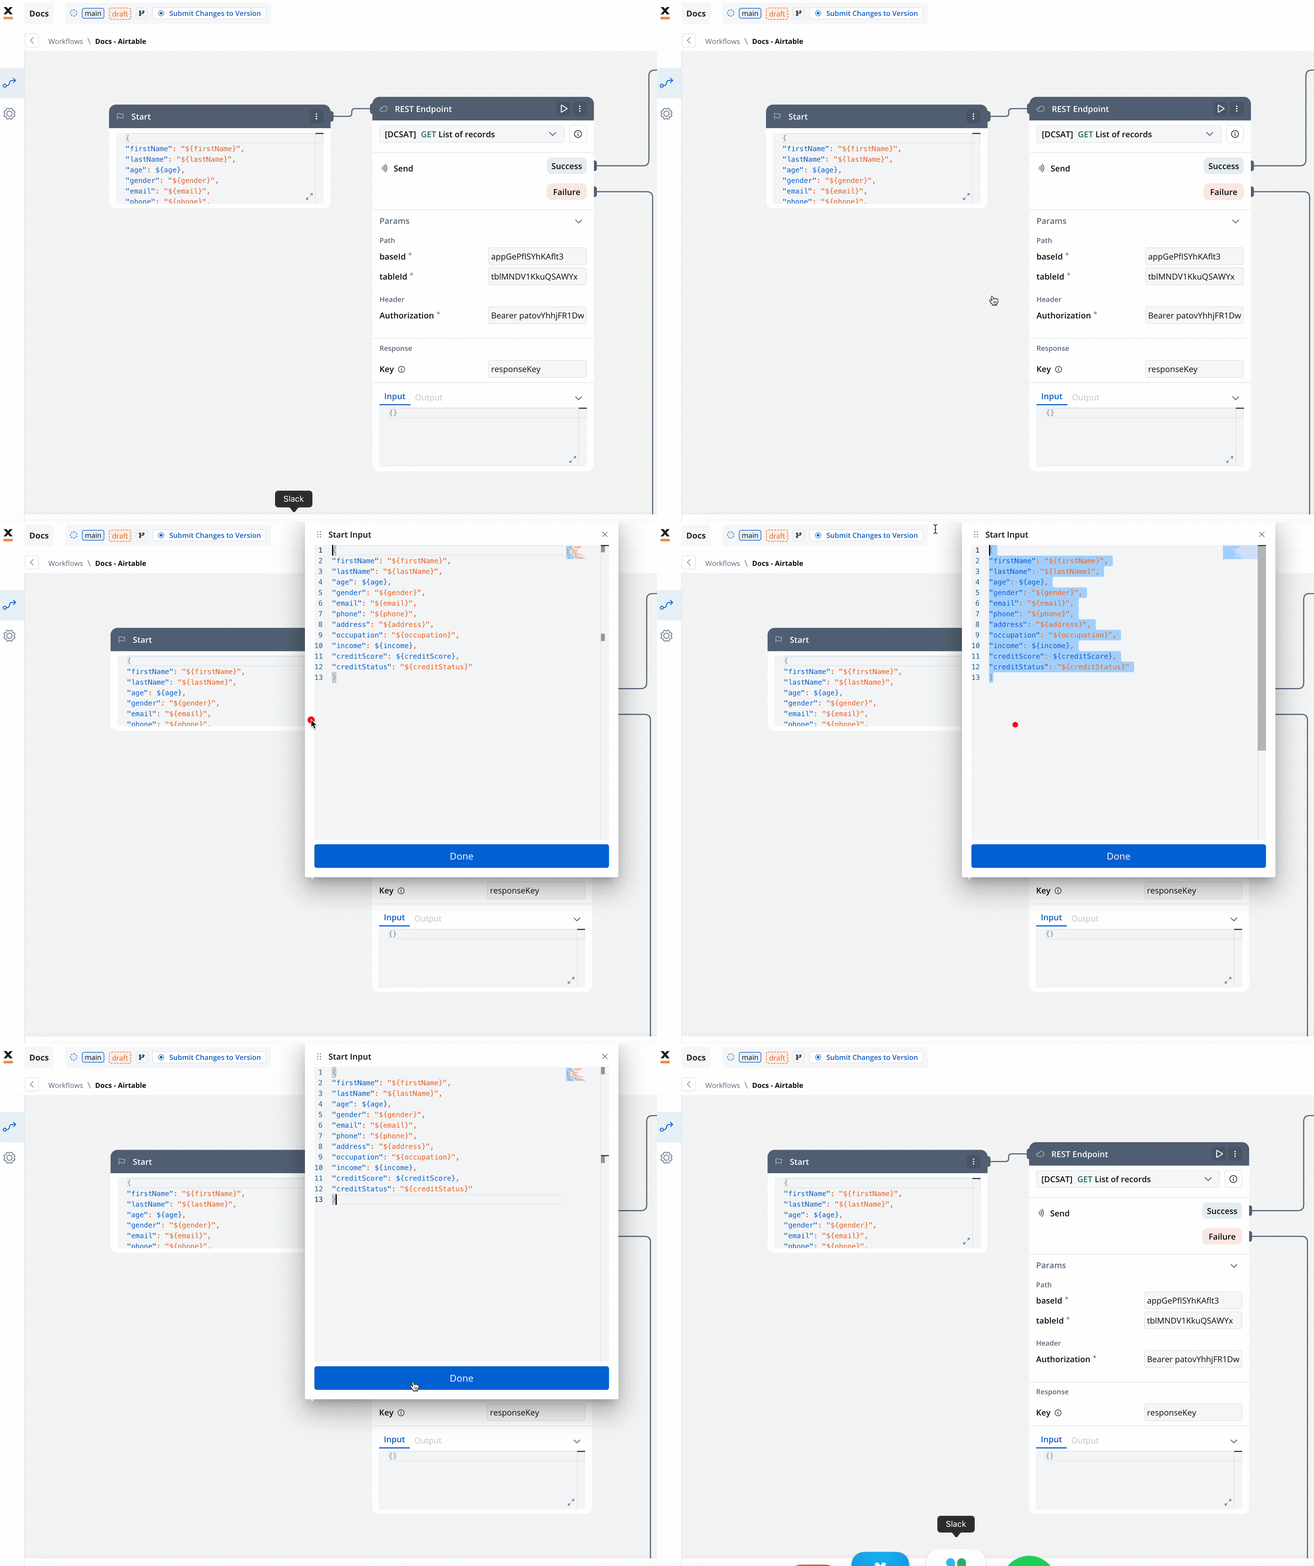
- REST Node: Set up API calls:
- GET Endpoint for fetching records from Airtable.
- POST Endpoint for creating new records.
- Condition Node: Add logic to handle credit scores (e.g., triggering a warning if the credit score is below 300).
- Script Node: Include custom scripts if needed for processing data (not used in this example).
- End Node: Define the end of the workflow with success or failure outcomes.
Link the Workflow to a Process
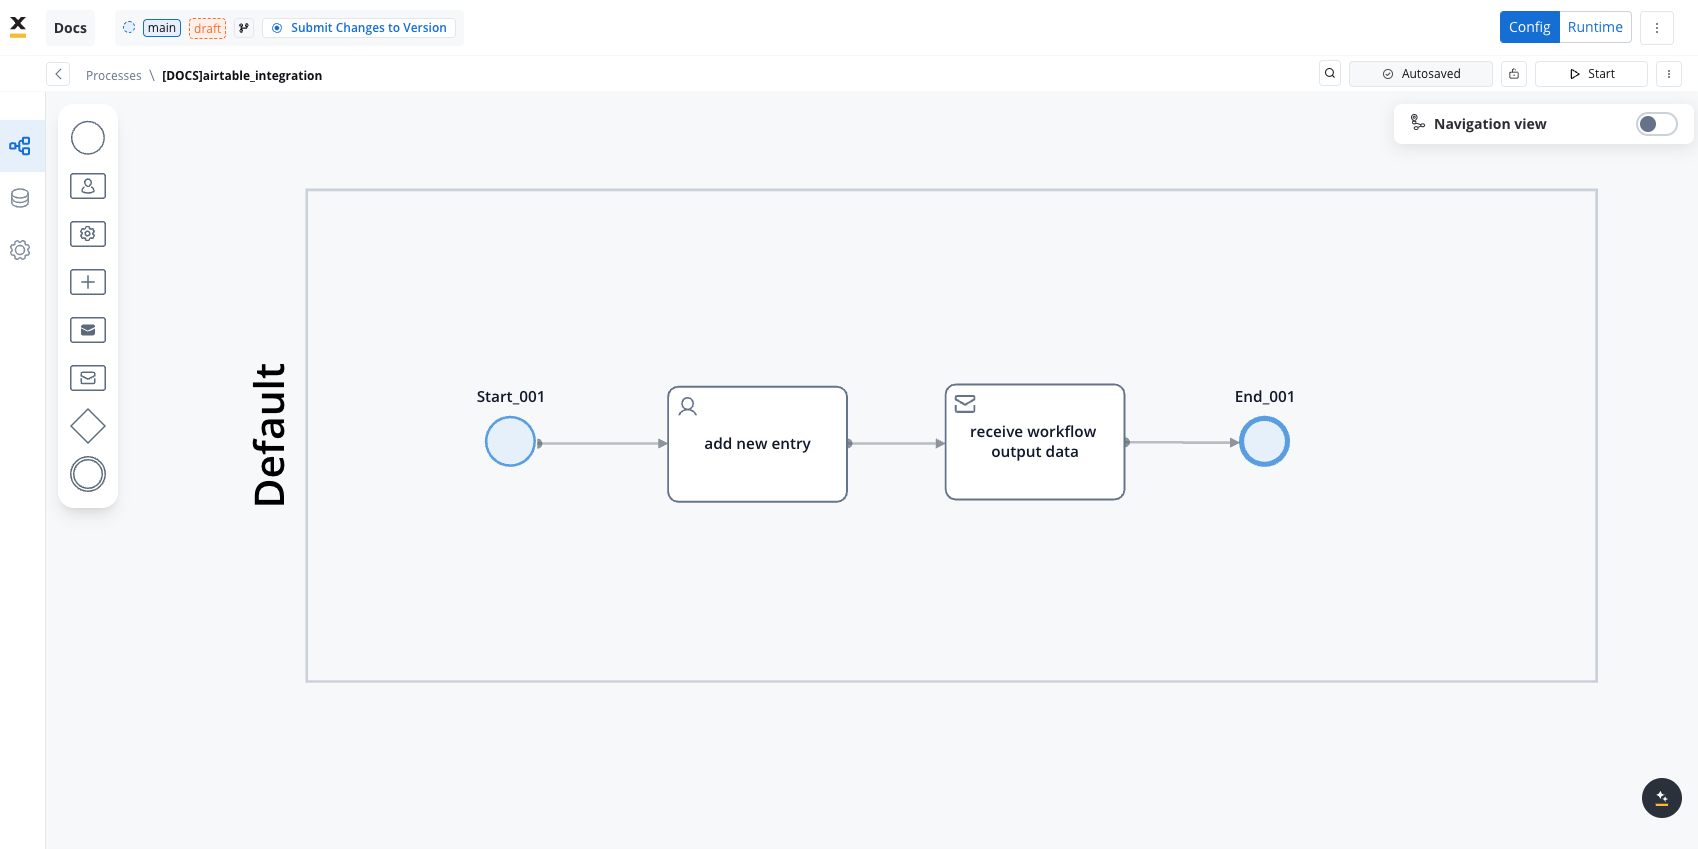
- Integrate the workflow into a BPMN process:
- Open the process diagram and include a User Task and a Receive Message Task.
- Map Data in the UI Designer:
- Create the data model
- Link data attributes from the data model to form fields, ensuring the user input aligns with the expected parameters.
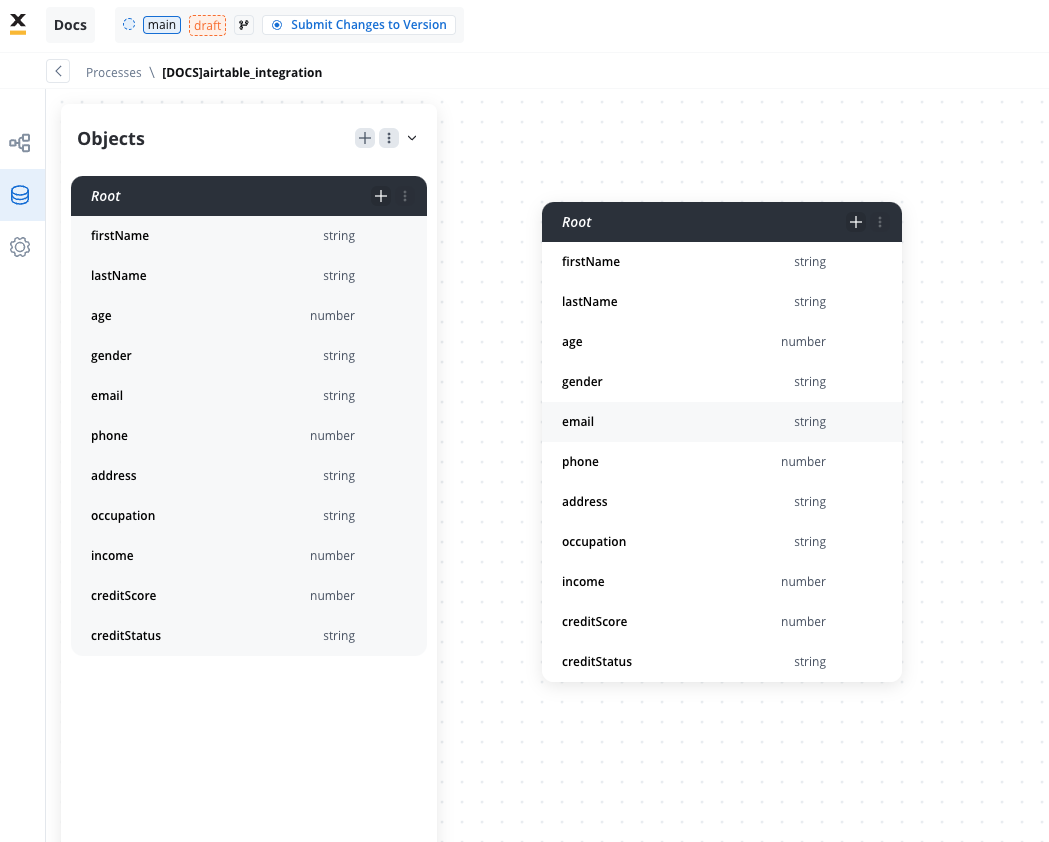
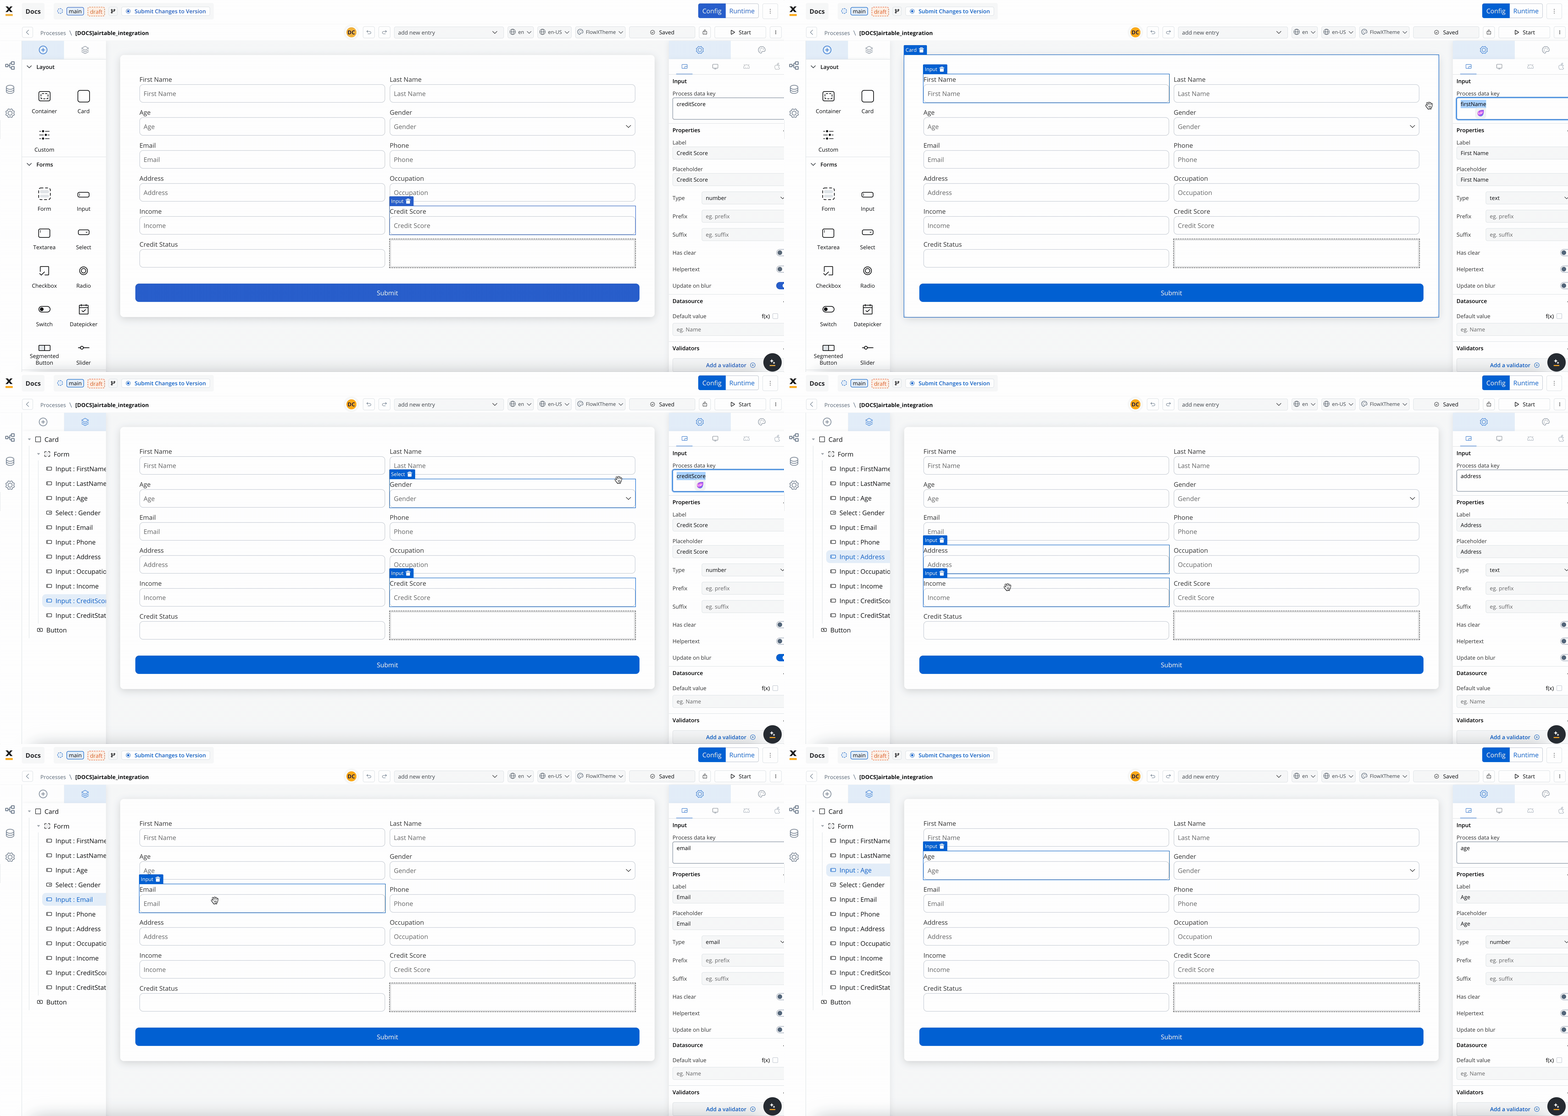
- Add a Start Integration Workflow node action:
- Make sure all the input will be captured.
Monitor Workflow and Capture Output
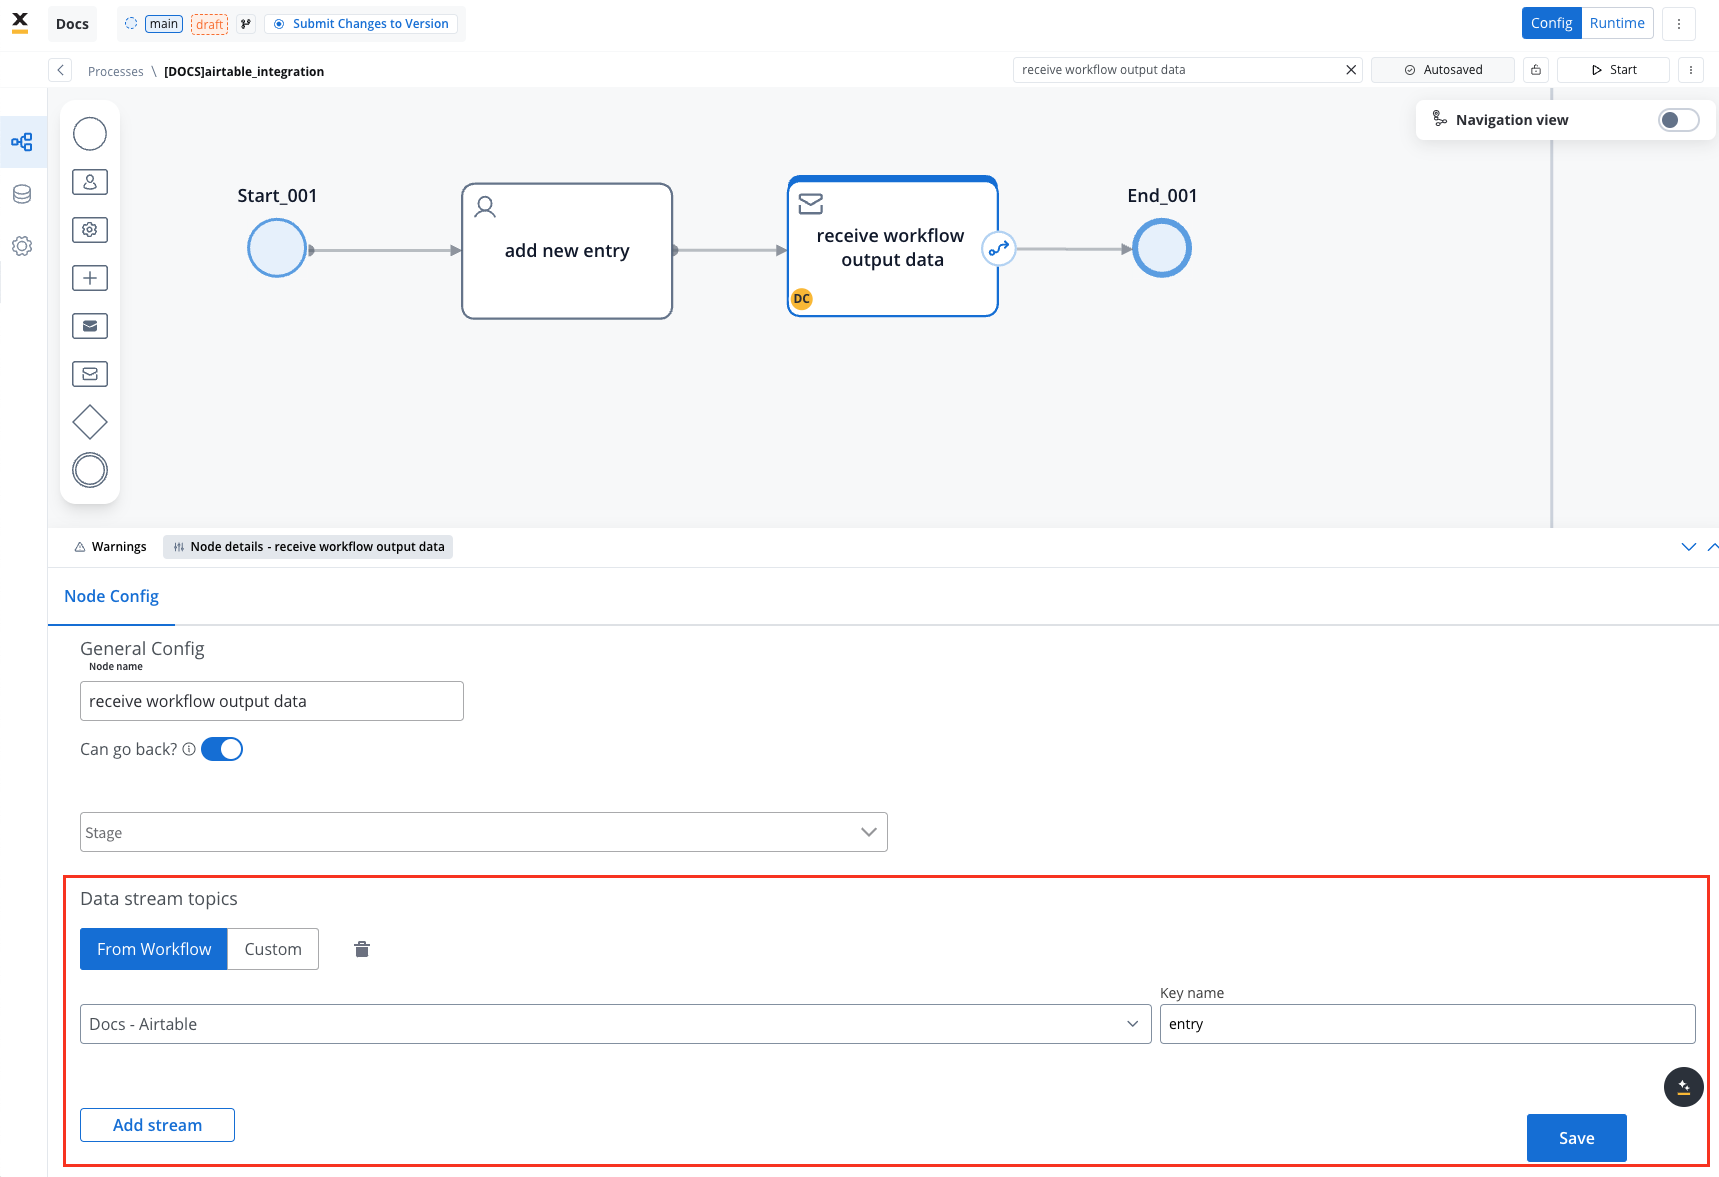
- Use the Receive Message Task to capture workflow outputs like status or returned data.
- Set up a Data stream topic to ensure workflow output is mapped to a predefined key.
Start the integration
- Start your process to initiate the workflow integration. It should add a new user with the details captured in the user task.
- Check if it worked by going to your base in Airtable. You can see, our user has been added.
This example demonstrates how to integrate Airtable with FlowX to automate data management. You configured a system, set up endpoints, designed a workflow, and linked it to a BPMN process.
FAQs
Can I use protocols other than REST?
Can I use protocols other than REST?
How is security handled in integrations??
How is security handled in integrations??
How are errors handled?
How are errors handled?
Can I import endpoint specifications in the Integration Designer?
Can I import endpoint specifications in the Integration Designer?
Can I cache responses from all endpoint methods?
Can I cache responses from all endpoint methods?
What happens if the cache service fails?
What happens if the cache service fails?
Can I use different cache policies for the same endpoint in different workflows?
Can I use different cache policies for the same endpoint in different workflows?
How do I know if my workflow is using cached data?
How do I know if my workflow is using cached data?


