Documentation Index
Fetch the complete documentation index at: https://docs.flowx.ai/llms.txt
Use this file to discover all available pages before exploring further.
Available starting with FlowX.AI 5.6.0Conversational workflows require the Chat component for user interaction.
Overview
Conversational workflows are a specialized workflow type designed for multi-turn chat interactions. Unlike output focused workflows that process structured input/output, conversational workflows manage ongoing dialogue between users and AI agents — handling message exchange, session memory, and response routing. When creating a workflow in the Integration Designer, you choose the workflow type: Chat Driven or Output Focused. This choice is permanent and cannot be changed after creation.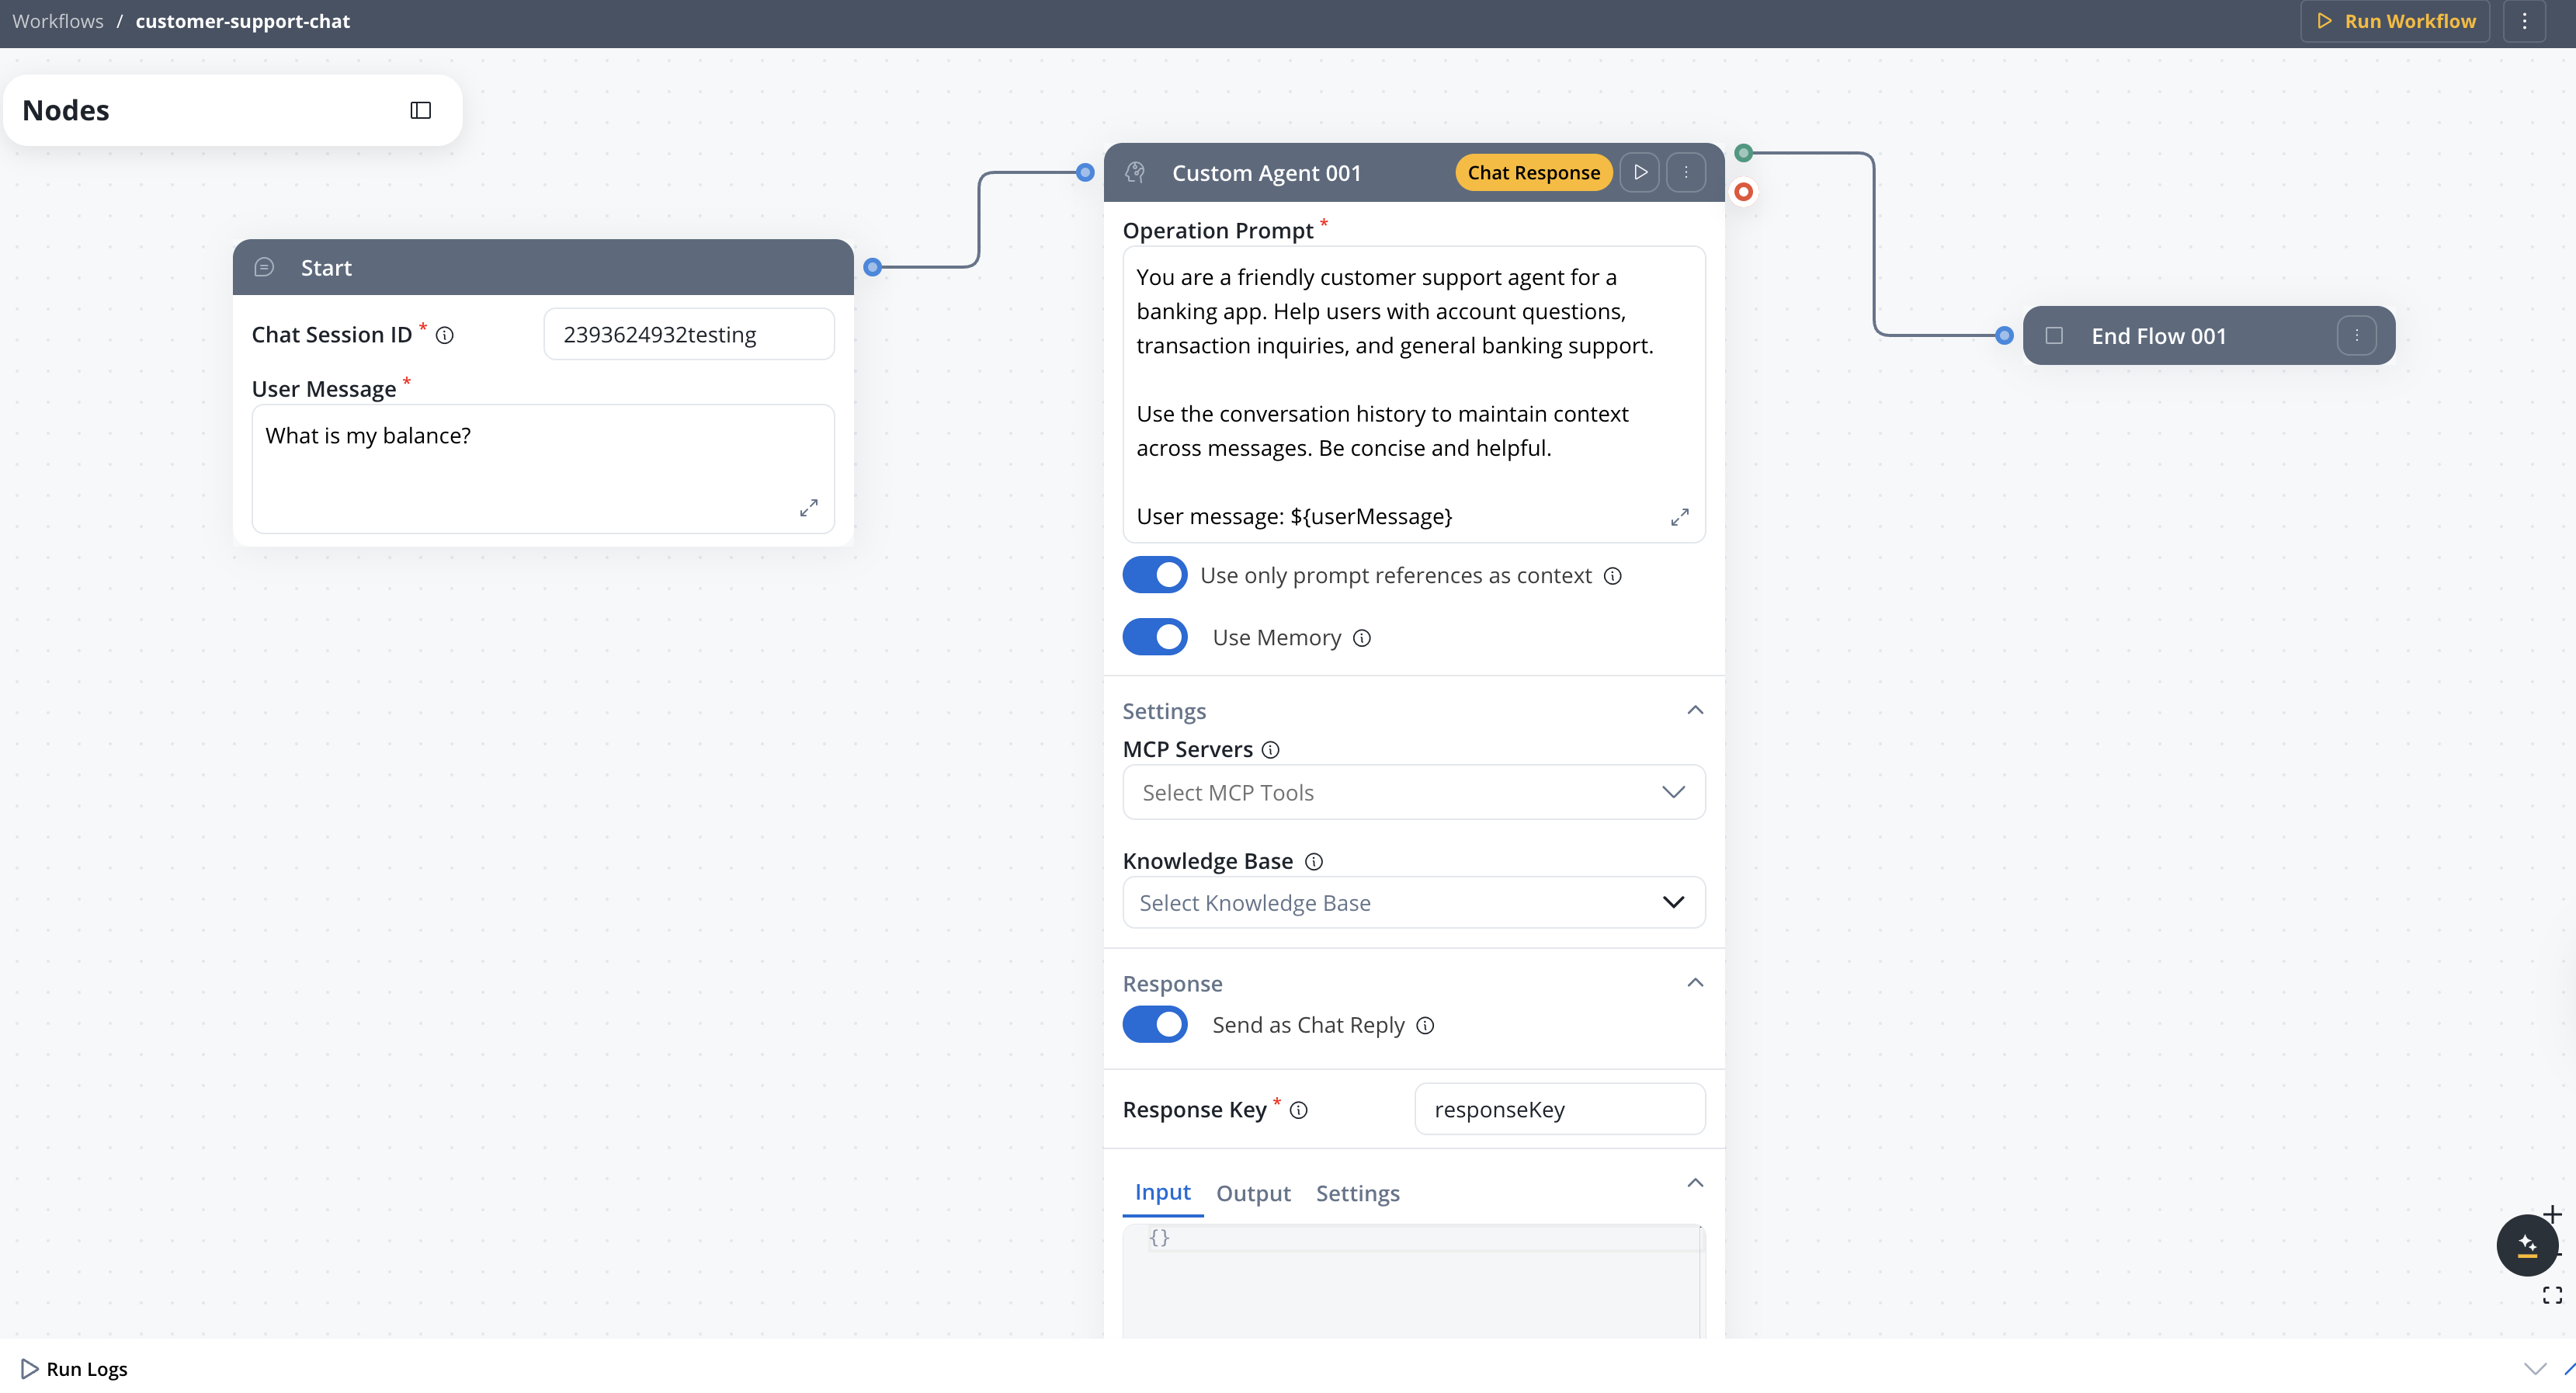
Session memory
Automatically persist and retrieve conversation history across messages within a session
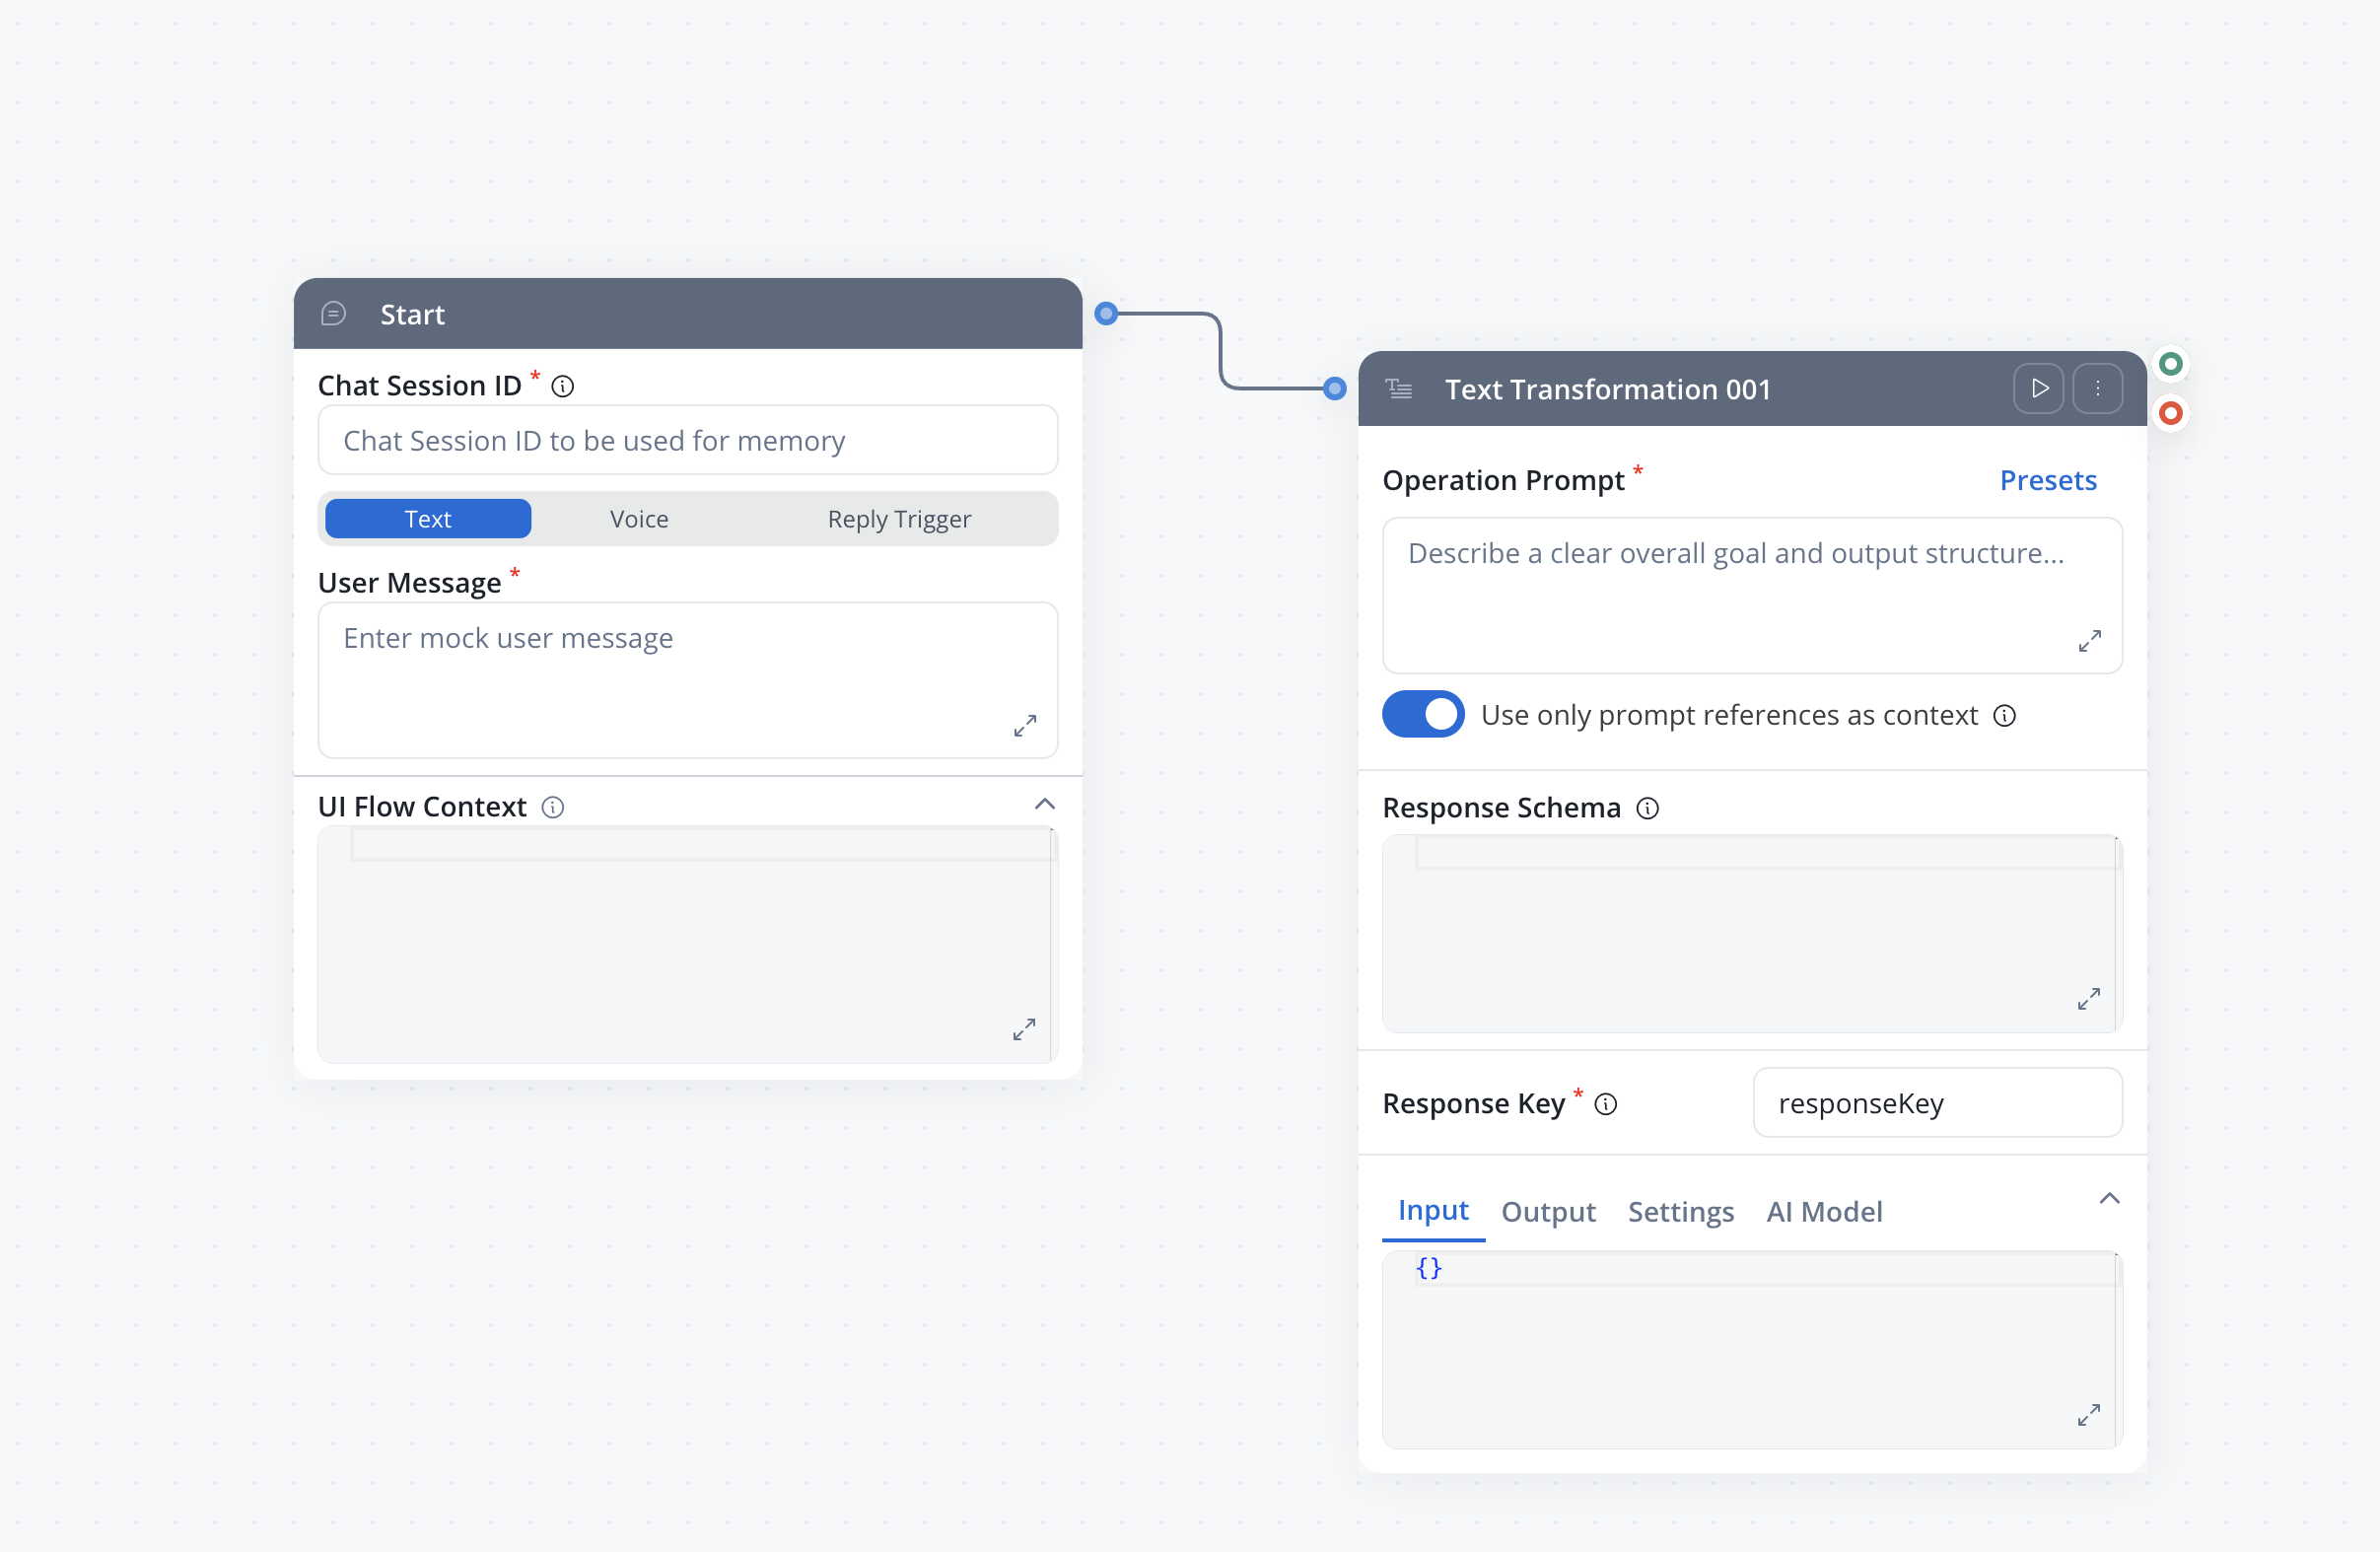
Dedicated Start node
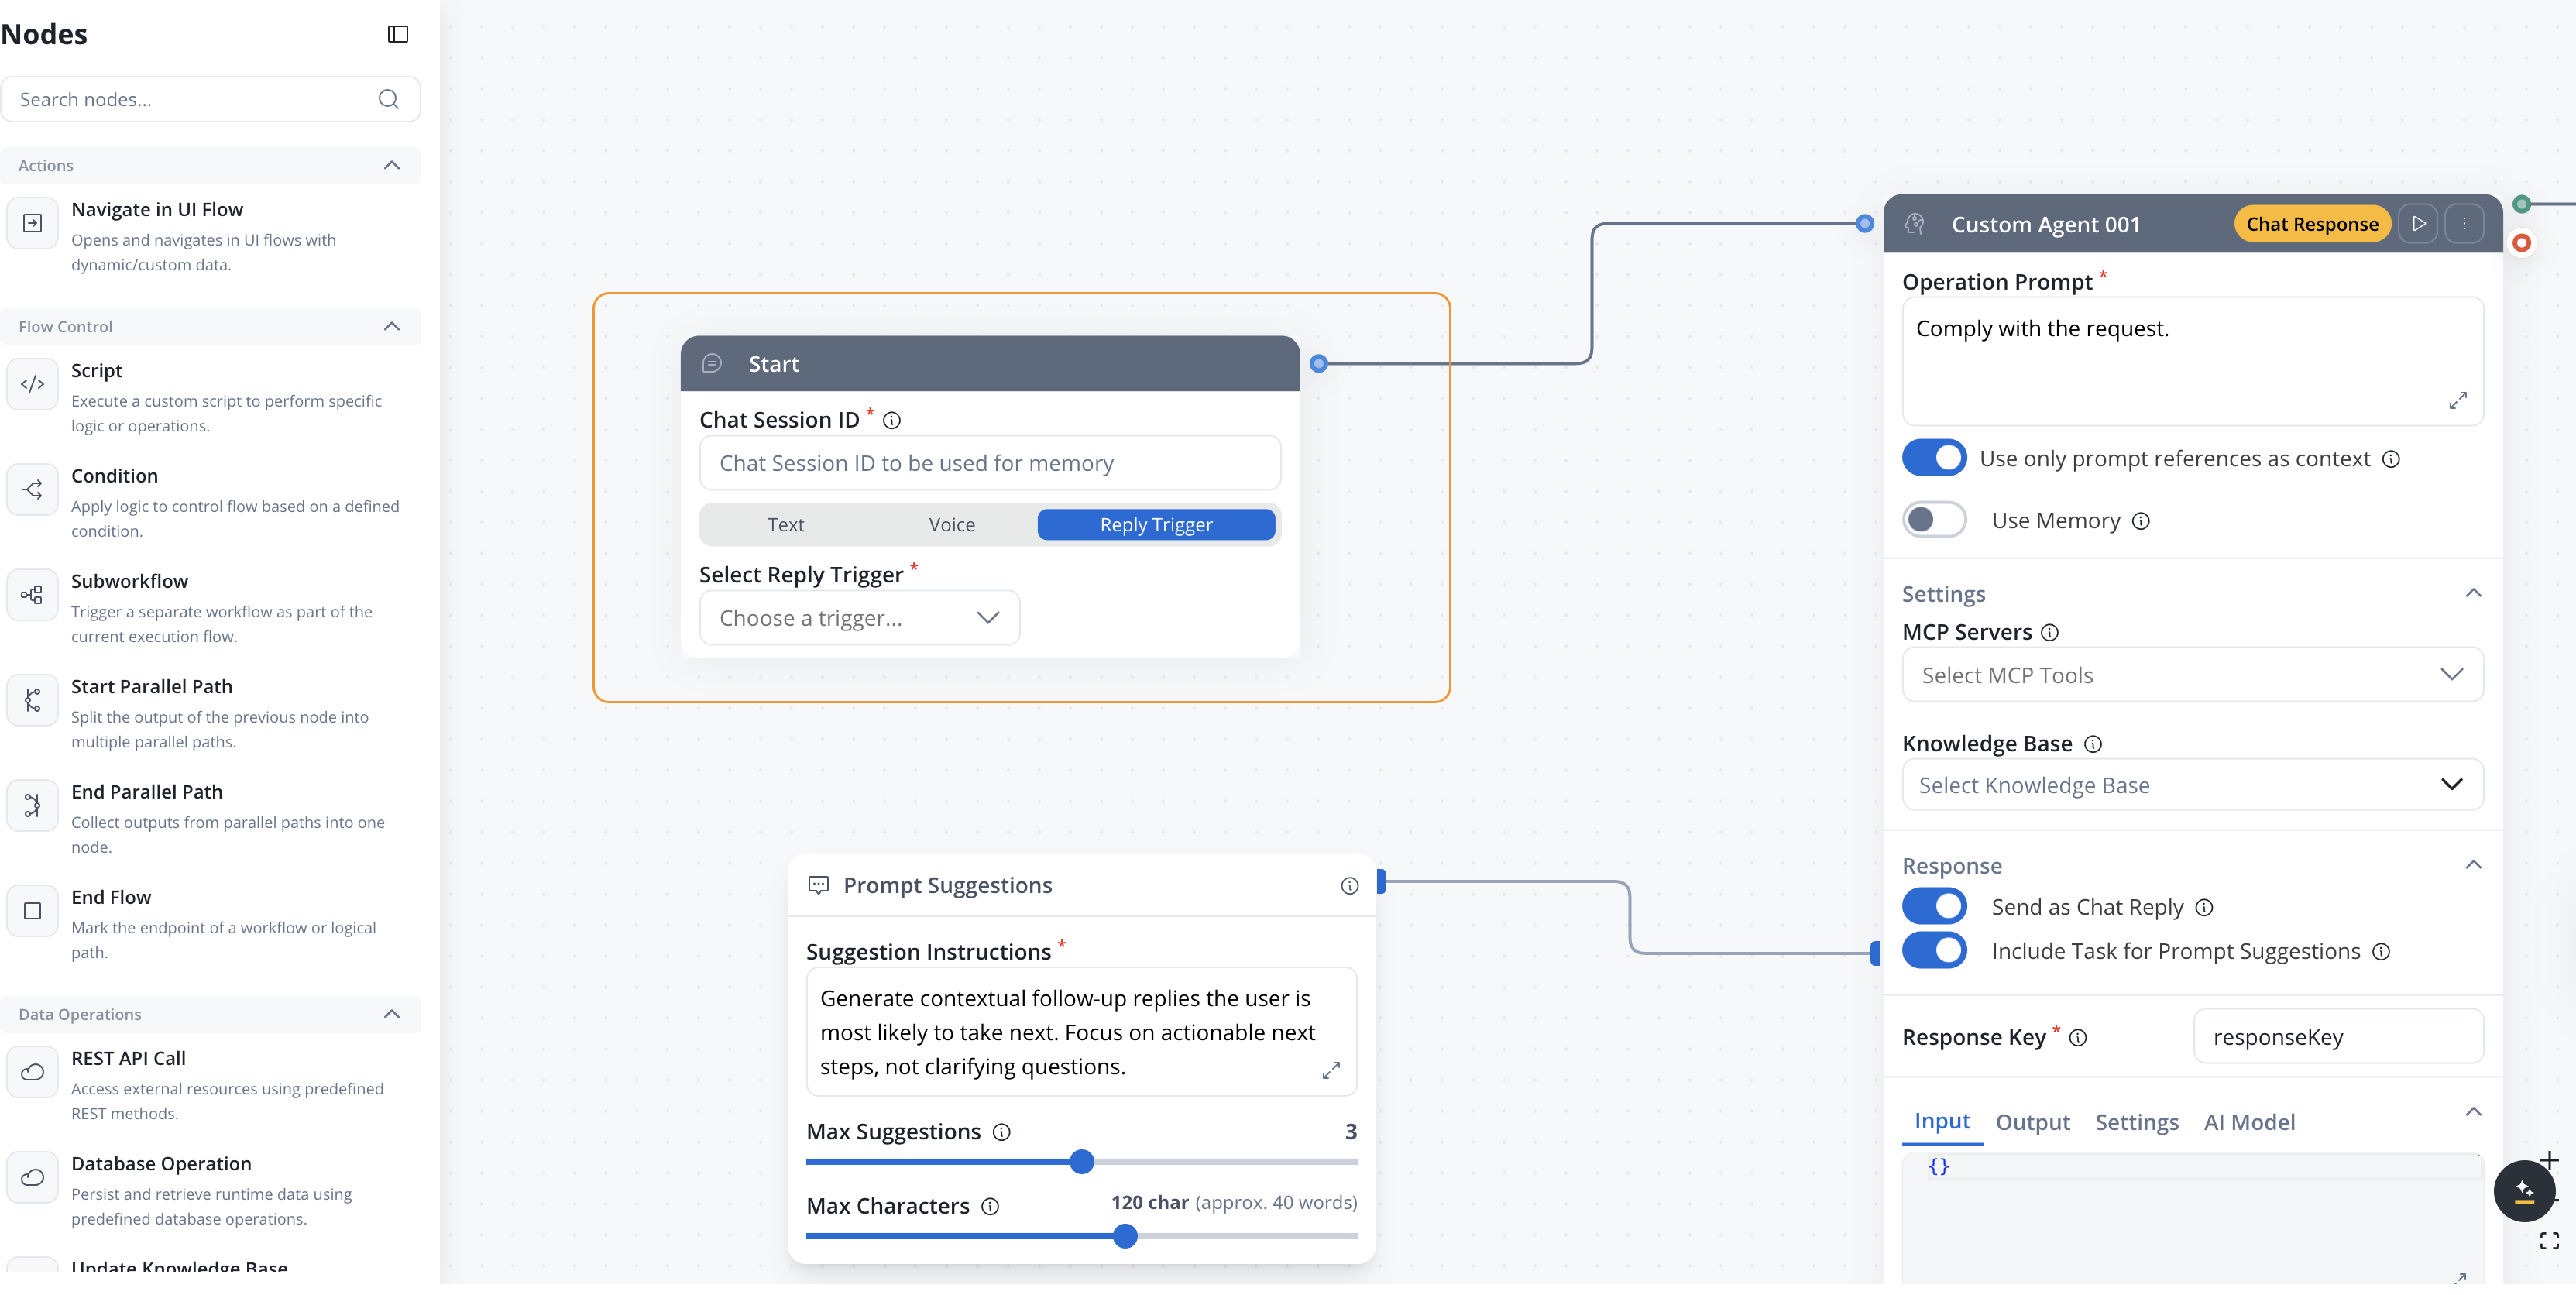
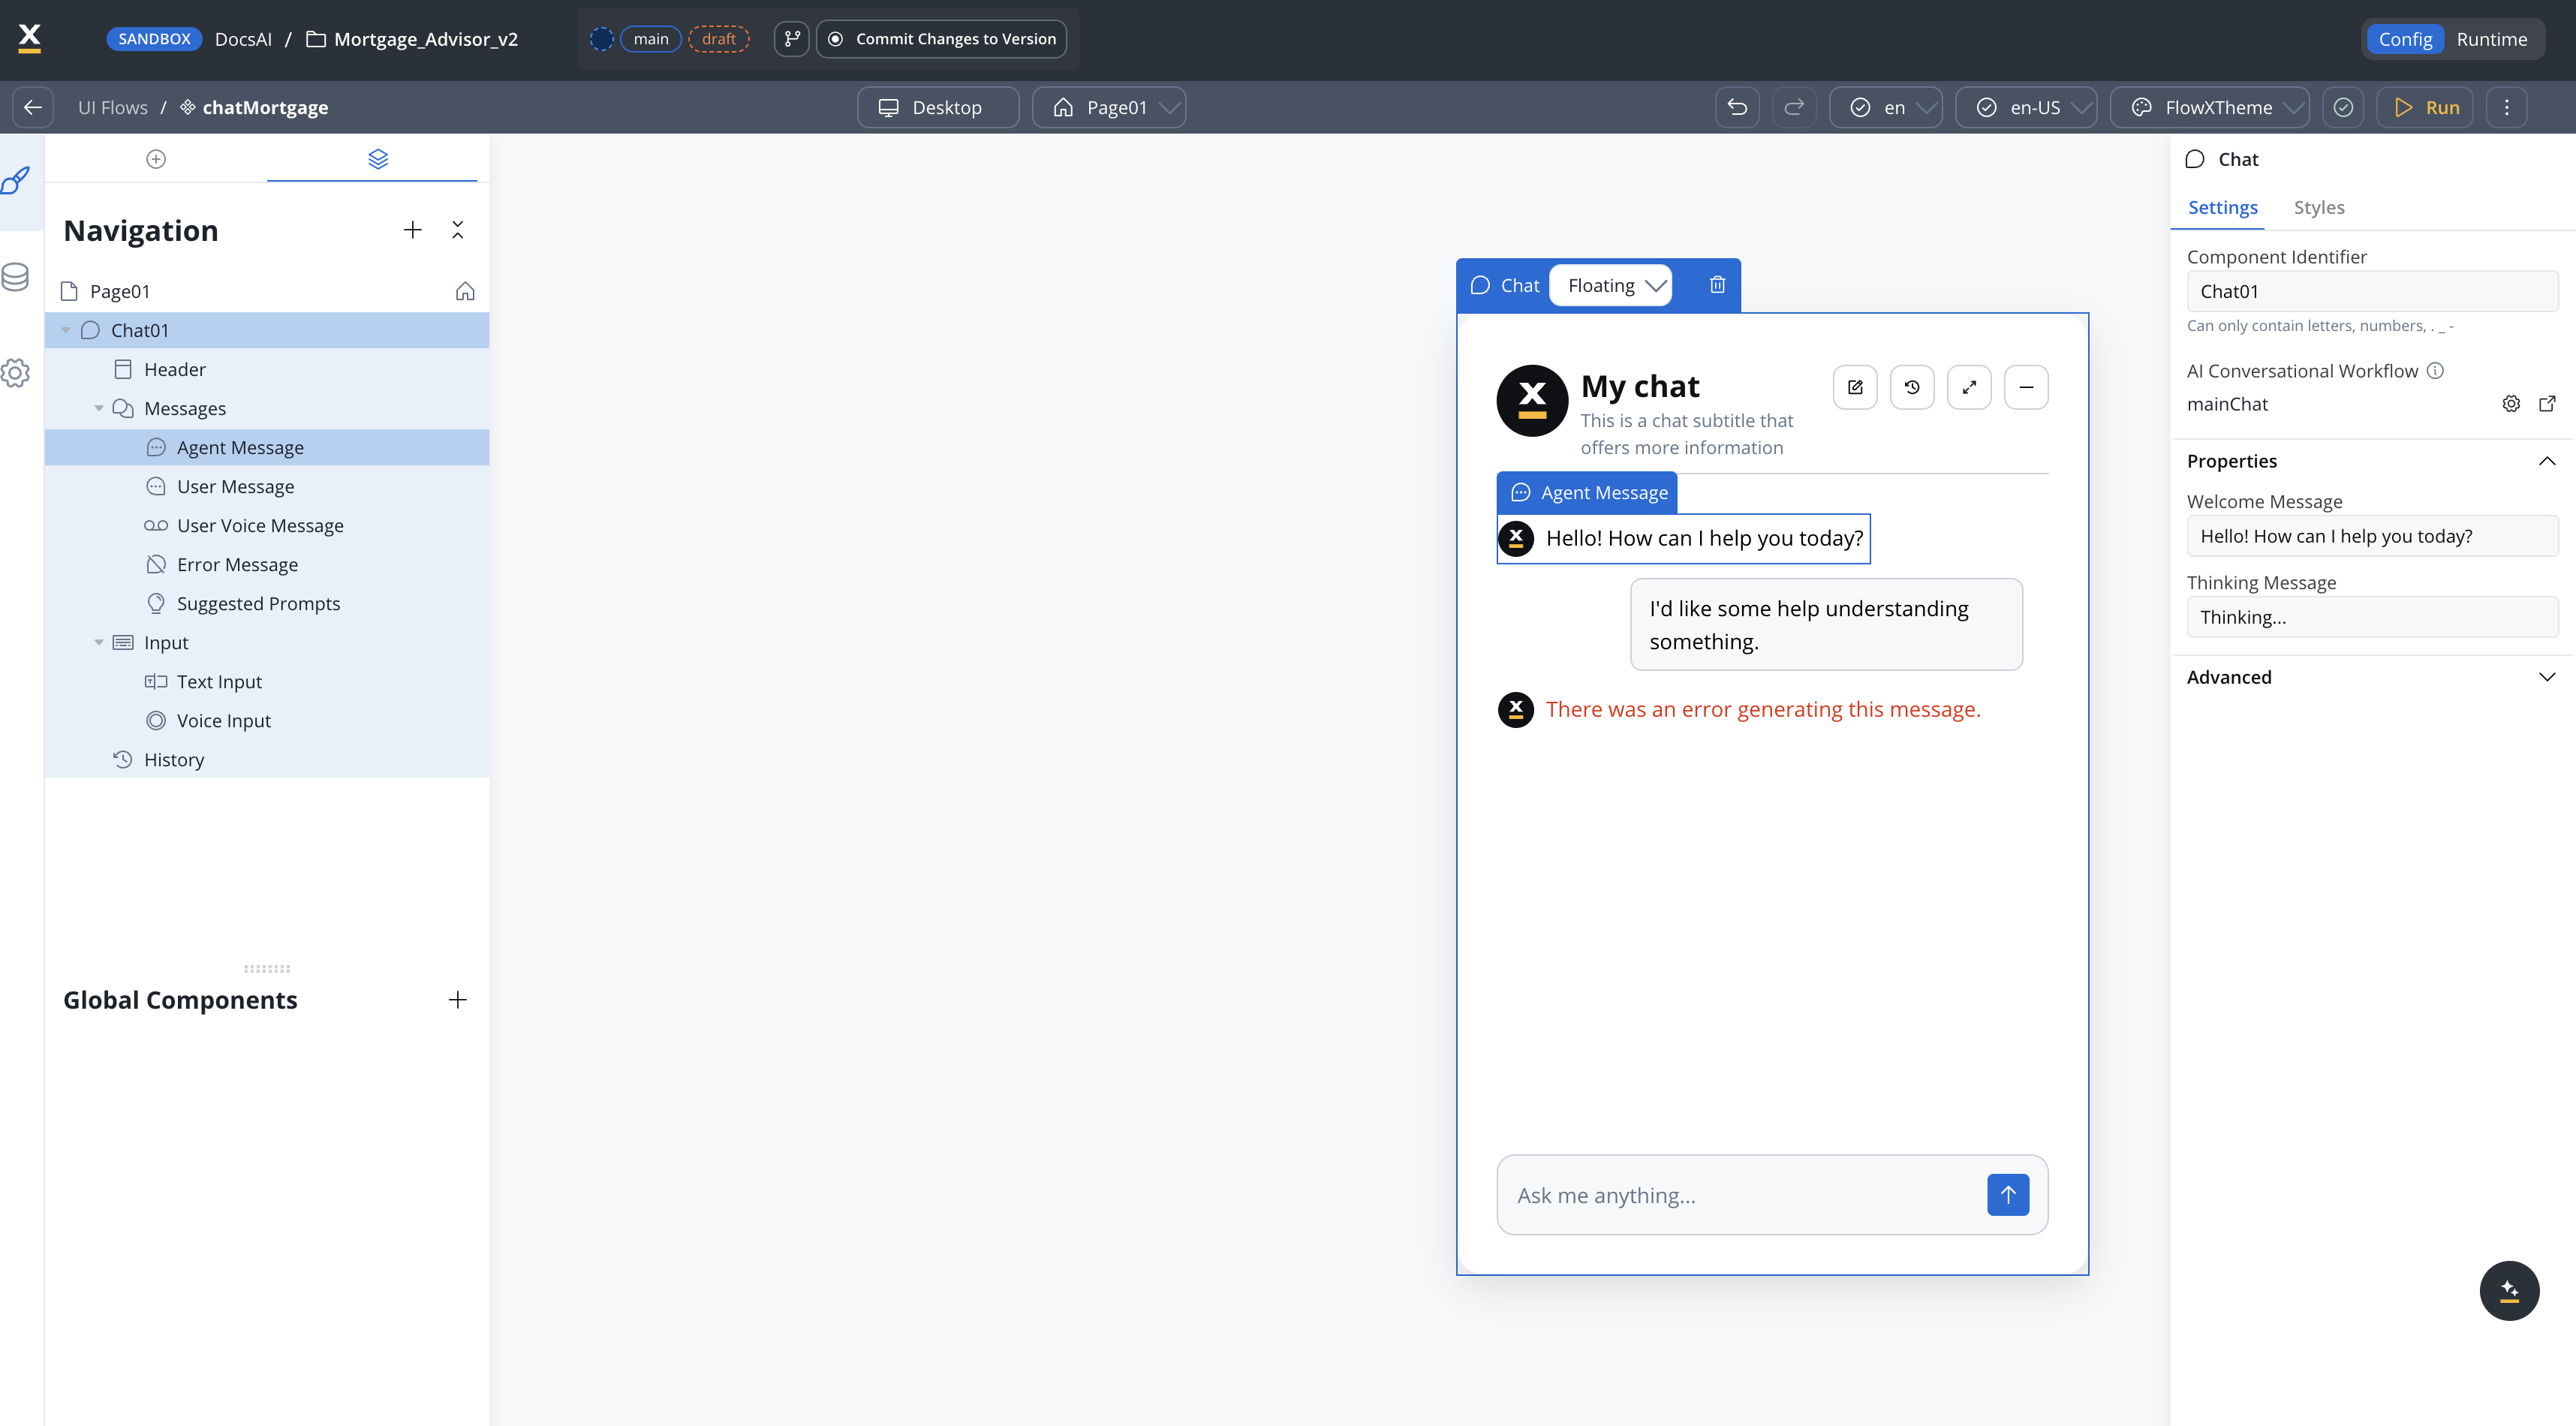
The Start node provides Chat Session ID, User Message, and optional UI Flow Context fields for receiving chat input
Chat replies
AI agent nodes send responses directly to the Chat component in real time
Intent routing
Classify user messages and route to appropriate workflow branches using the Intent Classification node
Chat driven vs output focused workflows
| Aspect | Chat Driven | Output Focused |
|---|---|---|
| Purpose | Multi-turn dialogue with users | Structured input/output processing |
| Start node | Chat Session ID + User Message + optional UI Flow Context | Standard Start node (JSON input) |
| Memory | Built-in session memory | No memory |
| Response delivery | Direct chat reply from Custom Agent nodes | Output on End node |
| Data model | Input/Output tabs hidden | Full data model access |
| Integration | Chat component only | Process actions, subworkflows, API |
How it works
Memory retrieval
The Start node retrieves session memory — the latest 3 message turns plus a summary of earlier conversation history.
AI processing
The workflow processes the message through AI nodes. Nodes with Use Memory enabled receive the conversation history as context for their LLM calls.
Response delivery
The Custom Agent node with Send as Chat Reply enabled sends its response directly to the Chat component in Markdown format.
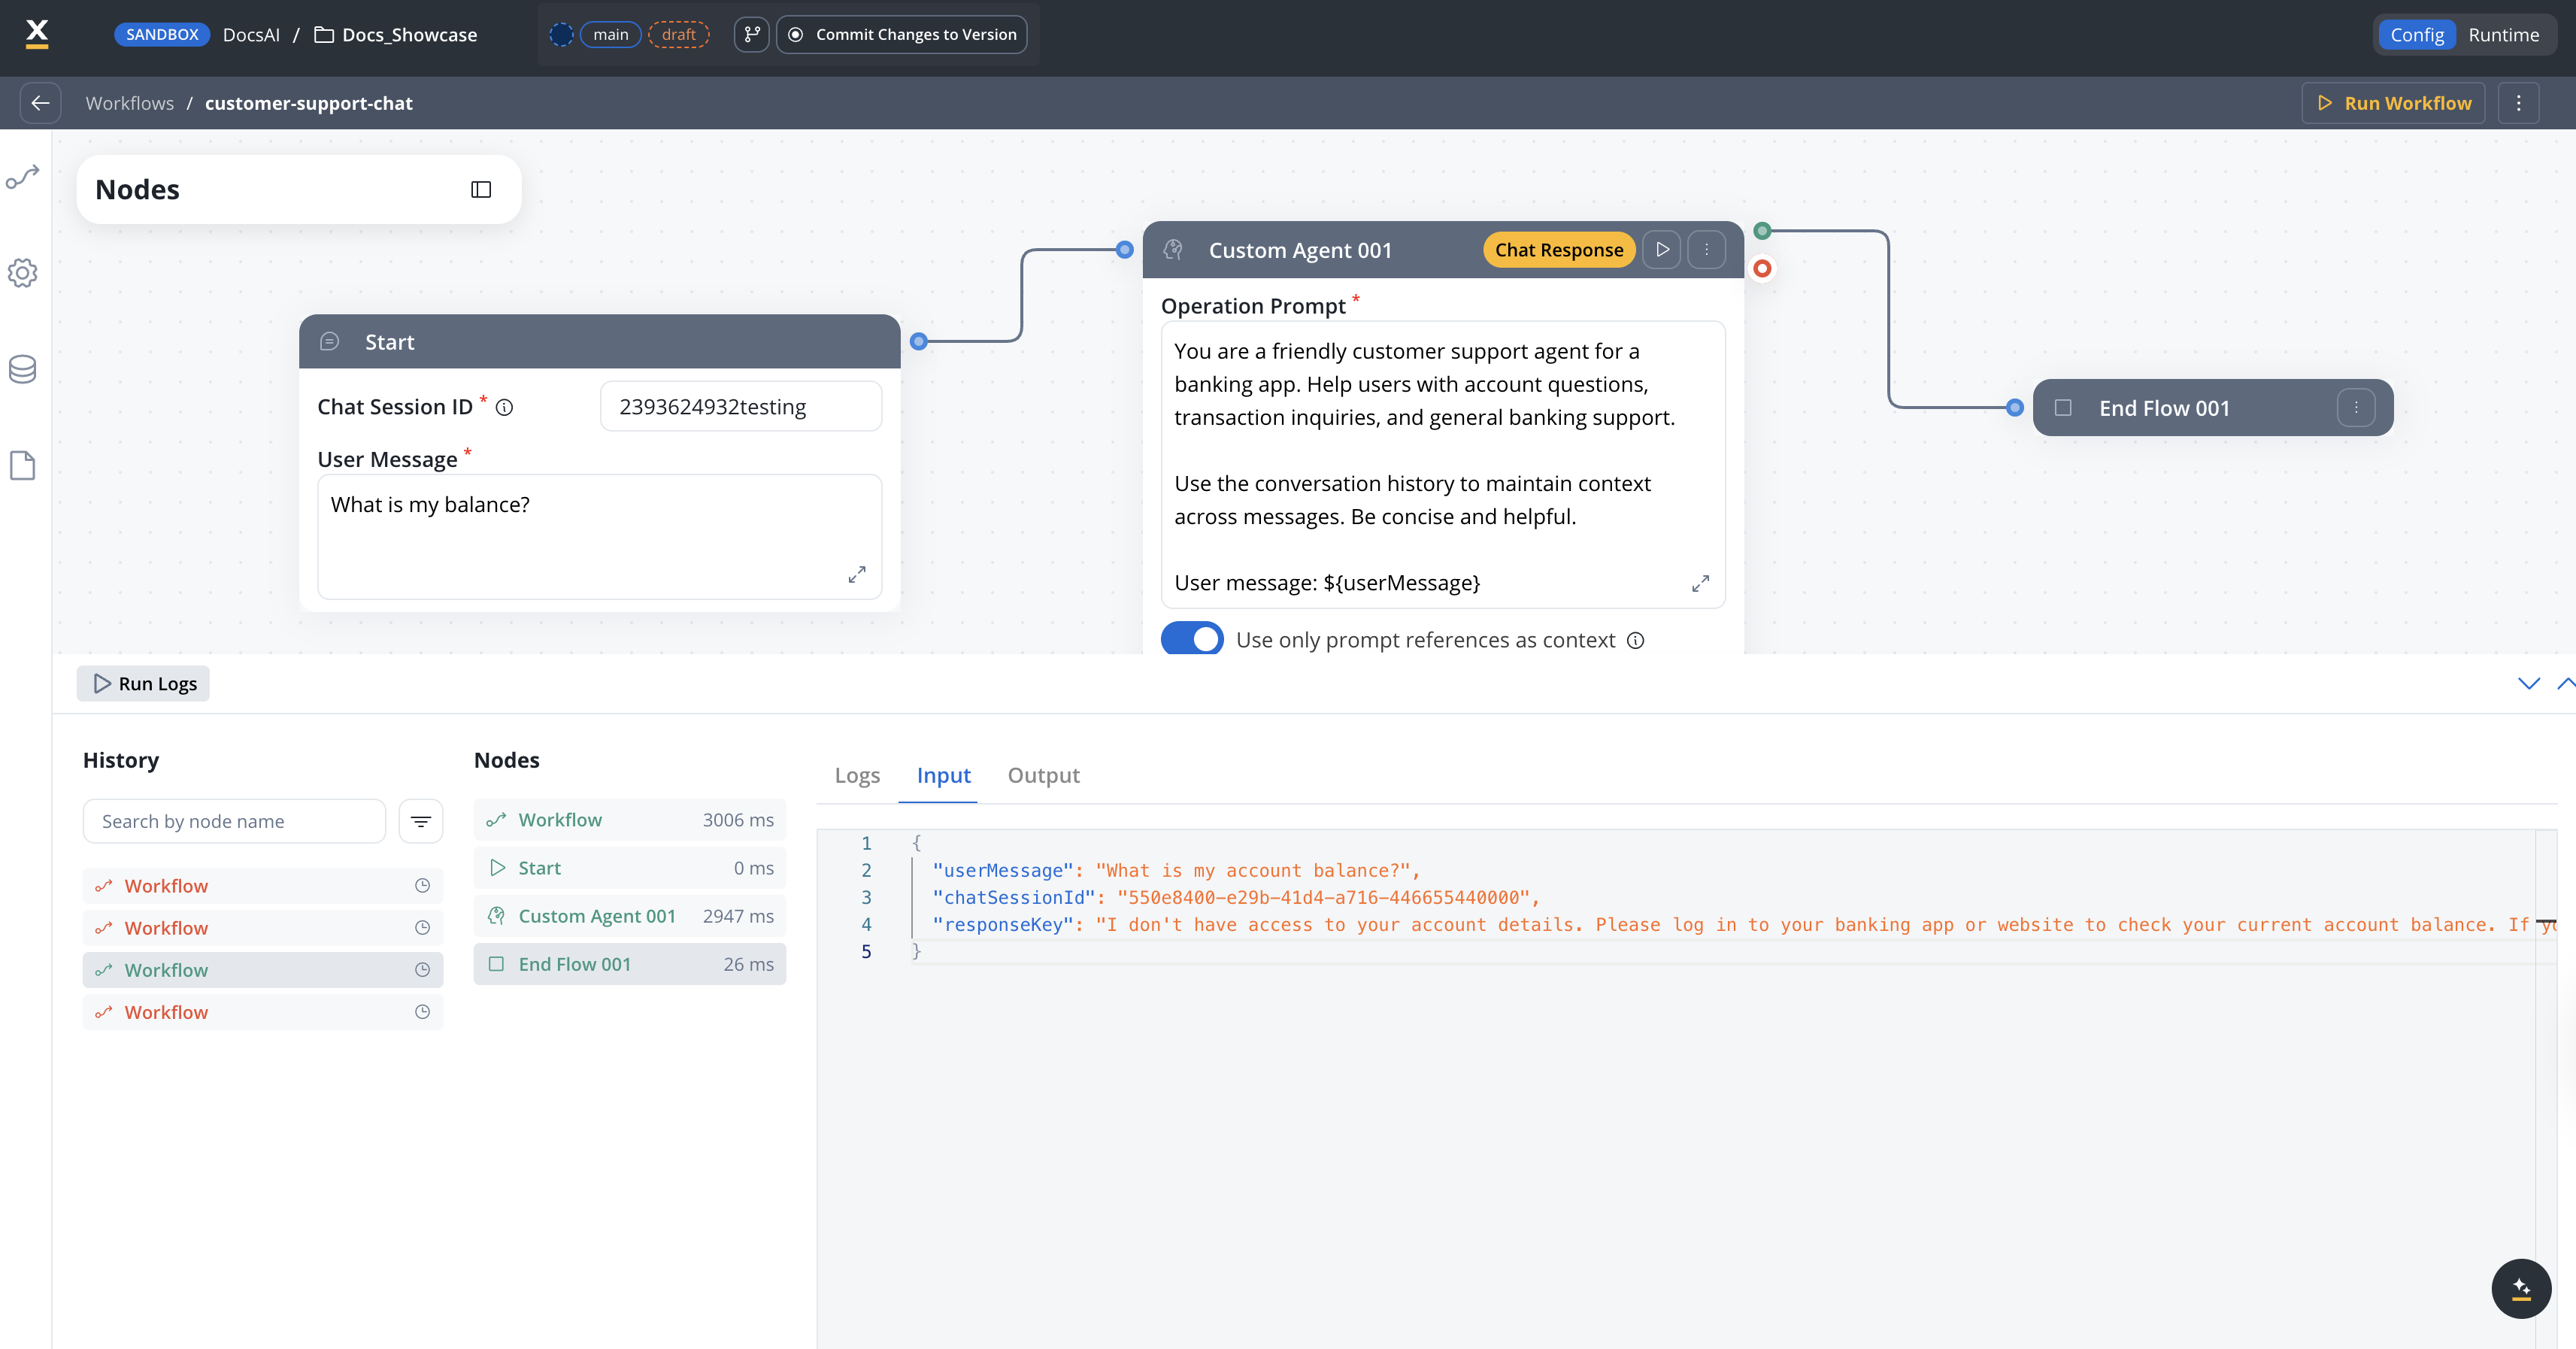
Start node
In Chat Driven workflows, the Start node provides dedicated input fields instead of the standard JSON editor:| Field | Description | Notes |
|---|---|---|
| Chat Session ID | Unique session identifier. Must be a valid UUID. At runtime, the Chat component generates this automatically. For testing, enter any valid UUID (e.g., 550e8400-e29b-41d4-a716-446655440000). | Required. Used for memory retrieval and storage |
| User Message | The user’s message text | Required. Referenced in nodes using ${userMessage} |
| UI Flow Context | JSON object passed alongside the user message to provide additional context (e.g., current page, customer ID, or other UI state). Collapsed by default under an expandable section on the Start node. | Optional. Must be a valid JSON object if provided |
The Start node in Chat Driven workflows is not a separate node type — it is the same Start node with a different layout tailored for chat input.
Setting context from a UI Flow
Available starting with FlowX.AI 5.7.0The Conversation Context property on UI Flow Pages lets you pass UI state to a conversational workflow without hard-coding it in the workflow itself.
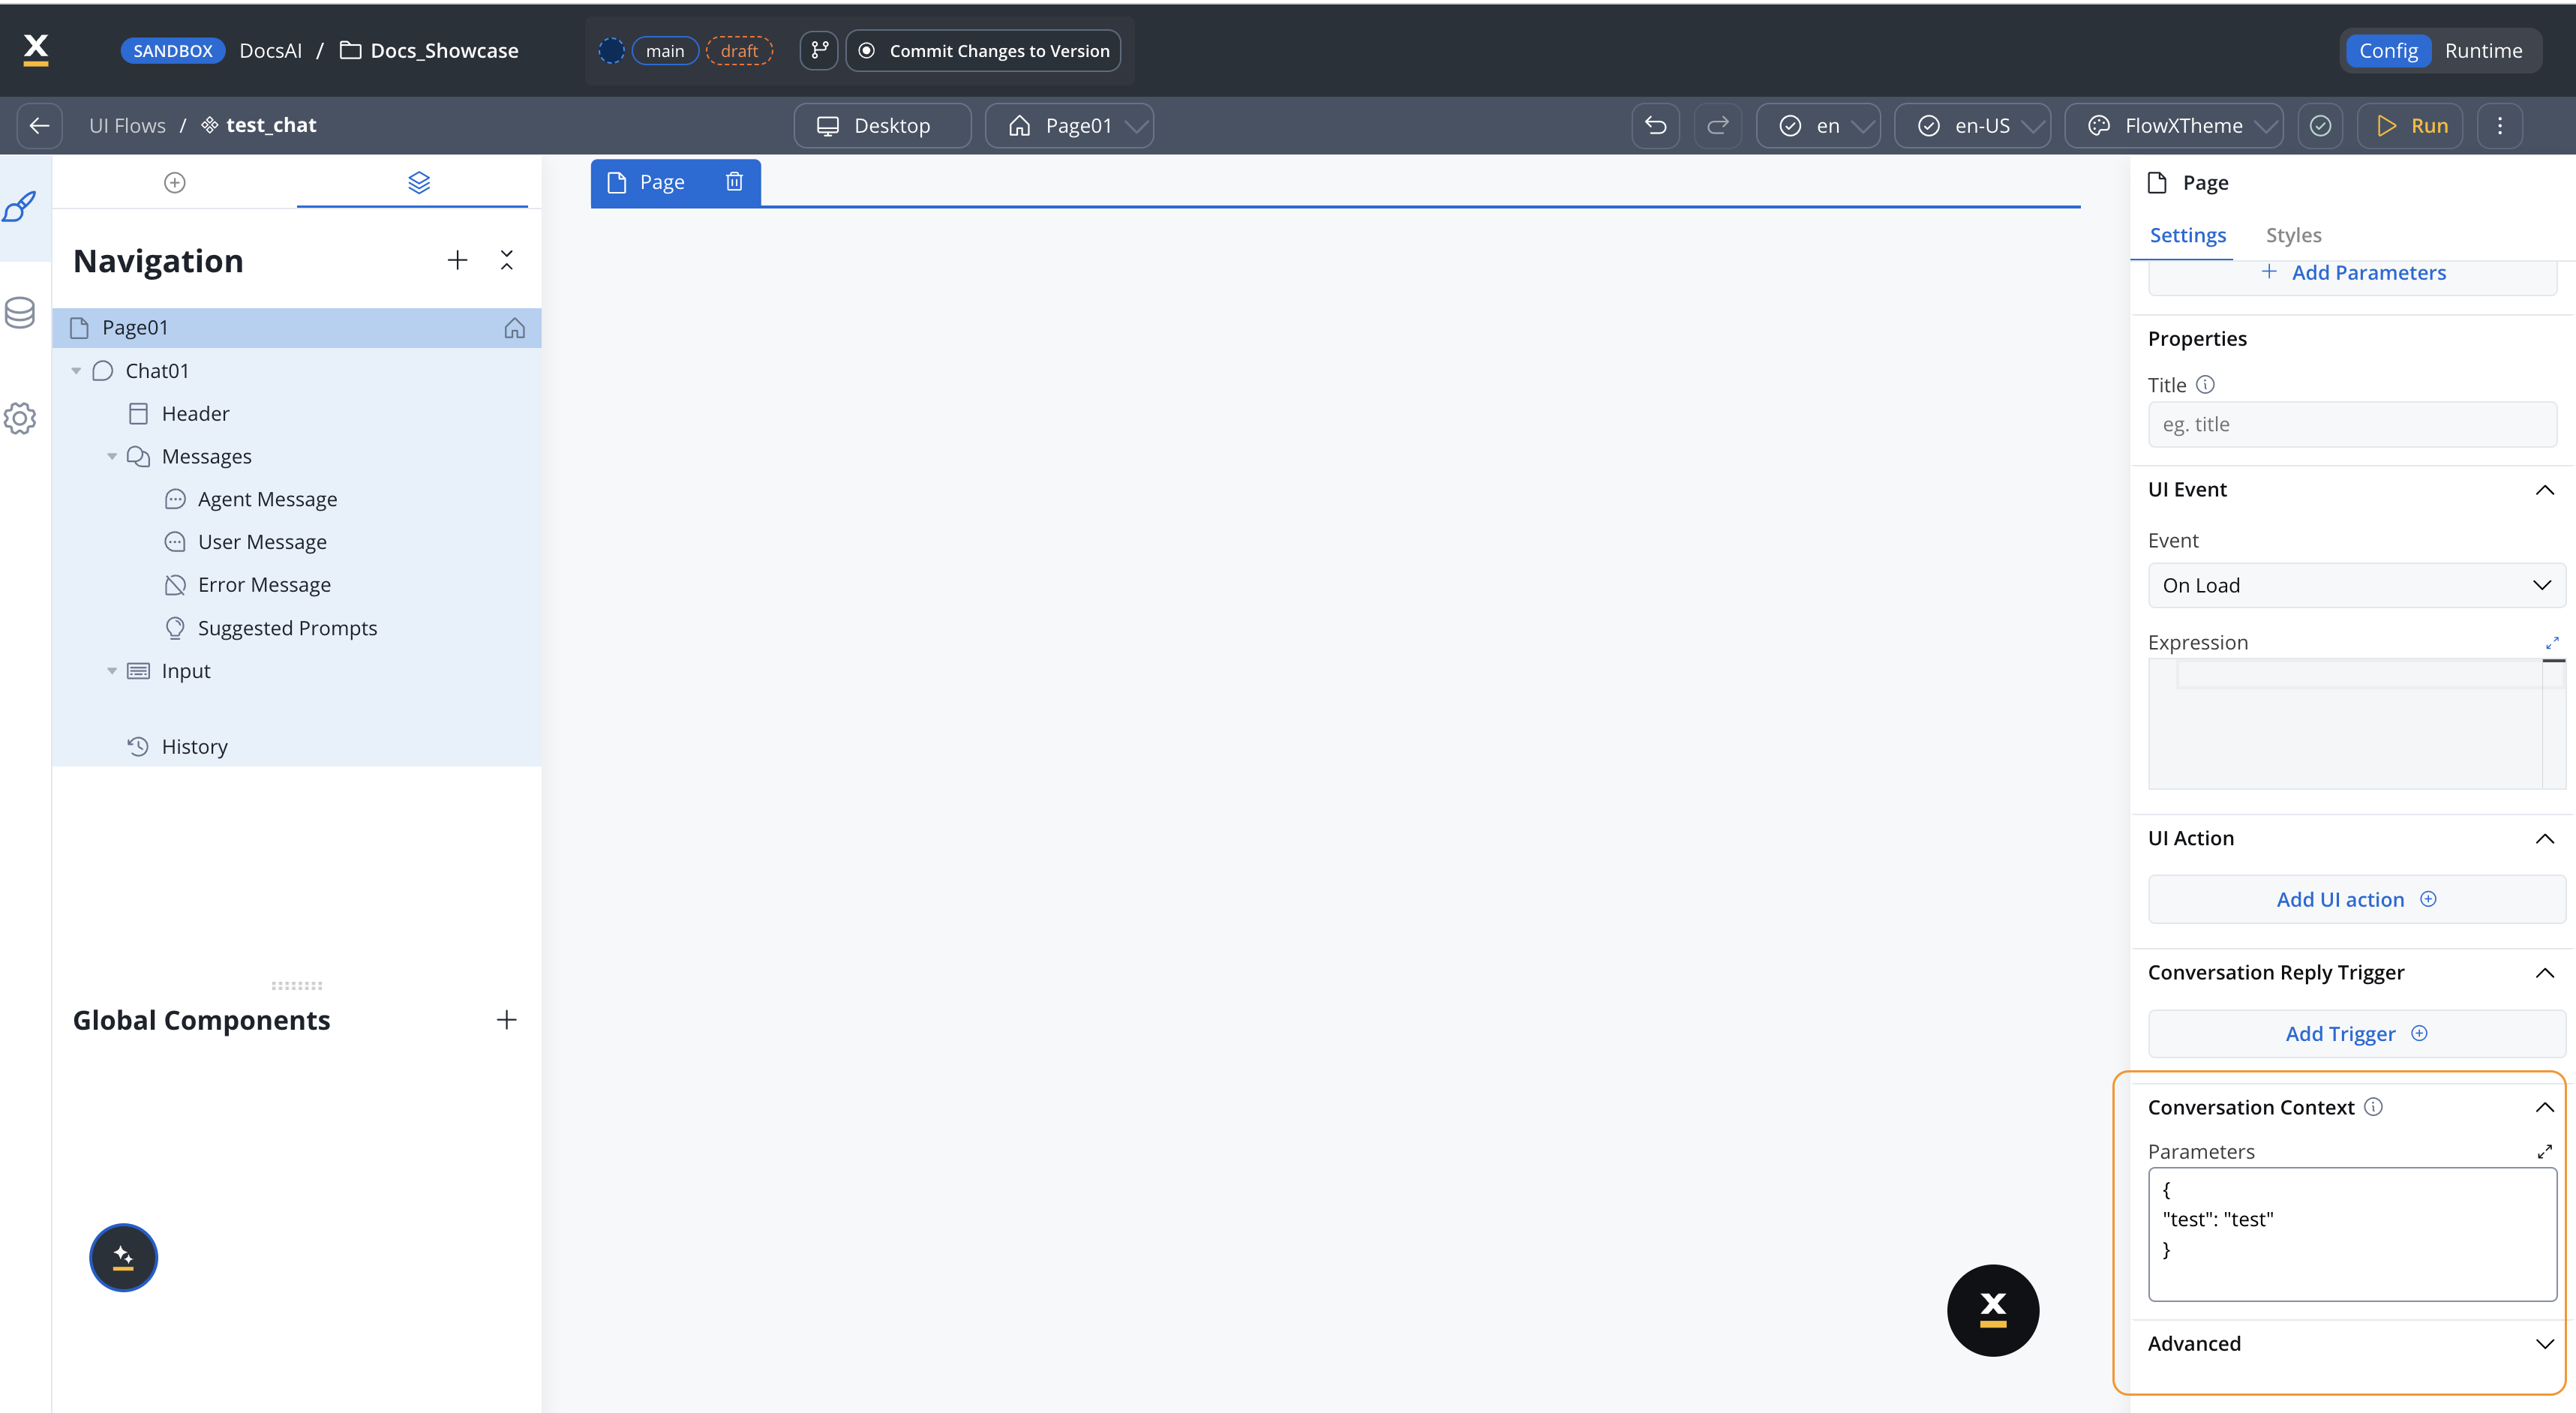
Configuring the property
On a Page in the UI Flow designer, open the Settings panel and expand Conversation Context. Fill in the Parameters field with a JSON object containing the keys the workflow should receive. Example:Custom Agent node
In Chat Driven workflows, the Custom Agent node has additional configuration options. The full layout from top to bottom: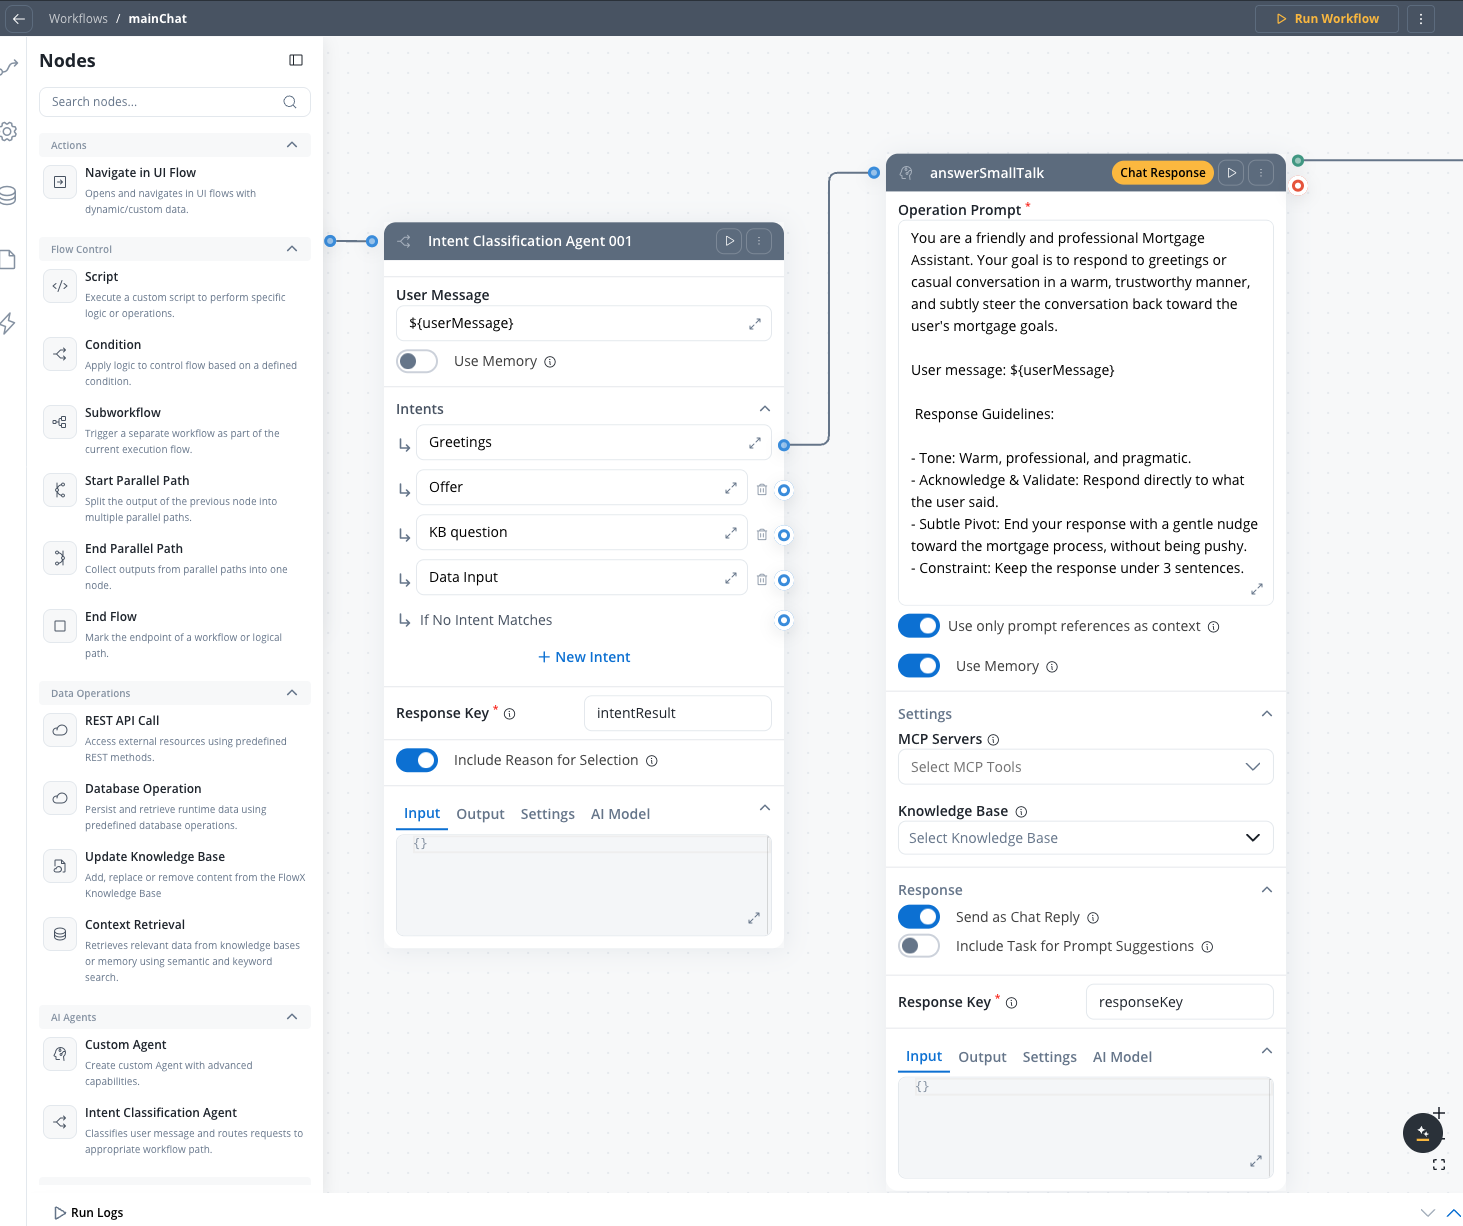
Operation Prompt
The system prompt for the LLM. Use${userMessage} to reference the user’s message.
Use only prompt references as context
When enabled, only the input values explicitly referenced with${...} placeholders in the Operation Prompt are sent to the LLM. Everything else in the node’s input is dropped before the call.
- Narrows the context the agent sees, which helps it respond more precisely
- Reduces token usage on each call, improving overall performance
- Leave ON by default; turn OFF only if the agent needs to reason over data not referenced explicitly in the prompt
Use Memory
When enabled:- The node includes the conversation history (retrieved via session ID) in the LLM prompt
- Memory consists of the latest 3 message turns plus a summary of earlier messages
- The session ID is sent to the AI platform, which attaches the conversation context to the prompt
Settings
- MCP Servers — Select MCP tools available to the agent
- Knowledge Base — Connect a knowledge base for RAG-powered responses
Response
Send as Chat Reply
When enabled:- The node’s output is sent directly to the Chat component as a Markdown-formatted response
- The Response Schema field is hidden (the LLM is instructed to return plain text)
- A Chat Response tag appears on the node header
- The response triggers a memory update (stores the user message + AI reply and iterates on the conversation summary)
At least one Custom Agent node in the workflow must have Send as Chat Reply enabled. If no node sends a chat reply, the console log displays an error.
Include Task for Prompt Suggestions
Available starting with FlowX.AI 5.7.0
Response Key
Always visible. Defines the key where the node output is stored in the workflow data.Response Schema
Only visible when Send as Chat Reply is OFF. Defines the expected JSON structure of the LLM response.Session memory
Chat Driven workflows use built-in session memory stored and managed by FlowX. On each message, the system retrieves the latest 3 user/agent message pairs in full, plus a summary of earlier exchanges. This memory is injected into the LLM’s system prompt for nodes with Use Memory enabled.Memory Capabilities
Full guide to memory structure, summarization, debugging, and storage
Console log
The workflow console log includes additional information for Chat Driven workflows:- Workflow level
- Custom Agent node
- Input tab — Displays User Message and Chat Session ID in JSON format (read-only)
- Output tab — Displays the chat response as text (not in JSON editor for readability)
- Memory tab — Shows the conversation history and summary sent to the LLM for that workflow instance
Constraints
Cannot be used as a subworkflow
Cannot be used as a subworkflow
Chat Driven workflows cannot be referenced as subworkflows. The subworkflow node filters out Chat Driven workflows from the selection list.
Cannot be started from Process Actions
Cannot be started from Process Actions
The Start Integration Workflow action in processes filters out Chat Driven workflows. They can only be started through the Chat component.
User message is mandatory
User message is mandatory
Running a Chat Driven workflow without a user message triggers an error: “The user message is mandatory in conversational workflows.”
End node is required
End node is required
A Chat Driven workflow requires an End Flow node to complete the execution path. The End Flow node is simplified (header only, no body configuration) since responses are sent from Custom Agent nodes. The End Flow node is not auto-created — you must add it manually from the node palette.
Chat component integration only
Chat component integration only
Only Chat Driven workflows can be integrated into the Chat component. Output Focused workflows are filtered out from the Chat component workflow selection.
Navigate in UI Flow node
The Navigate in UI Flow node is an action node exclusive to Chat Driven workflows. It navigates the user to a specific screen in a UI Flow, passing dynamic parameters — allowing the AI conversation to open forms, dashboards, or any UI flow destination with contextual data.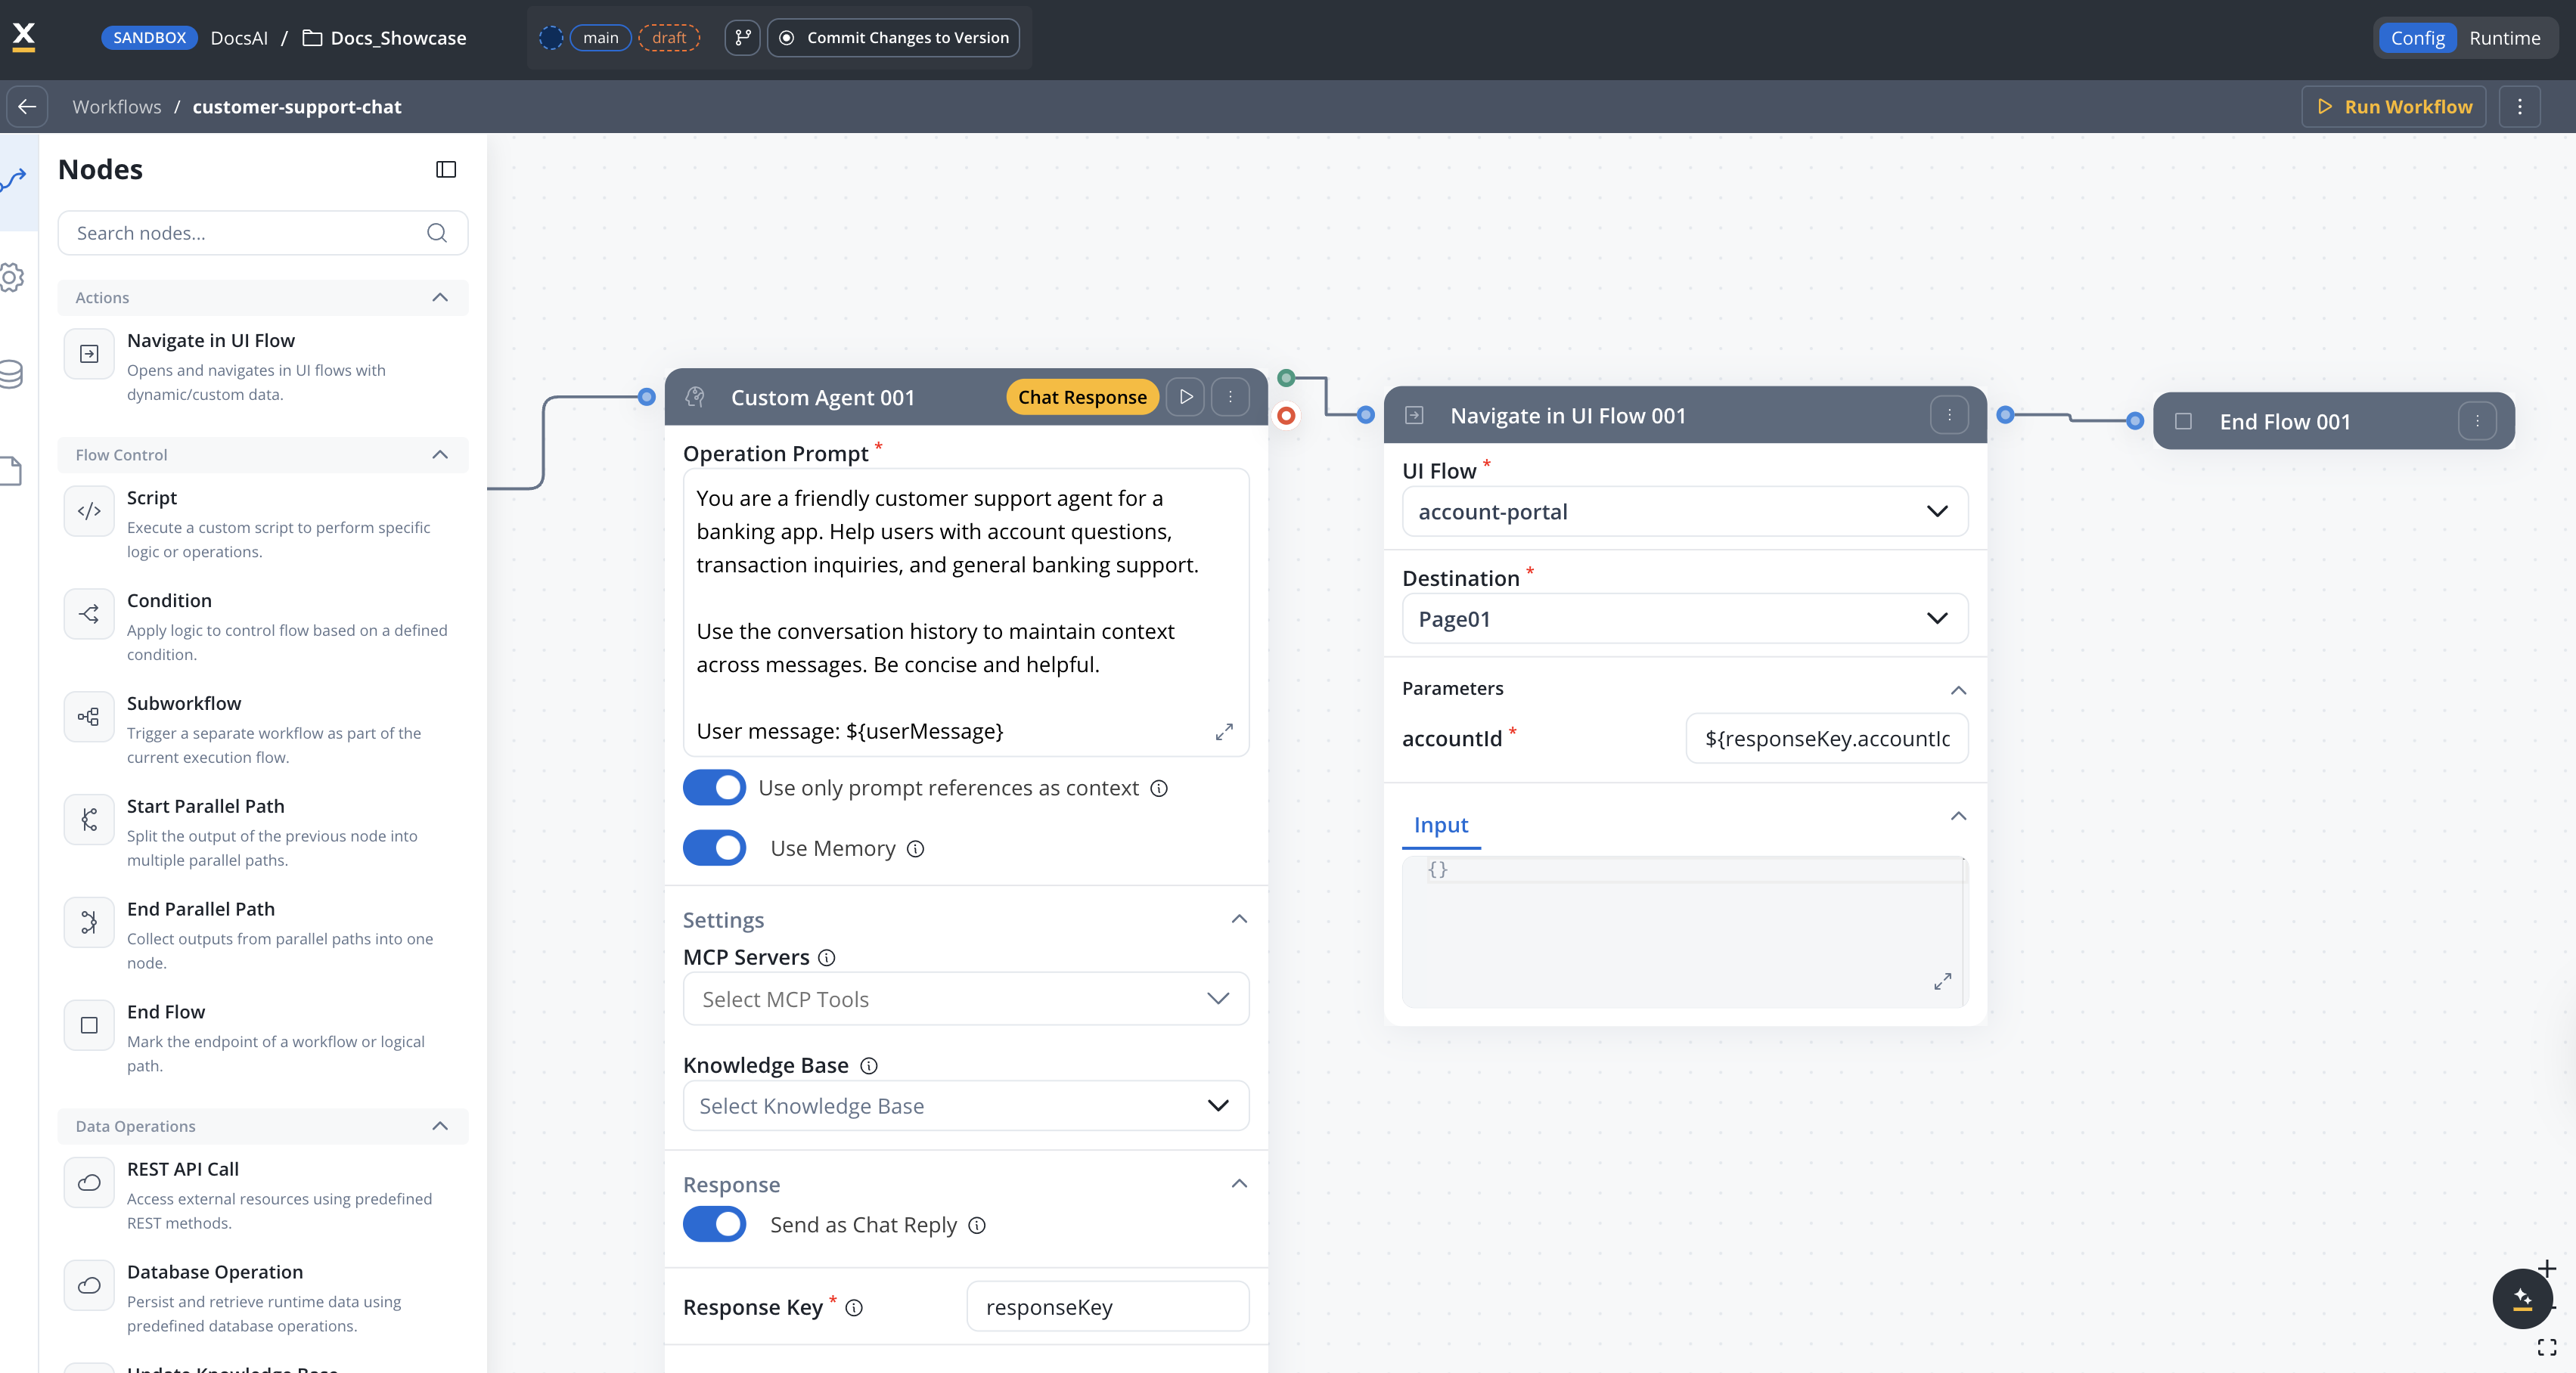
This node only appears in the Actions category when editing a Chat Driven workflow. It is not available in Output Focused workflows.
Configuration
Select the UI Flow resource to navigate to. Only UI Flows in the current project and its dependencies are available.
The specific screen (root view) within the selected UI Flow. The destination list is fetched dynamically and displays the navigation tree of the UI Flow.Changing the destination resets all configured parameters.
Dynamic parameters passed to the destination screen as query parameters. The available parameters are defined by the destination’s query parameter configuration.
- Use
${expression}syntax to map workflow data to parameters - Required parameters are marked with an asterisk (*)
- Default values are shown when configured on the destination
${customerData.accountId} maps the workflow’s customerData.accountId to the destination’s query parameter.How it works
When the node executes:- Validates that the workflow is Chat Driven (fails with error otherwise)
- Resolves
${expression}placeholders in parameter values using the current workflow context - Sends a navigation command to the Chat component via the events gateway
- The Chat component opens the target UI Flow screen with the resolved parameters
AI Triggers
Available starting with FlowX.AI 5.7.0AI Triggers are only available on Chat Driven (conversational) workflows.
Key concepts
Named templates
Each trigger has a name, a message template with
${paramName} placeholders, and optional parameters with default valuesParameterized context
Parameters are resolved at runtime — different pages can pass different values for the same trigger
Transparent to the agent
The resolved message is sent as standard user input — the agent processes it like any other message
Memory integration
The trigger message is saved to conversation memory but not displayed in the user’s chat history
Defining triggers
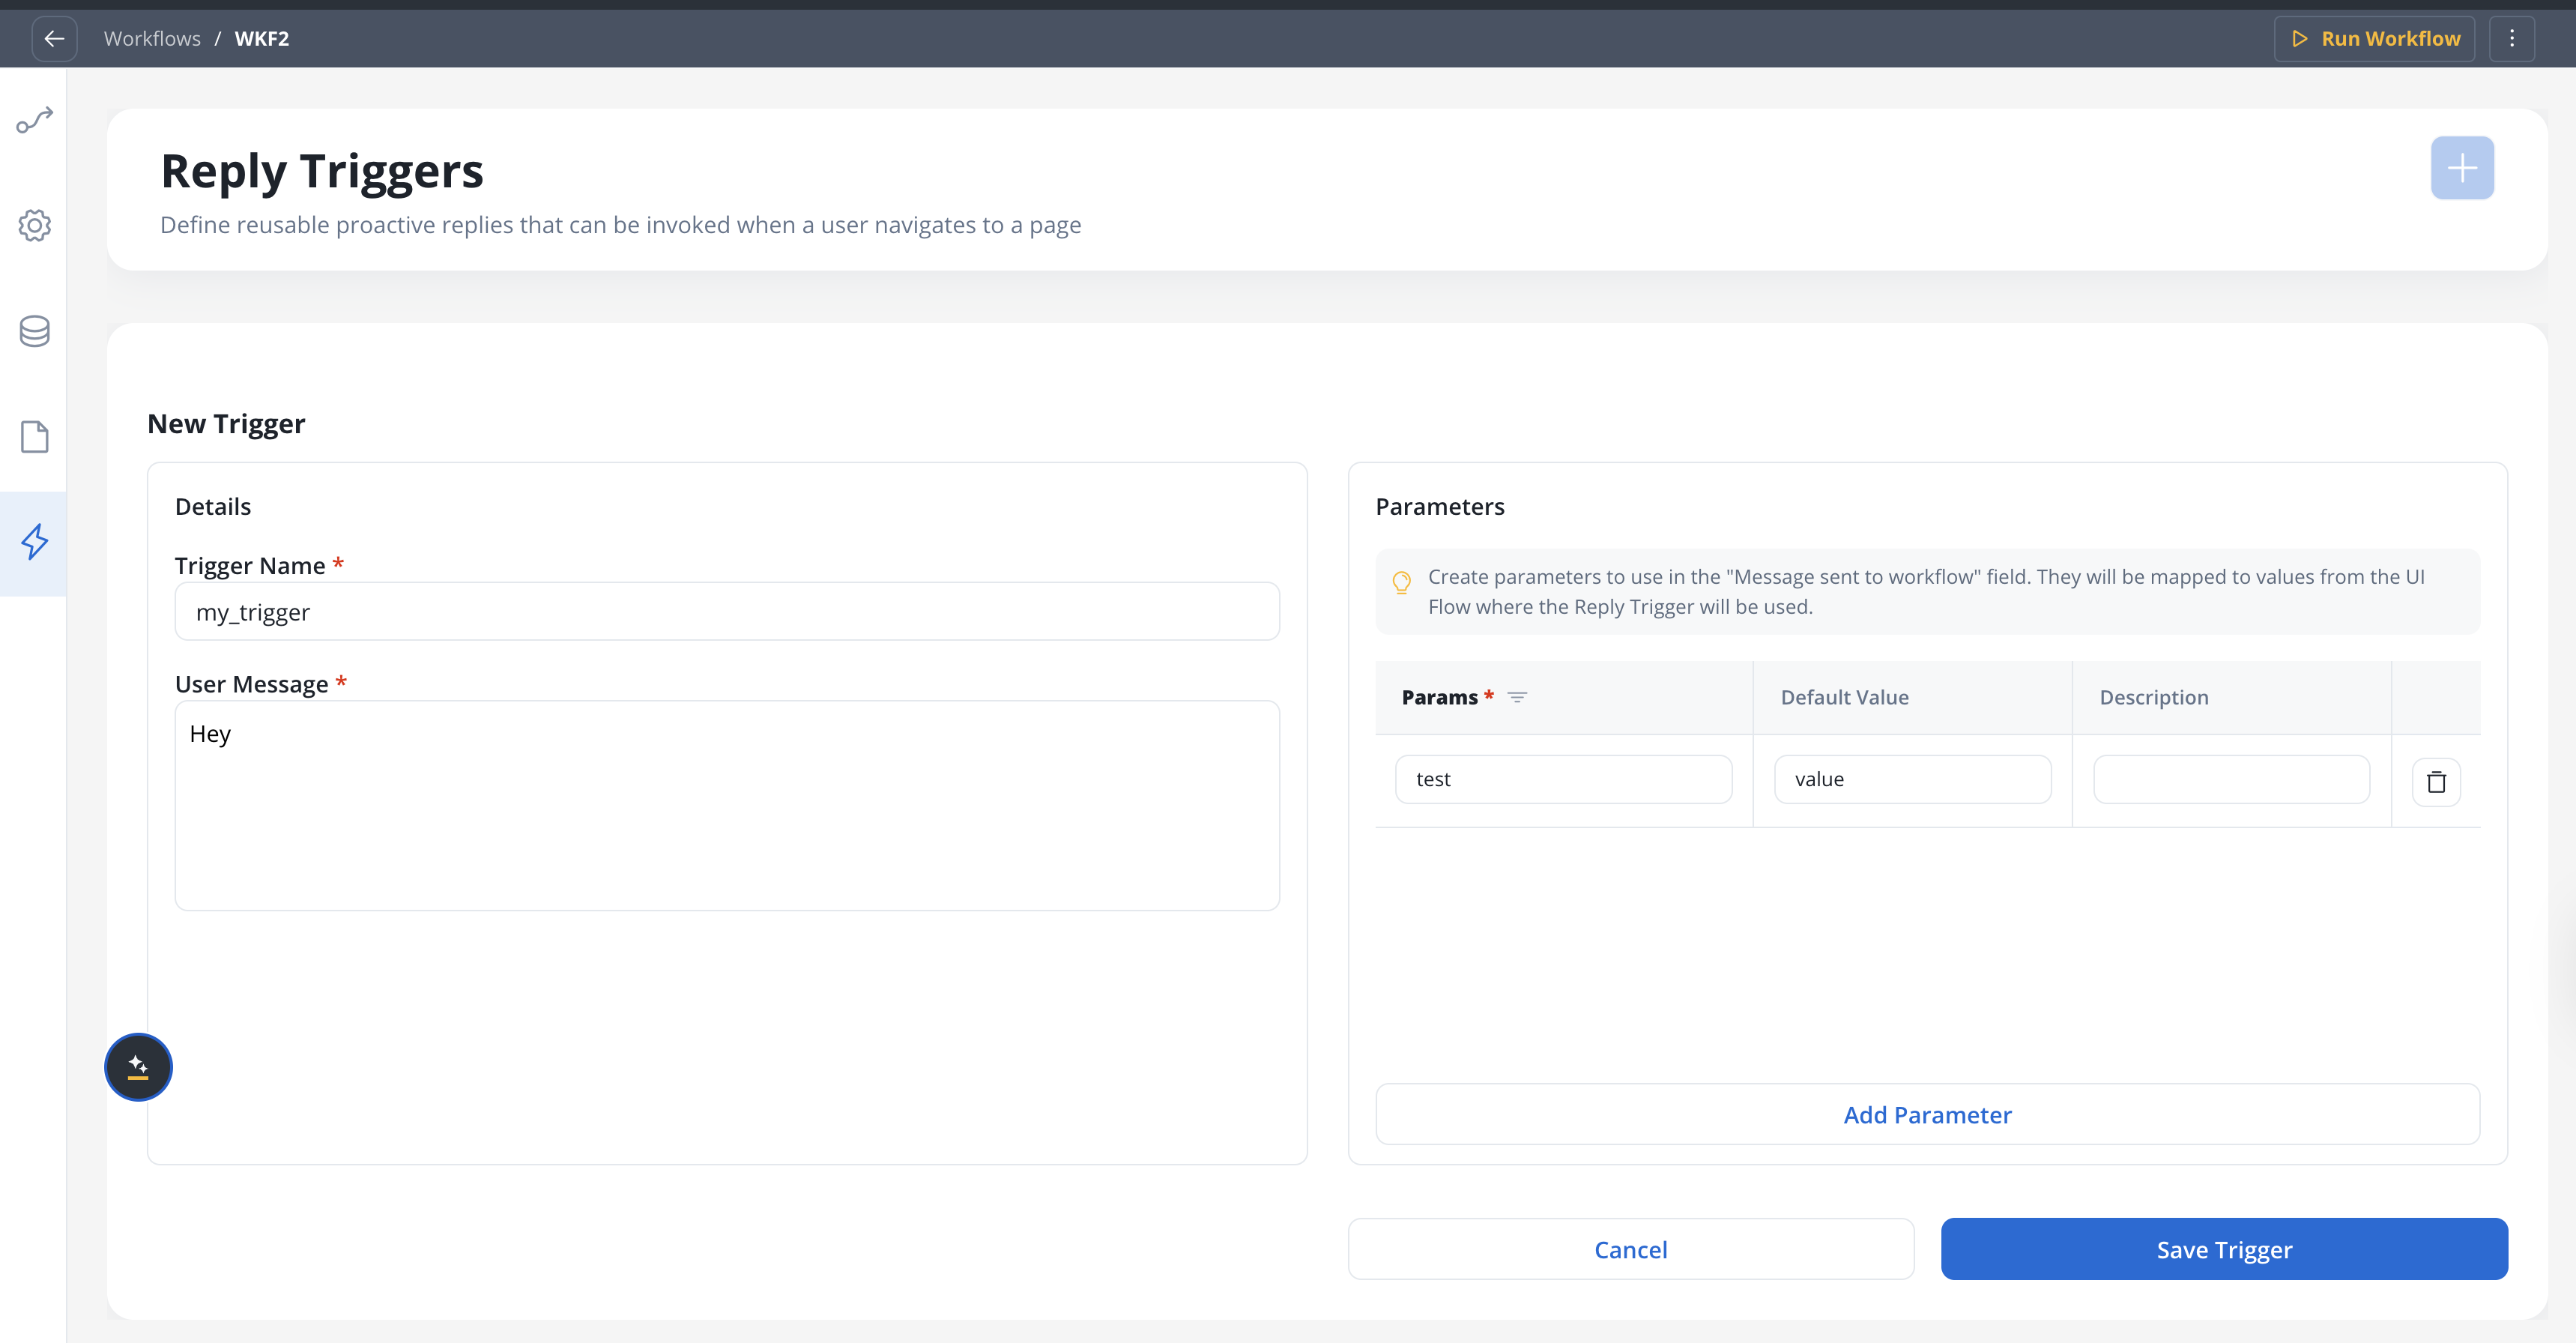
Open the AI Triggers tab
In the workflow editor, click the lightning icon in the secondary side nav. This tab only appears for Chat Driven workflows.
Add a trigger
Click Add Trigger. A form appears with the following fields:
A descriptive name for the trigger (e.g., “Order Support”, “Product Question”).
The message template sent as user input when the trigger fires. Supports
${paramName} interpolation. Maximum 2000 characters.Example: The customer needs help with order ${orderId}. Their account type is ${accountType}.Optional list of parameters referenced in the message template. Each parameter has:
- Name (required) — the key used in
${paramName}placeholders - Default value (optional) — used when no value is provided at runtime
- Description (optional) — explains the parameter’s purpose
Using triggers on the Start node
The Start node of a conversational workflow provides a segmented toggle to switch between Text mode (default) and AI Triggers mode:- Text mode
- AI Triggers mode
The default behavior — a free-text User Message field, Chat Session ID, and an optional UI Flow Context JSON editor.
Chat integration
When the workflow is connected to a Chat component via a UI Flow, triggers are sent from the UI to the workflow:- The available triggers (ID, name, and parameters) are exposed to the UI Flow
- The UI can invoke a trigger by sending the trigger ID along with parameter values
- The resolved message (with all
${paramName}values substituted) is sent as the workflow’s starting input - The trigger message is saved to conversation memory for context continuity
- The trigger message is not displayed in the user’s chat history
If a trigger is deleted from the workflow while still referenced by a UI Flow page, it is automatically removed from the page — the same behavior as when a REST API endpoint is removed from a system.
Console and run logs
Workflow runs initiated via an AI Trigger show additional details in the run history:| Field | Description |
|---|---|
| User message type | text or AI trigger |
| Trigger | The trigger name (e.g., “Triggered by: Order Support”) |
| User message | The fully resolved message with all ${paramName} values replaced |
user_message_type, trigger, and user_message fields.
Testing conversational workflows
When testing via Run Workflow, the test modal provides two modes:Text mode
- Chat Session ID — A valid UUID that identifies the test conversation session (e.g.,
550e8400-e29b-41d4-a716-446655440000). Required. Used for memory storage and retrieval. - User Message — The test message to send (e.g., “What is my account balance?”)
- UI Flow Context — Optional JSON object to mock the context a UI Flow would normally supply at runtime (e.g.,
{"customerId": "42"}). Invalid JSON is rejected before the run starts.
AI Triggers mode
- Chat Session ID — Same as above, required
- Trigger — Select from the workflow’s defined triggers
- Parameters — Fill in test values for the trigger’s parameters (e.g.,
${orderId}→ORD-12345)
Setting up a conversational workflow
Create a new workflow
In the Integration Designer, click + to create a new workflow. Enter a name and select Chat Driven as the workflow type.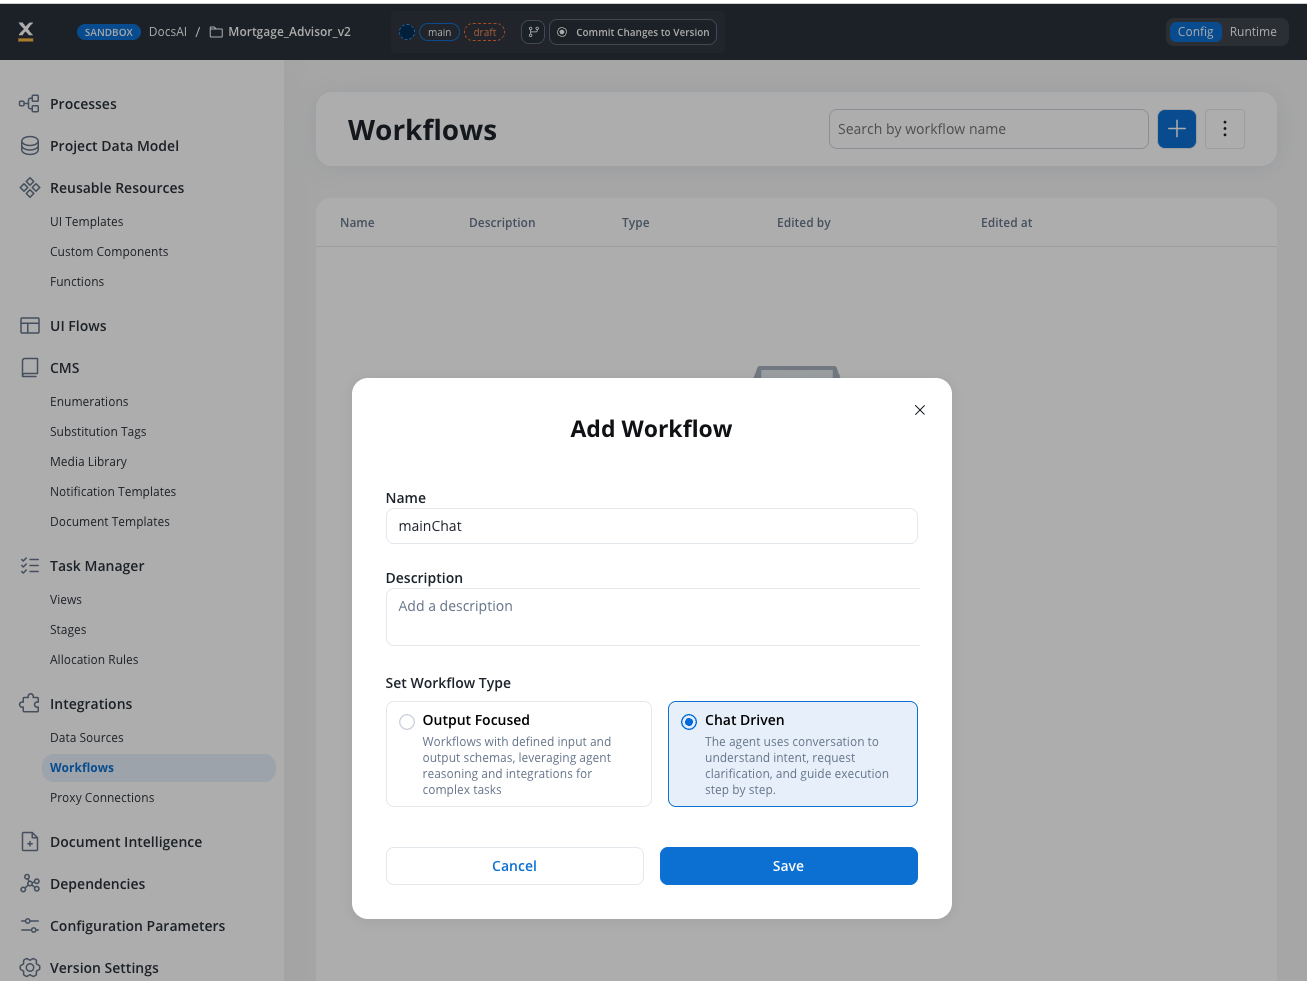
Review the Start node
The Start node is created automatically with Chat Session ID, User Message, and an optional UI Flow Context editor pre-configured.
Add AI processing nodes
Add Custom Agent nodes or Intent Classification nodes to process user messages.
Enable Chat Reply
On the Custom Agent node that generates the final response, toggle Send as Chat Reply to ON.
Add an End Flow node
Add an End Flow node from the node palette and connect it to the final node in your workflow. The End Flow node has no body configuration in Chat Driven workflows.
Integrate with a UI Flow
Connect the conversational workflow to your UI: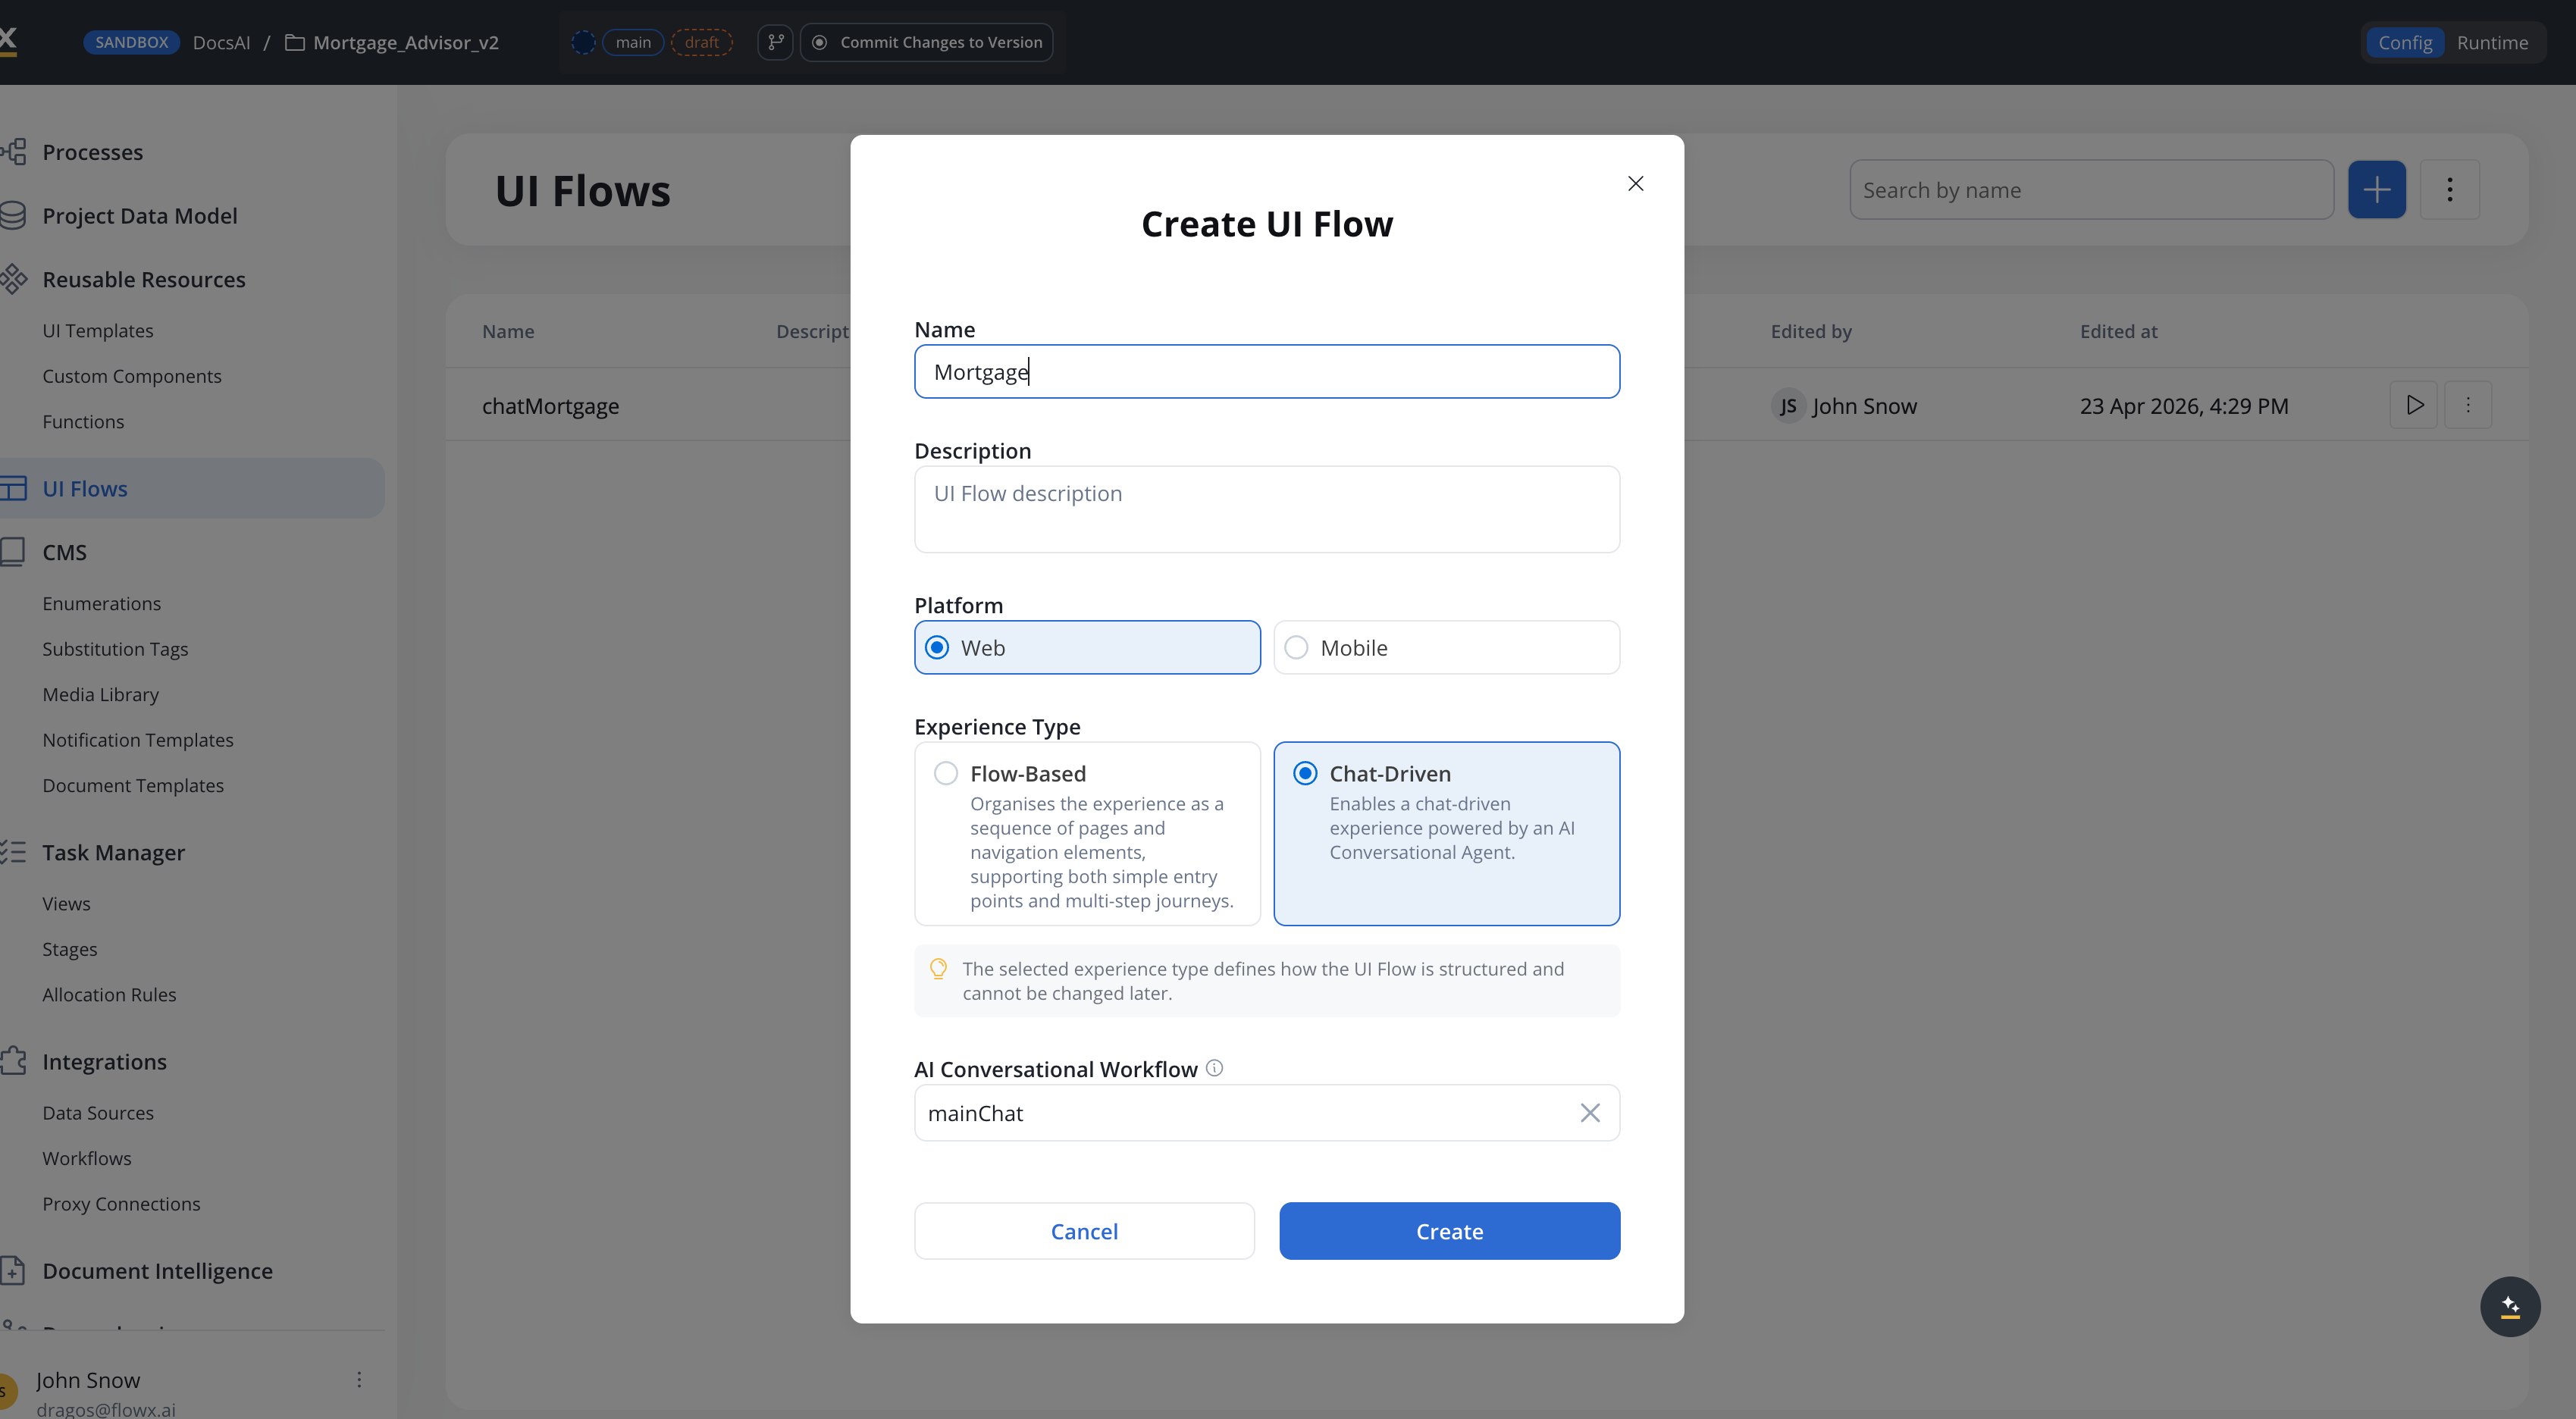
- Option A (5.7.0+): Create a Chat-Based UI Flow and select this workflow as the default conversational workflow. All Chat components in the UI Flow will use it automatically.
- Option B: In any UI Flow, add a Chat component and select the Chat Driven workflow directly on the component.
Available starting with FlowX.AI 5.7.0: Chat-Based UI Flows let you set a single conversational workflow for the entire UI Flow, instead of configuring it on each Chat component individually. See UI Flows for details.
Cancelling a running workflow
Available starting with FlowX.AI 5.7.0Conversational workflow instances can be cancelled mid-execution. The Chat component uses this when the user presses Stop agent response.
Endpoint
| Parameter | Type | Description |
|---|---|---|
workspaceId | UUID | The workspace identifier |
appId | UUID | The app identifier |
instanceUuid | string | The workflow instance to cancel |
Cancellation behavior
What happens depends on where the workflow instance is when the cancel request arrives:- Before any AI node runs — The user prompt is persisted on the chat message with
cancelled: true. No AI call is made. The workflow stops. - While an AI node is executing — The in-flight AI call is stopped, any partial response is discarded, and the user prompt is persisted with
cancelled: true. The workflow stops.
chatCancelled Server-Sent Event on the CHAT_WORKFLOW_RESPONSE channel so the UI can exit its streaming state.
Related resources
Chat component
Technical reference for runtime behavior, session management, and SDK integration
AI node types
Overview of all available AI workflow node types
Chat interface
Conceptual overview of adding conversational AI to your apps
Knowledge Base
Connect knowledge bases for context-aware AI responses