

Connector essentials
At its core, a connector acts as an anti-corruption layer. It manages interactions with external systems and crucial data transformations for integrations.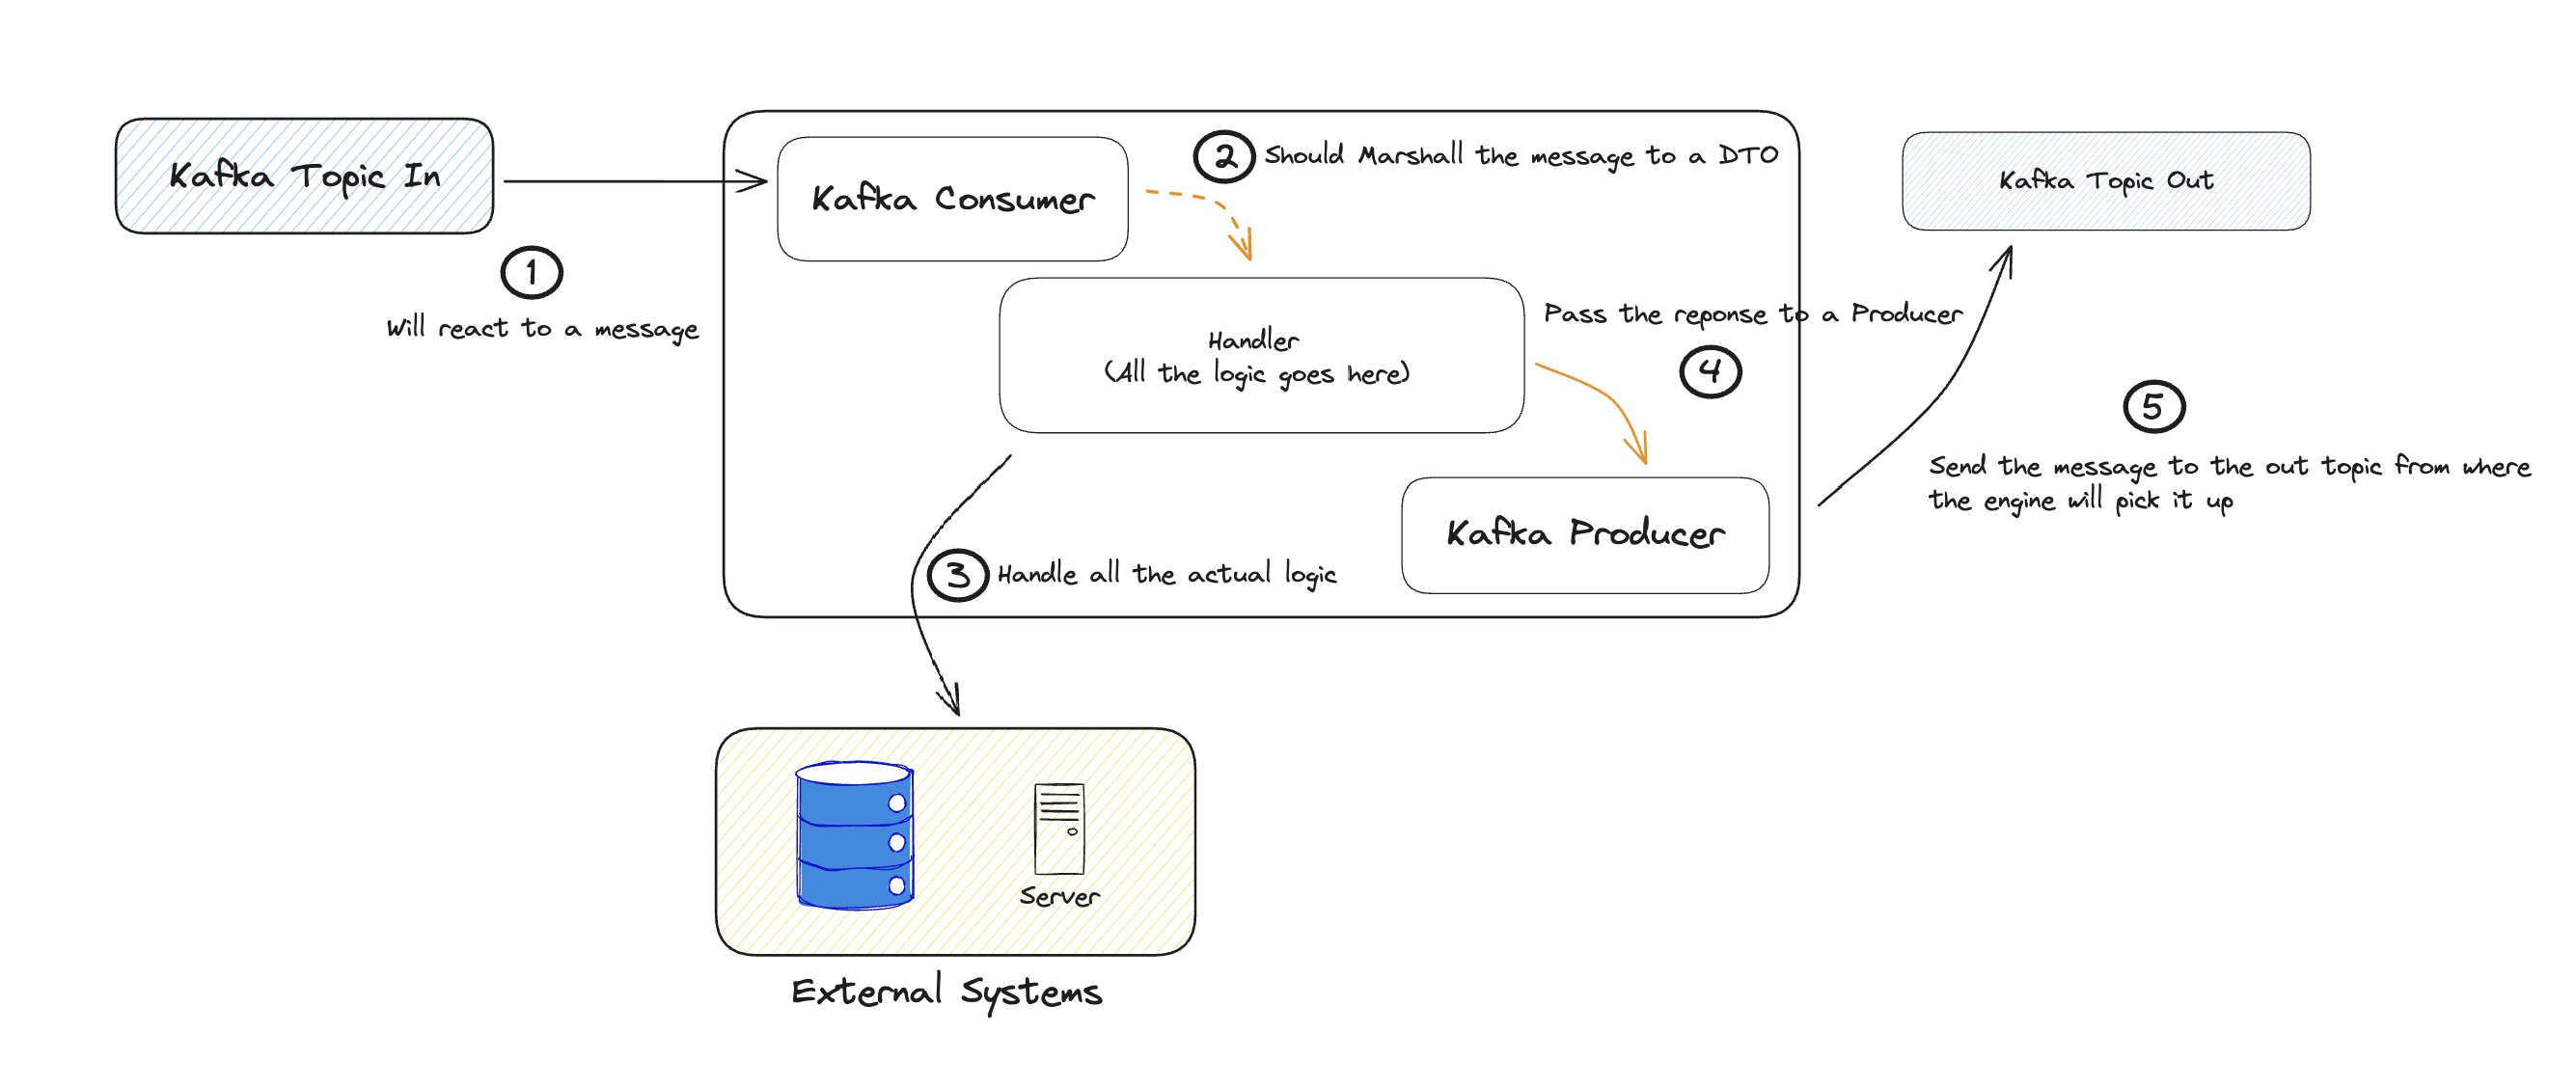
Key functions
Connectors act as lightweight business logic layers, performing essential tasks:- Data Transformation: Ensure compatibility between different data formats, like date formats, value lists, and units.
- Information Enrichment: Add non-critical integration information like flags and tracing GUIDs.
Creating a connector
- Create a Kafka Consumer: Follow this guide to configure a Kafka consumer for your Connector.
- Create a Kafka Producer: Refer to this guide for instructions on setting up a Kafka producer.
Adaptable Kafka settings can yield advantageous event-driven communication patterns. Fine-tuning partition counts and consumers based on load testing is crucial for optimal performance.
Design considerations
Efficient Connector design within an event-driven architecture demands:- Load balancing solutions for varying communication types between the Connector and legacy systems.
- Custom implementations for request load balancing, Connector scaling, and more.
Incorporate all received Kafka headers in responses to ensure proper communication with the FlowX Engine.
Connector configuration sample
Here’s a basic setup example for a connector:- Configurations and examples for Kafka listeners and message senders.
- OPTIONAL: Activation examples for custom health checks.
- Name Your Connector: Choose a meaningful name for your connector service in the configuration file (
quickstart-connector/src/main/resources/config/application.yml):
- Select Listening Topic: Decide the primary topic for your connector to listen on ( you can do this at the following path →
quickstart-connector/src/main/resources/config/application-kafka.yml):
If the connector needs to listen to multiple topics, ensure you add settings and configure a separate thread pool executor for each needed topic (refer to
KafkaConfiguration, you can find it at quickstart-connector/src/main/java/ai/flowx/quickstart/connector/config/KafkaConfiguration.java).- Define Reply Topic: Determine the reply topic, aligning with the Engine’s topic pattern.
- Adjust Consumer Threads: Modify consumer thread counts to match partition numbers.
in and out topics belong to your connector — they are not part of the topic catalog FlowX provisions at deployment, and FlowX brokers run with topic auto-creation turned off. Create both topics in your Kafka cluster before starting the connector, with a partition count that matches your consumer scaling (instances × consumer threads).
Custom connectors are a self-hosted capability. On FlowX.AI SaaS the Kafka cluster is internal to the platform and not reachable from outside, so a customer-run connector cannot connect to it. On SaaS, integrate external systems through the Integration Designer (REST data sources and workflows), incoming webhooks, or email triggers instead.
- Define Incoming Data Format (DTO): Specify the structure for incoming and outgoing data using DTOs. This can be found at the path:
quickstart-connector/src/main/java/ai/flowx/quickstart/connector/dto/KafkaRequestMessageDTO.java.
- Define Outgoing Data Format (DTO): Specify the structure for outgoing data at the following path →
quickstart-connector/src/main/java/ai/flowx/quickstart/connector/dto/KafkaResponseMessageDTO.java.
- Implement Business Logic: Develop logic for handling messages from the Engine and generating replies. Ensure to include the process instance UUID as a Kafka message key.
- Health Checks: Enable health checks for all utilized services in your setup.
application.yaml and application-kafka.yaml) should resemble the provided samples, adjusting settings according to your requirements:
application-kafka.yaml) should look like this:
Setting up the connector locally
For detailed setup instructions, refer to the Setting Up FlowX.AI Quickstart Connector Readme:Readme file
- a terminal to clone the GitHub repository
- a code editor and IDE
- JDK version 11 or later (the quickstart-connector sample targets Java 11)
- the Docker Desktop app
- an internet browser
Integrating a connector in FlowX.AI Designer
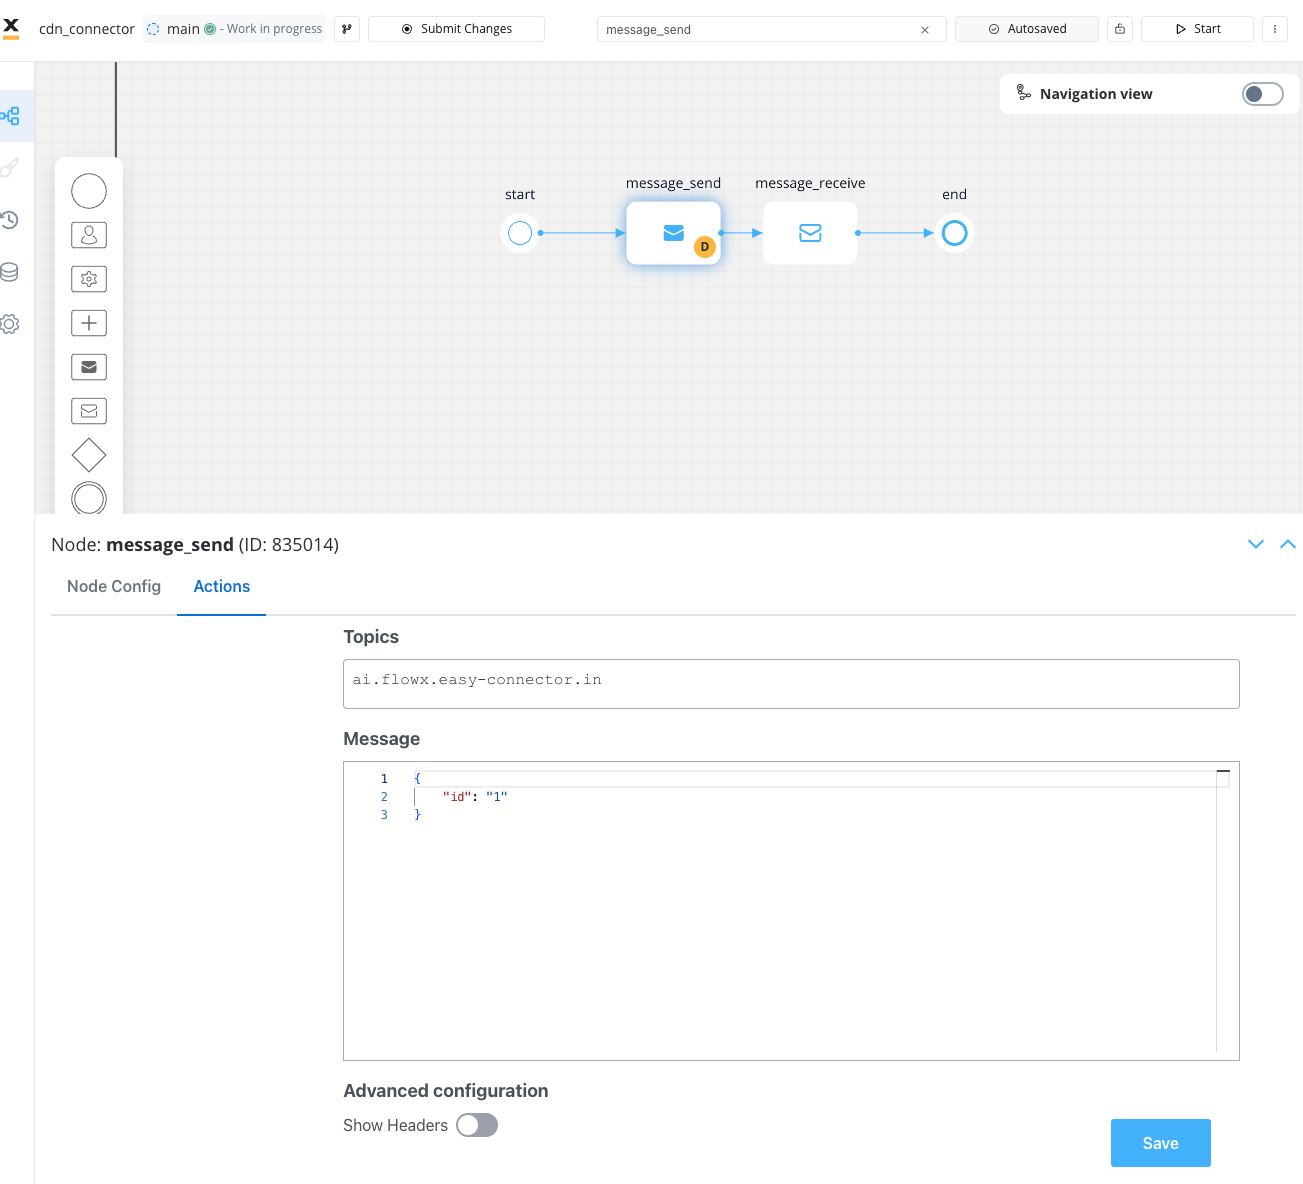
To integrate and utilize the connector within FlowX.AI Designer, follow these steps:- Process Designer Configuration: Utilize the designated communication nodes within the Process Designer:
- Send Message Task: Transmit a message to a topic monitored by the connector. Make sure you choose Kafka Send Action type.
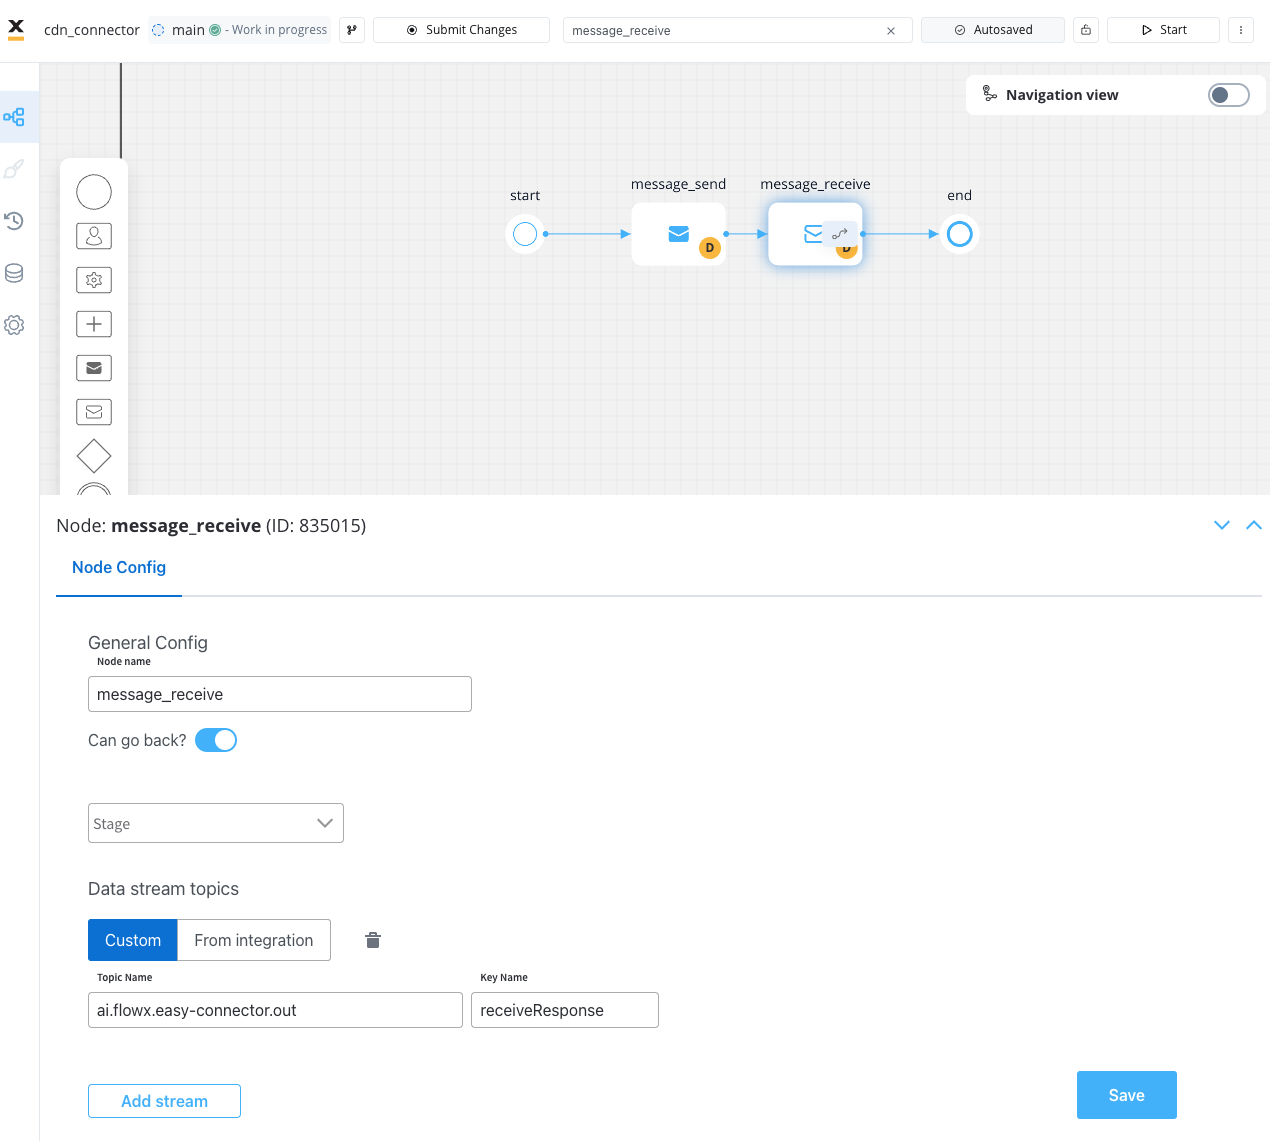
- Receive Message Task: Await a message from the connector on a topic monitored by the engine.
- Connector Operations: The connector identifies and processes the incoming message.
- Handling Response: Upon receiving a response, the connector serializes and deposits the message onto the specified OUT topic.
- Engine Processing: The engine detects the new message, captures the entire content, and stores it within its variables based on the configured variable settings.