

- Design a BPMN process with multiple node types
- Create user-facing forms
- Integrate with external systems
- Handle branching logic based on business rules
- Send notifications
Time required: 30-45 minutesPrerequisites:
- Access to FlowX Designer
- A workspace and project set up (create one here)
What you’ll build
A customer requests a new credit card through a bank app. The process:- Collects personal information
- Checks credit score automatically
- Assigns a card type based on the score
- Sends confirmation email
- Lets the user pick a branch for card pickup
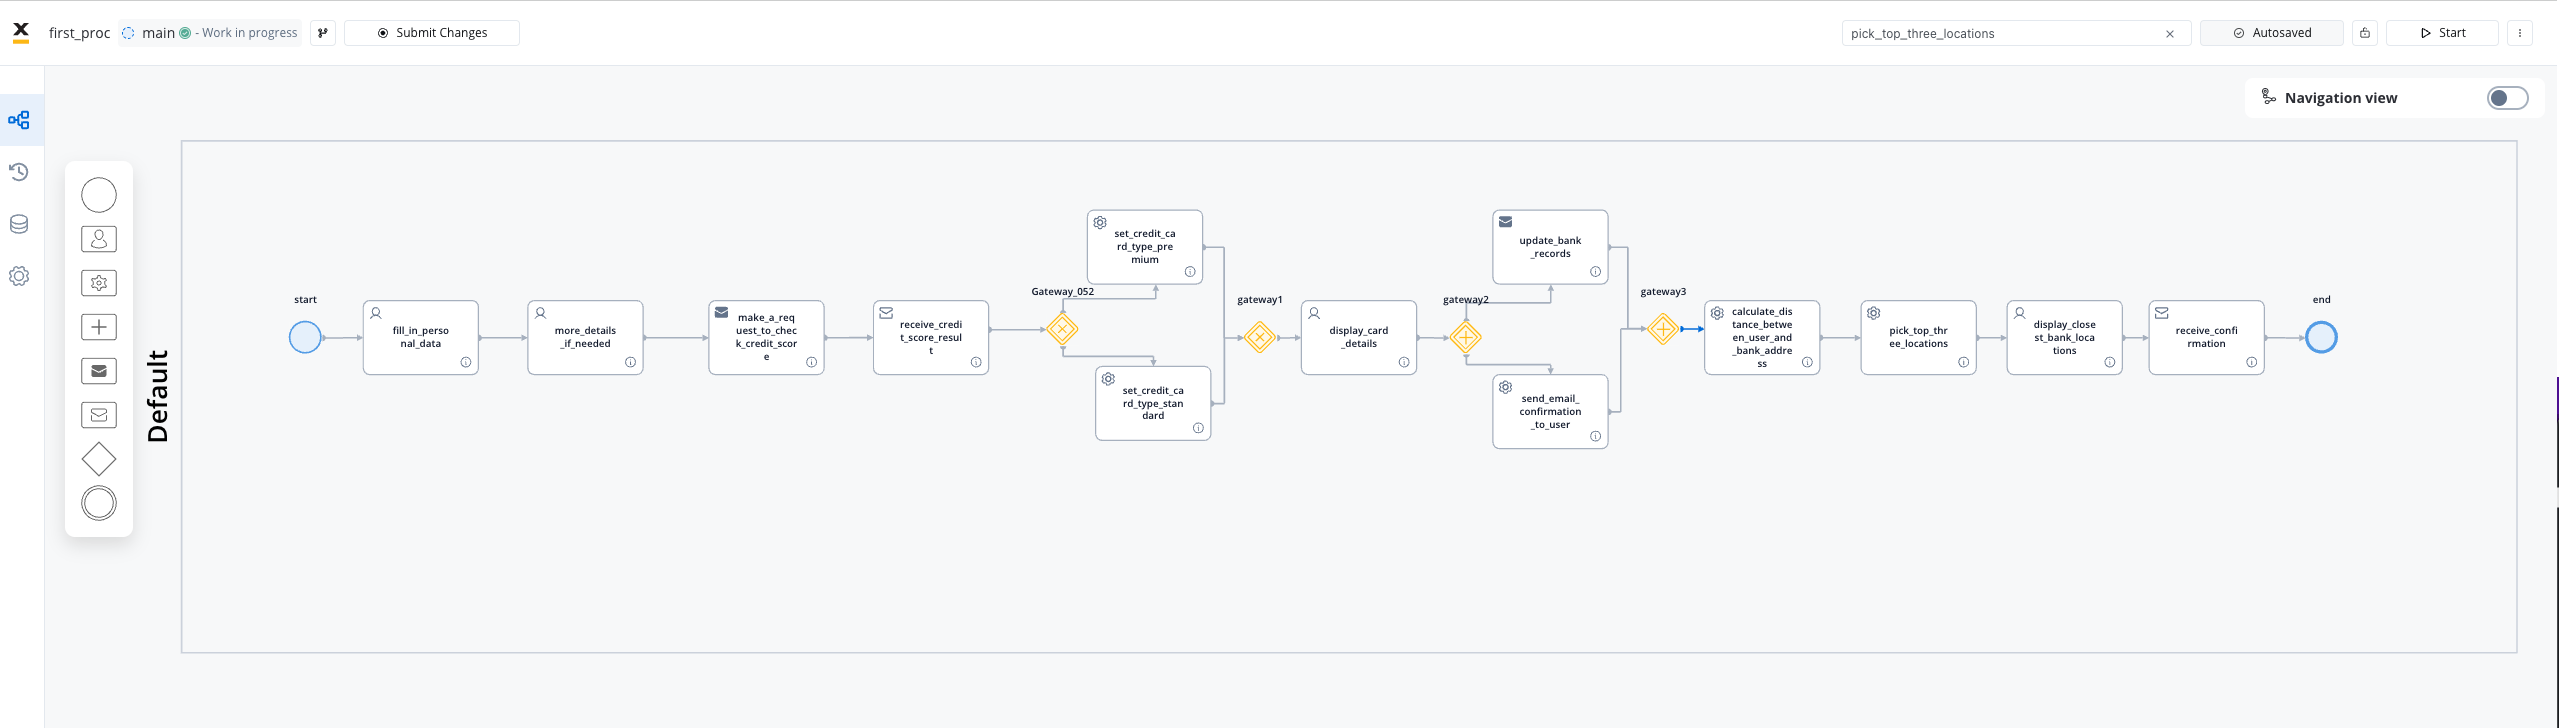
Download this process
Import this BPMN file to follow along or explore the finished result.
Step 1: Create the process
1
Open your project
Navigate to FlowX Designer → your workspace → your project.
2
Create a new process
Click New → Process. Name it
credit-card-request.3
Add a Start Event
Drag a Start Event node onto the canvas. This is where the process begins when a customer opens the credit card application.
Learn more about processes
Step 2: Collect user data (User Task)
The first step is collecting the customer’s personal information.1
Add a User Task
Drag a User Task node after the Start Event. Name it
Fill Personal Data.2
Design the form
In the node settings, open the UI Designer. Add form fields:
- Full name (text input)
- Email (text input with email validation)
- Date of birth (date picker)
- Annual income (number input)
3
Configure the data model
Map each field to a key in your data model:
application.fullNameapplication.emailapplication.dateOfBirthapplication.annualIncome
4
Add a Continue button and wire it
The form cannot advance the process on its own: it needs a button bound to an action. A user task already comes with a Save Data action named
saveData, set to Manual so it waits for the user, so you do not have to create one.In the UI Designer, drag a Button onto the screen and label it Continue. In its Event Handlers section, click +, choose the On Click trigger, set Action Type to Node Action, and select saveData.Under Add form to submit, select your form. This validates the visible fields and sends their values with the action.Buttons never advance a process on their own. Each button corresponds to a manual node action on the same node, reached through an On Click event handler. If you are coming from 5.1.x, the Event Handlers section is what replaced the separate UI actions tab. See the migration mapping for the old-to-new action names.
Learn more about User Tasks
Event Handlers
Step 3: Check credit score (integration workflow)
Call an external credit scoring service automatically. In FlowX, integrations run as Workflows: lightweight flows that call external systems through Data Sources, triggered from your BPMN process with a Start Integration Workflow action.1
Create the credit-scoring workflow
Define your scoring service as a RESTful System data source, then build a workflow that calls it. New to workflows? The integration workflow tutorial walks through this exact Data Source + Workflow setup.
2
Add a Send Message Task with a Start Integration Workflow action
Drag a Send Message Task after the user task. Add a Start Integration Workflow action, select your credit-scoring workflow, and map the customer data (for example
${processInstanceData.application.annualIncome}) as workflow input.3
Add a Receive Message Task
This waits for the workflow to complete. Configure its Data Stream to map the workflow output to
application.creditScore.Learn more about the Start Integration Workflow action
Step 4: Branch based on credit score (Exclusive Gateway)
Different credit scores qualify for different card types.1
Add an Exclusive Gateway
This creates a decision point based on the credit score.
2
Configure branch conditions
- Branch 1:
application.creditScore >= 700→ Premium card - Branch 2:
application.creditScore >= 500→ Standard card - Branch 3: Default → Basic card
3
Add Service Tasks for each branch
Each branch sets the card type:
4
Add a closing Exclusive Gateway
Merge the branches back together after the card type is set.
Learn more about Gateways
Step 5: Show results and confirm (User Task)
Let the customer review their card type and confirm.1
Add a User Task
Name it
Review and Confirm.2
Design the confirmation screen
Display the assigned card type and benefits.
3
Add the Confirm button
Add a Button labeled
Confirm in the UI Designer and give it an On Click event handler with Action Type set to Node Action, pointing at this node’s saveData action, exactly as you did in Step 2.Step 6: Send notification and register (Parallel Gateway)
After confirmation, two things happen simultaneously:1
Add a Parallel Gateway
This splits the flow into parallel branches.
2
Branch 1: Send confirmation email
Add a Send Message Task that triggers the notification plugin.Configure email template with customer name and card type.
3
Branch 2: Register in bank system
Add a Send Message Task to your bank system adapter.This creates the card request in your core banking system.
4
Add a Closing Parallel Gateway
Wait for both branches to complete before continuing.
Learn more about Notifications
Step 7: Select pickup location (Service Task + User Task)
Let the customer choose where to pick up their card.1
Add a Service Task to fetch locations
Call an API (like Google Maps) to get nearby branches based on customer address.
2
Add a User Task
Display the top 3 branches as selectable options.
Step 8: End the process
1
Add a Receive Message Task
This waits for confirmation that the customer picked up the card (from branch system).
2
Add an End Event
The process completes.
Test your process
1
Save and validate
Click Save. Fix any validation errors shown.
2
Start a process instance
Click Run to start a new instance. Fill in the forms and watch the process flow.
3
Check the token
Use the Process Instance view to see where the token is and inspect data at each step.
What you learned
You’ve built a complete process that demonstrates:Next steps
Continue: build your first workflow
Your credit score check in Step 3 used an integration workflow. Build one yourself: connect an external API as a Data Source and call it from a process.
UI components
Learn all available form and display components
Business rules
Add complex logic with JavaScript or Python business rules
Error handling
Handle failures gracefully
FlowX Academy
Take structured courses with certifications