

Prerequisites: a project in your workspace, access to FlowX.AI Designer, and the AI platform turned on for your environment (the workflow uses the Document Extraction node). To receive real invoices you also need an IMAP mailbox. You can build and test everything without one: the workflow runs on uploaded test files and the process accepts mock email content. If integration workflows are new to you, start with Call an external API from a process, which covers the send, workflow, receive round trip this cookbook builds on.
The pattern
Two halves, joined by one workflow call:- A FlowX Database holds the approved purchase orders that invoices are matched against.
- An integration workflow does the matching: it extracts the invoice, looks up its PO, and returns
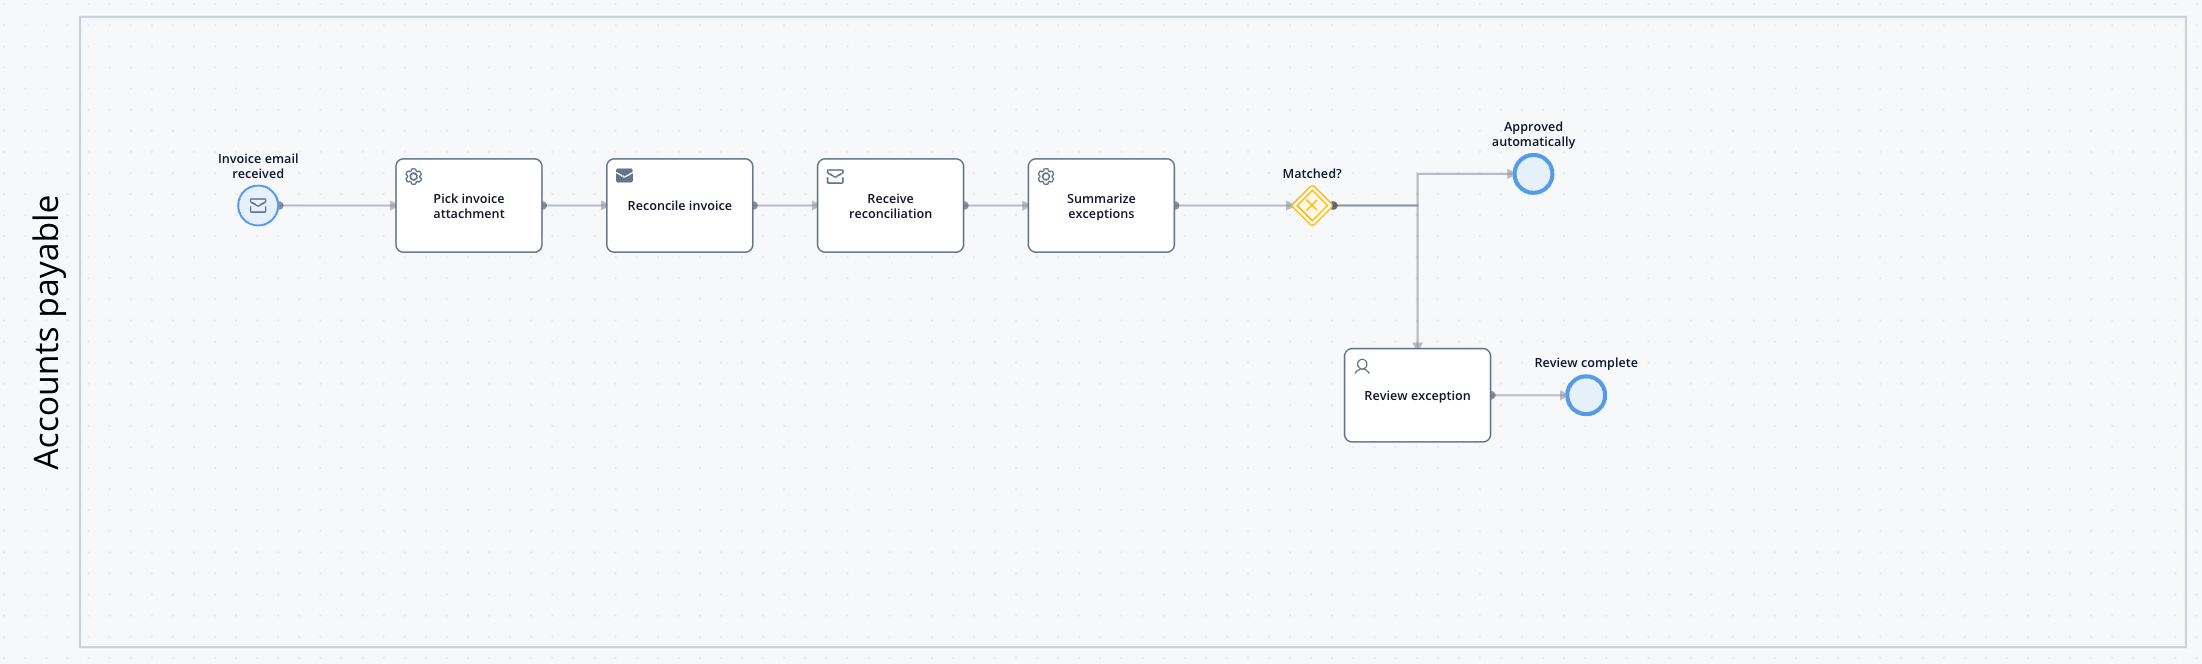
MATCHEDorEXCEPTIONtogether with the list of reasons. It never decides anything a person should decide. - A process owns the business flow: an Email Trigger starts it for each invoice email, it hands the attachment to the workflow, and it routes the result either to automatic approval or to a reviewer.
Step 1: Store the purchase orders
1
Model a purchase order
In your project, create two data types:
2
Create the FlowX Database
Go to Integrations → Data Sources, add a FlowX Database named
PurchaseOrders, and select PurchaseOrder as its schema. Keep the default partition key _id.3
Add a lookup operation
Add a FindOne operation named 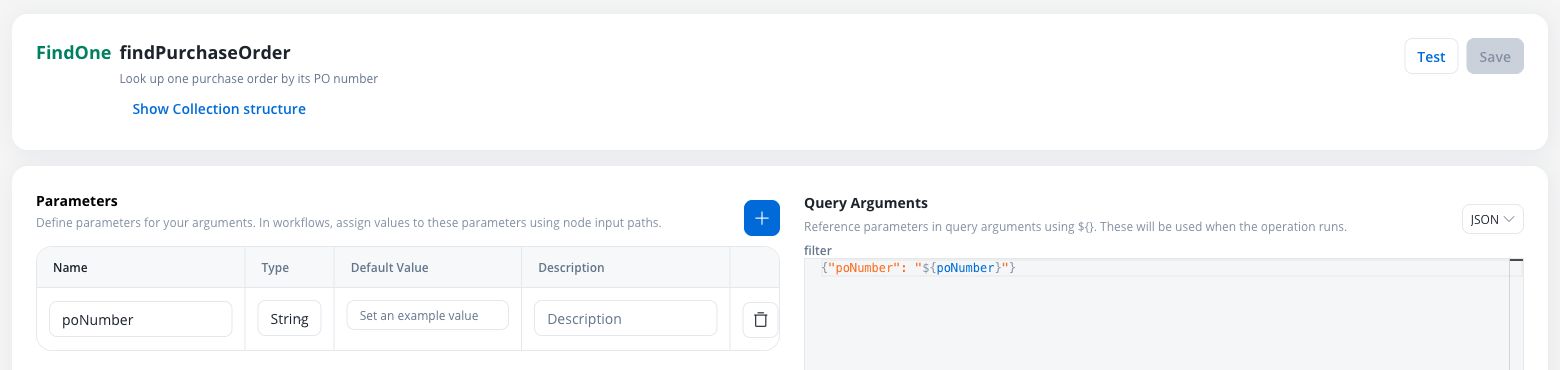
findPurchaseOrder with one String parameter, poNumber, and this filter:4
Load sample purchase orders
Add an InsertMany operation named Run the workflow once, then check the Documents tab of
insertPurchaseOrders with an Object parameter orders and the payload ${orders}. Then create a run-once workflow, seedPurchaseOrders: a Script node that builds the orders, followed by a Data Source node that calls insertPurchaseOrders with orders bound to ${orders}.PurchaseOrders: it lists the three orders. In a real deployment, your ERP feeds this collection instead.Step 2: Extract the invoice
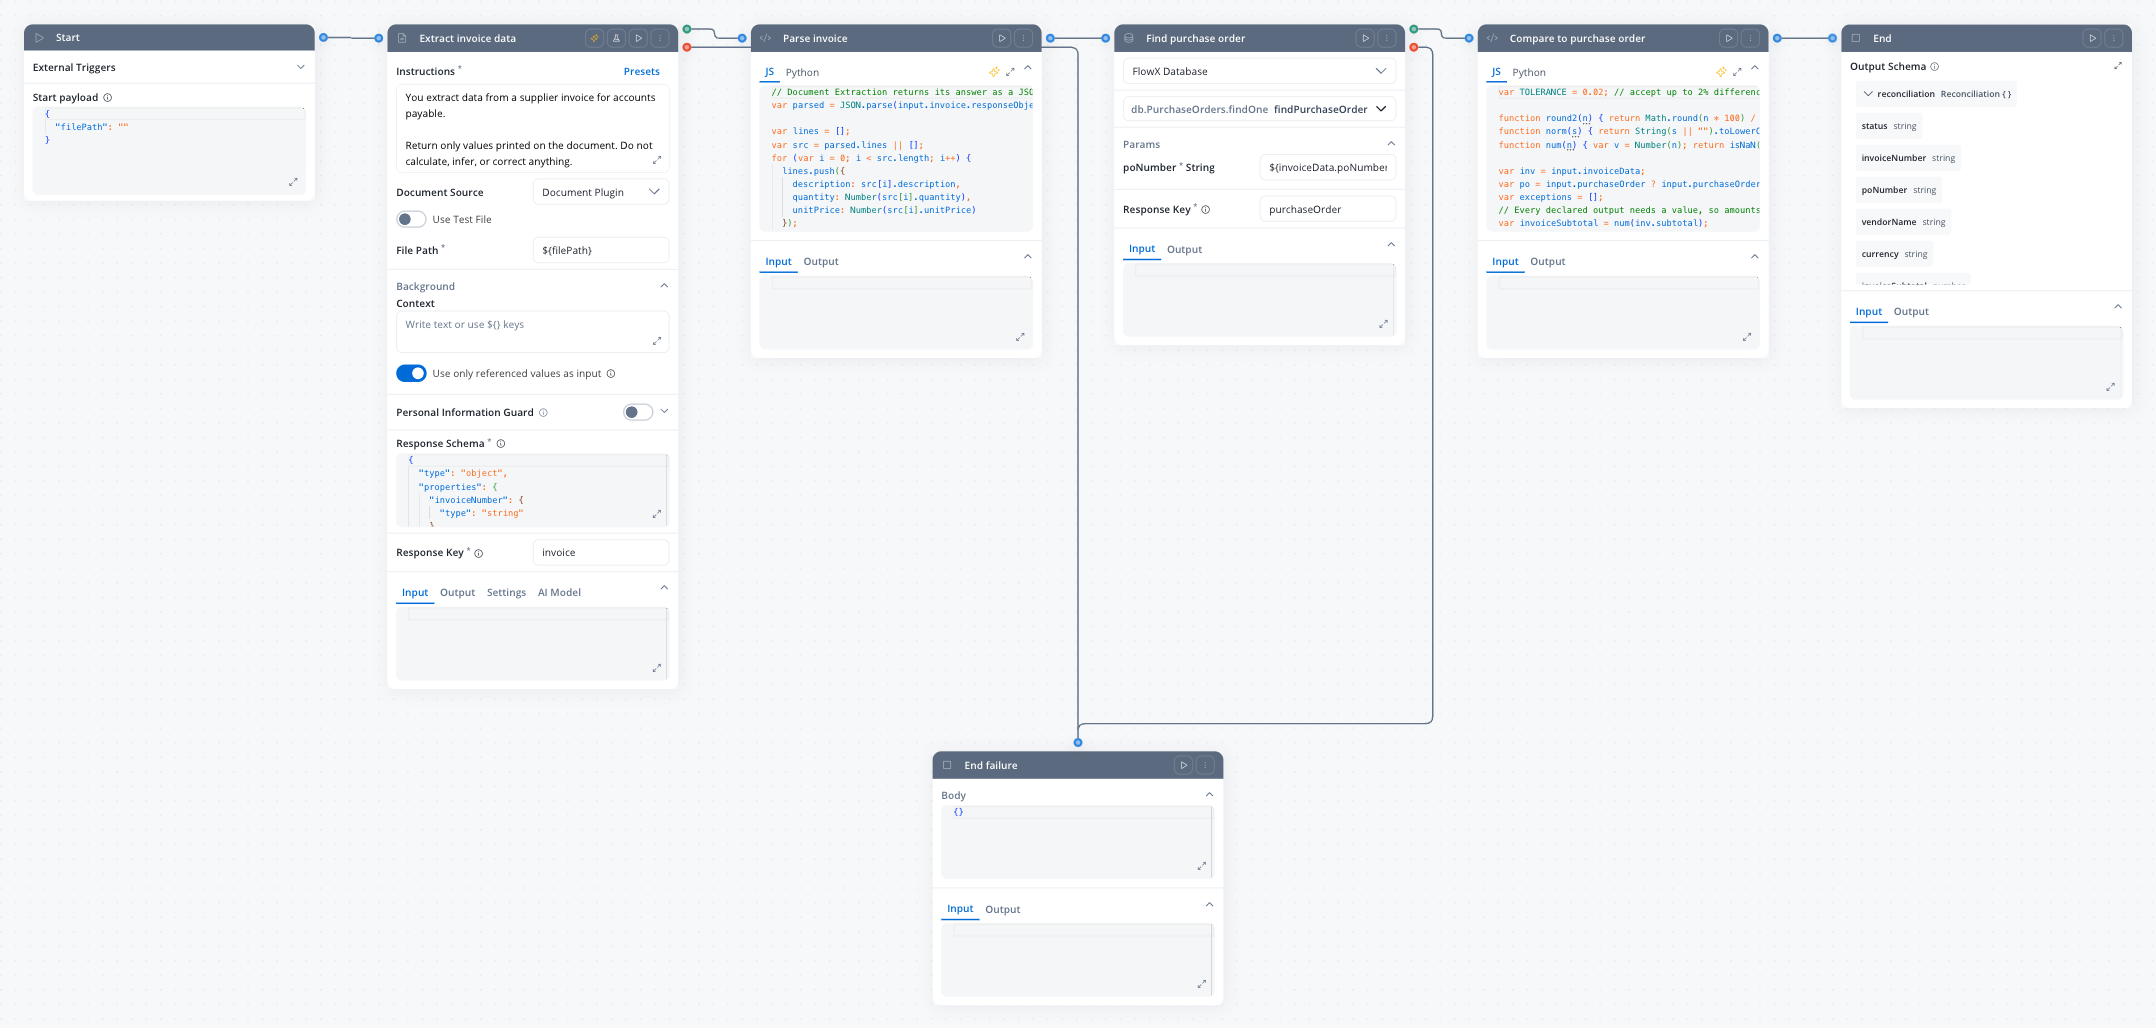
Create a workflow namedreconcileInvoice. It takes one input, the path of the invoice file in the Document Plugin, and returns the reconciliation result.
1
Declare the input
In the workflow’s data model, add a String attribute
filePath and declare it as the Start node’s input parameter.2
Add the Document Extraction node
Add a Document Extraction node named Response Schema: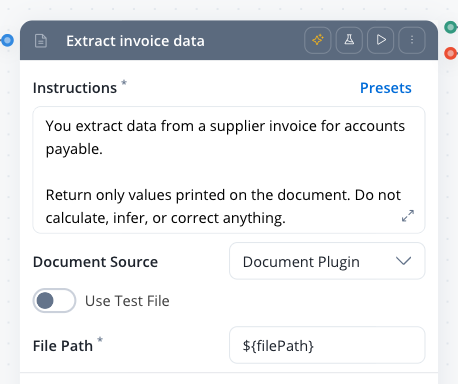
Extract invoice data after Start:- Presets: Metadata Generation, then replace the prefilled instructions with the ones below
- Document Source: Document Plugin
- File Path:
${filePath} - Response Key:
invoice
3
Branch the failure path
Connect the node’s failure branch to an End node named
End failure. An unreadable file or a model error then ends the run visibly instead of passing empty data downstream.Step 3: Match the invoice against its purchase order
1
Parse the extraction result
Add a Script node named
Parse invoice on the extraction node’s success branch. Document Extraction returns its answer as a JSON string in responseObjects[0], so parse it and copy the fields into a plain object:2
Look up the purchase order
Add a Data Source node named 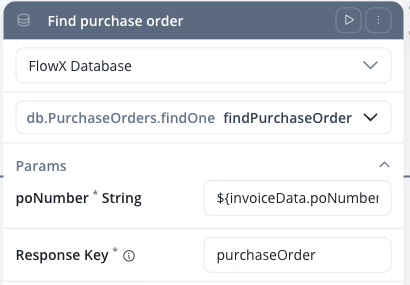 A FindOne result lands one level down, at
Find purchase order. Select the PurchaseOrders database and the findPurchaseOrder operation, set the poNumber parameter to ${invoiceData.poNumber}, and set Response Key to purchaseOrder. Connect its failure branch to End failure.purchaseOrder.data.3
Compare invoice and PO
Add a Script node named A line matches a PO line when its description starts with the PO line’s description, so a carrier that prints
Compare to purchase order. It checks the PO’s status, vendor, currency, subtotal, and every invoice line, and collects one readable message per difference:Road freight FTL Bucharest - Vienna, 13.6 m trailer still matches the PO line Road freight FTL Bucharest - Vienna.4
Declare the output
In the workflow’s data model, add an object 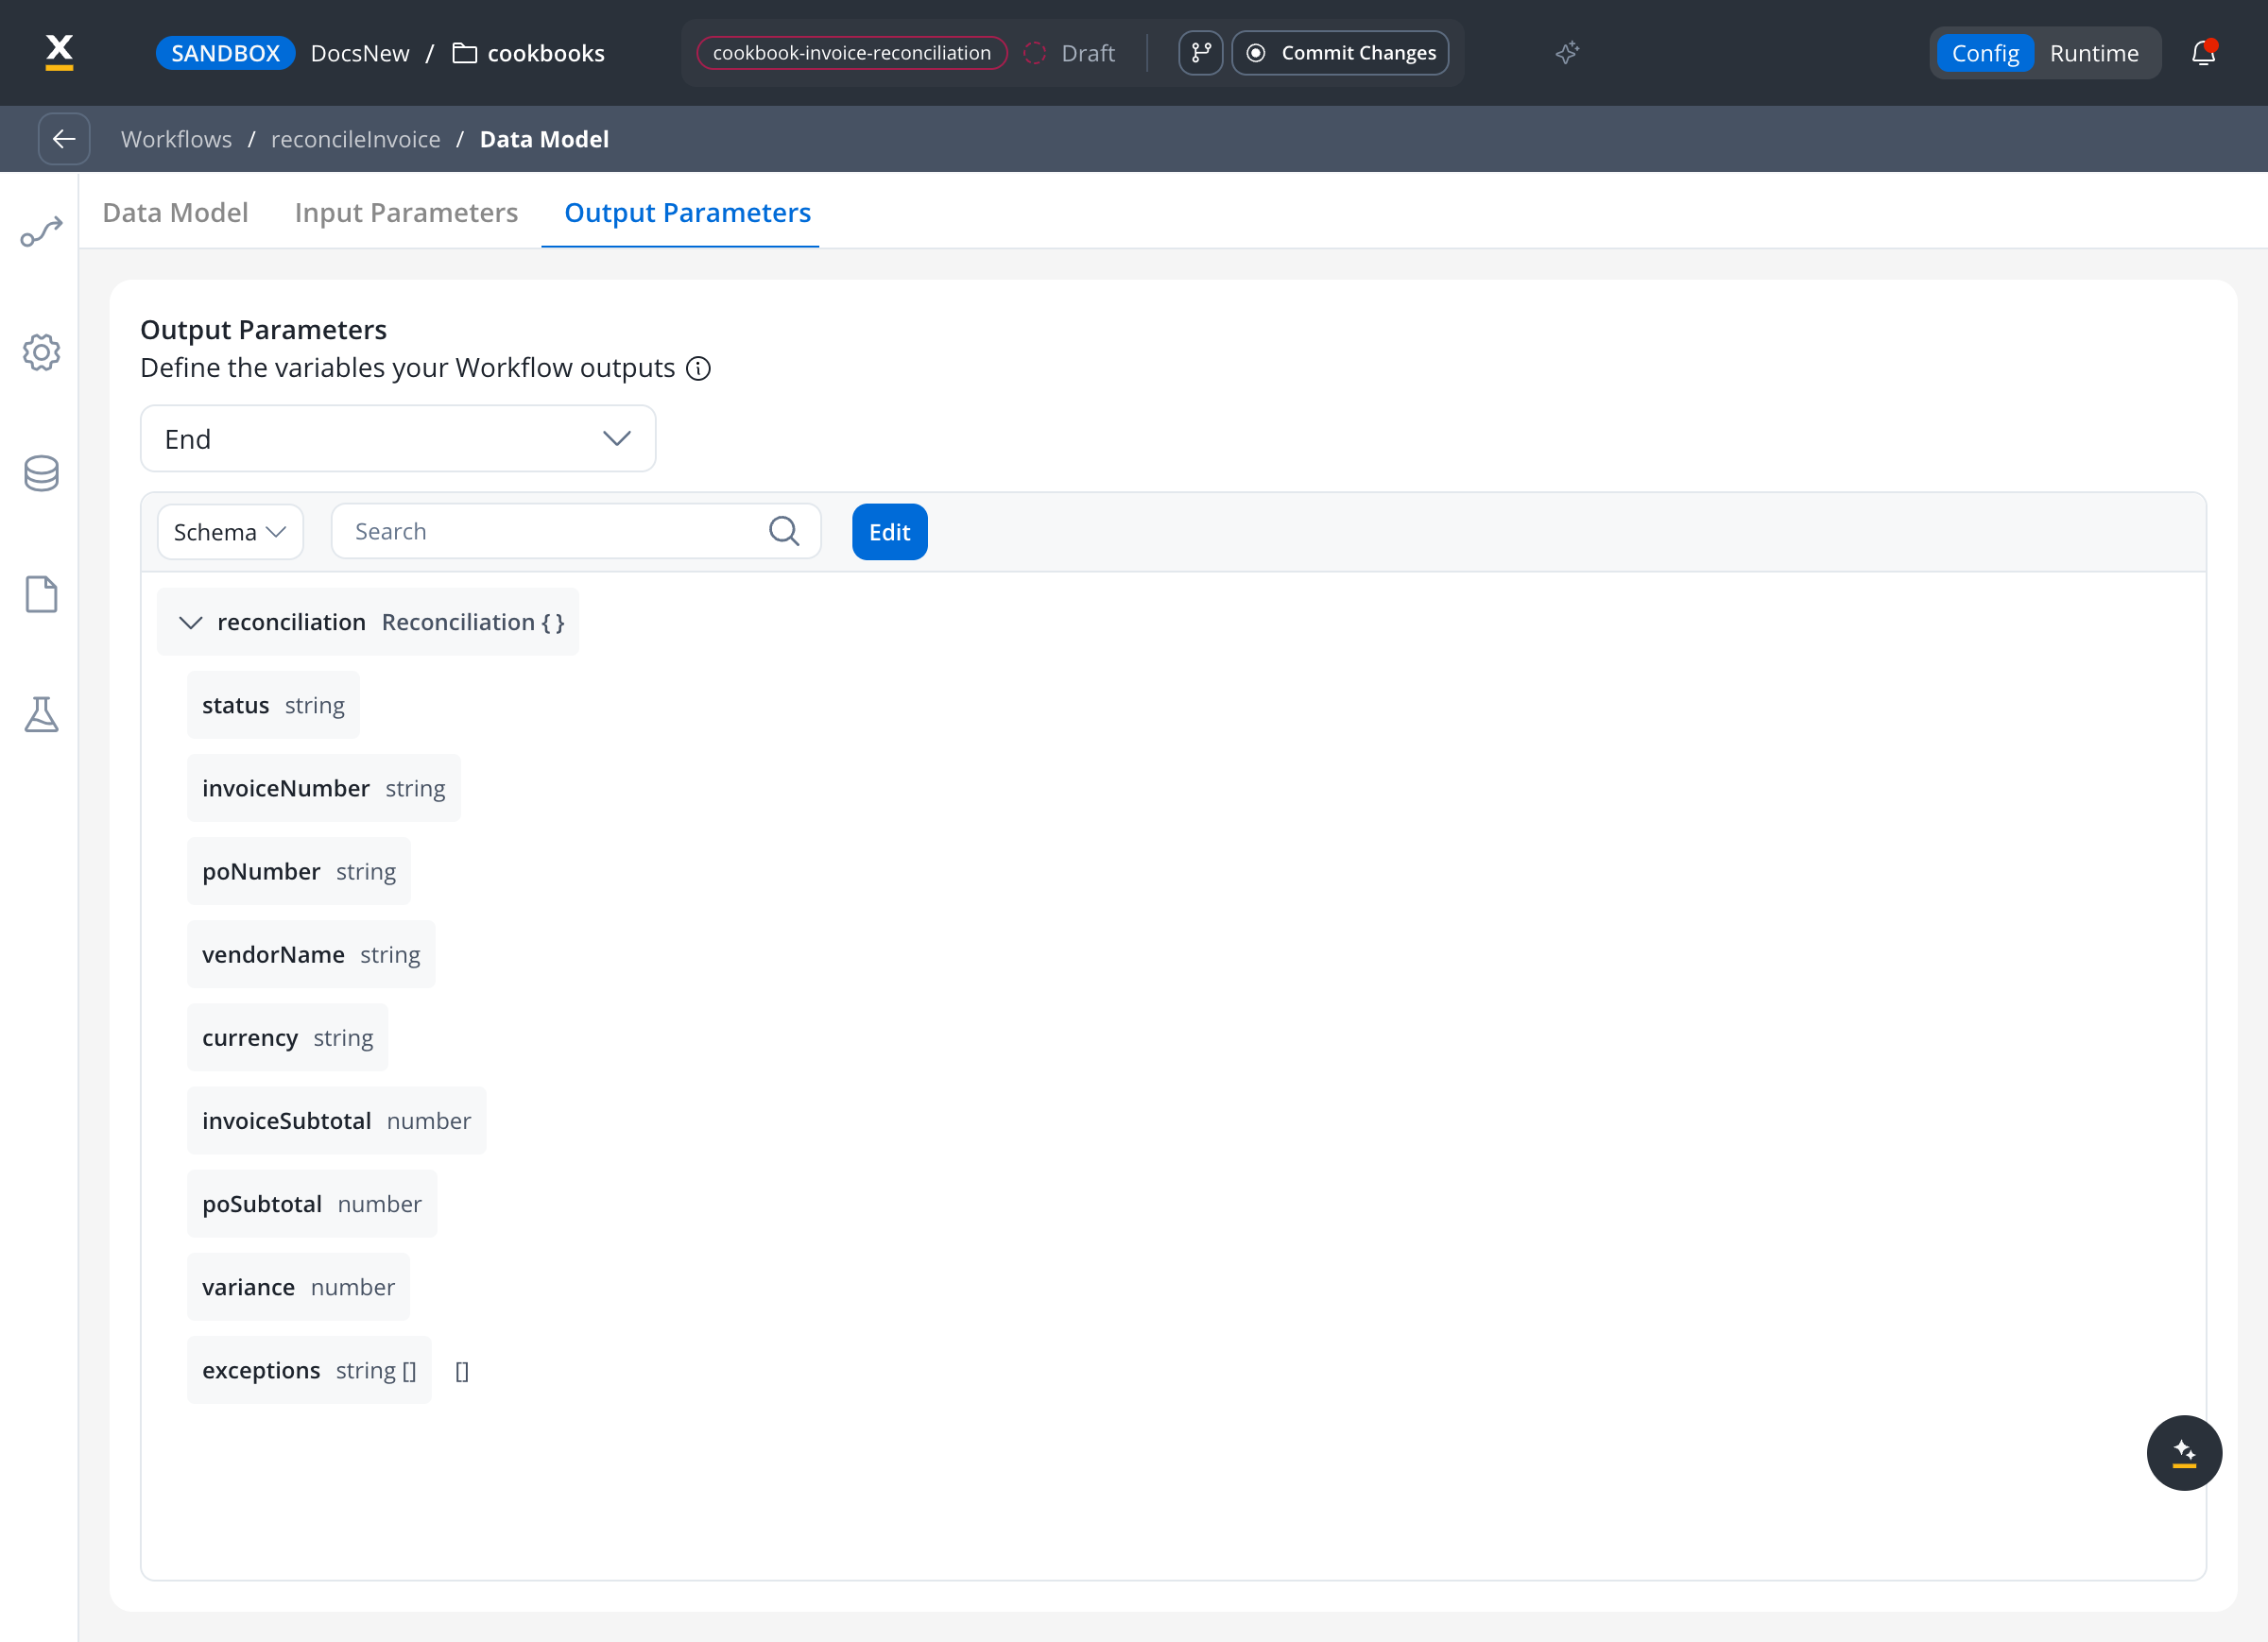
reconciliation with status, invoiceNumber, poNumber, vendorName, and currency (String), invoiceSubtotal, poSubtotal, and variance (Number), and exceptions (Array of String). Declare it as the output of the success End node.Script nodes receive workflow data as Java-backed objects, not plain JavaScript. Both scripts read fields one by one and loop with an index instead of calling
.map() or JSON.stringify() on their input, and they only put plain objects in output. Clearing invoice, purchaseOrder, and invoiceData with {} once they are consumed keeps the data that travels between nodes small.Step 4: Test the workflow on sample invoices
Create two PDF invoices to test with. Any tool that prints a PDF works; what matters is the content:
On the extraction node, turn on Use Test File, attach a sample invoice, and click Run Workflow. The run details show each node’s input and output. The two invoices produce:
The Northwind invoice bills container handling at 135.00 against an agreed 120.00, which is 12.5% above the rate and well past the 2% tolerance.
Step 5: Receive invoices by email
1
Create the Email Trigger
Go to Integrations → Data Sources and add an Email Trigger named 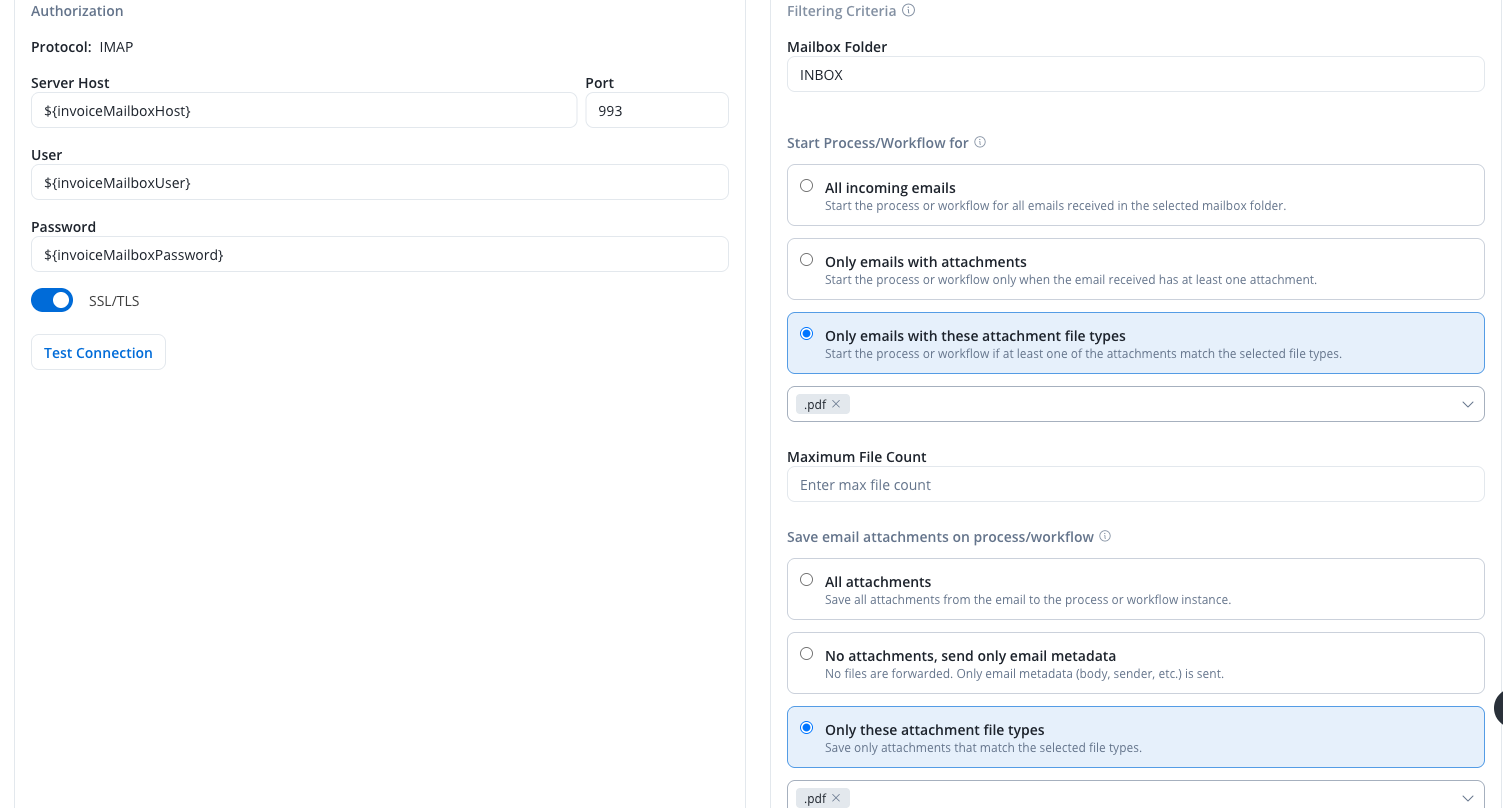
Invoice mailbox. Enter the IMAP connection of your AP mailbox. Reference the host, user, and password as configuration parameters (${configParam}) instead of typing them in, so each environment uses its own mailbox and the password never sits in the project.Under the filtering criteria, set:- Start Process/Workflow for: Only emails with these attachment file types,
.pdf - Save email attachments on process/workflow: Only these attachment file types,
.pdf
2
Start the process from the trigger
Create a process named 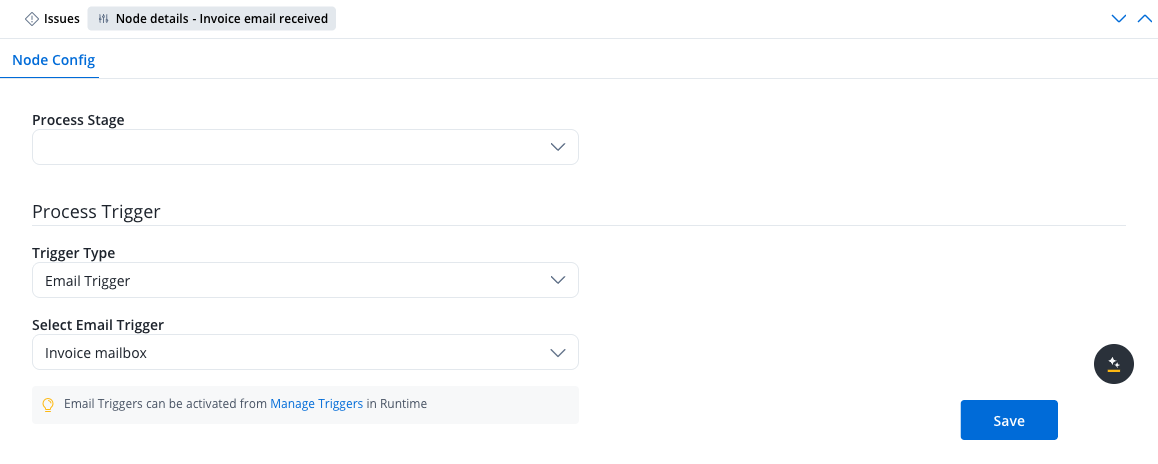
invoiceIntake with a swimlane named Accounts payable. Its start node is a Message Start Event named Invoice email received. In its node config, set Trigger Type to Email Trigger and select Invoice mailbox.emailMessage.fileAttachments, one entry per file with its filePath. For the full email schema, see Email Trigger.
Step 6: Hand the invoice to the workflow
1
Pick the attachment
Add a Service Task named The trigger forwards PDFs only, so the first attachment is the invoice. If your suppliers send several invoices in one email, start the workflow once per attachment instead.
Pick invoice attachment with a business rule action:2
Start the workflow
Add a Send Message Task named 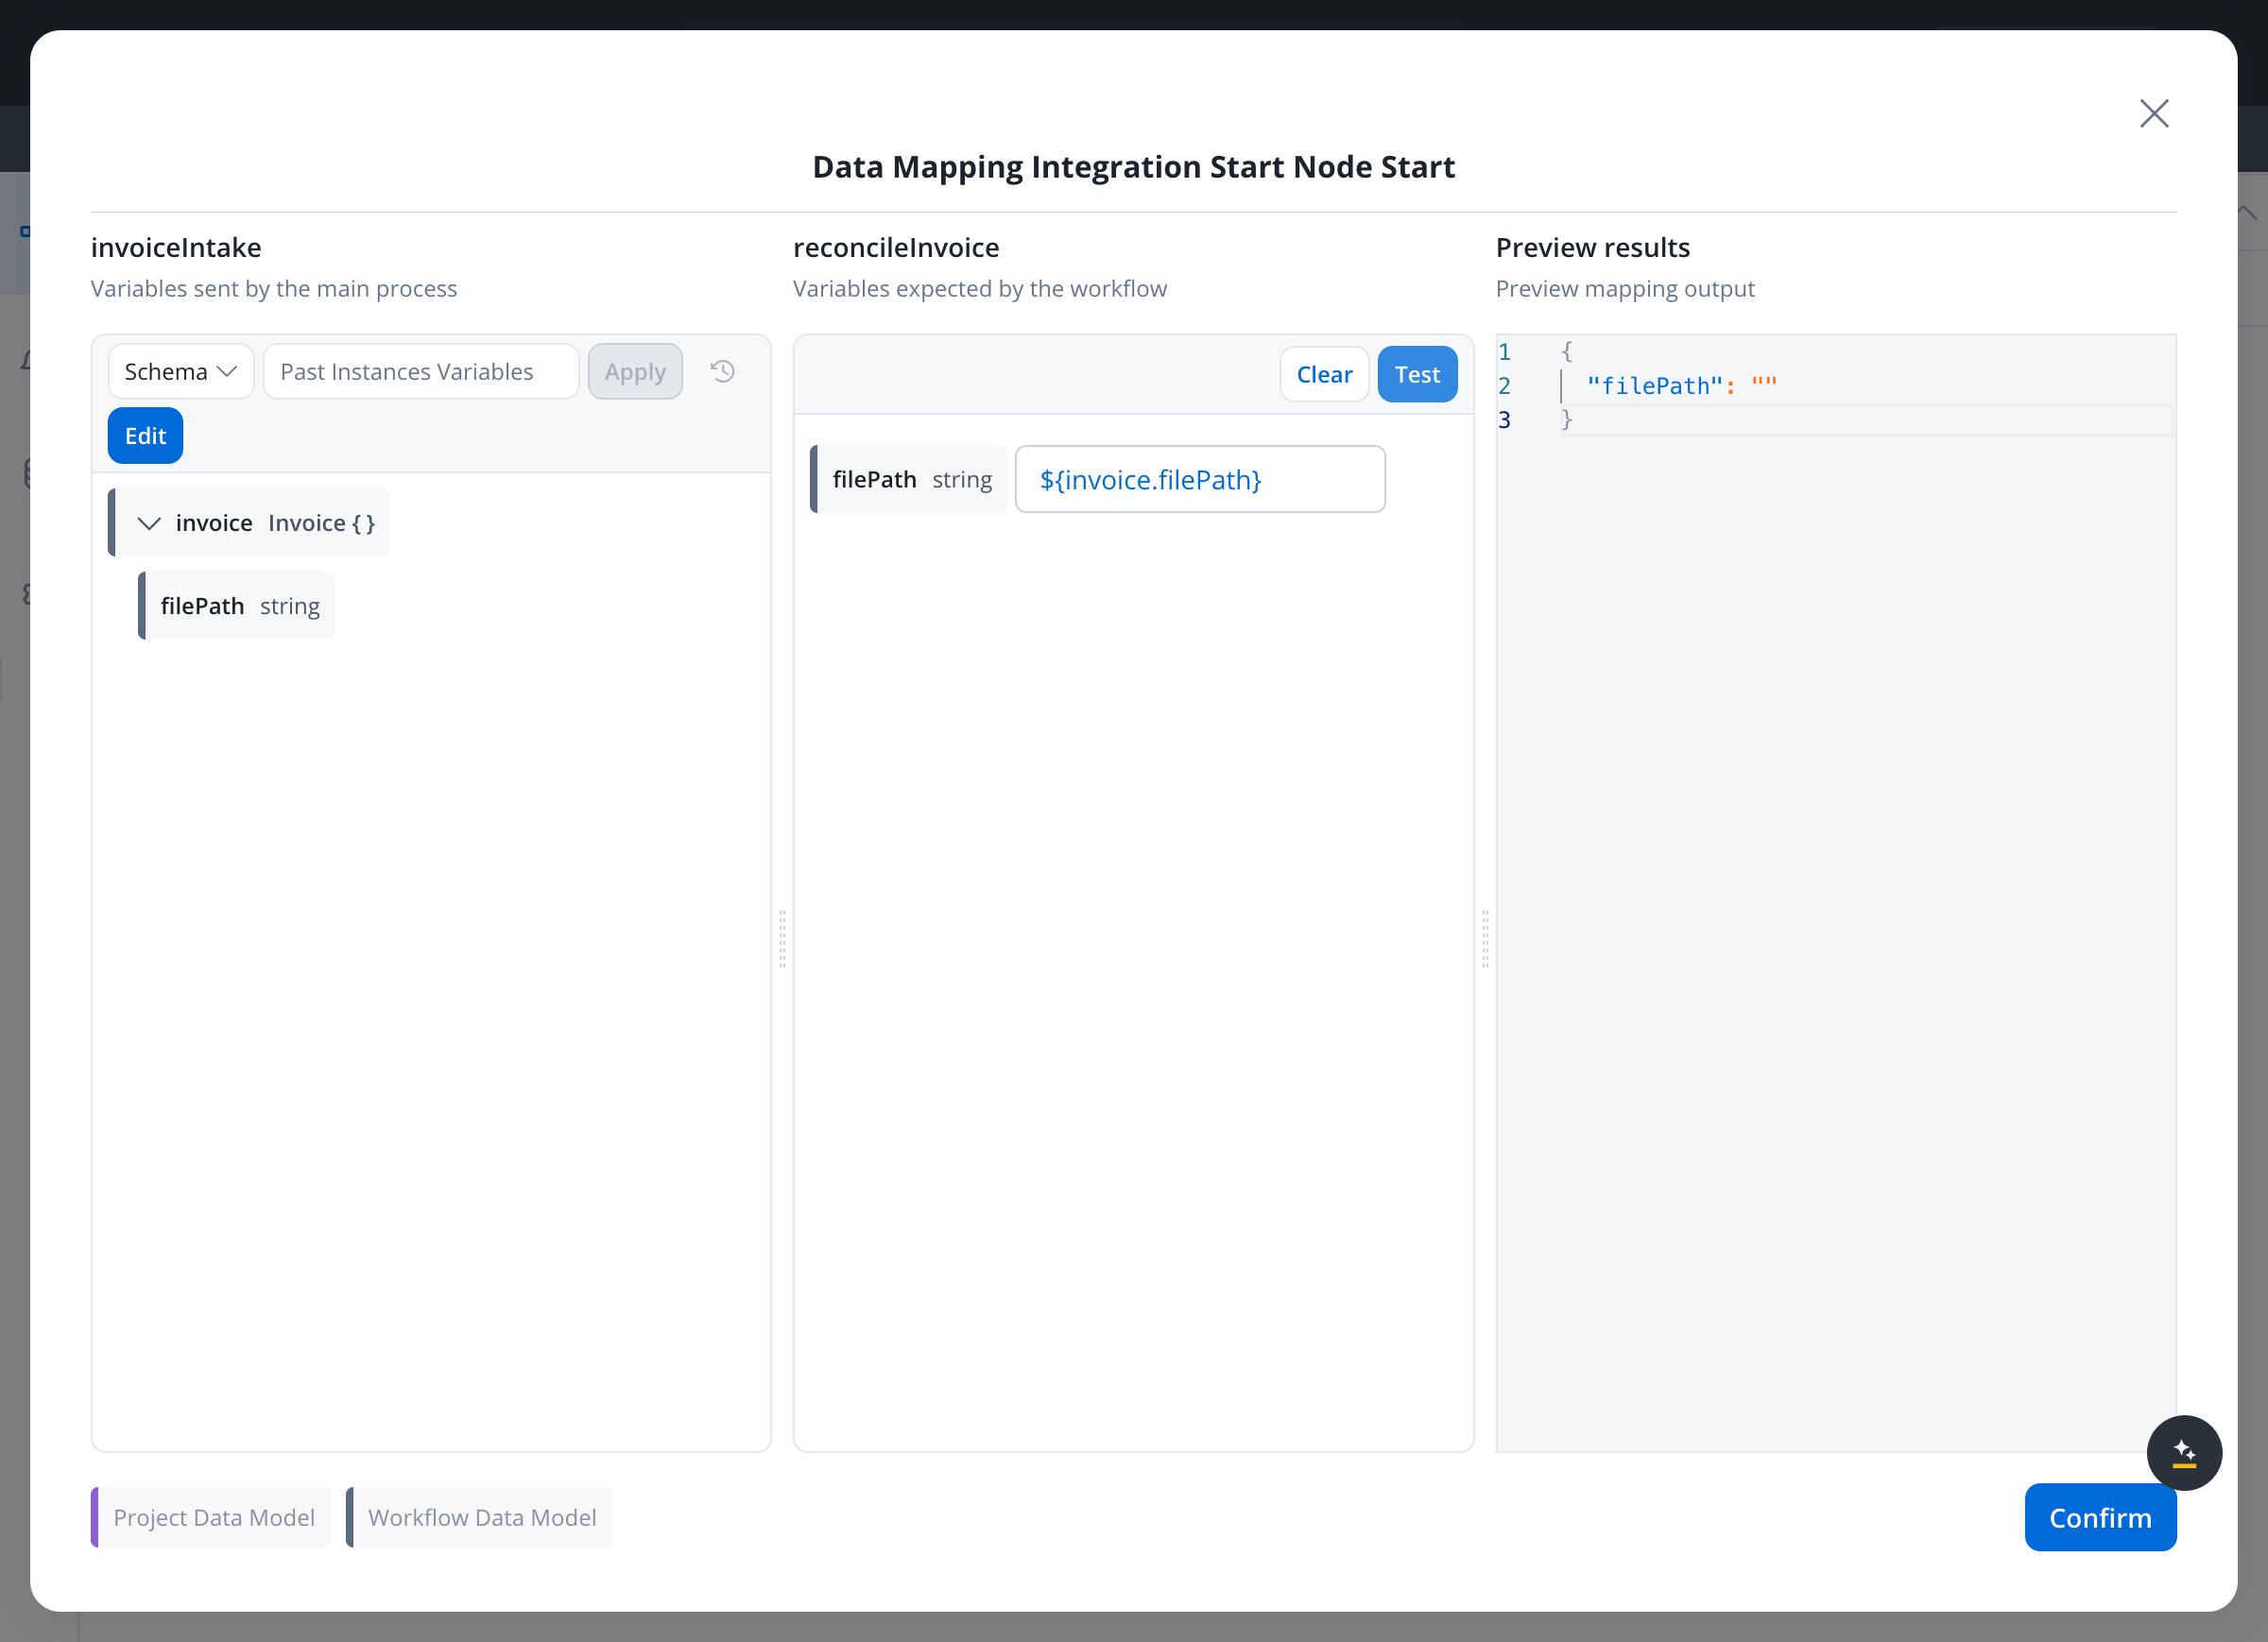
Reconcile invoice with a Start Integration Workflow action. Select reconcileInvoice and map its filePath input to ${invoice.filePath}.3
Receive the result
Add a Receive Message Task named 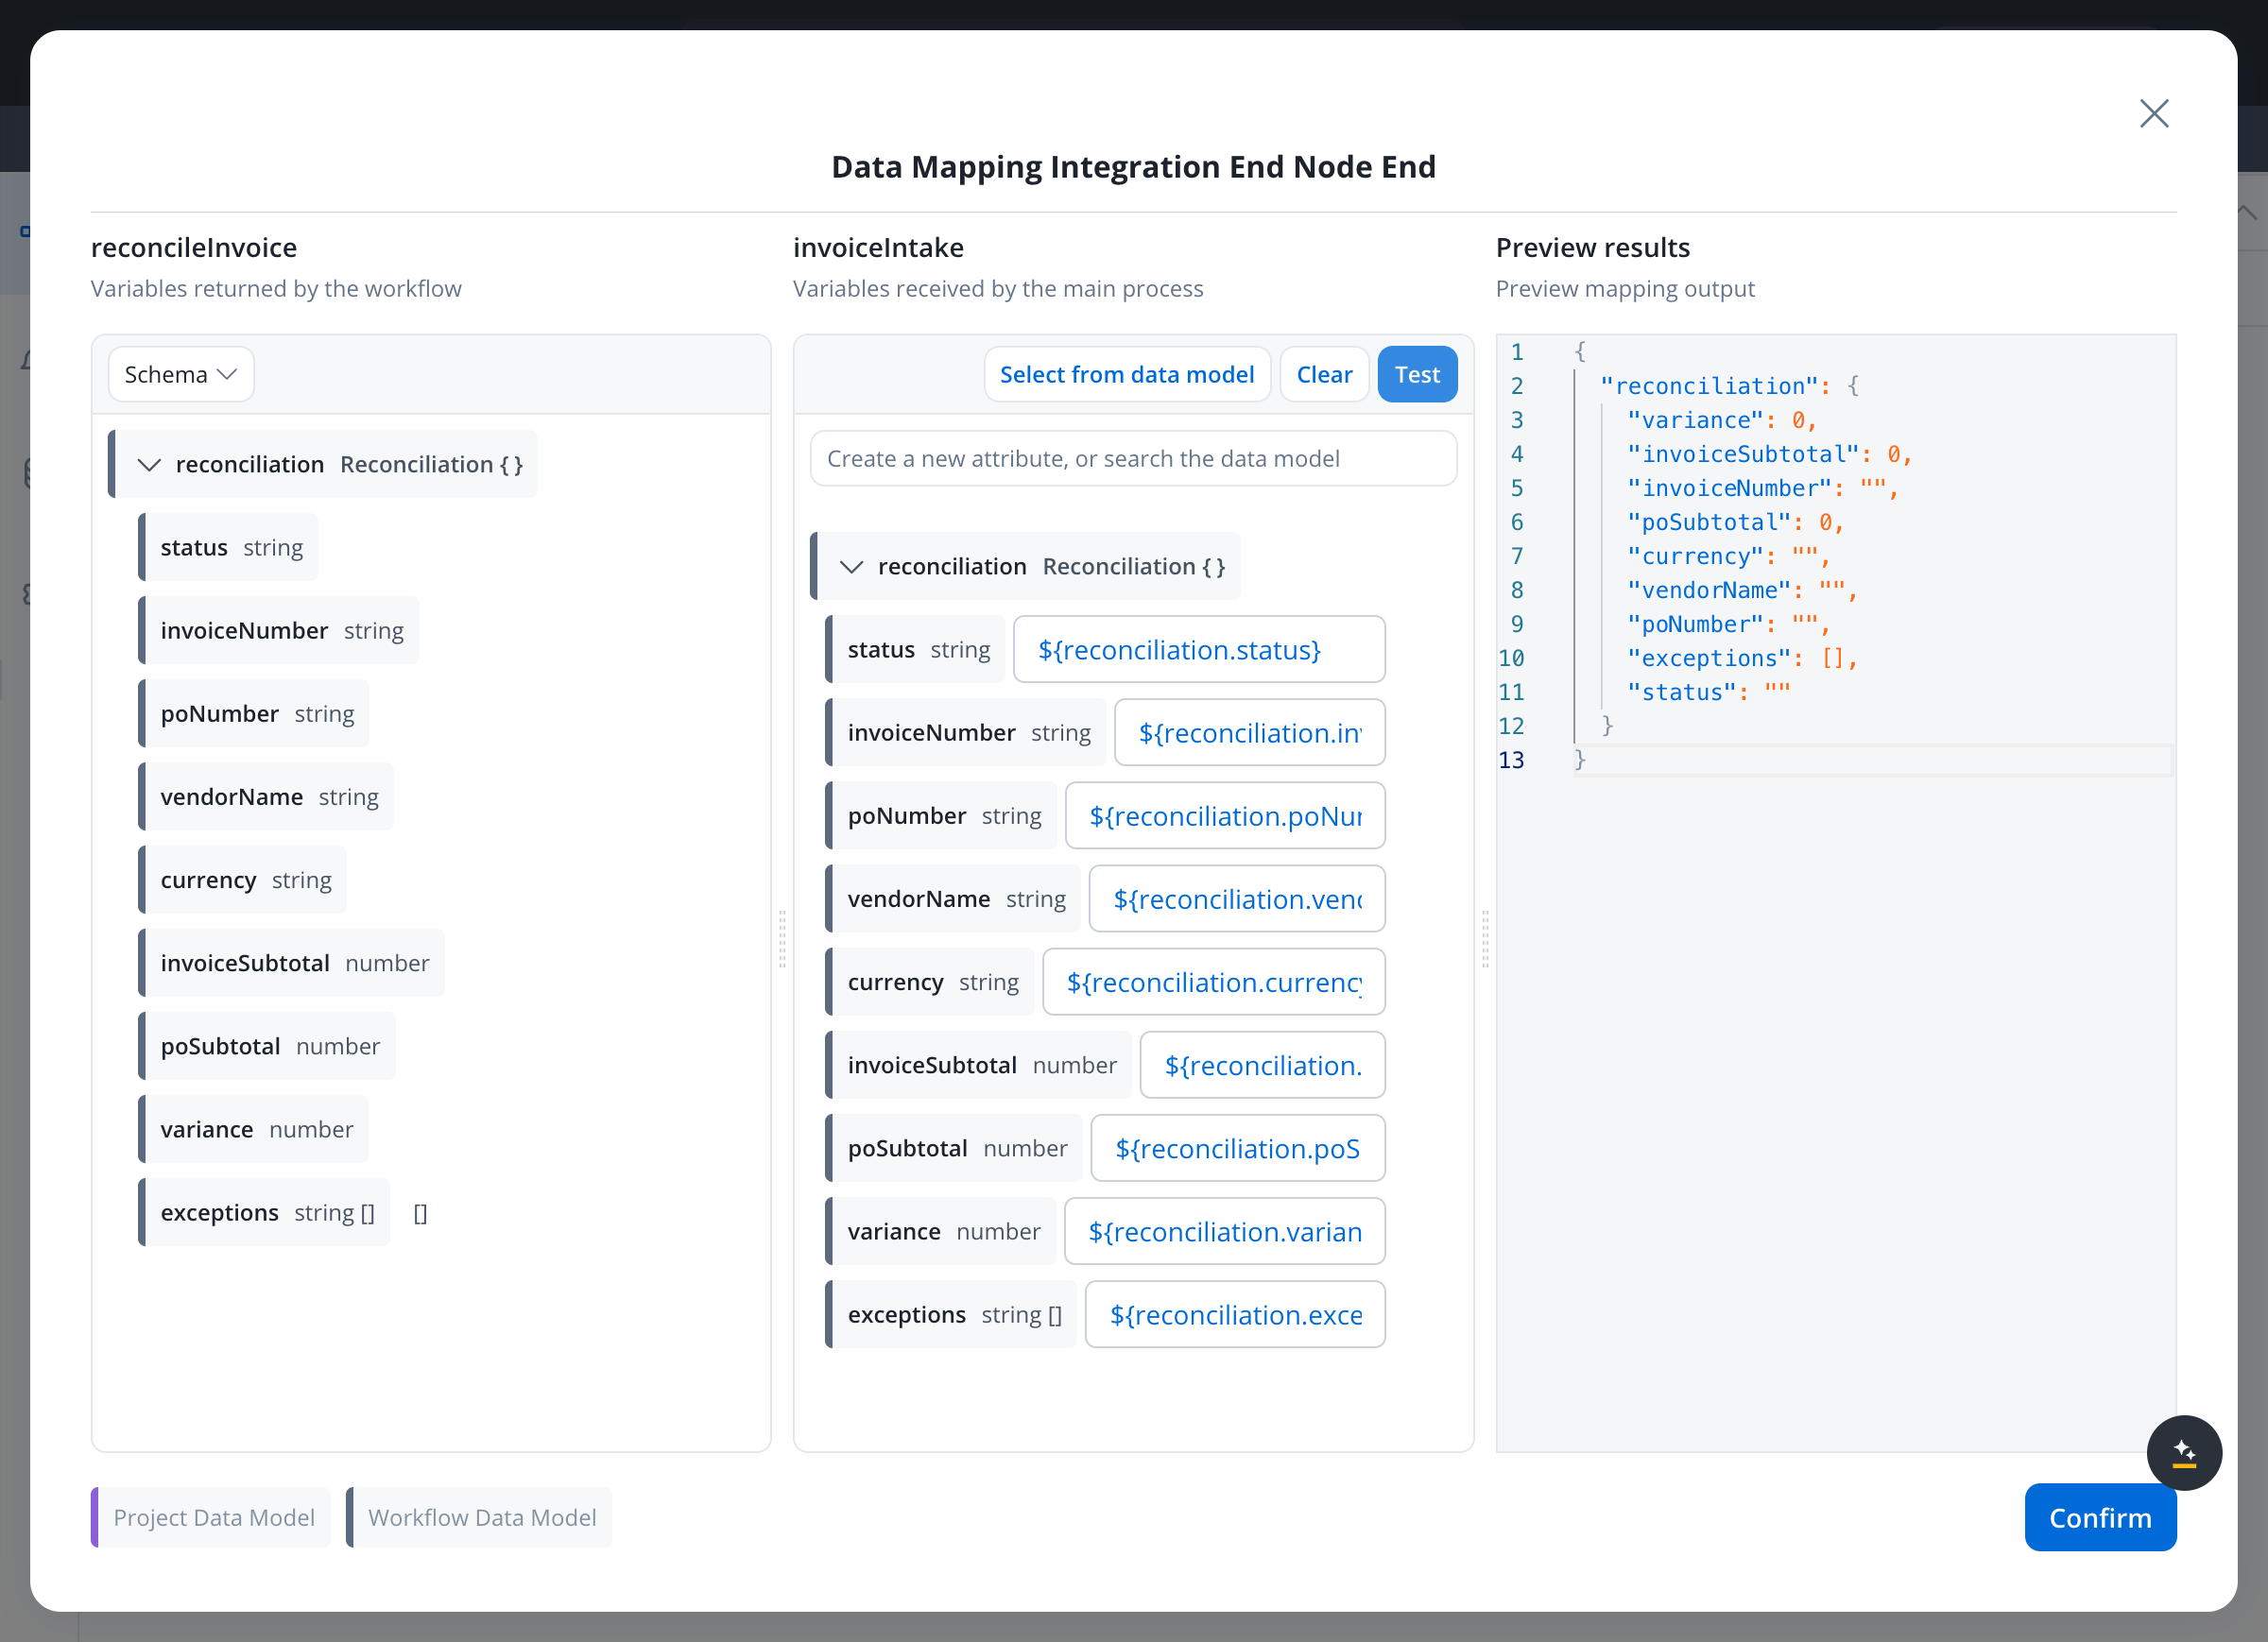
Receive reconciliation. Add a data stream with Source set to Workflow, select reconcileInvoice, and in the Output Mapping of its success End node map each of the nine reconciliation fields to the process attribute of the same name. Click Update, then save the node.Step 7: Route exceptions to a reviewer
1
Summarize the exceptions
Add a Service Task named
Summarize exceptions with a business rule that joins the list into one block of text the review form can show:2
Branch on the result
Add an Exclusive Gateway named
Matched?. Send the flow to an End node named Approved automatically when input.reconciliation.status == "MATCHED", and to a User Task named Review exception otherwise.3
Build the review form
Place 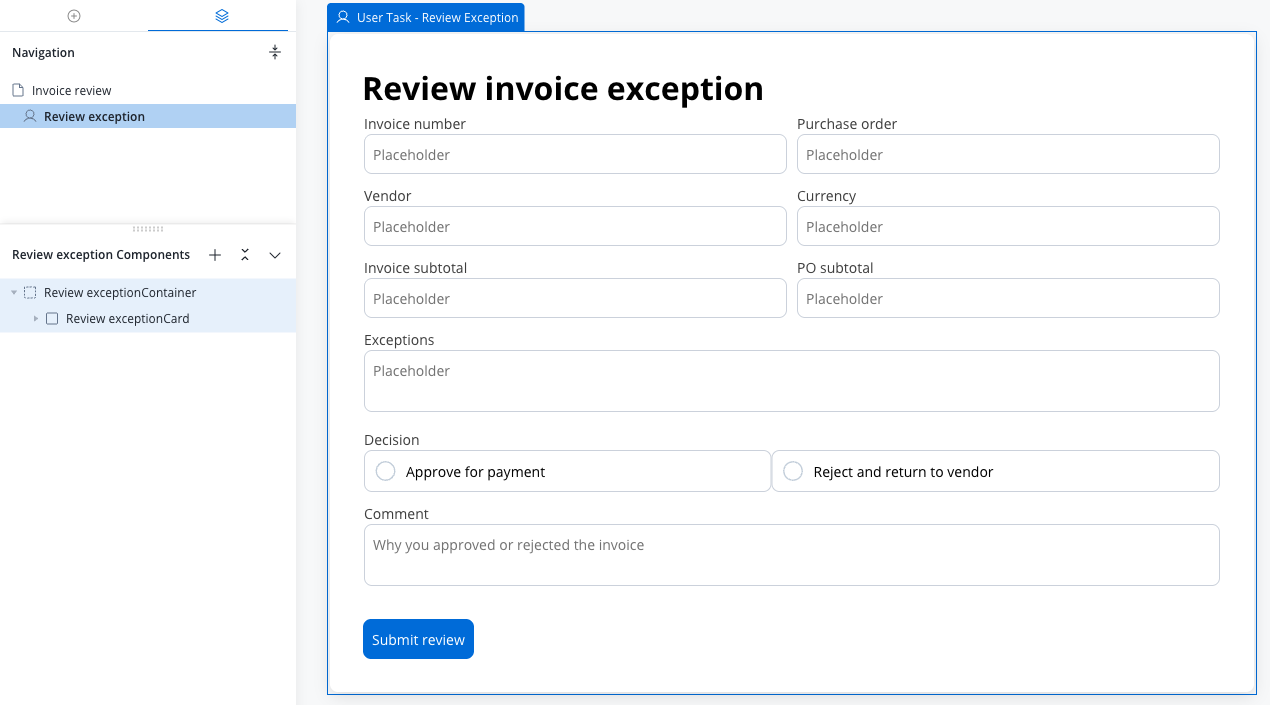
Review exception in a navigation area (for example a Page named Invoice review), then open its UI and add a Card titled Review invoice exception that holds a Form with:Add a Submit review button that runs the user task’s
saveData action, and connect the task to an End node named Review complete.Step 8: Run it end to end
1
Test with mock email content
Start 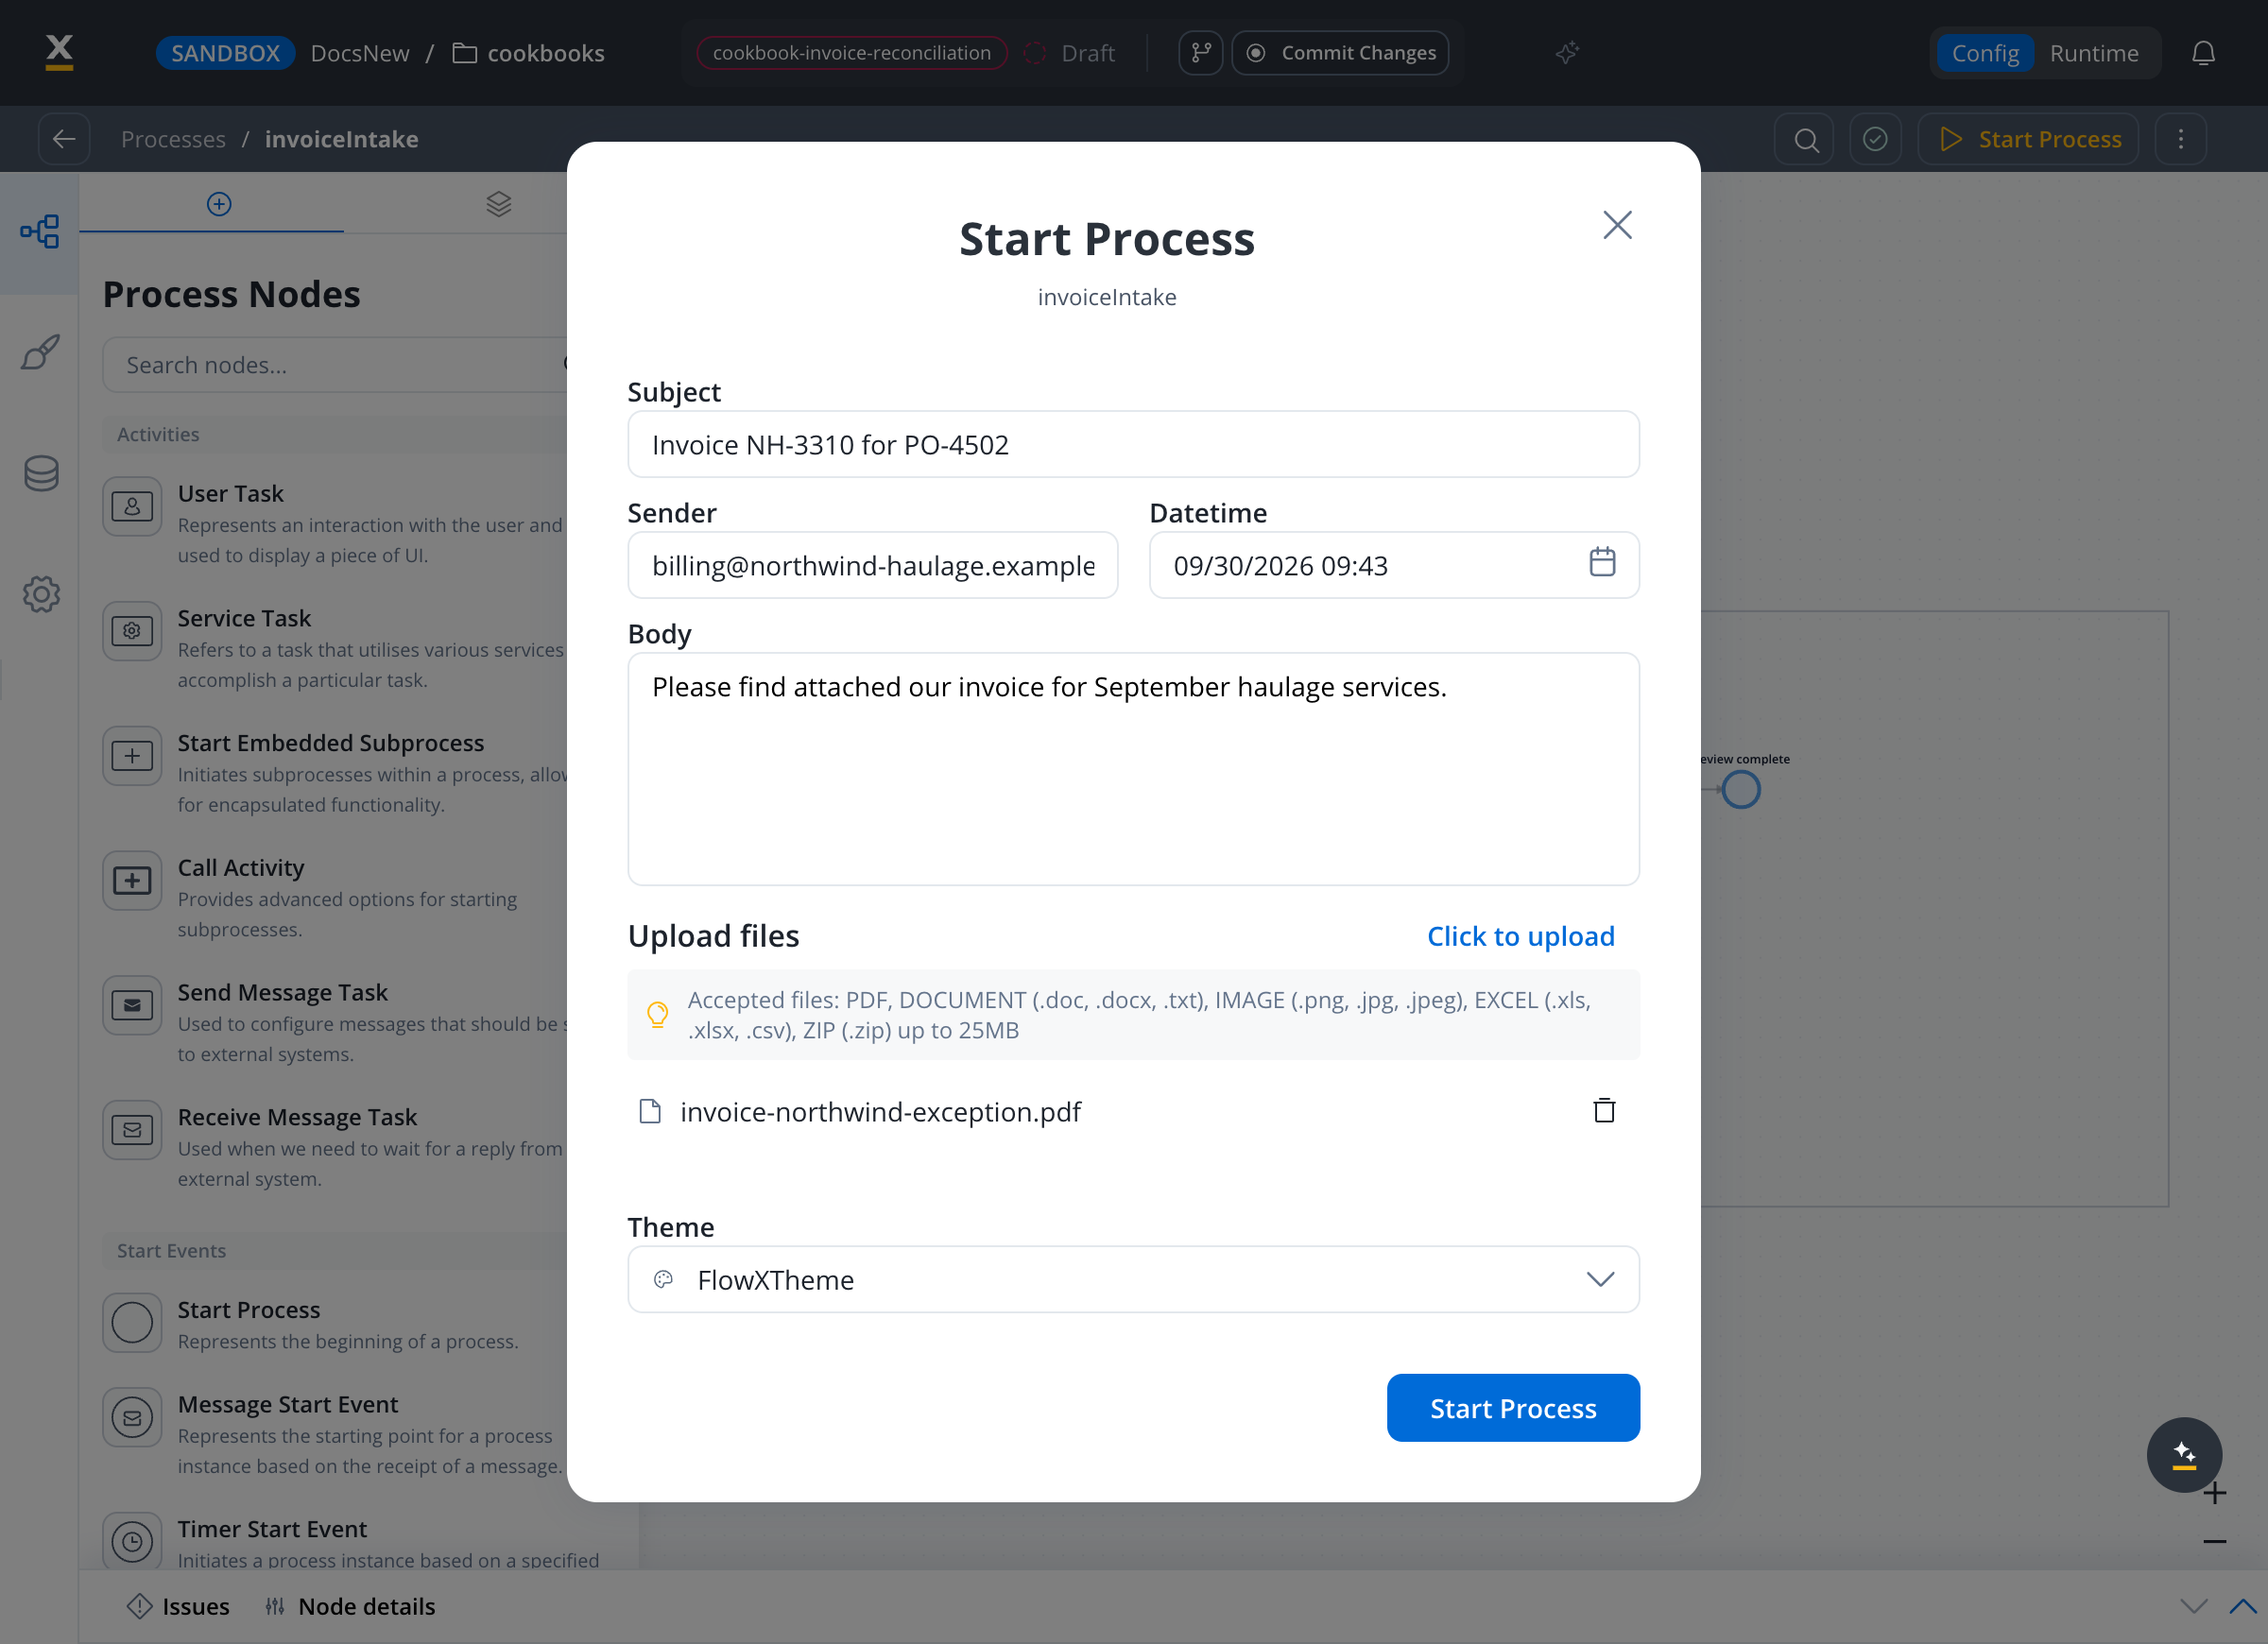
invoiceIntake with mock email content instead of a real email: fill in a subject, a sender, and a body, and upload the Northwind sample invoice. See Testing with mock email content.2
Review the exception
The instance stops at 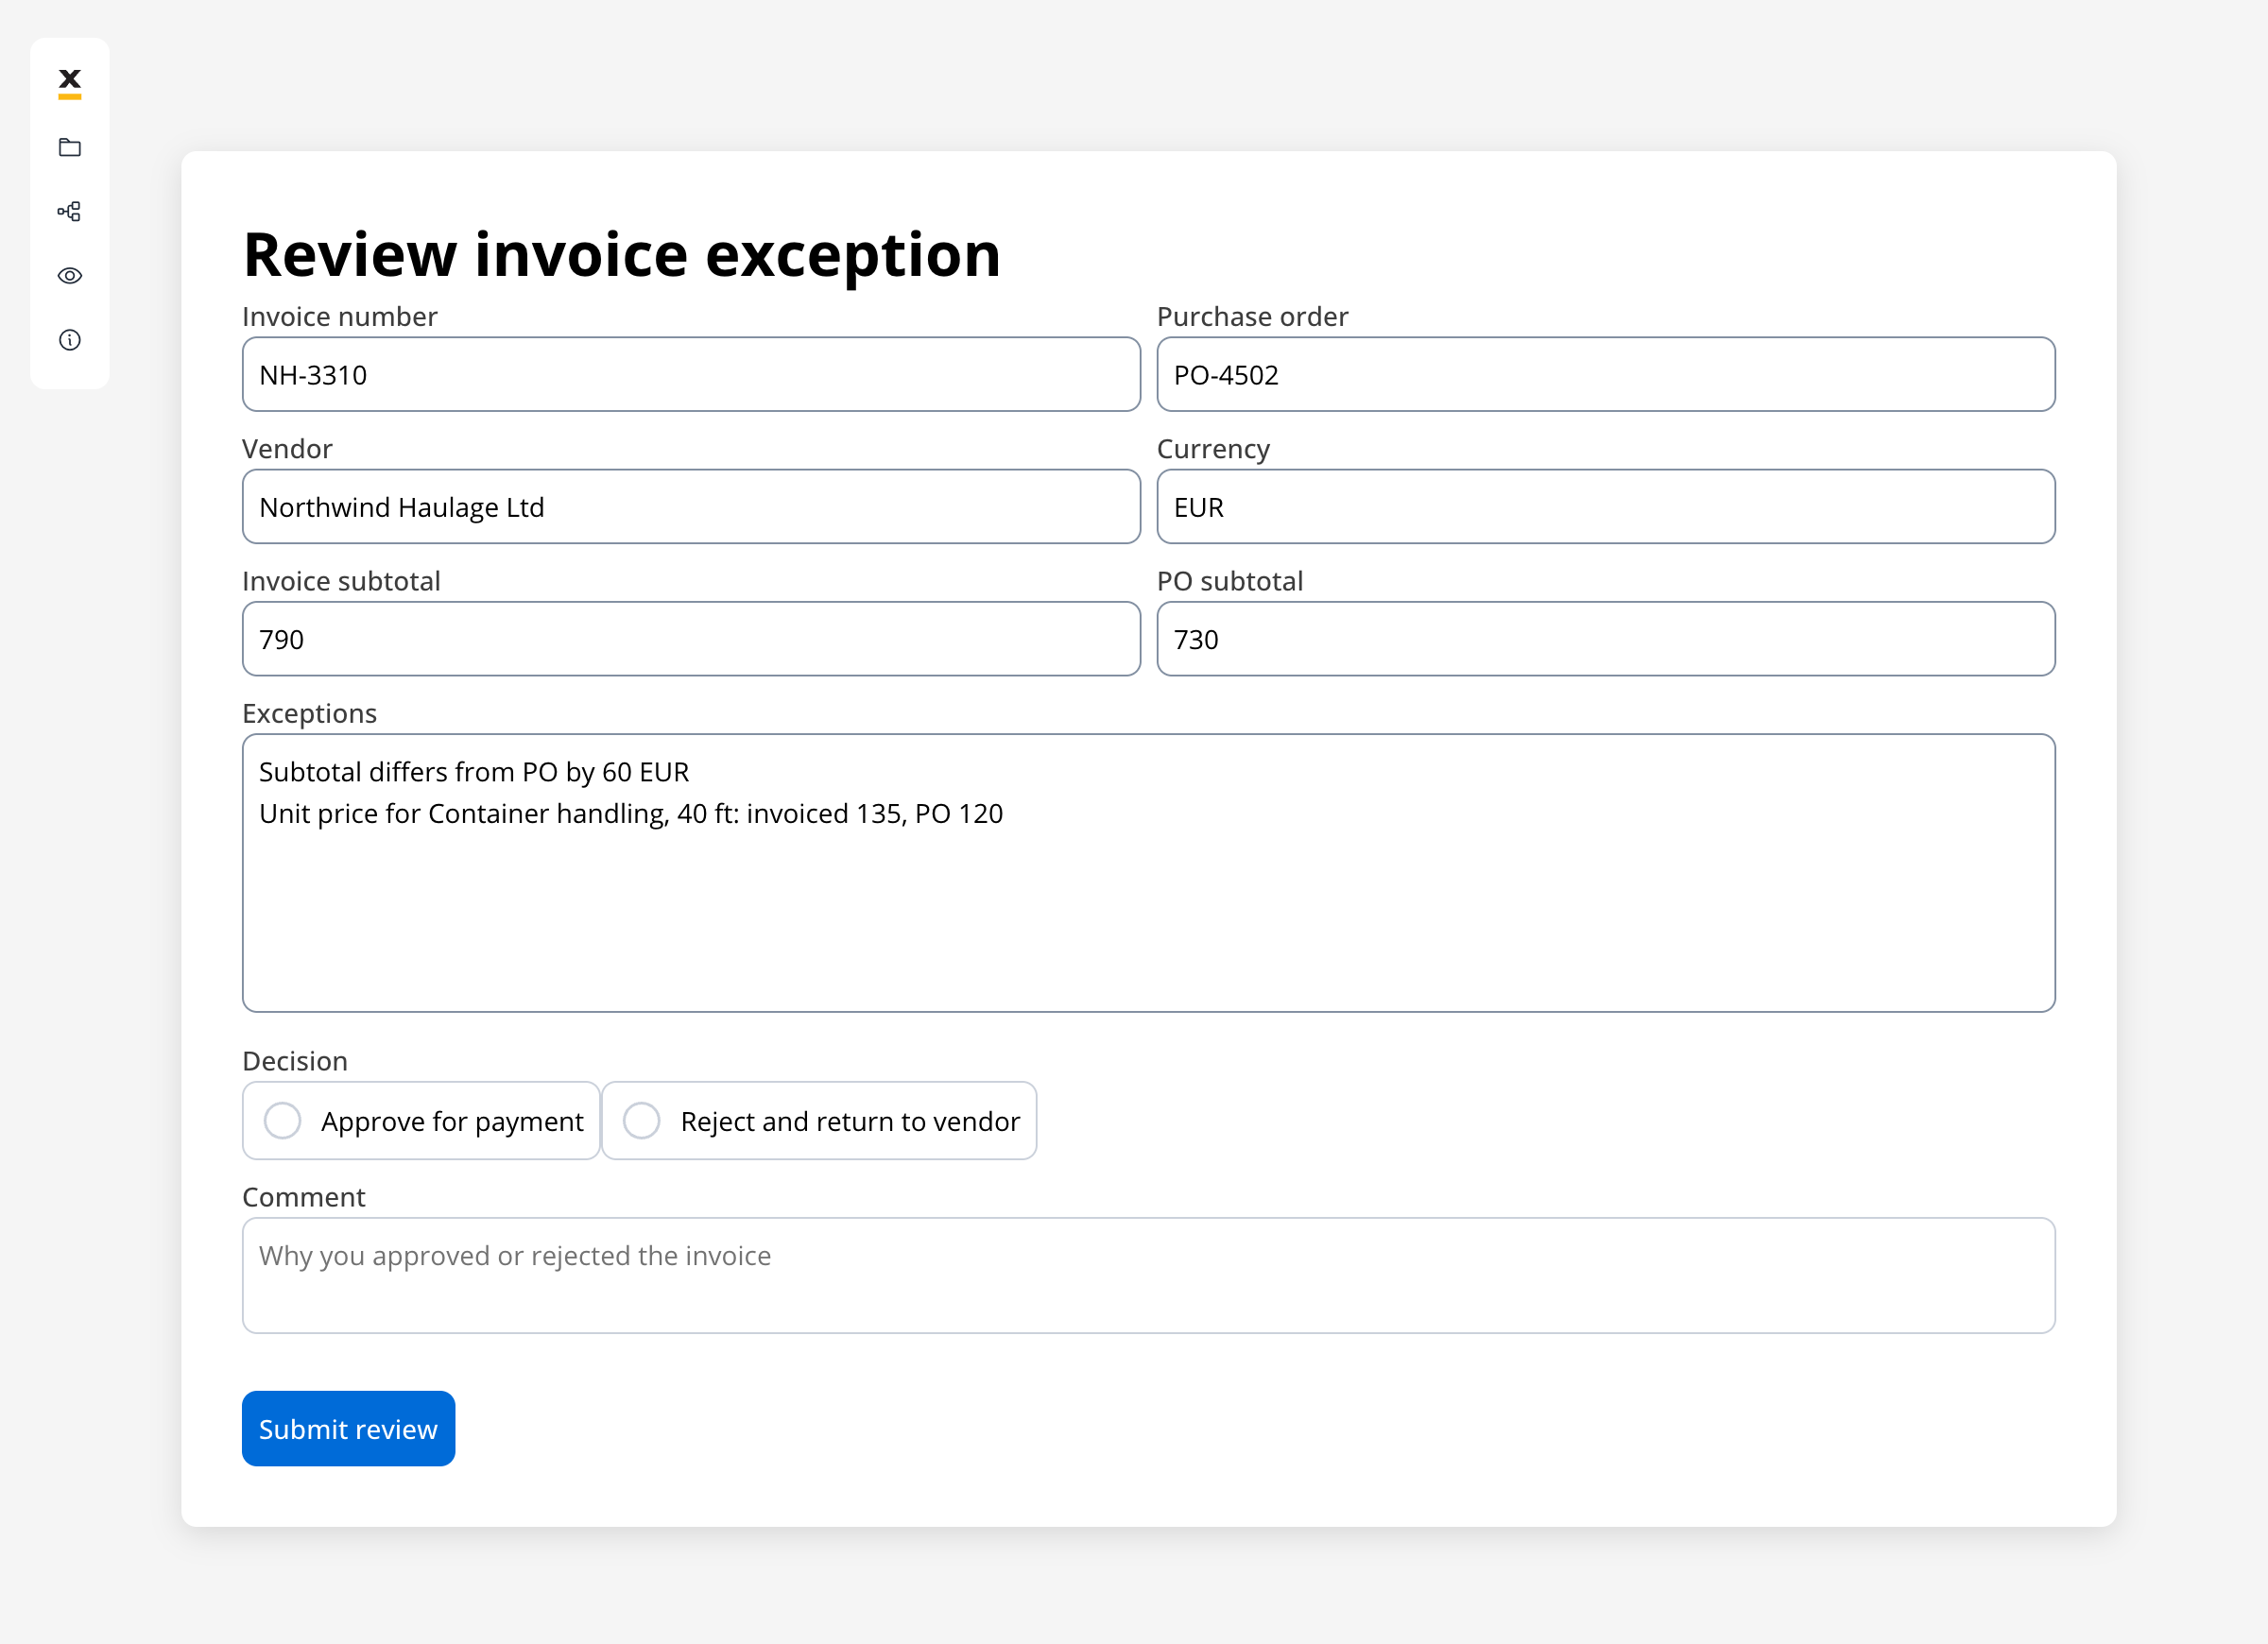
Review exception with both differences listed. Choose a decision, add a comment, and click Submit review. The instance finishes at Review complete.3
Watch a clean match pass
Start a second instance with the Acme Freight invoice. It passes the gateway and finishes at
Approved automatically without creating a task.4
Go live
Activate
Invoice mailbox from Manage Triggers in Runtime Settings. From then on, each PDF invoice that arrives in the mailbox starts an instance.You built an AP pipeline that reads invoices from a mailbox, extracts them with AI, matches them against purchase orders in a FlowX Database, approves clean matches on its own, and sends each exception to a person with the reasons attached.
Adapt the matching rules
The Compare script is the one place where AP policy lives. Common changes:- Tolerance:
TOLERANCE = 0.02accepts a 2% difference on the subtotal and on unit prices. Set it to0for exact matching, or split it into separate rate and total tolerances. - Partial deliveries: the quantity check only flags invoiced quantities above the PO. To bill against the remaining PO balance, store the quantity invoiced so far on each PO line and compare against the balance.
- Duplicate invoices: add a FlowX Database of processed invoice numbers, look it up before the comparison, and raise an exception when the vendor has billed the same number before.
- Line matching: prefix matching on descriptions suits carriers that append details. When suppliers print item codes, add a
codeattribute toPurchaseOrderLineand match on it instead.
When it fails
Related resources
Email Trigger
Connection settings, filtering criteria, the email data schema, and mock email testing.
FlowX Database
Operations, parameters, and how Data Source nodes bind them in workflows.
AI comparison and reconciliation
The general pattern behind this cookbook, and when to compare with AI instead of rules.
Document processing tutorial
Classify and extract several document types in one flow.