

- A main Chat Driven workflow that uses an Intent Classification Agent to route messages
- Built-in session memory that carries financial data across conversation turns
- A knowledge base Q&A handler that answers mortgage questions from uploaded documents, using agentic search
- A data collection handler that captures the user’s financial data from free-text messages
- A personalized offer generator where a Custom Agent calls a workflow-as-tool for auditable calculations
- A small talk responder and fallback handler
Architecture overview
The app is a Chat Driven workflow that uses an Intent Classification Agent to classify each user message and route it to the right handler. Each intent maps to a separate output branch on the node, eliminating the need for a Condition node. Each handler is a Custom Agent with Send as Chat Reply enabled, which delivers the response directly to the Chat component and updates session memory.In Chat Driven workflows, responses are delivered to the user by Custom Agent nodes with Send as Chat Reply enabled, not by the End Flow node. The End Flow node has no body configuration.
Data model
In a Chat Driven workflow, the Start node provides Chat Session ID, User Message, and an optional UI Flow Context as dedicated input fields — you reference them as${chatSessionId}, ${userMessage}, and ${context} in downstream nodes. These are not keys you declare in the data model.
mainChat data model
The mainChat workflow does not need any chat-specific keys in its data model — everything comes from the Start node fields and from the offer tool’s output.mortgageOfferCalc data contract
The offer calculation workflow is exposed to the offer agent as a tool, so it declares an explicit input and output contract:Built-in session memoryChat Driven workflows retrieve the last 30 turns of the conversation automatically and send them to the model in full. Any Custom Agent node with Use conversation memory enabled receives this history as LLM context, so data mentioned in earlier turns (age, income, loan amount) is available to later turns without manual persistence. See Session state management and Chat-driven workflows — Session memory.
Prerequisites
Before starting, make sure you have:- Access to a FlowX Designer workspace with AI Platform enabled
- Familiarity with creating workflows in FlowX
- A Knowledge Base data source with mortgage-related documents uploaded (see Step 4)
Step 1: Build the main orchestration workflow
Create a workflow namedmainChat and select Chat Driven as the workflow type.
Review the Start node
The Start node is created automatically with three fields:- Chat Session ID — a UUID populated by the Chat component at runtime (referenced as
${chatSessionId}) - User Message — the user’s text message (referenced as
${userMessage}) - UI Flow Context — optional JSON object passed from the UI (referenced as
${context})
Add the Intent Classification Agent
From the node palette, drag an Intent Classification Agent node onto the canvas and connect it to the Start node. Configure the node: User Message:${userMessage}
Intents: in the Intents section, click + New Intent for each row below and type the description into the field (“Describe the intent in a few words”). Each intent is a single description, and the node adds up to 10. The short names in the first column are only how this tutorial refers to each branch.
Response Key:
intentResult
The If No Intent Matches branch is a default output port that fires when the classifier can’t confidently match any intent. It’s always present on the node — you connect it to the fallback handler in Step 2.
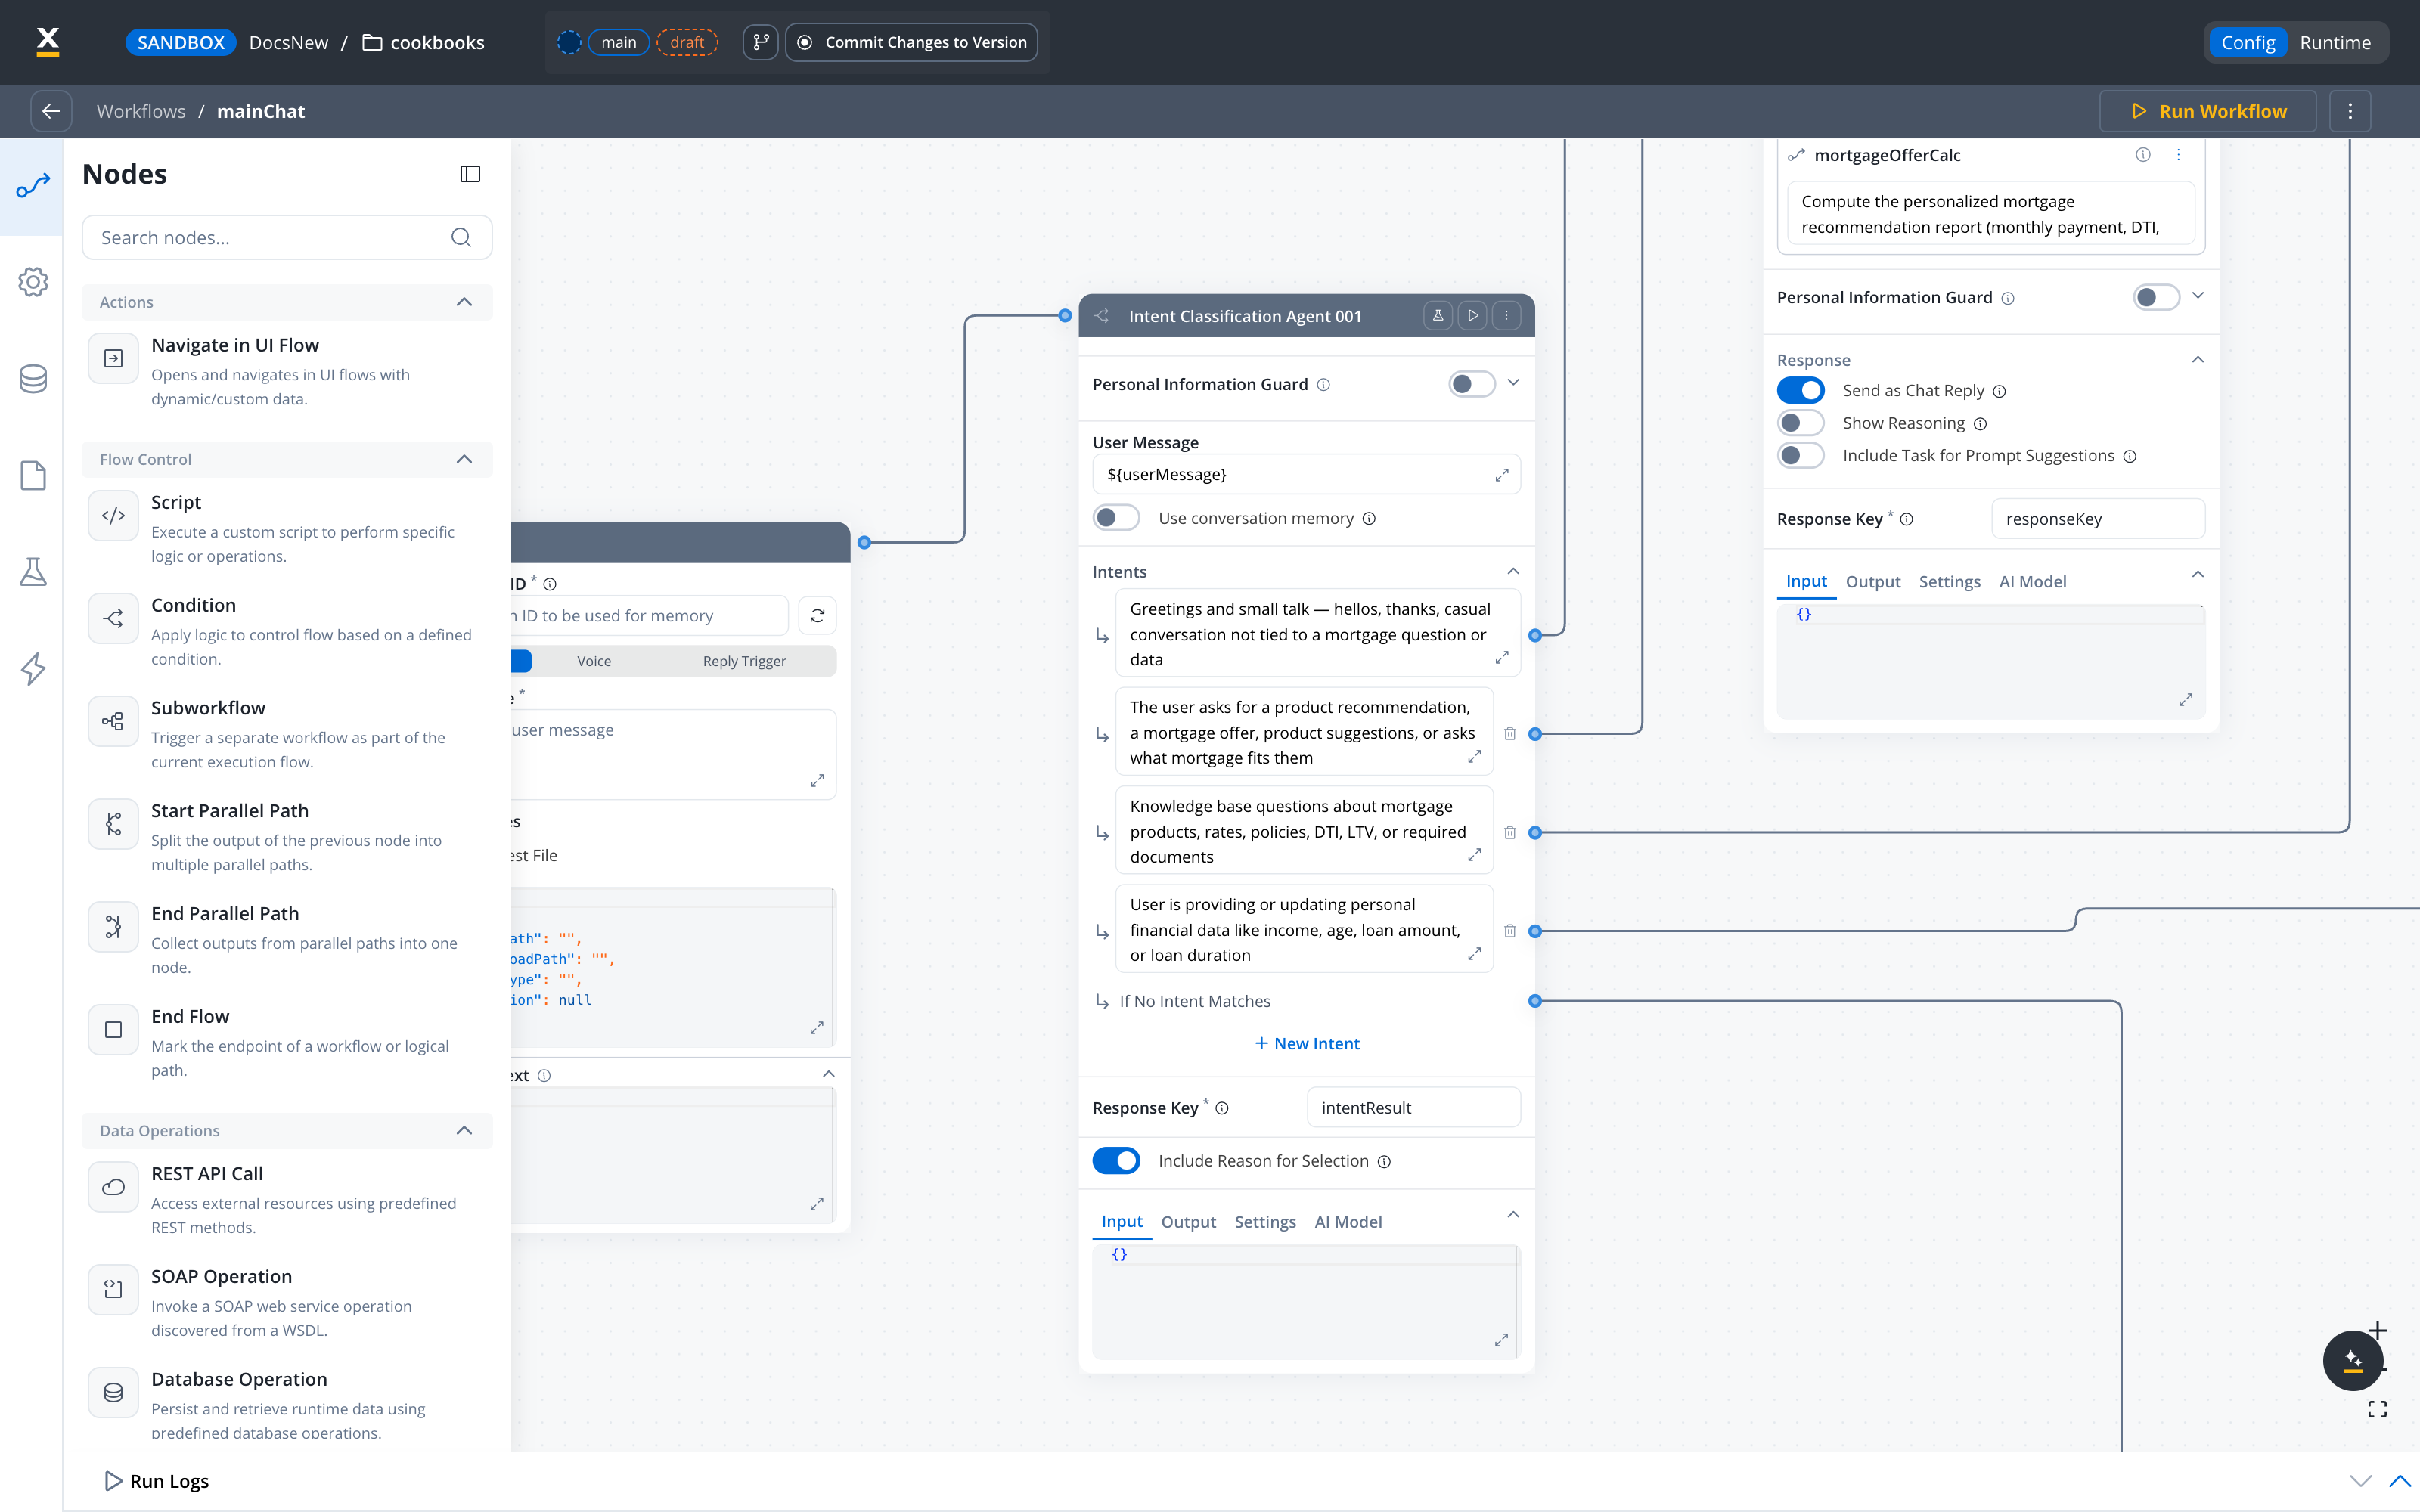
Each intent creates a separate output port on the node. When the agent classifies a message, the workflow continues along the matching branch — no Condition node needed. Leave Use conversation memory OFF so each message is classified on its own; turn it ON only if you want the classifier to resolve ambiguous follow-ups against prior turns.
Connect handler nodes to each branch
Add the following nodes and connect each to its corresponding intent output:Add the End Flow node
Add an End Flow node from the palette (it is not auto-created for Chat Driven workflows) and connect every handler branch to it. The End Flow node has no body configuration — responses are already delivered by the Custom Agent nodes upstream.Step 2: Build the inline handlers
Every handler in this tutorial is a Custom Agent placed directly in themainChat workflow.
Shared Custom Agent settingsEvery Custom Agent in
mainChat uses the same two defaults:- Use only referenced values as input: ON — keeps each call scoped to the values referenced with
${...}in the Context field and reduces token usage. - Include Task for Prompt Suggestions: OFF — turn ON only if you want AI-generated follow-up prompts shown in the Chat component.
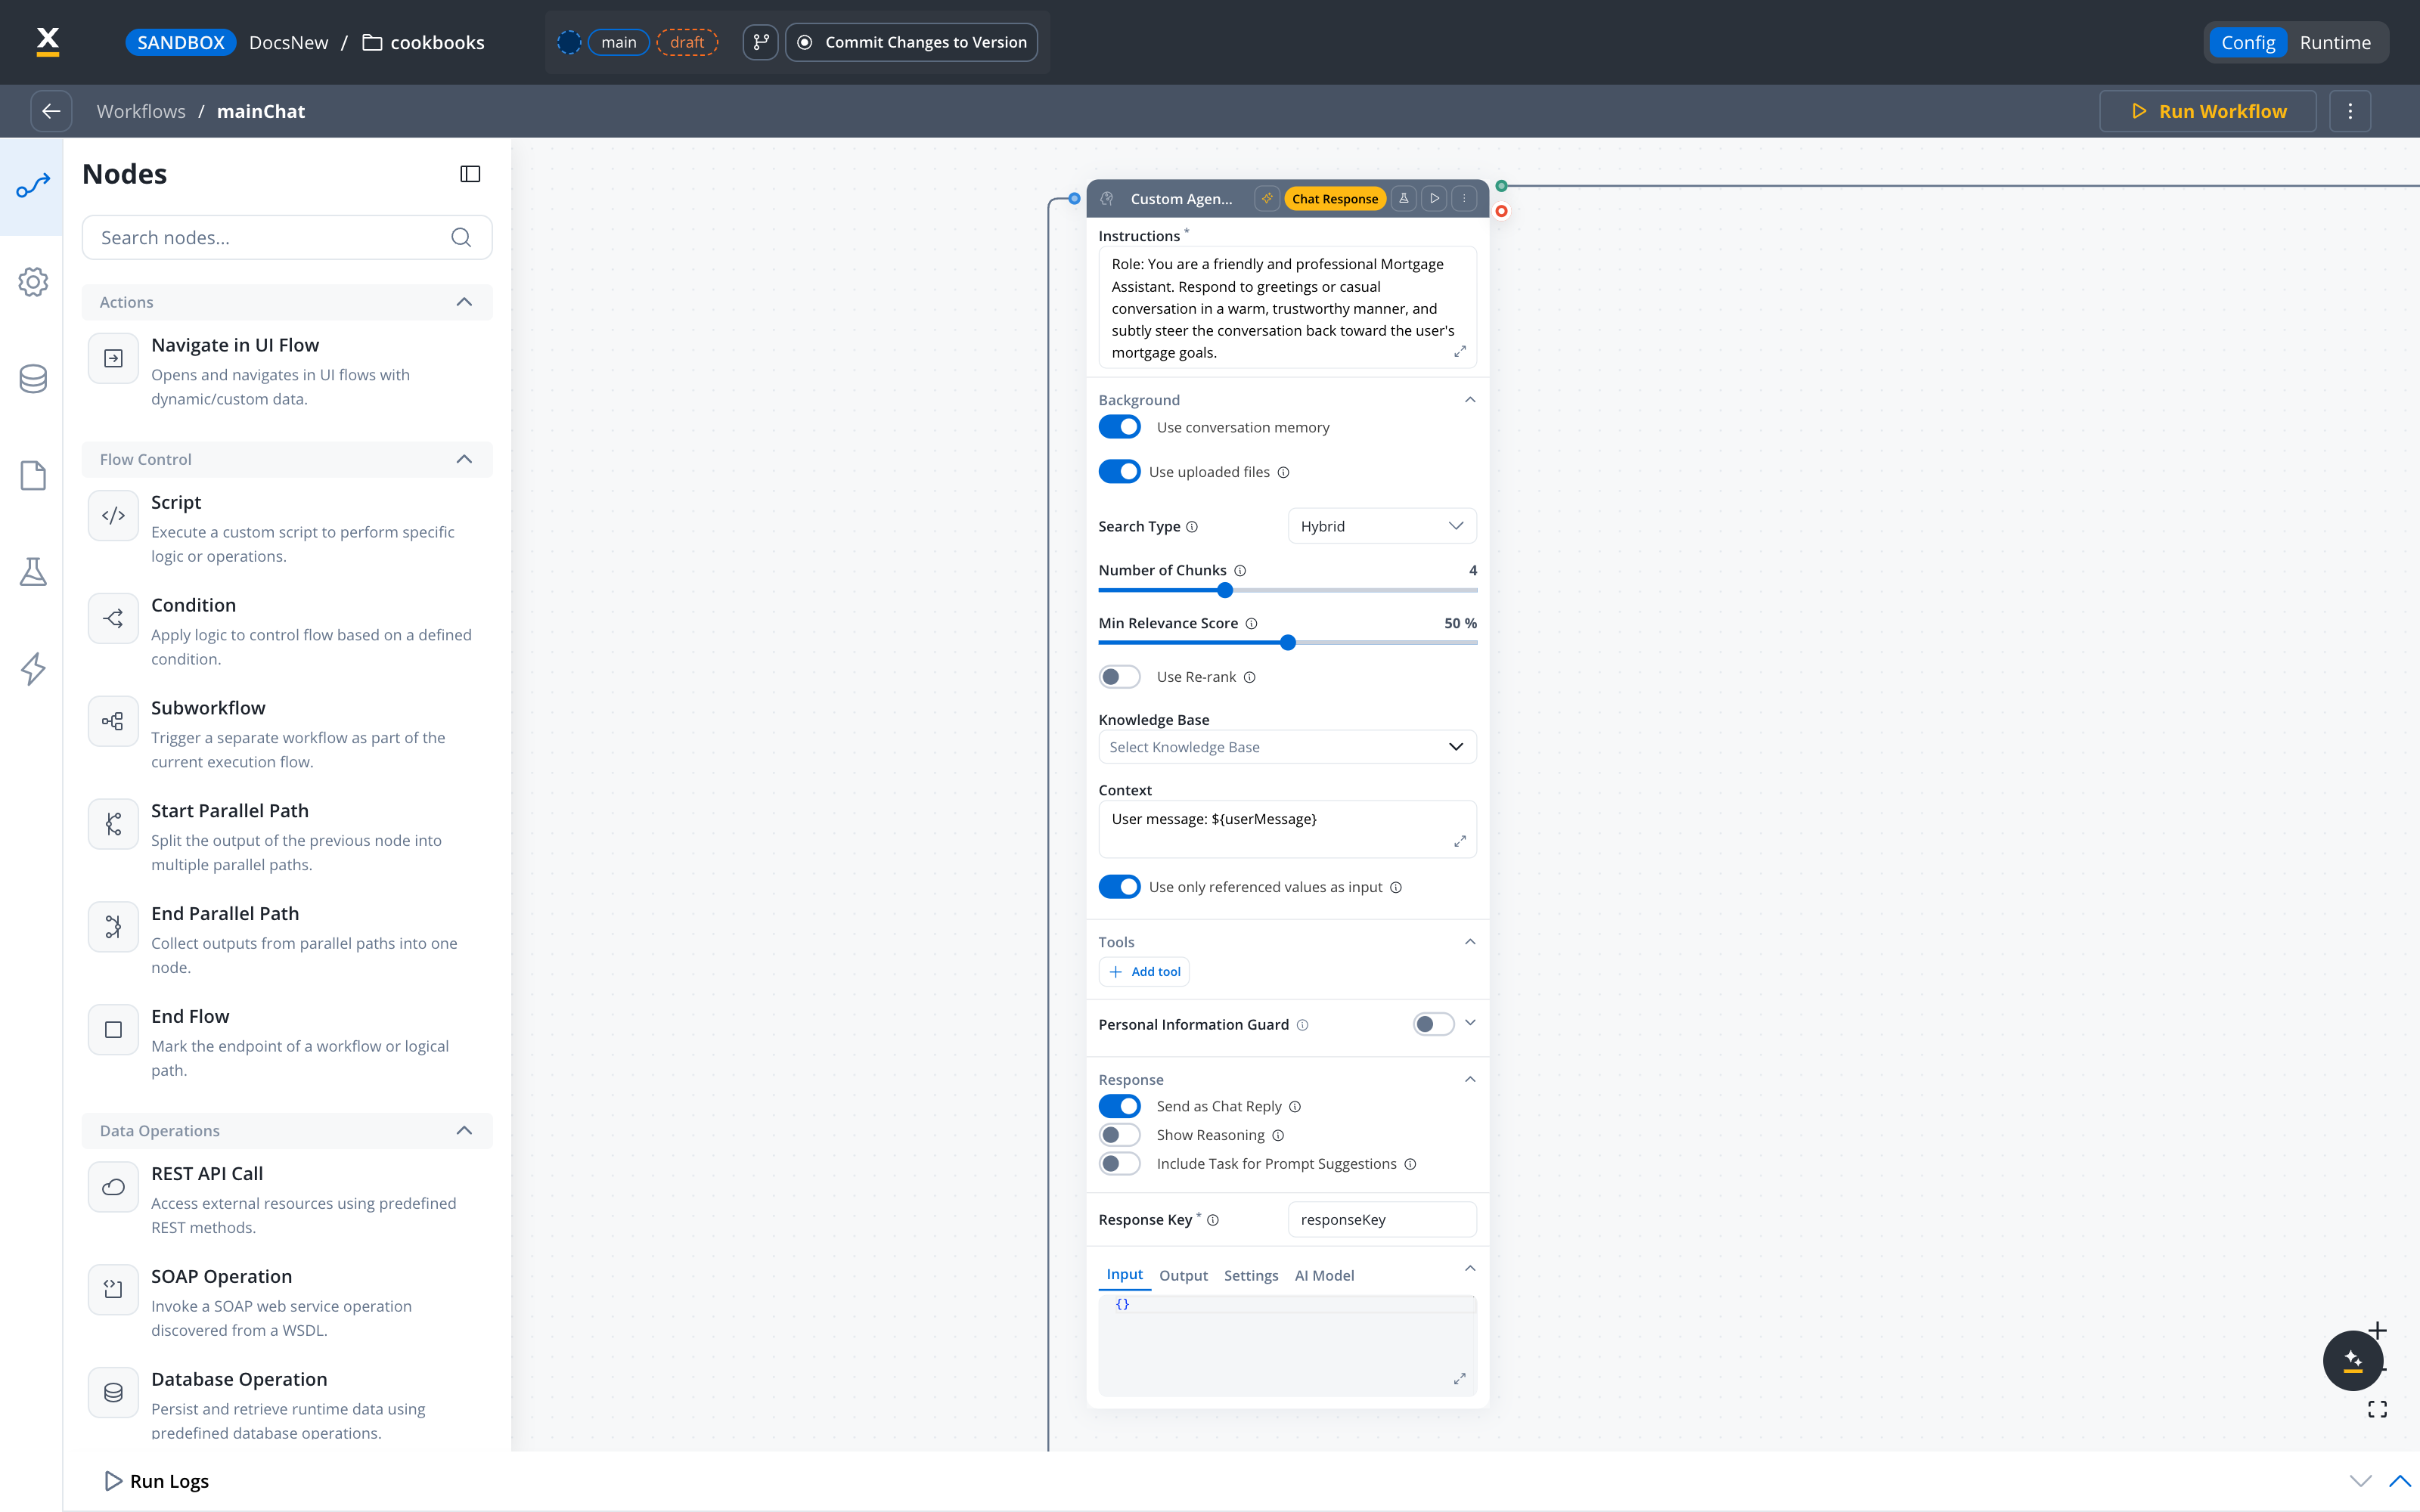
answerSmalltalk (Custom Agent)
Add a Custom Agent node namedanswerSmalltalk to the Greetings branch.
Instructions:
The Instructions field is static — the node rejects
${...} references inside it with “This field is static. Use Context for dynamic values.” Put dynamic values in the Context field, which accepts mixed text and ${...} keys. This split applies to every AI node in this tutorial.fallback (Custom Agent)
Add a Custom Agent node namedfallback on the No Match branch.
Instructions:
Step 3: Build the data input handler
The Data Input branch is a single Custom Agent namedhandleDataInput. With built-in session memory, the agent both captures the financial data from the message and confirms it back — no separate extraction script is needed.
Instructions:
Step 4: Build the knowledge base Q&A handler
The KB question branch is a single Custom Agent node namedknowledgeBaseQA, placed inline on the Intent 3 branch, with a Knowledge Base attached and Send as Chat Reply enabled.
Set up the Knowledge Base
1
Create a Knowledge Base data source
In the Integration Designer, add a new Knowledge Base data source. Name it something descriptive like
MortgageKnowledgeBase.2
Upload mortgage documents
On the Knowledge Base’s Stores tab, upload your own PDF documents covering product sheets (rates, terms, eligibility), FAQ documents (DTI, LTV), and regulatory guides (required documents, application process). This tutorial doesn’t ship sample documents. Wait for automatic chunking and vector indexing to complete.
3
Test queries
On the Chunks tab, type a query like “What is DTI?” or “What documents do I need?” in Query Input, then click Run to check that relevant chunks come back.
For detailed Knowledge Base setup, see the Knowledge Base integration documentation.
Configure the Custom Agent node
Add a Custom Agent node namedknowledgeBaseQA on the Intent 3 branch. In the node’s Background section, select your MortgageKnowledgeBase data source from the Knowledge Base dropdown. The knowledge base options below appear once a knowledge base is selected.
Turn on Enable agentic knowledge base search. Instead of a single lookup, the agent issues several sub-queries per turn and merges the results, which improves recall on multi-part questions. To tune it, click Settings next to Additional controls and set Max attempts and Subqueries per attempt.
Under Filtering options, keep Manual unless you want the model to write its own metadata filter at run time (Agentic).
SaaS · 5.11
Available on SaaS with FlowX.AI 5.11. This feature is live on managed (SaaS) deployments now. Self-hosted deployments will receive it with the next LTS release family.
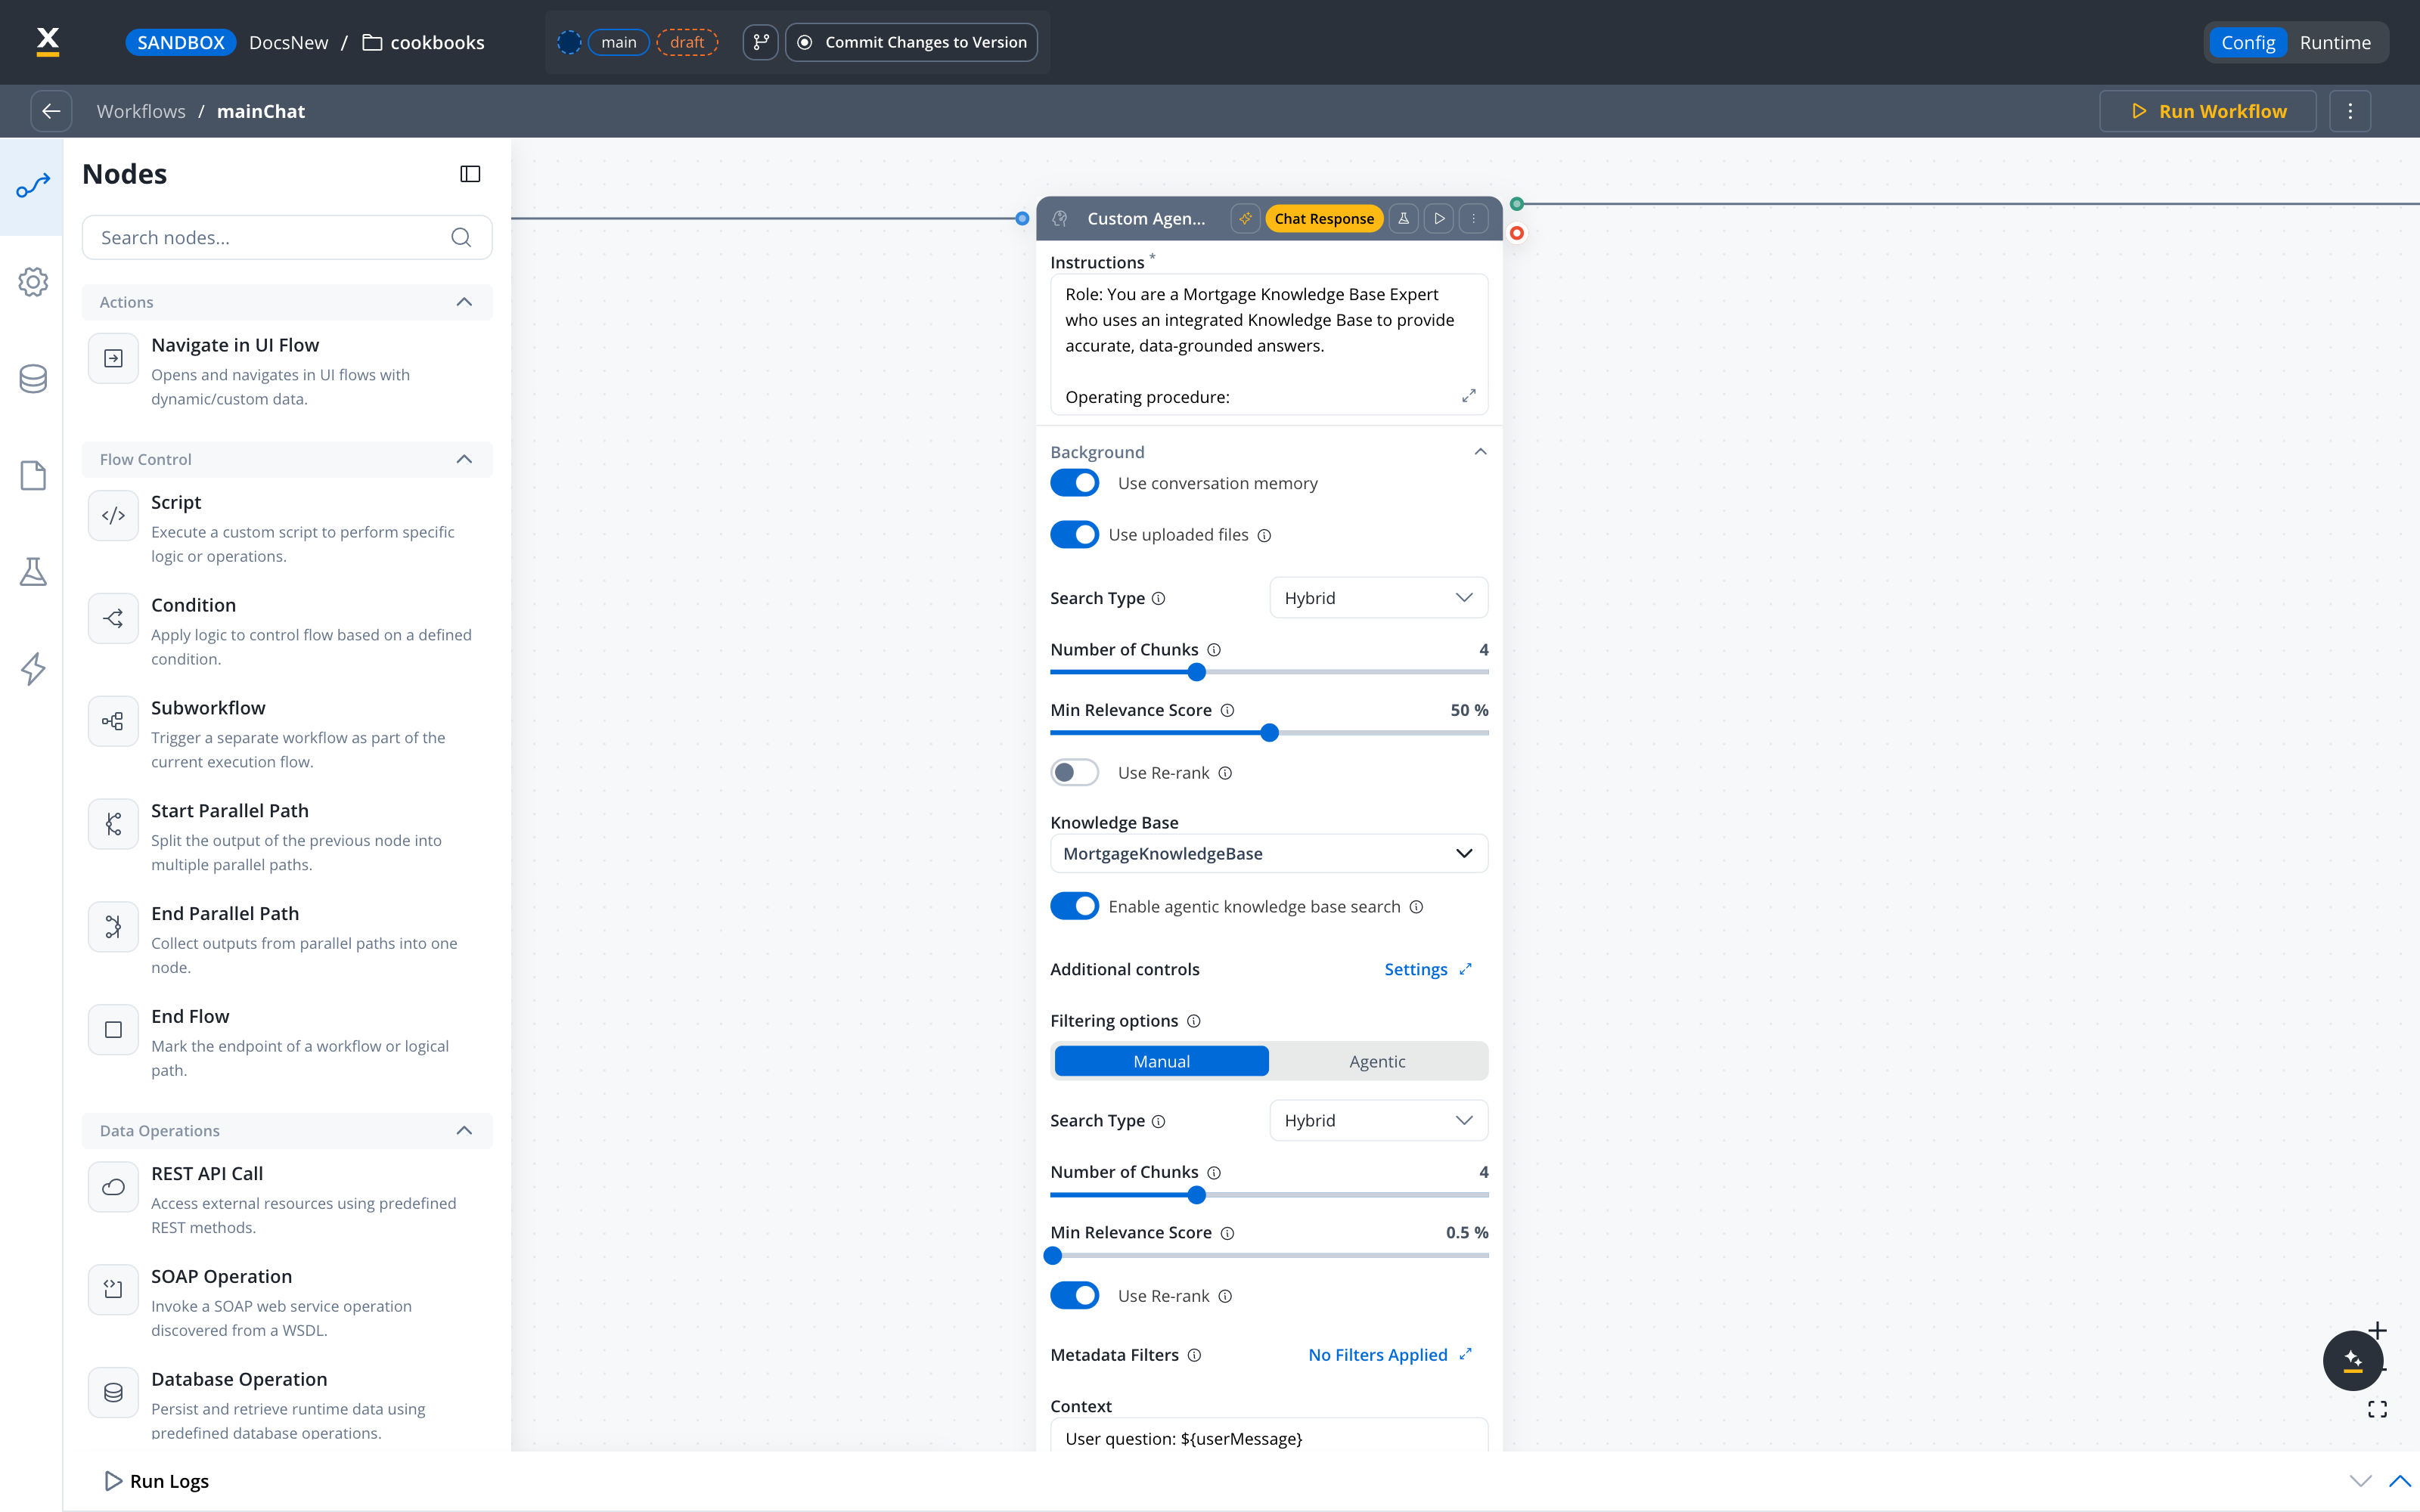
Under Hybrid search the Min Relevance Score slider does not filter results — a hybrid score is a rank, not a similarity. To gate strictly on relevance, use Semantic search, or bound retrieval with Number of Chunks and re-rank.
Step 5: Build the personalized offer handler
SaaS · 5.11Available on SaaS with FlowX.AI 5.11. This feature is live on managed (SaaS) deployments now. Self-hosted deployments will receive it with the next LTS release family.
Step 5a: Build the mortgageOfferCalc workflow
Create a workflow namedmortgageOfferCalc with Output Focused as the workflow type. In its Description, say what the workflow computes, for example Deterministic mortgage offer calculator: monthly payment, DTI, maximum eligible loan, and ranked products. The agent reads this description when it decides whether to call the tool.
Open the workflow’s Data Model and give it an input and output contract so it can be exposed as a tool:
- Input Parameters tab:
age,income,loanAmount,loanDuration(all INTEGER) - Output Parameters tab:
reportText(STRING)
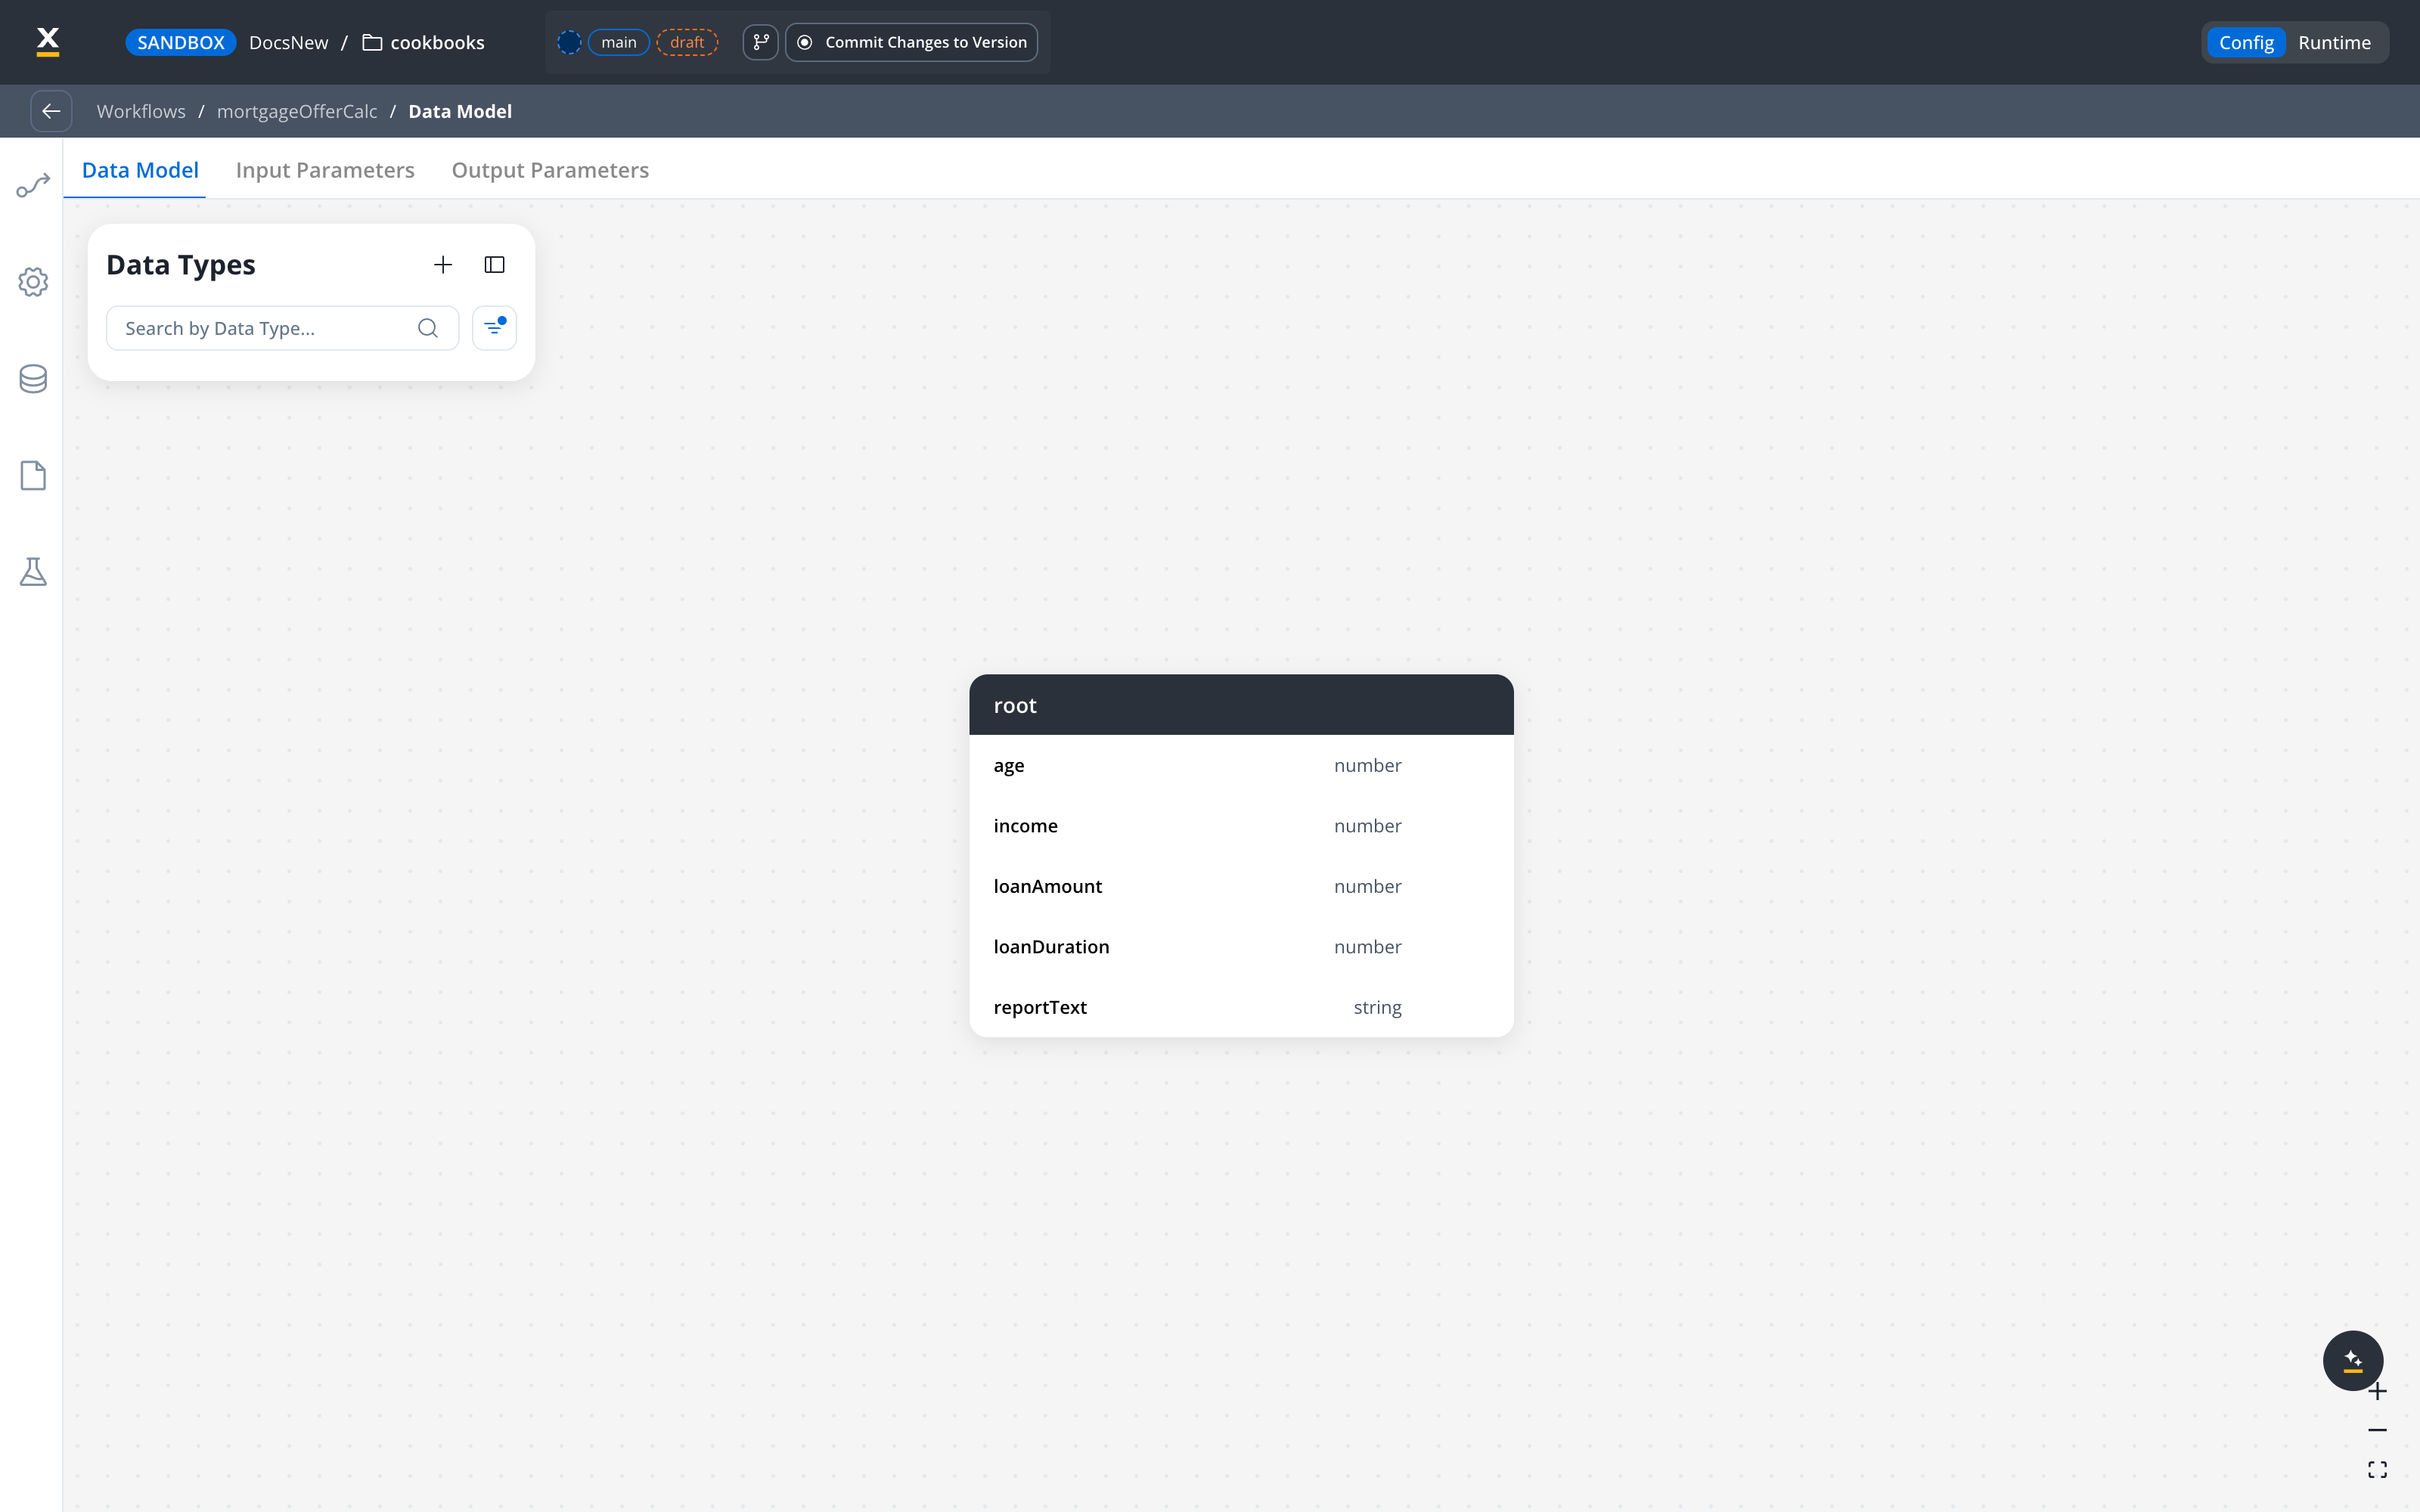
reportText.
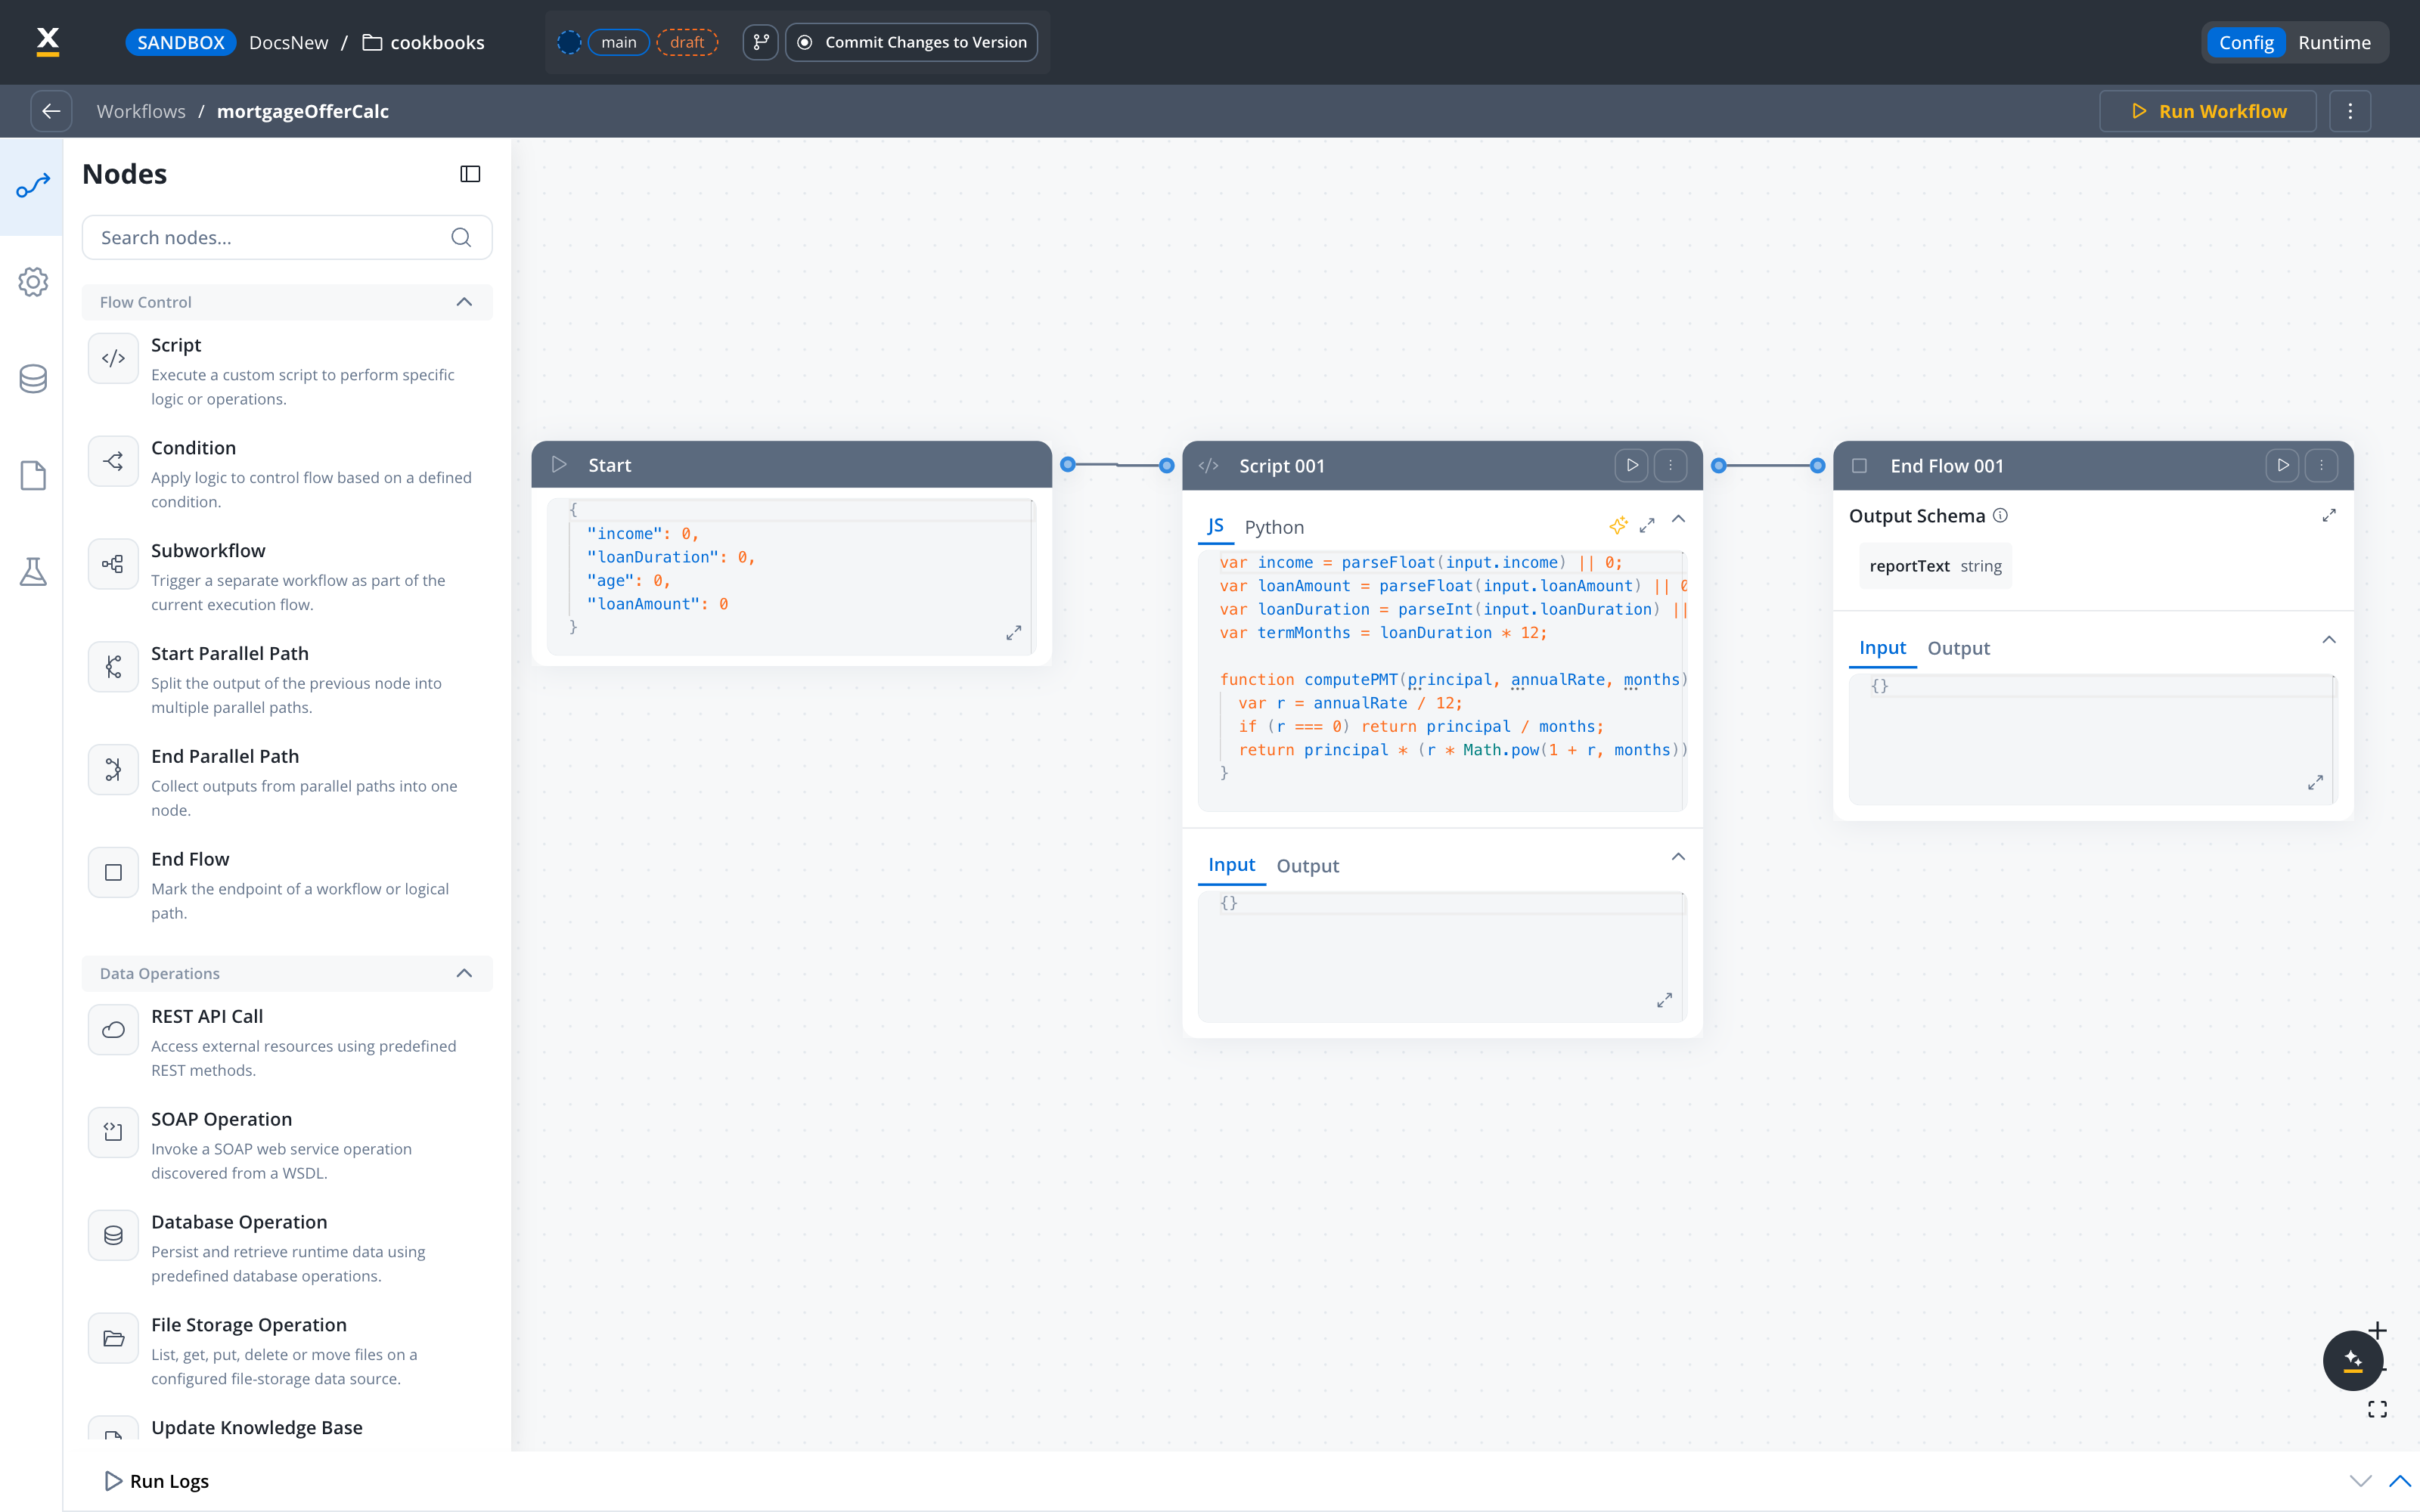
Keeping the numbers in a Script node rather than an LLM keeps them deterministic and auditable. For any recommendation, you can trace exactly which formula produced each figure.
Step 5b: Attach the workflow as a tool on the offer agent
Switch back tomainChat. On the Offer branch, add a Custom Agent node named answerPersonalisedOffer. Under Tools, click Add tool → Workflow and select mortgageOfferCalc. Only workflows with input parameters appear in the list.
In the tool’s When should the agent use this workflow? field, name the arguments and add a stop condition:
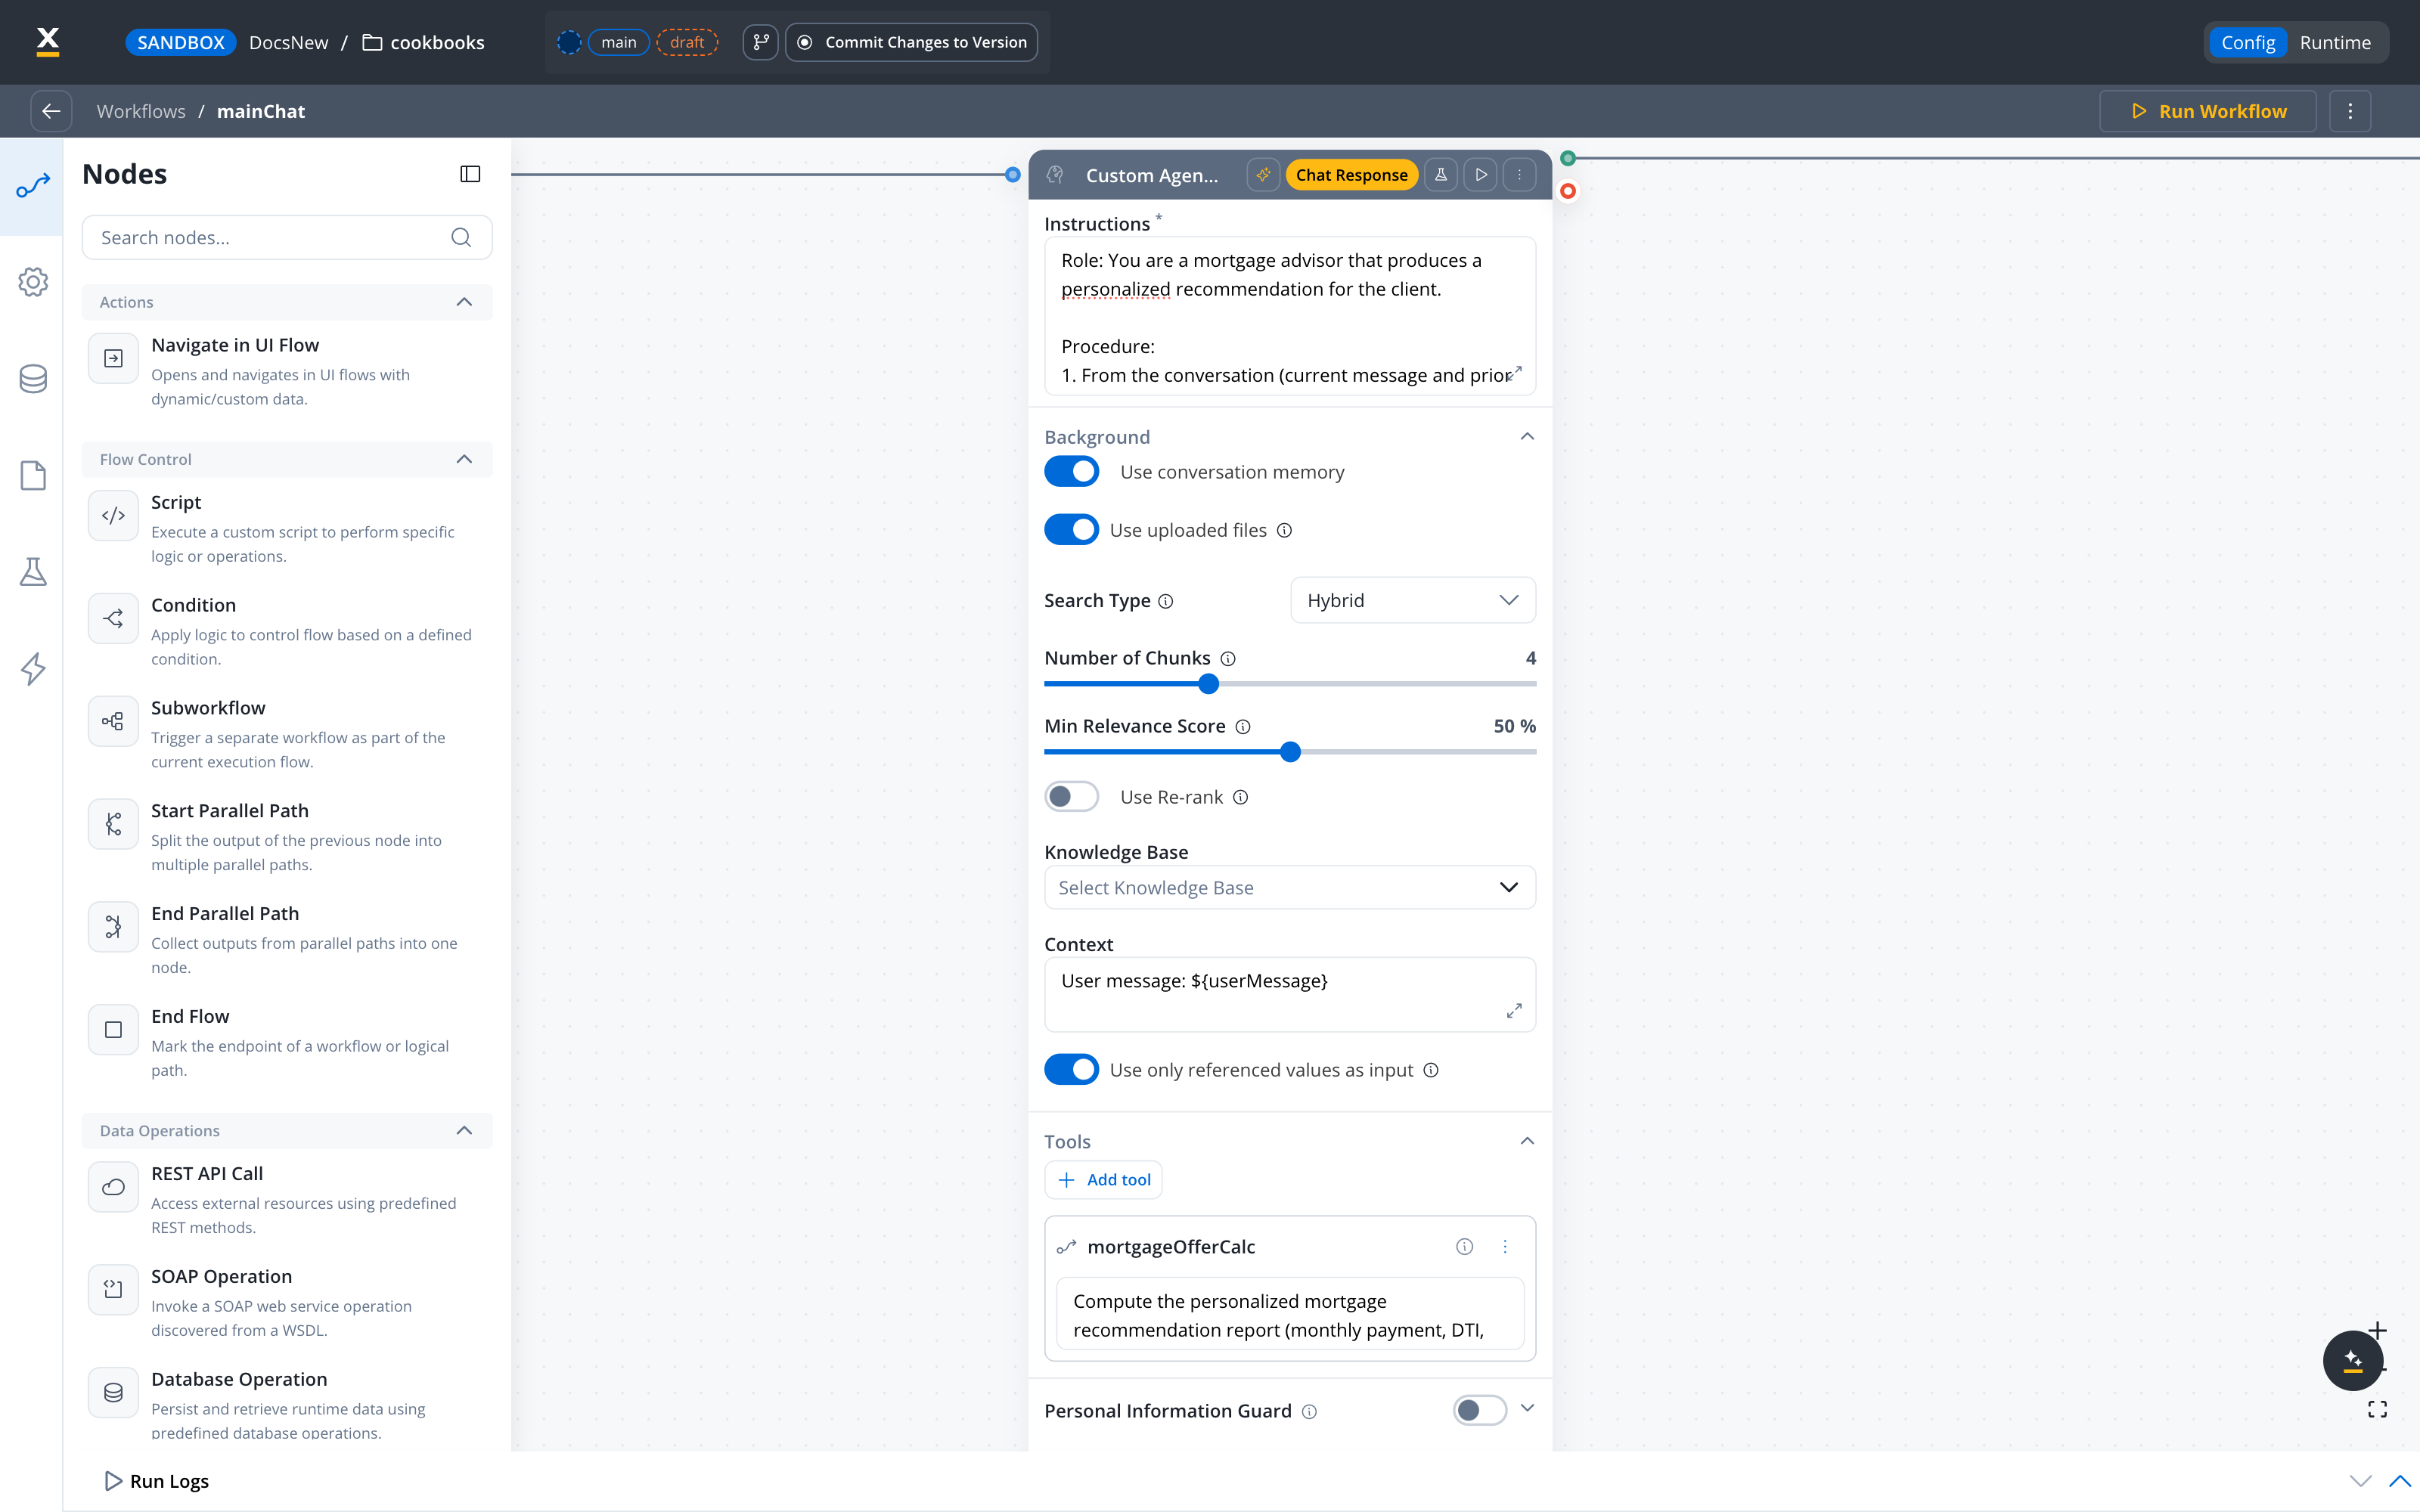
mainChat.
A workflow can be attached as a tool only if it declares input parameters, and it needs output parameters to return anything useful (Step 5a). The agent sees the workflow’s Description plus the When should the agent use this workflow? text as the tool description, so name the arguments it needs and add a stop condition there. An agent node is capped at 10 workflow-tool calls per run — past the cap the call is not dispatched and the agent is told to answer with what it already has, so the prompt is still what stops a model from re-calling a tool that already succeeded.
Step 6: Connect to the chat UI
1
Create a Chat-Driven UI Flow
Go to UI Flows and create a new UI Flow, selecting Chat-Driven as the experience type. Set
mainChat in the AI Conversational Workflow field.2
Add a Chat component
Add a Chat component to the page. In a Chat-Driven UI Flow it uses
mainChat by default — no per-component configuration needed.3
Test the chat
Click Run to preview the UI Flow and interact with the chatbot.
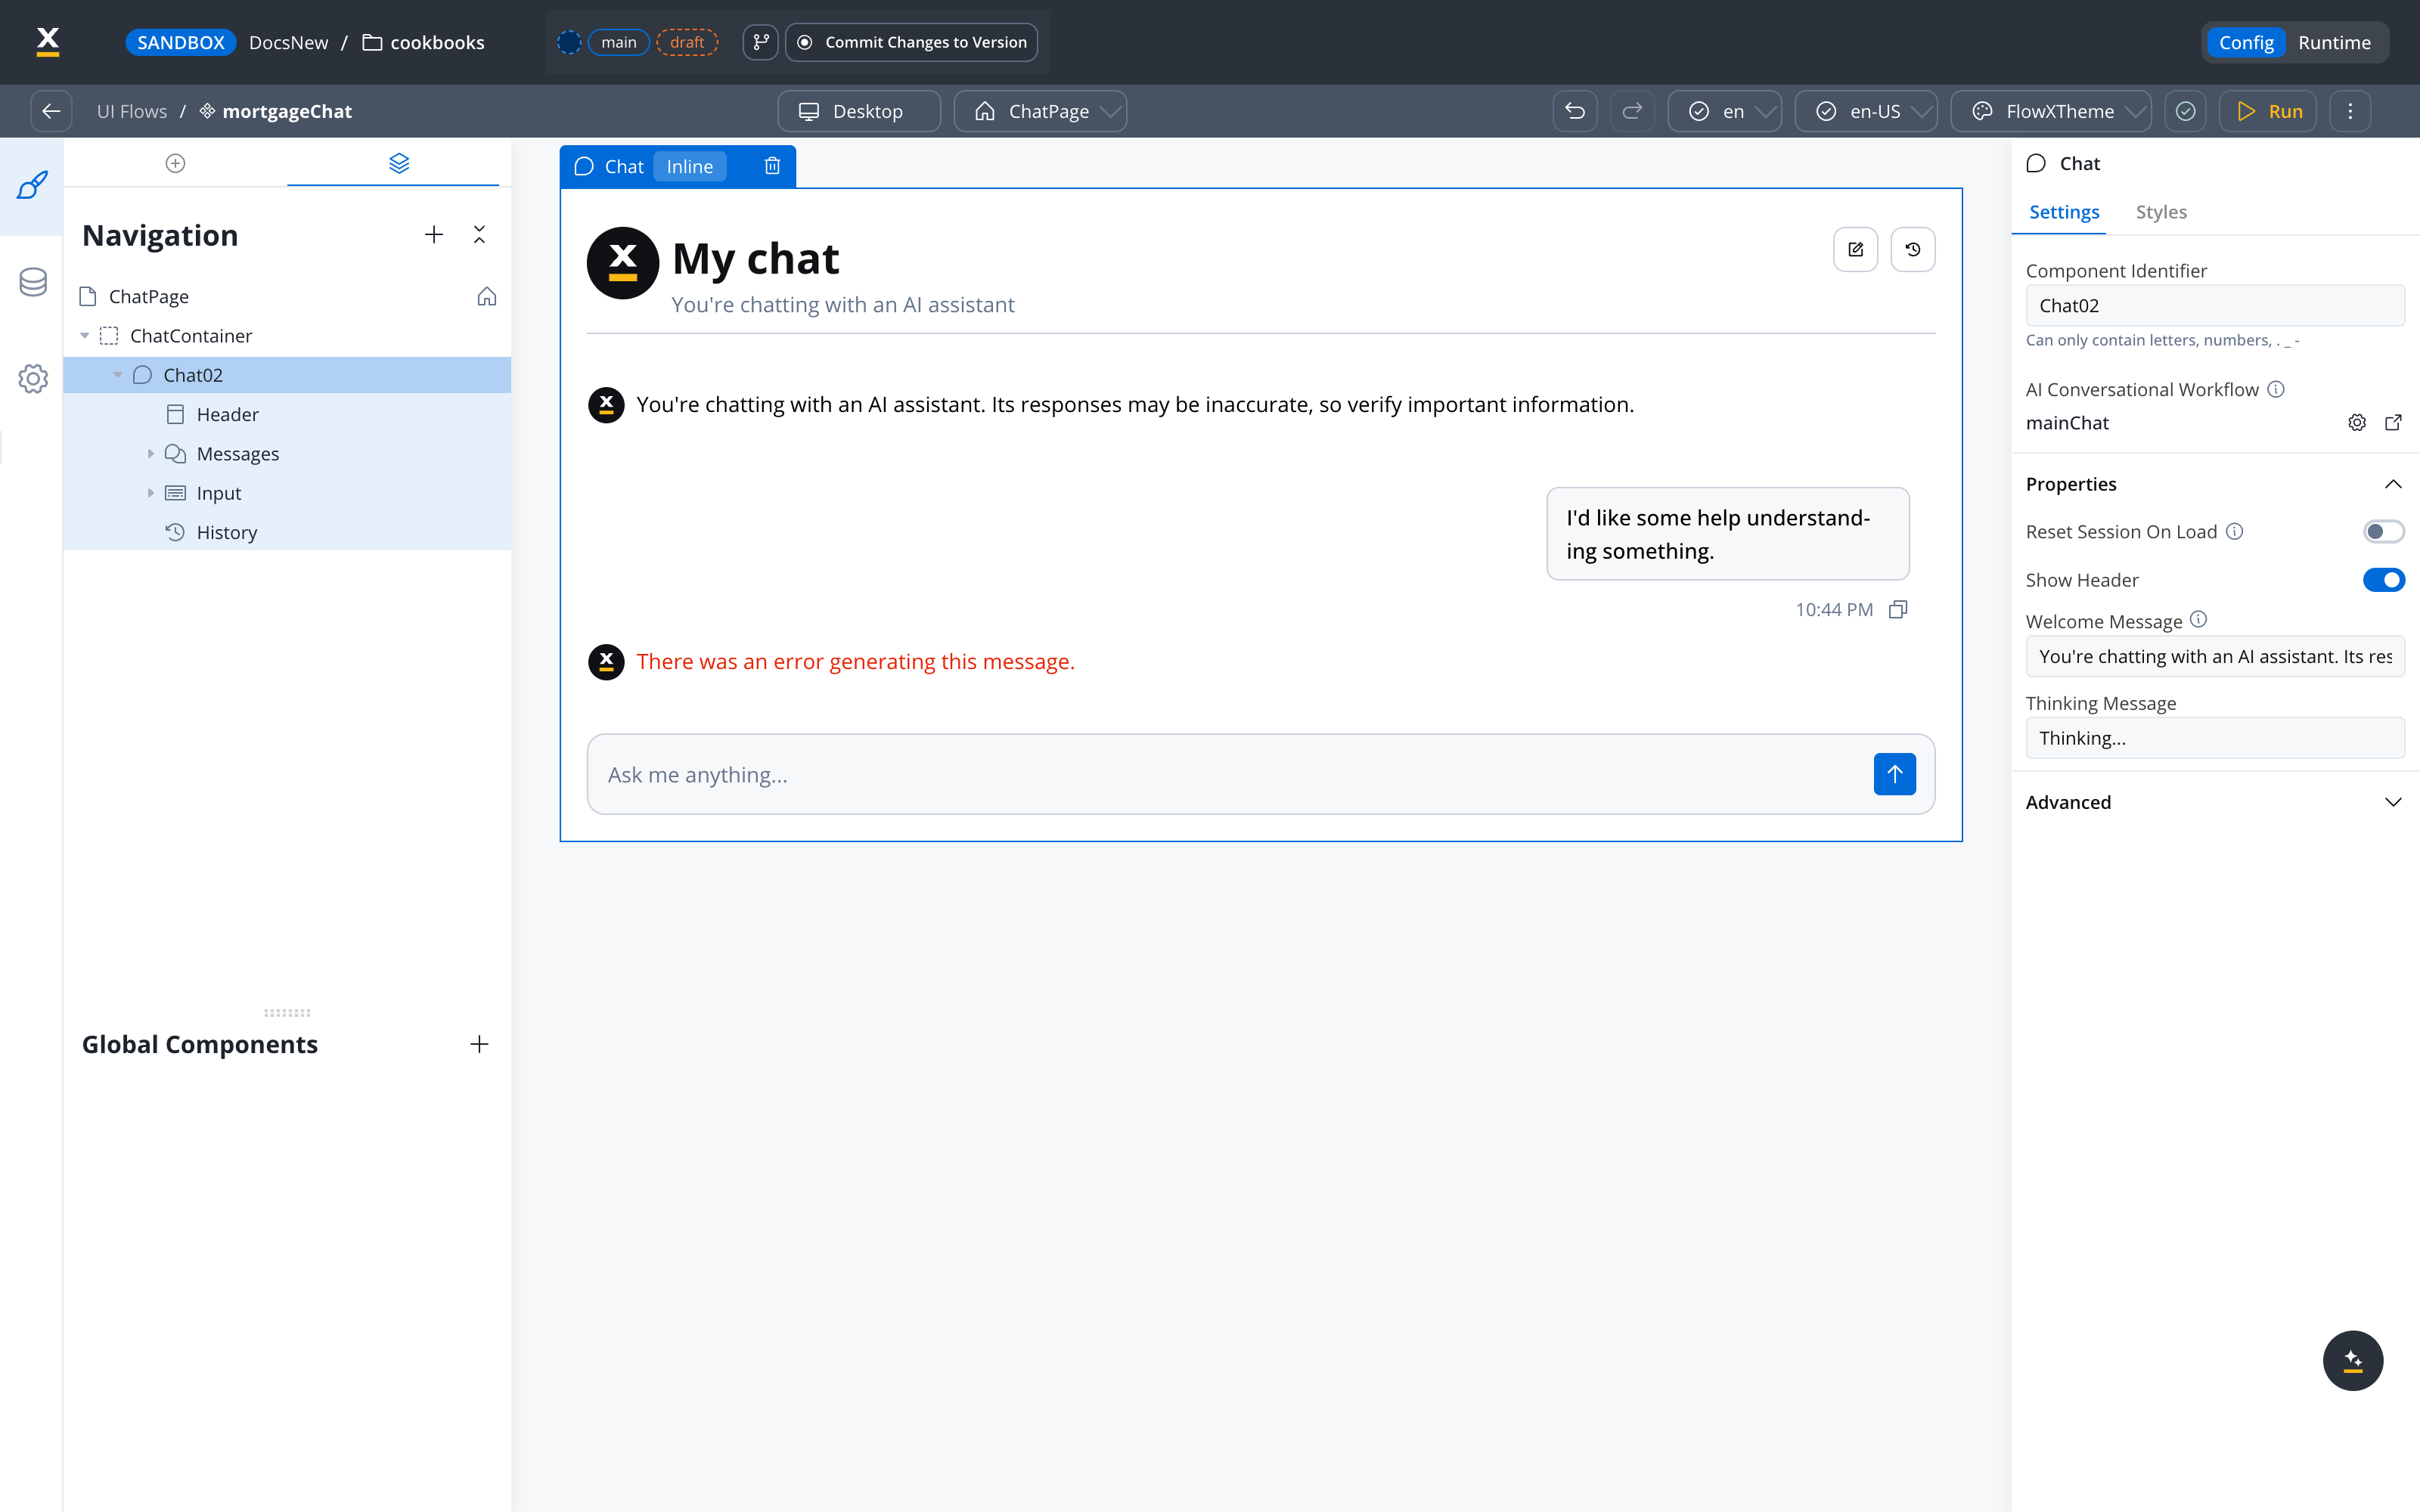
For details on configuring chat experiences with built-in session memory, see Chat-driven workflows. For the Chat component reference, see Chat component.
Testing
1
Test the mainChat workflow directly
Open
mainChat and click Run Workflow. In the test modal, provide a valid UUID for Chat Session ID (click Generate Chat Session ID to create one, and reuse the same one across runs to verify multi-turn memory) and a User Message.2
Test the full chat flow
Run the UI Flow that embeds the Chat component. With built-in session memory, financial details captured in earlier turns are available to later turns: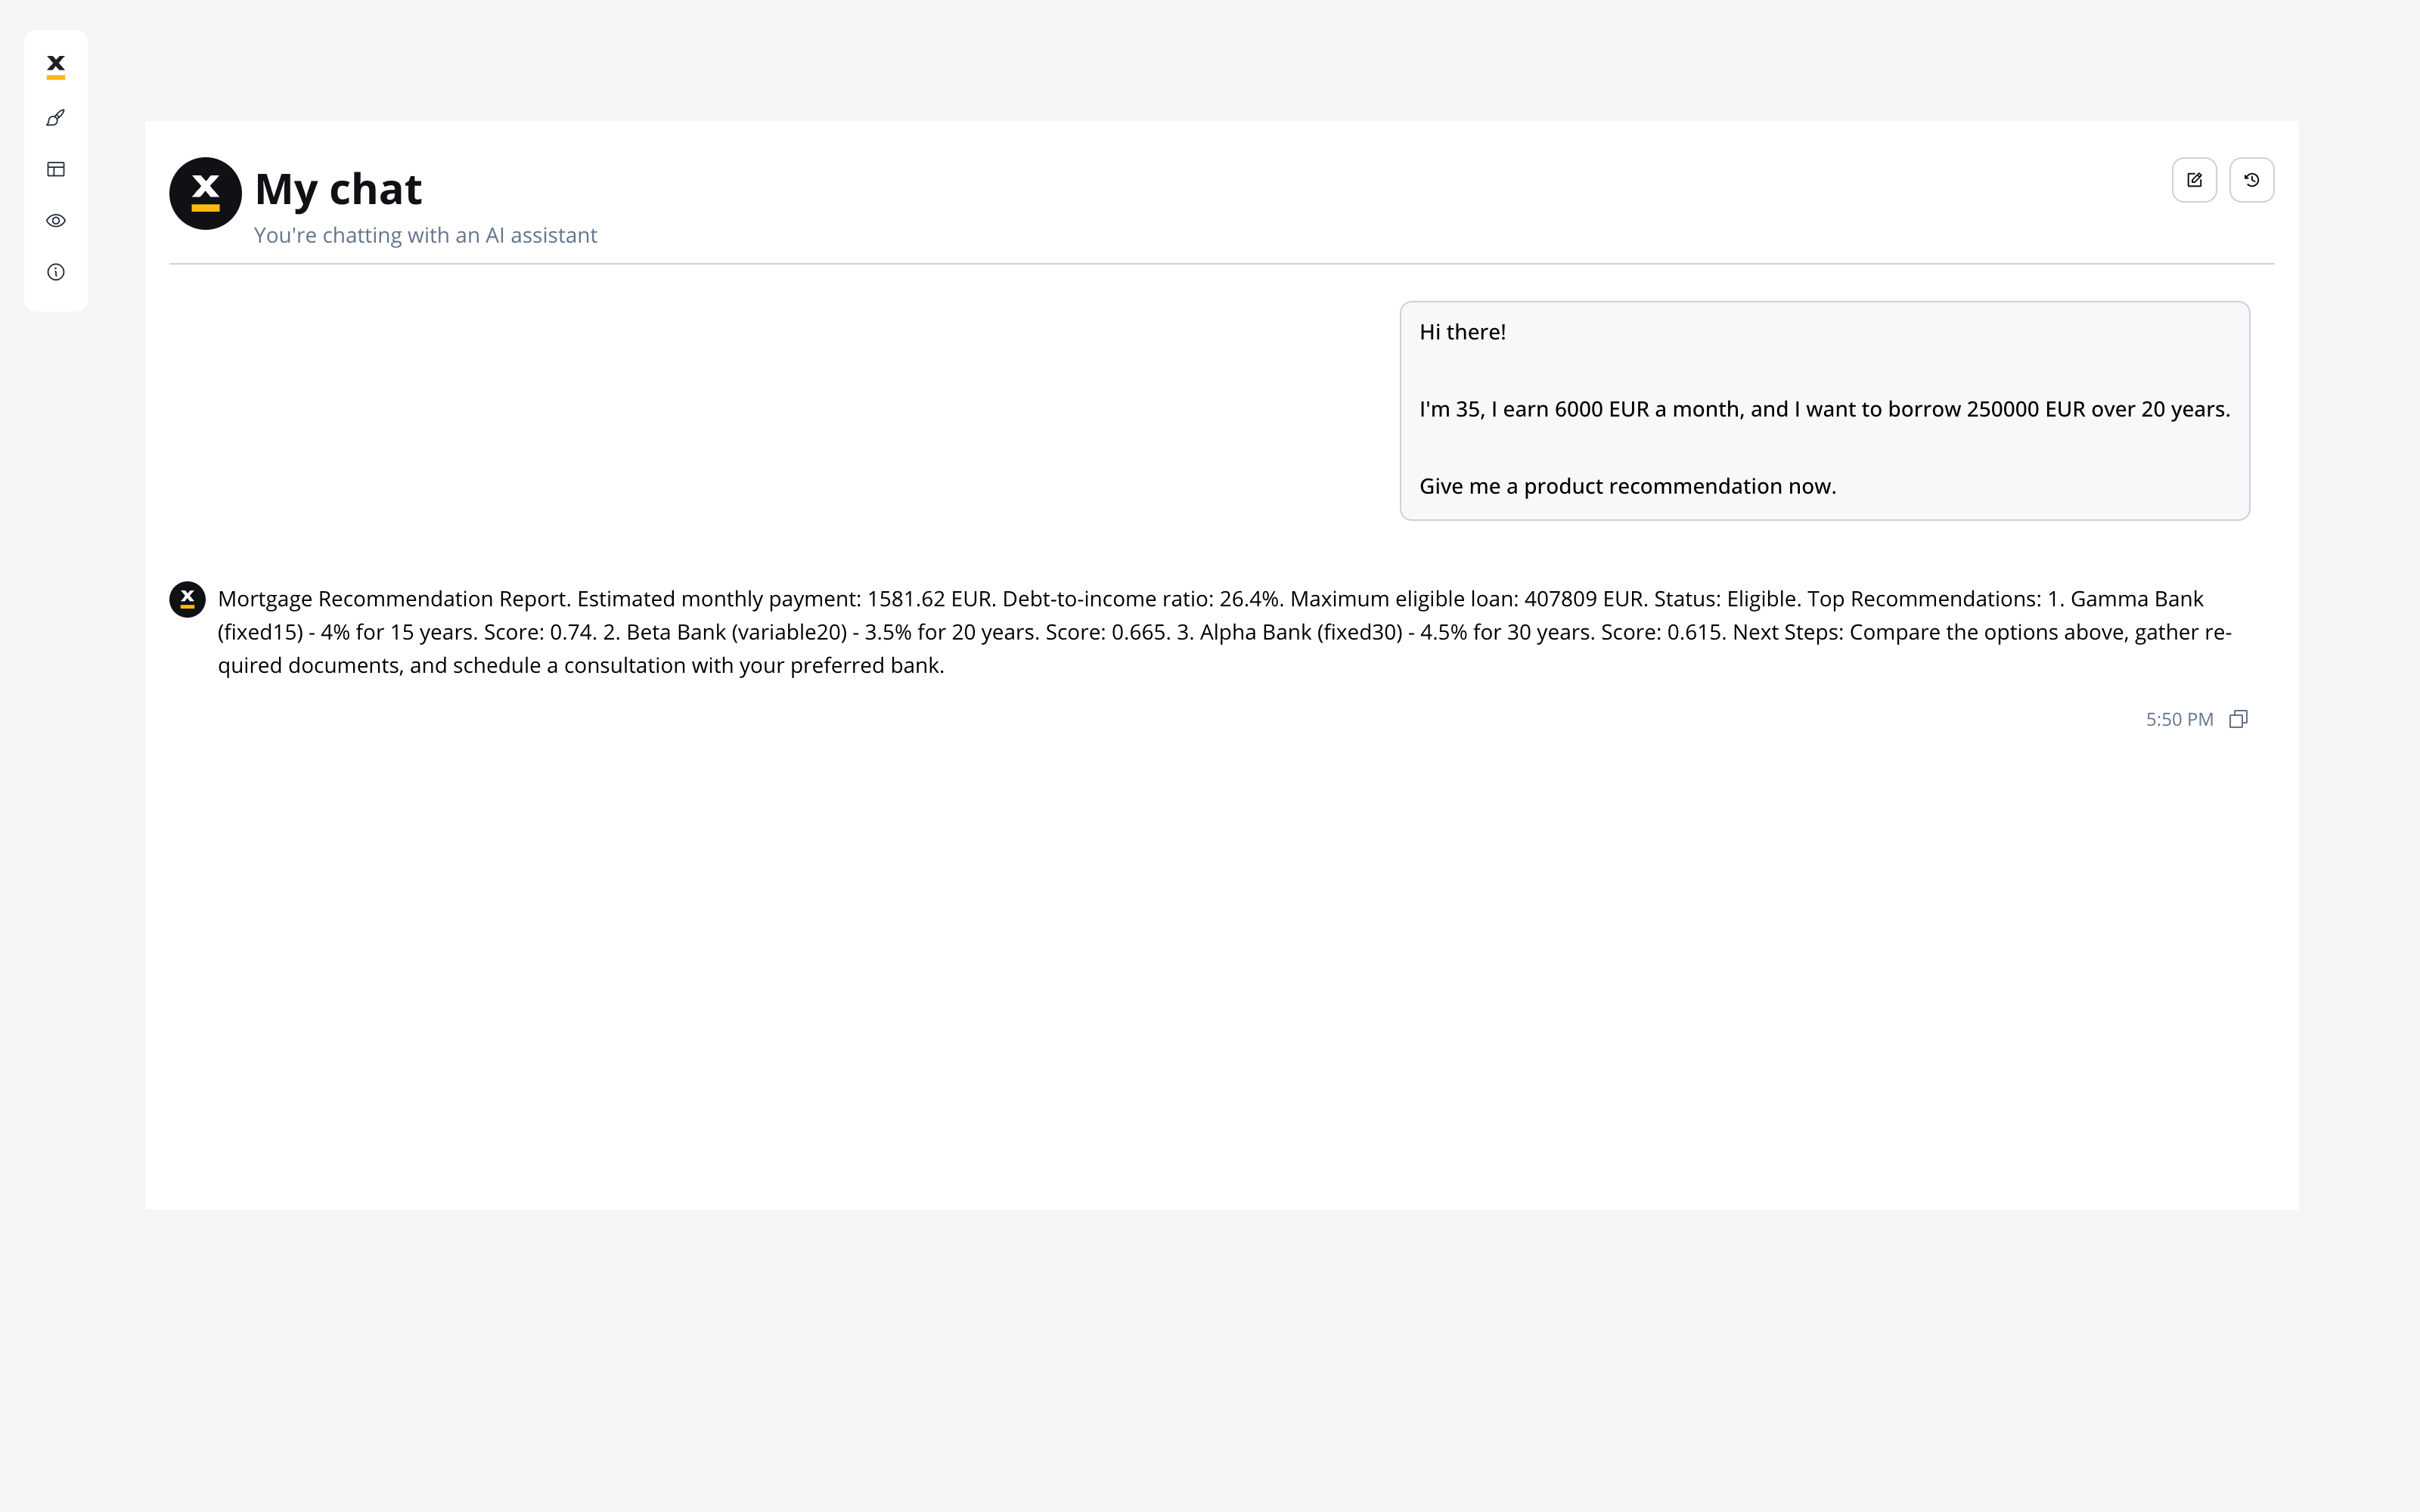
3
Test edge cases
What you learned
In this tutorial, you built a full-featured Chat Driven app that demonstrates:- Chat Driven workflow basics — dedicated Start node fields,
${userMessage}interpolation, simplified End Flow (guide) - Built-in session memory — multi-turn context without manually persisting conversation history
- Intent classification and routing — using an Intent Classification Agent to route messages to handler branches automatically (pattern)
- Agentic knowledge base search — grounding answers in uploaded documents with multi-query retrieval and re-rank (pattern)
- Workflow-as-tool — letting a Custom Agent call a deterministic calculation workflow for auditable, hybrid AI + business-rule recommendations (pattern)
Next steps
Chat-driven workflows
Full reference for Chat Driven workflows, AI Triggers, and session memory
AI patterns
Deep-dive into the patterns used in this tutorial
Node types reference
Detailed configuration reference for all AI node types
Knowledge Base integration
Create and manage Knowledge Bases for RAG