

Prerequisites: a project in your workspace and access to FlowX.AI Designer. If integration workflows are new to you, read Build your first workflow first - it introduces the same three building blocks conceptually. This cookbook is the hands-on companion: a concrete build you can reproduce click for click, plus the runtime failure modes.
The pattern
Three resources, one hop each:- A data source holds the connection: base URL, authorization, and reusable endpoint definitions.
- An integration workflow calls the endpoint and declares what it returns. Whatever the workflow declares as output becomes a runtime contract.
- In the process, a Send Message Task starts the workflow and a Receive Message Task maps its output into process data.
Step 1: Create the data source
1
Add a RESTful System
In FlowX.AI Designer, go to your project → Integrations → Data Sources, click +, and pick RESTful System:
- Name:
RandomNumber - Base URL:
https://www.random.org/ - Authorization: No Auth - the random.org integers endpoint is public
2
Define the endpoint
Add an endpoint named 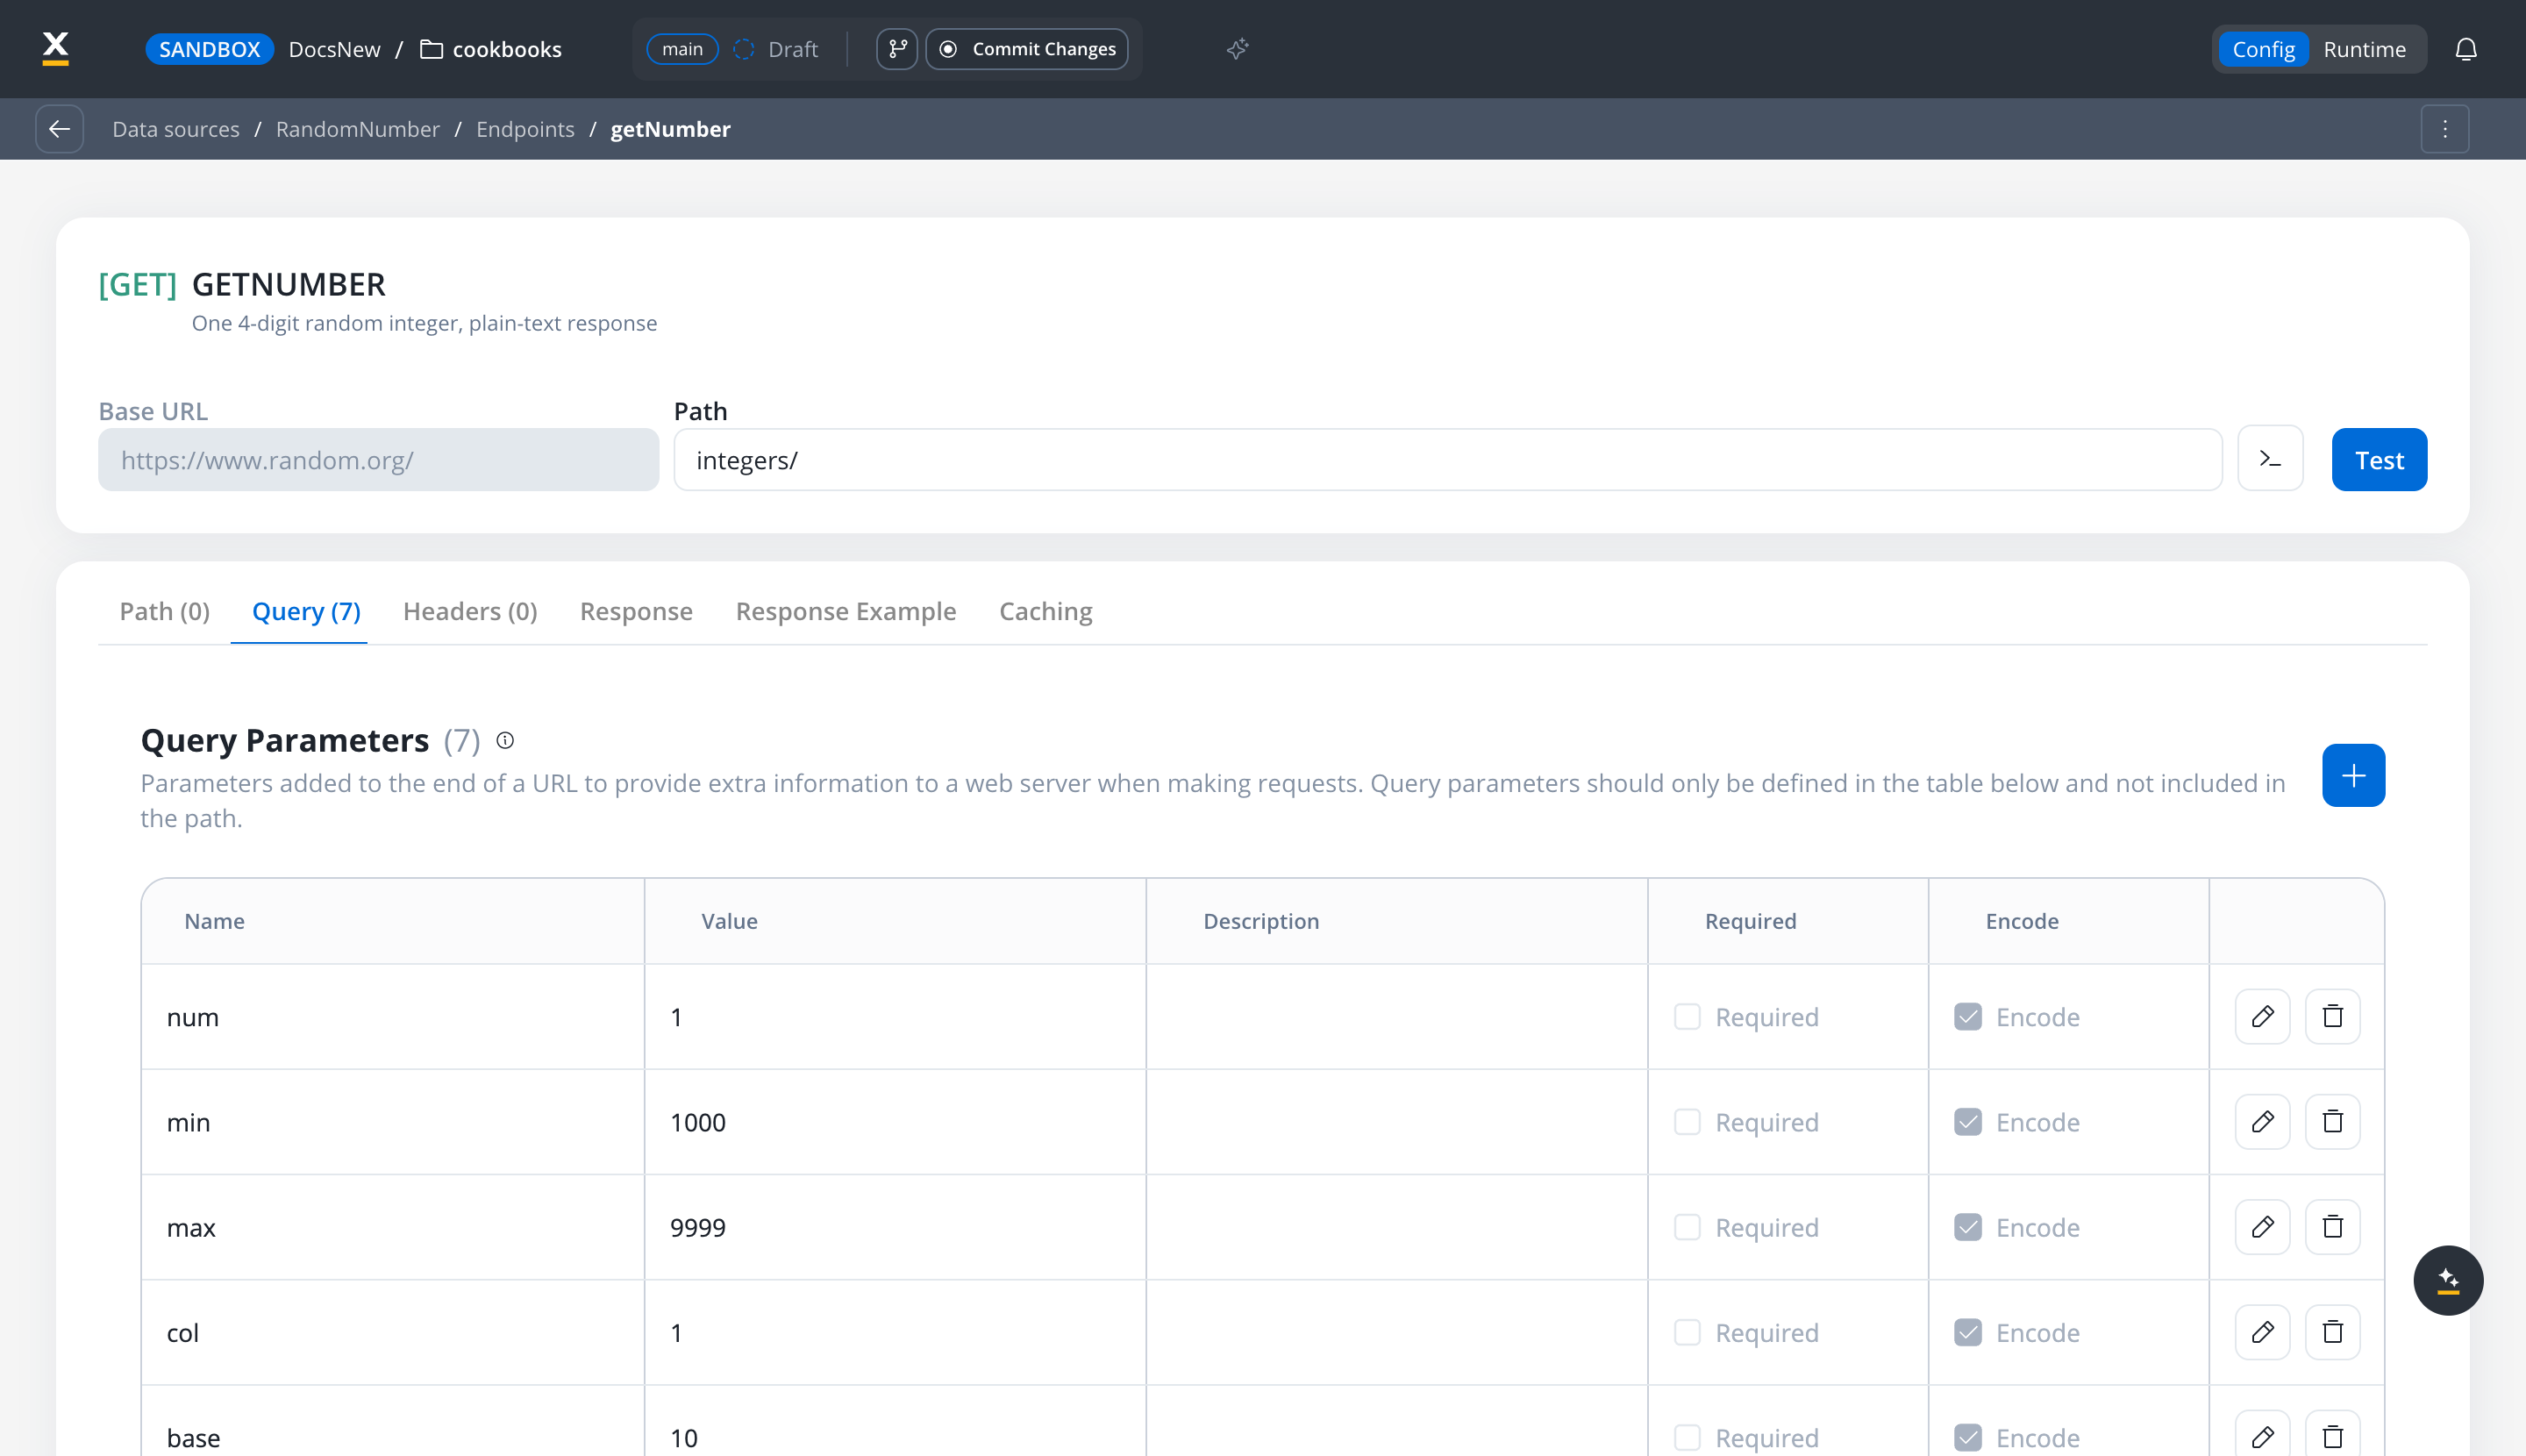
getNumber:- Method:
GET - Path:
integers/ - Query parameters:
format=plain means the API answers with text/plain - the body is the bare number followed by a newline, for example 7841\n, not JSON. That trailing newline is invisible in most tools but matters later: see Plain-text responses below.Step 2: Build the workflow
1
Create the workflow
Go to Integrations → Workflows and create a workflow named
getNumber. It starts with a Start node - this workflow needs no input, so leave it empty.2
Add the REST API Call node
Add a REST API Call node after Start and select the 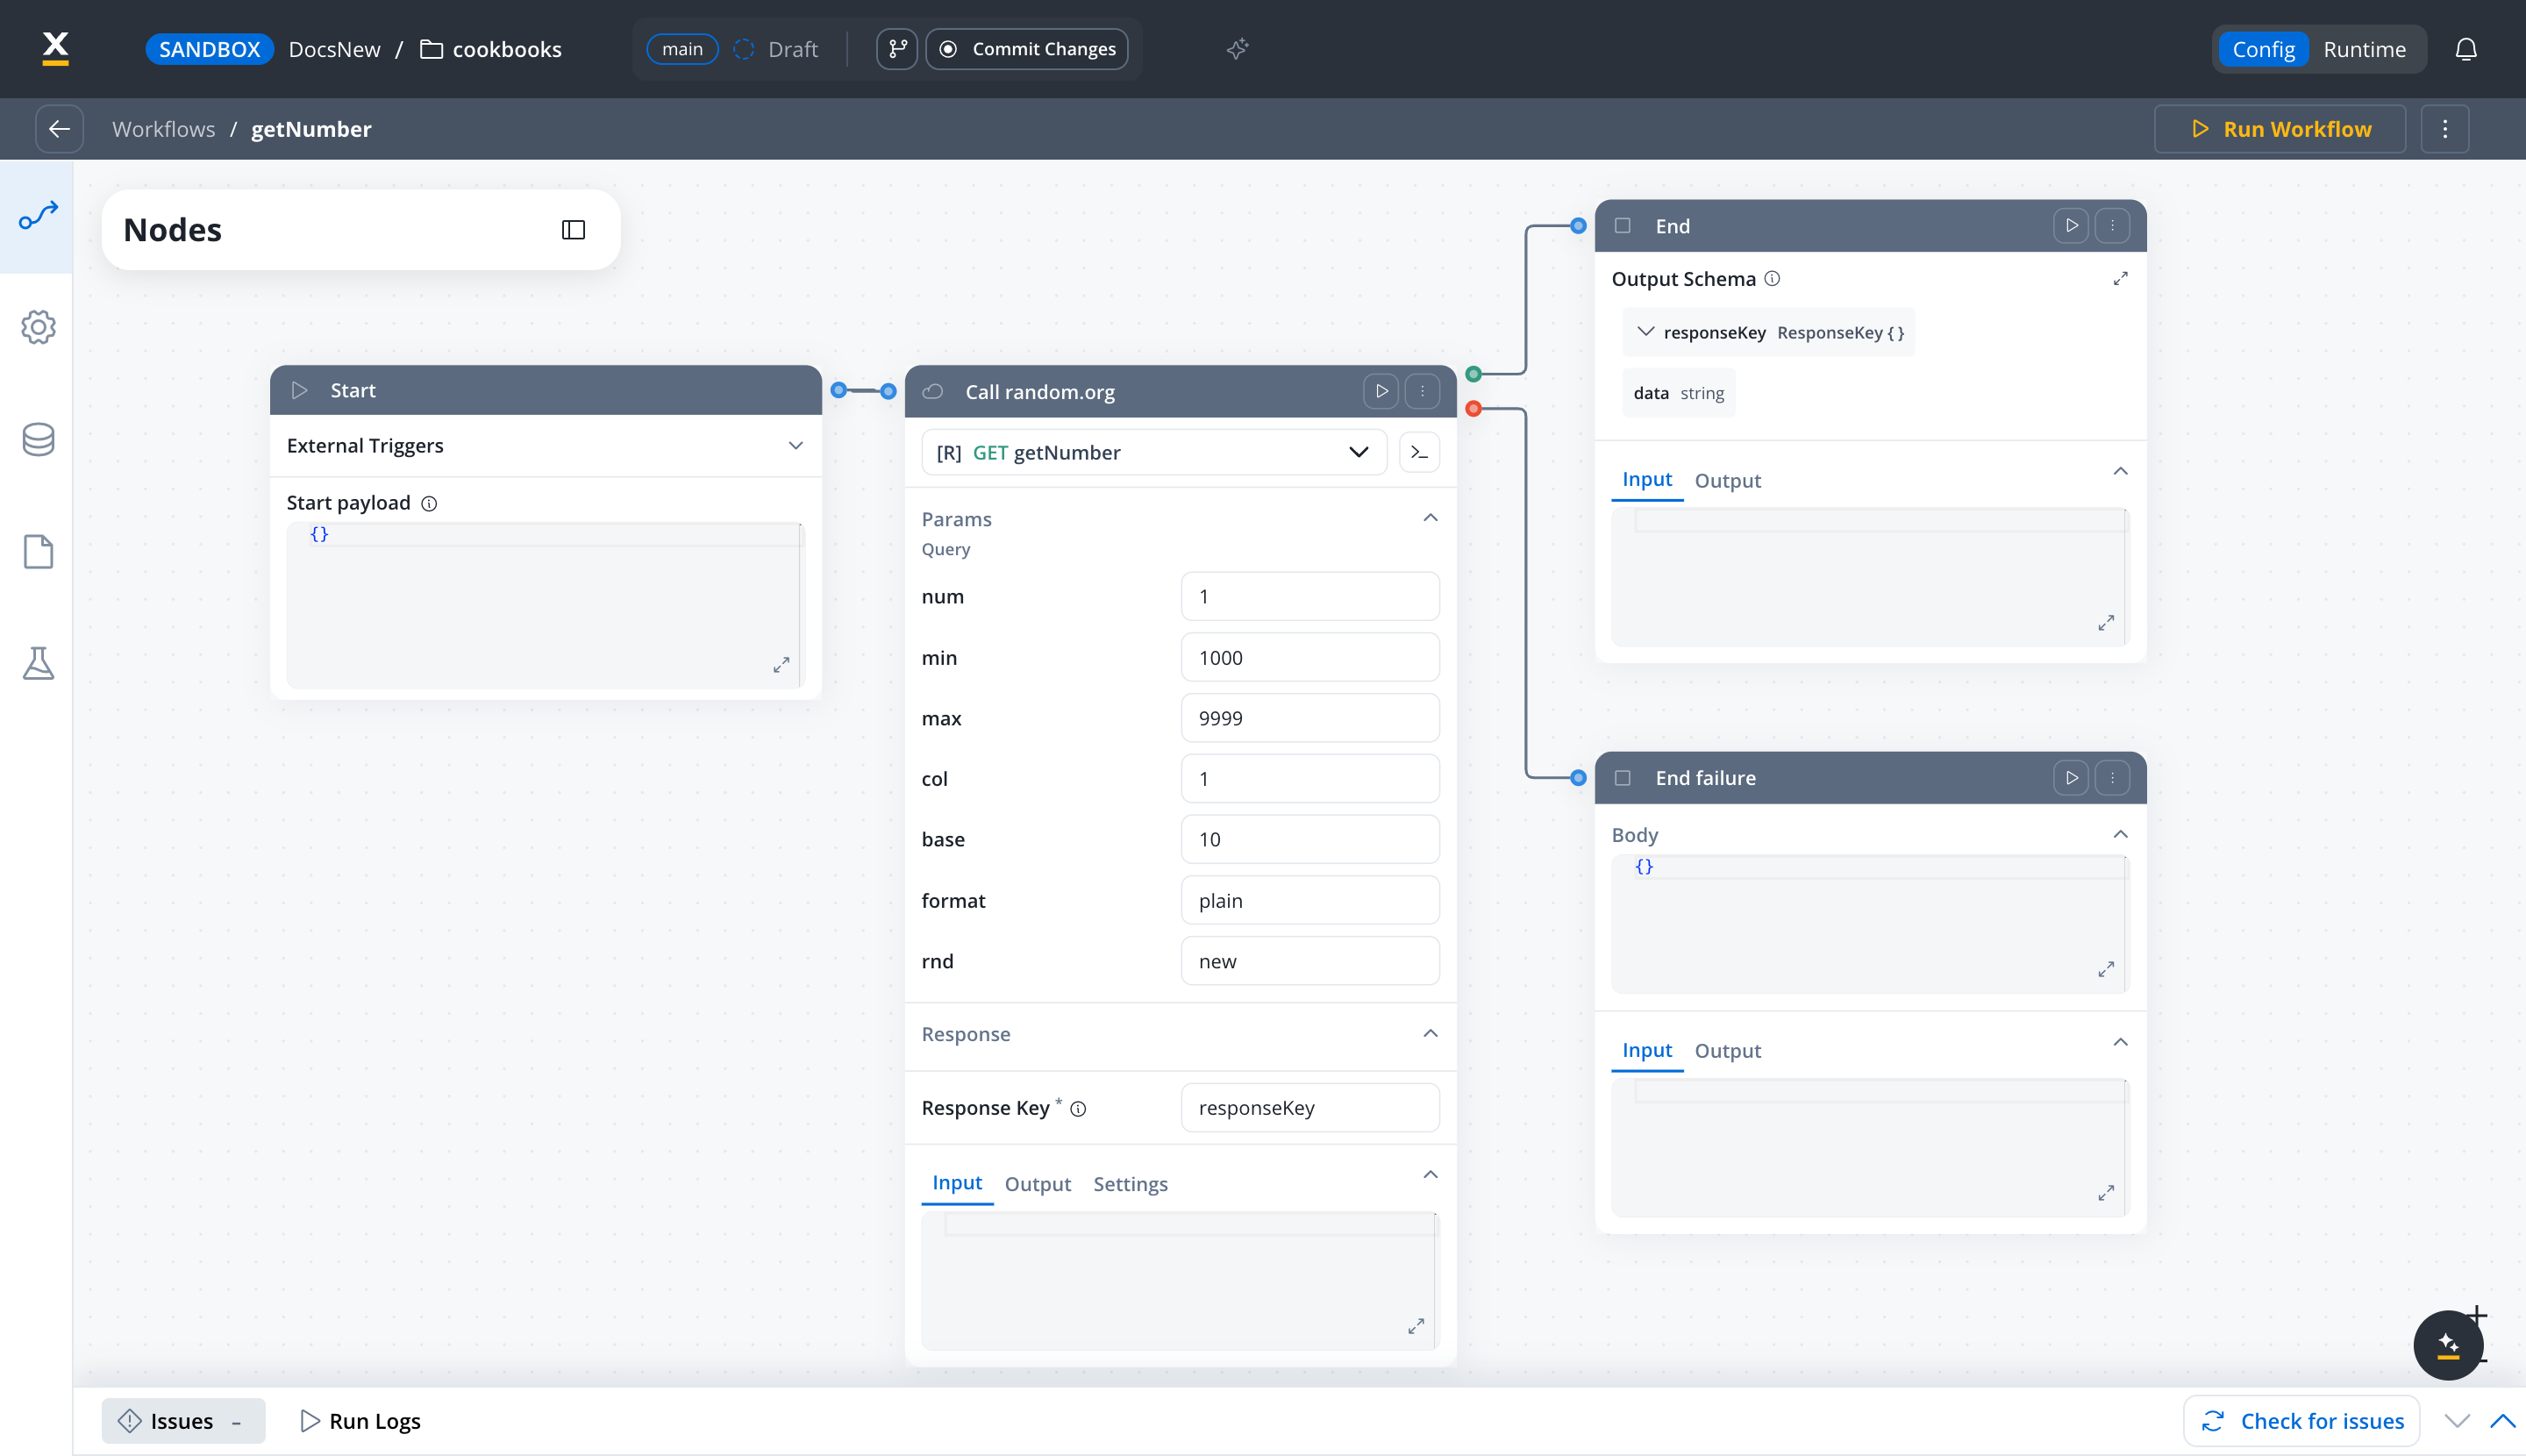
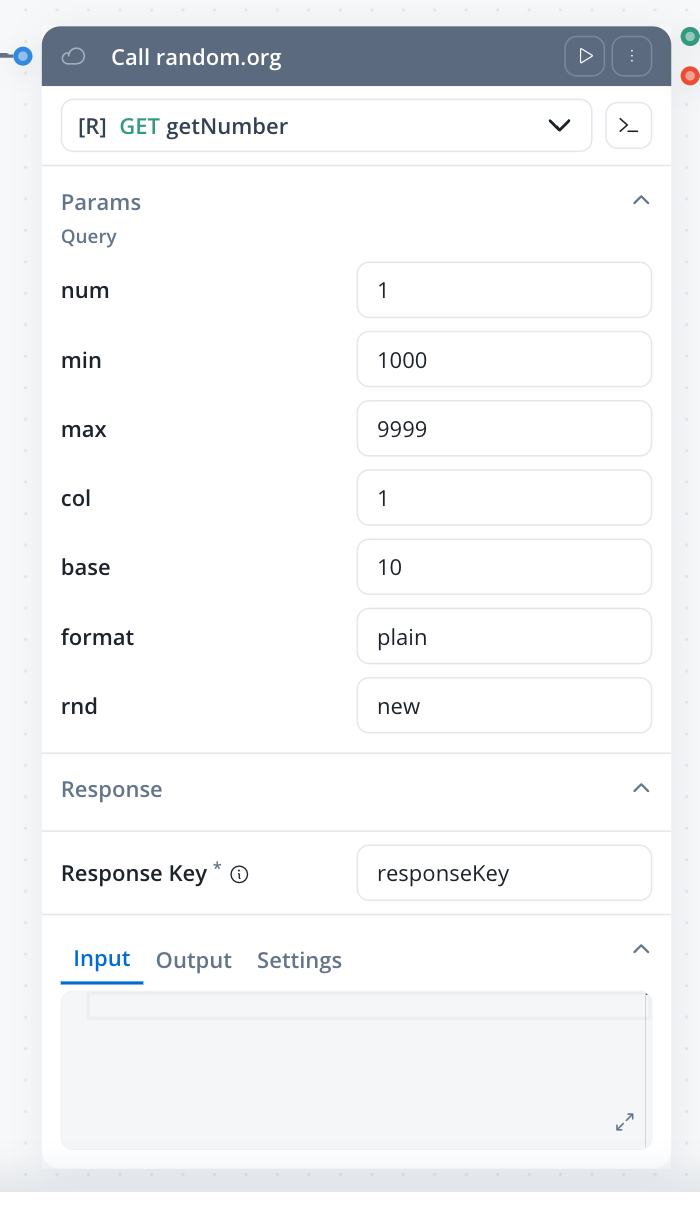
getNumber endpoint (endpoints are grouped by data source). Set its Response Key to responseKey.The node stores its full result under that key: the response body at responseKey.data, plus responseKey.metadata (status code and headers) and responseKey.hasError. Every placeholder downstream references the body as ${responseKey.data}.3
Branch success and failure
Connect the REST node to two End nodes: one on the success branch, one on the failure branch. The failure branch keeps a timeout or non-2xx response from masquerading as a result.
4
Test the REST node on its own
Run the workflow from the editor and open the REST node in the run details - it shows the exact input it sent and the output it stored. Confirm the body sits at
responseKey.data before wiring anything else.Step 3: Declare the workflow output
The calling process only receives what the workflow declares as output. Declare it through the workflow data model, then mark it as the success End node’s output.1
Model the output attribute
In the workflow’s data model, add an object attribute
responseKey with a string attribute data under it - mirroring where the REST node stores the body.2
Set the End node output
On the success End node, set the output to 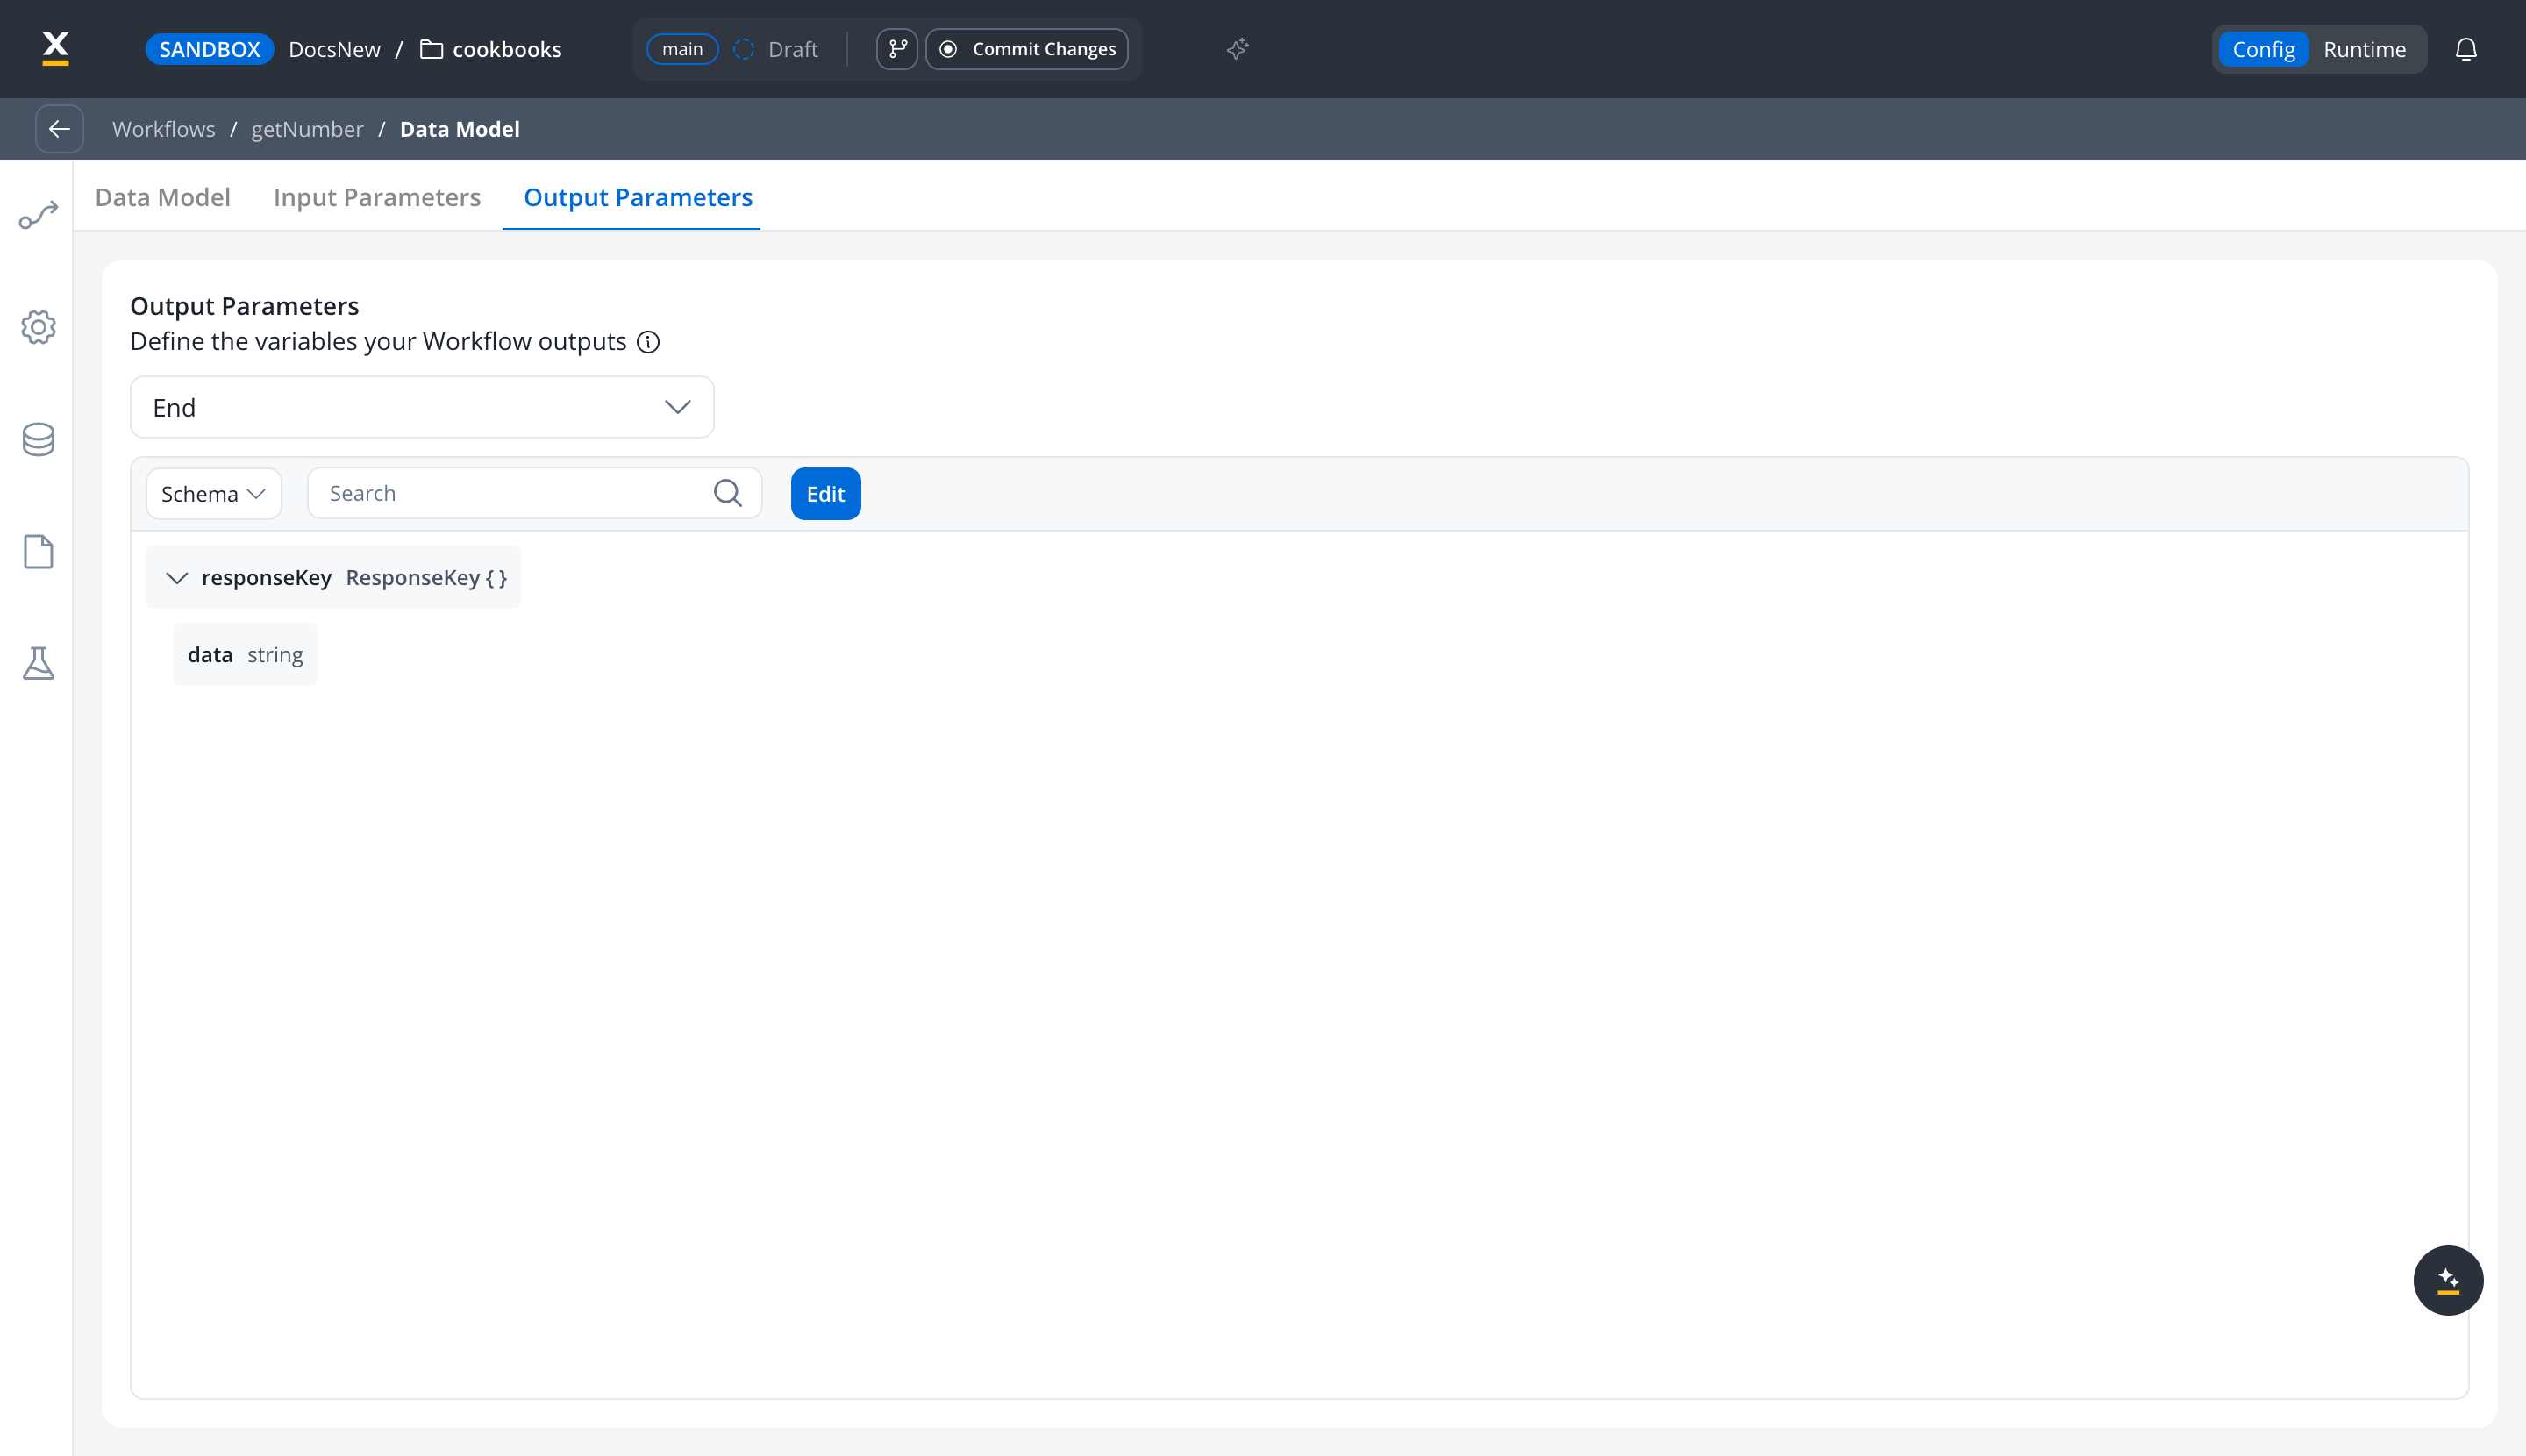
responseKey.data. This is the declared output parameter: the value the calling process gets back.Plain-text responses and the End node
If you hand-write the End node’s payload as JSON instead of mapping the data model, placeholders are substituted as raw text. For this API the body is7841\n, and the trailing newline makes {"value": "${responseKey.data}"} invalid JSON - the run fails with Executing an end node produced an error!. Keep the placeholder unquoted for numeric values, or clean the value in a Script node first. The data-model mapping used in this cookbook carries the value as a string and avoids the problem entirely.
Step 4: Start the workflow from the process
1
Add the Send Message Task
In your BPMN process, add a Send Message Task node where the code should be requested.
2
Configure the Start Integration Workflow action
Add a Start Integration Workflow action on the node and select the 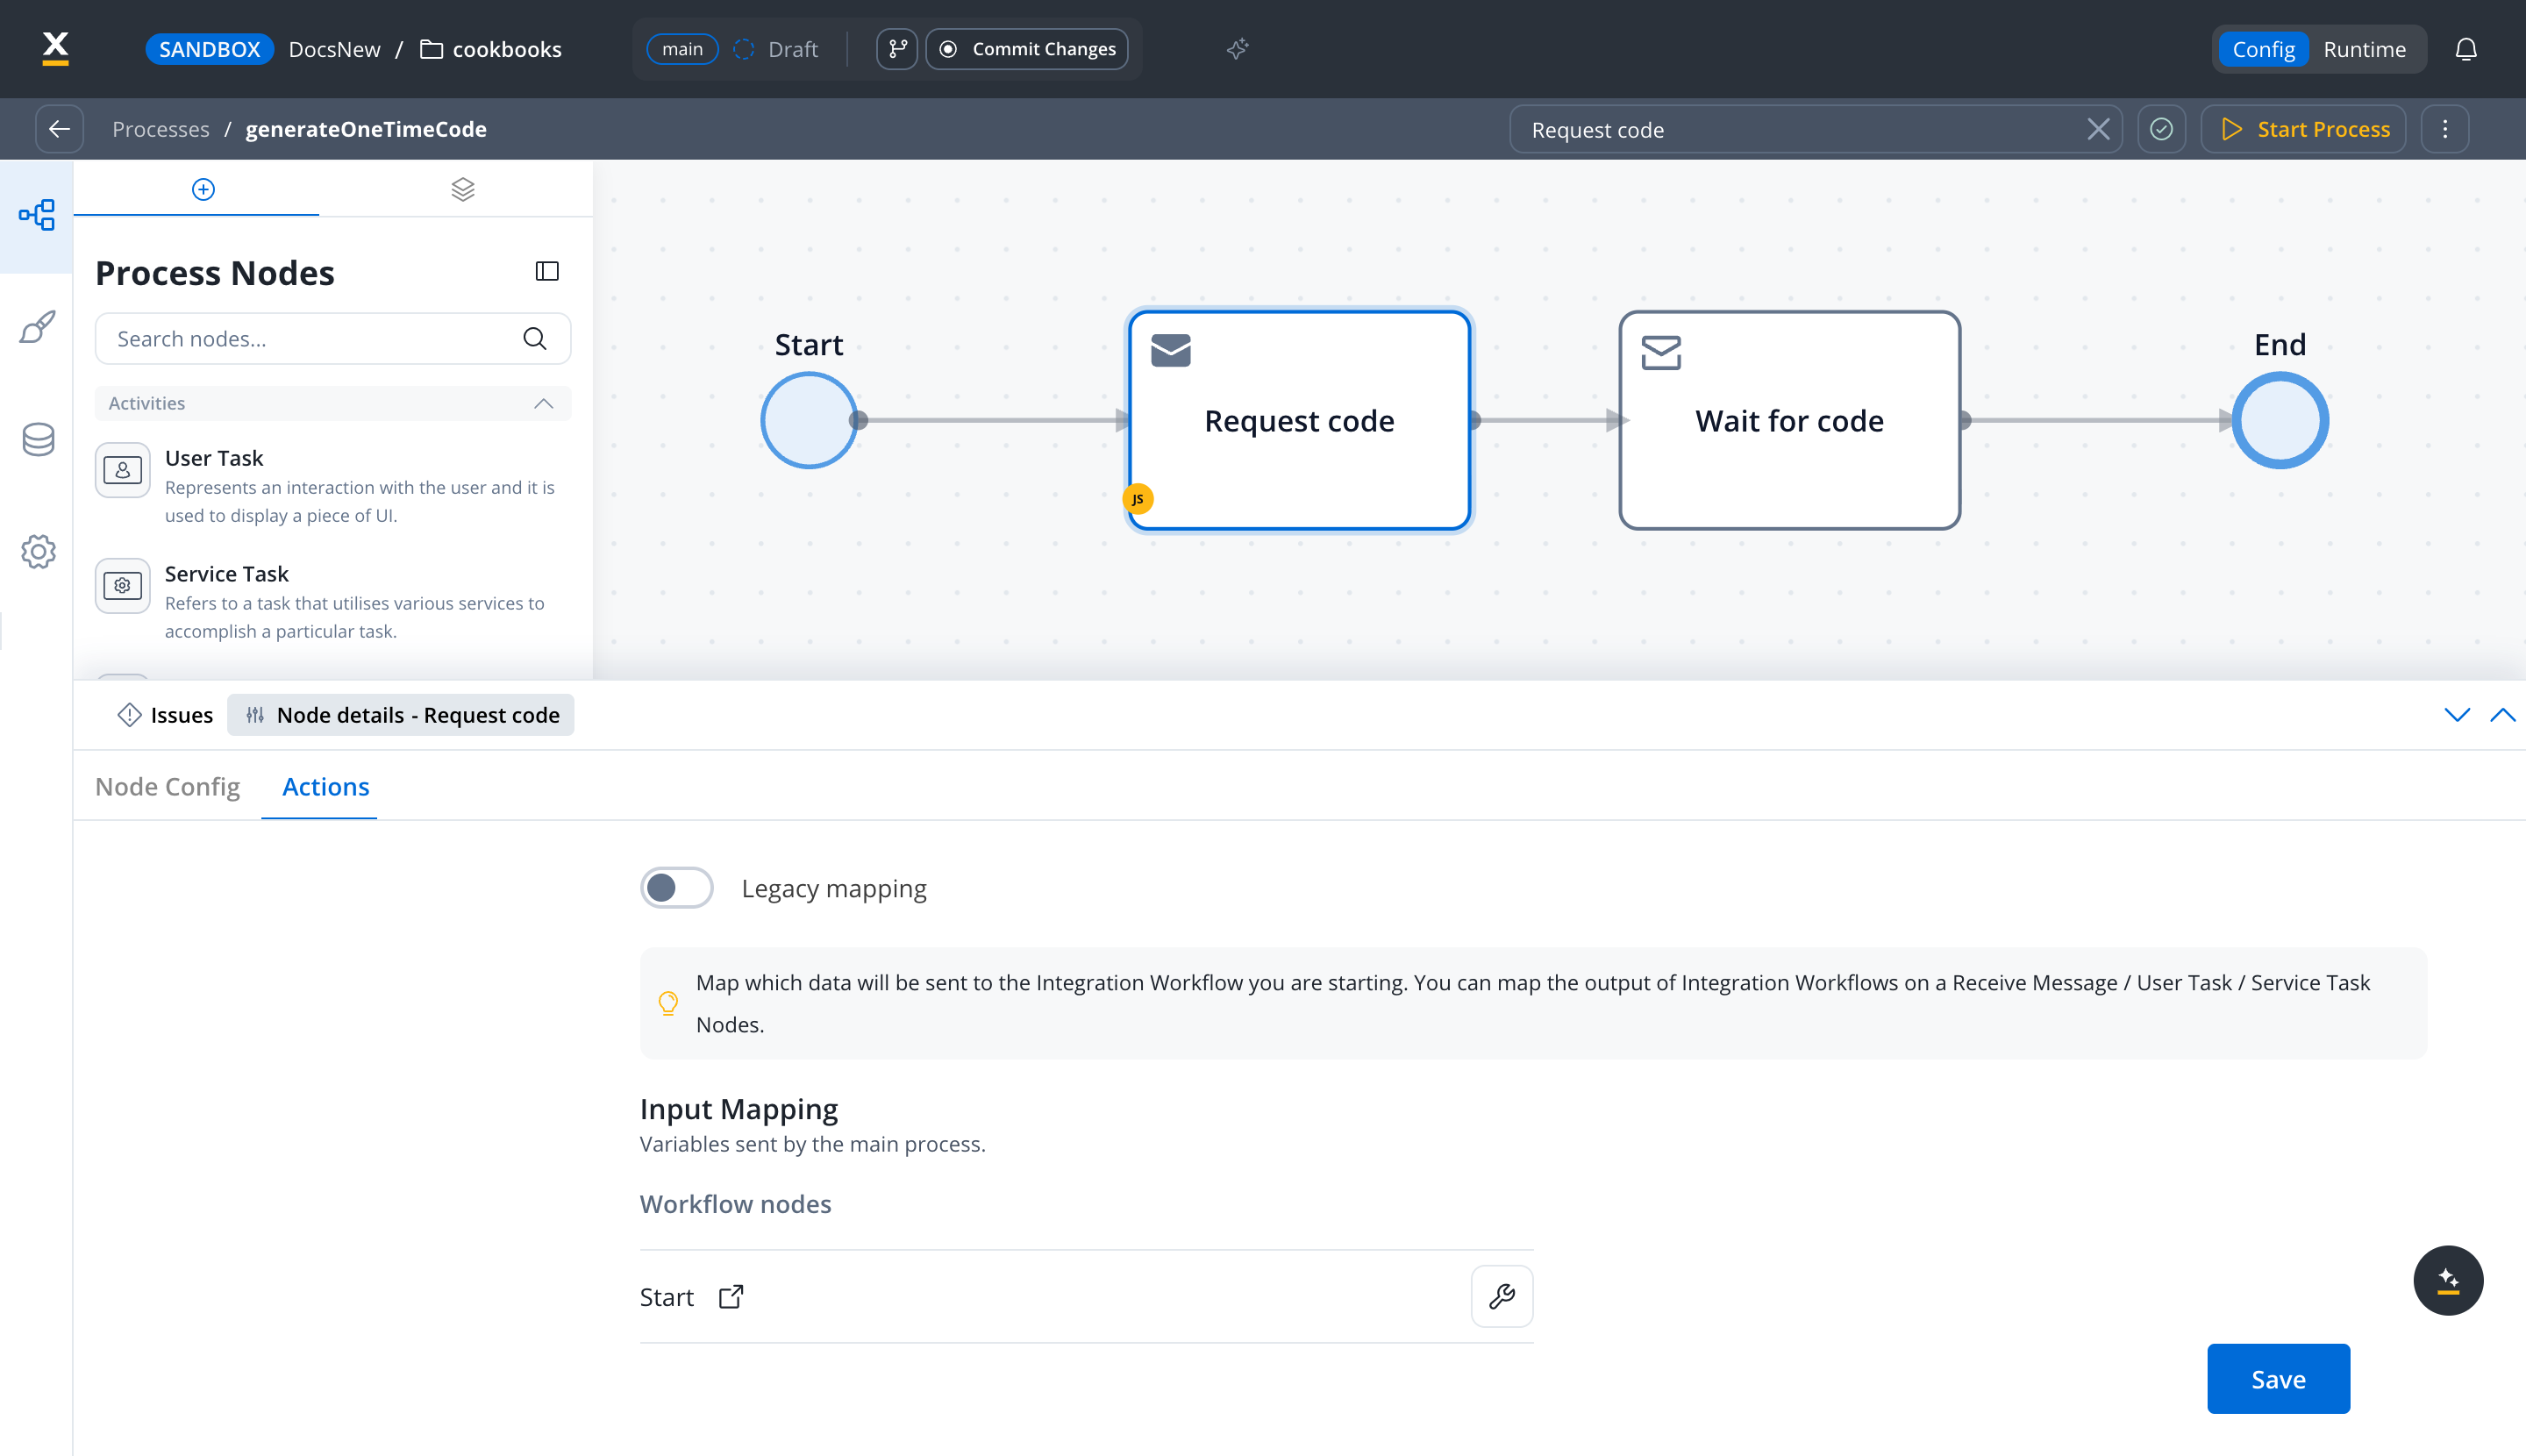
getNumber workflow. This workflow declares no input, so there is nothing to map - for an API that takes parameters, map process data to the workflow’s declared input parameters here.Step 5: Receive the output
1
Add the Receive Message Task
Add a Receive Message Task directly after the Send Message Task. The process waits here until the workflow replies.
2
Select the workflow as the data stream
In the node’s Data Stream configuration, set the source to From Workflow and select 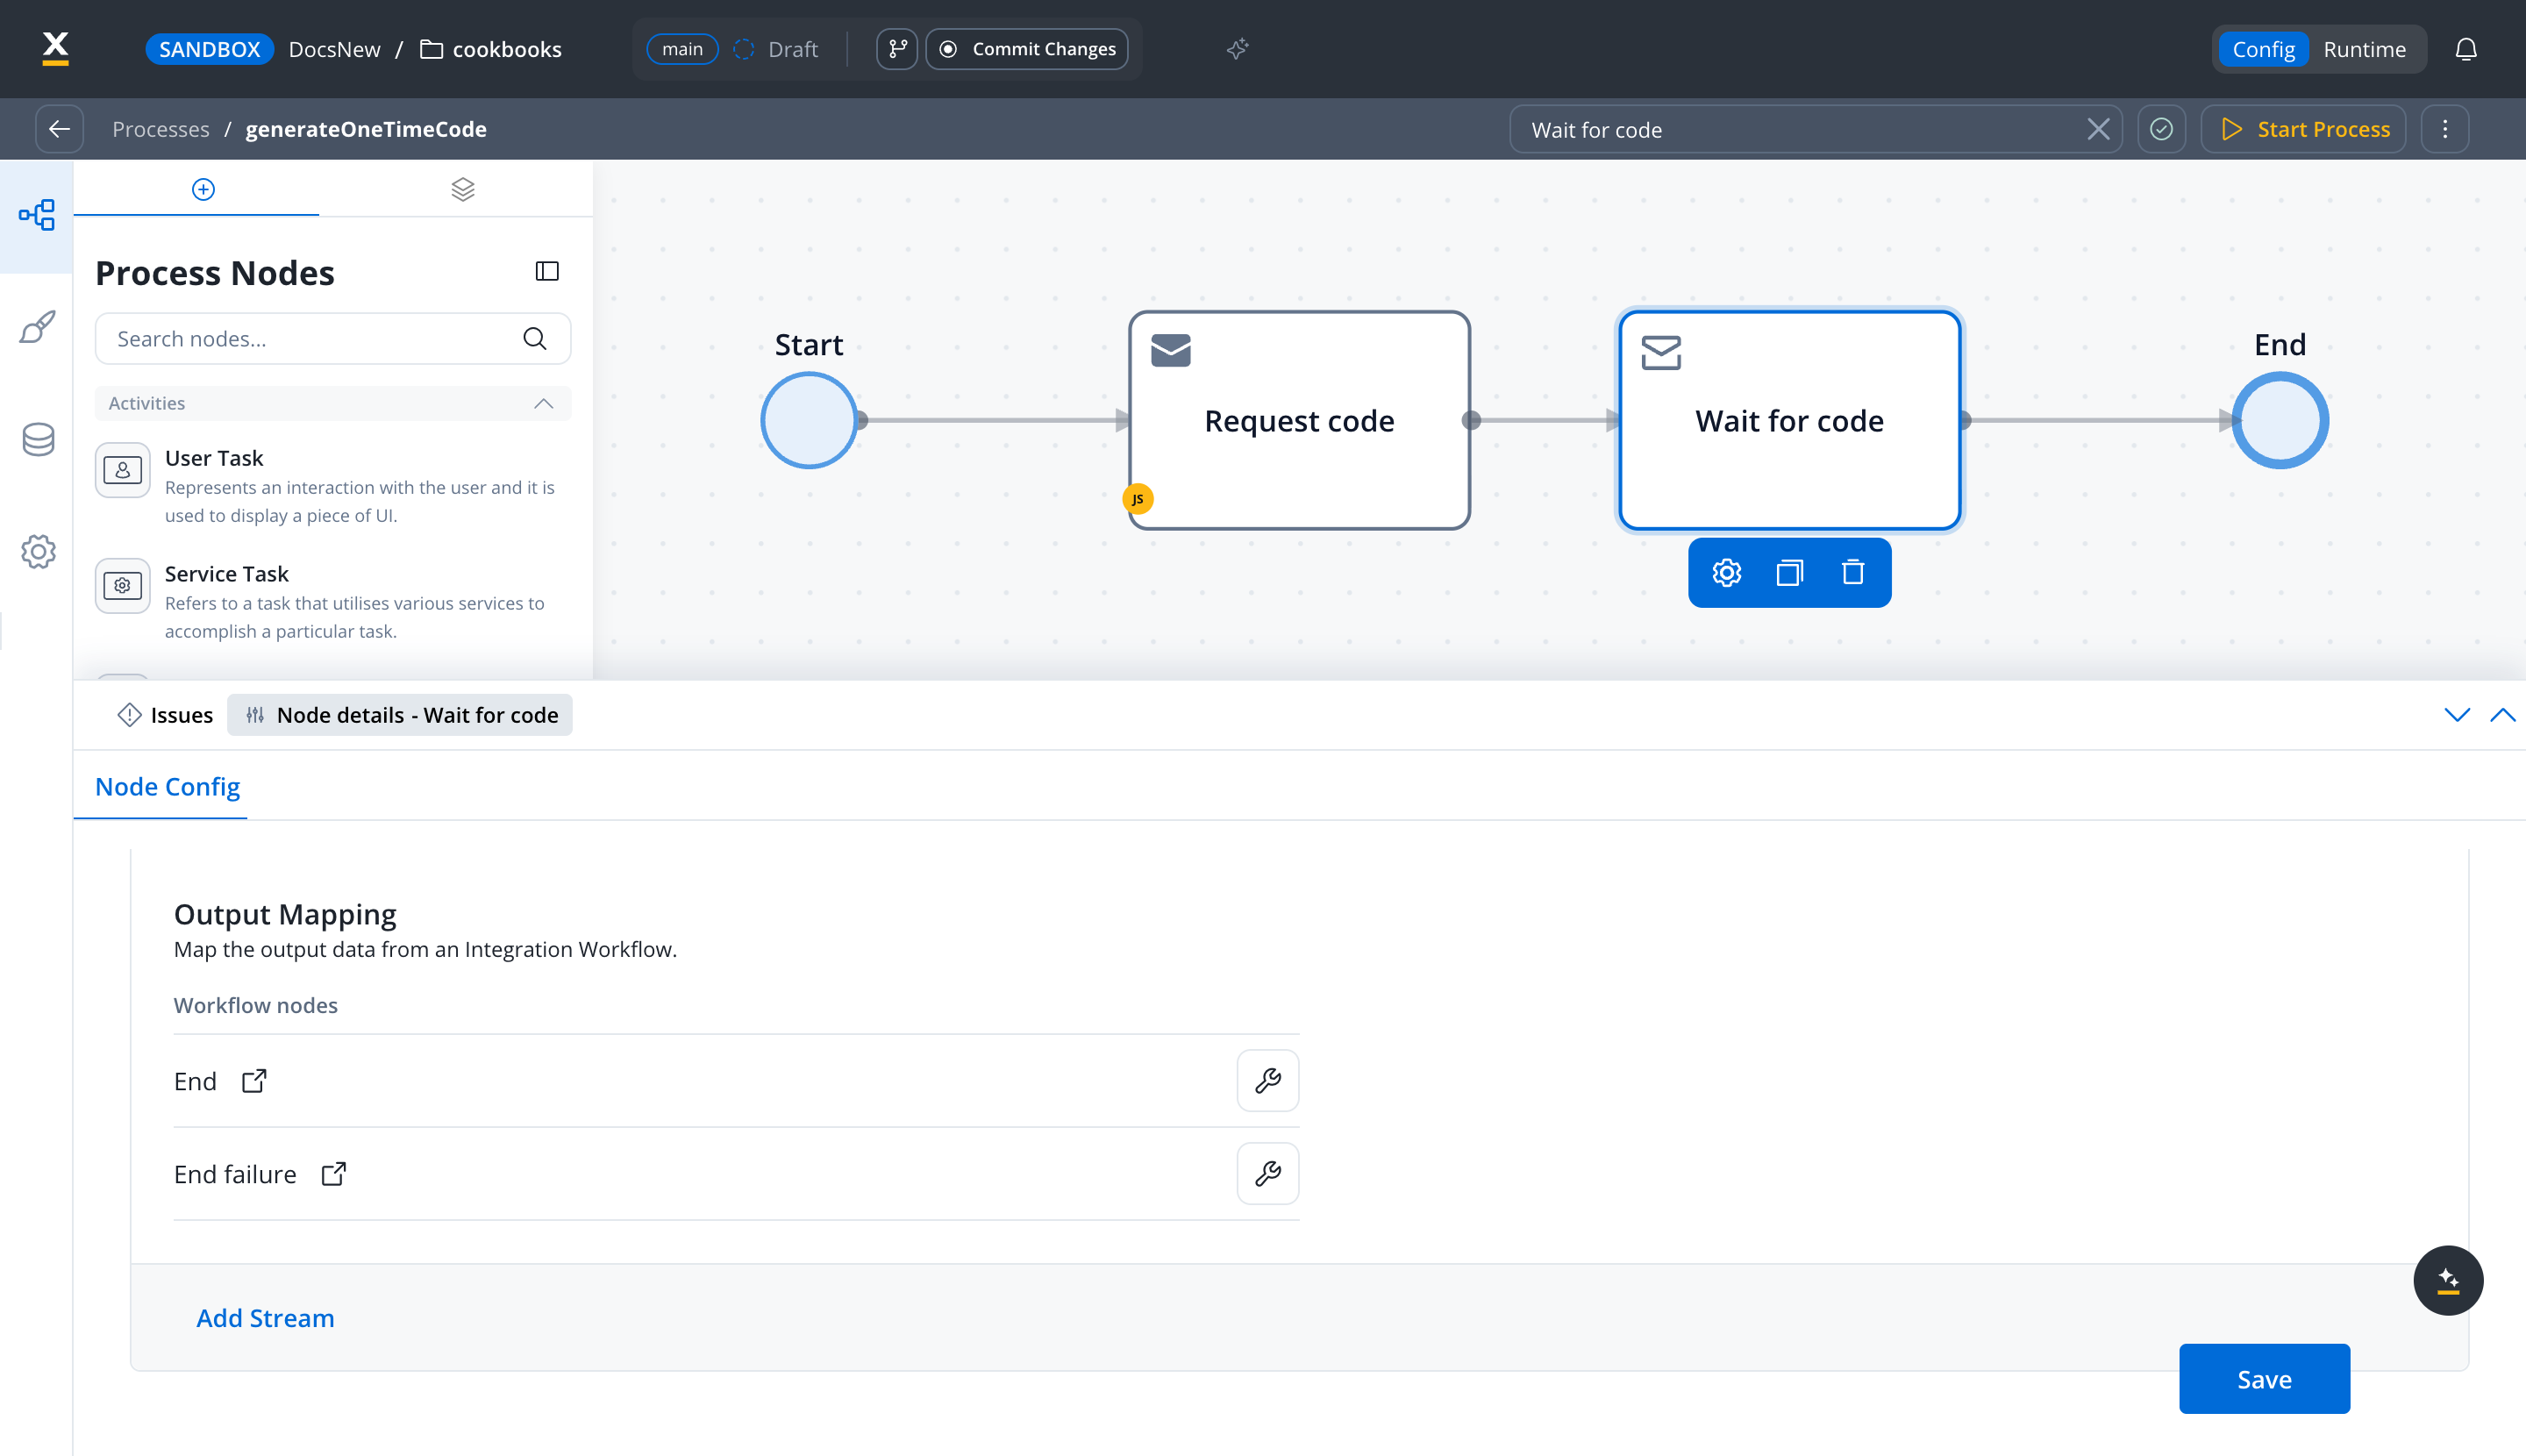
getNumber.3
Map the output
Open the Output Mapping for the workflow’s success End node and map the workflow output to the process attribute that should receive it - for example 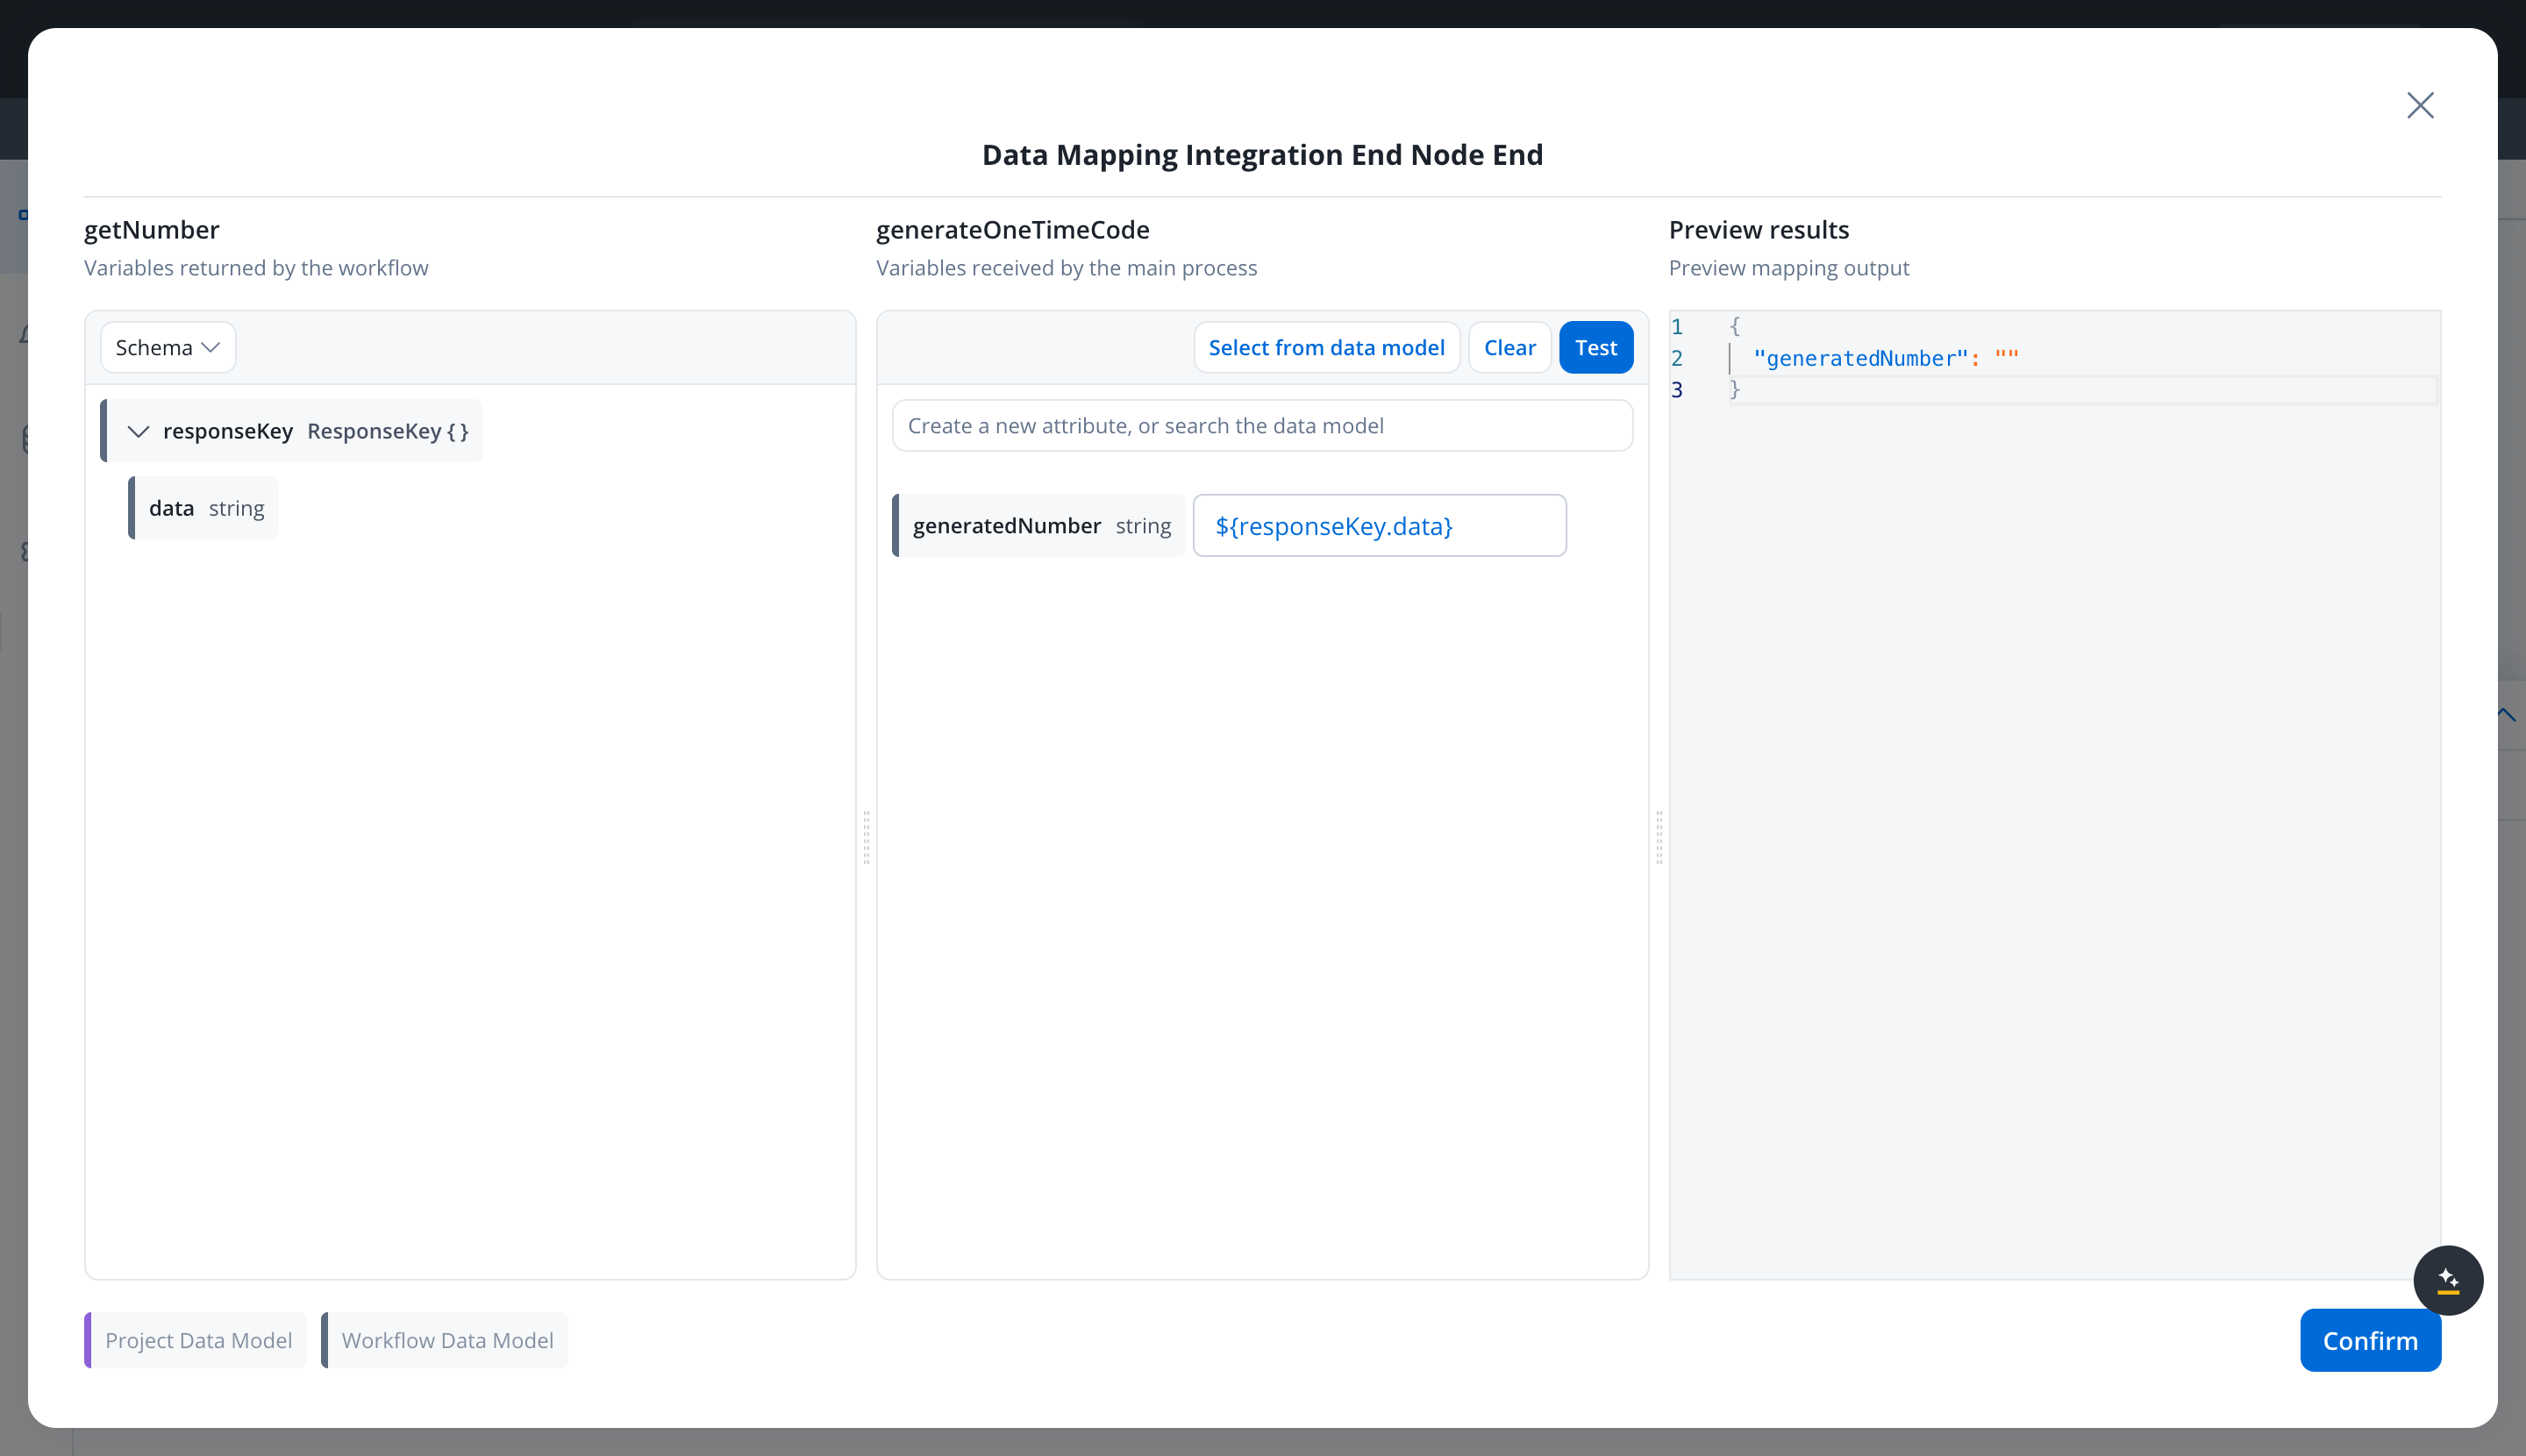
generatedNumber. Click Test to preview the mapped result, then Update to store the mapping.4
Save the node
Save the Receive Message Task itself. The mapping is persisted only when the node is saved.
Step 6: Run it end to end
Start a process instance and let it pass the Send Message Task. When the Receive Message Task completes, the instance data holds the code undergeneratedNumber - every node after it can read the value, display it in the UI, or branch on it.
To see the round trip from the workflow’s side, open the workflow’s run details: each node shows the exact input it received and the output it produced, so you can watch responseKey.data travel from the REST node through the End node.
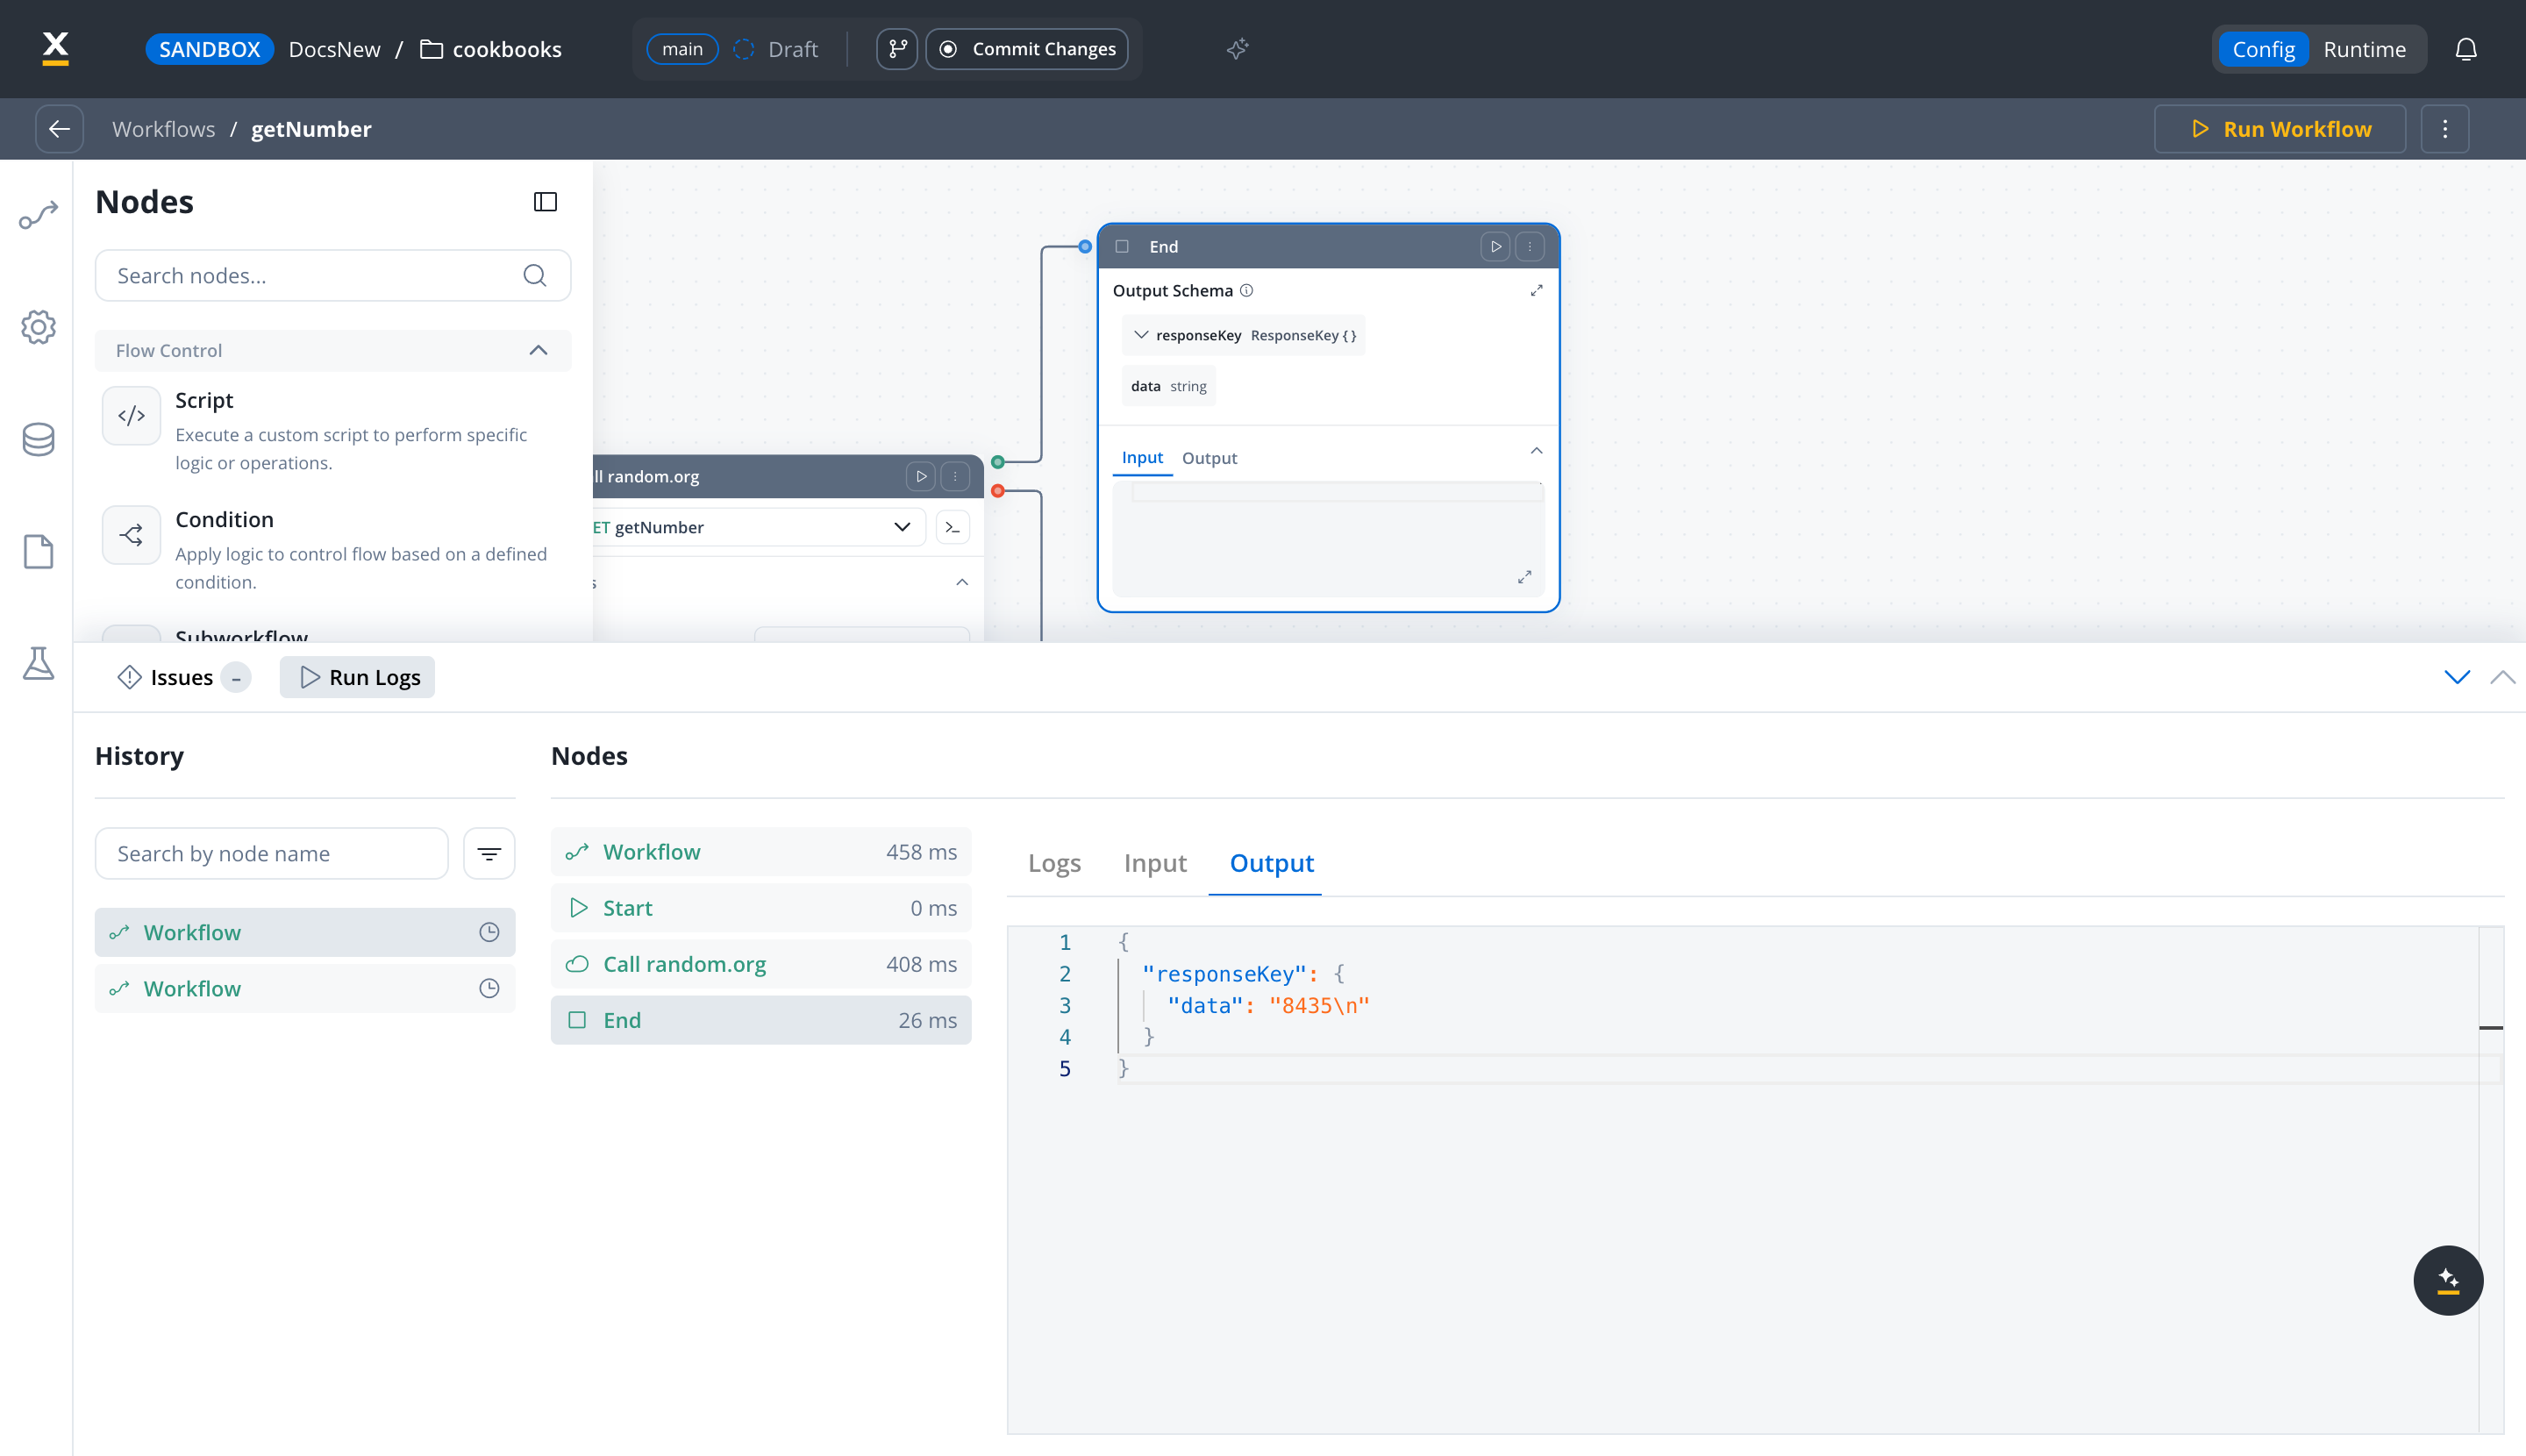
You built a reusable data source, a workflow with a declared output contract, and a process that delegates the call and maps the result - the pattern behind most FlowX integrations.
When it fails
Each hop fails with its own signature. All three are documented in depth in the error glossary:Related resources
Build your first workflow
The conceptual introduction to data sources, workflows, and process actions.
Integration Designer
The full reference: endpoint parameters, authorization, variables, and every workflow node.
Send and Receive Message Tasks
Node configuration in detail, including data stream topics and mapping modes.
Error glossary: integration workflow output
The three runtime errors of this pattern, with causes and fixes.