The Build feature allows for the creation of deployable packages of a project, encapsulating all its resources into a single unit.
A build is a snapshot of a specific project version, packaged and prepared for deployment to a runtime environment. The concept of builds plays a crucial role in ensuring that the correct version of a project, with all its configurations and dependencies, runs consistently across different environments (for example, Dev, UAT, Production).
You can create multiple versions of a project before creating a build. You can create a build for any committed project version. Once created, a build cannot be edited—you’ll need to create a new project version and generate a new build to incorporate changes.
Project Version is the editable snapshot of a project’s state at a specific point in time. It contains all the resources (like processes, integrations, templates, etc.) and configurations grouped within the project.
A Build is the deployable package of a project version. It is the compiled and immutable state that contains all the project resources transformed into executable components for the runtime environment.
Single Version Rule
A build can only represent a single version of a project. If you have multiple versions of a project, each one can have a unique build. This ensures that you can clearly manage which version of the project is running in a specific environment without conflicts.
Consistency and Deployment
Builds ensure that when you deploy a project to a different environment (like moving from Dev to UAT), the exact configuration, processes, templates, integrations, and all associated resources remain consistent.
Builds are immutable—once created, a build cannot be altered. Any updates require creating a new version of the project and generating a new build.
To create a build from a committed project version:
1
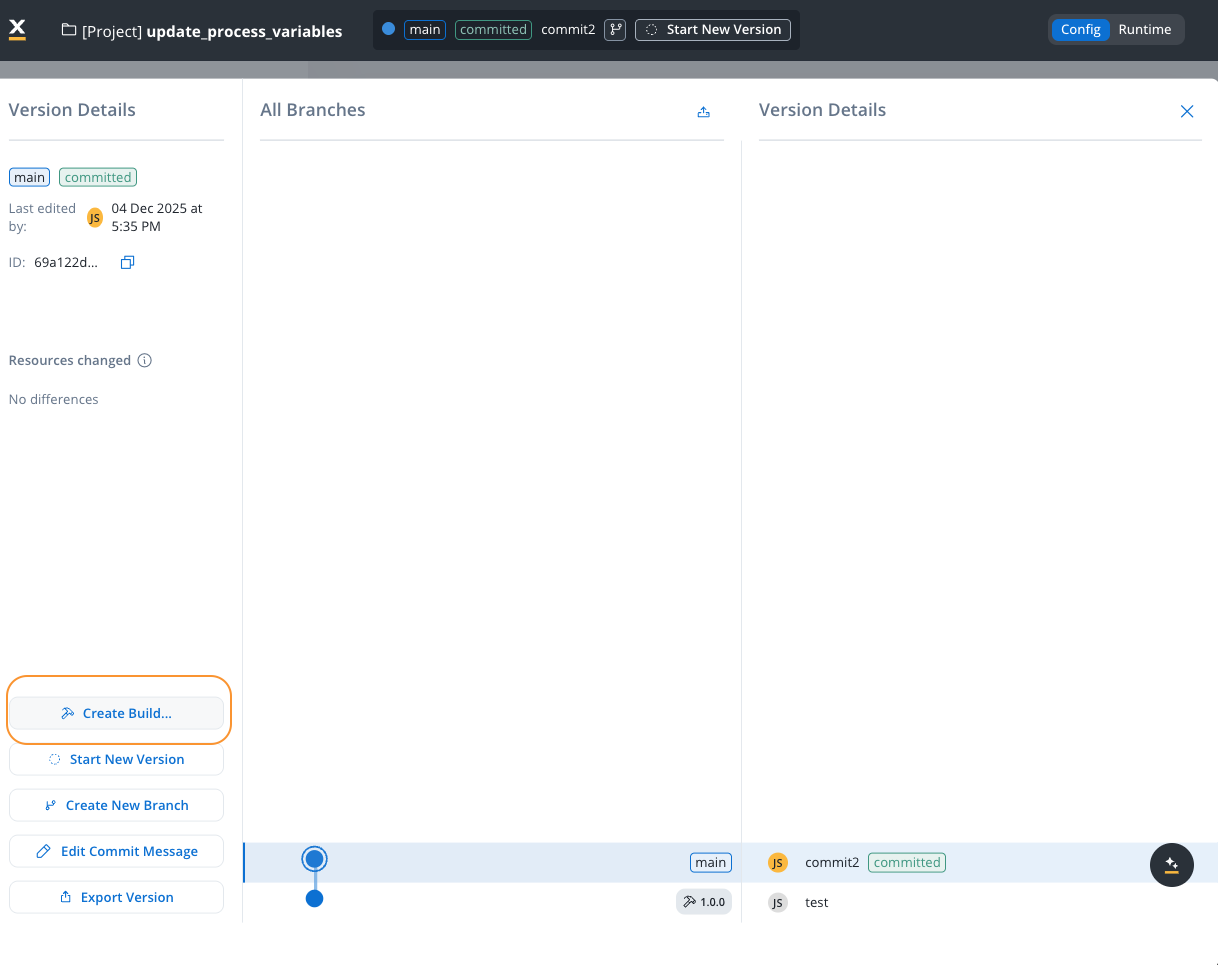
Navigate to Version Details
Access the version details panel for the committed version you want to build. You can only create builds from committed versions, not from draft (WIP) versions.
2
Open Create Build Dialog
Click the Create Build… button in the version details panel. This opens the build creation modal.
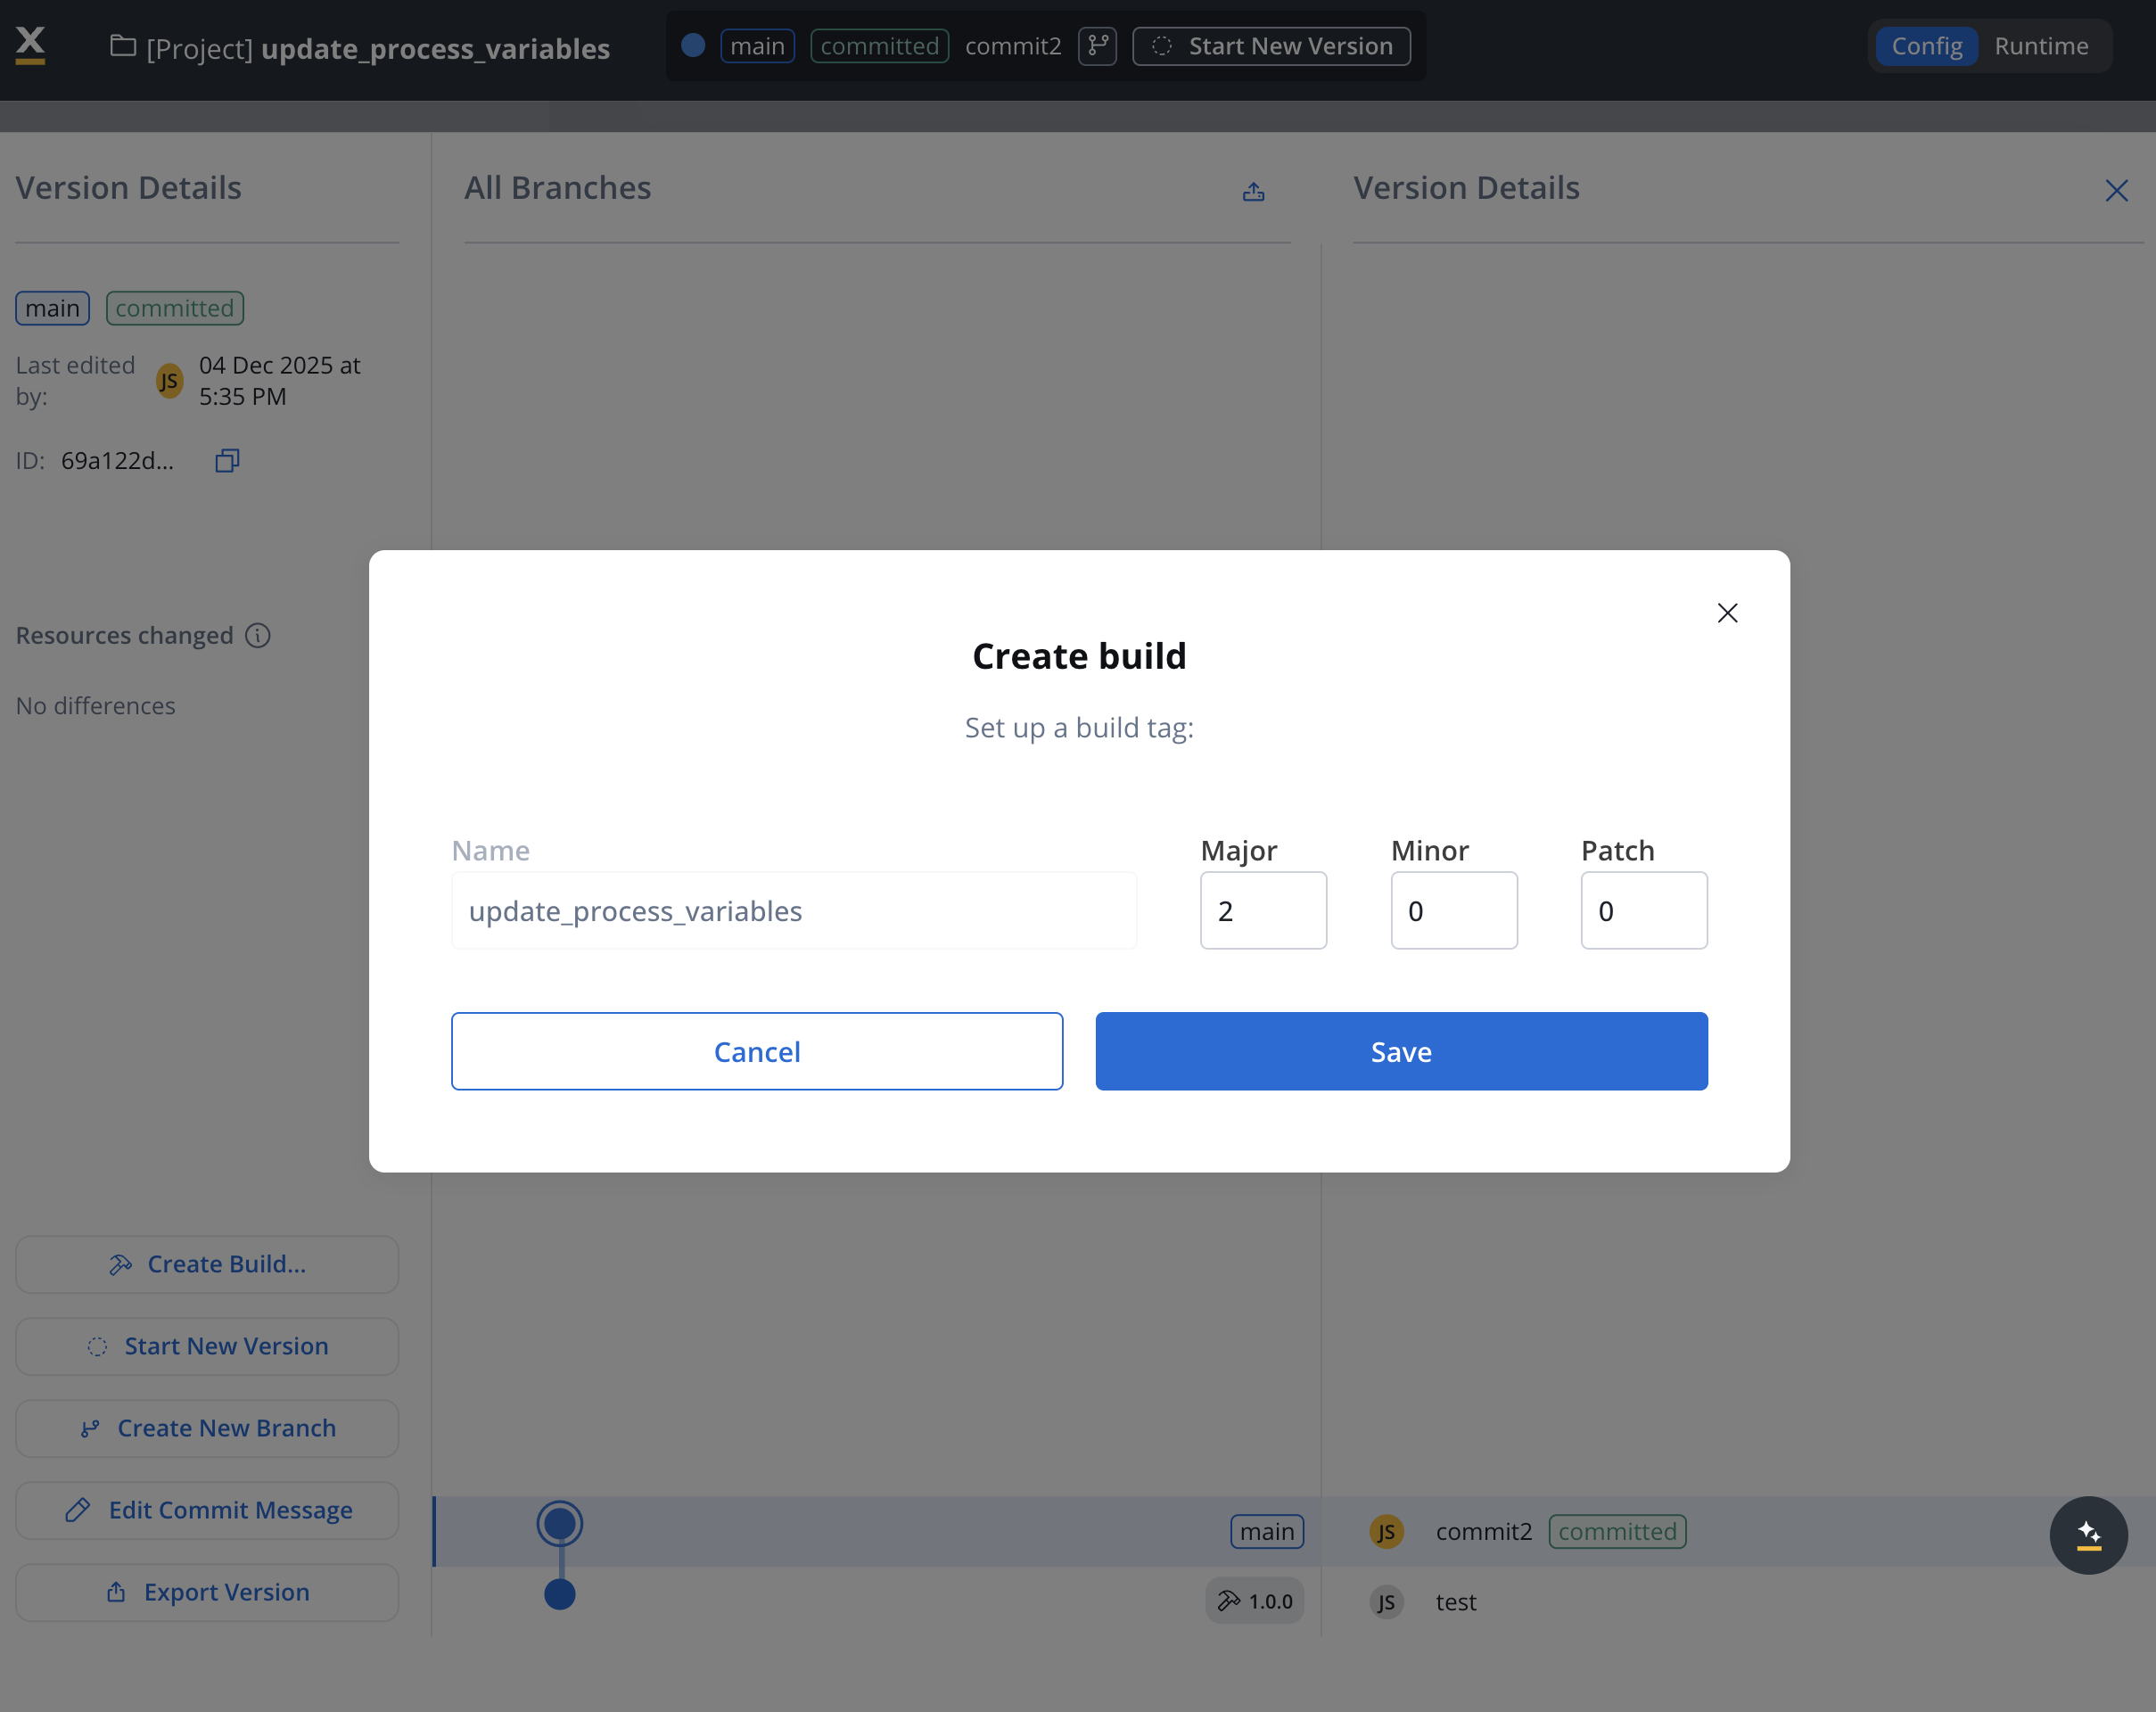
Create Build
3
Configure Build Settings
In the Create build modal, configure the following settings:
Name: The build name (defaults to the project name). This helps identify the build in the builds list.
Build Tag Version: Set the semantic version for this build:
Major: Major version number (for example, 1)
Minor: Minor version number (for example, 0)
Patch: Patch version number (for example, 0)
The build tag follows semantic versioning format (for example, 1.0.0) and helps track different builds of the same project version.
4
Save the Build
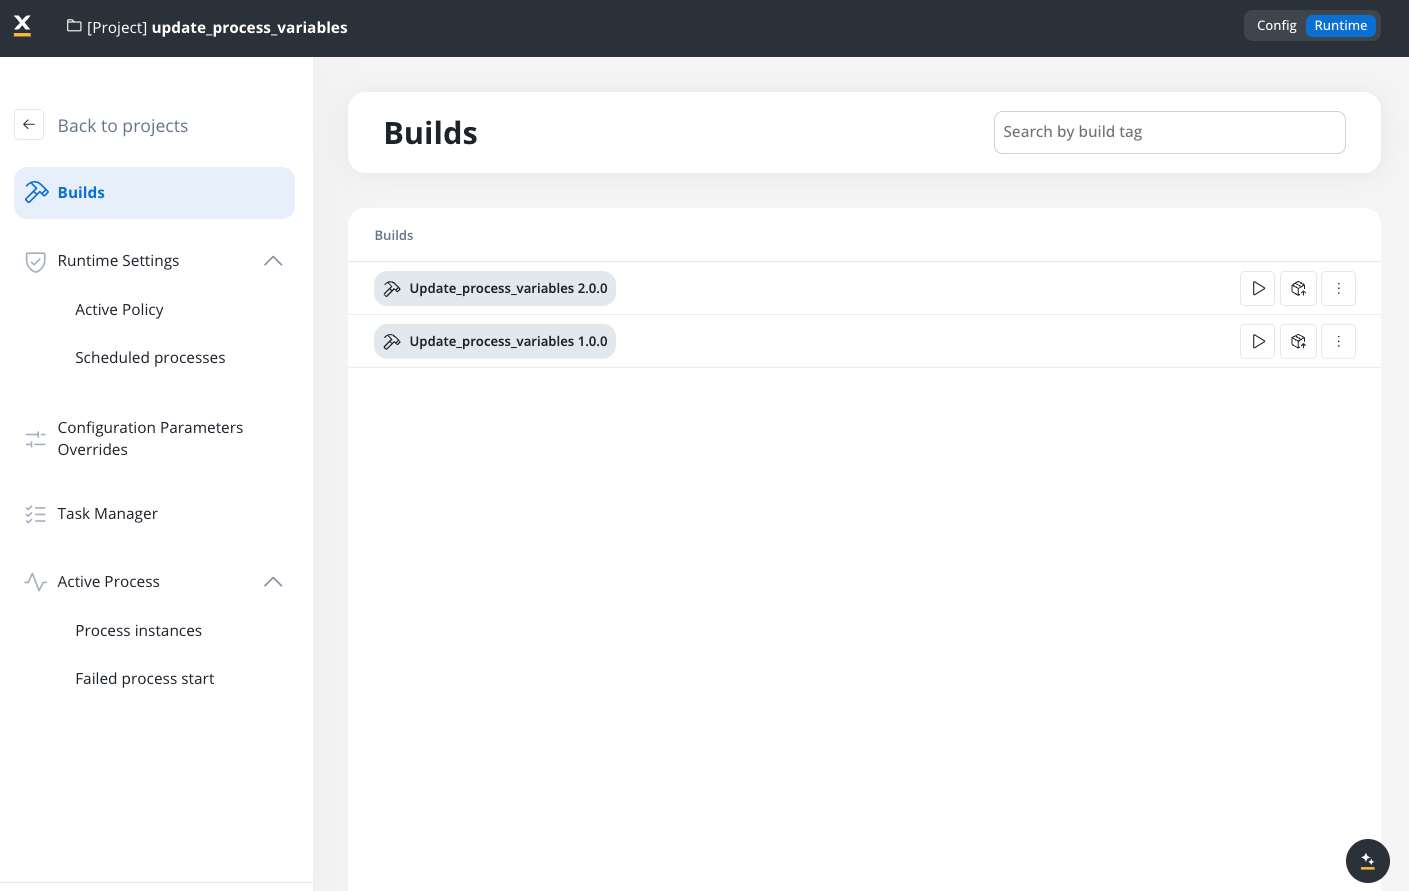
Click Save to create the build. The build is now available in the Builds section and can be deployed to runtime environments.
Each build includes a checksum or identifier to verify its integrity. This ensures that the deployed build matches the expected configuration and no changes have been made post-build.
Runtime Dependency
The runtime environment relies on builds to determine the active project configuration. This means the runtime does not directly interact with the editable project versions but uses builds to maintain stability and reliability.
Version Control
Builds are version-controlled, and each build corresponds to a specific project version. This means you can trace exactly which project configuration is active in a particular environment at any time.
Consistency Across Environments: Builds ensure that the same version of an project runs in different environments, avoiding discrepancies between development and production.
Reduced Errors: Immutable builds reduce the risk of runtime errors caused by unexpected changes.
Simplified Rollbacks: If an issue is detected with a current build, previous builds can be deployed quickly, providing an efficient rollback strategy.
Simplified Deployment: Builds allow for a straightforward deployment process, reducing the complexity of transferring configurations and resources between environments.
The Builds section provides a centralized interface for viewing and managing all builds for your project. Access this section by navigating to your project, switching to Runtime mode, and selecting Builds from the navigation menu.
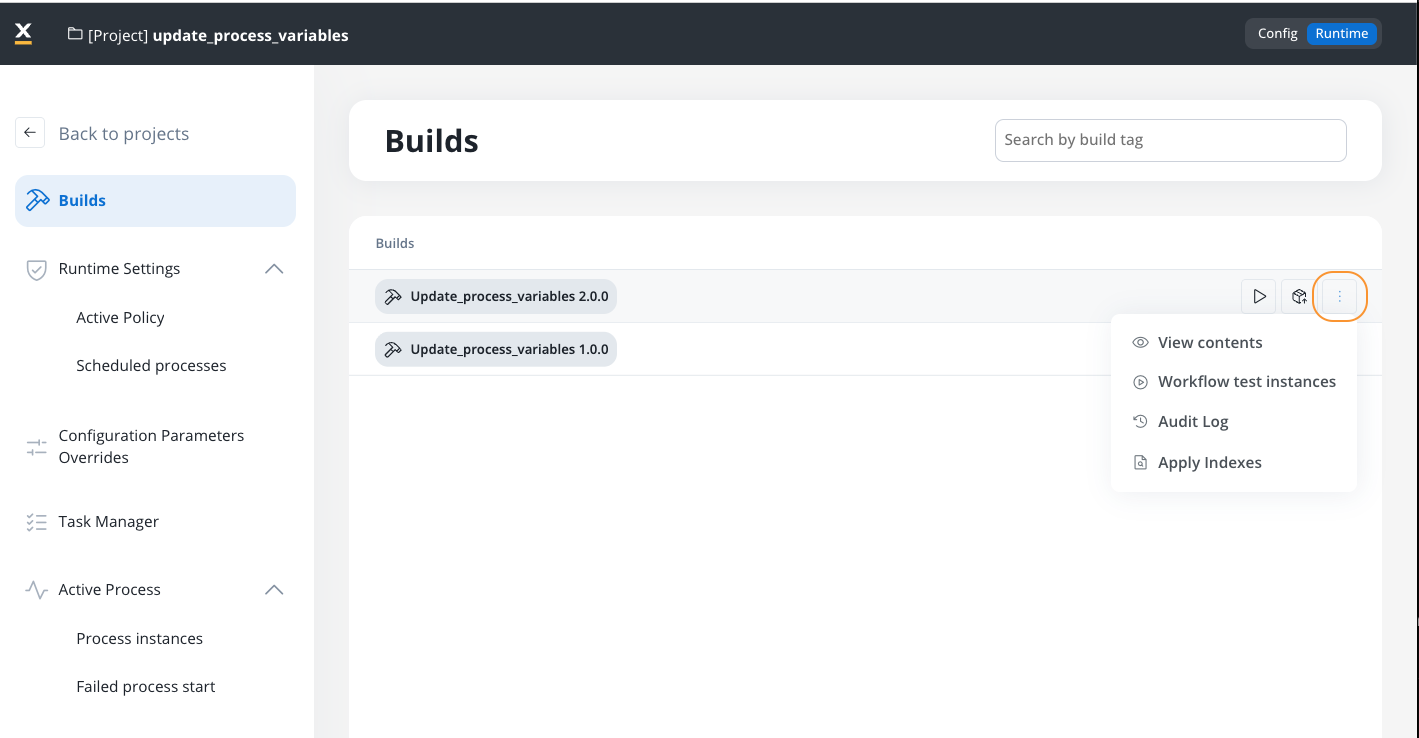
Indexes defined on FlowX Database collections during config time are not automatically applied to the actual MongoDB database. To apply them, use the Apply Indexes action from the build’s context menu (More options → Apply Indexes).Indexes are applied from the build’s snapshot, not from your current configuration. If you add or change indexes, create a new build to capture them and run Apply Indexes on that build. If the indexes are unchanged, you don’t need to re-apply them for every new build — once applied, they stay on the database until you change them or use Drop Indexes.
Only one build per project or library can have indexes applied at a time.
Applying indexes on a new build replaces any previously applied indexes that differ from those in the new build.
To remove all applied indexes from a build, use Drop Indexes from the same menu. Dropping indexes may impact existing query performance.
Use the Search by build tag field to quickly find specific builds by their version tag or name. This is particularly useful when managing multiple builds for the same project.
You can export builds directly from the Builds section. This is useful when you want to transfer a specific build (rather than a version) between environments or workspaces.
1
Navigate to Builds Section
Open FlowX.AI Designer and go to the Projects section
Select your project and navigate to Runtime and then to the Builds section
2
Select Build to Export
Locate the build you want to export in the builds list
Click the Export icon (box with upward arrow) for the desired build
3
Complete Export
The build export follows the same process as version export, including the binary files option. The exported build can be imported into other environments or workspaces.
Each build contains a manifest that lists all the resources included, their version IDs, and their resource definitions.
Metadata helps identify which project version the build is derived from, providing traceability.
Separation of Design and Runtime
Builds serve as a bridge between the design (config) view and the runtime view. The config view is where changes are made and managed, while the runtime view uses builds to execute stable, tested versions of projects.
Storage
Builds are stored in a dedicated storage system to ensure they are separate from the editable project versions. This storage supports easy retrieval and deployment of builds.
Imagine you have a project for customer onboarding with multiple processes, templates, and integrations. After completing development and final testing, you:
Submit changes to create Version 1.0 of the project.
Create a build for Version 1.0.
Deploy this build to the UAT environment for final stakeholder review.
If any adjustments are needed, you go back to the project, make changes, and submit them as Version 1.1.
Create a new build for Version 1.1, ensuring that the changes are encapsulated separately from the previous version.
Once everything is approved, you can publish Version 1.1 Build to the Production environment, ensuring all environments are aligned without manual reconfiguration.
The Build feature is essential for managing projects across multiple environments. It provides a clear and organized pathway from development to deployment, ensuring consistency, integrity, and stability throughout the project’s lifecycle.