What is a project data model?
Key concepts
- Data Model Types
- Data Types & Attributes
FlowX.AI supports several data model layers, each serving different purposes:
Benefits of project data model
Consistency
Ensures data structure consistency across multiple processes and resources
Reusability
Define once, use many times across processes, business rules, and other components
Efficiency
Reduces development time by eliminating duplicate definitions
Maintainability
Centralized management of data structures
Standardization
Promotes the use of common data structures across projects
How to use the project data model
Access the project data model
1
Open FlowX.AI Designer
Open FlowX.AI Designer.
2
Navigate to your project
Select the project where you want to configure the Project Data Model.
3
Select Data Model
Select “Project Data Model” from the project menu.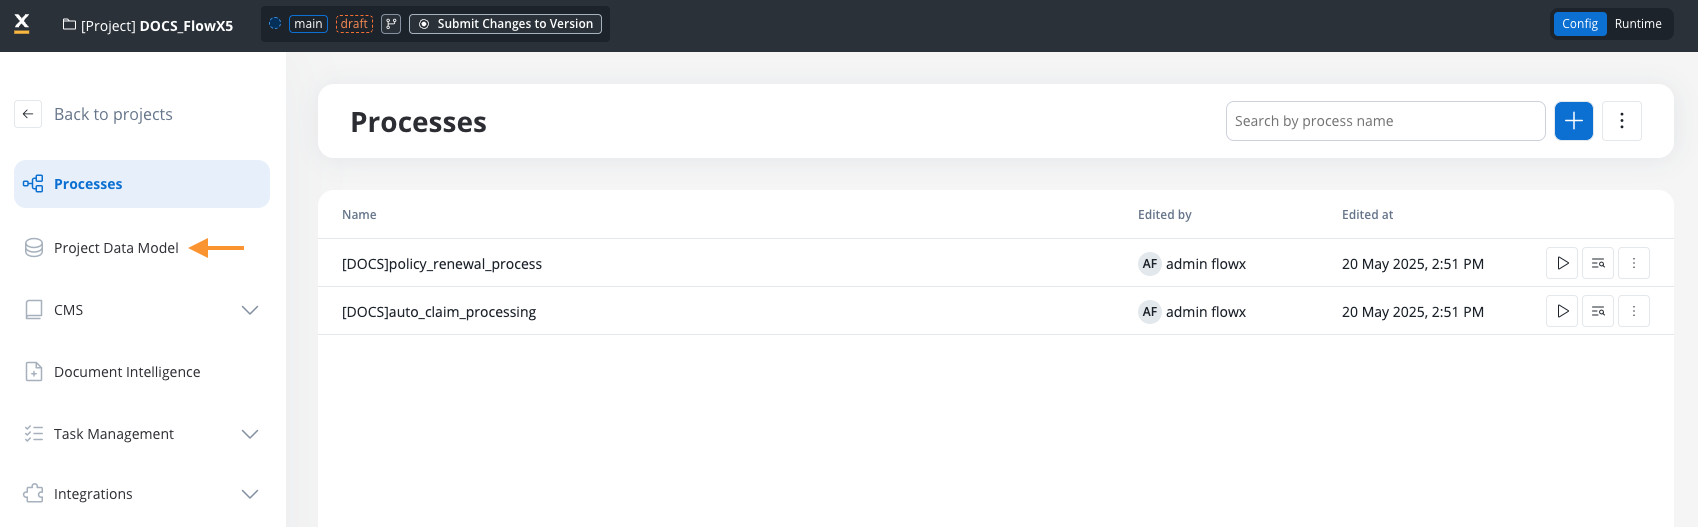
Define a project data model
1
Add a new data type
In the Project Data Model view, click + to add a new data type. A confirmation toast notifies you when the data type is created.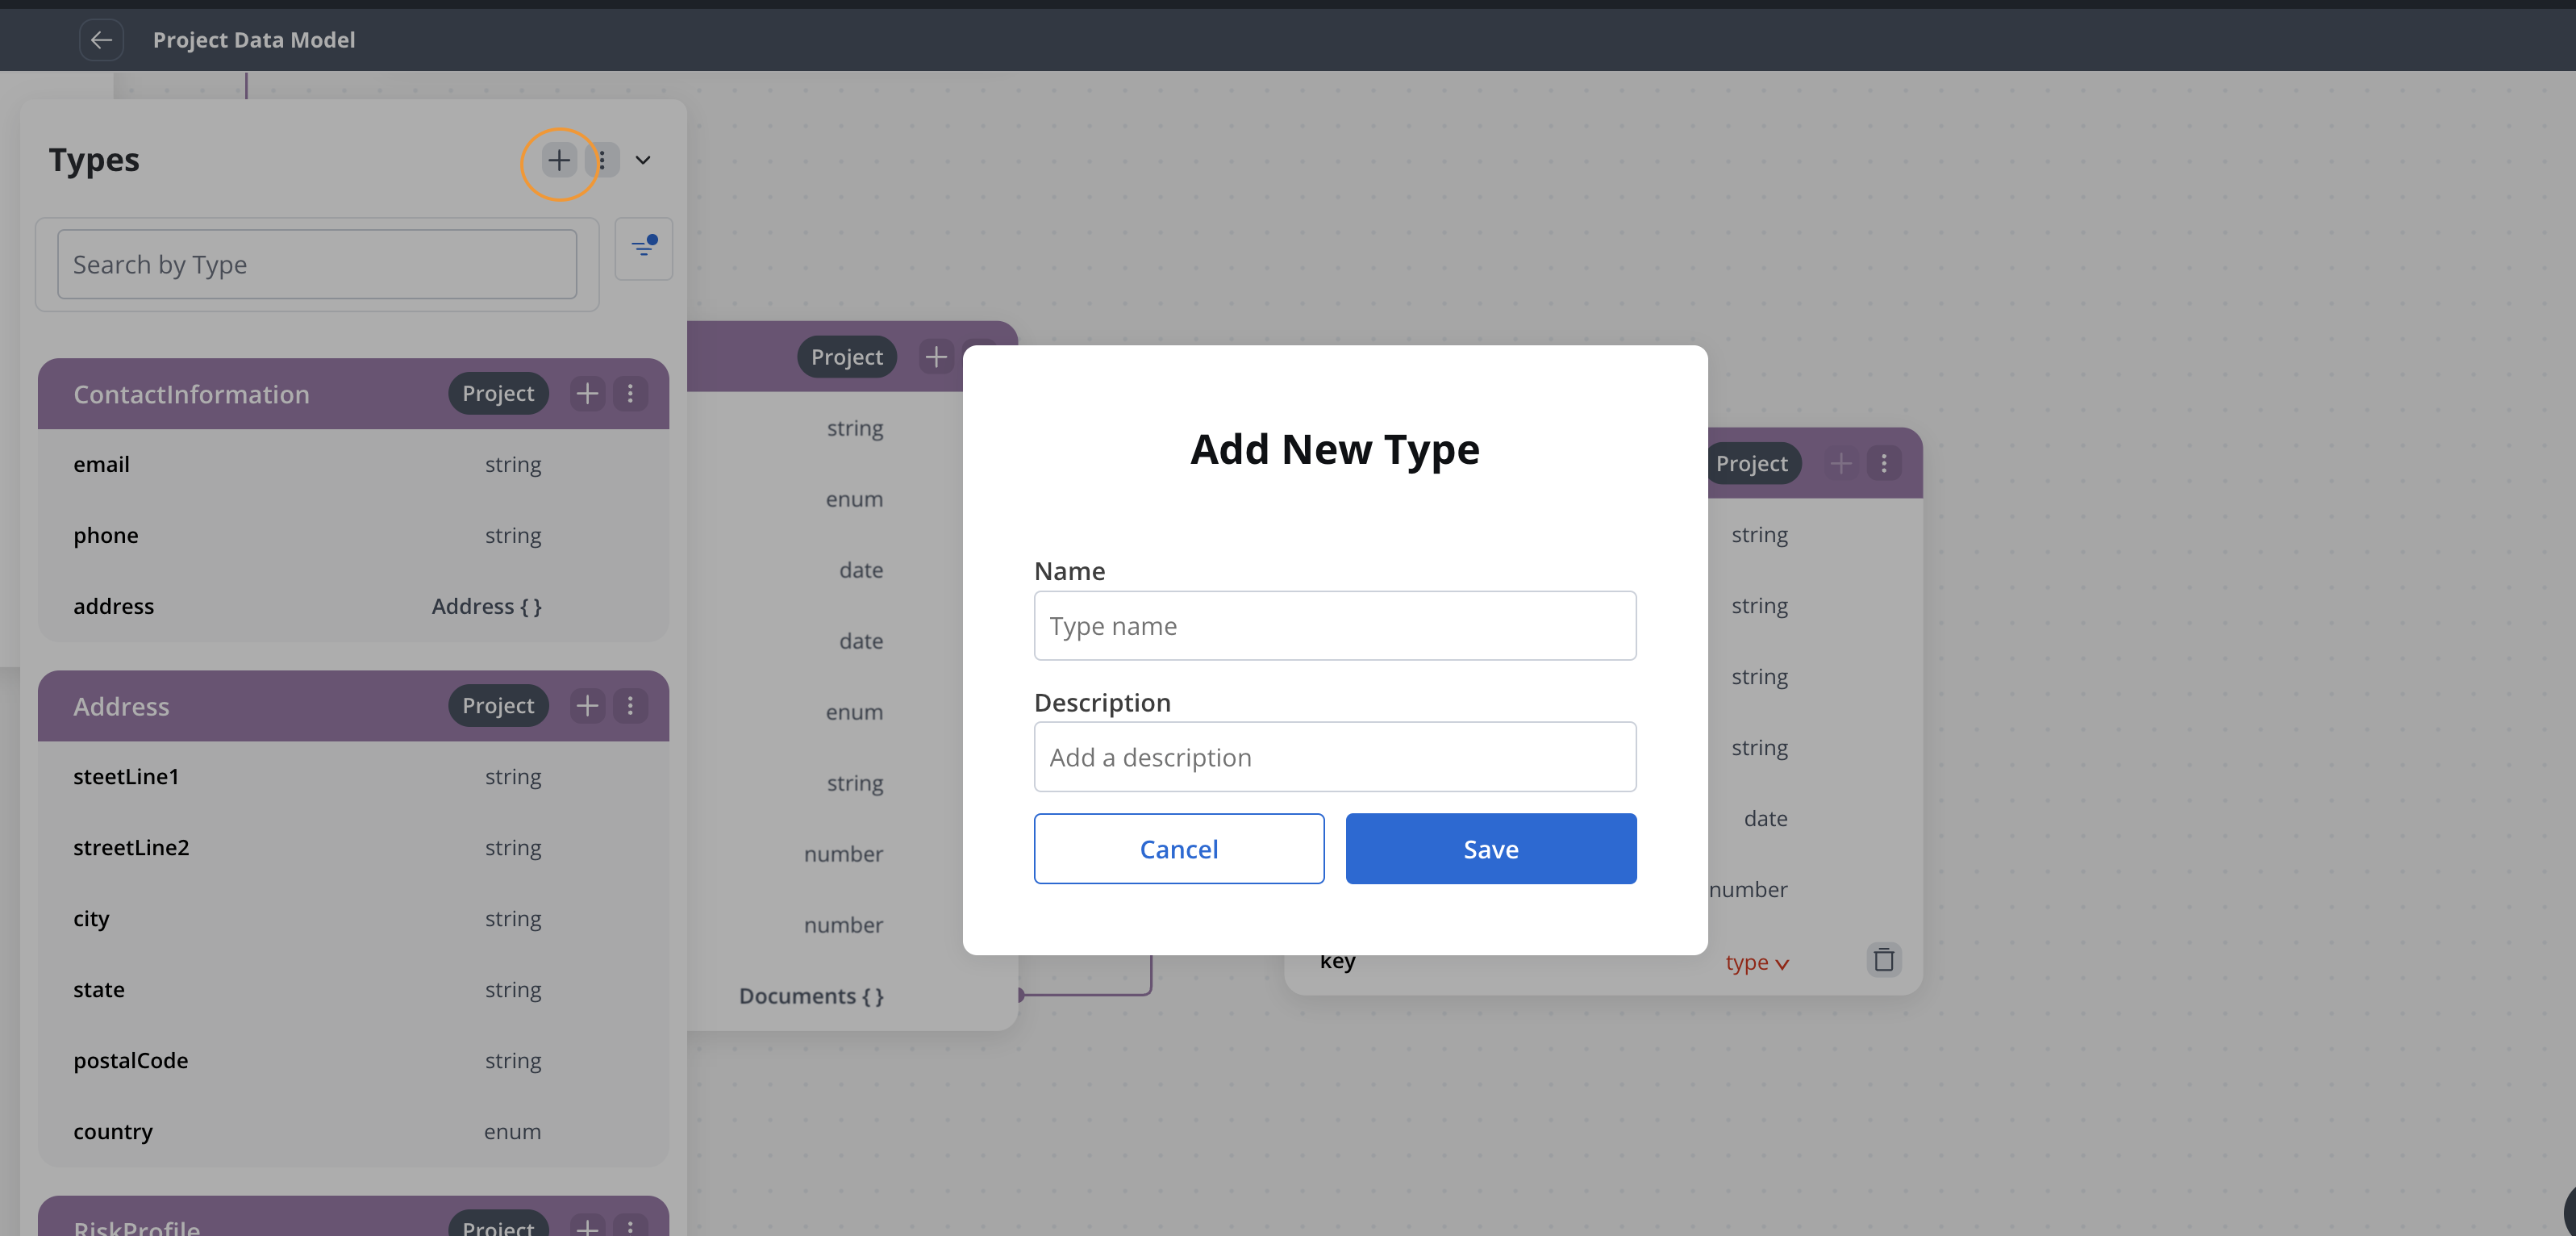
2
Name the data type
Provide a name for the data type.
3
Add attributes
Each data type displays an Add attribute button for creating the first attribute. After the first attribute exists, the button appears only on hover over the data type.When you select an attribute, a settings side panel opens on the right where you can configure: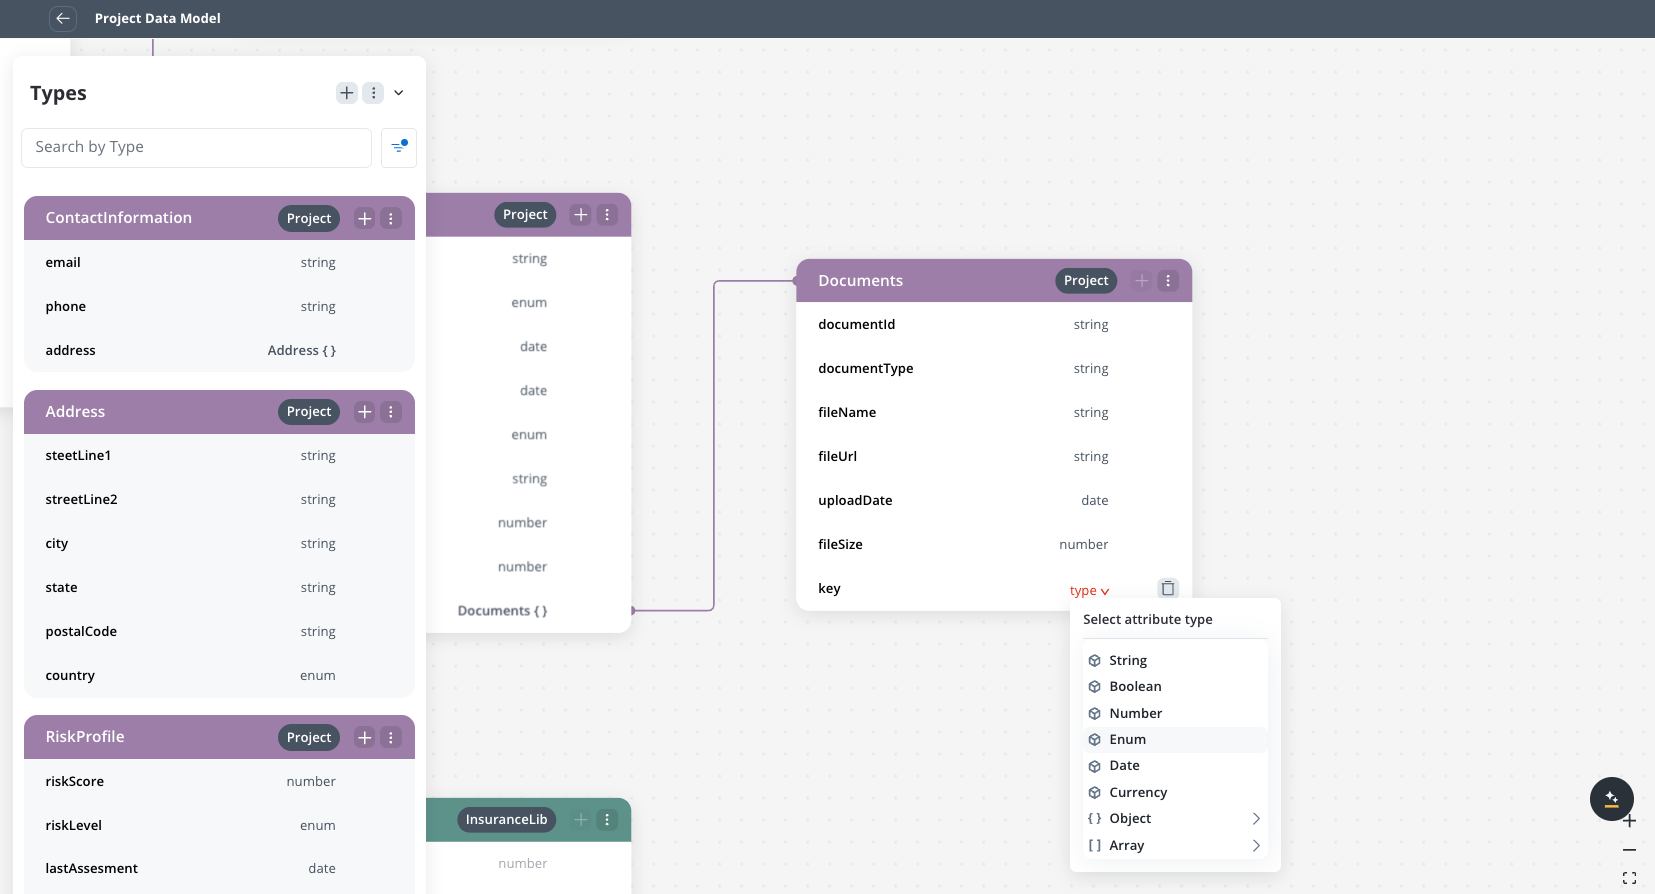
- Attribute name and type (string, number, boolean, object, array, enum)
- Validations, sensitive data, and reporting settings
- Example values for data mapping
Manage data types
Add a data type
- Click + in the Data Types panel.
- Enter the name and properties of the data type.
- Use the inline Add attribute button on the data type to add attributes.
- Save changes.
Edit a data type
1
Select the data type
Select the data type in the Project Data Model.
2
Select an attribute
Click an attribute to open the settings side panel on the right with all configuration options.
3
Edit the attribute
Edit the attribute settings as needed. Changes are saved automatically.
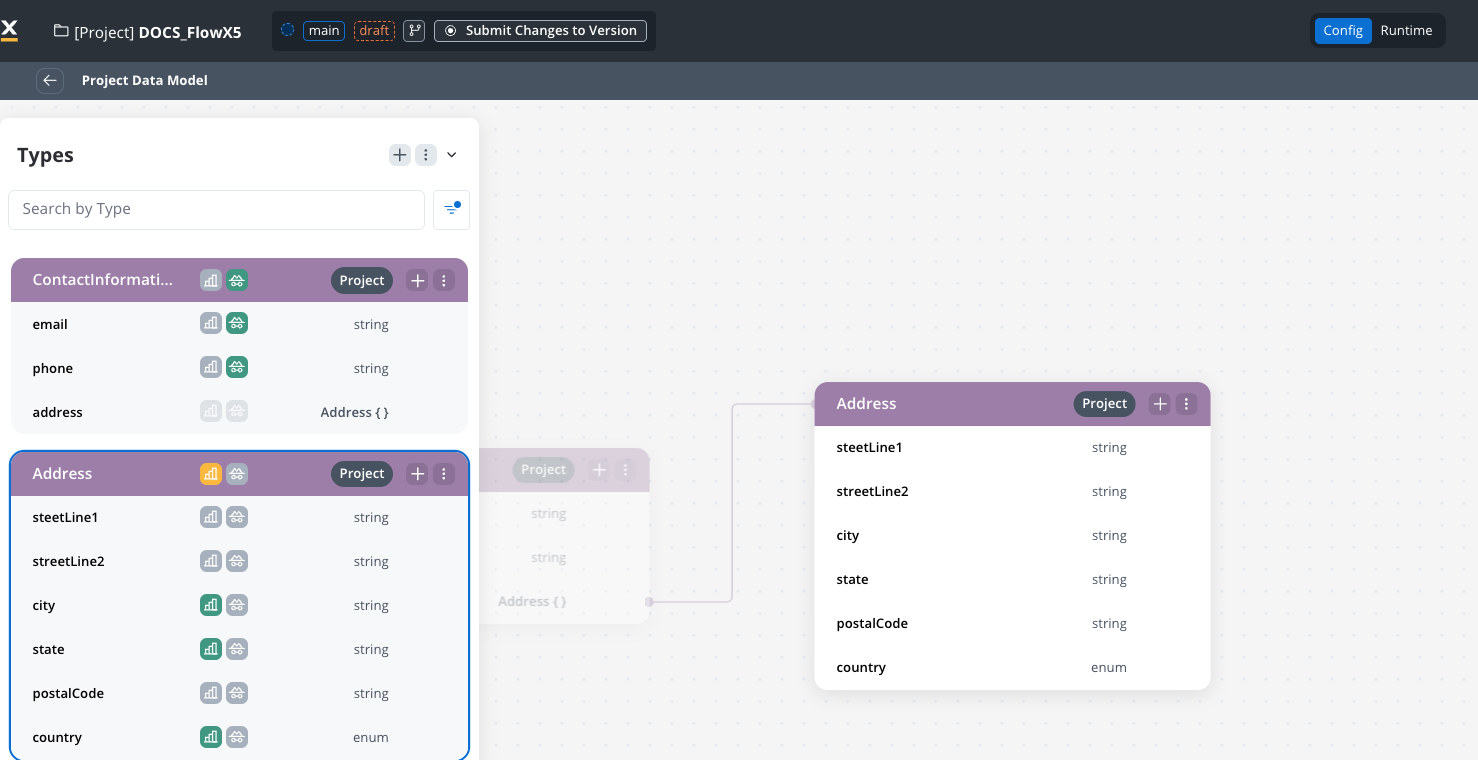
Attribute path
Each attribute displays a path button next to its name. Click it to view the full key path and copy it to your clipboard. This is useful when referencing keys in business rules, UI component bindings, or integration mappings.Changes to data types propagate to all processes referencing them. If a process is using this data type, it will automatically get the updated structure.
Remove a data type
1
Select the data type
Select the data type to remove.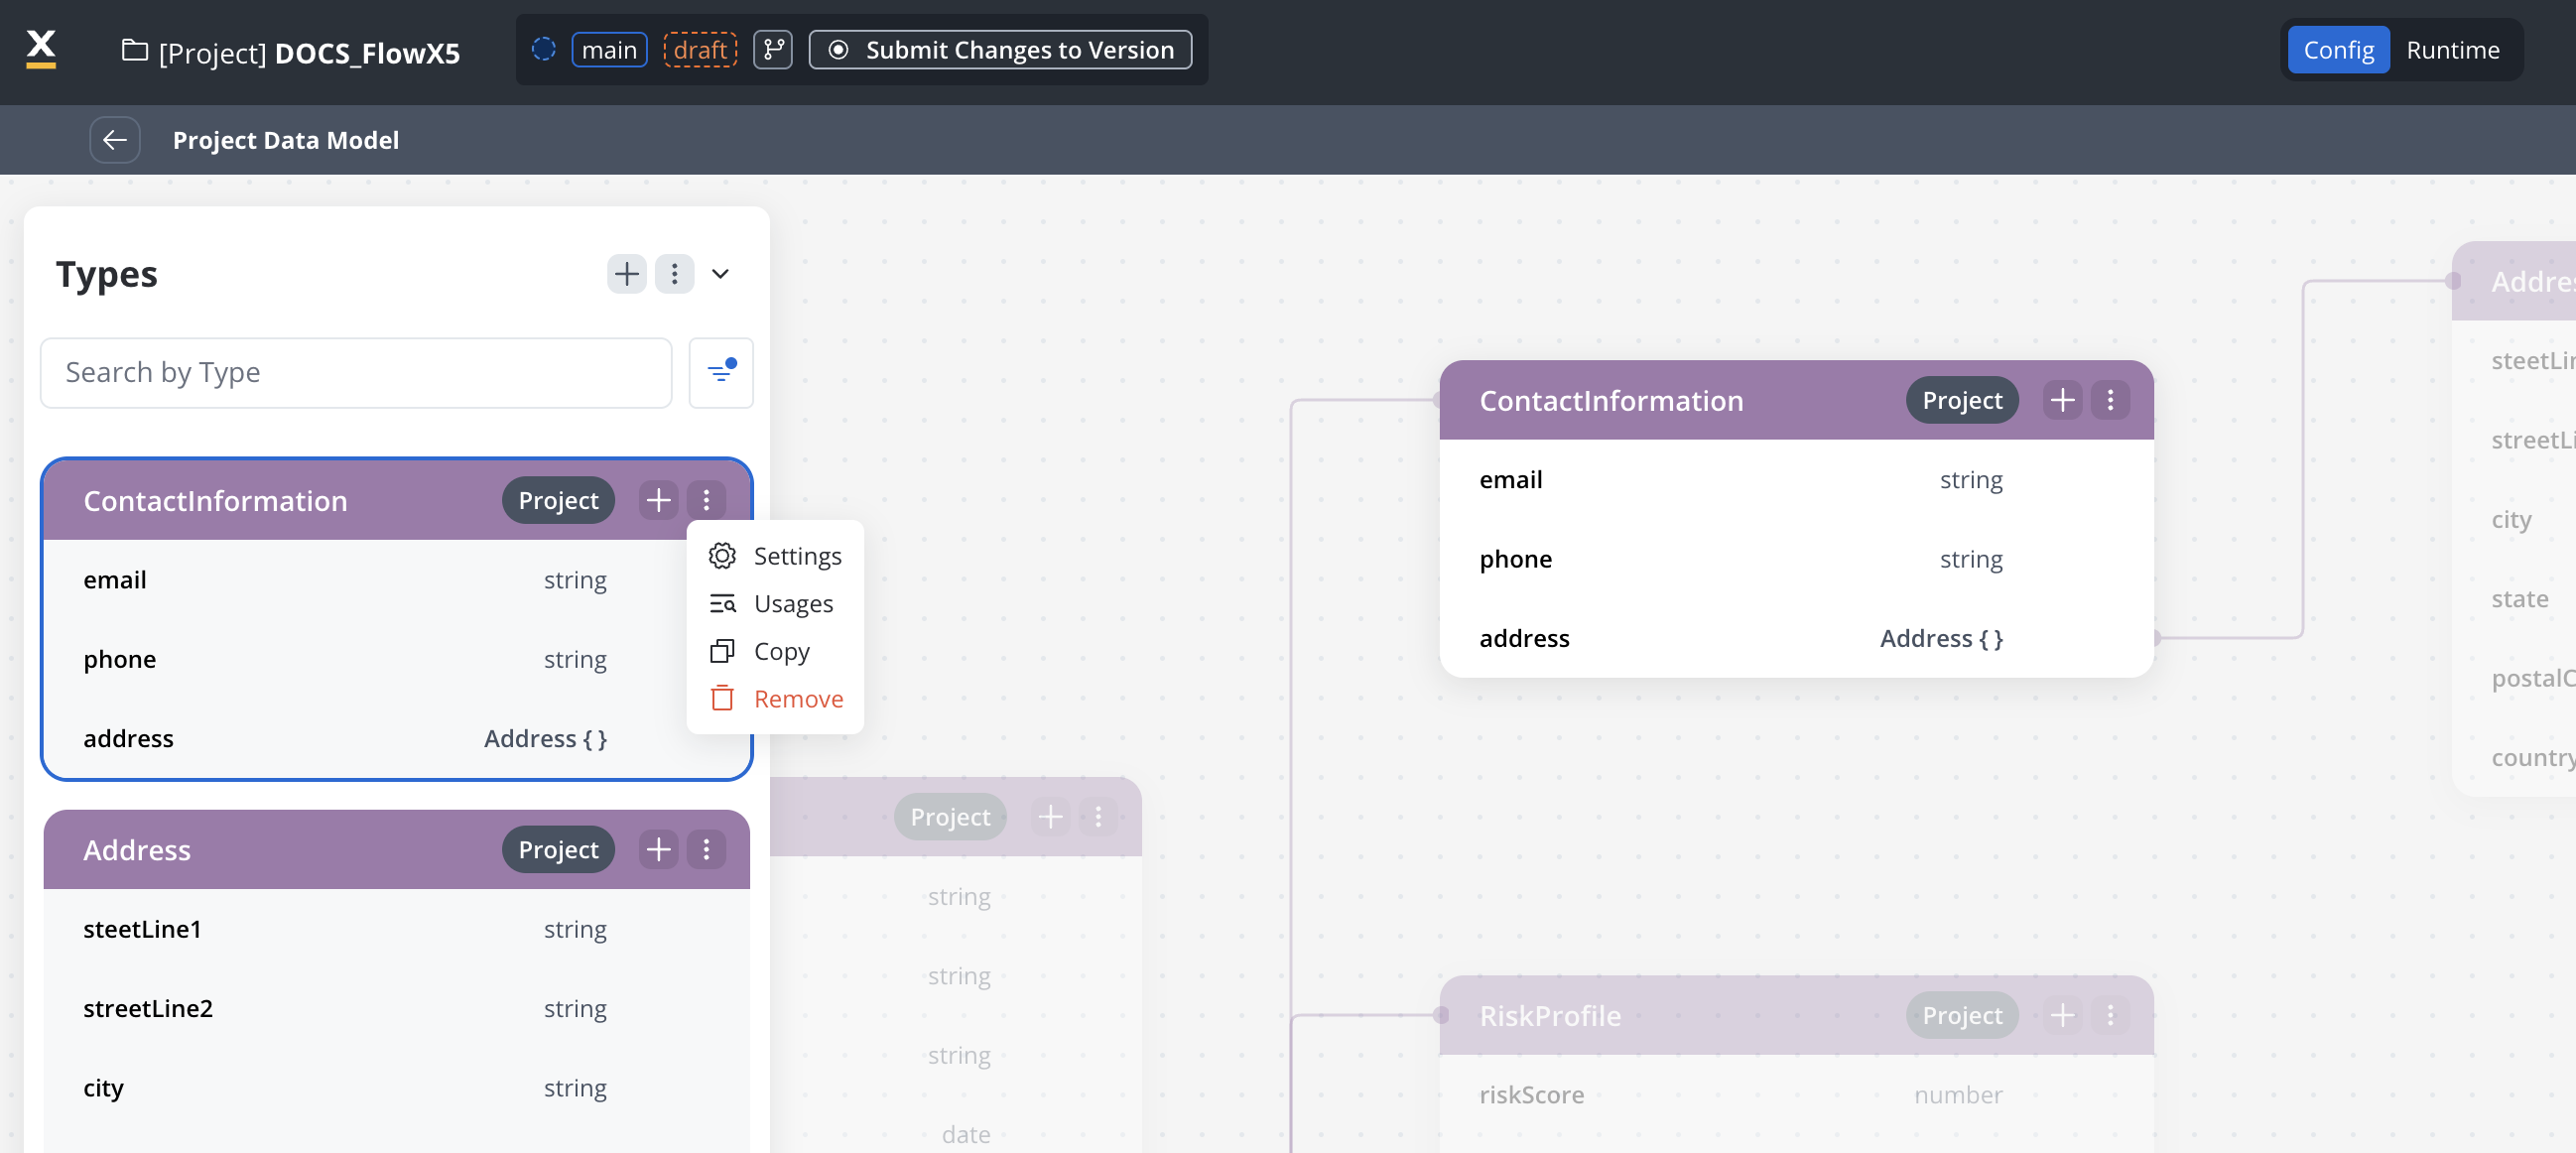
You can either delete an entire object or just a single attribute.
2
Click remove
Click the remove button.
3
Confirm deletion
You can delete the data type even if it’s in use. The system will show you a warning message indicating which processes reference the data type.
If the data type is in use by processes, you will receive a warning message showing which processes reference it. You can still proceed with the deletion, but this may affect the referenced processes.
Working with referenced data types
When a data type from the Project Data Model is used in a Process Data Model:- The Process Data Model will display the referenced data type.
- The referenced data type cannot be modified at the process level.
- Changes to the data type in the Project Data Model will propagate to all referencing processes.
Common scenarios
- Edit a Key
- Remove a Key
- Change Type
1
Access PDM
Navigate to the Project Data Model.
2
Make changes
Make changes to an existing key or attribute.
3
Propagation
The changes automatically propagate to all processes using that key.
4
Updates
Referenced components in processes will be updated to reflect the changes, but UI Designer paths require manual adjustment.
Use the Project Data Model in processes
- Navigate to a process within your project.
- Open the Process Data Model.
- Project data types are available for selection.
- Select the desired project data type to use in your process.
- The data type is added to your Process Data Model, maintaining reference to the Project Data Model.
Work with libraries
Integrate Library Data Models
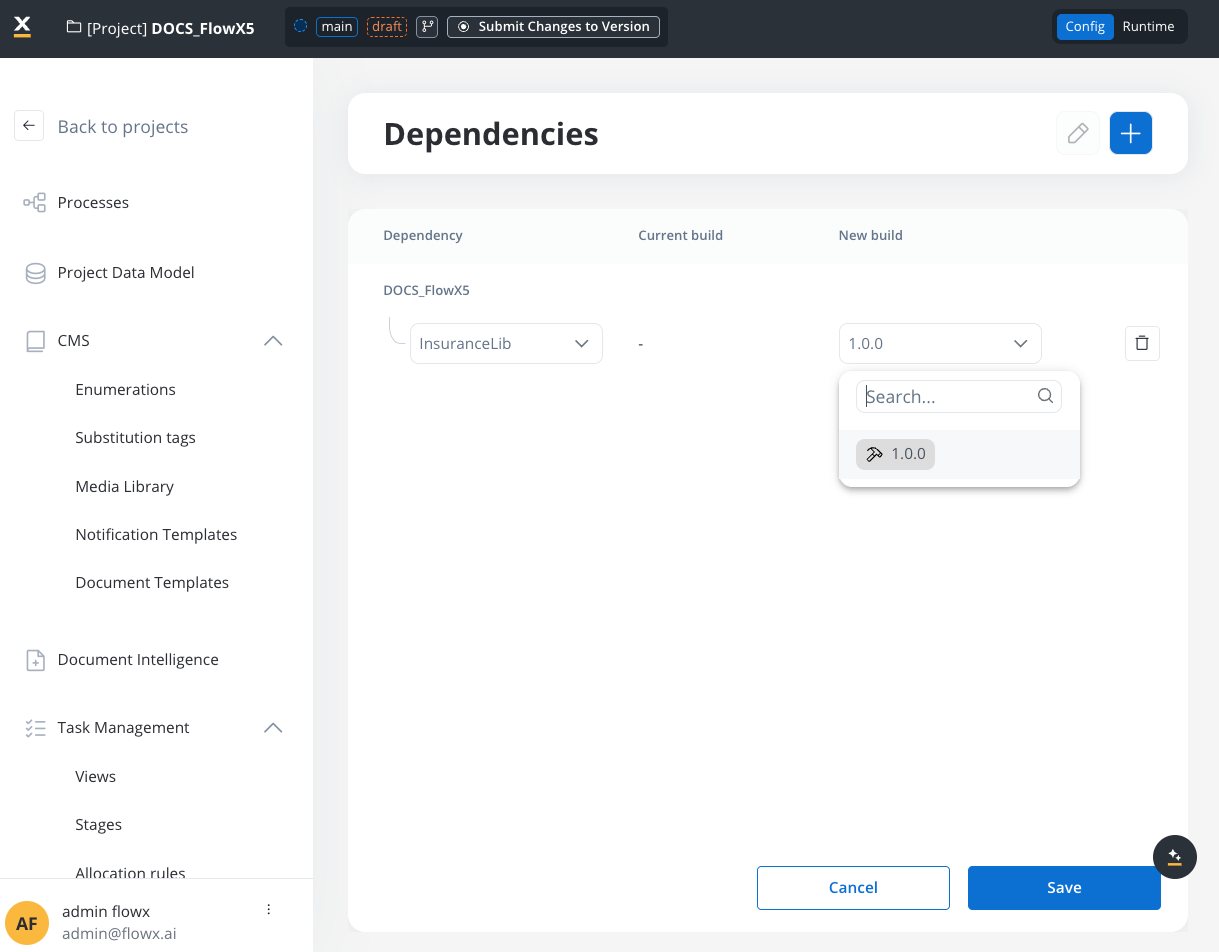
- Navigate to your project dependencies.
- Add a library as a dependency. The library must have a build created.
- Library data types become available in your Project Data Model.
To filter by library types you can use the “Filter by source” feature.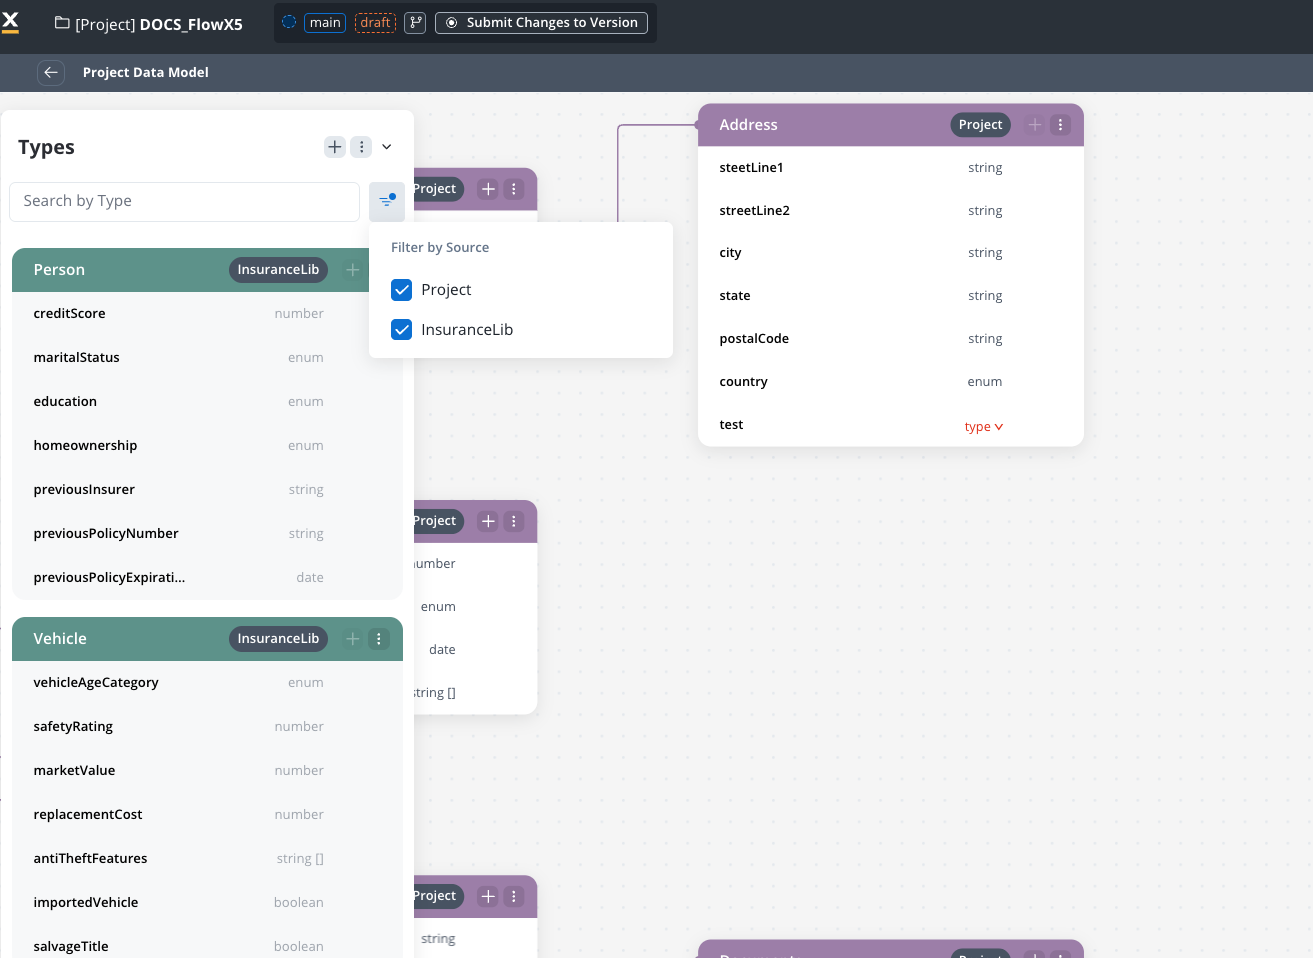
- You can now use the library data types in your data model.
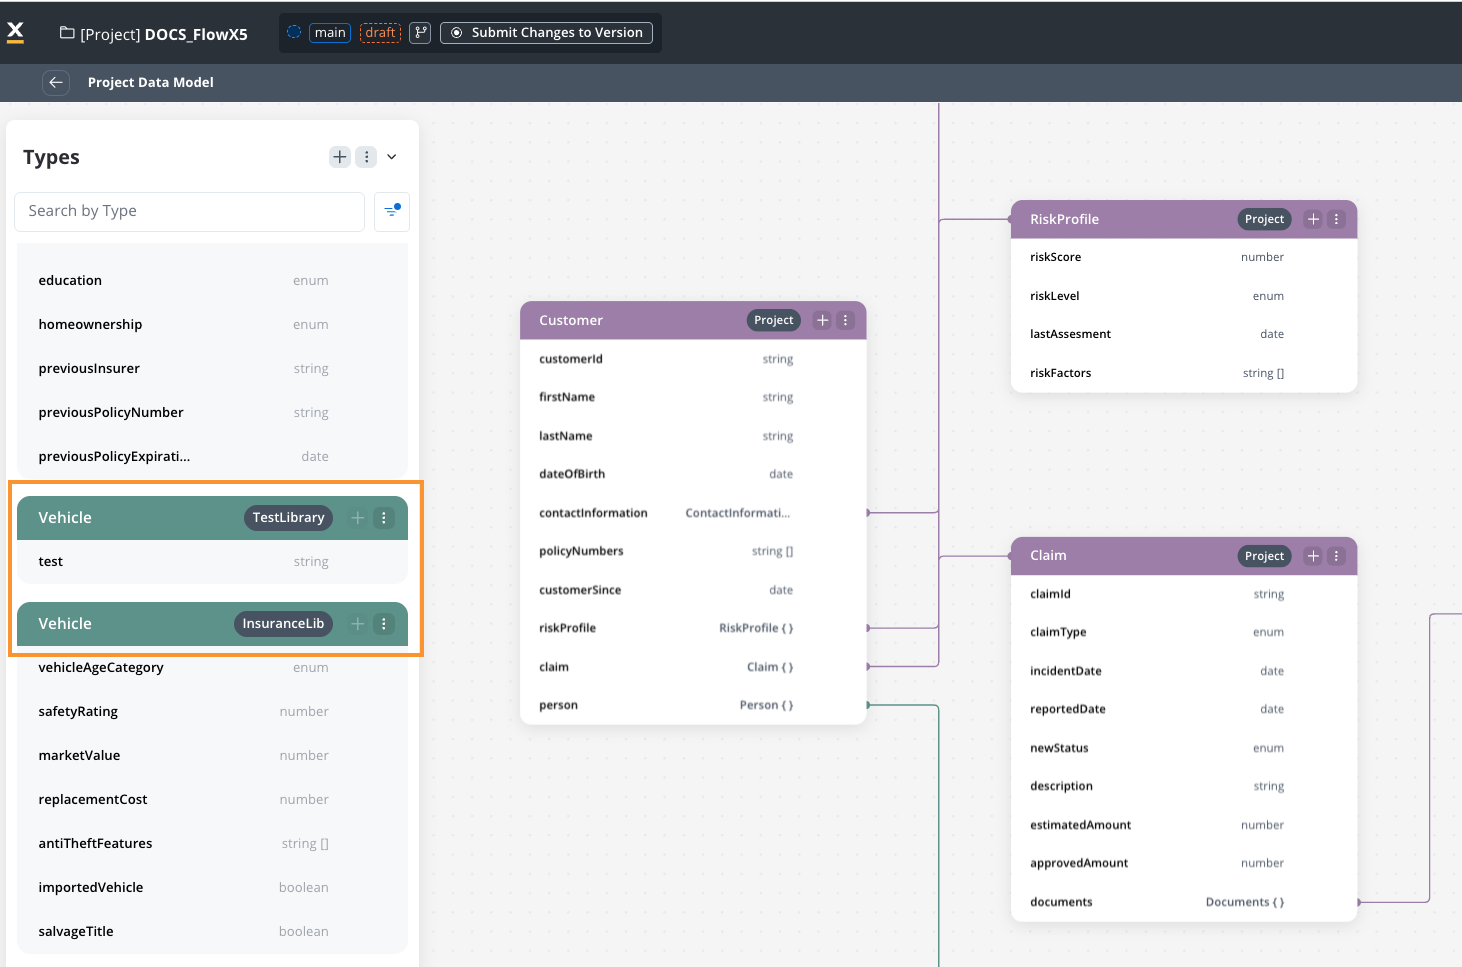
Handle duplicate types from libraries
When multiple libraries contain data types with the same name:- Both types will be visible in the Project Data Model with visual indicators.
- Namespacing functionality will prevent technical issues.
Configure reporting and sensitive data settings
You can configure reporting and sensitive data settings directly from the attribute settings side panel:- Go to the Project Data Model.
- Select an attribute to open the settings side panel.
- Toggle Sensitive data or Use in Reporting as needed.
These settings apply to all instances of the attribute across processes.
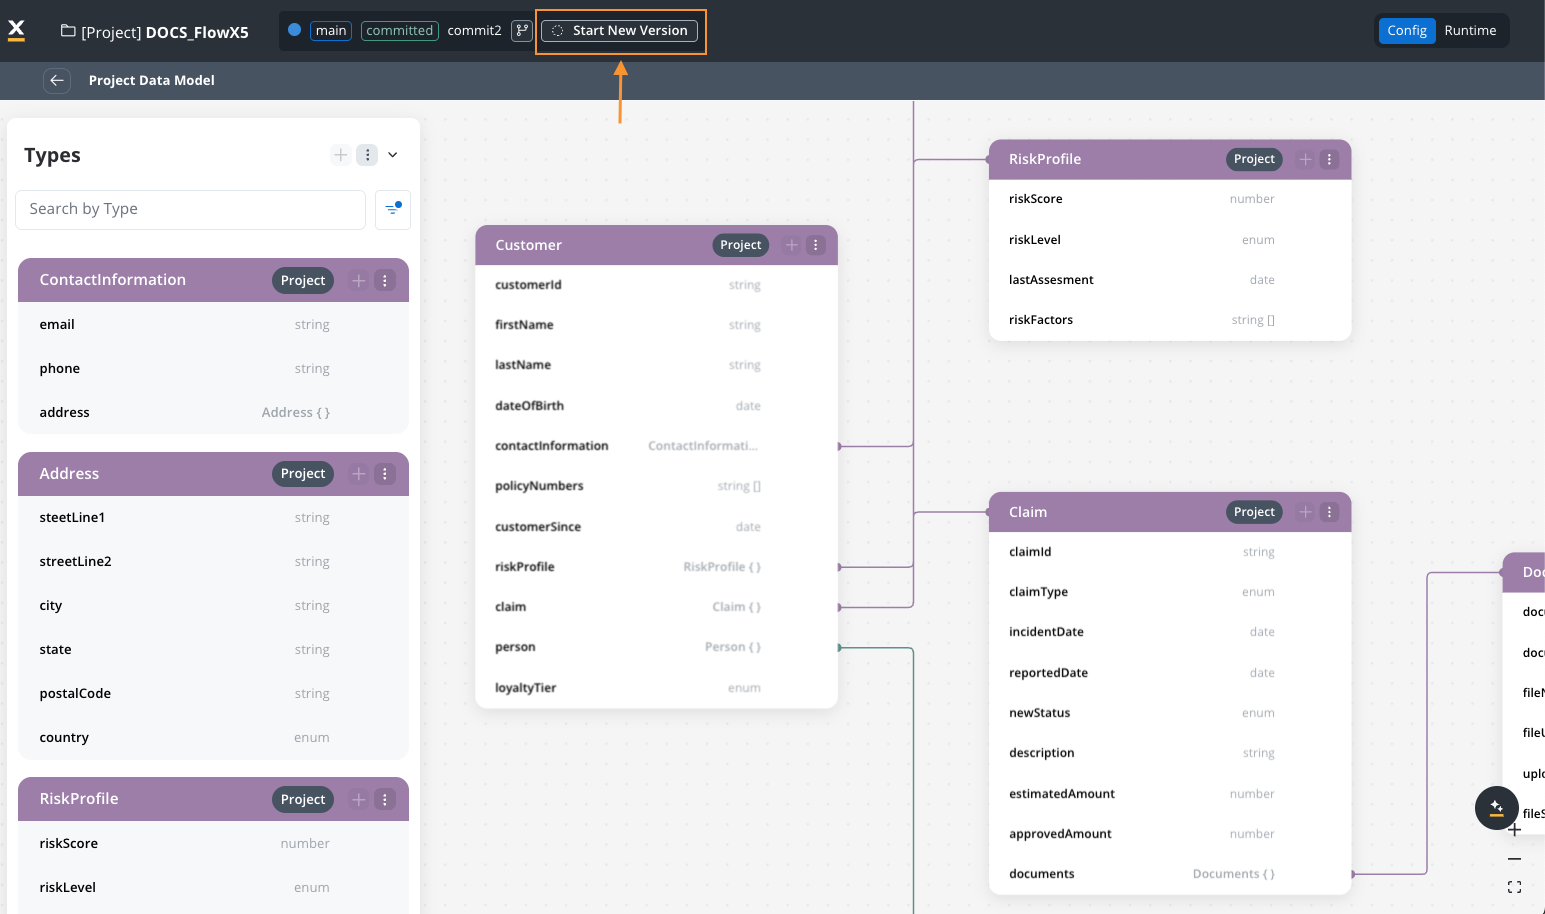
Project Data Model after version commitment
After committing a project version:- The Project Data Model becomes read-only.
- You can still view the diagram and monitor usage.
- This read-only configuration is available for any configuration on committed versions and applies also to resource data models.
- To make changes to the data model, you will require a new project version.
Search and filter
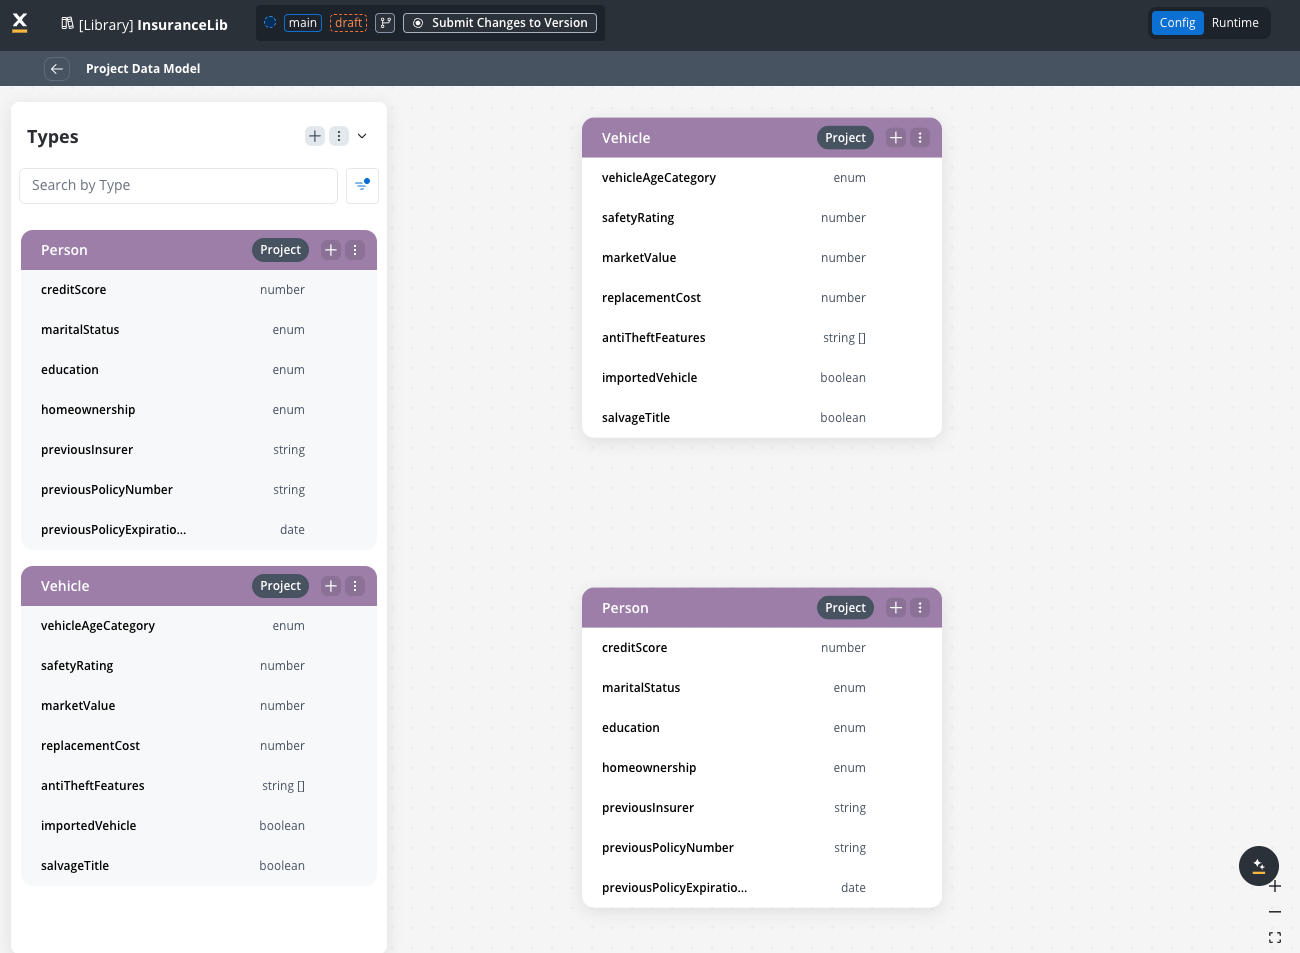
The Project Data Model interface provides tools to help you find and work with your data types:- Navigate to the Project Data Model.
- By default, only project-level types are displayed.
- Use filters to view library types as well.
- Use the search function to find specific types by name.
Update library dependencies
When updating library dependencies:- Navigate to the dependencies section.
- Select the new library version.
- The system will inform you of any breaking changes to data types.
- You can decide whether to proceed with the update.
- If you proceed, changes will propagate to processes according to compatibility rules.
Real-world example: Insurance claims processing
This example demonstrates how an insurance company uses project data model for their claims processing system.
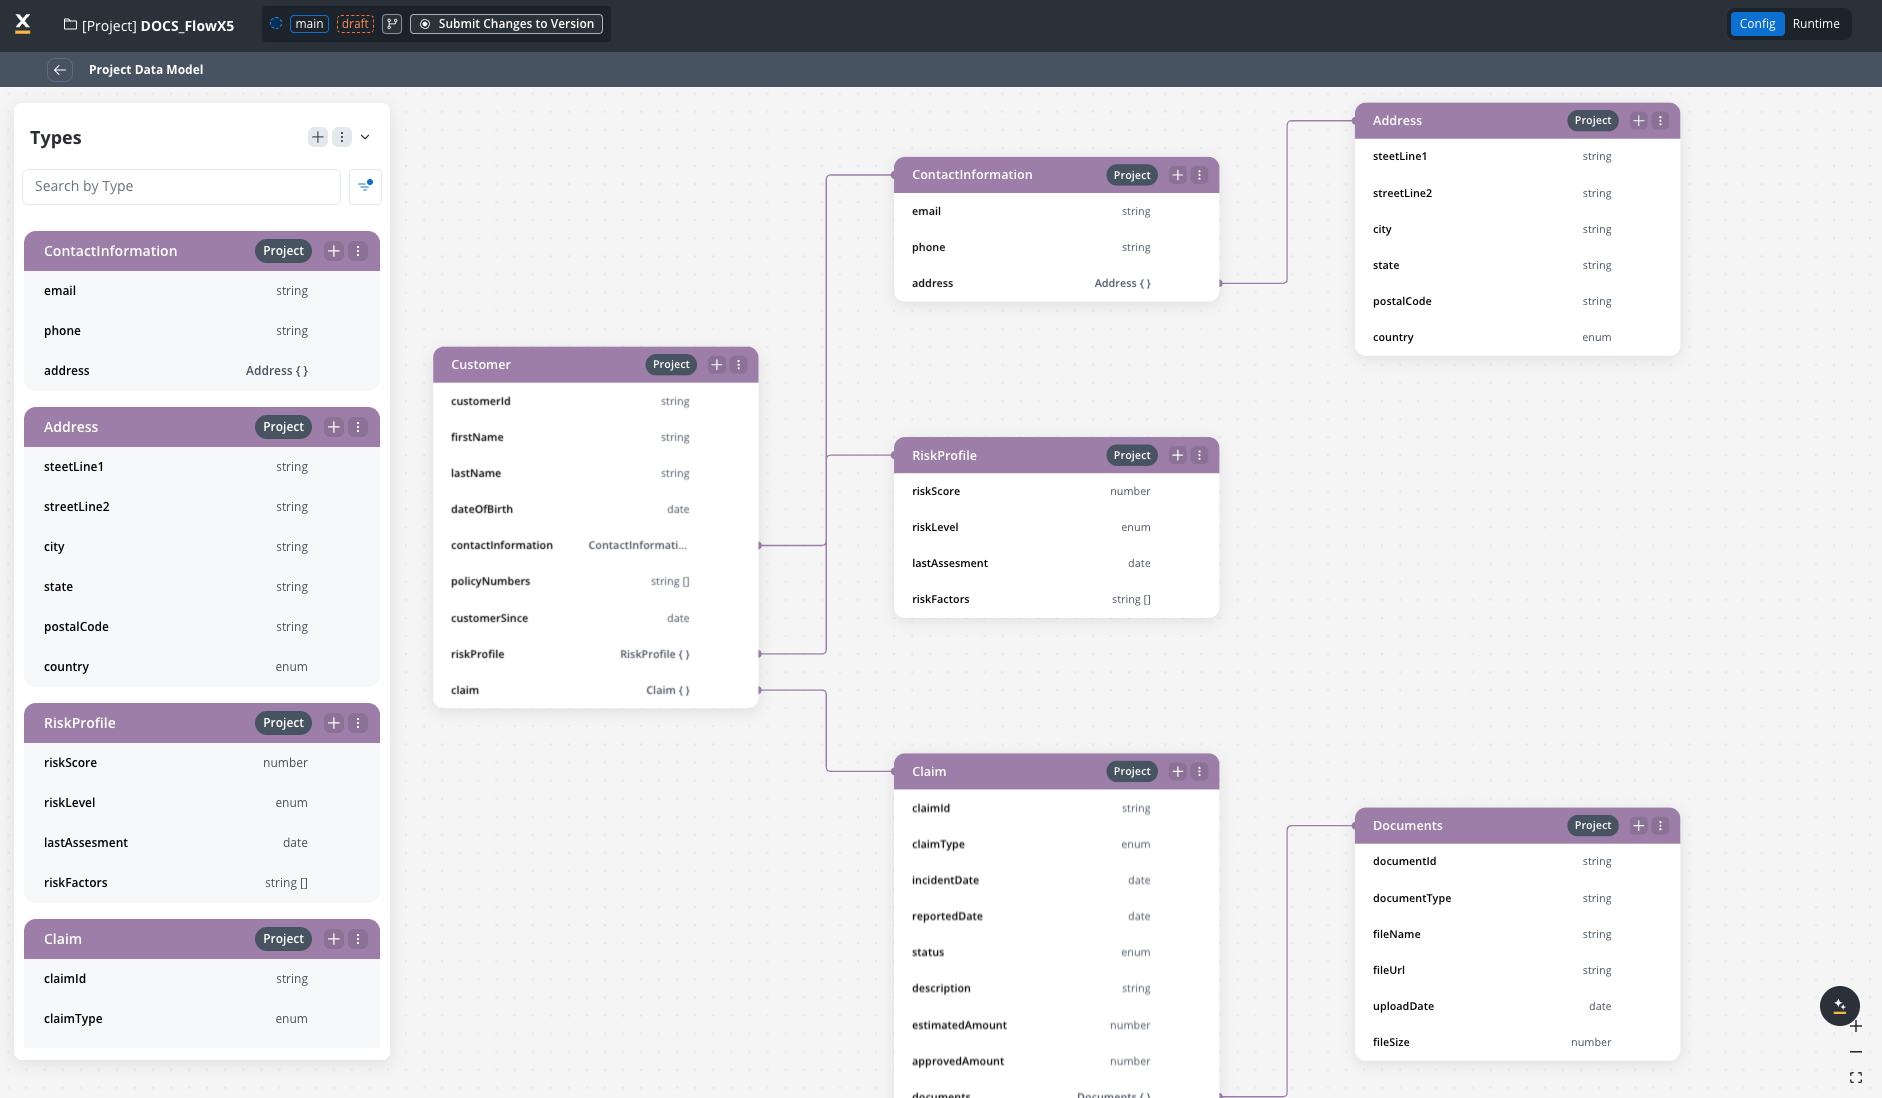
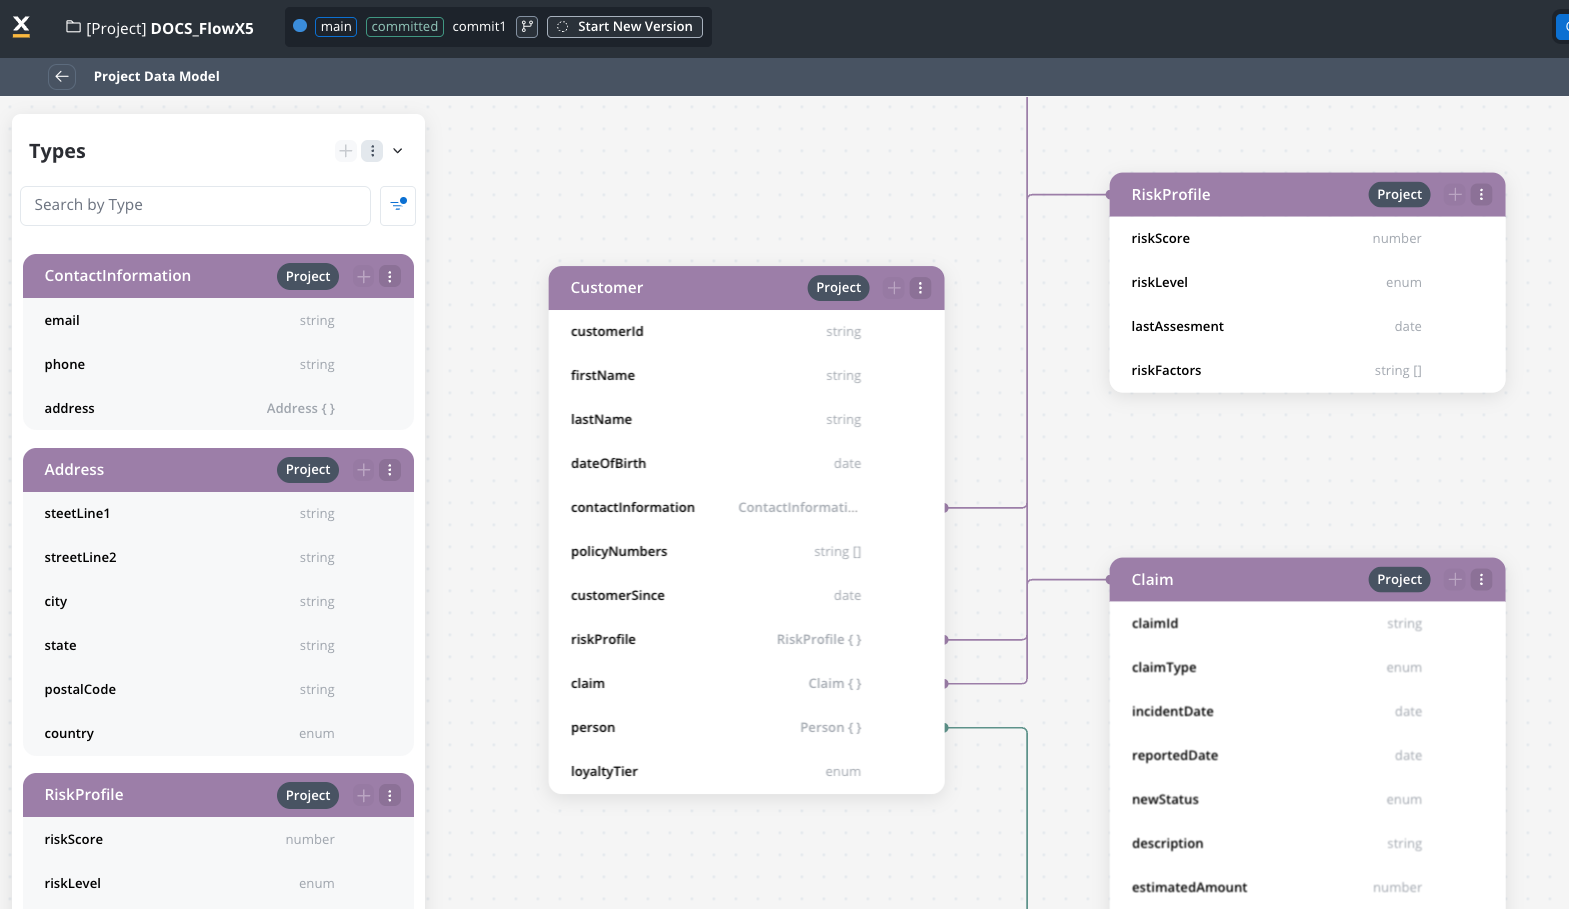
Core data types in PDM
Core data types in PDM
The insurance company created these data types in their Project Data Model: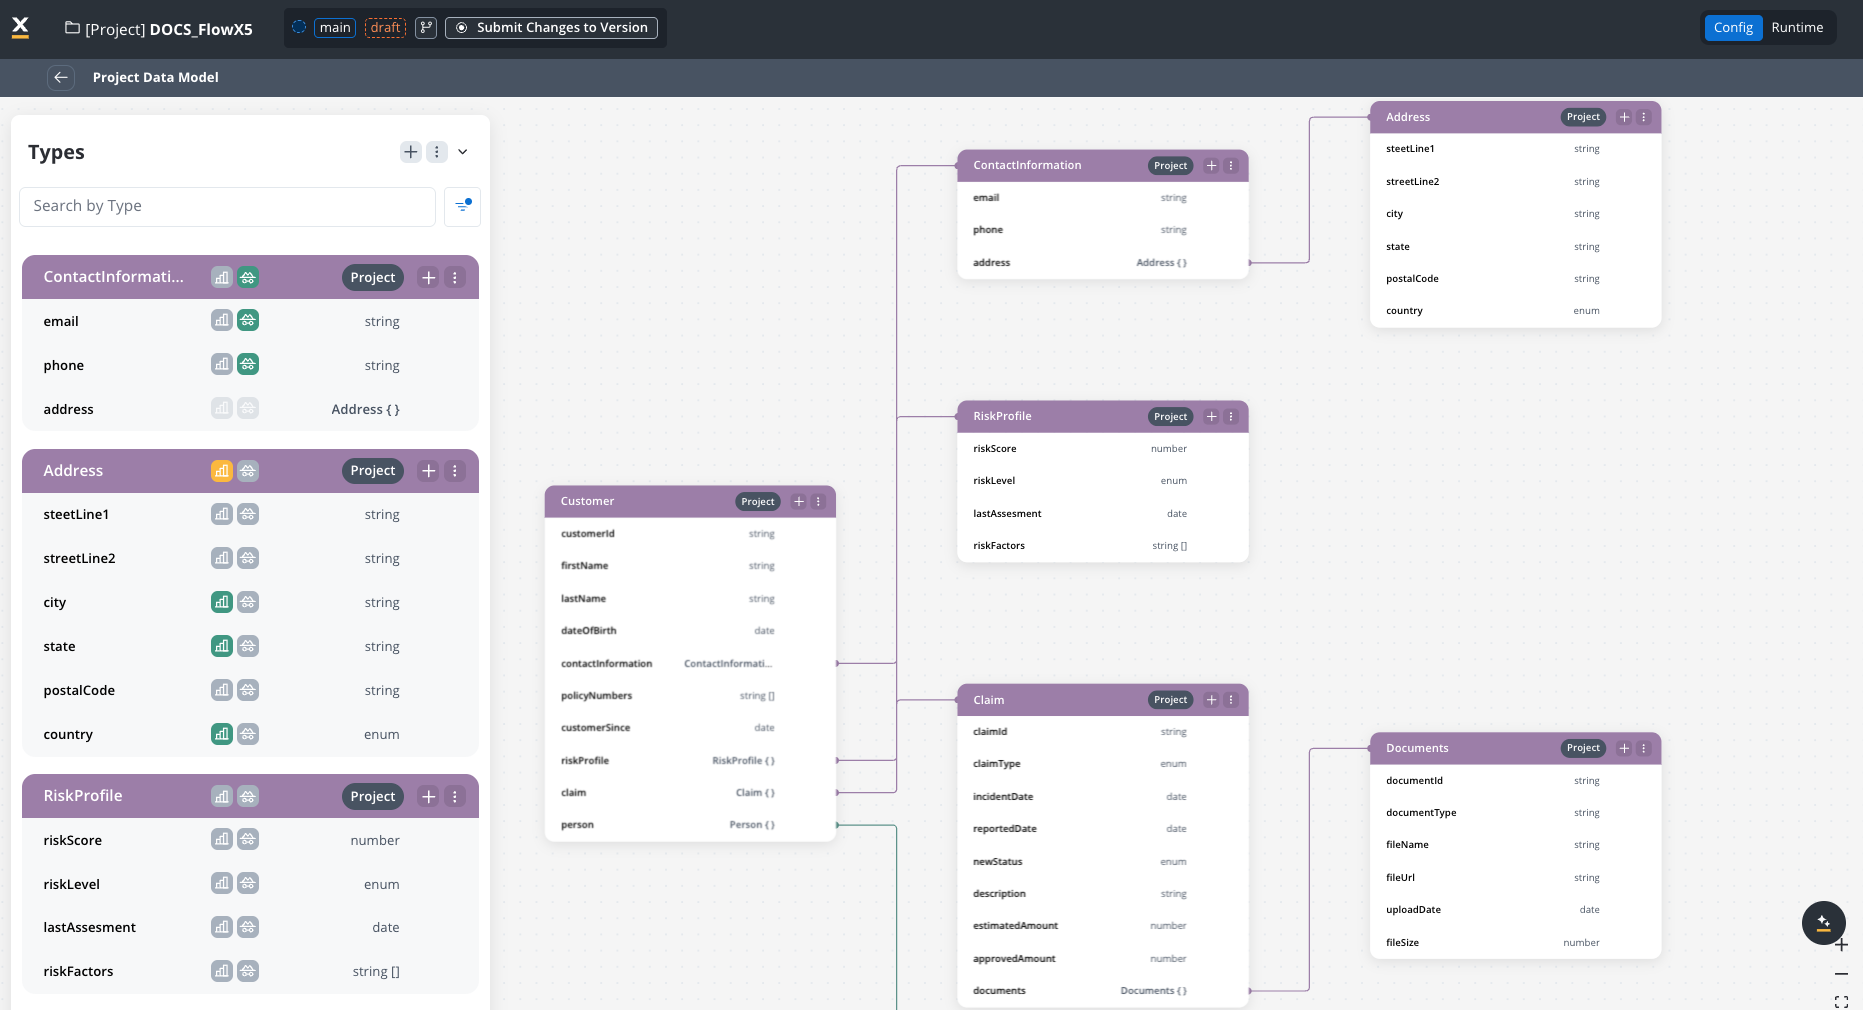
-
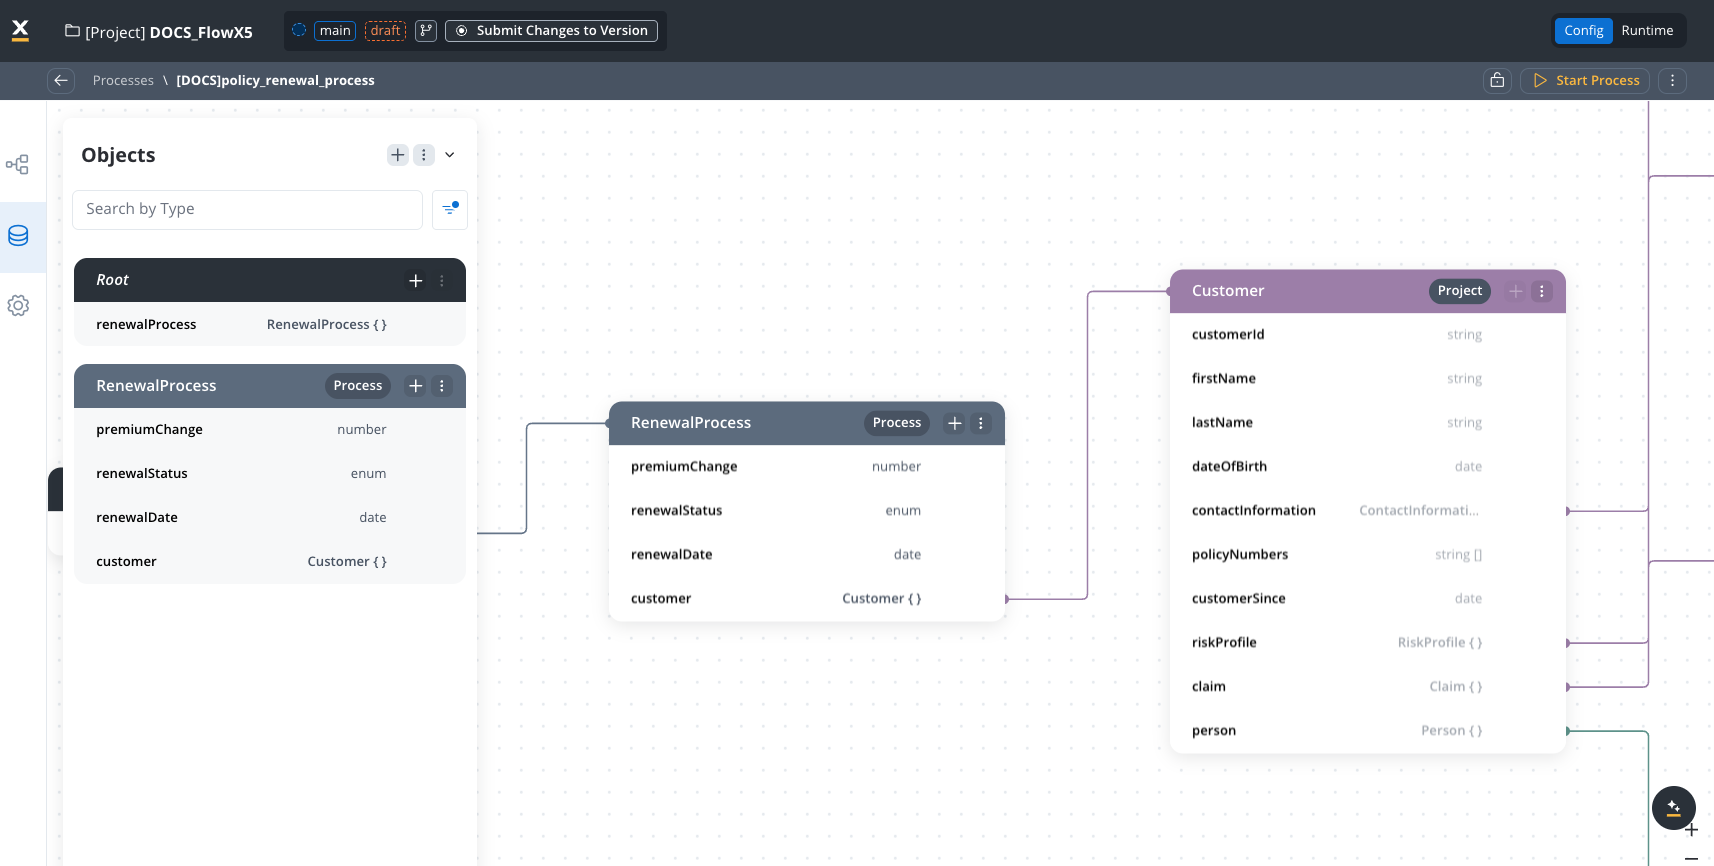
Customer
customerId: stringfirstName: stringlastName: stringdateOfBirth: datecontactInformation: ContactInfo (reference)policyNumbers: array of stringcustomerSince: dateriskProfile: RiskProfile (reference)- Settings: Sensitive data = True, Used in reporting = True
-
ContactInfo
email: stringphone: stringaddress: Address (reference)- Settings: Sensitive data = True, Used in reporting = False
-
Claim
claimId: stringpolicyNumber: string (reference to Policy)claimType: enum [“Auto”, “Property”, “Medical”, “Liability”]incidentDate: datereportedDate: datestatus: enum [“New”, “Under Review”, “Pending Documents”, “Approved”, “Denied”, “Closed”]estimatedAmount: numberapprovedAmount: numberdocuments: array of Document (reference)- Settings: Sensitive data = False, Used in reporting = True
-
Document
documentId: stringdocumentType: stringfileName: stringfileUrl: stringuploadDate: date- Settings: Sensitive data = False, Used in reporting = False
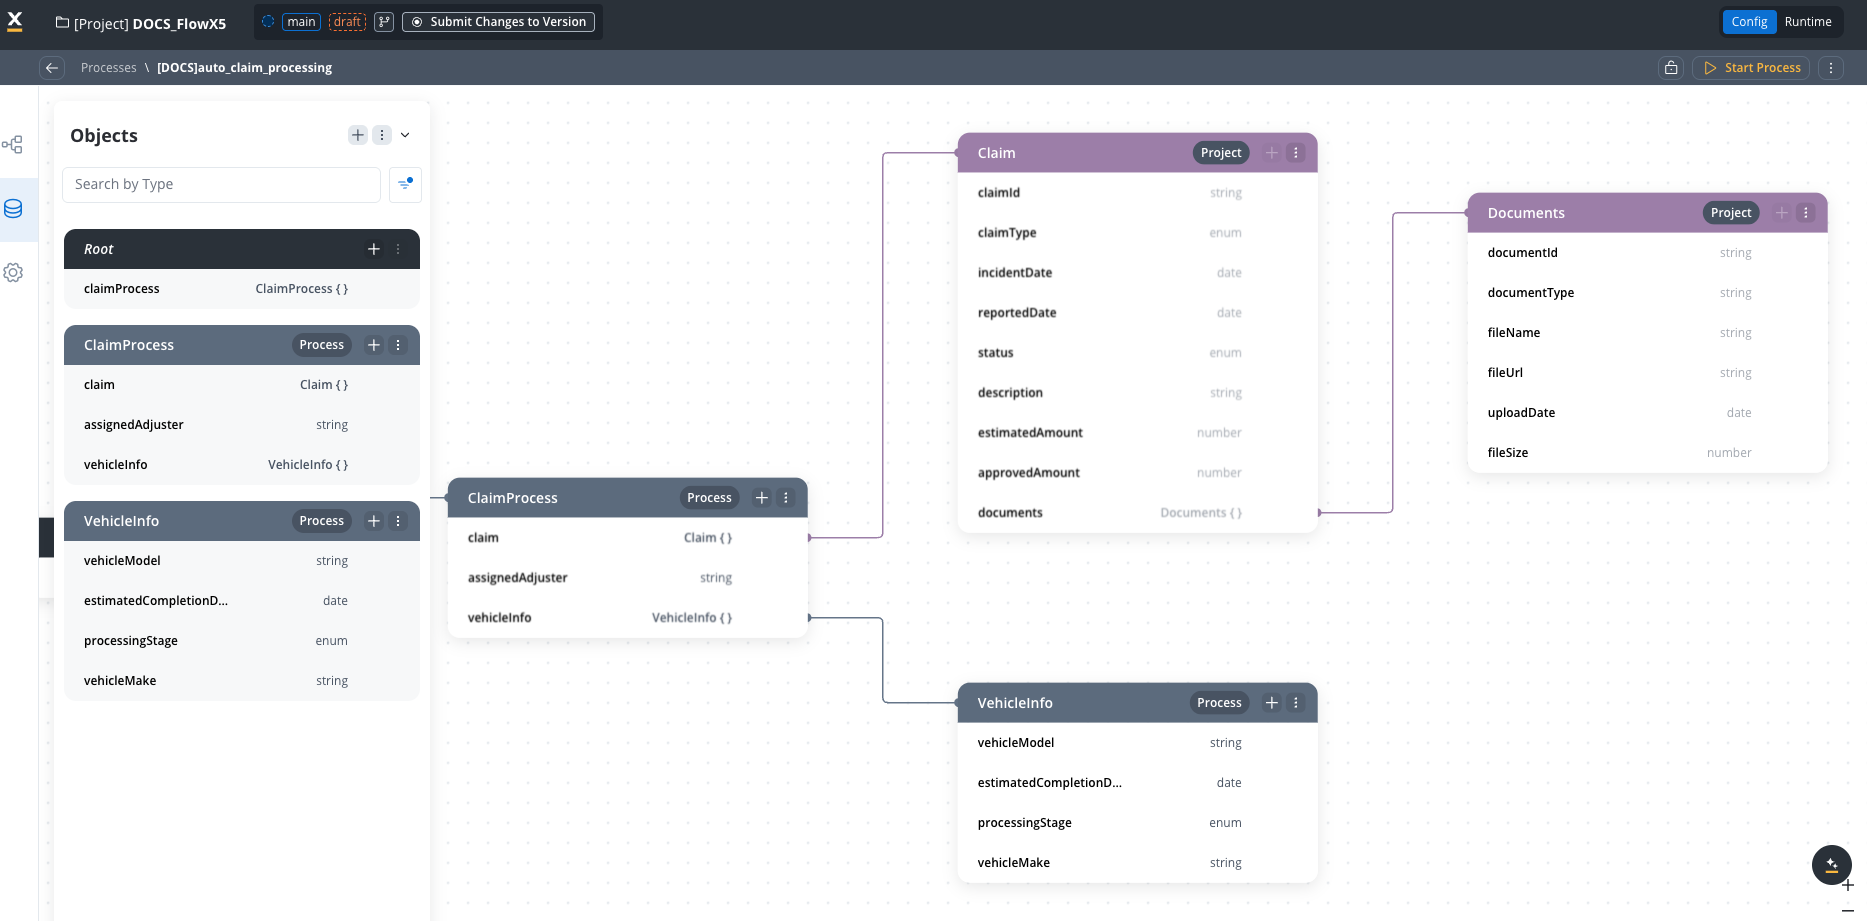
Process-specific data models
Process-specific data models
The company created multiple processes using the PDM:
- Auto Claim Processing
- Policy Renewal Process
Root: ClaimProcess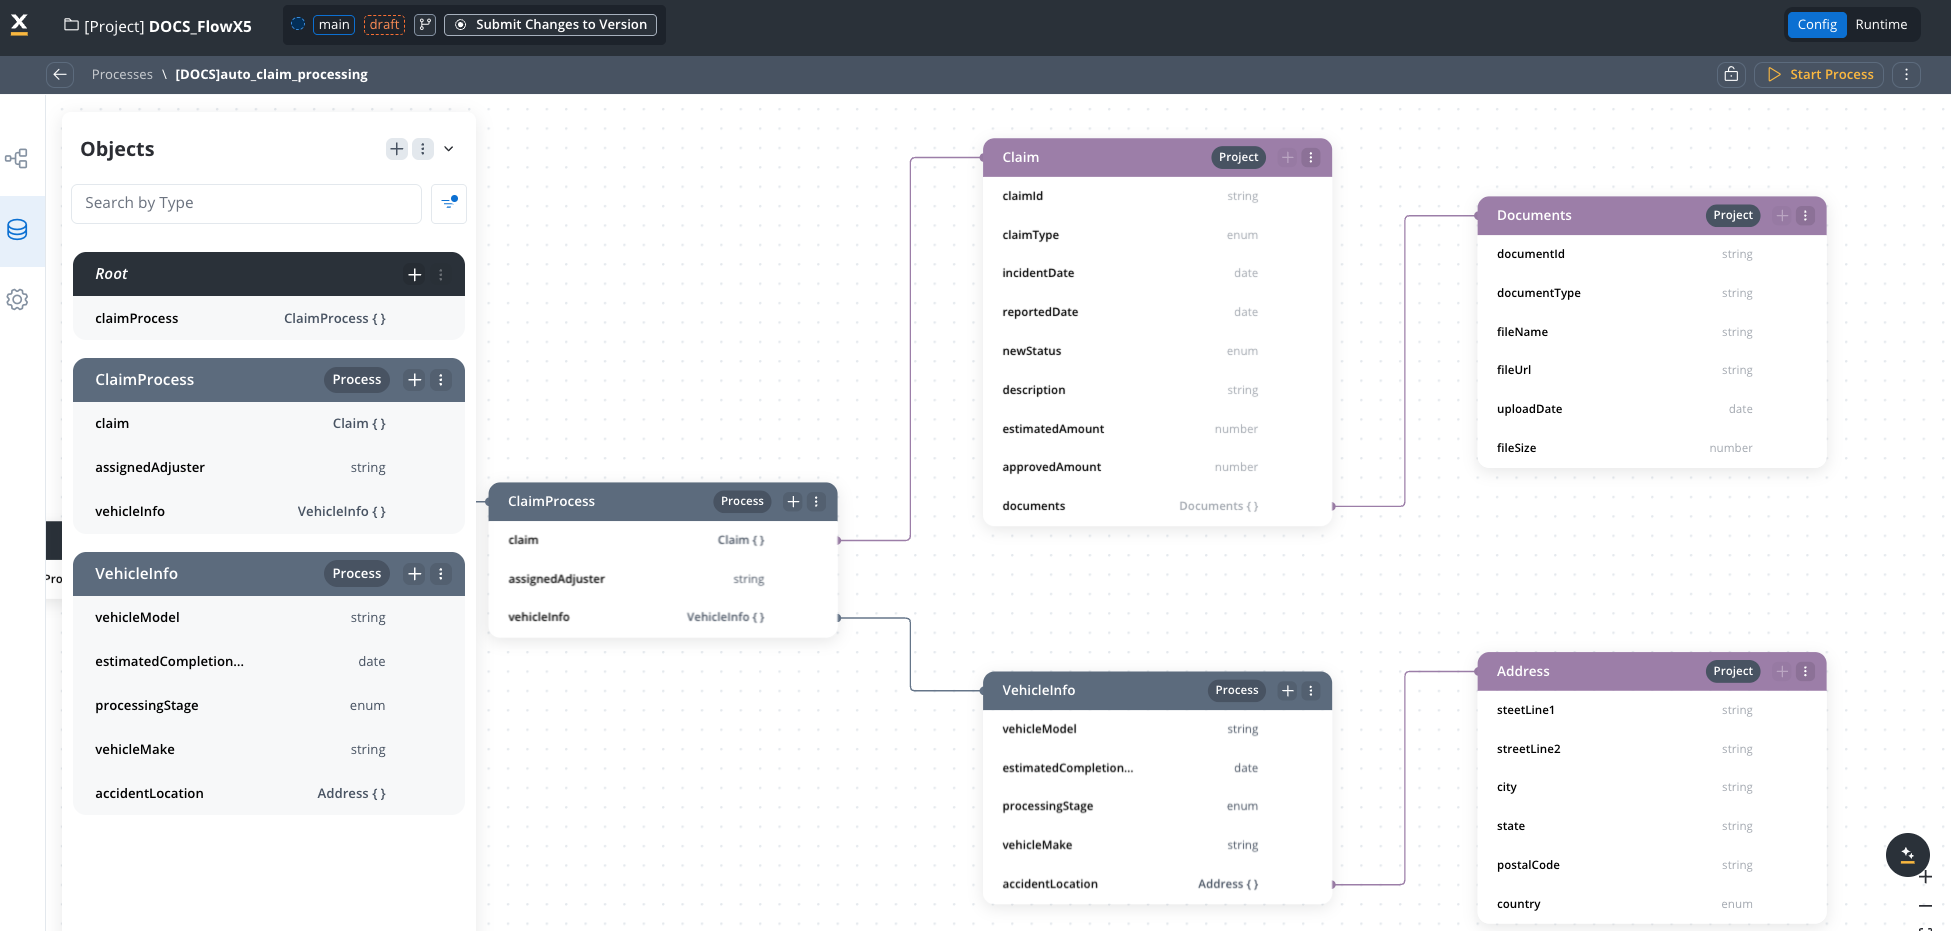 Data Structure:
-
ClaimProcess (Process-specific type)
claim: Claim (reference from PDM)assignedAdjuster: stringvehicleInfo: AutoClaimDetails (reference)processingStage: enum [“Initial Review”, “Damage Assessment”, “Liability Determination”, “Settlement Negotiation”, “Payment Processing”]
-
AutoClaimDetails (Process-specific type)
vehicleMake: stringvehicleModel: stringvehicleYear: numbervin: stringaccidentLocation: Address (reference from PDM)damageDescription: string
Example use cases
Example use cases
- Add an attribute
- Remove a field
- Library integration
- A configurator adds a new attribute
loyaltyTierto the Customer data type in the PDM. - This attribute is an enum [“Bronze”, “Silver”, “Gold”, “Platinum”].
- The new attribute automatically propagates to all processes using the Customer data type.
- The Policy Renewal Process now has access to the customer’s loyalty tier without any process-level changes.


Benefits demonstrated
Benefits demonstrated
This example shows how the Project Data Model:
- Ensures data consistency: Core entities like Customer and Policy maintain consistent structures across all processes and resources.
- Promotes reusability: Common data types are defined once and reused in in multiple processes, business rules, and other resources.
- Simplifies changes: Updates to data types are propagated automatically to all processes.
- Enforces governance: Sensitive data is marked at the project level for consistent handling.
- Allows flexibility: Process-specific data can extend the PDM while maintaining core data integrity.
Export and import
You can export and import project data types to transfer them between projects or environments.Exporting
To export project data types:- Open the context menu on the Project Data Model page
- Select Export
- The data types are downloaded as a ZIP file
Importing
To import project data types:- Open the context menu on the Project Data Model page
- Select Import
- Select the ZIP file exported from another project or environment
- If data types with the same identifiers already exist, a Review Resource Identifiers Conflicts modal appears
- Choose a strategy for each conflicting data type (or use Apply to all):
- Keep both - imports the data type as a new copy alongside the existing one
- Replace - overwrites the existing data type with the imported version
- Skip this one - keeps the existing data type unchanged
- Click Continue to complete the import
Importing is only available for work-in-progress (WIP) project versions. You cannot import into a committed version.
Best practices
Plan before implementation: Design your Project Data Model before creating processes to ensure consistency.
Always provide example values: Example values will be used in data mapping and other operations.
Use descriptive names: Choose clear, descriptive names for data types and attributes.
Document your model: Add descriptions to data types and attributes for better understanding and for AI agents.
Consider reusability: Design data types with reusability in mind across processes and resources.
Review impact of changes: Before modifying data types, check their usage across processes.
Use libraries for cross-project standards: For data types needed across multiple projects, define them in libraries.
Maintain regularly: Periodically review and clean up unused data types.
Limitations
Troubleshooting
Cannot modify a referenced data type in process
Cannot modify a referenced data type in process
1
Problem
You’re trying to edit a data type from the PDM within a process, but the fields are read-only.
2
Solution
Make changes at the project level instead:
- Navigate to the Project Data Model
- Locate and edit the data type
- Save changes
- The changes will propagate to all processes
Cannot delete a data type that is in use
Cannot delete a data type that is in use
1
Problem
You’re trying to delete a data type, but receive an error that it’s in use.
2
Solution
Either:
- Remove all references to the data type first
- Create a new version of your project to make the change
References broken after type change
References broken after type change
1
Problem
After changing a data type (e.g., from string to number), references are broken in processes.
2
Solution
Review affected processes and update references manually:
- Check the warning message that lists affected processes
- Open each process
- Update UI templates or other components that referenced the changed attribute
Library update warning about breaking changes
Library update warning about breaking changes
1
Problem
When updating a library dependency, you receive warnings about breaking changes to data types.
2
Solution
Carefully review the changes and their impact before proceeding:
- Check which data types are affected
- Review how these types are used in your processes
- Decide whether to proceed with the update or maintain the current version
Academy courses
Data Model 101 course
Learn attribute types, JSON format, and data modeling fundamentals
Handle Dynamic Data course
Configure dynamic dropdowns and data-driven UI from process data