Process Designer interface
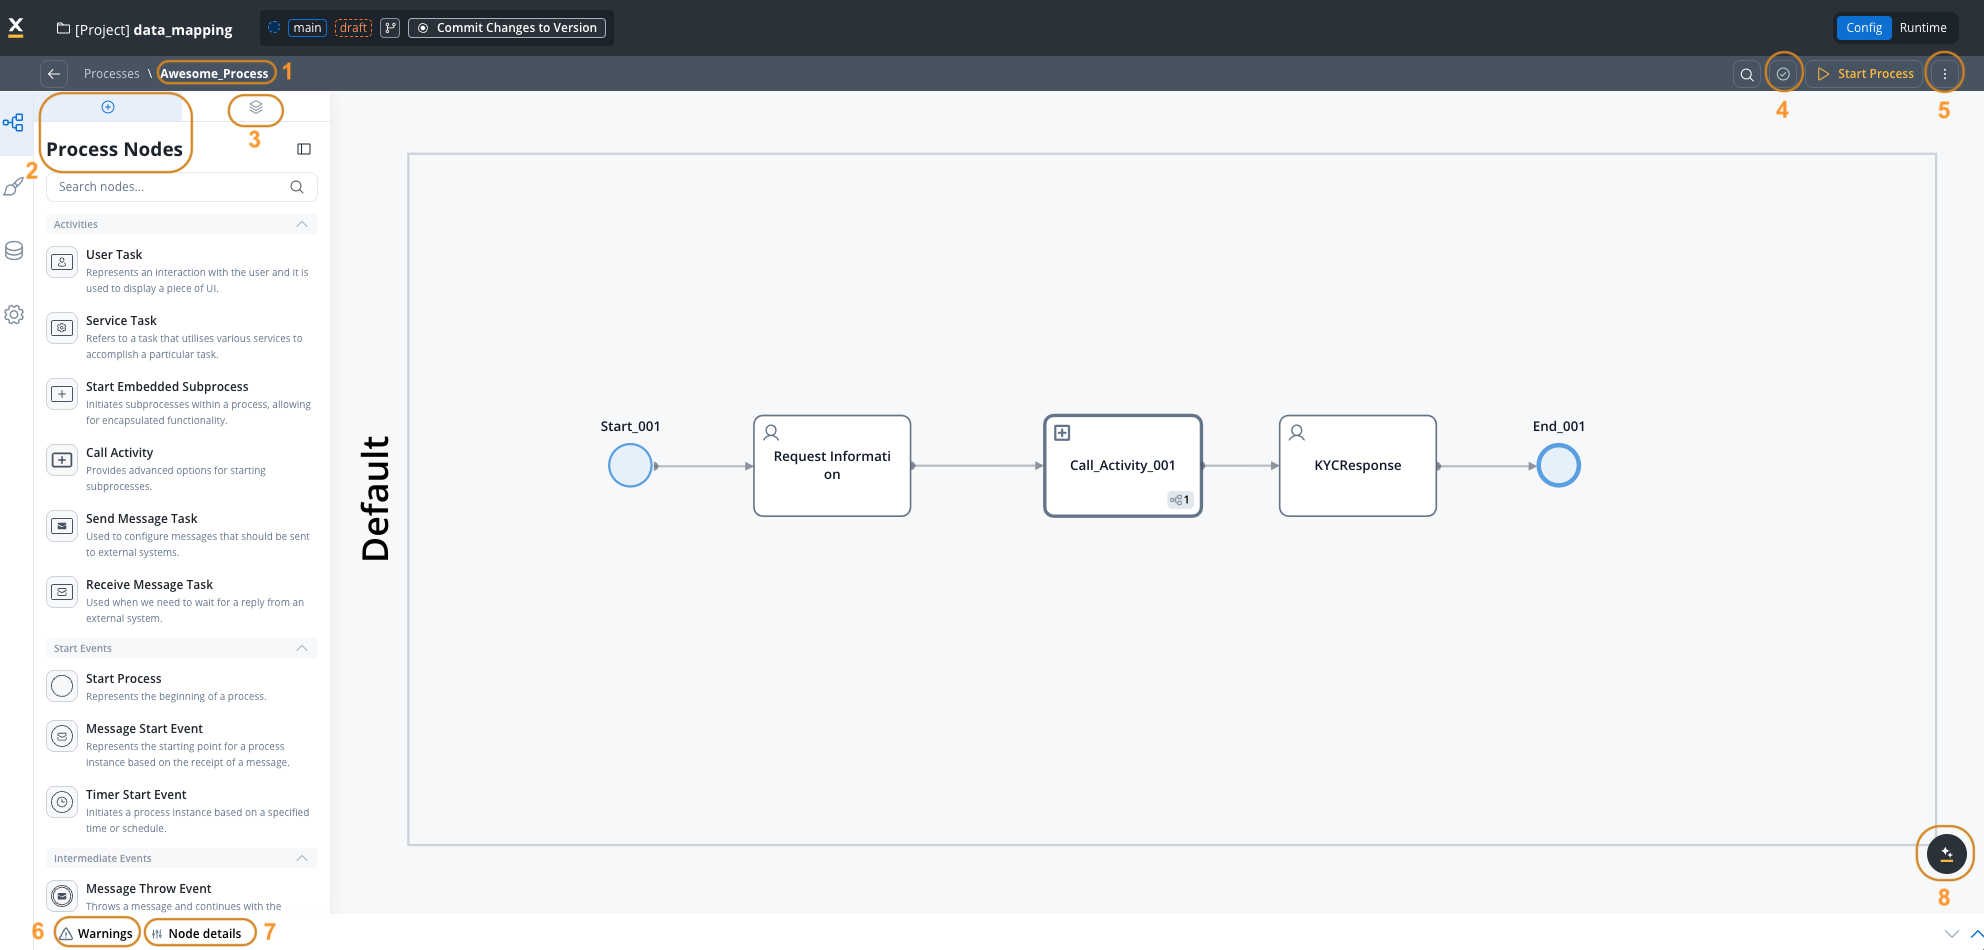
When you open a process definition, you’ll see the following essential elements:1. Process definition name
1. Process definition name
The name of your process definition appears at the top, providing a clear identifier for the workflow. Click on the name to access process-level settings including permissions, expiry time, platform configuration, and task management options.
2. Process Nodes
2. Process Nodes
The left panel contains the node palette with all available BPMN elements you can drag and drop onto the canvas. Nodes are organized by category: events, tasks, gateways, and subprocesses.
3. Navigation Areas
3. Navigation Areas
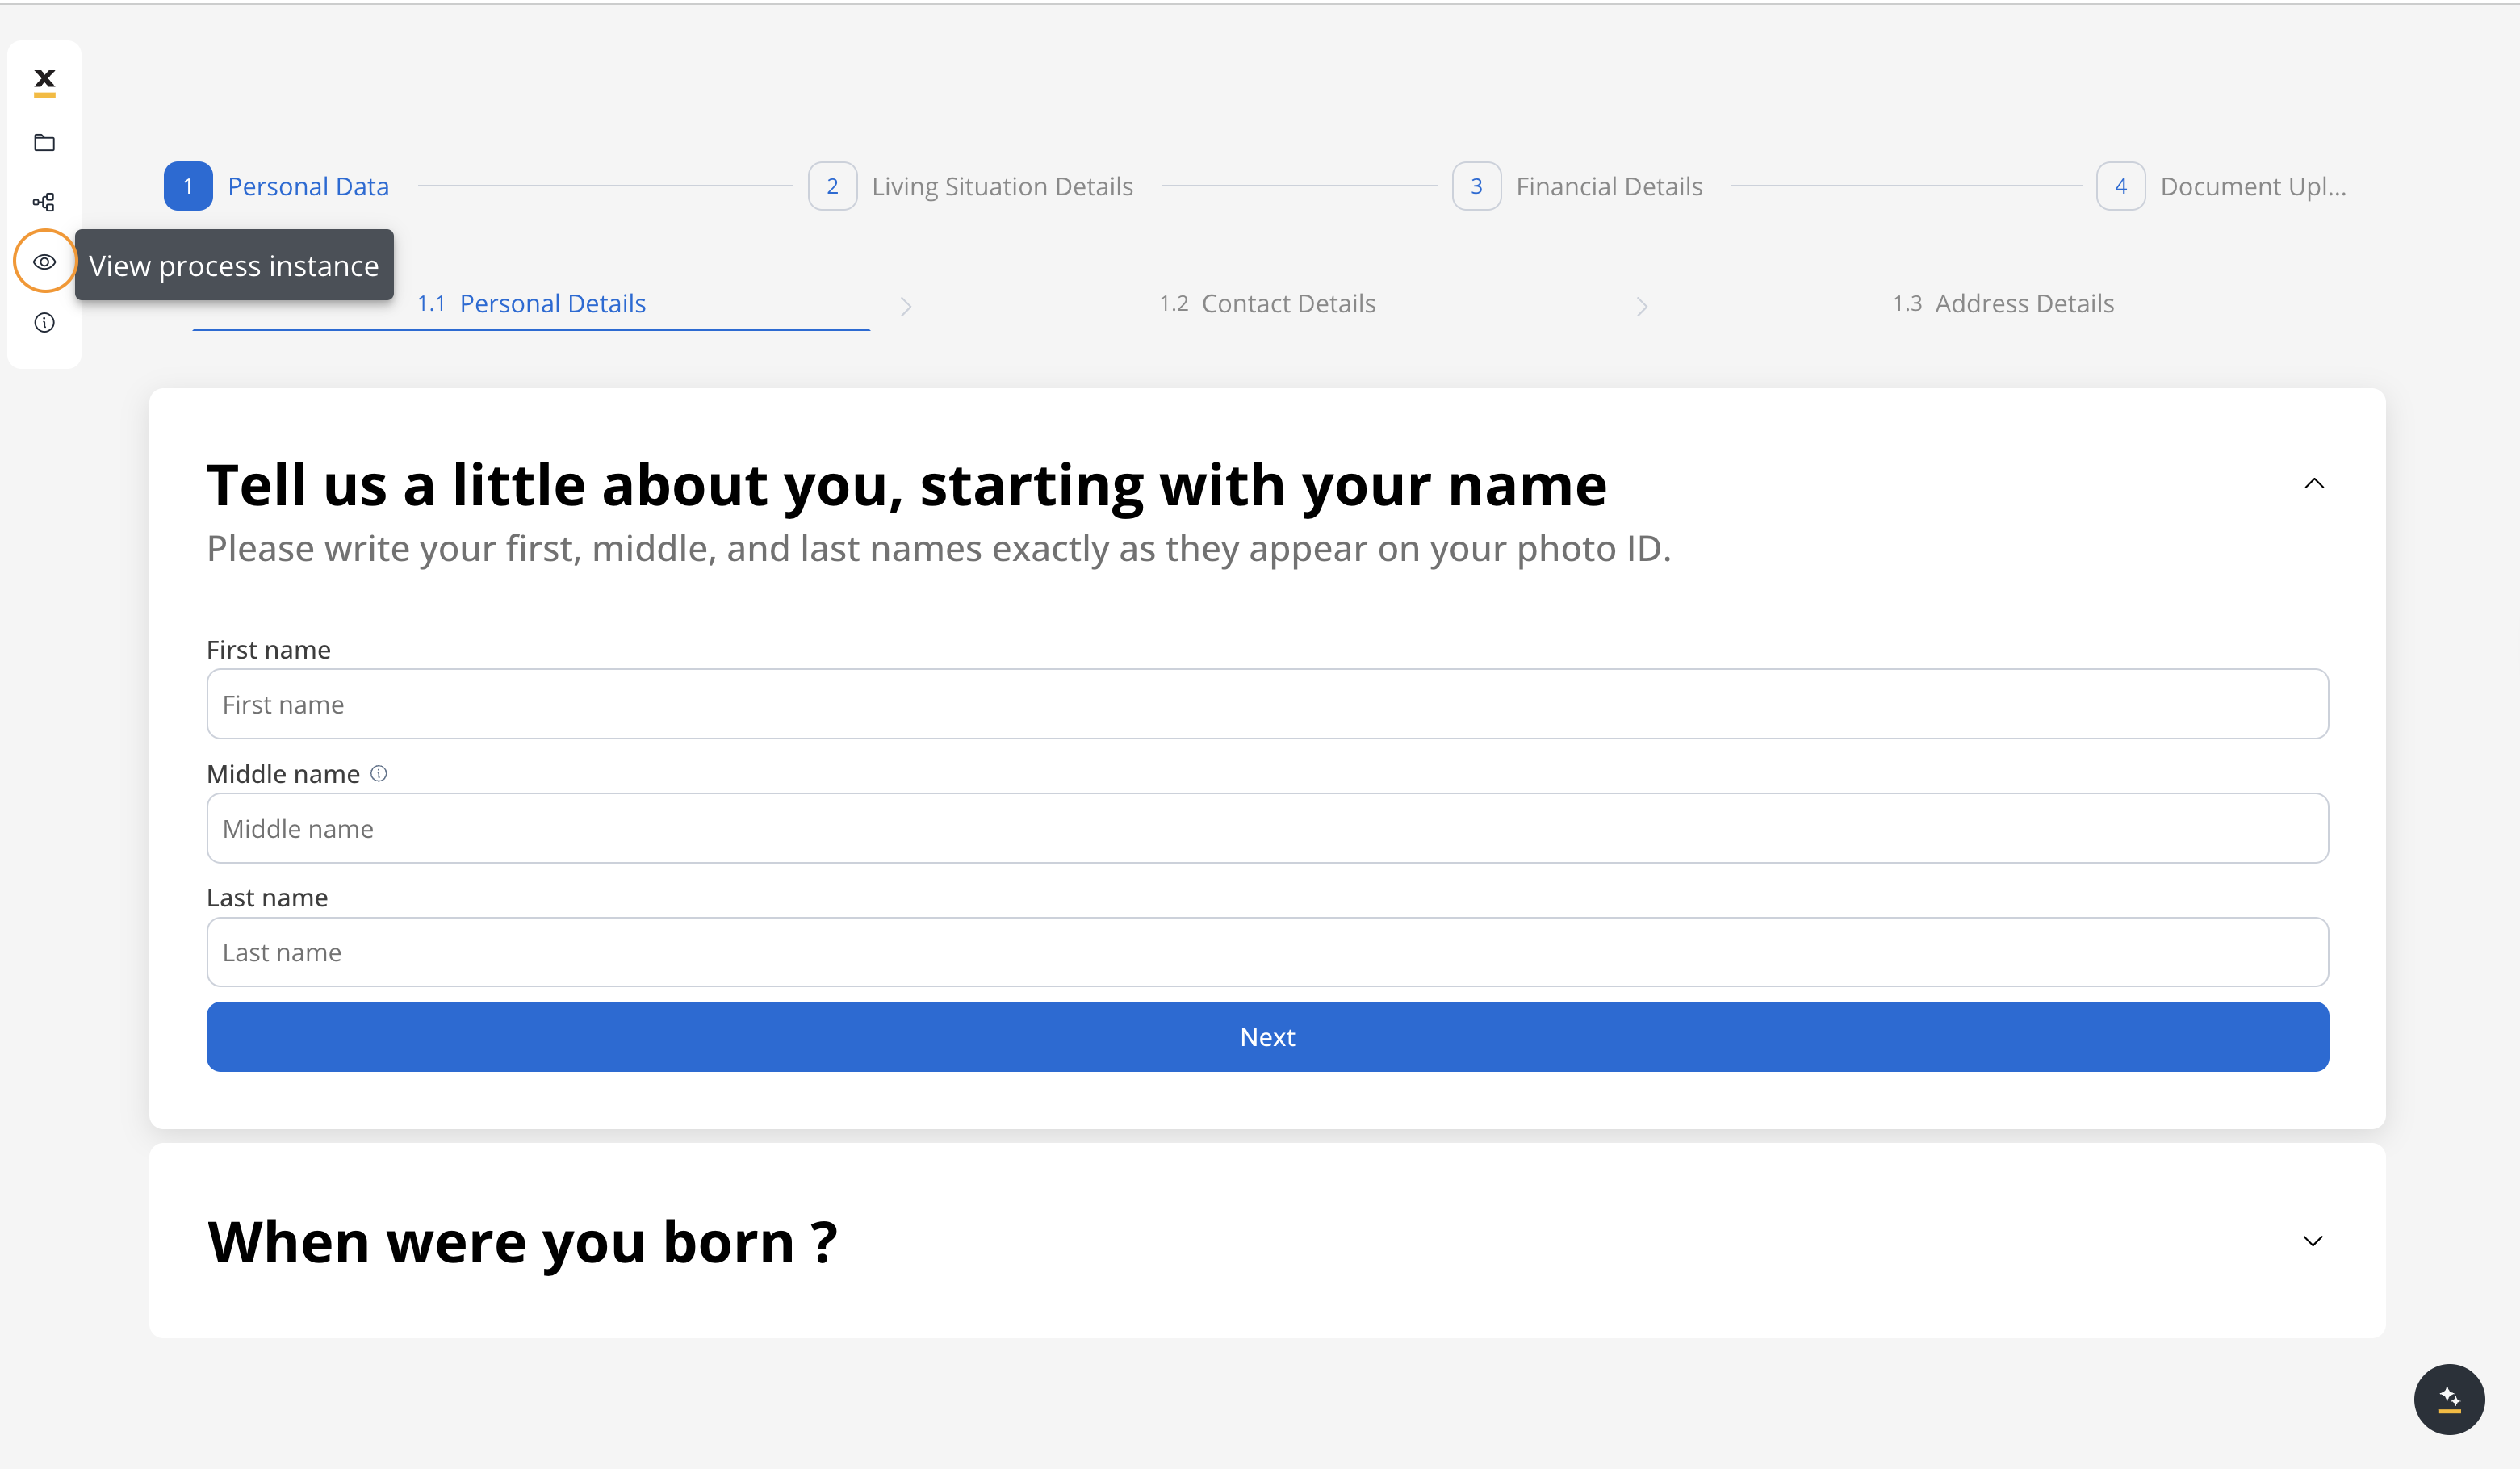
The Navigation section allows you to configure how users navigate through your process on web and mobile platforms. You can create steppers, modals, and other navigation structures that organize user tasks.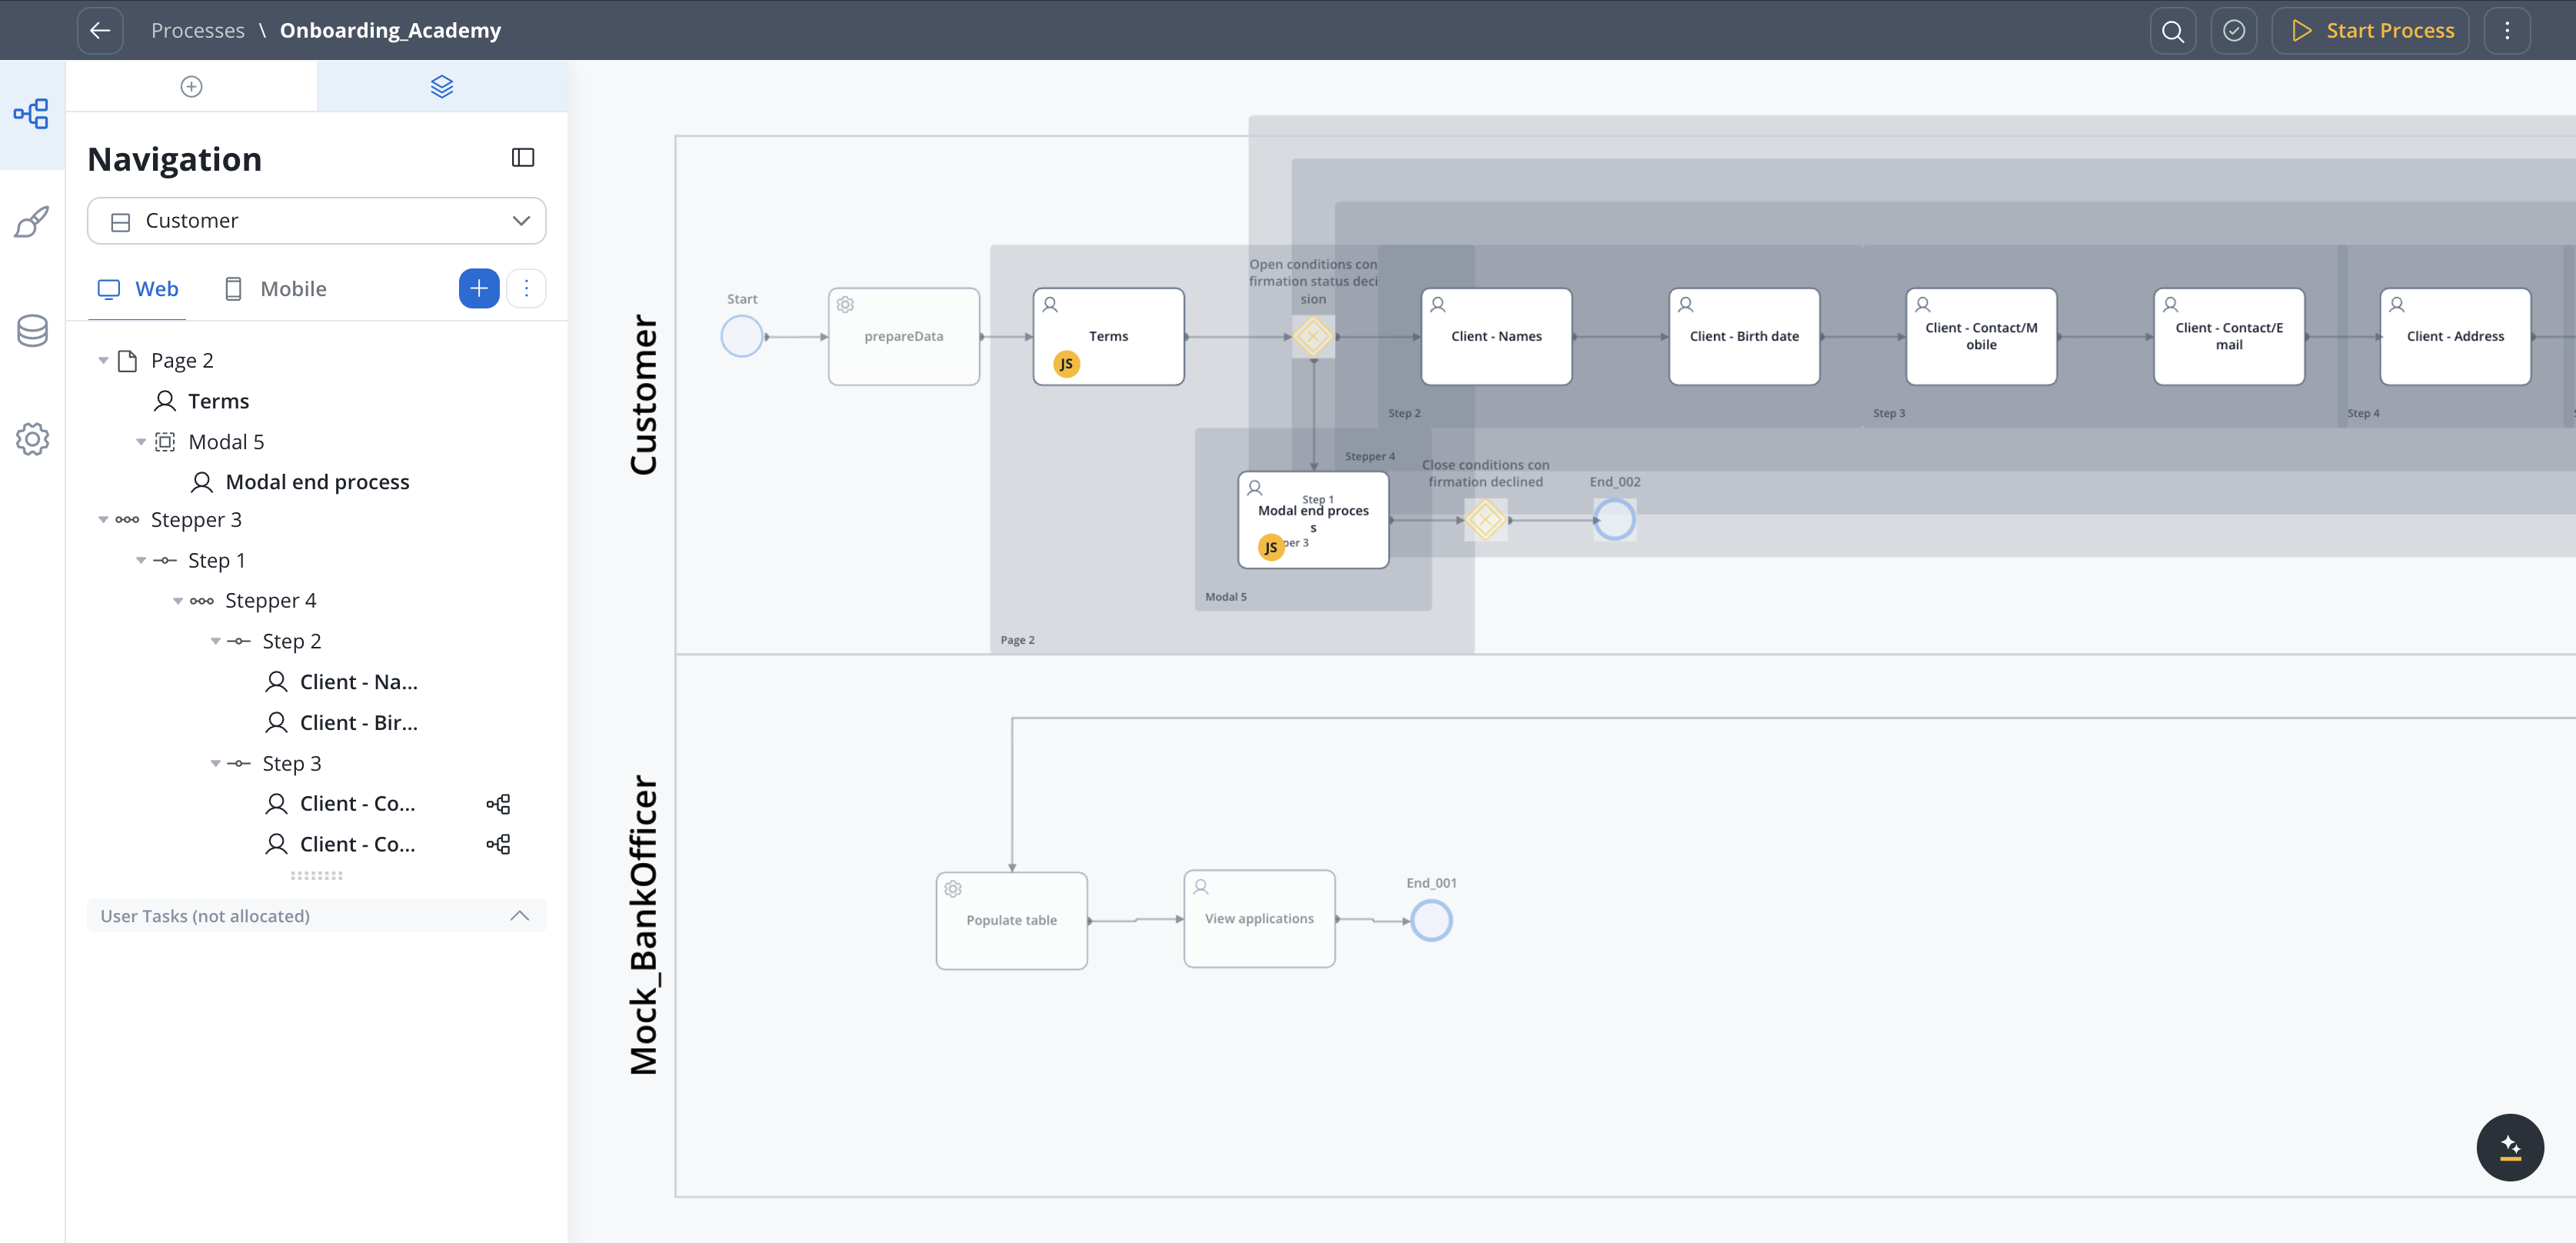
Navigation Areas
4. Autosave
4. Autosave
Changes to your process are automatically saved as you work, eliminating the need to manually save. The autosave indicator shows when your last change was saved, ensuring your work is never lost.
Autosave works on draft versions. To make changes permanent and available to other environments, you need to commit your project version.
5. Canvas
5. Canvas
The main canvas area is where you design your process flow by adding nodes, connecting them with sequences, and organizing them into swimlanes. The canvas supports zoom, pan, and offers visual feedback for validation warnings.
6. Warnings
6. Warnings
The warning indicator displays misconfigurations that could prevent your process from executing correctly. Warnings are platform-specific and help ensure your navigation structure and UI configuration align with your selected platforms (Web, Mobile, or Omnichannel).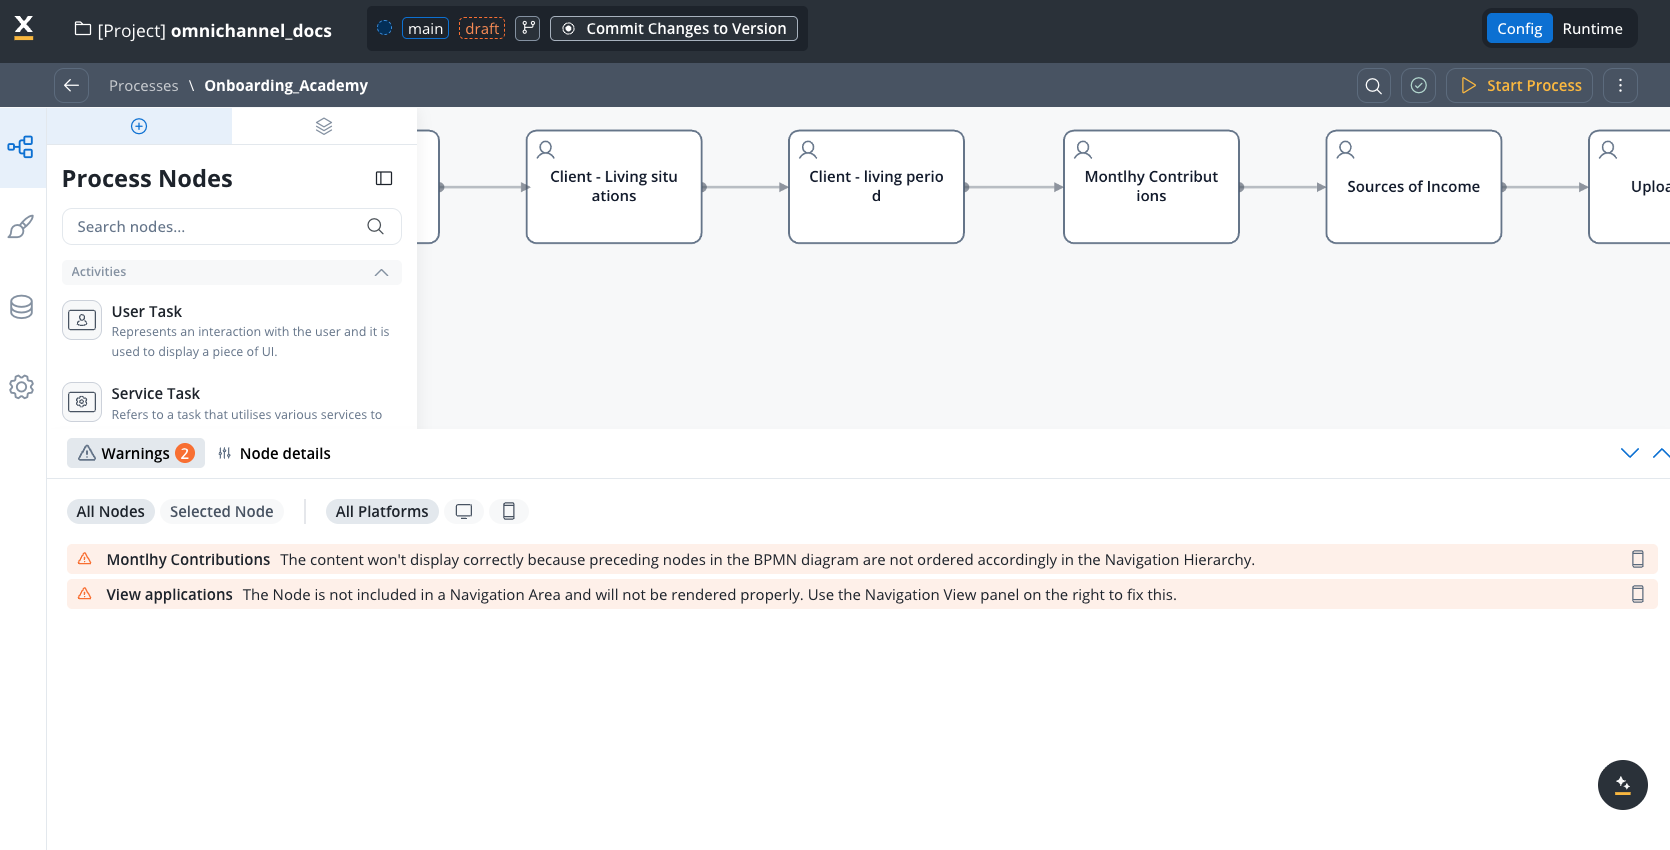
7. Node details
7. Node details
When you select a node, the right panel displays its configuration options. Here you can set node properties, add actions, configure UI elements for user tasks, and define business rules.
BPMN nodes
Comprehensive guide to all available node types
BPMN 101
Learn BPMN fundamentals through FlowX Academy
Working with the canvas
The Process Designer canvas provides several features to help you efficiently create and manage process flows:Canvas navigation
- Zoom: Use the mouse wheel or zoom controls to zoom in and out of your process
- Pan: Click and drag on empty canvas space to move around large processes
Adding and connecting nodes
Add a node
Drag a node from the left palette onto the canvas, or click a node type to add it to the center of your current view.
Connect nodes
Click on a node to select it, then click the arrow icon that appears. Click on the target node to create a sequence flow connection.
Organizing your process
Swimlanes: Organize nodes by roles or departments using swimlanes. This helps visualize which parts of the process are handled by which teams and enables role-based access control. Layout best practices:- Arrange your process flow from left to right for better readability
- Use vertical spacing to separate parallel branches
- Group related nodes close together
- Keep crossing sequence flows to a minimum
- Use subprocesses to encapsulate complex logic
Swimlanes
Validating your process
Before publishing a process, ensure it meets all requirements:Validation rules
The Process Designer automatically validates your process and displays warnings for:- Missing required nodes: Processes must have at least one START and one END node
- Disconnected nodes: All nodes must be reachable through sequence flows
- Missing configurations: User tasks without assigned navigation areas or UI elements
- Platform mismatches: UI configurations that don’t align with selected platforms (Web/Mobile/Omnichannel)
- Permission issues: Swimlanes without proper role assignments
- Invalid expressions: Business rules or conditions with syntax errors
Click on any warning to navigate directly to the problematic node or configuration.
Testing your process
Before deploying to production:- Start a test instance: Use the test function to start a process instance in your development environment
- Monitor execution: Watch how tokens move through your process and verify all paths work correctly
- Check data flow: Ensure data is properly captured and passed between nodes
- Test all branches: Verify that gateways route correctly based on different conditions
- Validate integrations: Confirm external system connections work as expected
Starting a process
Common validation errors
Process definition not found
Process definition not found
Cause: The process hasn’t been set as published or doesn’t exist in the target environment.Solution: Ensure your process is part of a committed project version and deployed to the environment.
Start node not properly configured
Start node not properly configured
Cause: Missing or misconfigured START node.Solution: Add a START node and ensure it has proper permissions configured if multiple start nodes exist.
Multiple start nodes without conditions
Multiple start nodes without conditions
Cause: Multiple START nodes defined without start conditions to differentiate them.Solution: Add start conditions to each START node or remove extra START nodes.
User task not assigned to navigation area
User task not assigned to navigation area
Collaboration and versioning
Working with multiple users
Multiple team members can work on processes simultaneously:- Concurrent editing: Multiple users can view and edit processes within the same draft version
- Real-time updates: Changes made by other users appear automatically when you refresh
- Conflict prevention: The system prevents conflicting changes through optimistic locking
- Change tracking: The audit log records who made what changes and when
Version management
Processes are versioned as part of projects:- Draft versions: Work-in-progress changes that can be edited
- Committed versions: Finalized snapshots that are immutable
- Version comparison: Compare different versions to see what changed
- Audit trail: Track all changes with timestamps and user information
Versioning
Learn about project versioning
Audit log
View change history
Best practices
Troubleshooting
Process won't save
Process won't save
Symptoms: Changes aren’t being saved or the autosave indicator shows an error.Solutions:
- Check your network connection
- Verify you have edit permissions for the project
- Ensure the project is in draft status (committed versions can’t be edited)
- Try refreshing the page and re-applying your changes
- Check if another user has locked the resource
Nodes can't be connected
Nodes can't be connected
Symptoms: Unable to create sequence flows between nodes.Solutions:
- Verify you’re connecting compatible node types (e.g., END nodes can’t have outgoing sequences)
- Check if a sequence already exists between the nodes
- Ensure nodes are in the same process (not trying to connect across subprocess boundaries)
- Try zooming in - connection points might be difficult to target at small zoom levels
Process instances fail to start
Process instances fail to start
Symptoms: Runtime errors when trying to start process instances.Solutions:
- Review and resolve all validation warnings
- Verify the process is published and included in an active build
- Check that users have appropriate permissions (execute role)
- Ensure all required integrations are configured and accessible
- Review the exceptions log for detailed error messages
Failed process start
UI elements not displaying
UI elements not displaying
Symptoms: Configured UI components don’t appear when running the process.Solutions:
- Verify user tasks are assigned to navigation areas
- Check that UI elements are configured for the correct platform (Web/Mobile)
- Ensure actions are set to “Manual” if they should be triggered by user interaction
- Validate that the process platform setting matches your deployment (Web Only, Mobile Only, or Omnichannel)
- Check hide/disable expressions aren’t preventing element display
Process Instance Monitoring
Learn how to monitor and debug running process instances
Process definition
The process is the core building block of the platform. Think of it as a representation of your business use case, for example making a request for a new credit card, placing an online food order, registering your new car or creating an online fundraiser supporting your cause.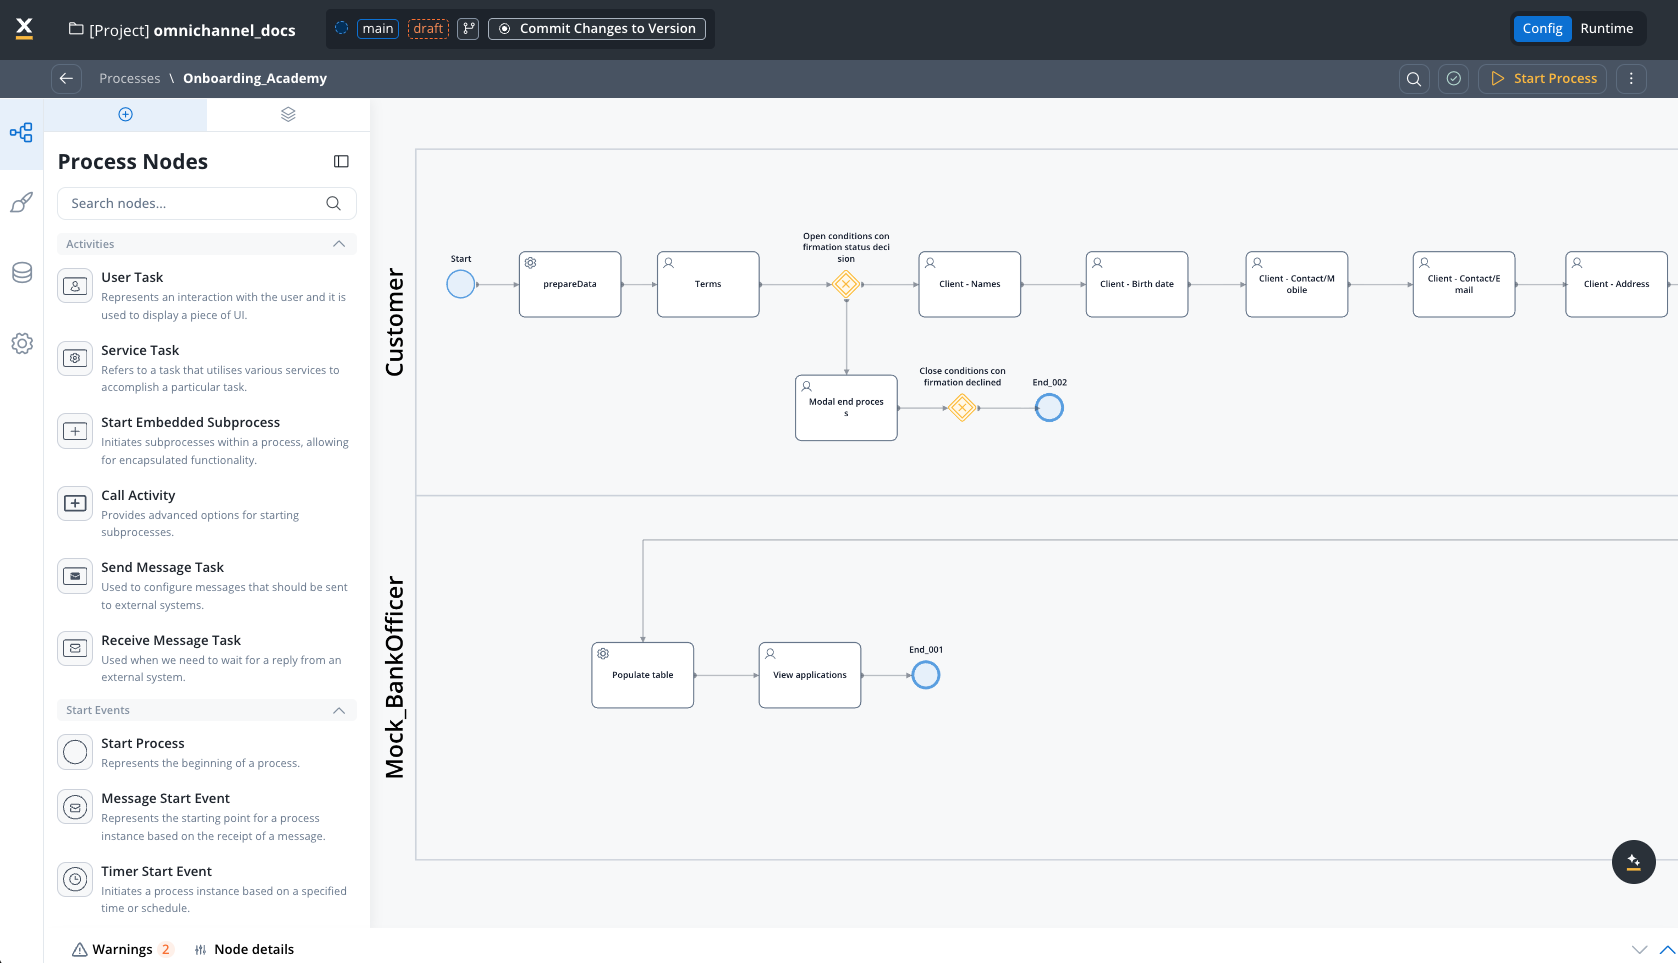
Process definition
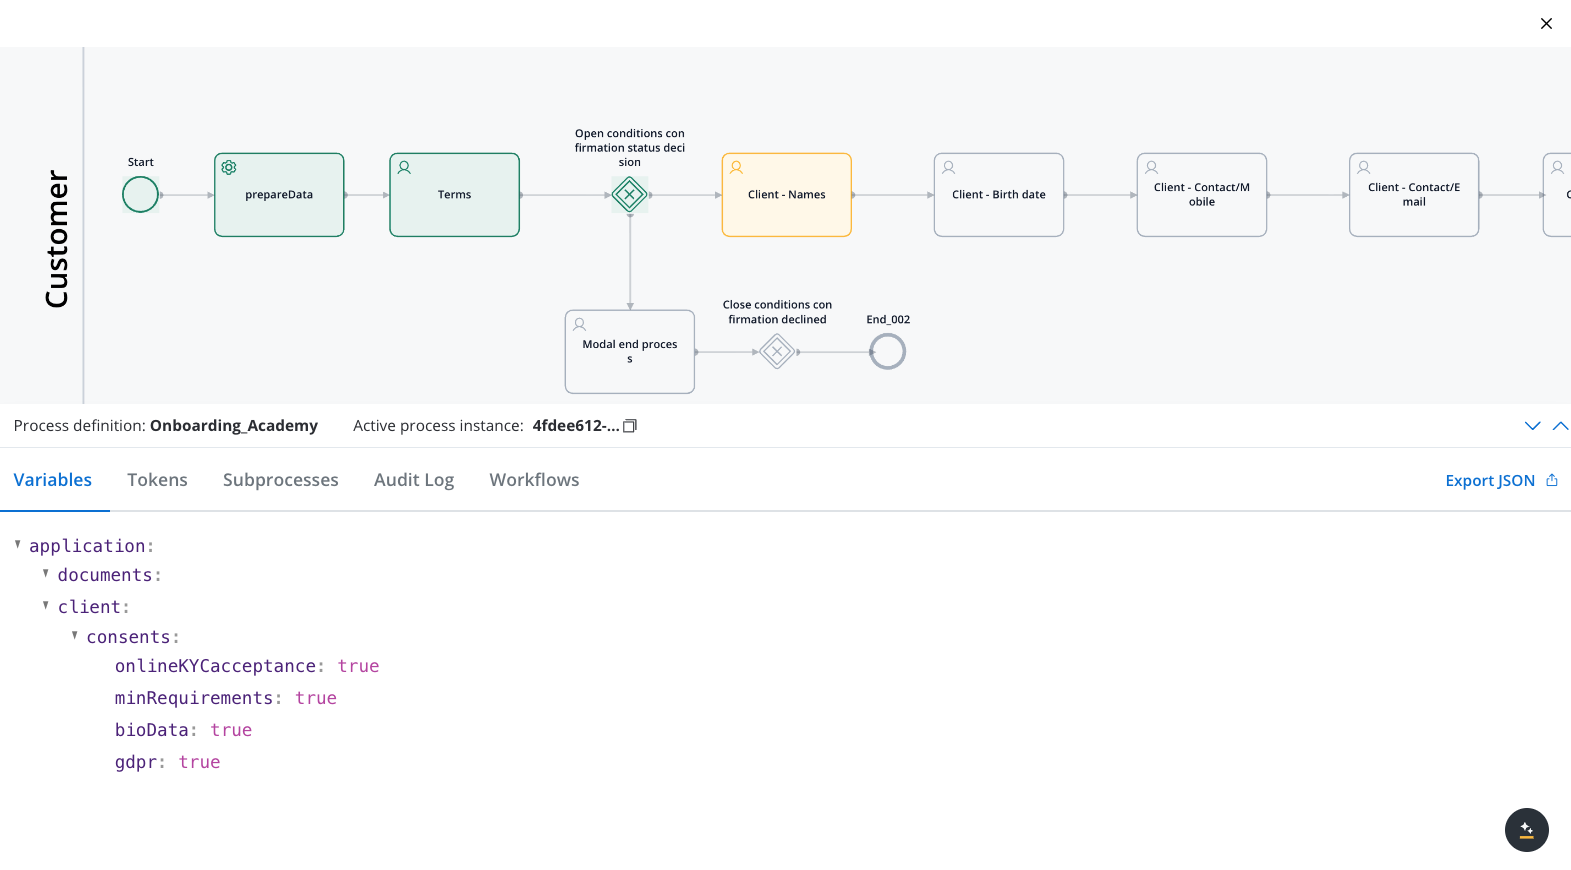
Process instance
Once the desired processes are defined in the platform, they are ready to be used. Each time a process needs to be used, for example, each time a customer wants to request a new credit card, a new instance of the specified process definition is started in the platform. Think of the process definition as a blueprint for a house, and of the process instance as each house of that type that is being built.