

Overview
Organization Admins can invite designer users to their organization via email. Invited users receive a secure invitation link, can be pre-assigned roles and groups, and go through a guided activation flow before becoming active members.Only users with the Organization Admin role can invite new designer users.
SMTP is required. Invitations and password-recovery emails are dispatched by Keycloak. On self-hosted deployments the client must configure SMTP in Keycloak (per realm) before either flow will work — without it, invitations fail silently. See Email (SMTP) configuration.
Accessing user invitations
The invitation feature is available from the Designer Users page:1
Navigate to Designer Users
Go to Organization Settings → Designer Users
2
Open the invite dialog
Click Invite User from the contextual menu or action bar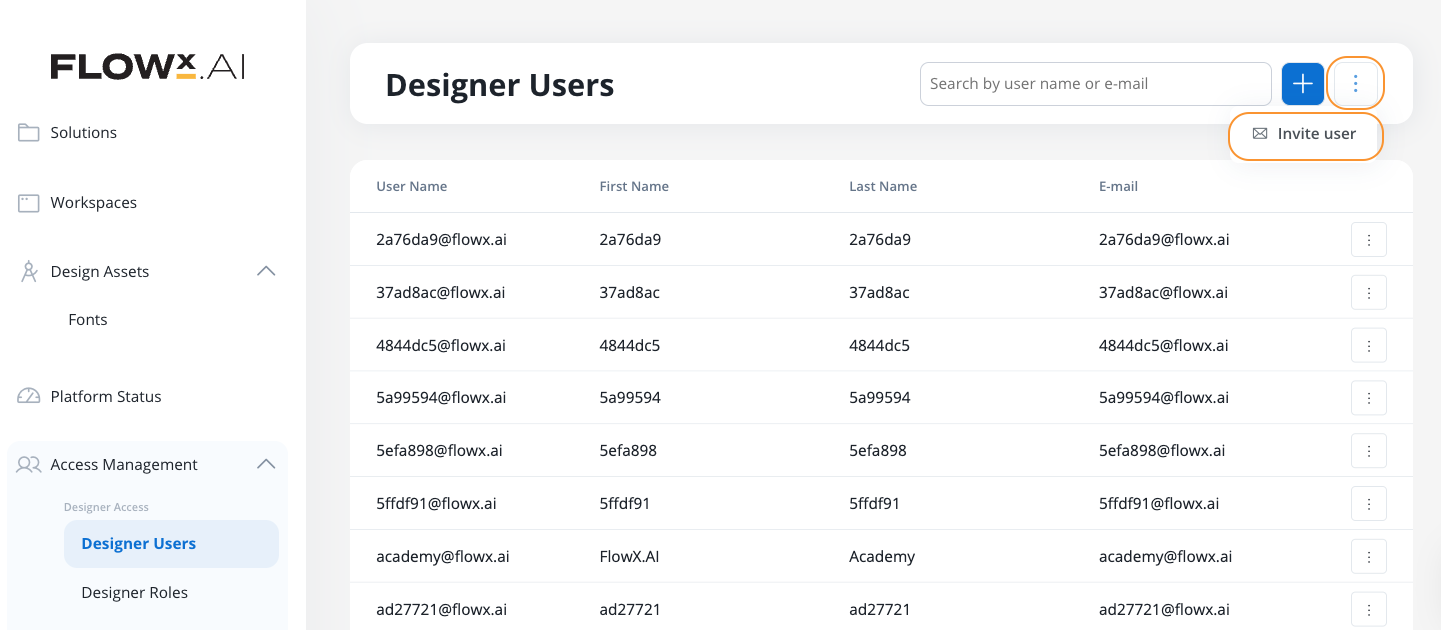
Invitation form
When inviting a new user, you can configure the following options: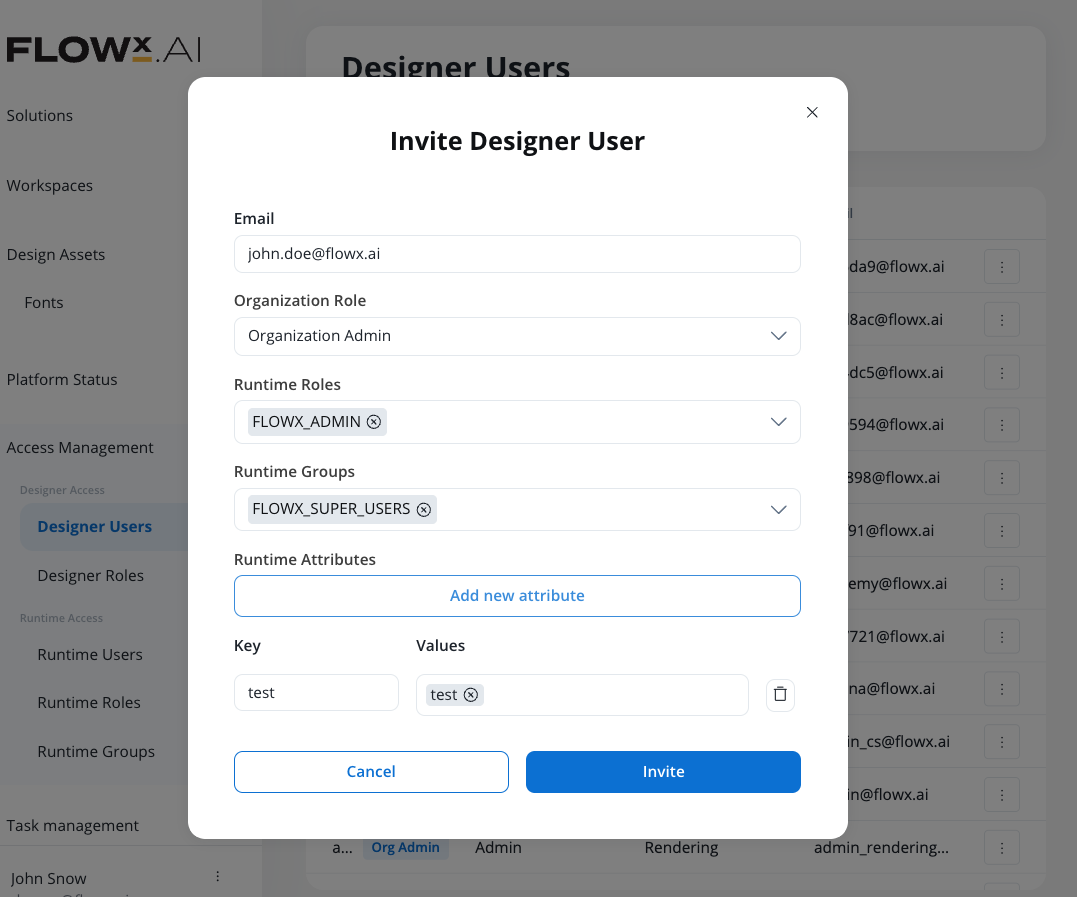
Invitation workflow
Sending an invitation
1
Enter email address
Provide the email address of the user you want to invite
2
Configure access (optional)
Select a designer role, runtime roles, groups, and any custom attributes
3
Send invitation
Click Send invite to create the user and trigger the invitation email
-
A user account is created in Keycloak with:
- The provided email address
- Selected runtime roles and groups
- email verified set to
false - Required actions: update password and update profile
-
A user record is created in FlowX with:
- Assigned selections (roles, groups, attributes)
- Status: Pending
- Organization Owner role (if selected)
- An invitation email is sent to the user
A success notification confirms: “Invitation sent successfully”
Invitation email
The invited user receives an email with the following content:Invitation email
Subject: You’ve been invited to your FlowX.ai accountHi,You’ve been invited to join the FlowX Platform to test our new Agentic Apps.This early access will let you explore how Agentic Apps work and give feedback on the experience before the broader rollout.[Accept Invitation]Best
User activation flow
When the invited user clicks the invitation link, they complete a two-step activation process:Step 1: Set password
The user creates a secure password for their account:- Minimum 8 characters, maximum 64 characters
- Must include at least one uppercase letter, one lowercase letter, one number, and one special character (
!@#$%^&*()_+-) - Cannot be the same as the user’s email address
- Upon submission, proceeds to profile setup
Step 2: Complete profile
The user provides their profile information:
Upon submission:
- User profile is updated with the provided information
- email is marked as verified
- User is redirected to the login page with a success message
First login
After completing activation and logging in for the first time:- User status changes from Pending to Active
- First name and last name are populated in the FlowX user profile
- User appears in the Designer Users list with Active status
Handling expired invitations
If a user clicks an invitation link after it has expired (more than 2 days), they see an “Invite link expired” page.User statuses
Disabling and enabling users
Administrators can change a user’s status from the Designer Users or Runtime Users page:1
Open user actions
Find the user in the users list and open the context menu (three-dot menu)
2
Select the action
Choose Disable to deactivate an active user, or Enable to reactivate a disabled user
3
Confirm the action
Confirm the action in the dialog. The user’s status updates immediately.
The Disable/Enable actions are available only for Runtime Users. Disabled users cannot log in until their account is re-enabled.
Resending invitations
If a user’s invitation has expired or was lost, you can resend it:1
Find the pending user
Find the user with Pending status in the Designer Users or Runtime Users list.
2
Select Resend invite
Open the context menu and select Resend invite.
3
Invitation sent
A new invitation email is sent with a fresh activation link.
Best practices
Pre-assign appropriate roles
Pre-assign appropriate roles
Configure the correct designer role and runtime roles during invitation to ensure users have proper access from day one.
Use runtime groups for team organization
Use runtime groups for team organization
Add users to runtime groups during invitation to automatically organize them into teams and apply group-based permissions.
Monitor pending invitations
Monitor pending invitations
Regularly check the Designer Users page for users with Pending status to identify invitations that may need to be resent.
Communicate invitation timing
Communicate invitation timing
Let invited users know to expect the invitation email and complete activation within 2 days to avoid expiration.
Limitations
The following features are planned for future releases:
- Cancel invite - Ability to cancel a pending invitation
- Copy invite link - Ability to copy the invitation link directly
Related documentation
FlowX SaaS Overview
Learn about FlowX SaaS deployment and multi-tenancy
Access Management
Configure IAM and Keycloak settings
Workspaces
Understand workspace organization
Roles & Permissions
View the complete roles and permissions reference