What is a process definition?
A process definition is the blueprint for your business processes. It defines the complete workflow logic—including nodes, sequences, decision points, user interactions, and integrations—that makes up your business process.A process definition is like an architectural blueprint. The definition specifies how to build the structure, while process instances are the actual buildings constructed from that blueprint.
Key characteristics of process definitions
Executable Blueprint
Once defined and published, process definitions can be instantiated, executed, and monitored in real-time
Version Controlled
Processes are versioned as part of projects, enabling safe evolution and rollback capabilities
Multi-Platform Support
Configure processes for Web Only, Mobile Only, or Omnichannel deployment
Role-Based Access
Control who can view, execute, and modify processes using swimlanes and permissions
Understand definitions and instances
Process definitions and process instances serve different purposes:| Aspect | Process Definition | Process Instance |
|---|---|---|
| Nature | Blueprint/template | Actual execution |
| When created | Design time | Runtime |
| Quantity | One per process type | Many per definition |
| Changeability | Can be versioned and updated | Immutable once started |
| Contains | Node configurations, rules, UI | Current state, runtime data, token position |
Process instance
Learn about running process instances
Failed process start
Troubleshoot process execution errors
Manage the process lifecycle
The process lifecycle consists of seven stages, from initial design through deployment and optimization:Design
Create your process definition using the Process Designer, adding nodes, configuring actions, and building the UI.
Configure
Set process-level settings including permissions, platforms, expiry time, and integrations with Task Manager or reporting.
Validate
Address any configuration warnings and test the process with sample data to ensure it works as expected.
Commit
Save your changes as part of a committed project version, making them available for deployment.
Committed versions are immutable. To make further changes, create a new draft version.
Build and Deploy
Include the process in a project build and deploy it to your target environments (development, staging, production).
Execute
Process instances are created from the definition when users or systems trigger the process.
Creating a process definition
Step-by-step guide to creating your first process
Work with core components
Process definitions consist of six integrated workspaces and tools that work together to create business applications: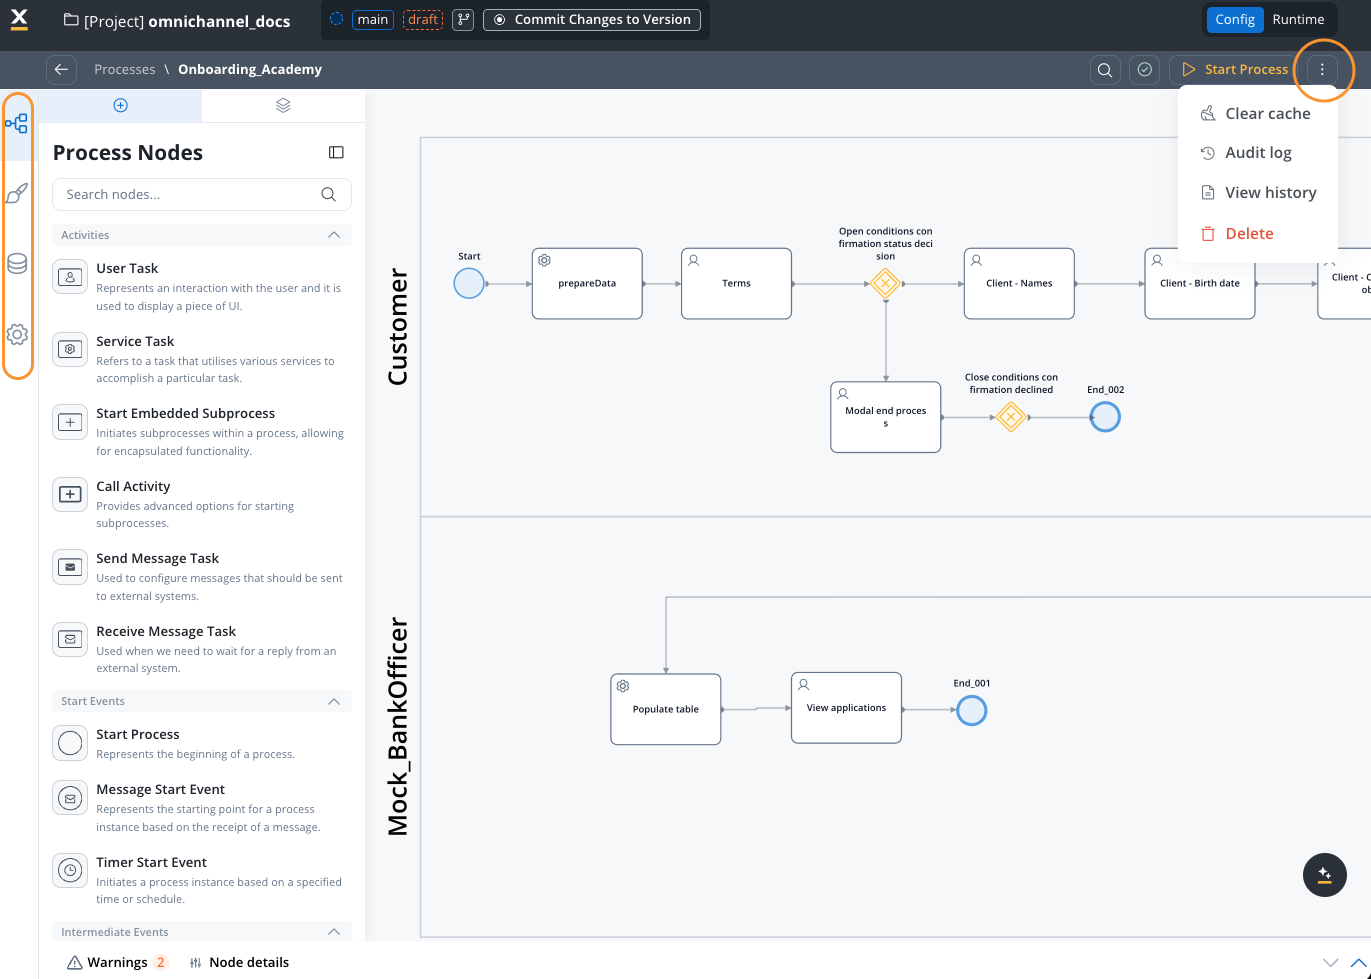
1. Process Designer
The visual BPMN 2.0 workspace where you create and edit process logic using a drag-and-drop interface.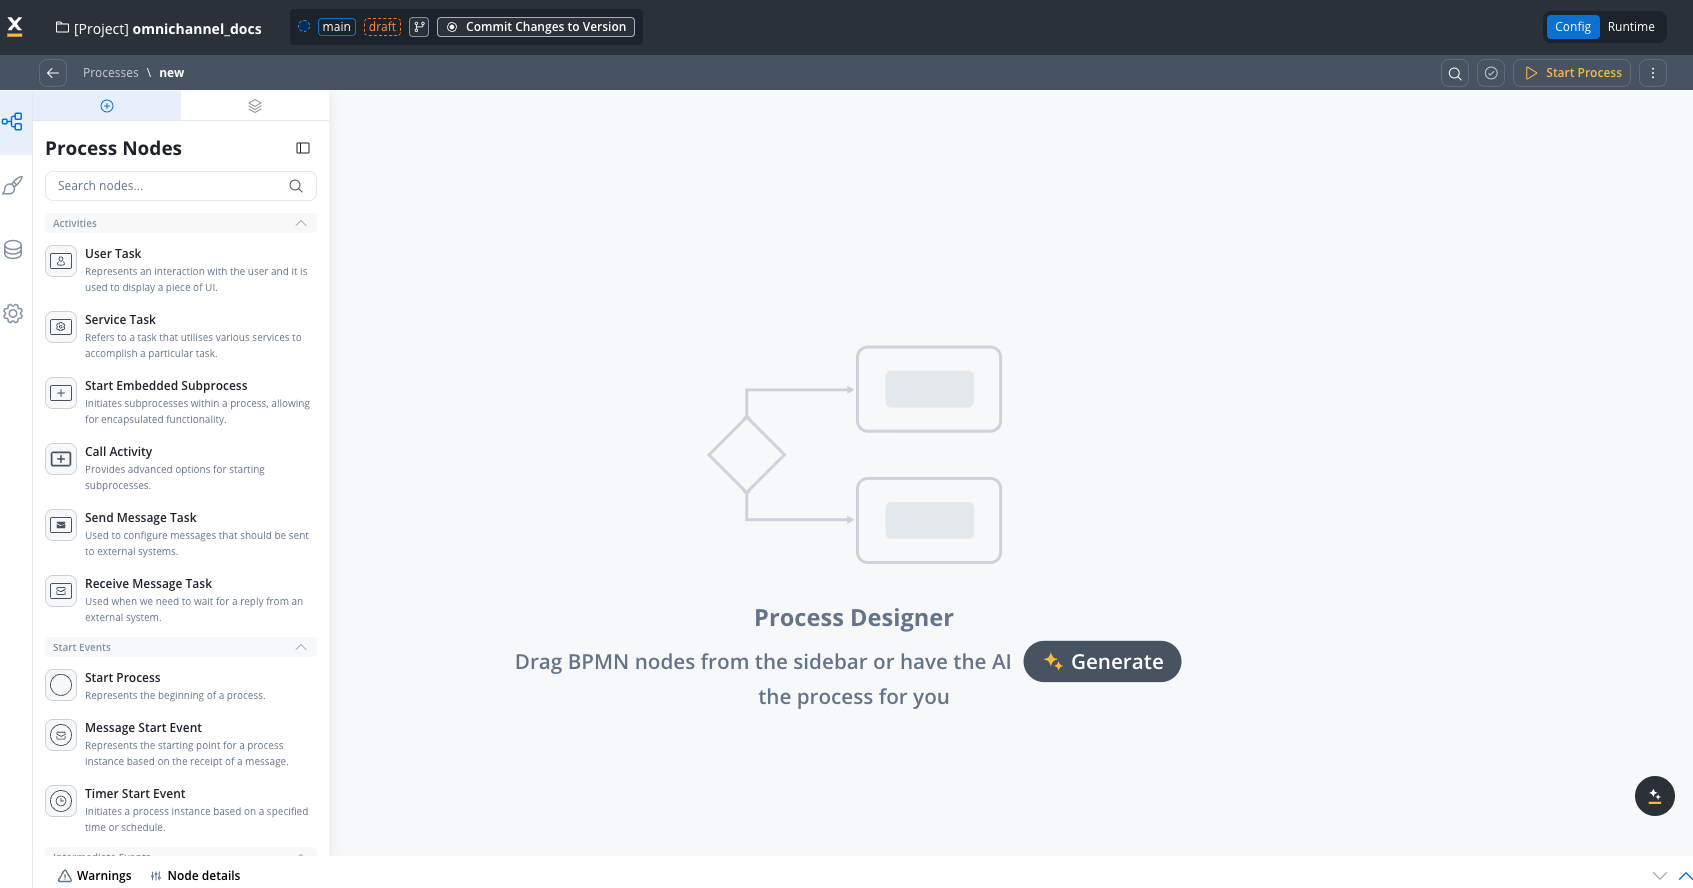
- Node palette: Access all BPMN node types (User Tasks, Service Tasks, Gateways, Events, etc.)
- Swimlanes: Organize process steps by role or department for access control
- Canvas controls: Zoom, pan, and navigate large process diagrams
- Sequence flows: Connect nodes to define the execution path
- Visual feedback: Real-time validation warnings and configuration status
Process Designer
Complete guide to the Process Designer workspace
2. UI Designer
The visual workspace where you design user interfaces for process interactions without code.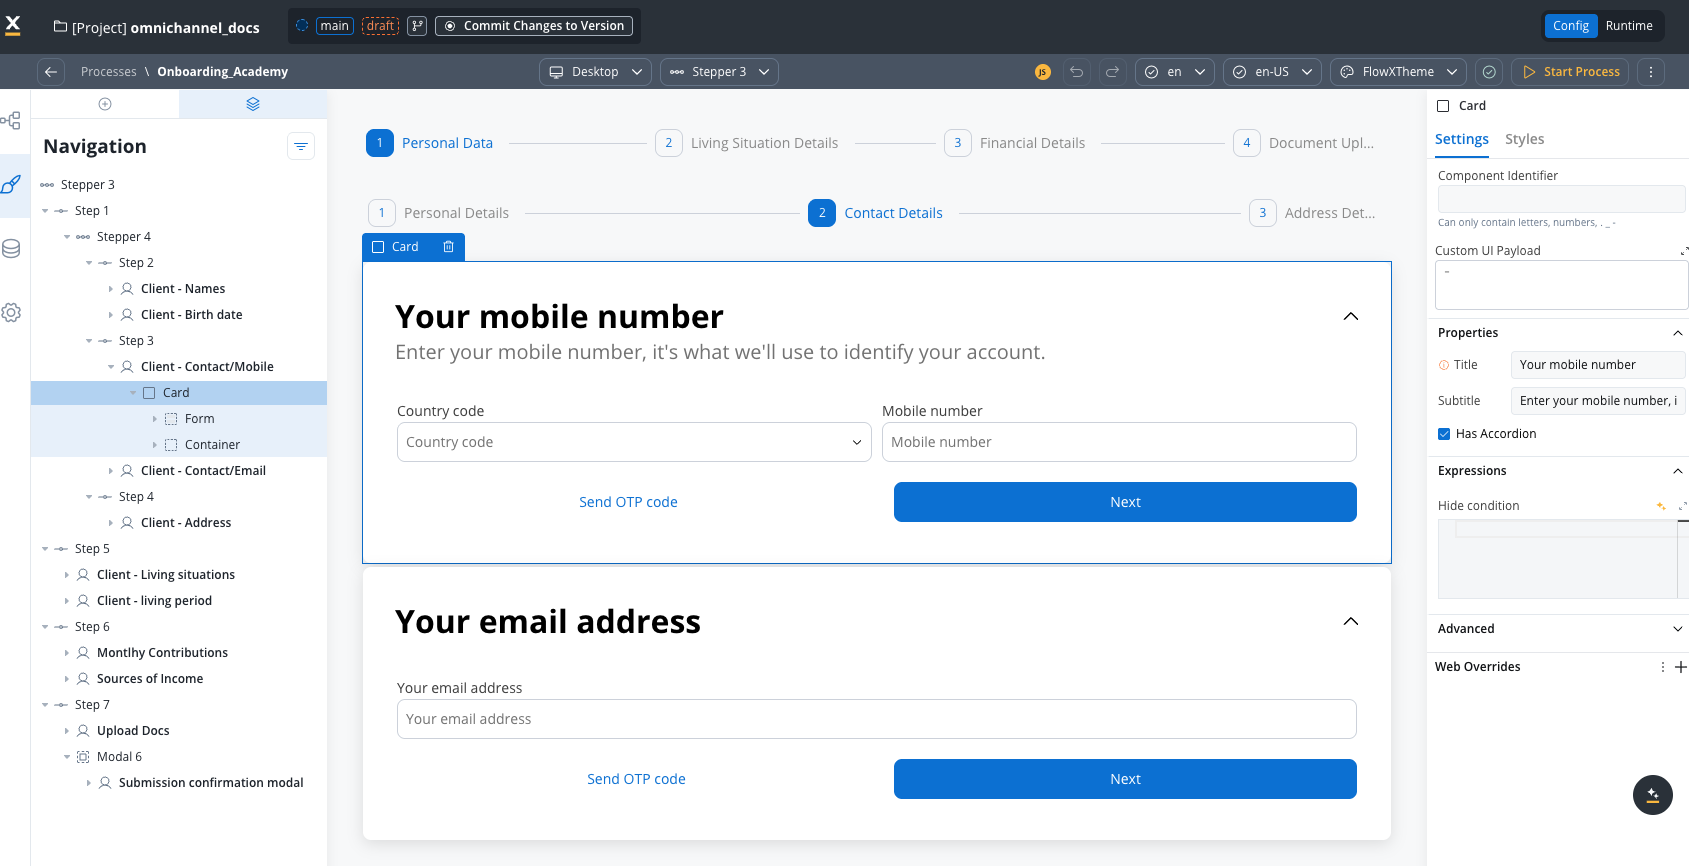
- Component library: Pre-built UI components (Forms, Inputs, Buttons, Tables, Cards, etc.)
- Drag-and-drop design: Build interfaces by dragging components onto the canvas
- Live preview: See how your UI will appear to users in real-time
- Platform-specific design: Configure separate UIs for Web, iOS, and Android
- Data binding: Connect UI elements directly to process data
- Theme support: Apply consistent styling across your application
UI Designer
Learn about UI component configuration
3. Data Model
Define the structure and schema for all data that flows through your process.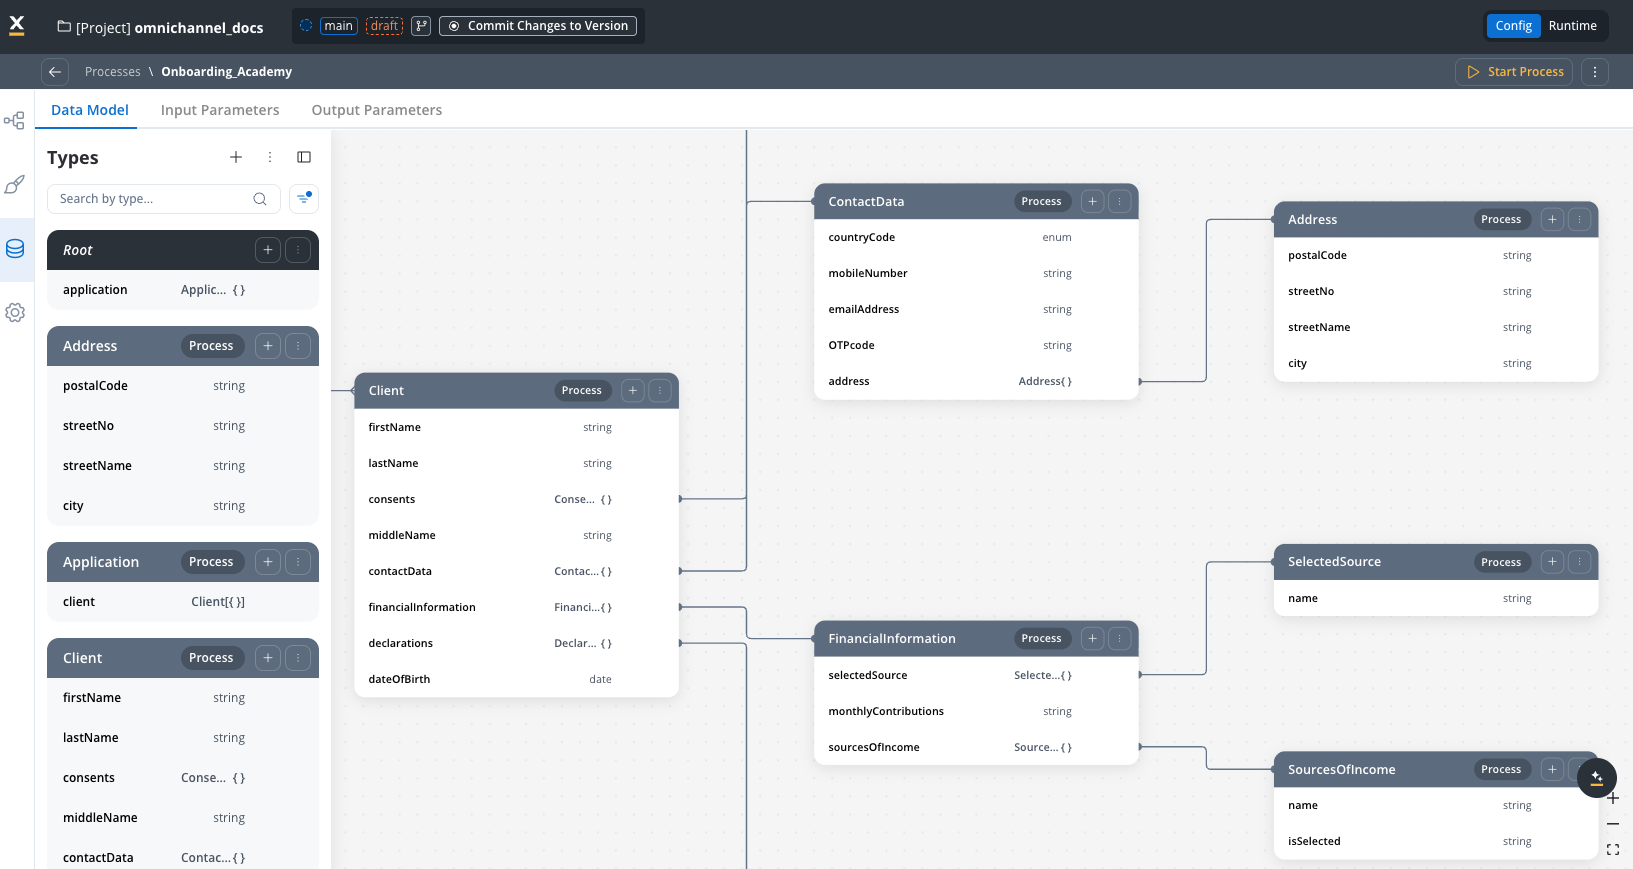
- Type definitions: Create reusable data structures with typed fields
- Visual relationships: See how data objects connect and reference each other
- Input parameters: Define what data the process expects to receive
- Output parameters: Specify what data the process returns
- Example values: Include sample data for testing and development
- Validation rules: Ensure data integrity with type checking
Data Model
Comprehensive data modeling guide
4. Settings
Configure process-level settings including naming, permissions, integrations, and platform options.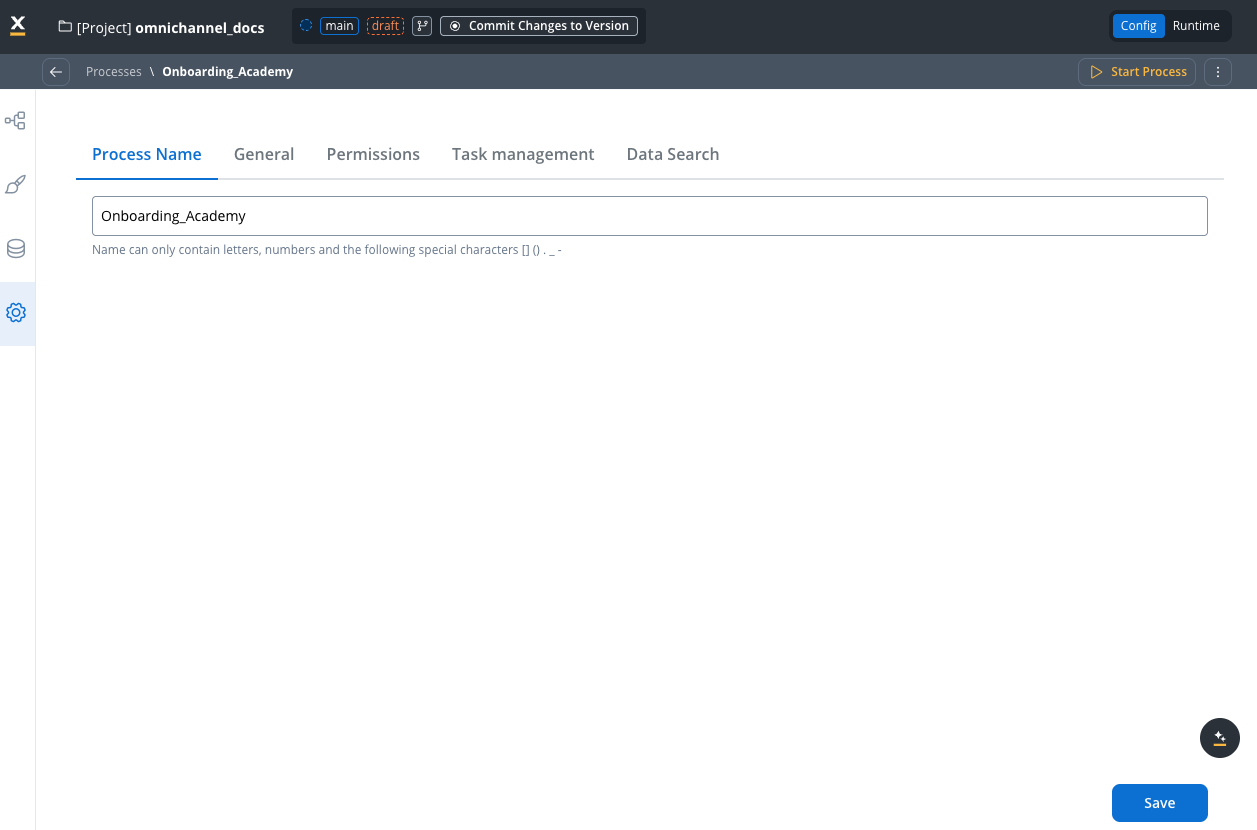
- Process Name: Set the unique identifier with naming constraints
- General: Platform selection, reporting, task management, expiry time
- Permissions: Configure swimlane roles and access control
- Task management: Integration with Task Manager plugin
- Data Search: Define searchable and filterable process data keys
5. Start a process for testing
Click the Start Process button in the top-right corner to test your process directly from the designer. Capabilities:- Automatically generates input forms based on your defined input parameters
- Validates required data before the process starts
- Creates a test process instance in your current environment
- Helps you test and debug during development
Starting a process
Learn more about starting and testing processes
6. Access additional operations
Click the contextual menu (three-dot icon ⋮ in the top-right corner) to access essential process operations: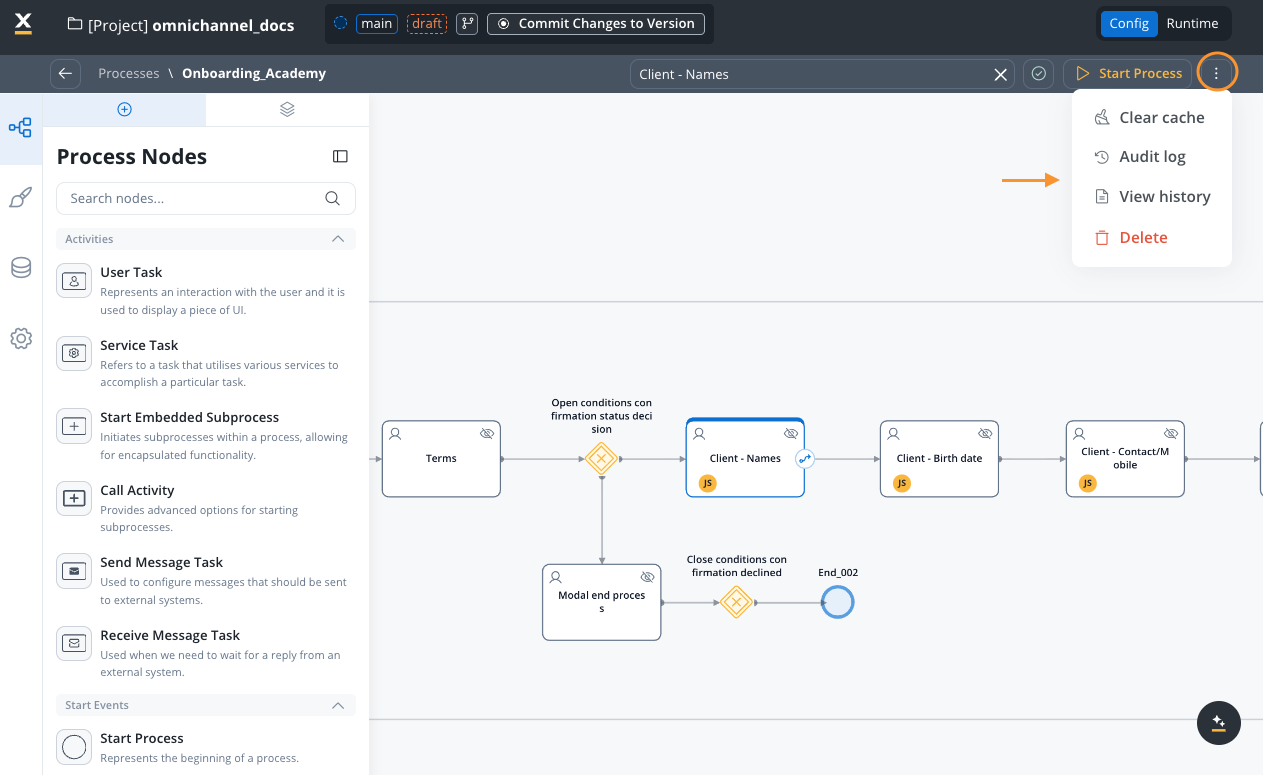
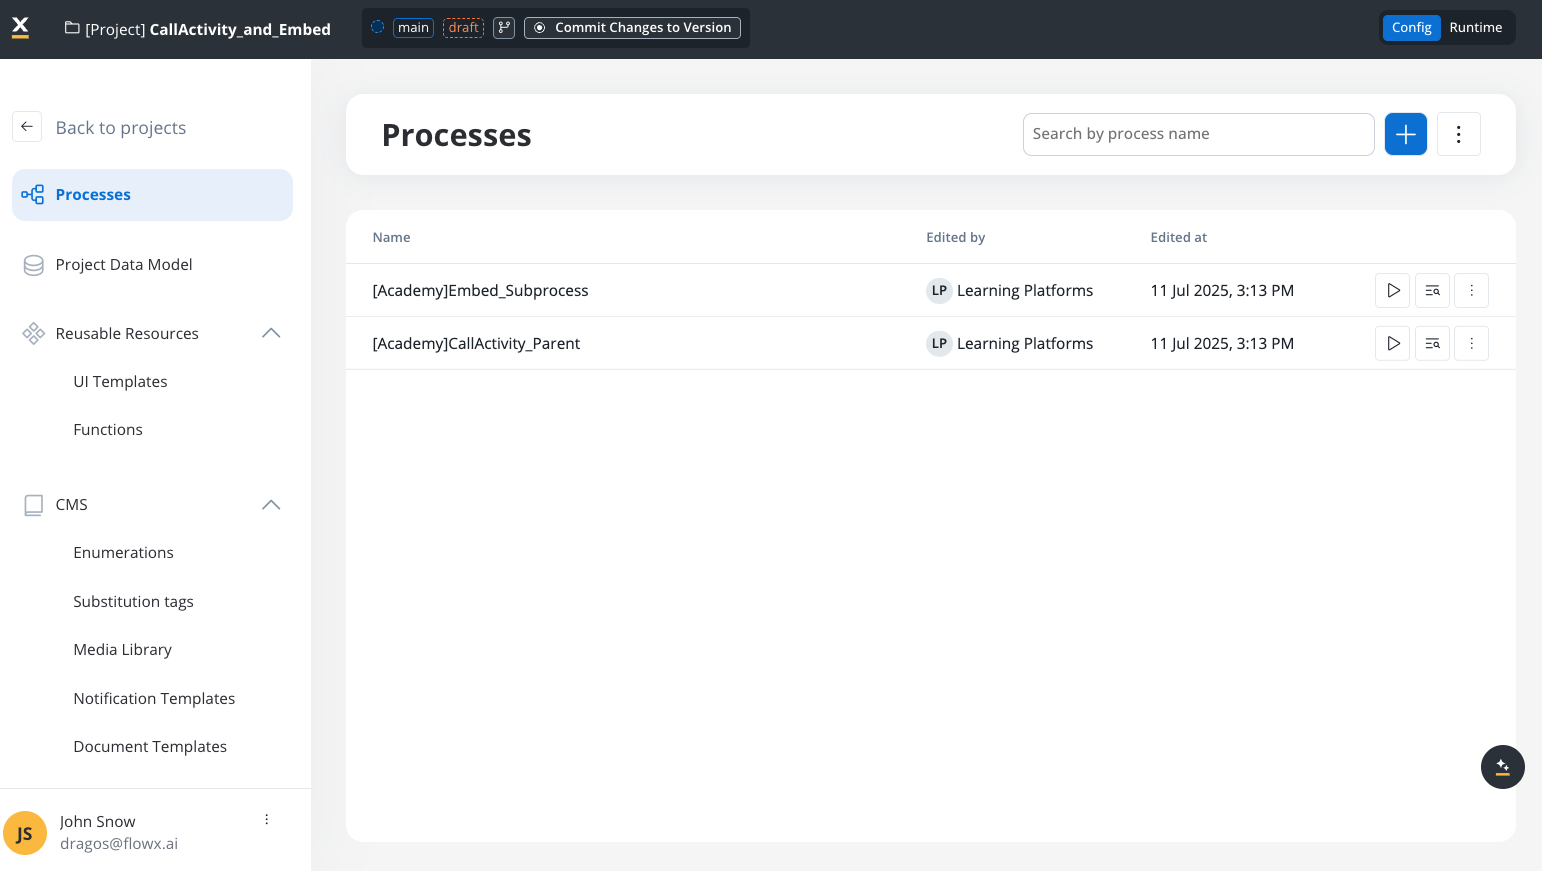
Two contextual menus for process management:This menu is available when you’re inside a process definition, actively editing it. There’s also a separate contextual menu available from the Processes list view (before opening a process) that provides operations like Export, Duplicate, Copy to another project, and See used resources.
Managing processes from the list view
Learn about the Processes list contextual menu for export, duplicate, and copy operations
Clear Cache
Clear Cache
Clear cached process definition data to force a refresh from the database.When to use:
- After making significant changes that aren’t reflecting in the UI
- When experiencing unexpected behavior or outdated data display
- To troubleshoot synchronization issues
This only clears the cache for the current process definition in your browser session.
Audit Log
Audit Log
View comprehensive change history for the process definition.Information tracked:
- Timestamp of each change
- User who made the change
- Application version
- Subject and event type
- Subject identifier
- Status of the change
- Filterable entries for easy tracking
- Complete audit trail for compliance
- Version comparison capabilities
Audit documentation
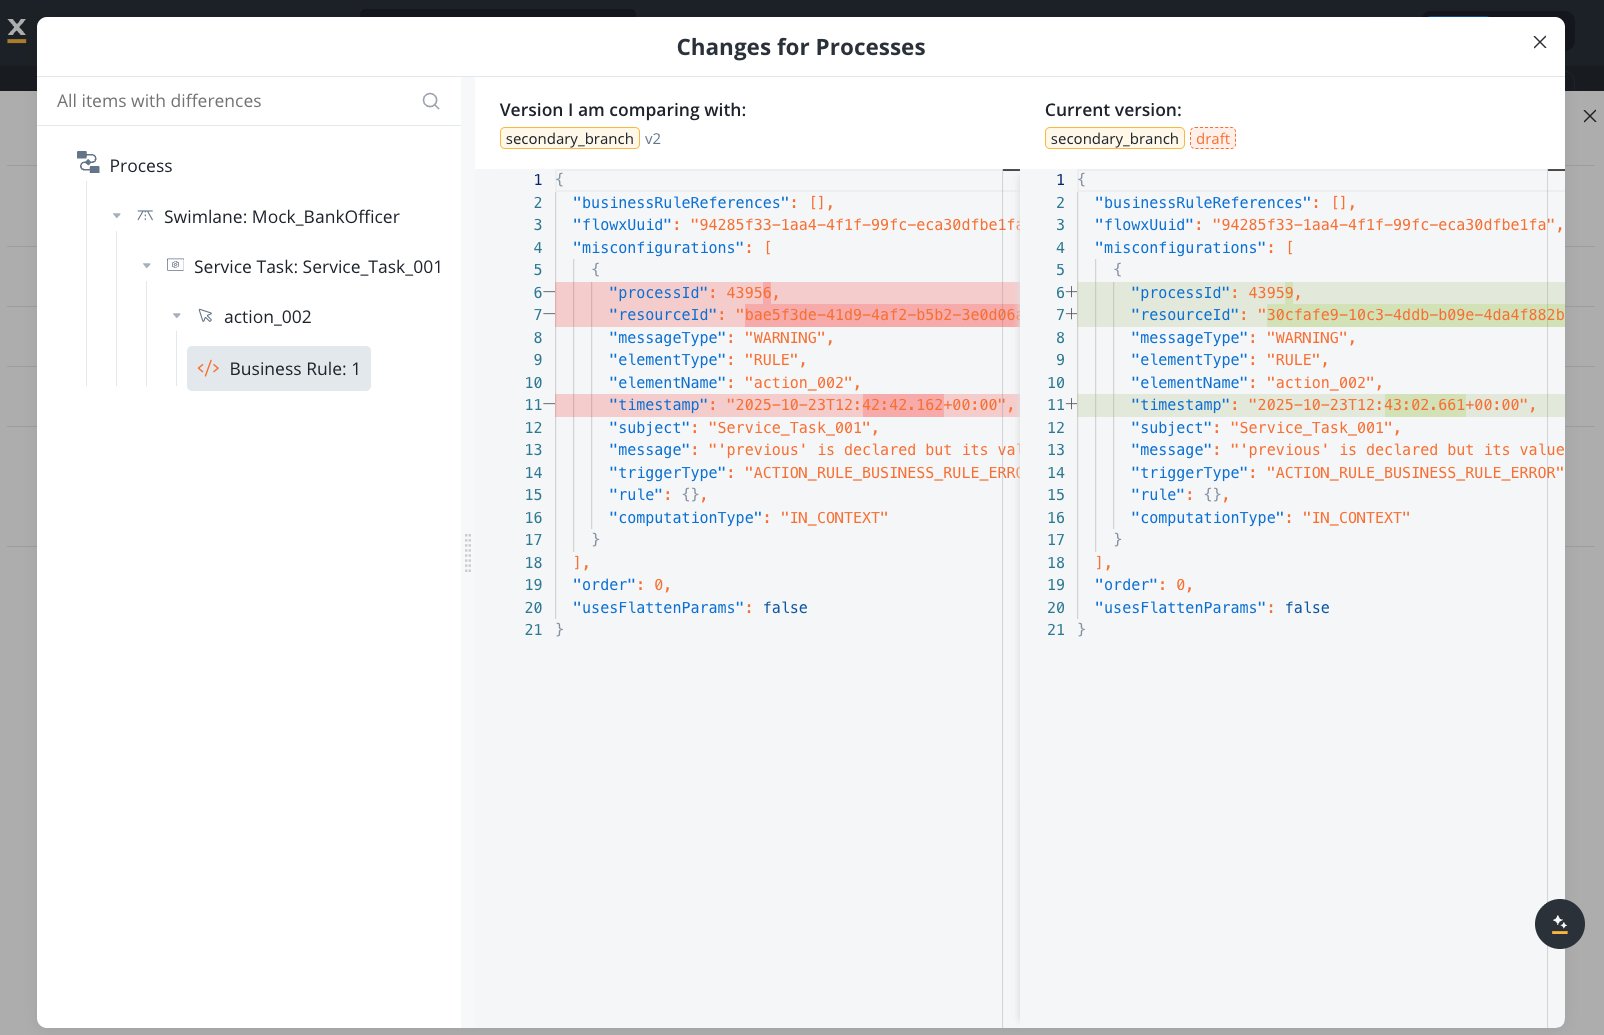
View History
View History
Access the version history of the process definition to see all changes over time.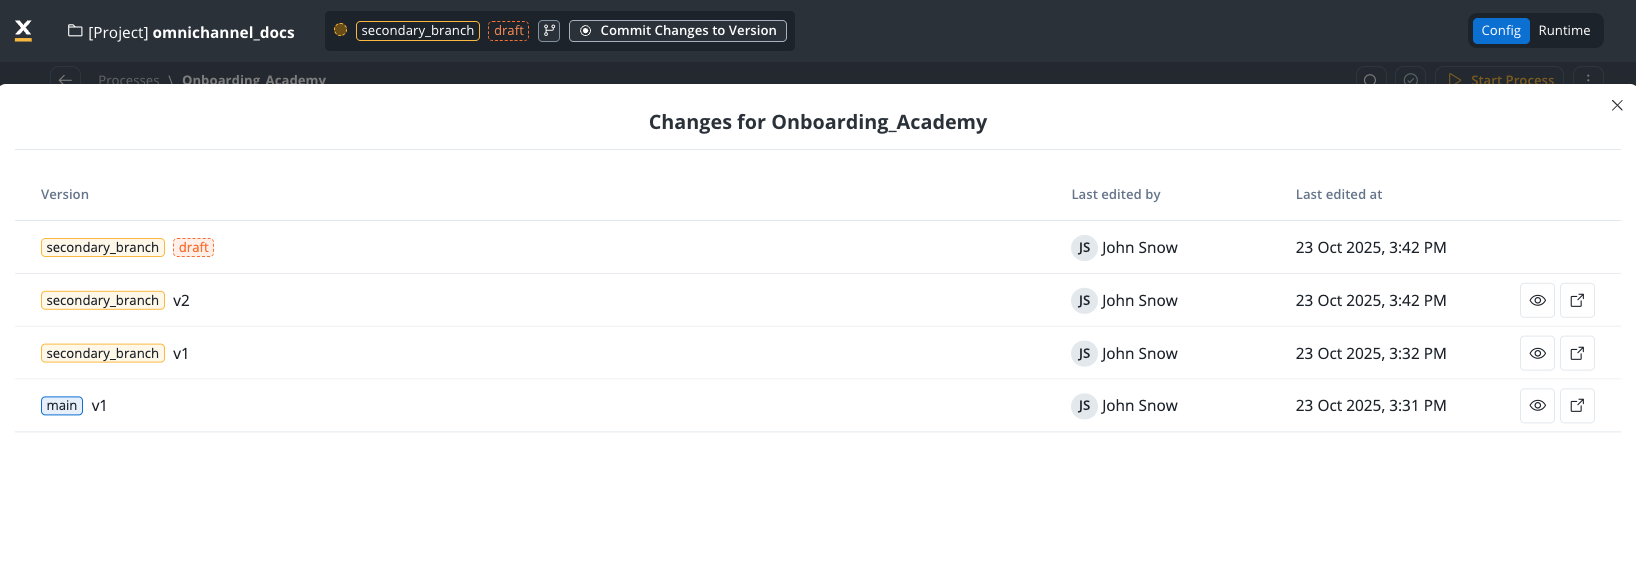
 Capabilities:
- Compare different versions side-by-side
- See what changed between versions
- Track evolution of the process definition
- Identify when specific changes were introduced
This shows the version history within the project versioning system, allowing you to see how the process evolved across committed versions.
Delete
Delete
Remove the process definition from the project.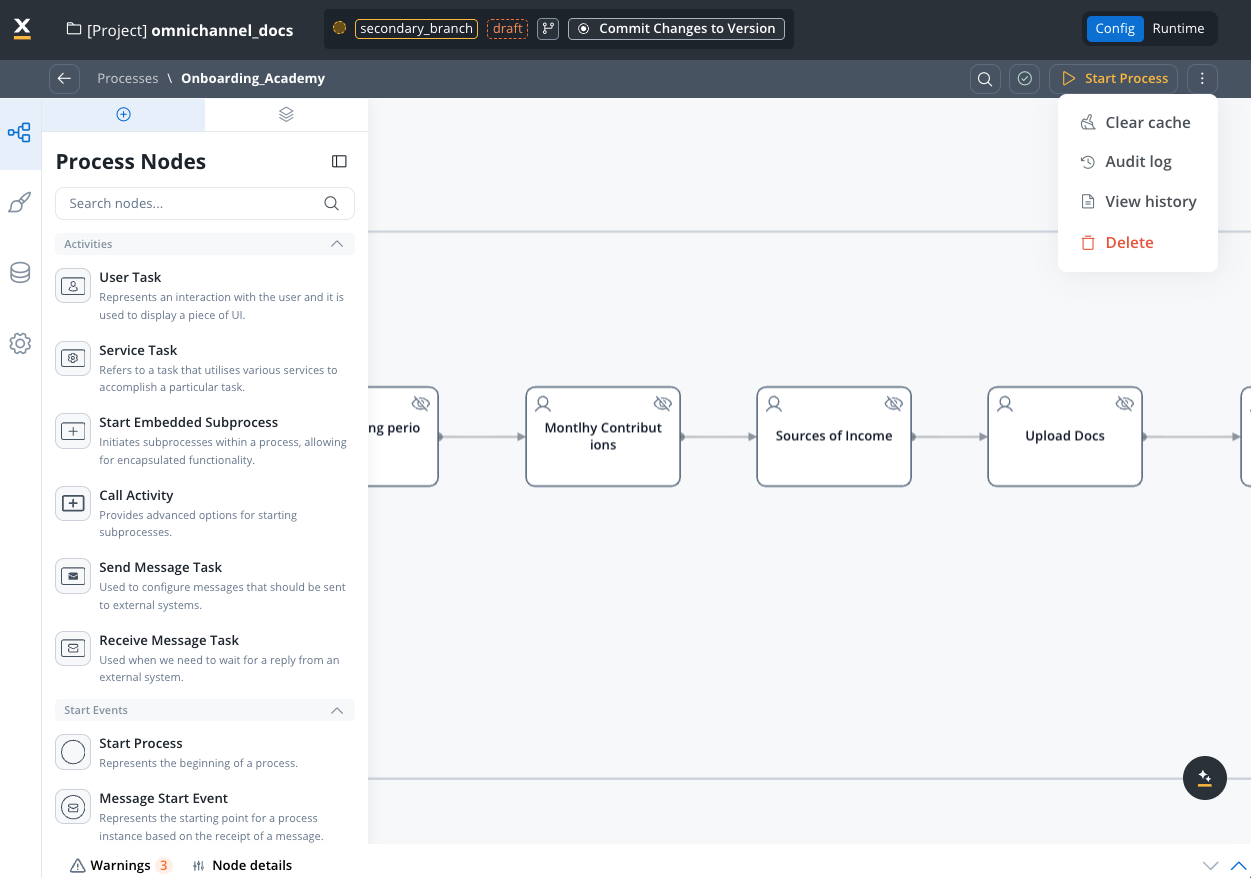 Impact:
- The process definition is removed from the current wip version (you cannot delete a process definition that is part of a committed version)
- References from other processes may break
- Historical data of process instances is not affected
- Can be recovered from previous committed versions if needed
Define your data model
The data model defines the structure of all data in your process. It acts as the schema for process variables, letting you organize and manage data throughout the process lifecycle.Access the data model directly from the process definition interface to add new key-value pairs without switching menus.
Why define a data model?
Defining your data model provides several benefits:- Type safety: Prevent errors during process execution by defining data types
- Auto-completion: Get intelligent suggestions in UI Designer based on defined keys
- Validation: Ensure data consistency across nodes and actions
- Documentation: Use the data model as living documentation of your process data structure
- Reusability: Reference data structures across multiple nodes and actions
- Testing: Include example values to test without creating mock data
Data model
Configure input and output parameters
Define the data contract for your process by specifying what data it receives (inputs) and what data it returns (outputs). These parameters are essential for subprocesses, workflows, and process testing.Access parameter configuration
To configure parameters, navigate to the Data Model tab. Input parameters Input parameters define the data structure your process expects when it starts or when called as a subprocess:- Enable process start validation
- Generate automatic input prompts for testing
- Support Call Activity nodes and subprocess integration
- Return data to parent processes
- Enable synchronous subprocess communication
- Replace manual “Append Data to Parent Process” actions
How to configure parameters
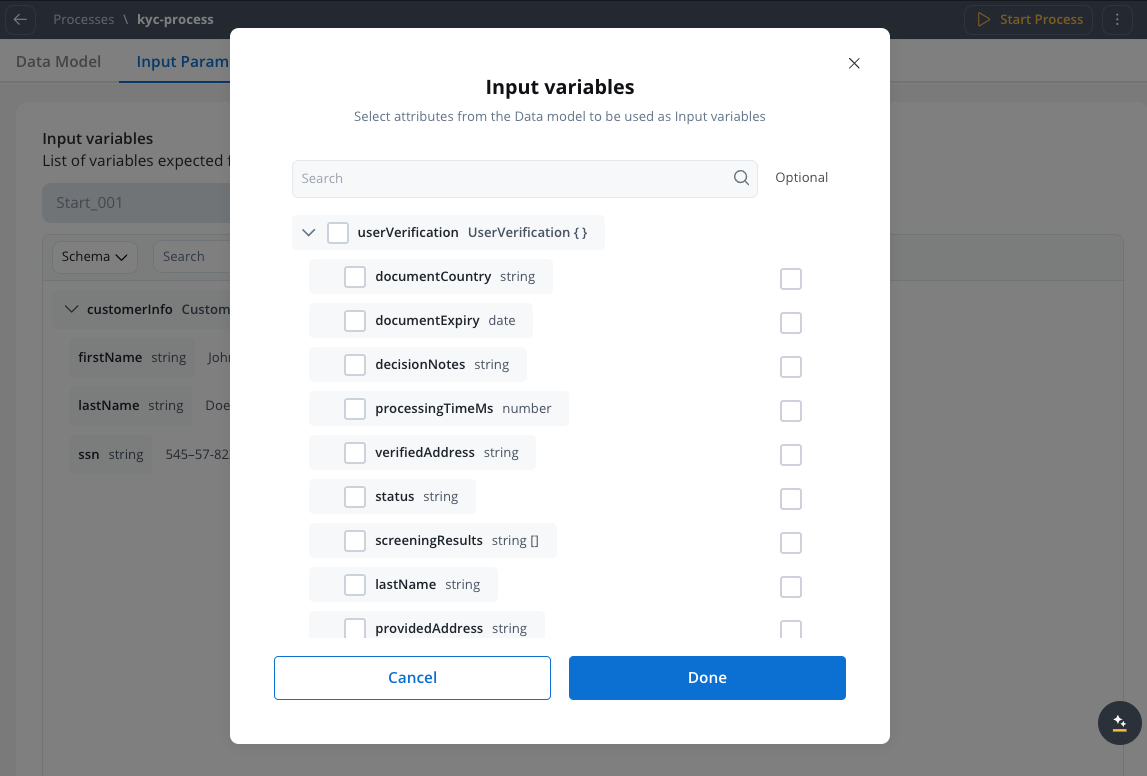
To configure input or output parameters:- Navigate to Data Model → Input/Output Parameters.
- Click Define parameters.
- Configure the schema:
- Add the parameter name and data type.
- Mark parameters as required or optional.
- Add descriptions and example values.
- If you have multiple start or end nodes, select the specific node from the dropdown.
Key features
- Automatic validation of required parameters
- Type checking ensures data integrity
- Change propagation: Deleted/renamed attributes automatically update in mappings
- Multiple nodes support: Different parameters for different start/end points
Data mappers
Complete guide to mapping data between components
Call Activity node
Using parameters with subprocess calls
Organize processes with swimlanes
Swimlanes provide a visual and functional way to organize process nodes by participants or roles. You can structure your process by dividing it into horizontal lanes, with each lane representing different actors, departments, or responsibility areas.Swimlanes serve two purposes: they provide visual organization in the process designer and enforce role-based access control at runtime.
Benefits of using swimlanes
Use swimlanes to:- Improve visual clarity: Show which team or role is responsible for each process step
- Control access: Restrict who can execute, view, or self-assign tasks in each lane
- Ensure compliance: Enforce separation of duties by distributing tasks across different roles
- Optimize processes: Identify bottlenecks by seeing which roles handle the most tasks
Add swimlanes
To add swimlanes to your process definition:Open the process
- Access the FlowX.AI Designer
- Open an existing process definition or create a new one
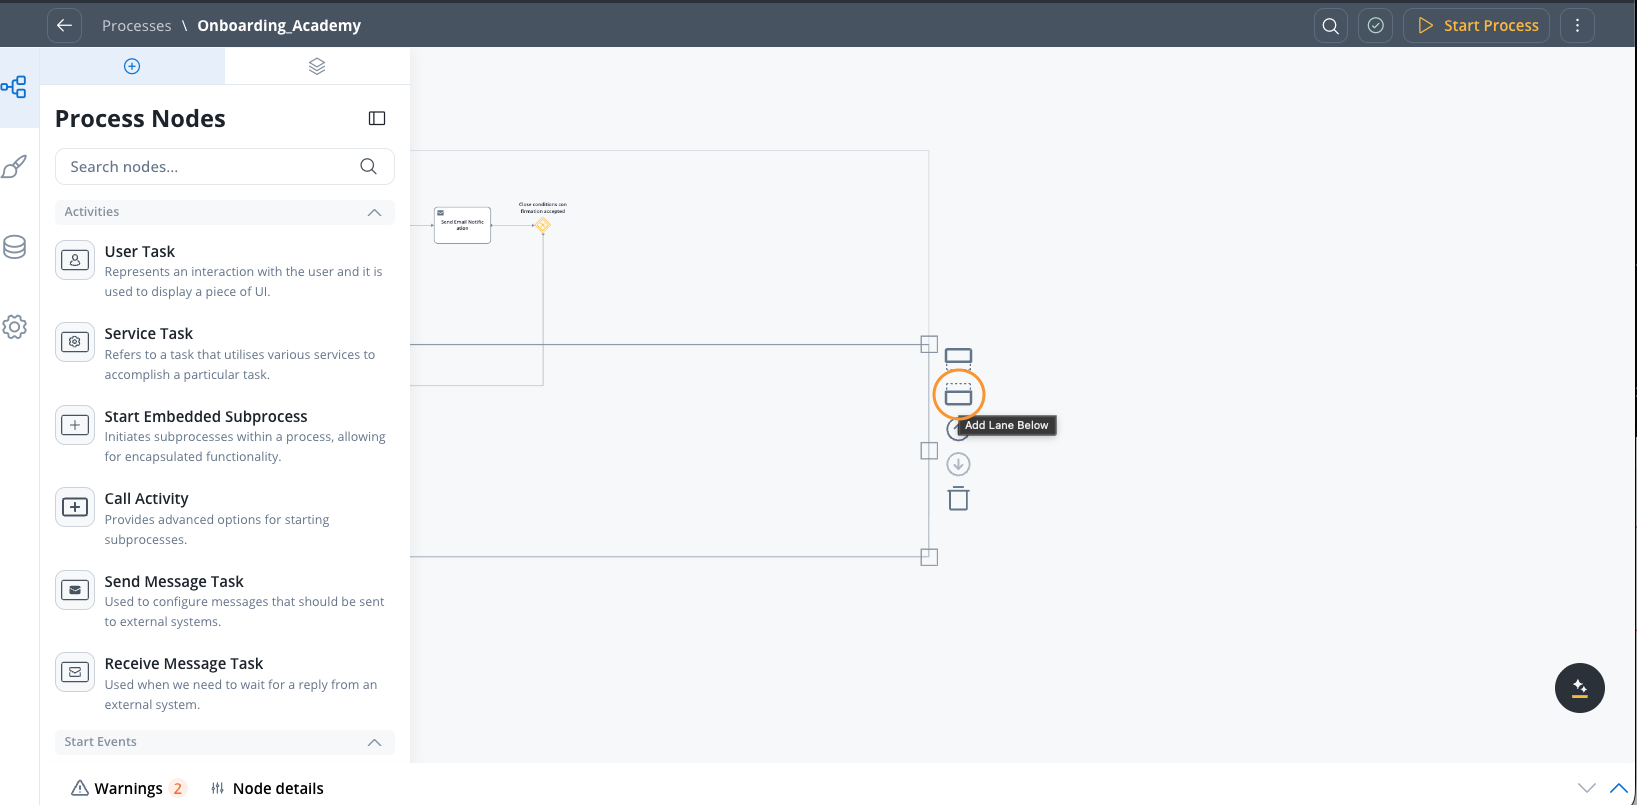
Add swimlane
- Choose the desired location for the new swimlane (above or below existing lanes)
- Click the add swimlane icon to create the new swimlane
- Give the swimlane a descriptive name (e.g., “Front Office”, “Approver”, “Back Office”)
User roles management - Swimlanes
Configuring access roles for processes
Configure process settings
The Settings panel provides configuration options organized across five tabs. To access settings, click the settings icon in the left sidebar.Set your process name
Configure the unique identifier for your process definition in the Process Name tab.- Process definition name: The unique name for your process
Name can only contain letters, numbers and the following special characters:
[ ] ( ) . _ -- Use descriptive names that clearly identify the process purpose.
- Follow a consistent naming convention across your organization.
- Use underscores or hyphens instead of spaces.
- Keep names concise but meaningful (for example,
Customer_OnboardingorLoan_Application).
Configure general settings
Use the General tab to configure platform settings, reporting options, process data, and expiry time.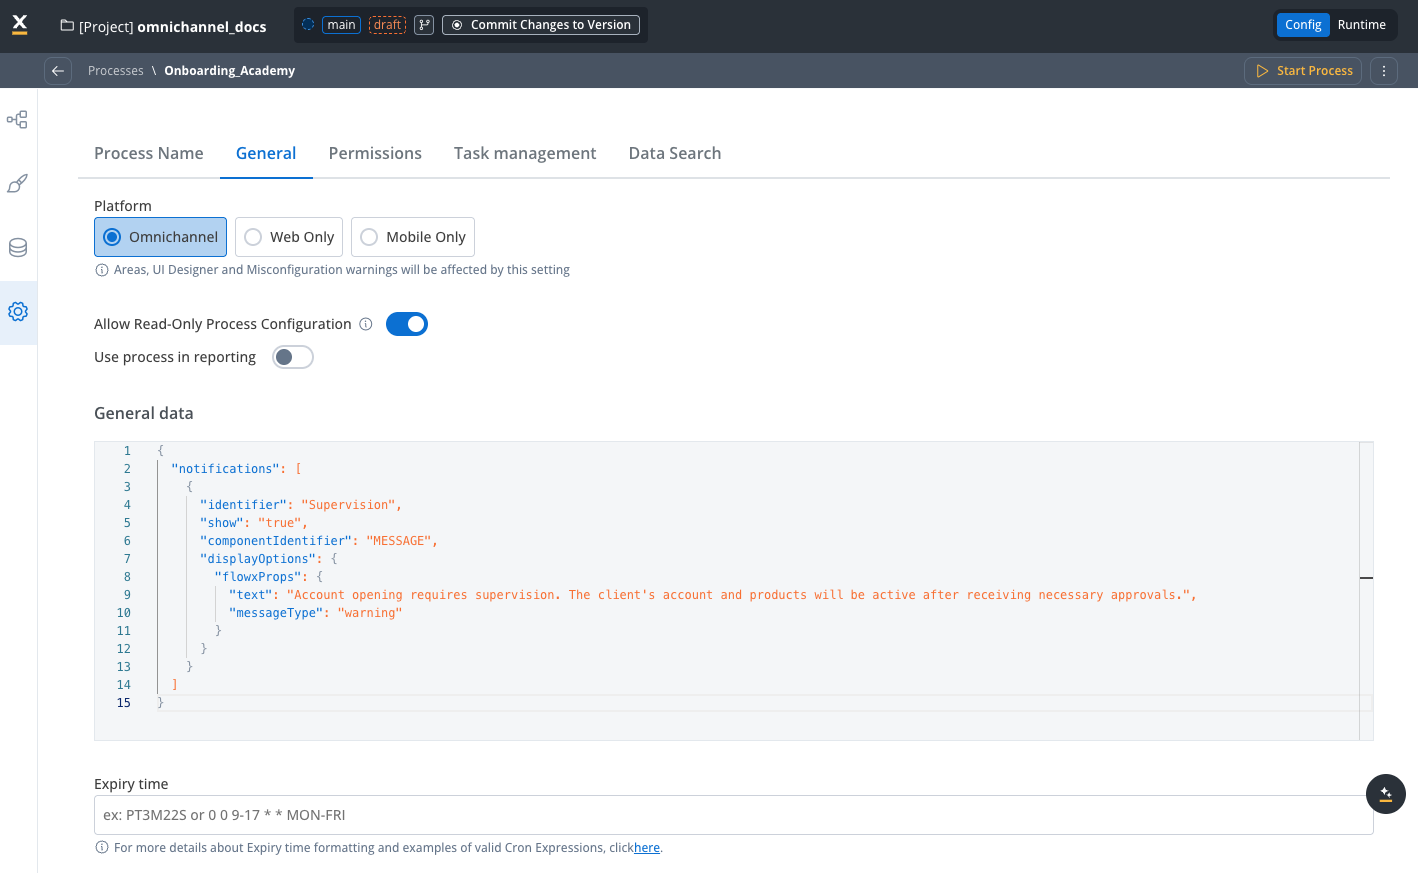
Select your deployment platform
Choose the deployment target for your process. This setting affects configuration options in Navigation Areas, UI Designer, and Misconfigurations. Available platforms:- Web Only: Use this option when your navigation areas are defined exclusively for web. The process is optimized for web usage and doesn’t provide the same functionality on mobile devices.
- Mobile Only: Use this option when your navigation areas are defined only for mobile. The process uses mobile-specific features and provides an optimal mobile experience.
- Omnichannel: Use this option when your process has navigation areas defined for both web and mobile platforms. This ensures users have a consistent experience regardless of their platform.
Navigation Areas, UI Designer and misconfigurations will be affected by this setting.
By default, new processes are set to Web Only. This ensures that they are initially optimized for web-based usage, providing a starting point for most users and scenarios.
Enable read-only access
Allow users to view and navigate through your process definition without modifying data or triggering actions.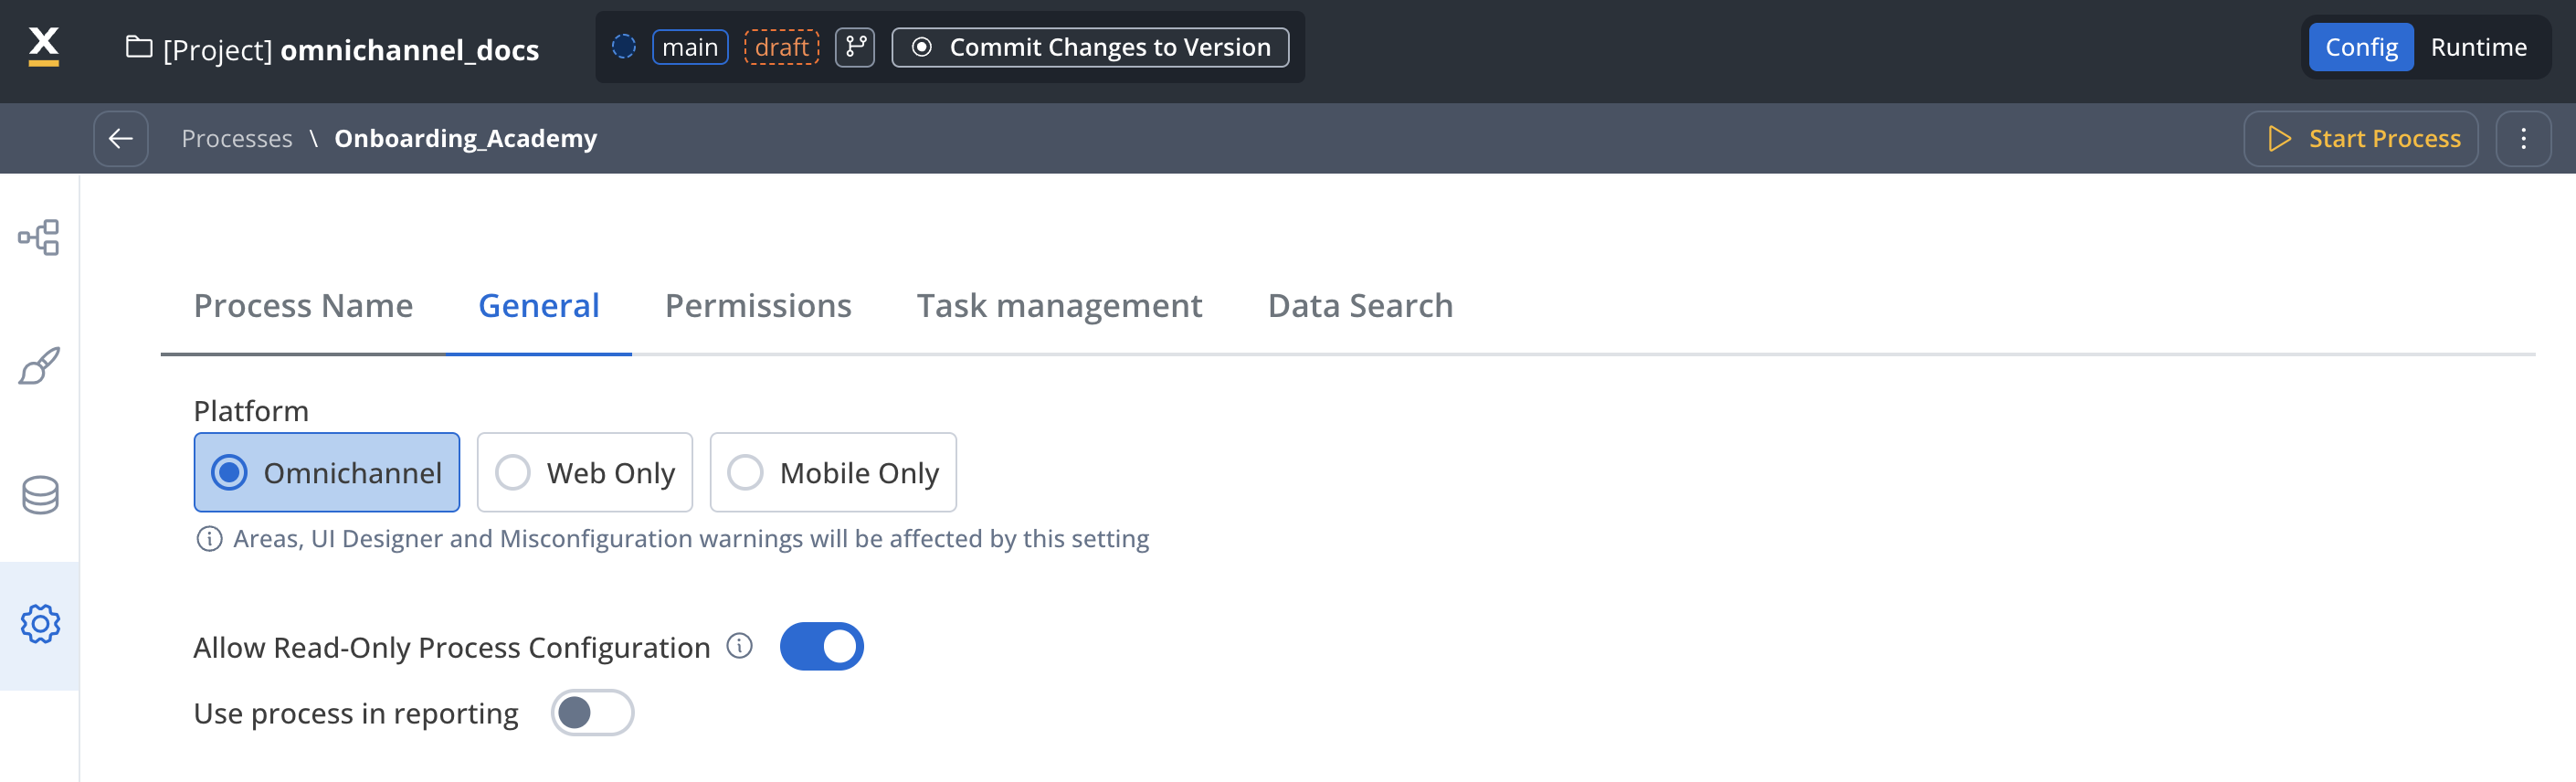
- Supervision and oversight: Let supervisors review process instances without making changes.
- Audit and compliance: Let auditors view process data and history without risk of modification.
- Information sharing: Let stakeholders view process status without granting edit permissions.
- Training and demo: Show process flows and data to trainees without allowing changes.
- Enable “Allow Read-Only Process Configuration” in the General settings tab.
- Configure read-only permissions at the swimlane level in the Permissions tab.
- Use permission-based expressions in UI Designer to control element visibility and interaction.
- Enable or disable the toggle at the node level to configure read-only access for specific nodes.
Read-only access allows users to navigate through process screens and see the full context without the ability to modify data or execute actions. This is useful for oversight, auditing, and information sharing scenarios.
Permission-based expressions
Learn how to configure granular read-only access control
Enable reporting
Toggle Use process in reporting to include the process in reporting via the Reporting plugin.Configure general data
Use general data to display notifications, warnings, or informational content immediately when a process starts. When to use general data General data is useful for:- Supervision messages: Display important notices about account supervision or approval requirements.
- Document generation status: Show immediate feedback about document processing.
- Process-level notifications: Present critical information that needs to be visible from the start.
- Banner messages: Display persistent notifications at the top of the process interface.
Set expiry time
You can configure an expiry time expression on a process definition to specify when the process expires.| Example | Expression | Explanation |
|---|---|---|
| Daily Expiry at Midnight | 0 0 0 * * ? | Sets the process to expire at 00:00 (midnight) every day. The ? is used in the day-of-week field to ignore its value. |
| Hourly Expiry on Weekdays | 0 0 9-17 * * MON-FRI | Sets the process to expire at the start of each hour between 9 AM and 5 PM on weekdays (Monday to Friday). |
| Expiry After a Duration | PT3M22S | Sets the process to expire after a duration of 3 minutes and 22 seconds from the start, using ISO 8601 format. |
The cron expression format should include seconds (0), minutes (0), hours (0), and then wildcards for the day, month, and day of the week fields. The
? sign in the day-of-week field is used when the day-of-month field is already specified (or ignored in this case).You can use both ISO 8601 duration format (
PT3M22S) and cron expressions (0 0 0 * * ?, 0 0 9-17 * * MON-FRI) to define expiryTime expressions for process definitions.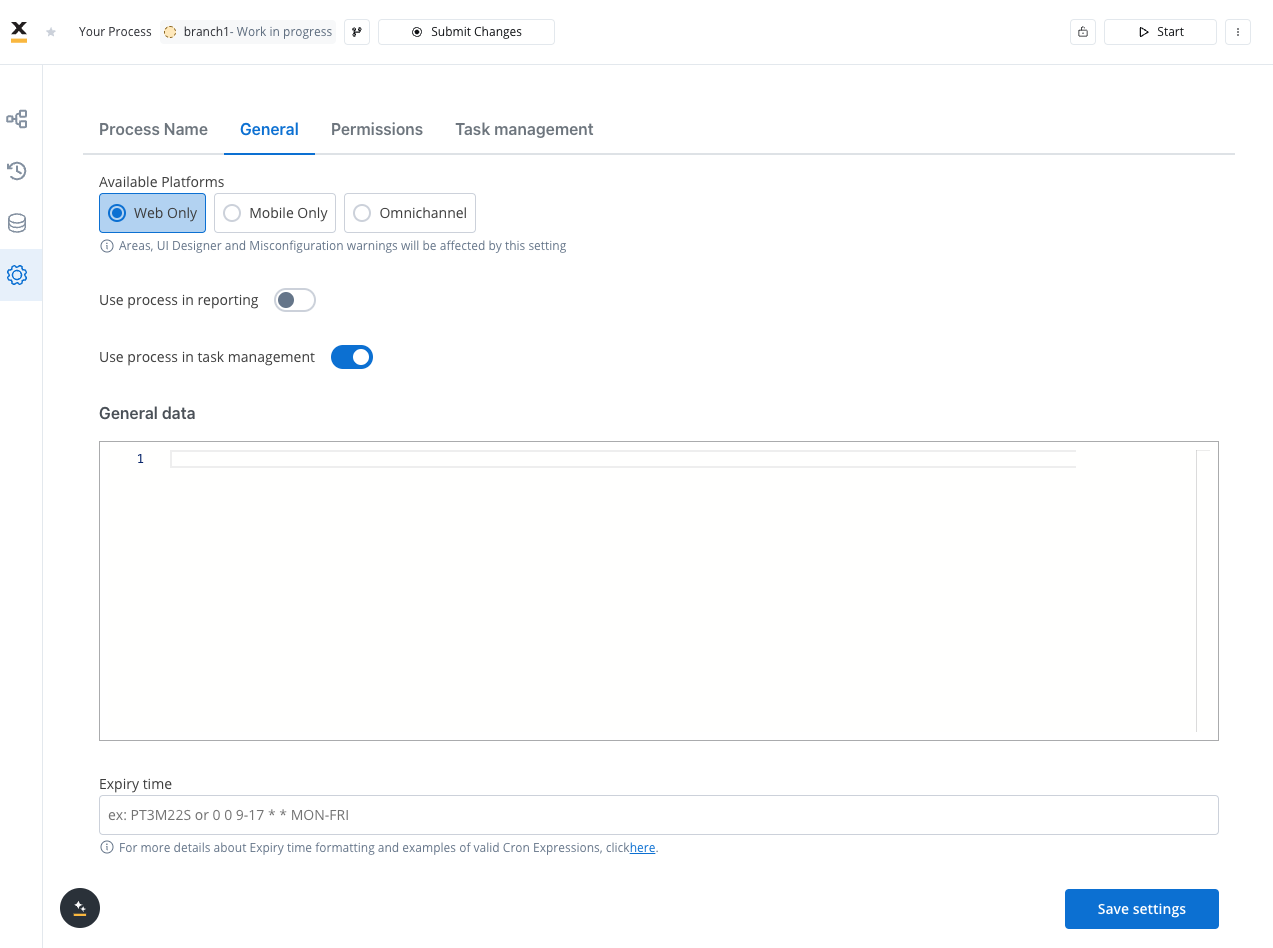
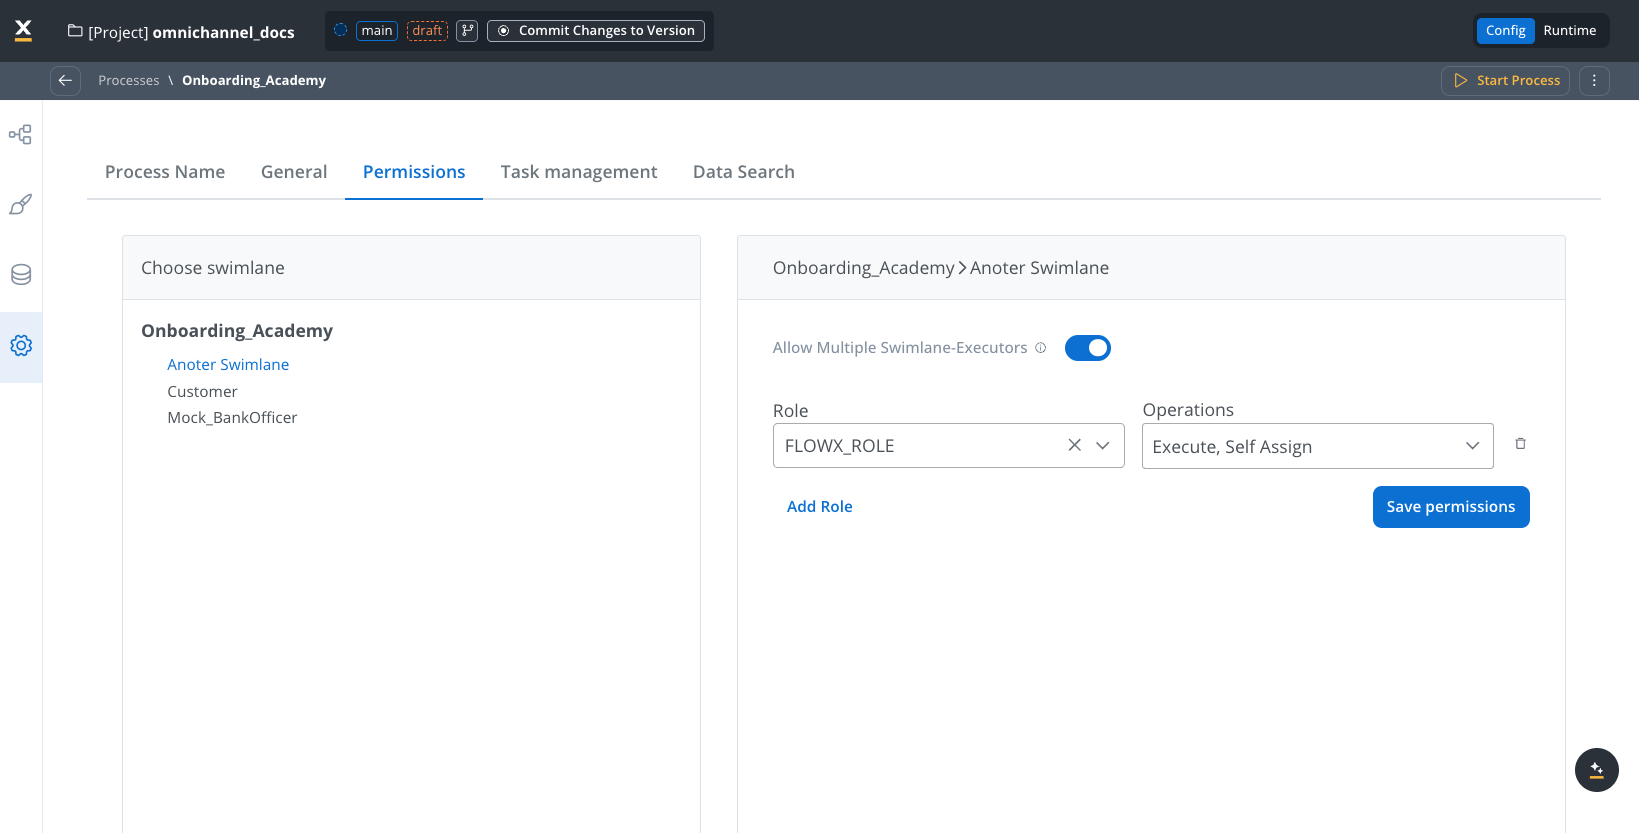
Set permissions
Use the Permissions tab to configure role-based access control for each swimlane in your process.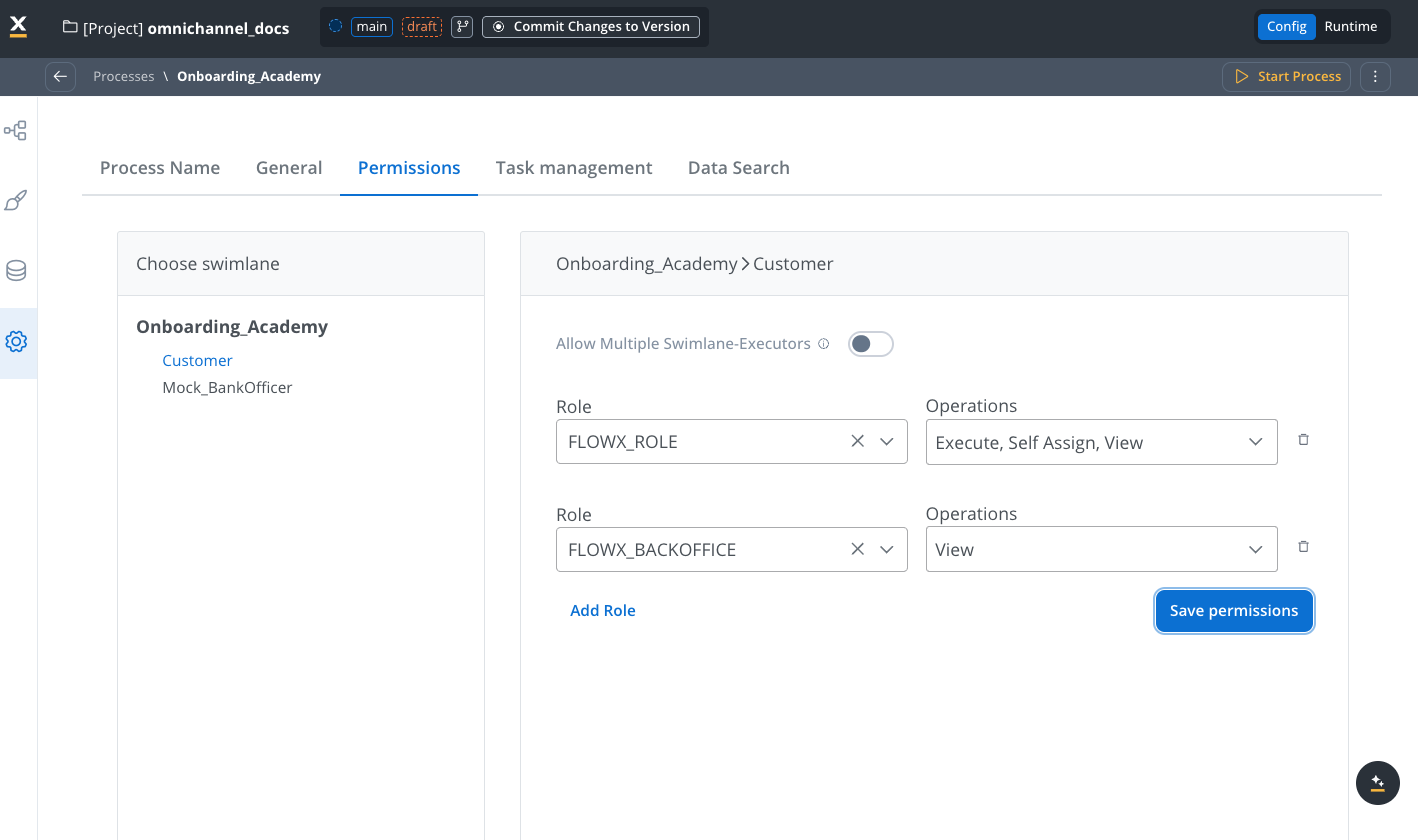
Configure swimlane permissions
Add roles
- Click Add Role to assign permissions
- Select the role from the dropdown
- Choose permission types: Execute, Self Assign, View
Configure multiple executors
Toggle Allow Multiple Swimlane-Executors to enable multiple users with different roles to work concurrently on the same process instance within the same swimlane.
When enabled, permissions can be configured at UI Element level in User Tasks from the selected swimlane, allowing granular control over who can see and interact with specific UI components.
Default permissions
When you create a new swimlane, it comes with two default permissions:- Execute: Allows users to perform actions in the swimlane
- Self-assign: Enables users to assign tasks to themselves
Configuring access rights for processes
Permission-based expressions
Integrate with Task Manager
Use the Task Management tab to configure integration with the Task Manager plugin for task tracking and management.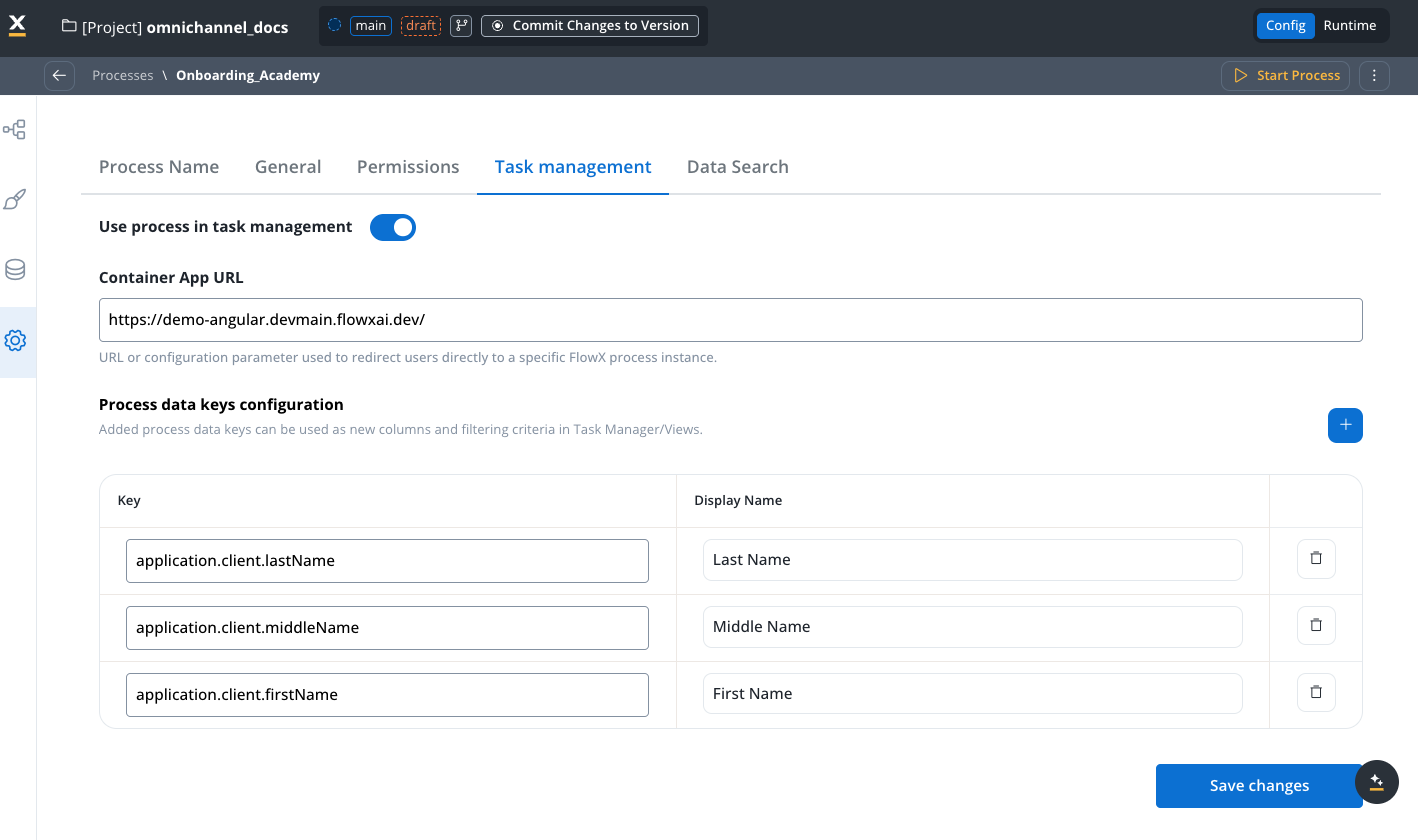
Available configuration options
Use process in task management Toggle this option to enable integration with the Task Manager system. When you enable this option, the process becomes available for managing tasks within Task Management. This allows data, tasks, and status updates to flow between the process and Task Manager. Container App URL The Container App URL is the endpoint that directs users to the specific application instance where your process runs. The URL serves as a reference point for accessing and managing tasks directly from Task Manager. It follows this format:- Define the URL dynamically using configuration parameters (for example,
${genericParameter}). - Set the URL at the process data level using business rules.
Task Management
Learn more about Task Manager configuration
Task Management Localization
Localize Task Management in 34+ languages
Configure data search
Use the Data Search tab to configure which process data keys are indexed for searching and filtering process instances.
Index search keys
The Search Key Indexing section lets you define which process data fields are searchable. These indexed keys enable efficient searching and filtering of process instances in the Active Process view. How to configure search keys:- Click the + button to add a new search key.
- Enter the key path (for example,
application.client.firstName). - Save your changes to apply the indexing configuration.
- Use dot notation to access nested fields:
parent.child.fieldName. - Keys must match your data model structure exactly.
- Matching is case-sensitive.
application.client.firstNameapplication.client.lastNameapplication.statusapplication.dateOfBirth
Performance consideration: Only index keys you actually need for searching. Excessive indexing can impact performance. Focus on fields commonly used for filtering and searching process instances.
Apply best practices
Follow these guidelines to create well-structured, maintainable process definitions.Follow configuration standards
Apply these best practices when configuring your process definitions: Platform selection:- Choose Web Only for desktop-focused applications with complex interactions.
- Choose Mobile Only for mobile-first experiences optimized for touch.
- Choose Omnichannel only when you need both platforms. Maintain separate processes when platform requirements diverge significantly.
- Use descriptive, consistent names that clearly identify the process purpose.
- Follow a naming convention like
[Department]_[Function]_[Action](for example,HR_Onboarding_NewEmployee). - Avoid special characters beyond the allowed set:
[ ] ( ) . _ -. - Keep process names under 50 characters for better readability in lists.
- Define your data model structure before building process flows.
- Use meaningful key names that describe the data they contain.
- Organize related data under common parent keys (for example,
customer.firstNameandcustomer.lastName). - Include example values in the data model to help with development and testing.
- Avoid deeply nested structures—limit nesting to 3-4 levels for better performance.
Configure swimlanes effectively
Swimlane best practices:- Create swimlanes that mirror your organizational structure or process ownership.
- Assign clear, descriptive names to swimlanes (for example, “Front Office”, “Back Office”, or “Supervisor”).
- Configure appropriate permissions for each swimlane (execute, view, self-assign).
- Enable Allow multiple executors when multiple users with different roles need concurrent access.
- Limit the number of swimlanes—too many can make processes difficult to visualize. Aim for 3-5 maximum.
Permission-based expressions
Learn advanced permission configuration for granular access control
Optimize performance
Settings that affect performance:- Expiry time: Set appropriate expiry times to prevent stale process instances from accumulating.
- Task management integration: Only enable when needed—it adds overhead for task tracking.
- Reporting integration: Enable selectively for business-critical processes that require analytics.
- Search indexing: Index only the keys you need for searching—excessive indexing affects performance.
- General data: Keep general data lightweight—it loads on every process start.
- Don’t store large binary data in the process data model.
- Use references to external systems for large files or documents.
- Clean up temporary data that’s no longer needed as the process progresses.
Follow security best practices
Configuration checklist
Before deploying a process definition, verify:Basic Configuration
- Process name is descriptive and follows naming conventions
- Platform selection (Web/Mobile/Omnichannel) matches your deployment target
- Data model is defined with clear, meaningful key names
Permissions
- Swimlanes are configured with appropriate roles
- Execute permissions are assigned to correct user roles
- Self-assign permissions are configured where needed
- Permission-based expressions are tested with different user roles
Integrations
- Task Manager integration enabled only if required
- Application URL configured correctly for Task Manager
- Keys to send to Task Manager are defined
- Reporting integration enabled only if needed
- Search indexing configured for relevant keys
Manage process versions
Process definitions are versioned as part of projects, providing comprehensive change management.Understanding versioning
Process definitions in FlowX.AI are versioned at the project level, not individually. This ensures all related resources stay synchronized.
- Draft versions: Work-in-progress changes that you can edit freely.
- Committed versions: Finalized snapshots that become immutable.
- Branches: Parallel development paths for different features or environments.
- Version comparison: Tools to compare settings and configurations across versions.
Make changes to process definitions
Edit in draft
Process definitions can only be edited when part of a draft project version. If you need to modify a committed process:
- Create a new draft version of your project
- Make your changes to the process definition
- Test thoroughly
- Commit the project version
Commit changes
When you commit a project version:
- The process definition becomes immutable
- It’s available for inclusion in builds
- All settings are frozen at that point in time
Versioning
Detailed guide to project versioning
Builds and deployment
Learn about building and deploying processes
Understand the impact on running instances
What this means:- You can safely deploy new process definition versions without affecting active users.
- Long-running processes complete using their original definition.
- New process instances use the latest deployed version.
- To apply changes to running instances, you need to migrate them (typically not recommended).
Troubleshoot common issues
This section covers common issues when configuring process definitions and how to resolve them.Process won't commit
Process won't commit
Symptoms: You can’t commit project version or get errors when trying to save changes.Common causes and solutions:
- Validation errors: Review process designer warnings and fix all configuration issues.
- Missing required nodes: Ensure your process has at least one start node and one end node.
- Invalid expressions: Check all business rules, cron expressions, and permission expressions for syntax errors.
- Permission issues: Verify you have commit permissions for the project.
- Uncommitted dependencies: Ensure all referenced subprocesses and workflows are also committed.
Process instances won't start
Process instances won't start
Symptoms: Users get errors when trying to start a new process instance.Common causes and solutions:
- Process not published: Verify the process is part of an active build deployed to the environment.
- Missing permissions: Check that user roles have execute permission on the process start node.
- Invalid start node configuration: Review the start node settings and start conditions.
- Multiple start nodes without conditions: If you have multiple start nodes, ensure each has a unique start condition.
- Environment mismatch: Confirm the process is deployed to the correct environment.
Failed process start errors
Task Manager integration not working
Task Manager integration not working
Symptoms: The process doesn’t appear in Task Manager or tasks aren’t created.Common causes and solutions:
- Integration not enabled: Enable “Use process in task management” in the General settings tab.
- Application URL misconfigured: Verify the application URL format is correct and uses valid parameters.
- Keys not configured: Define which keys should be sent to Task Manager.
- Indexing issues: Keys may need re-indexing after data model changes.
- Task Manager service unavailable: Check platform status to ensure the Task Manager service is running.
Search/filtering not working correctly
Search/filtering not working correctly
Symptoms: You can’t find process instances using search, or filters return incorrect results.Common causes and solutions:
- Keys not indexed: Add the required keys to the Data Search configuration.
- Data model changes not re-indexed: After changing the data model structure, re-index search keys.
- Incorrect key paths: Verify the key paths match your actual data model structure and check for typos.
- Case sensitivity: Search is case-sensitive—ensure queries match the actual data casing.
- Indexing delay: Recent process instances may not be immediately searchable—allow time for indexing.
Re-indexing can take several minutes for environments with many process instances.
Expiry time not working as expected
Expiry time not working as expected
Symptoms: Processes expire too early, too late, or not at all.Common causes and solutions:
- Cron expression errors: Verify your cron expression includes all six required fields (seconds, minutes, hours, day, month, day of week).
- Time zone issues: Cron expressions use server time zone—account for time zone differences.
- ISO 8601 format errors: Check the duration format is correct (for example,
PT3M22Sfor 3 minutes 22 seconds). - Expiry not enabled: Confirm the expiry time expression is configured in settings.
- Process already expired: Processes past expiry time may not be startable.
Timer expressions
Platform-specific configuration issues
Platform-specific configuration issues
Symptoms: Navigation areas or UI elements don’t appear on expected platforms.Common causes and solutions:
- Incorrect platform setting: Verify “Available Platforms” matches your navigation area configuration.
- Web Only with mobile navigation: If set to Web Only, mobile navigation areas aren’t available.
- Platform mismatch with deployment: Ensure the deployed build targets the correct platform (web renderer or mobile renderer).
- Navigation areas not configured: Check that navigation areas exist for the selected platform.
- UI Designer platform mismatch: Verify UI elements are configured for the same platform as the process.
Permission configuration errors
Permission configuration errors
Symptoms: Users can’t access the process, see unexpected UI elements, or can’t perform actions.Common causes and solutions:
- Missing role assignments: Verify users have required roles in your identity provider (for example, Keycloak).
- Swimlane permissions not configured: Check that appropriate permissions (execute, view, self-assign) are set.
- Permission expressions incorrect: Review permission-based expressions for syntax errors.
- Multiple executors not enabled: If you need multiple users in the same swimlane, enable “Allow multiple executors”.
- Cross-swimlane reference issues: When referencing users from other swimlanes, store them in process data.
Permission-based expressions
Get help with other issues
If you continue experiencing issues:- Check the audit log to see recent changes that might have caused problems.
- Review process validation warnings in the Process Designer.
- Test with a simple process to isolate whether the issue is process-specific or environmental.
- Check Platform Status to ensure all FlowX services are healthy.
- Review logs in your FlowX.AI deployment for detailed error messages.
Platform status monitoring
Check the health of FlowX services
Related resources
Process Designer
Learn about the canvas and design interface
BPMN Nodes
Complete guide to all node types
Data Model
Managing process data structures
Subprocess
Creating reusable process components
Navigation Areas
Configuring user navigation
User Roles Management
Advanced swimlane configuration