

Did you know?
Unlike Postman, which focuses on API testing, the Integration Designer automates workflows between systems. With drag-and-drop ease, it handles REST API connections, real-time processes, and error management, making integrations scalable and maintainable.
Overview
Integration Designer facilitates the integration of the FlowX platform with external systems, applications, and data sources.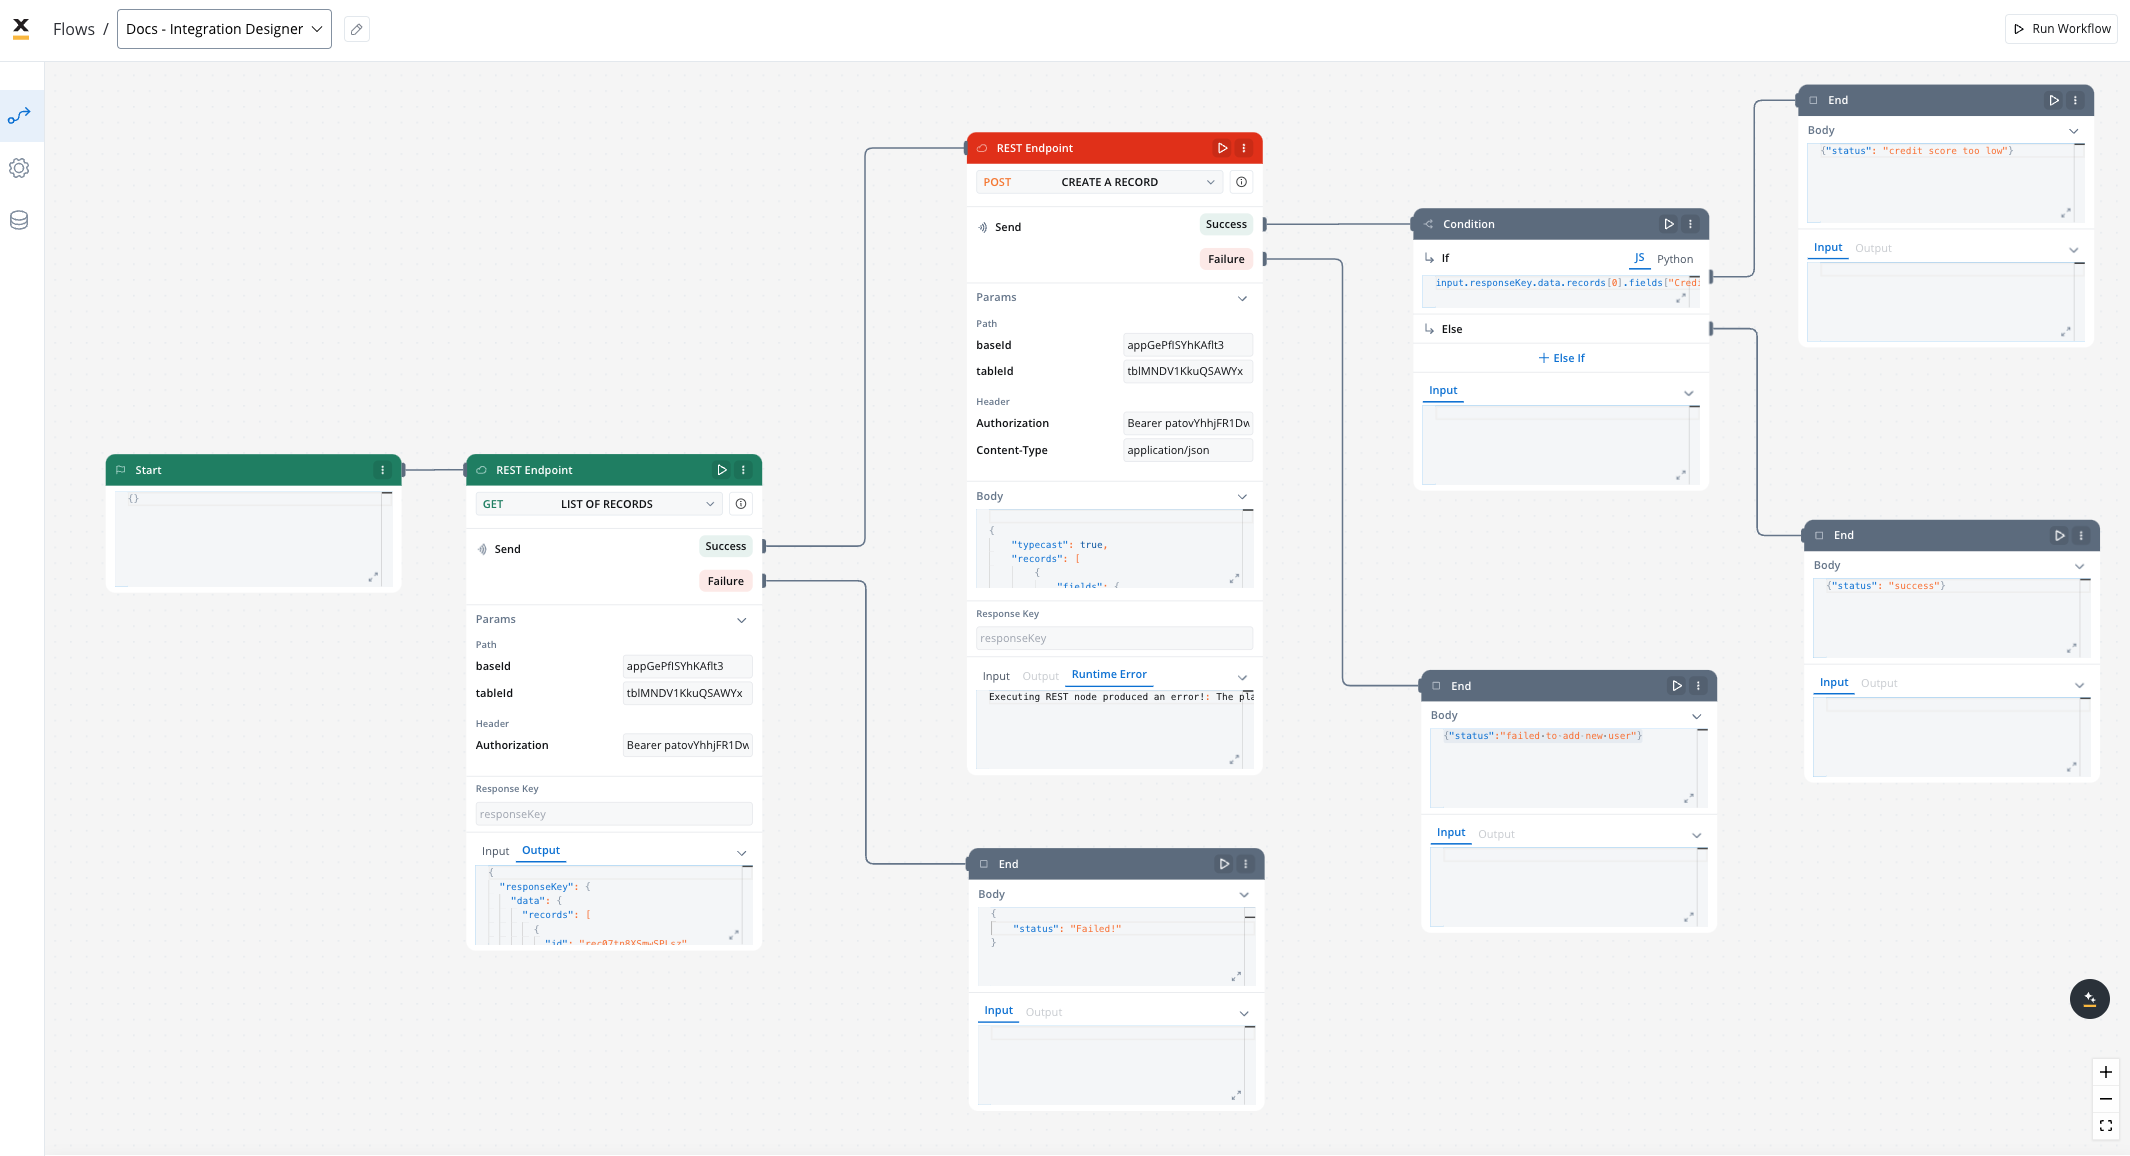
Integration Designer supports multiple data source types including RESTful Systems, FlowX Database, MCP Integration, Knowledge Base, Email Trigger, Email Sender, and Microsoft Outlook.
Integration resources (data sources, workflows, systems) are versioned as part of your project version, not individually. Changes are tracked in the project’s Resources Changed view. To view the change history for a specific integration resource, right-click it and select View History.
Key features
1
Drag-and-Drop Simplicity
You can build complex API workflows using a drag-and-drop interface, making it accessible for both technical and non-technical audience.
2
Visual REST API Integration
Specifically tailored for creating and managing REST API calls through a visual interface, streamlining the integration process without the need for extensive coding.
3
Real-Time Testing and Validation
Allows for immediate testing and validation of REST API calls within the design interface.
Integration Designer guides
Data sources and endpoints
Define data sources and REST endpoints, with caching, variables, parameters, and authorization
File handling
Receive files and XML or SOAP responses, and send files from endpoints
Workflows
Create, configure, and run integration workflows
Control flow nodes
Start, REST API Call, FlowX Database, Condition, Parallel, Script, Subworkflow, and End nodes
Data and AI nodes
Tabular data, templates, notifications, PDF files, context retrieval, and AI agent nodes
Integration with external systems
This example demonstrates how to integrate FlowX with an external system, in this example, using Airtable, to manage and update user credit status data. It walks through the setup of a data source, defining API endpoints, creating workflows, and linking them to BPMN processes in FlowX Designer.Before going through this example of integration, we recommend:
- Create your own base and table in Airtable. For more information, see the Airtable base creation guide.
- Review the Airtable Web API documentation to get familiarized with the Airtable API.
Integration in FlowX.AI
1
Define a Data Source
Navigate to the Integration Designer and create a new data source: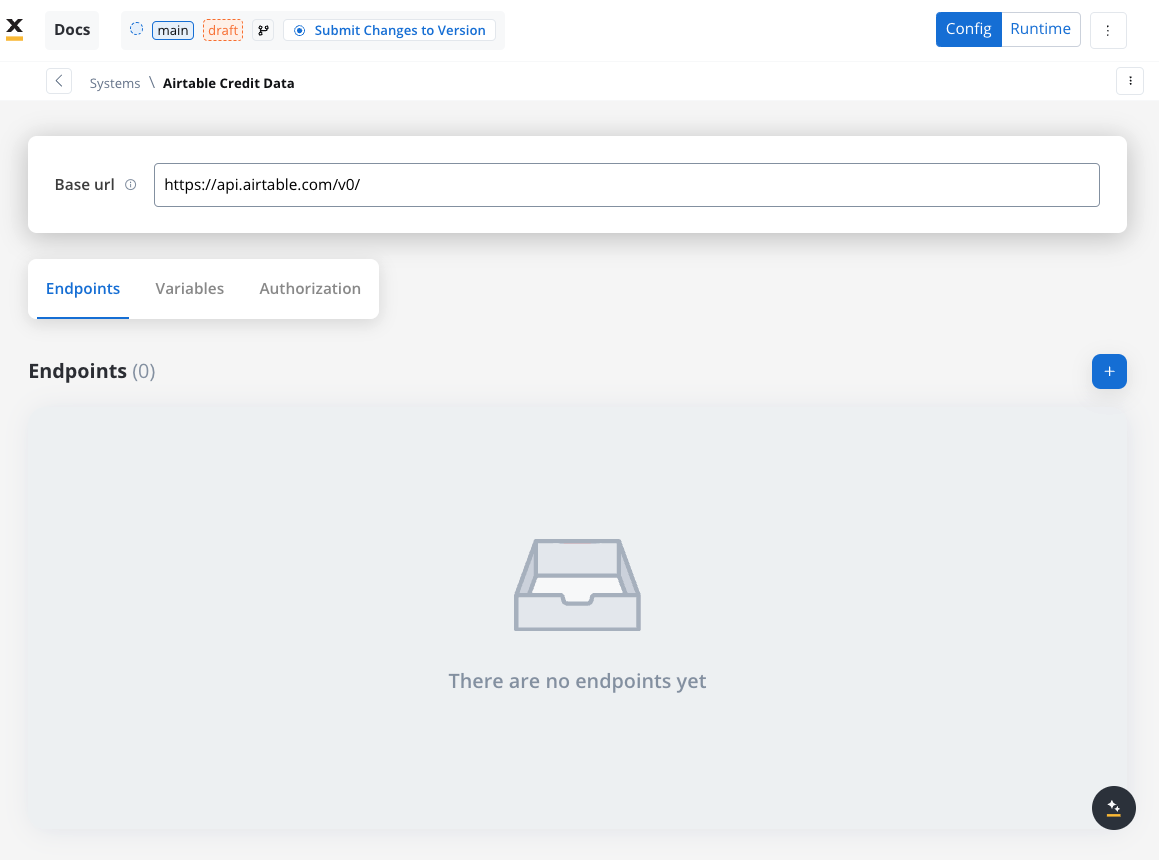
- Name: Airtable Credit Data
- Base URL:
https://api.airtable.com/v0/
2
Define Endpoints
In the Endpoints section, add the necessary API endpoints for system integration: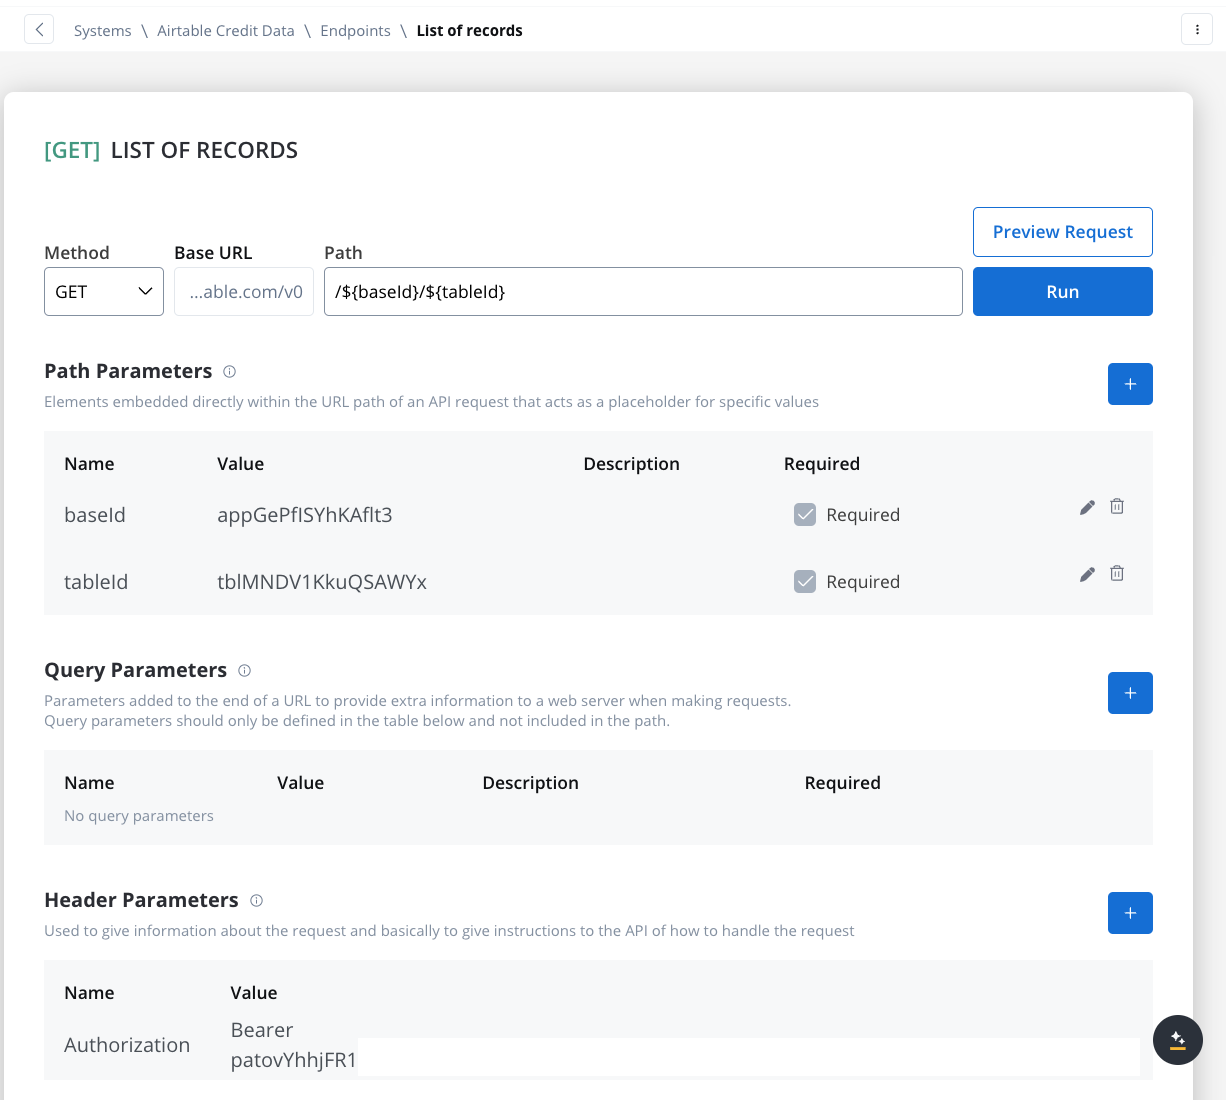
- Get Records Endpoint:
- Method: GET
- Path:
/${baseId}/${tableId} - Path Parameters: Add the values for the baseId and for the tableId so they will be available in the path.
- Header Parameters: Authorization Bearer token
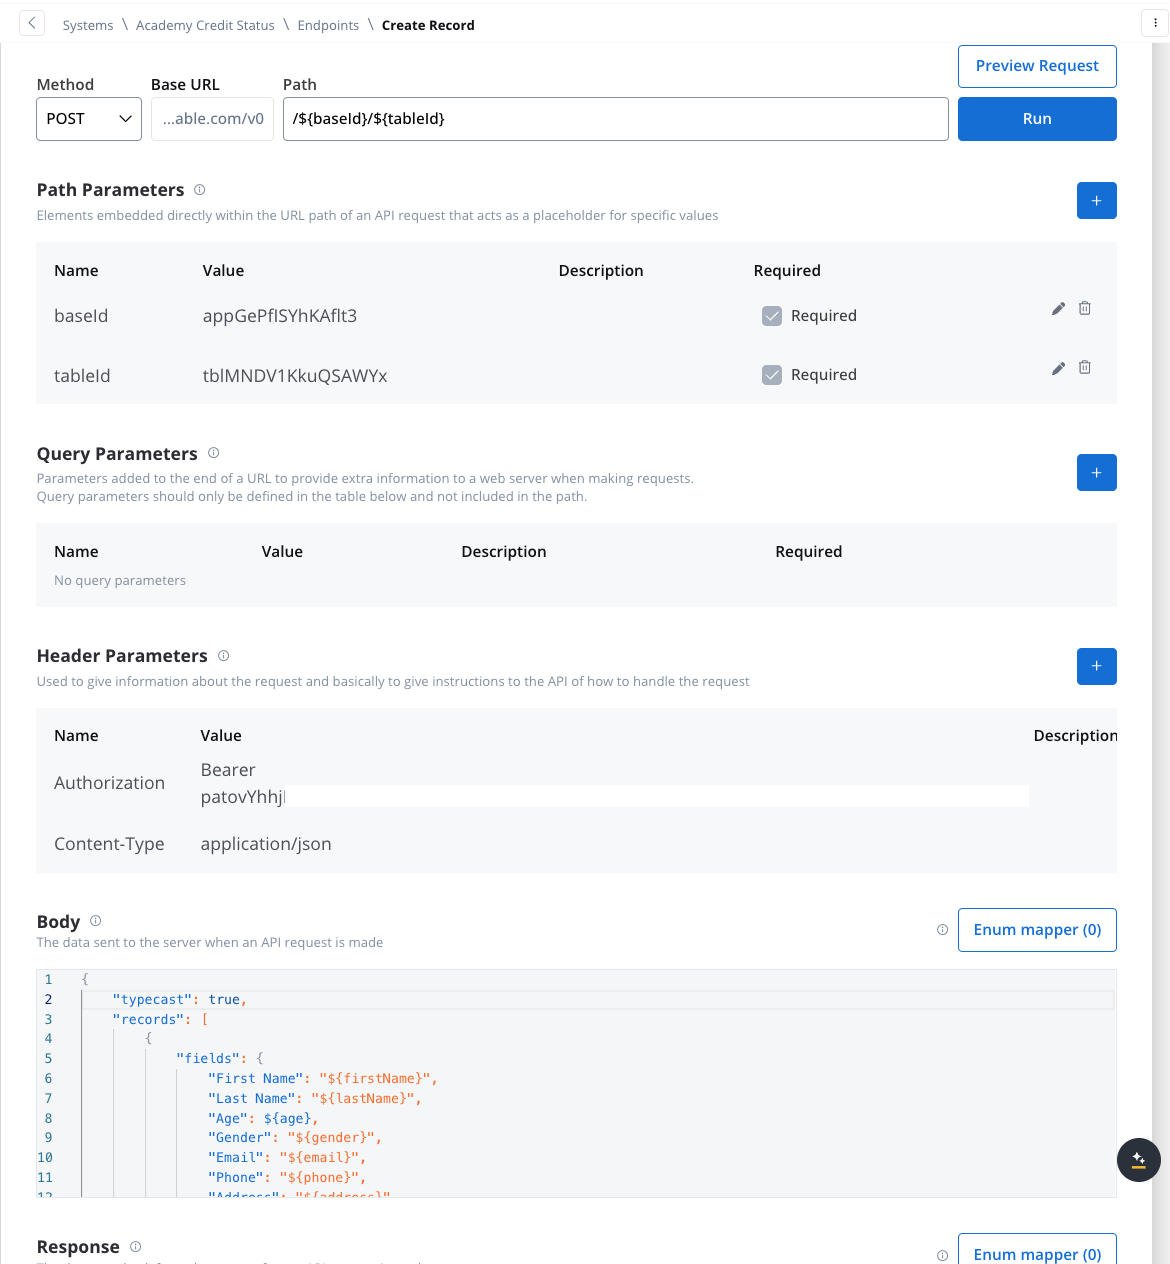
- Create Records Endpoint:
- Method: POST
- Path:
/${baseId}/${tableId} - Path Parameters: Add the values for the baseId and for the tableId so they will be available in the path.
- Header Parameters:
Content-Type: application/json- Authorization Bearer token
- Body: JSON format containing the fields for the new record. Example:
3
Design the Workflow
-
Open the Workflow Designer and create a new workflow.
- Provide a name and description.
-
Configure Workflow Nodes:
- Start Node: Initialize the workflow.
On the start node add the data that you want to extract from the process. This way when you will add the Start Workflow Integration node action it will be populated with this data.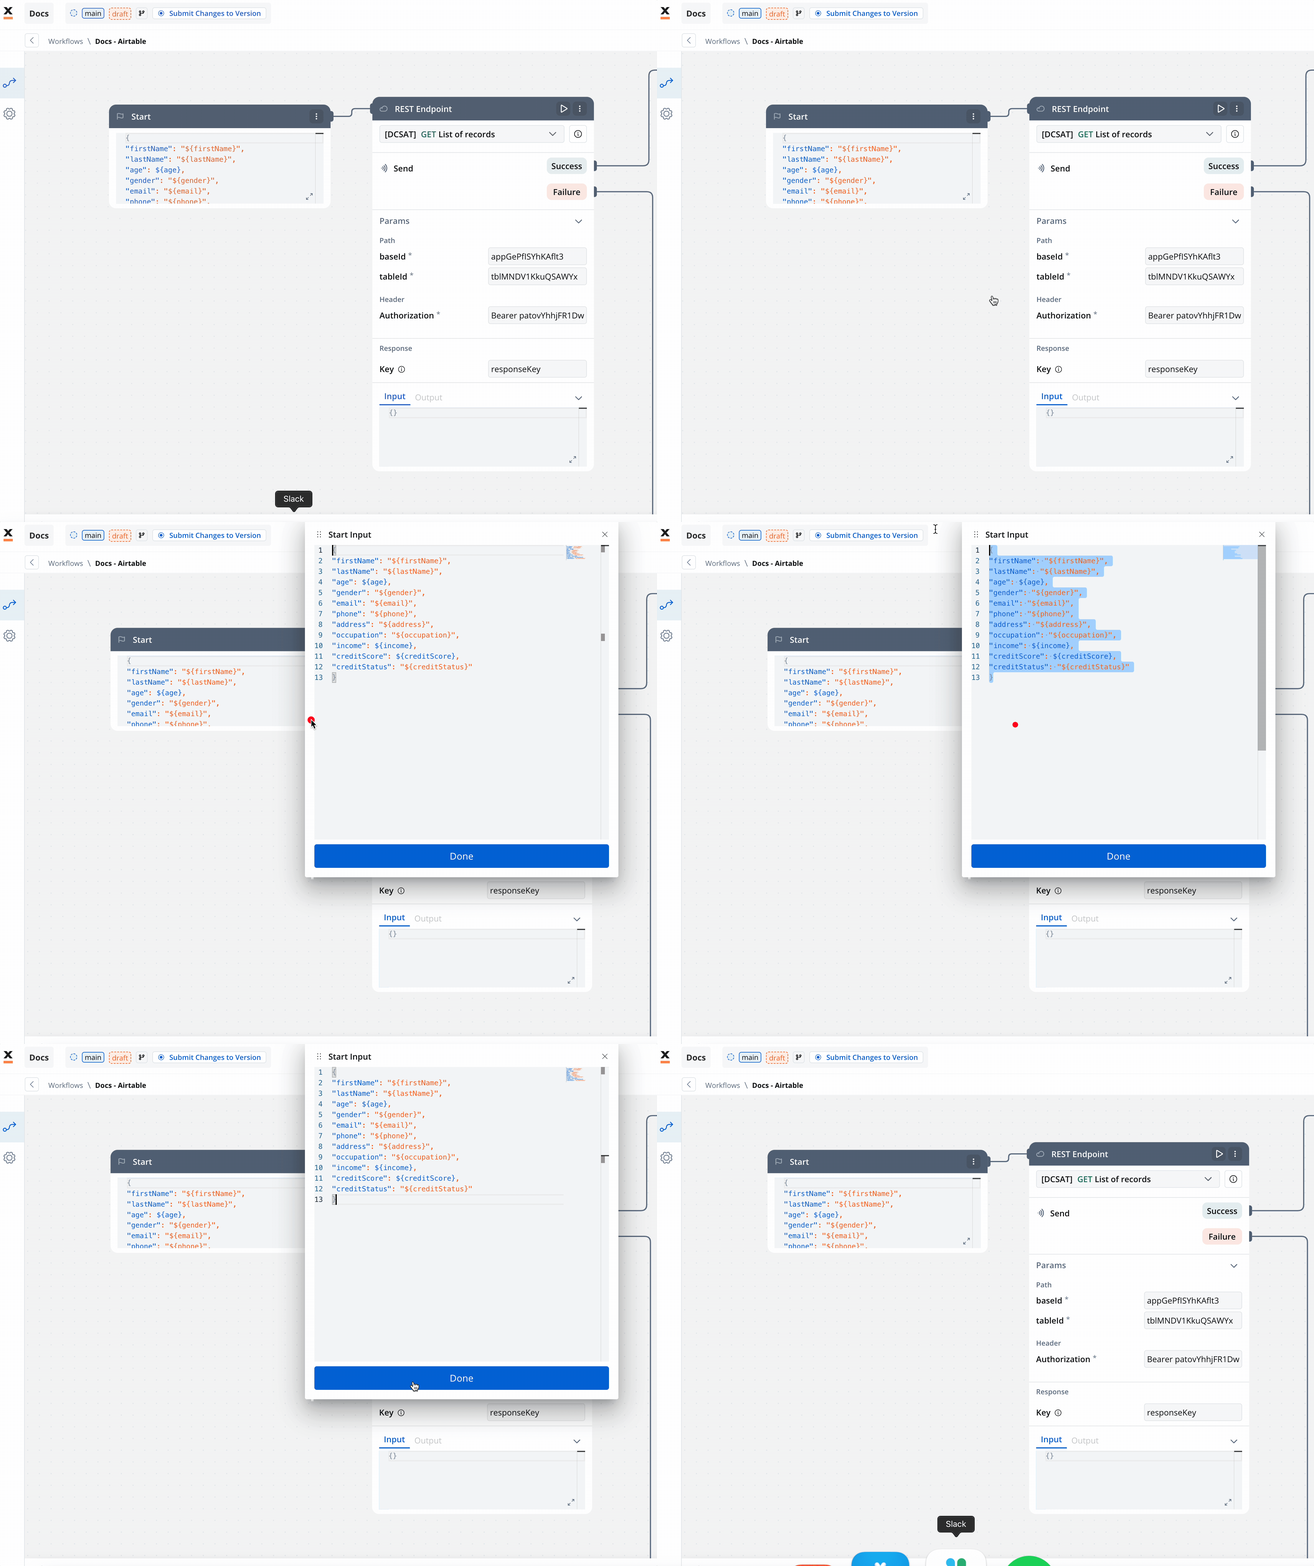 Make sure these keys are also mapped in the data model of your process with their corresponding attributes.
- REST Node: Set up API calls:
- GET Endpoint for fetching records from Airtable.
- POST Endpoint for creating new records.
- Condition Node: Add logic to handle credit scores (e.g., triggering a warning if the credit score is below 300).
- Script Node: Include custom scripts if needed for processing data (not used in this example).
- End Node: Define the end of the workflow with success or failure outcomes.
4
Link the Workflow to a Process
- Integrate the workflow into a BPMN process:
- Open the process diagram and include a User Task and a Receive Message Task.
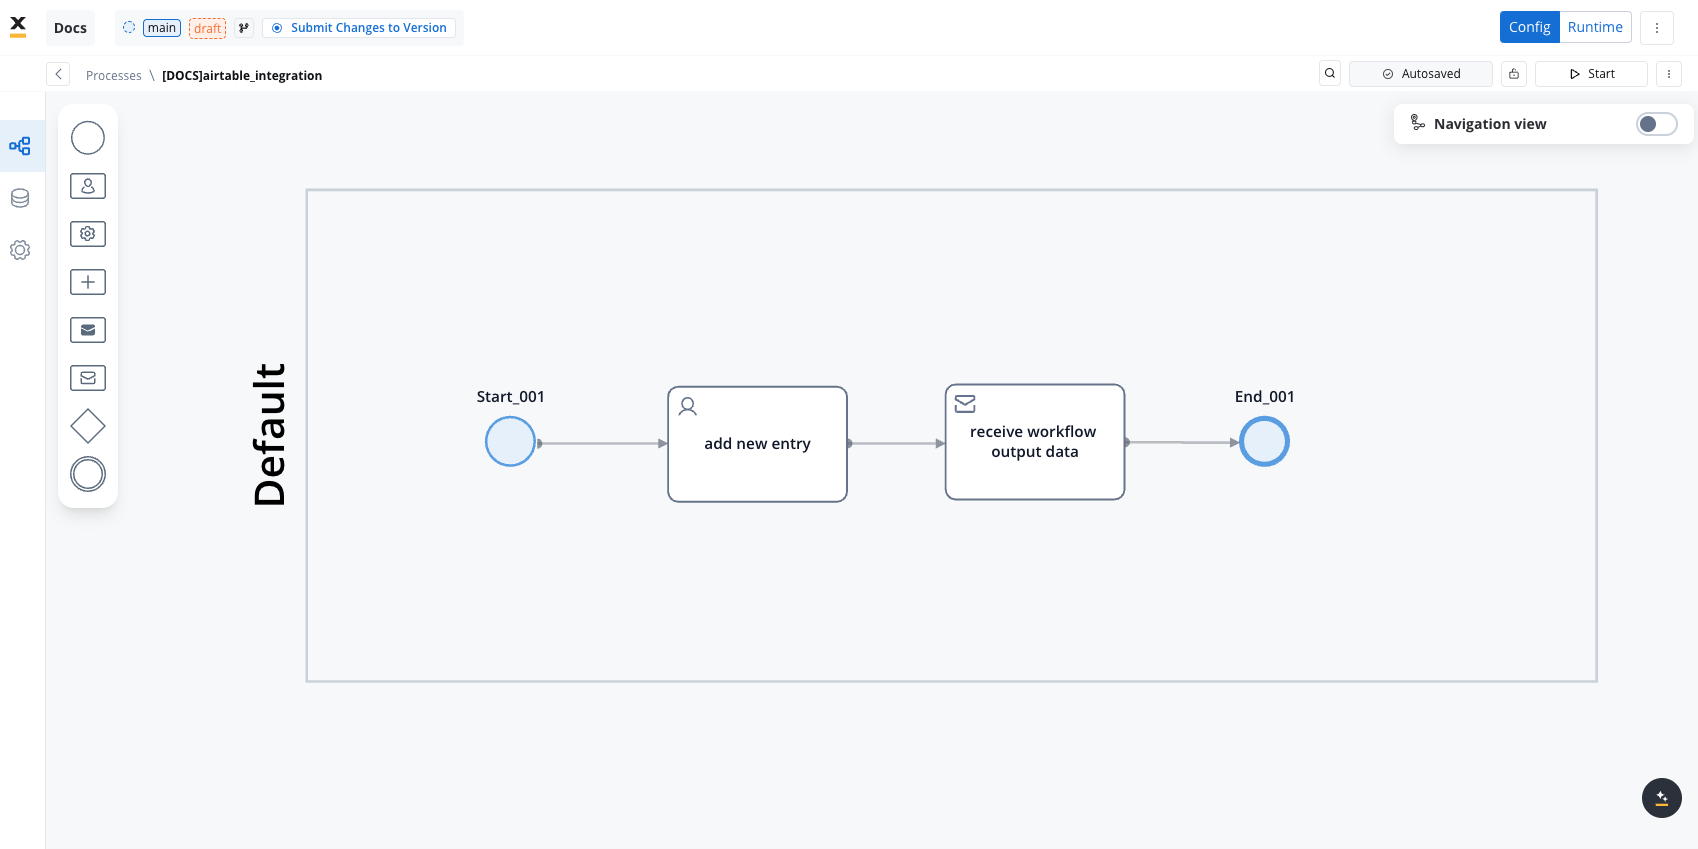
In this example, we’ll use a User Task because we need to capture user data and send it to our workflow.
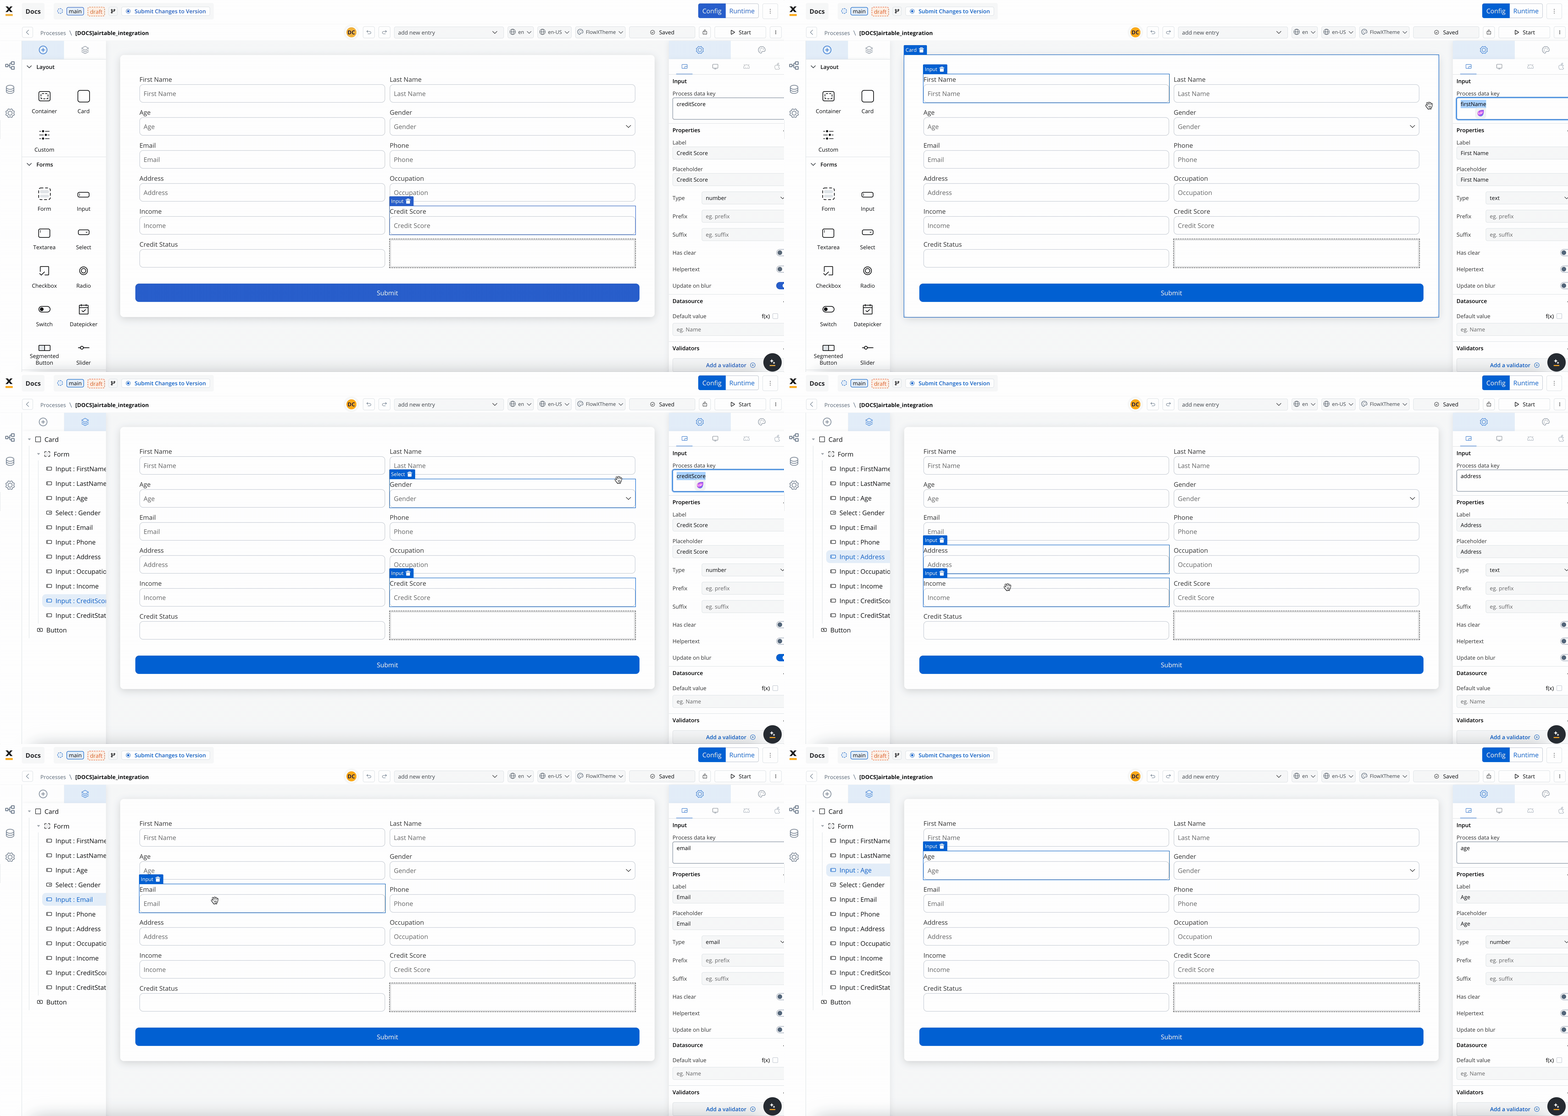
- Map Data in the UI Designer:
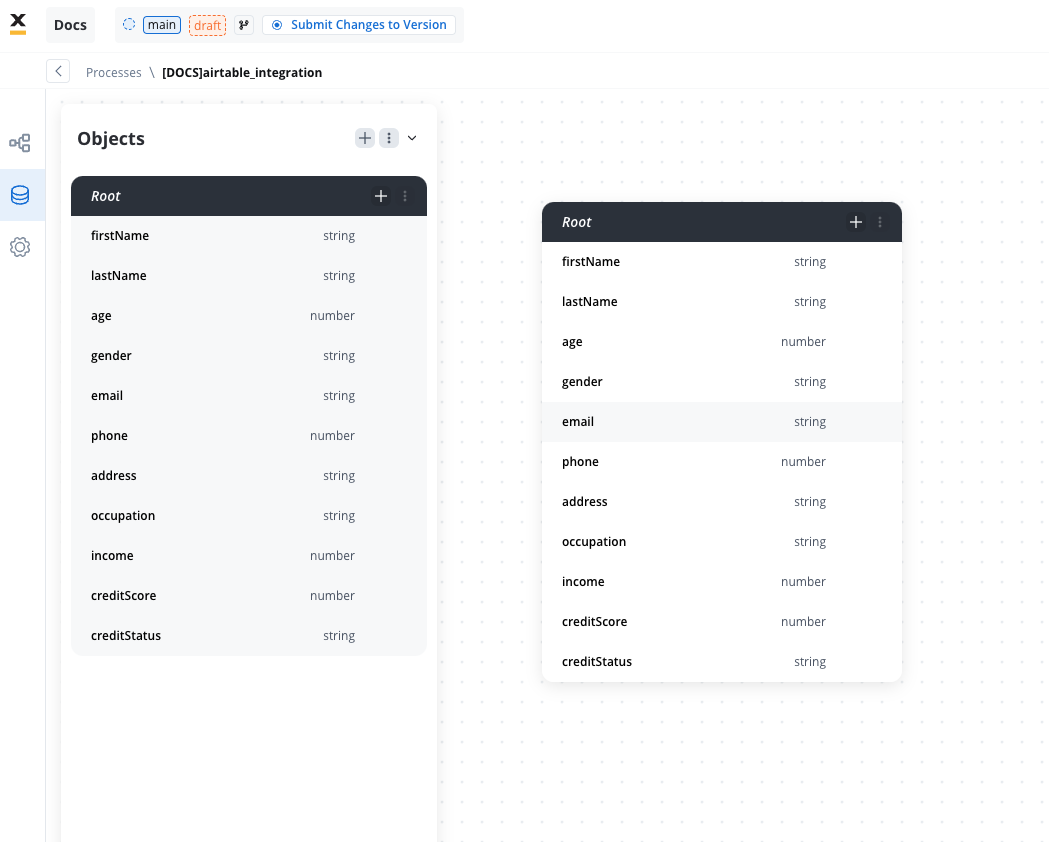
- Create the data model
- Link data attributes from the data model to form fields, ensuring the user input aligns with the expected parameters.
- Add a Start Integration Workflow node action:
- Make sure all the input will be captured.
5
Monitor Workflow and Capture Output
Receive Workflow Output: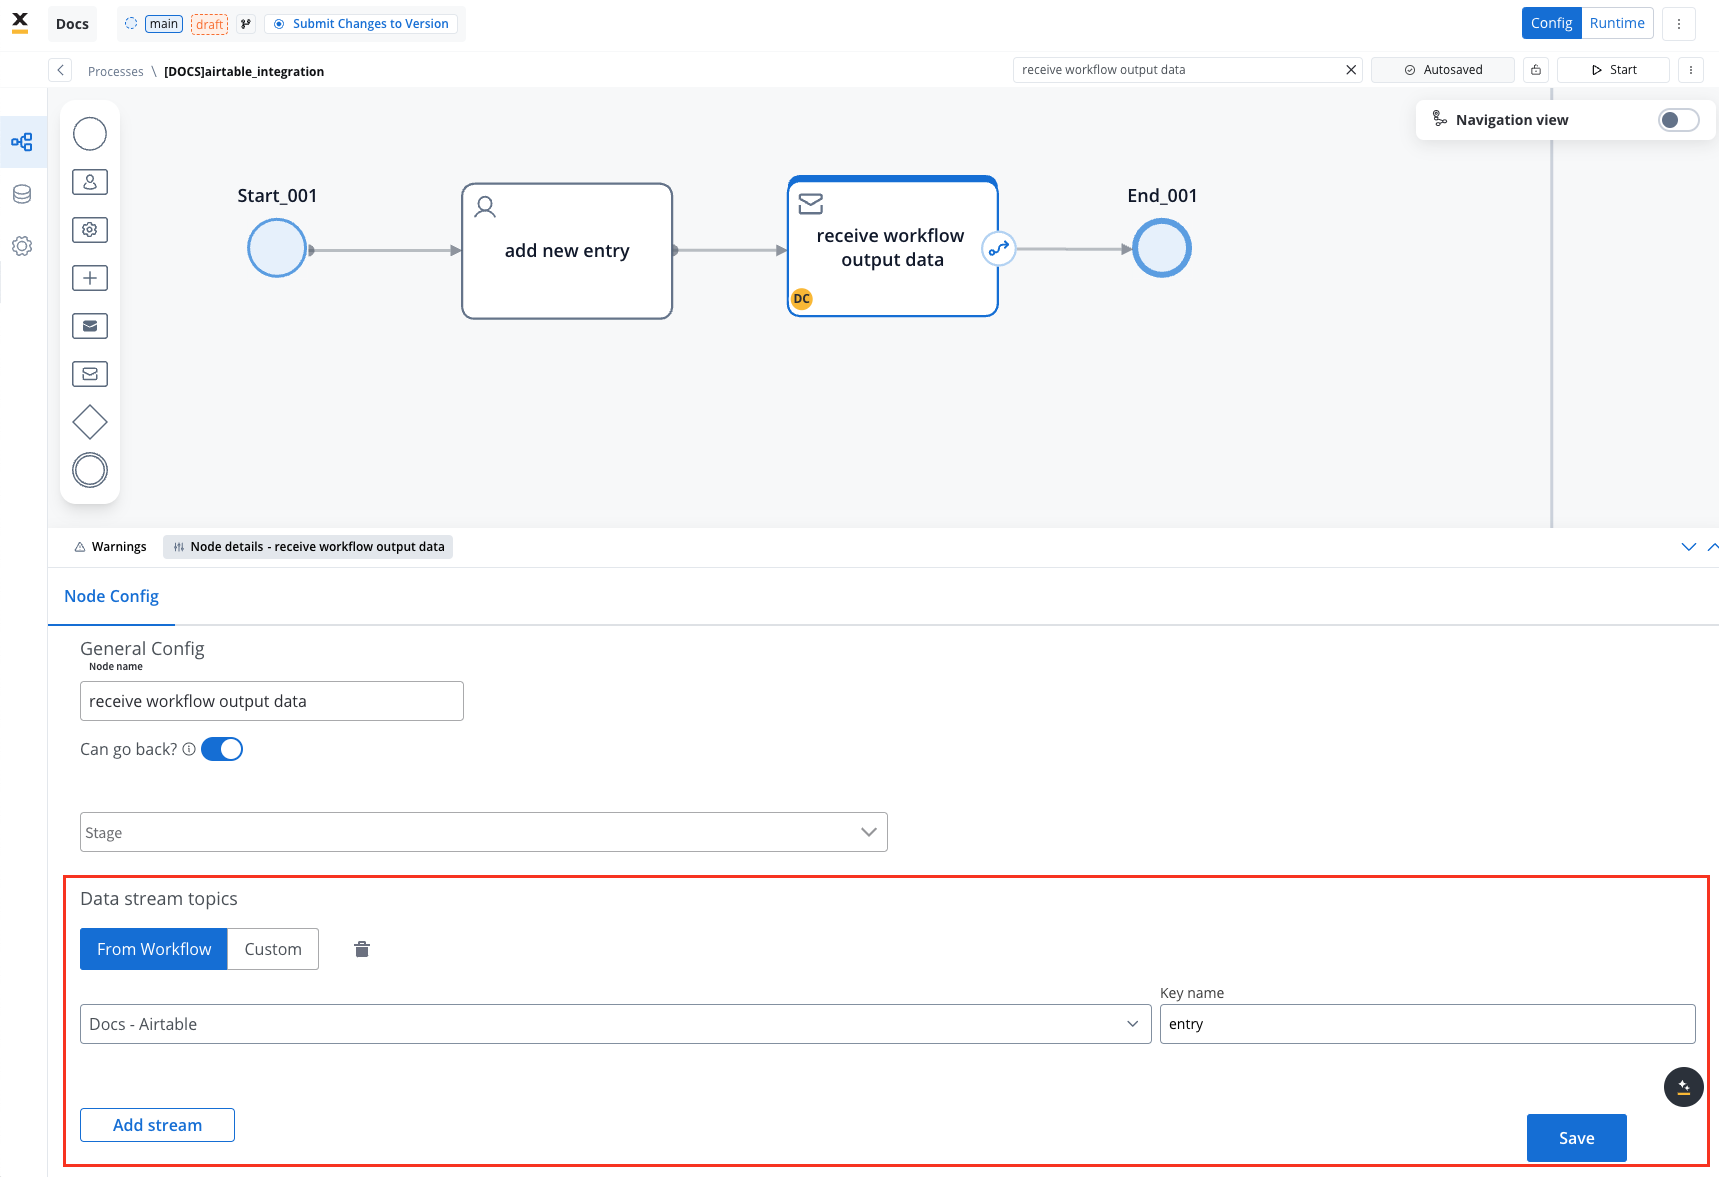
- Use the Receive Message Task to capture workflow outputs like status or returned data.
- Set up a data stream in the node’s Integration Output section to ensure workflow output is mapped to a predefined key.
One key per hop. Data crosses three boundaries on its way back to the process, and each one uses its own name:
- Inside the workflow, the REST node stores its result under its Response Key - the body is at
${responseKey.data}. - The End node maps that value into the workflow’s declared output parameter.
- The Receive Message Task maps the returned output into a process attribute through its data stream output mapping.
${...} placeholder resolves silently to nothing rather than raising an error. If the result never reaches the process, check the error glossary for the two runtime errors that pinpoint which hop is broken.6
Start the integration
- Start your process to initiate the workflow integration. It should add a new user with the details captured in the user task.
- Check if it worked by going to your base in Airtable. You can see, our user has been added.
This example demonstrates how to integrate Airtable with FlowX to automate data management. You configured a data source, set up endpoints, designed a workflow, and linked it to a BPMN process.
Export and import
You can export and import both data sources and workflows as ZIP files to transfer them between projects or environments (for example, from development to UAT to production).Exporting
To export a data source or workflow:- Navigate to the Data Sources or Workflows list in Integration Designer
- Open the context menu for the resource you want to export
- Select Export
- The resource is downloaded as a ZIP file containing the full configuration
- Data Sources - data source configuration, endpoints, NoSQL operations, MCP tools
- Workflows - workflow nodes and their configurations
Importing
To import a data source or workflow:- Navigate to the Data Sources or Workflows list in Integration Designer
- Open the context menu and select Import from ZIP
- Select the ZIP file exported from another project or environment
- If resources with the same identifiers already exist, a Review Resource Identifiers Conflicts modal appears
- Choose a strategy for each conflicting resource (or use Apply to all):
- Keep both - imports the resource as a new copy alongside the existing one
- Replace - overwrites the existing resource with the imported version
- Skip this one - keeps the existing resource unchanged
- Click Continue to complete the import
Importing is only available for work-in-progress (WIP) project versions. You cannot import into a committed version.
FAQs
Can I call GraphQL, SOAP, or gRPC endpoints?
Can I call GraphQL, SOAP, or gRPC endpoints?
A: For external API calls, the Integration Designer uses REST (HTTP) as the communication protocol. There is no dedicated GraphQL, SOAP, gRPC, or JDBC data source type — but protocols that run over HTTP can be called through a REST data source.You can call a GraphQL endpoint by using a REST data source configured with the POST method, sending the GraphQL query as a JSON body:Set the endpoint content type to
application/json and map the response as you would for any REST call.For SOAP, there is a dedicated SOAP System data source with WSDL import and automatic envelope composition — available on SaaS starting with 5.10; see SOAP System. On earlier releases (and self-hosted deployments until the next LTS), call a SOAP web service through REST instead: configure a POST REST endpoint, set the Content type to Raw, put the SOAP envelope in the request body, and add the Content-Type (text/xml or application/soap+xml) and SOAPAction request headers. The XML response is parsed automatically, so you can map its fields like any JSON response — see Receiving XML and SOAP responses. With the REST approach there is no WSDL import or automatic envelope/fault generation; you build the envelope yourself.gRPC and JDBC are not supported — they are not HTTP-based and have no data source type.The Integration Designer also supports specialized data source types beyond REST: FlowX Database, Unmanaged MongoDB, MCP Server, Knowledge Base, Email Trigger, Email Sender, Incoming Webhook, and Microsoft Outlook. See Data sources for details.How is security handled in integrations??
How is security handled in integrations??
A: The Integration Service handles all security aspects, including certificates and secret keys. Authorization methods like Service Token, Bearer Token, and OAuth 2.0 are supported.
How are errors handled?
How are errors handled?
A: Errors are logged within the workflow and can be reviewed in the monitoring dedicated console for troubleshooting and diagnostics
Can I import endpoint specifications in the Integration Designer?
Can I import endpoint specifications in the Integration Designer?
A: You can import full data sources (including their endpoints) and workflows via ZIP files using the Import from ZIP option in the context menu. See the Export and import section for details.Importing endpoint specifications from external formats like Swagger/OpenAPI is not yet supported. Endpoints must be defined manually within the data source configuration.
Can I cache responses from all endpoint methods?
Can I cache responses from all endpoint methods?
A: No. On FlowX.AI 5.9.x, caching is available for GET endpoints only. On SaaS, starting with FlowX.AI 5.11, POST endpoints can also be cached, with the request body as part of the cache key (see Extended response caching). PUT, PATCH, and DELETE methods cannot be cached, as they are designed to modify data rather than retrieve it.
What happens if the cache service fails?
What happens if the cache service fails?
A: FlowX.AI automatically falls back to calling the external API directly. Your workflows always receive correct data even if caching fails. The failure is logged for monitoring purposes.
Can I use different cache policies for the same endpoint in different workflows?
Can I use different cache policies for the same endpoint in different workflows?
A: No, the cache policy is configured at the endpoint level in the Data Source definition. All workflows using that endpoint share the same cache. If you need different caching behavior, create separate endpoint definitions.
How do I know if my workflow is using cached data?
How do I know if my workflow is using cached data?
A: Cache status is visible in both the endpoint testing modal and the workflow console logs. You’ll see whether the response came from cache (hit) or from the external API (miss), along with the cache key and TTL information.
Academy courses
Integration Designer course
Hands-on course covering systems, data sources, workflows, and REST integration patterns
Data Mappers course
Learn Kafka data mapping and transformation between process and integration workflows