 Integrations serve various purposes, including working with legacy APIs, implementing custom file exchange solutions, or integrating with RPAs.
High-level architecture
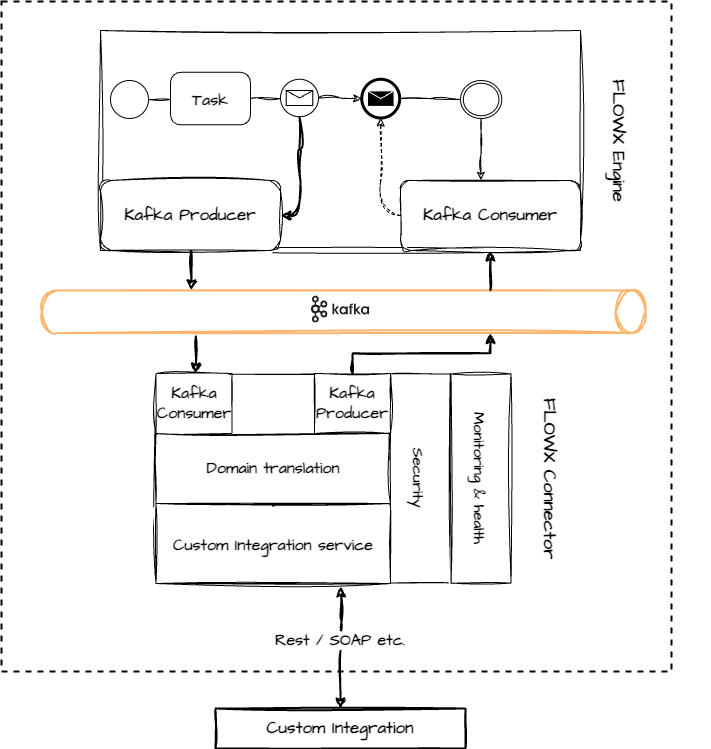 Integrations involve interaction with legacy systems and require custom development to integrate them into your FLOWX.AI setup.
Developing a custom integration
Developing custom integrations for the FlowX.AI platform is a straightforward process. You can use your preferred technology to write the necessary custom code, with the requirement that it can send and receive messages from the Kafka cluster.
Steps to create a custom integration
Follow these steps to create a custom integration:
-
Develop a microservice, referred to as a “Connector,” using your preferred tech stack. The Connector should listen for Kafka events, process the received data, interact with legacy systems if required, and send the data back to Kafka.
-
Configure the process definition by adding a message send action in one of the nodes. This action sends the required data to the Connector.
-
Once the custom integration’s response is ready, send it back to the FLOWX.AI engine. Keep in mind that the process will wait in a receive message node until the response is received.
For Java-based Connector microservices, you can use the following startup code as a quickstart guide:
Managing an integration
Managing Kafka topics
It’s essential to configure the engine to consume events from topics that follow a predefined naming pattern. The naming pattern is defined using a topic prefix and suffix, such as “ai.flowx.dev.engine.receive.”
We recommend the following naming convention for your topics: topic:
naming:
package: "ai.flowx."
environment: "dev."
version: ".v1"
prefix: ${kafka.topic.naming.package}${kafka.topic.naming.environment}
suffix: ${kafka.topic.naming.version}
engineReceivePattern: engine.receive
pattern: ${kafka.topic.naming.prefix}${kafka.topic.naming.engineReceivePattern}*
Last modified on December 23, 2025