Data & Localization
Media & Styling
- defines a decision point
- no decision making
- all outgoing branches are activated
(type: SELECT)"] end end Enum[("Countries" Enumeration)] Select -. "Data Source" .-> Enum Select -.-> RefType["Reference Type = SELECT"] style RefType fill:#ffd700,stroke:#333,stroke-width:2px style Select fill:#e1f5fe,stroke:#0288d1 style Enum fill:#f3e5f5,stroke:#7b1fa2 ``` ### The rule
When the connection with the database fails
when the connection with [Redis](../../../platform-overview/frameworks-and-standards/event-driven-architecture-frameworks/intro-to-redis) fails
| | Definition | Misconfigurations: process def name, subprocess parent process id value, start node condition missing. | | Node | When an outgoing node can’t be found (missing sequence etc). | | Gateway Evaluation |When the token can’t pass a gateway for any reason, possible causes:
- Missing sequence/node
- Failed node rule
-
{steps.map((step, i) => (
- {step.completed ? "✓" : "○"} {step.label} ))}
*Input, Textarea, Select, Checkbox, Radio, Switch, Datepicker, Slider, Segmented Button* | - **Default Value**
- **Label**
- **Placeholder**
- **Helper Text**
- **Validators**
- **Prefix**, **Suffix** | **Yes:** Process parameters or Substitution tags | | [**Document Preview**](./ui-component-types/file-preview) | - **Title**
- **Subtitle** | **Yes:** Process parameters or Substitution tags | | [**Card**](./ui-component-types/root-components/card) | - **Title**
- **Subtitle** | **Yes:** Process parameters or Substitution tags | | **Form** | - **Title** | **Yes:** Process parameters or Substitution tags | | **Message** | - **Message** | **Yes:** Process parameters or Substitution tags | | [**Button**](./ui-component-types/buttons), [**Upload**](./ui-component-types/buttons) | - **Label** | **Yes:** Process parameters or Substitution tags | | **Select**, **Checkbox**, **Radio**, **Segmented Button**
(*Static source type only*) | - **Label**
- **Value** | **Substitution tags only** | | **Text** | - **Text** | **Yes:** Process parameters or Substitution tags | | **Link** | - **Link Text** | **Yes:** Process parameters or Substitution tags | | **Modal**
*(`modalDismissAlert` properties)* | - **Title**
- **Message**
- **ConfirmLabel**
- **CancelLabel** | **Yes:** Process parameters or Substitution tags | | **Step** | - **Label** | **Yes:** Process parameters or Substitution tags | | **Tab** | - **Title** | **Yes:** Process parameters or Substitution tags |
` tag — Markdown blank lines and trailing spaces do **not** produce breaks) ```html theme={"system"} First line.
Second line. ``` Let's take the following markdown text example: ```markdown theme={"system"} Be among the *first* to receive updates about our **exciting new products** and releases. Subscribe [here](flowx.ai/newsletter) to stay in the loop! Do not ~~miss~~ it! ``` When running the process it will be displayed like this: 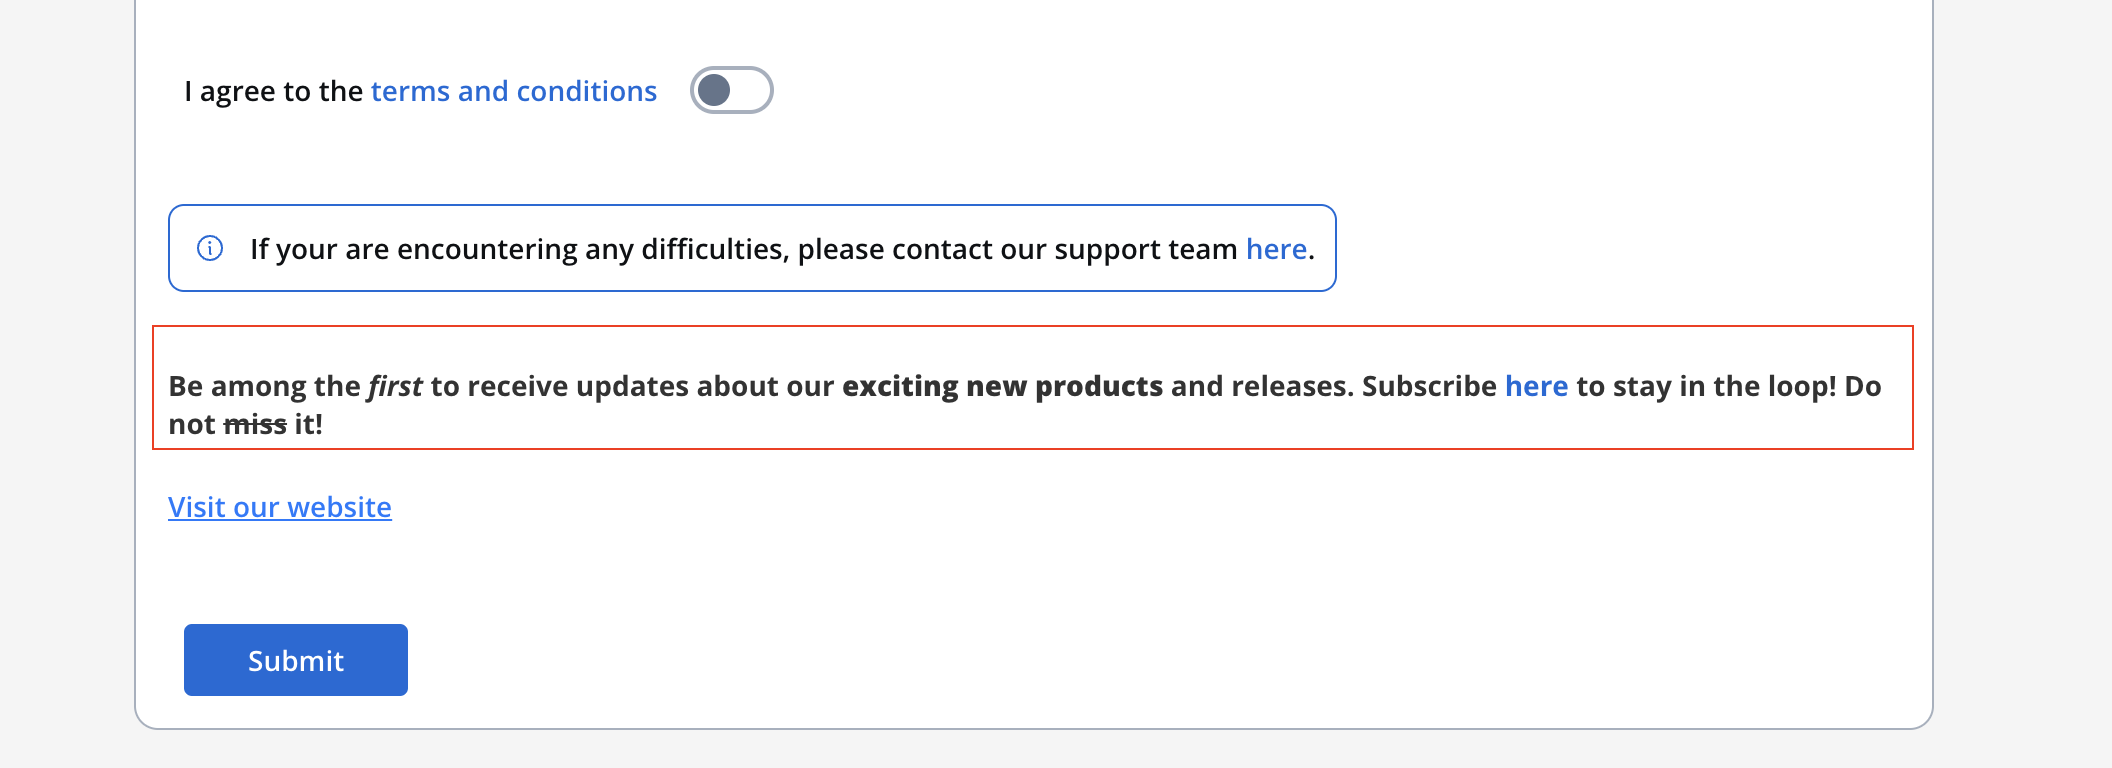
` tag between lines (shown above). Markdown blank lines and trailing spaces do not produce a line break.
- Process Instance
- Process variables
- Token
- Task
- Exception
- Process definition
- Node
- Action
- UI Component
- General Settings
- Swimlane
- Swimlane Permissions
- Connector
- Enumeration
- Enumeration Value
- Substitution Tag
- Content Model
- Language
- Source System
- Image
- Font file
- Create
- Update
- Update bulk
- Update state
- Edit
- Export
- Import
- Delete
- Clone
- Start
- Start with inherit
- Advance
- View
- Expire
- Message Send
- Message Receive
- Notification receive
- Run scheduled action
- Execute action
- Finish
- Dismiss
- Retry
- Abort
- Assign
- Unassign
- Hold
- Unhold

Offer Document
Client Information
Client Name:
Client ID:
Offer Details
| Item | Description | Price |
|---|---|---|
Dynamic Sections for Certain Conditions
This is displayed if it is a preferred client. They are eligible for special discounts!
This is displayed if the client has specific requests. Please review them carefully.
This is displayed if the client has an active contract with us.
Income source:
Cultivation of non-perennial plants:
* Cultivation of cereals (excluding rice), leguminous plants and oilseeds * Cultivation of rice * Growing of vegetables and melons, roots and tubers * Cultivation of tobaccoCultivation of plants from permanent crops:
* Cultivation of grapes * Cultivation of grapes * Cultivation of seeds and stone fruits * Cultivation of oil seedsAnimal husbandry:
* Raising of dairy cattle * Raising of other cattle * Raising horses and other horsesForestry and other forestry activities:
* Forestry and other forestry activitiesLogging:
* LoggingCollection of non-wood forest products from spontaneous flora:
* Collection of non-wood forest products from spontaneous florFishing:
* Sea fishing * Freshwater fishingAquaculture:
* Maritime aquaculture * Freshwater aquaculture{{ "stringToLocalize" | flxLocalize}}
`, }) export class DummyComponent{ stringToLocalize: string = `@@localizedString` } ``` Strings that need to be localized must have the '**@@**' prefix which the **flxLocalize** pipe uses to extract and replace the string with a value found in the substitution tags enumeration. Substitution tags are retrieved when a start process call is first made, and it's cached on subsequent start process calls. ## Task Management localization Substitution tags are essential for localizing Task Management interfaces. FlowX.AI provides **51 system substitution tags** (prefixed with `sys_tm_*`) specifically for Task Management localization:response\_key) for output.
* Input: Provide input in JSON format.
* Output: Output is read-only JSON after execution.
\[name] subworkflow not found.
responseKey.
```json theme={"system"}
{
"crmData": "${responseKey}"
}
```
`) |
Personal Information"] B --> C["User Task:
Address Details"] C --> D["User Task:
Employment & Income"] D --> E["User Task:
Document Upload"] E --> F["Send Message Task:
Start KYC Check"] F -. "Workflow:
kycVerification" .-> F F --> G["Receive Message Task:
KYC Result"] G --> H{"Exclusive Gateway:
KYC Decision"} H -- "PASSED" --> I["Generate Welcome Letter
(Send/Receive Message)"] H -- "FAILED / REVIEW" --> J["User Task: Manual Review
⏱ 48h Timer Boundary"] J -- "APPROVED" --> I J -- "REJECTED" --> K(("End
(Rejected)")) I --> L["Send Email Notification
(Send/Receive Message)"] L --> M(("End
(Success)")) ``` The main process orchestrates four form steps, delegates KYC verification to an integration workflow, and uses an exclusive gateway to branch into success or manual review paths. *** ## Prerequisites Before starting, make sure you have: * Access to a FlowX Designer workspace * The **Documents Plugin** deployed and configured (for document generation) * The **Notifications Plugin** deployed and configured (for email sending) * A document template named `welcomeLetter` created in **Document Templates** (HTML template with placeholders for customer name and date) * Familiarity with creating processes, user tasks, and actions in FlowX
(file upload UI)"] B --> C["Send / Receive Message Task"] C -. "Workflow: classifyAndExtract
(per document)" .-> C C --> D["Send / Receive Message Task"] D -. "Workflow: reconcileData" .-> D D --> E["Business Rule
(validation)"] E --> F{"Exclusive Gateway"} F -- "All valid" --> G["Auto-approve"] F -- "Exceptions found" --> H["Human Review Task"] G --> I["Send / Receive Message Task"] H --> I I -. "Workflow: generateSummary" .-> I I --> J(("End Event")) style A fill:#f0f4ff,stroke:#4a6fa5 style J fill:#f0f4ff,stroke:#4a6fa5 ``` **Workflow breakdown:** | Workflow | AI nodes | Purpose | | -------------------- | ------------------------------------------- | ----------------------------------------------------------------------- | | `classifyAndExtract` | Text Understanding + Extract Data from File | Classify document type, then extract fields using type-specific prompts | | `reconcileData` | Text Understanding | Compare extracted fields against application data | | `generateSummary` | Text Generation | Produce a human-readable verification report | *** ## Prerequisites Before starting, make sure you have: * Access to a FlowX Designer workspace with AI Platform enabled * Familiarity with creating processes, workflows, and UI flows in FlowX * A project with the Documents Plugin configured (for file uploads) *** ## Data model Define the following data model keys in your process. These keys hold the application data submitted by the customer and the results produced by the AI pipeline. ```json theme={"system"} { "applicant": { "firstName": "string", "lastName": "string", "dateOfBirth": "string", "address": { "street": "string", "city": "string", "postalCode": "string", "country": "string" }, "monthlyIncome": "number", "employer": "string" }, "documents": { "uploadedFiles": [ { "fileId": "string", "filePath": "string", "fileName": "string" } ] }, "extraction": { "classifiedDocs": [ { "fileId": "string", "documentType": "string", "confidence": "number", "extractedData": "object" } ] }, "reconciliation": { "matchRate": "number", "fieldResults": "array", "exceptions": "array", "overallStatus": "string" }, "review": { "reviewerDecision": "string", "reviewerNotes": "string" }, "summary": { "report": "string" } } ```
(Chat Session ID, User Message)"] --> B["Intent Classification Agent"] B -- "Greetings" --> C["answerSmalltalk
(Custom Agent → chat reply)"] B -- "Offer" --> D["answerPersonalisedOffer
(Subworkflow: Hybrid AI + Rules → chat reply)"] B -- "Knowledge QA" --> E["knowledgeBaseQA
(Custom Agent + KB → chat reply)"] B -- "Data Input" --> F["handleDataInput
(Script → Custom Agent → chat reply)"] B -- "No Match" --> G["fallback
(Custom Agent → chat reply)"] C --> H["End Flow"] D --> H E --> H F --> H G --> H ```
It is highly recommended that the container projects to be aligned with these versions to avoid any compatibility issues.
Refer to the following steps for detailed information about the authentication process migration
The exposed data has been reduced to the maximum required for executing the action:
These rules are automatically merged into the container app’s ProGuard/R8 configuration and applied during code shrinking and obfuscation.
The container app may add additional rules if its specific logic requires them. ## iOS SDK migration guide ### SDK API changes #### Start process The start process API require a `workspaceId`. ```swift theme={"system"} public func startProcess(navigationController: UINavigationController, workspaceId: String, projectId: String, name: String, params: [String: Any]?, isModal: Bool = false, showLoader: Bool = false, onProcessEnded: (() -> Void)? = nil) ``` ```swift theme={"system"} public func startProcess(tabBarController: UITabBarController, workspaceId: String, projectId: String, name: String, params: [String: Any]?, isModal: Bool = false, showLoader: Bool = false, onProcessEnded: (() -> Void)? = nil) ``` #### Setup theme The setup theme API requires a `workspaceId`. ```swift theme={"system"} public func setupTheme(withUuid uuid: String, workspaceId: String, localFileUrl: URL? = nil, appearance: SwiftUI.ColorScheme? = .light, completion: (() -> Void)?) ``` # Post-upgrade troubleshooting Source: https://docs.flowx.ai/release-notes/v5.x/v5.1.x-lts/v5.1.0-september-2025/migrating-from-v4.7.x-to-5.1/troubleshooting Common issues and solutions that may occur after upgrading from FlowX v4.7.x to v5.1.0. This section covers common issues that may occur after completing the upgrade to FlowX.AI 5.1.0 and their solutions. ## Designer login issues ### DataIntegrityViolationException error If you cannot login to FlowX Designer after the 5.x upgrade and encounter the following error in the authorization-system logs: ``` org.springframework.dao.DataIntegrityViolationException: could not execute statement [ERROR: duplicate key value violates unique constraint "cas_user_username_key" Detail: Key (username)=(admin@flowx.ai) already exists.] [insert into public.cas_user (created_by,created_date,email,first_name,issuer,last_name,modified_by,modified_date,subject_id,username,id) values (?,?,?,?,?,?,?,?,?,?,?)]; SQL [insert into public.cas_user (created_by,created_date,email,first_name,issuer,last_name,modified_by,modified_date,subject_id,username,id) values (?,?,?,?,?,?,?,?,?,?,?)]; constraint [cas_user_username_key] ``` **Root Cause**: This error occurs because the `sub` (subject ID) is missing from JWT tokens. Starting with Keycloak version 25, the `sub` claim is not added by default to lightweight access tokens. **Solution**: Ensure the `basic` Client Scope is created in your Keycloak Realm and added to all FlowX clients.
Therefore, the new signature of the method is `populateUi(data: Any?)`. As a consequence, type checking, casting and extracting the needed data must be part of the implementation details of the custom component.
 ### FlowX.AI Engine #### Autocomputed data to send In previous platform versions, when creating your UI screens and working with data, you had to ensure that all the data stored in your process keys was saved in the process instance. This required adding an extra parameter called "Data to send" to the "Save Data" node action. | Older versions | v4.2 | | :-------------------------------------------------------------------------------------: | :-------------------------------------------------------------------------------------: | |  |  | | | | Now, with the autocompute feature, this step is no longer necessary, as the data is automatically saved and sent on your process instance.
*** ### Autocomputed data to send In previous platform versions, when creating your UI screens and working with data, you had to ensure that all the data stored in your process keys was saved in the process instance. This required adding an extra parameter called "Data to send" to the "Save Data" node action. **Older versions** vs **v4.5**:
A Custom Component can now be implemented only by using the **[Compose](https://developer.android.com/compose)** UI system. This means that the `CustomViewComponent` is now ignored in the internals of the SDK and has been marked as `@Deprecated` and will be completely removed in the next release.
#### Conditional formatting for UI elements Dynamically update styling and properties of UI elements based on conditions, reducing the need for multiple prototypes. 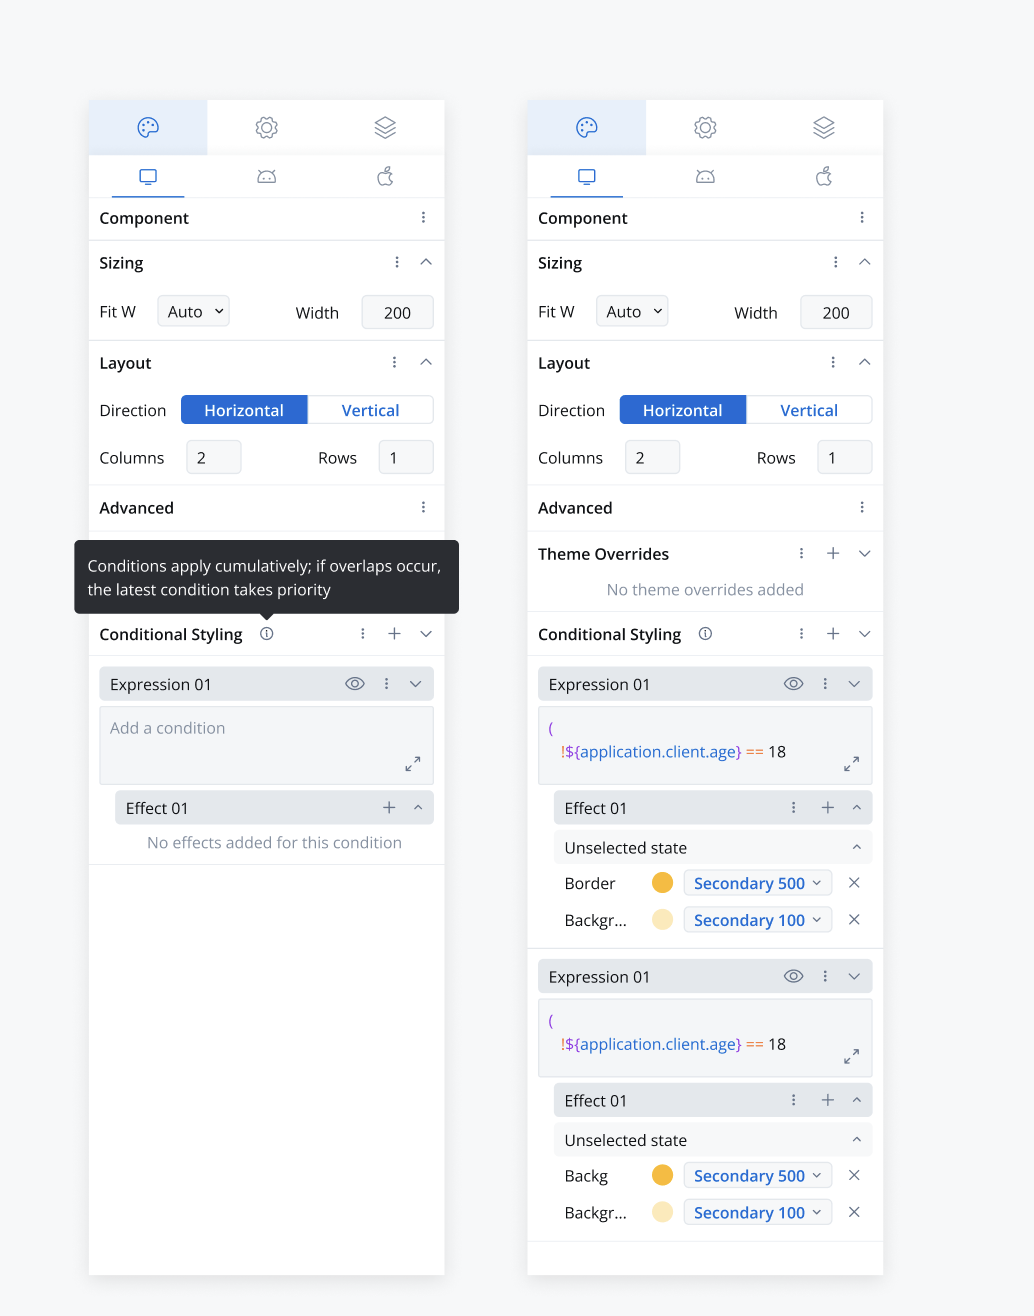
It is highly recommended that the container projects to be aligned with these versions to avoid any compatibility issues.
Refer to the following steps for detailed information about the authentication process migration
The exposed data has been reduced to the maximum required for executing the action:
These rules are automatically merged into the container app’s ProGuard/R8 configuration and applied during code shrinking and obfuscation.
The container app may add additional rules if its specific logic requires them. ## iOS SDK migration guide ### SDK API changes #### Start process The start process API require a `workspaceId`. ```swift theme={"system"} public func startProcess(navigationController: UINavigationController, workspaceId: String, projectId: String, name: String, params: [String: Any]?, isModal: Bool = false, showLoader: Bool = false, onProcessEnded: (() -> Void)? = nil) ``` ```swift theme={"system"} public func startProcess(tabBarController: UITabBarController, workspaceId: String, projectId: String, name: String, params: [String: Any]?, isModal: Bool = false, showLoader: Bool = false, onProcessEnded: (() -> Void)? = nil) ``` #### Setup theme The setup theme API requires a `workspaceId`. ```swift theme={"system"} public func setupTheme(withUuid uuid: String, workspaceId: String, localFileUrl: URL? = nil, appearance: SwiftUI.ColorScheme? = .light, completion: (() -> Void)?) ``` # Android SDK Source: https://docs.flowx.ai/5.1/sdks/android-renderer Install and configure the FlowX.AI Android SDK to render process-driven UI in native Android apps. Requires Android 8.0+ (API 26). ## Android project requirements System requirements: * **minSdk = 26** (Android 8.0) * **compileSdk = 35** The SDK library was build using: * **[Android Gradle Plugin](https://developer.android.com/build/releases/gradle-plugin) 8.11.0** * **[Gradle](https://gradle.org/releases/) 8.14.2** * **[Kotlin](https://kotlinlang.org/) 2.2.0** ## Installing the library 1. Add the maven repository in your project's `settings.gradle.kts` file: ```kotlin theme={"system"} dependencyResolutionManagement { ... repositories { ... maven { url = uri("https://nexus-jx.dev.rd.flowx.ai/repository/flowx-maven-releases/") credentials { username = "your_username" password = "your_password" } } } } ``` 2. Add the library as a dependency in your `app/build.gradle.kts` file: ```kotlin theme={"system"} dependencies { ... implementation("ai.flowx.android:sdk:9.0.2") ... } ``` ### Library dependencies Impactful dependencies: * **[Android Core KTX](https://developer.android.com/kotlin/ktx#core) 1.16.0** * **[Android Activity Compose](https://developer.android.com/jetpack/androidx/releases/activity) 1.10.1** * **[Compose BOM](https://developer.android.com/jetpack/compose/bom/bom-mapping) 2025.09.01** * **[Accompanist Permissions](https://google.github.io/accompanist/permissions/) 0.37.3** * **[Kotlin Coroutines](https://kotlinlang.org/docs/coroutines-overview.html) 1.10.2** * **[Compose Navigation](https://developer.android.com/develop/ui/compose/navigation) 2.9.1** * **[Android Lifecycle](https://developer.android.com/jetpack/androidx/releases/lifecycle) 2.9.1** * **[Android Core Library Desugaring](https://developer.android.com/studio/write/java8-support#library-desugaring) 2.1.5** * **[OkHttp BOM](https://square.github.io/okhttp/) 4.12.0** * **[Retrofit](https://square.github.io/retrofit/) 2.12.0** * **[Moshi](https://github.com/square/moshi) 1.15.2** * **[Coil BOM](https://coil-kt.github.io/coil/) 3.2.0** ### Public API The SDK library is managed through the `Flowx` singleton instance, which exposes the following methods: | Name | Description | Definition | | ---------------------- | ------------------------------------------------------------------------------------------------------------------ | ---------------------------------------------------------------------------------------------------------------------------------------------------------------------------------------------------------------------------------------------------------------------------------------------------------------------------------------------- | | `init` | Initializes the FlowX SDK. Must be called in your application's `onCreate()` | `fun init(context: Context, config: Config, customComponentsProvider: CustomComponentsProvider? = null, customStepperHeaderProvider: CustomStepperHeaderProvider? = null, customLoaderProvider: CustomLoaderProvider? = null, analyticsCollector: AnalyticsCollector? = null, onNewProcessStarted: NewProcessStartedHandler.Delegate? = null)` | | `setAccessToken` | Updates the access token | `fun setAccessToken(accessToken: String?)` | | `setupTheme` | Sets up the theme to be used when rendering a process | `fun setupTheme(workspaceUuid: String, appearance: ThemeAppearance = ThemeAppearance.LIGHT, themeUuid: String, fallbackThemeJsonFileAssetsPath: String? = null, @MainThread onCompletion: () -> Unit)` | | `changeLocaleSettings` | Changes the current locale settings (i.e. locale and language) | `fun changeLocaleSettings(locale: Locale, language: String)` | | `startProcess` | Starts a FlowX process instance, by returning a `@Composable` function where the process is rendered. | `fun startProcess(workspaceId: String, projectId: String, processName: String, params: JSONObject = JSONObject(), isModal: Boolean = false, onProcessEnded: (() -> Unit)? = null, closeModalFunc: (CloseModalProcessScope.(processName: String) -> Unit)? = null): @Composable () -> Unit` | | `continueProcess` | Continues an existing FlowX process instance, by returning a `@Composable` function where the process is rendered. | `fun continueProcess(processUuid: String, isModal: Boolean = false, onProcessEnded: (() -> Unit)? = null, closeModalFunc: (CloseModalProcessScope.(processName: String) -> Unit)? = null): @Composable () -> Unit` | ## Configuring the library To configure the SDK, there are two things needed in the project's application class: 1. first, make it implement the `FlowxOwner` interface: ```kotlin theme={"system"} class MyApplication : Application(), FlowxOwner { override val flowx: Lazy
• The implementation for providing a `custom view for the header` of the [Stepper](../docs/building-blocks/process/navigation-areas#stepper) component is detailed in [its own section](#custom-header-view-for-the-stepper-component).
• The implementation for providing a `custom loader` is explained in [its own section](#custom-loaders).
• Collecting analytics events from the SDK is explained in [its own section](#collecting-analytics-events).
• Handling the start of a new process while in a running process is explained in [its own section](#handling-“start-of-a-new-process”).
#### Sample ```kotlin theme={"system"} class MyApplication : Application(), FlowxOwner { override val flowx: Lazy
Check the [authentication](#authentication) section for details.
If the `fallbackThemeJsonFileAssetsPath` parameter value is `null`, there will be no fallback mechanism set in place, meaning if fetching the theme fails, the redered process will have no style applied over it's displayed components.
The change is successful only if made before [starting](#start-a-flowx-process) or [resuming](#resume-a-flowx-process) a process.
More information regarding the standard can be found by reading [RFC 4647 "Matching of Language Tags"](https://datatracker.ietf.org/doc/html/rfc4647) and [RFC 5646 "Tags for Identifying Languages"](https://datatracker.ietf.org/doc/html/rfc5646).
An example of BCP 47 is `en-US` (language code `en` and country `US`).
This wrapper activity must display only the `@Composable` returned from the SDK (i.e. it occupies the whole activity screen space).
This wrapper activity must display only the `@Composable` returned from the SDK (i.e. it occupies the whole activity screen space).
It can also be validated and provide data back into the process when executing an action. To handle custom components, an *implementation* of the `CustomComponentsProvider` interface should be passed as a parameter when initializing the SDK: ```kotlin theme={"system"} interface CustomComponentsProvider { fun provideCustomComponent(componentIdentifier: String): CustomComponent? } ``` #### Sample ```kotlin theme={"system"} class FxCustomComponentsProvider : CustomComponentsProvider { override fun provideCustomComponent(componentIdentifier: String): CustomComponent? = when (componentIdentifier) { "myCustomComponent" -> object : CustomComponent {...} else -> null } } ``` ### CustomComponent The implementation for providing a custom component is based on creating and binding a user defined [@Composable](https://developer.android.com/reference/kotlin/androidx/compose/runtime/Composable) function, through the `CustomComponent` interface: ```kotlin theme={"system"} interface CustomComponent { /** * Returns the [Composable]s for every custom component identifier defined in the FlowX Designer */ val composable: @Composable CustomComponentScope.() -> Unit /** * This will be called when data is available for the custom component i.e. when the * User Task that contains the custom component is displayed. * * @param data used to populate the custom component */ fun populateUi(data: Any?) /** * This will be called when actions are available for the custom component i.e. when the * User Task that contains the custom component is displayed. * * @param actions that need to be attached to the custom component (e.g. onClick events) */ fun populateUi(actions: Map
* `Boolean` * `String` * `java.lang.Number` * `org.json.JSONObject` * `org.json.JSONArray` The appropriate way to check and cast the data accordingly to the needs must belong to the implementation details of the custom component.
These actions are received through the `actions` parameter of the `populateUi(actions: Map
To run an action (i.e. on a click of a button in the custom component) you need to call the `executeAction` method, through the `CustomComponentScope` context: ```kotlin theme={"system"} fun executeAction(action: CustomComponentAction, params: JSONObject? = null) ``` ##### Parameters | Name | Description | Type | Requirement | | -------- | --------------------------------------------------------------------------- | ------------------------------------------------------------------ | ------------------------------- | | `action` | Action object extracted from the `actions` received in the custom component | `ai.flowx.android.sdk.api.custom.components.CustomComponentAction` | Mandatory | | `params` | Parameters needed to execute the `action` | `JSONObject?` | Optional. It defaults to `null` | #### Get a substitution tag value by key ```kotlin theme={"system"} fun replaceSubstitutionTag(key: String): String ``` All substitution tags will be retrieved by the SDK before starting the process and will be stored in memory. Whenever the container app needs a substitution tag value for populating the UI of the custom components, it can request the substitution tag, through the `CustomComponentScope` context, using the method above, by providing the `key`. It returns: * the key's counterpart, if the `key` is valid and found * the empty string, if the `key` is valid, but not found * the unaltered string, if the key has the wrong format (i.e. not starting with `@@`) #### Get a media item url by key ```kotlin theme={"system"} fun getMediaResourceUrl(key: String): String? ``` All media items will be retrieved by the SDK before starting the process and will be stored in memory. Whenever the container app needs a media item url for populating the UI of the custom components, it can request the url, through the `CustomComponentScope` context, using the method above, by providing the `key`. It returns the `URL` string of the media resource, or `null`, if not found. #### Obtain enumeration data ```kotlin theme={"system"} suspend fun getEnumeration(name: String, parentName: String? = null): FxEnumeration? ``` Whenever the container app needs an enumeration data for populating the UI of the custom components, it can request the url, through the `CustomComponentScope` context, using the method above, by providing the `name` (and the `parentName`, if there's a hierarchy defined and the desired enumeration data (`name` is child of `parentName`). It returns the enumeration data, as an `FxEnumeration` object, or `null`, if not found. ```kotlin theme={"system"} interface FxEnumeration { val name: String val items: List
The custom view receives `data` to populate its UI, as described below. To provide a custom header for the [Stepper](../docs/building-blocks/process/navigation-areas#stepper), an *implementation* of the `CustomStepperHeaderProvider` interface should be passed as a parameter when initializing the SDK: ```kotlin theme={"system"} interface CustomStepperHeaderProvider { fun provideCustomStepperHeader(): CustomStepperHeader? } ``` #### Sample ```kotlin theme={"system"} class FxCustomStepperHeaderProvider : CustomStepperHeaderProvider { override fun provideCustomStepperHeader(): CustomStepperHeader? { return object : CustomStepperHeader {...} } } ``` ### CustomStepperHeader To provide the custom header view as a [@Composable](https://developer.android.com/reference/kotlin/androidx/compose/runtime/Composable) function, you have to implement the `CustomStepperHeader` interface: ```kotlin theme={"system"} interface CustomStepperHeader { /** * Returns the [Composable]s used to render the stepper header. * The received argument contains the stepper header necessary data to render the view. */ val composable: @Composable (data: Data) -> Unit interface Data { // title for the current step; can be empty or null val stepTitle: String? // title for the current selected substep; optional; // can be empty ("") if not defined or `null` if currently there is no selected substep val substepTitle: String? // 1-based index of the current step val step: Int // total number of steps val totalSteps: Int // 1-based index of the current substep; can be `null` when there are no defined substeps val substep: Int? // total number of substeps in the current step; can be `null` or `0` val totalSubsteps: Int? } } ``` #### Sample ```kotlin theme={"system"} override fun provideCustomStepperHeader(): CustomStepperHeader? { return object : CustomStepperHeader { override val composable: @Composable ((CustomStepperHeader.Data) -> Unit) get() = @Composable { data -> /* add some @Composable implementation which displays the `data` */ } } } ``` ## Custom loaders The container application can decide to provide custom loaders to be displayed at certain moments based on a given predefined `actionName`.
To provide custom loaders, an *implementation* of the `CustomLoaderProvider` interface should be passed as a parameter when initializing the SDK: ```kotlin theme={"system"} interface CustomLoaderProvider { fun provideCustomLoader(actionName: String?): CustomLoader? } ```
Returning null keeps the built-in platform loader for the specified use cases.
These rules are automatically merged into the container app’s ProGuard/R8 configuration and applied during code shrinking and obfuscation.
The container app may add additional rules if its specific logic requires them. ## Known issues * shadows are rendered only on **Android >= 28** having [hardware acceleration](https://developer.android.com/topic/performance/hardware-accel) **enabled** # Angular SDK Source: https://docs.flowx.ai/5.1/sdks/angular-renderer FlowxProcessRenderer is a library designed to render the UI of processes created via the Flowx Process Designer.
By default all process data is reset when the process renderer component gets destroyed. Setting this to true will keep process data even if the viewport gets destroyed
| boolean | false | false | - | | isDraft | When true allows starting a process in draft state. \*Note that isDraft = true requires that processName be the **id** (number) of the process and NOT the name. | boolean | false | false | - | | legacyHttpVersion | Set this to `true` only for HTTP versions \< 2 in order for SSE to work properly. Can be omitted otherwise. | boolean | false | false | - | | projectInfo | Information about the project that contains the process that is being run. | object | true | - | `{ projectId: '1234-5678-9012' }` | | locale | Locale used to localize the application. | string | false | en-US | 'en-US' | | cache | Caching of CMS resources (cached resources include: theme configurations, substitution tags, enumerations, media library assets) | boolean | false | true | - | | customLoader | Custom loader components for different loading scenarios | object | false | - | `{ startProcess: StartLoaderComponent, saveData: SaveLoaderComponent }` |Starting process...
Executing specific action...
Optionally you can pass an instance of `FXNavigationViewController`, which has the appearance set in the FlowX Theme, using the `FXNavigationViewController`s class func `FXNavigationViewController.navigationController()`.
Optionally you can pass an instance of `FXNavigationViewController`, which has the appearance set in the FlowX Theme, using the `FXNavigationViewController`s class func `FXNavigationViewController.navigationController()`.
Starting process...
Executing specific action...
Completed onboarding period | Project Owner | | `workspace_user` | `theme_editor` | User assigned to design responsibilities
Demonstrated design skills | Workspace Admin | | `workspace_user` | `runtime_editor` | User assigned to DevOps responsibilities
Deployment management needed | Workspace Admin | | `workspace_user` | `operations_editor` | User assigned to operations responsibilities
Process migration needs | Workspace Admin | | `project_editor` | `project_owner` | Original owner leaving
User taking over project leadership | Current Owner or Workspace Admin | | `workspace_user` | `workspace_admin` | User promoted to management
Administrative duties assigned | Organization Admin | | `workspace_admin` | `org_admin` | User taking platform-wide responsibilities
Multi-workspace management | Existing Org Admin + Management |
It is highly recommended that the container projects to be aligned with these versions to avoid any compatibility issues.
Refer to the following steps for detailed information about the authentication process migration
The exposed data has been reduced to the maximum required for executing the action:
These rules are automatically merged into the container app’s ProGuard/R8 configuration and applied during code shrinking and obfuscation.
The container app may add additional rules if its specific logic requires them. ## iOS SDK migration guide ### SDK API changes #### Start process The start process API require a `workspaceId`. ```swift theme={"system"} public func startProcess(navigationController: UINavigationController, workspaceId: String, projectId: String, name: String, params: [String: Any]?, isModal: Bool = false, showLoader: Bool = false, onProcessEnded: (() -> Void)? = nil) ``` ```swift theme={"system"} public func startProcess(tabBarController: UITabBarController, workspaceId: String, projectId: String, name: String, params: [String: Any]?, isModal: Bool = false, showLoader: Bool = false, onProcessEnded: (() -> Void)? = nil) ``` #### Setup theme The setup theme API requires a `workspaceId`. ```swift theme={"system"} public func setupTheme(withUuid uuid: String, workspaceId: String, localFileUrl: URL? = nil, appearance: SwiftUI.ColorScheme? = .light, completion: (() -> Void)?) ``` # FlowX.AI 5.0.0 Release Notes Source: https://docs.flowx.ai/release-notes/v5.x/v5.0.0-july-2025/v5.0.0-july-2025 Latest features, improvements, and bug fixes in our newest release
It is highly recommended that the container projects to be aligned with these versions to avoid any compatibility issues.
Refer to the following steps for detailed information about the authentication process migration
The exposed data has been reduced to the maximum required for executing the action:
These rules are automatically merged into the container app’s ProGuard/R8 configuration and applied during code shrinking and obfuscation.
The container app may add additional rules if its specific logic requires them. ## iOS SDK migration guide ### SDK API changes #### Start process The start process API require a `workspaceId`. ```swift theme={"system"} public func startProcess(navigationController: UINavigationController, workspaceId: String, projectId: String, name: String, params: [String: Any]?, isModal: Bool = false, showLoader: Bool = false, onProcessEnded: (() -> Void)? = nil) ``` ```swift theme={"system"} public func startProcess(tabBarController: UITabBarController, workspaceId: String, projectId: String, name: String, params: [String: Any]?, isModal: Bool = false, showLoader: Bool = false, onProcessEnded: (() -> Void)? = nil) ``` #### Setup theme The setup theme API requires a `workspaceId`. ```swift theme={"system"} public func setupTheme(withUuid uuid: String, workspaceId: String, localFileUrl: URL? = nil, appearance: SwiftUI.ColorScheme? = .light, completion: (() -> Void)?) ``` # Post-upgrade troubleshooting Source: https://docs.flowx.ai/release-notes/v5.x/v5.1.x-lts/v5.1.0-september-2025/migrating-from-v4.7.x-to-5.1/troubleshooting Common issues and solutions that may occur after upgrading from FlowX v4.7.x to v5.1.0. This section covers common issues that may occur after completing the upgrade to FlowX.AI 5.1.0 and their solutions. ## Designer login issues ### DataIntegrityViolationException error If you cannot login to FlowX Designer after the 5.x upgrade and encounter the following error in the authorization-system logs: ``` org.springframework.dao.DataIntegrityViolationException: could not execute statement [ERROR: duplicate key value violates unique constraint "cas_user_username_key" Detail: Key (username)=(admin@flowx.ai) already exists.] [insert into public.cas_user (created_by,created_date,email,first_name,issuer,last_name,modified_by,modified_date,subject_id,username,id) values (?,?,?,?,?,?,?,?,?,?,?)]; SQL [insert into public.cas_user (created_by,created_date,email,first_name,issuer,last_name,modified_by,modified_date,subject_id,username,id) values (?,?,?,?,?,?,?,?,?,?,?)]; constraint [cas_user_username_key] ``` **Root Cause**: This error occurs because the `sub` (subject ID) is missing from JWT tokens. Starting with Keycloak version 25, the `sub` claim is not added by default to lightweight access tokens. **Solution**: Ensure the `basic` Client Scope is created in your Keycloak Realm and added to all FlowX clients.
Therefore, the new signature of the method is `populateUi(data: Any?)`. As a consequence, type checking, casting and extracting the needed data must be part of the implementation details of the custom component.
 ### FlowX.AI Engine #### Autocomputed data to send In previous platform versions, when creating your UI screens and working with data, you had to ensure that all the data stored in your process keys was saved in the process instance. This required adding an extra parameter called "Data to send" to the "Save Data" node action. | Older versions | v4.2 | | :-------------------------------------------------------------------------------------: | :-------------------------------------------------------------------------------------: | |  |  | | | | Now, with the autocompute feature, this step is no longer necessary, as the data is automatically saved and sent on your process instance.
*** ### Autocomputed data to send In previous platform versions, when creating your UI screens and working with data, you had to ensure that all the data stored in your process keys was saved in the process instance. This required adding an extra parameter called "Data to send" to the "Save Data" node action. **Older versions** vs **v4.5**:
A Custom Component can now be implemented only by using the **[Compose](https://developer.android.com/compose)** UI system. This means that the `CustomViewComponent` is now ignored in the internals of the SDK and has been marked as `@Deprecated` and will be completely removed in the next release.
#### Conditional formatting for UI elements Dynamically update styling and properties of UI elements based on conditions, reducing the need for multiple prototypes. 
It is highly recommended that the container projects to be aligned with these versions to avoid any compatibility issues.
Refer to the following steps for detailed information about the authentication process migration
The exposed data has been reduced to the maximum required for executing the action:
These rules are automatically merged into the container app’s ProGuard/R8 configuration and applied during code shrinking and obfuscation.
The container app may add additional rules if its specific logic requires them. ## iOS SDK migration guide ### SDK API changes #### Start process The start process API require a `workspaceId`. ```swift theme={"system"} public func startProcess(navigationController: UINavigationController, workspaceId: String, projectId: String, name: String, params: [String: Any]?, isModal: Bool = false, showLoader: Bool = false, onProcessEnded: (() -> Void)? = nil) ``` ```swift theme={"system"} public func startProcess(tabBarController: UITabBarController, workspaceId: String, projectId: String, name: String, params: [String: Any]?, isModal: Bool = false, showLoader: Bool = false, onProcessEnded: (() -> Void)? = nil) ``` #### Setup theme The setup theme API requires a `workspaceId`. ```swift theme={"system"} public func setupTheme(withUuid uuid: String, workspaceId: String, localFileUrl: URL? = nil, appearance: SwiftUI.ColorScheme? = .light, completion: (() -> Void)?) ``` # FlowX.AI 5.0.0 Release Notes Source: https://docs.flowx.ai/release-notes/v5.x/v5.0.0-july-2025/v5.0.0-july-2025 Latest features, improvements, and bug fixes in our newest release
It is highly recommended that the container projects to be aligned with these versions to avoid any compatibility issues.
Refer to the following steps for detailed information about the authentication process migration
The exposed data has been reduced to the maximum required for executing the action:
These rules are automatically merged into the container app’s ProGuard/R8 configuration and applied during code shrinking and obfuscation.
The container app may add additional rules if its specific logic requires them. ## iOS SDK migration guide ### SDK API changes #### Start process The start process API require a `workspaceId`. ```swift theme={"system"} public func startProcess(navigationController: UINavigationController, workspaceId: String, projectId: String, name: String, params: [String: Any]?, isModal: Bool = false, showLoader: Bool = false, onProcessEnded: (() -> Void)? = nil) ``` ```swift theme={"system"} public func startProcess(tabBarController: UITabBarController, workspaceId: String, projectId: String, name: String, params: [String: Any]?, isModal: Bool = false, showLoader: Bool = false, onProcessEnded: (() -> Void)? = nil) ``` #### Setup theme The setup theme API requires a `workspaceId`. ```swift theme={"system"} public func setupTheme(withUuid uuid: String, workspaceId: String, localFileUrl: URL? = nil, appearance: SwiftUI.ColorScheme? = .light, completion: (() -> Void)?) ``` # Post-upgrade troubleshooting Source: https://docs.flowx.ai/release-notes/v5.x/v5.1.x-lts/v5.1.0-september-2025/migrating-from-v4.7.x-to-5.1/troubleshooting Common issues and solutions that may occur after upgrading from FlowX v4.7.x to v5.1.0. This section covers common issues that may occur after completing the upgrade to FlowX.AI 5.1.0 and their solutions. ## Designer login issues ### DataIntegrityViolationException error If you cannot login to FlowX Designer after the 5.x upgrade and encounter the following error in the authorization-system logs: ``` org.springframework.dao.DataIntegrityViolationException: could not execute statement [ERROR: duplicate key value violates unique constraint "cas_user_username_key" Detail: Key (username)=(admin@flowx.ai) already exists.] [insert into public.cas_user (created_by,created_date,email,first_name,issuer,last_name,modified_by,modified_date,subject_id,username,id) values (?,?,?,?,?,?,?,?,?,?,?)]; SQL [insert into public.cas_user (created_by,created_date,email,first_name,issuer,last_name,modified_by,modified_date,subject_id,username,id) values (?,?,?,?,?,?,?,?,?,?,?)]; constraint [cas_user_username_key] ``` **Root Cause**: This error occurs because the `sub` (subject ID) is missing from JWT tokens. Starting with Keycloak version 25, the `sub` claim is not added by default to lightweight access tokens. **Solution**: Ensure the `basic` Client Scope is created in your Keycloak Realm and added to all FlowX clients.
Therefore, the new signature of the method is `populateUi(data: Any?)`. As a consequence, type checking, casting and extracting the needed data must be part of the implementation details of the custom component.
 ### FlowX.AI Engine #### Autocomputed data to send In previous platform versions, when creating your UI screens and working with data, you had to ensure that all the data stored in your process keys was saved in the process instance. This required adding an extra parameter called "Data to send" to the "Save Data" node action. | Older versions | v4.2 | | :-------------------------------------------------------------------------------------: | :-------------------------------------------------------------------------------------: | |  |  | | | | Now, with the autocompute feature, this step is no longer necessary, as the data is automatically saved and sent on your process instance.
*** ### Autocomputed data to send In previous platform versions, when creating your UI screens and working with data, you had to ensure that all the data stored in your process keys was saved in the process instance. This required adding an extra parameter called "Data to send" to the "Save Data" node action. **Older versions** vs **v4.5**:
Therefore, the new signature of the method is `populateUi(data: Any?)`. As a consequence, type checking, casting and extracting the needed data must be part of the implementation details of the custom component.
 ### FlowX.AI Engine #### Autocomputed data to send In previous platform versions, when creating your UI screens and working with data, you had to ensure that all the data stored in your process keys was saved in the process instance. This required adding an extra parameter called "Data to send" to the "Save Data" node action. | Older versions | v4.2 | | :-------------------------------------------------------------------------------------: | :-------------------------------------------------------------------------------------: | |  |  | | | | Now, with the autocompute feature, this step is no longer necessary, as the data is automatically saved and sent on your process instance.
It is highly recommended that the container projects to be aligned with these versions to avoid any compatibility issues.
Refer to the following steps for detailed information about the authentication process migration
The exposed data has been reduced to the maximum required for executing the action:
These rules are automatically merged into the container app’s ProGuard/R8 configuration and applied during code shrinking and obfuscation.
The container app may add additional rules if its specific logic requires them. ## iOS SDK migration guide ### SDK API changes #### Start process The start process API require a `workspaceId`. ```swift theme={"system"} public func startProcess(navigationController: UINavigationController, workspaceId: String, projectId: String, name: String, params: [String: Any]?, isModal: Bool = false, showLoader: Bool = false, onProcessEnded: (() -> Void)? = nil) ``` ```swift theme={"system"} public func startProcess(tabBarController: UITabBarController, workspaceId: String, projectId: String, name: String, params: [String: Any]?, isModal: Bool = false, showLoader: Bool = false, onProcessEnded: (() -> Void)? = nil) ``` #### Setup theme The setup theme API requires a `workspaceId`. ```swift theme={"system"} public func setupTheme(withUuid uuid: String, workspaceId: String, localFileUrl: URL? = nil, appearance: SwiftUI.ColorScheme? = .light, completion: (() -> Void)?) ``` # FlowX.AI 5.0.0 Release Notes Source: https://docs.flowx.ai/release-notes/v5.x/v5.0.0-july-2025/v5.0.0-july-2025 Latest features, improvements, and bug fixes in our newest release
It is highly recommended that the container projects to be aligned with these versions to avoid any compatibility issues.
Refer to the following steps for detailed information about the authentication process migration
The exposed data has been reduced to the maximum required for executing the action:
These rules are automatically merged into the container app’s ProGuard/R8 configuration and applied during code shrinking and obfuscation.
The container app may add additional rules if its specific logic requires them. ## iOS SDK migration guide ### SDK API changes #### Start process The start process API require a `workspaceId`. ```swift theme={"system"} public func startProcess(navigationController: UINavigationController, workspaceId: String, projectId: String, name: String, params: [String: Any]?, isModal: Bool = false, showLoader: Bool = false, onProcessEnded: (() -> Void)? = nil) ``` ```swift theme={"system"} public func startProcess(tabBarController: UITabBarController, workspaceId: String, projectId: String, name: String, params: [String: Any]?, isModal: Bool = false, showLoader: Bool = false, onProcessEnded: (() -> Void)? = nil) ``` #### Setup theme The setup theme API requires a `workspaceId`. ```swift theme={"system"} public func setupTheme(withUuid uuid: String, workspaceId: String, localFileUrl: URL? = nil, appearance: SwiftUI.ColorScheme? = .light, completion: (() -> Void)?) ``` # Post-upgrade troubleshooting Source: https://docs.flowx.ai/release-notes/v5.x/v5.1.x-lts/v5.1.0-september-2025/migrating-from-v4.7.x-to-5.1/troubleshooting Common issues and solutions that may occur after upgrading from FlowX v4.7.x to v5.1.0. This section covers common issues that may occur after completing the upgrade to FlowX.AI 5.1.0 and their solutions. ## Designer login issues ### DataIntegrityViolationException error If you cannot login to FlowX Designer after the 5.x upgrade and encounter the following error in the authorization-system logs: ``` org.springframework.dao.DataIntegrityViolationException: could not execute statement [ERROR: duplicate key value violates unique constraint "cas_user_username_key" Detail: Key (username)=(admin@flowx.ai) already exists.] [insert into public.cas_user (created_by,created_date,email,first_name,issuer,last_name,modified_by,modified_date,subject_id,username,id) values (?,?,?,?,?,?,?,?,?,?,?)]; SQL [insert into public.cas_user (created_by,created_date,email,first_name,issuer,last_name,modified_by,modified_date,subject_id,username,id) values (?,?,?,?,?,?,?,?,?,?,?)]; constraint [cas_user_username_key] ``` **Root Cause**: This error occurs because the `sub` (subject ID) is missing from JWT tokens. Starting with Keycloak version 25, the `sub` claim is not added by default to lightweight access tokens. **Solution**: Ensure the `basic` Client Scope is created in your Keycloak Realm and added to all FlowX clients.
Therefore, the new signature of the method is `populateUi(data: Any?)`. As a consequence, type checking, casting and extracting the needed data must be part of the implementation details of the custom component.
 ### FlowX.AI Engine #### Autocomputed data to send In previous platform versions, when creating your UI screens and working with data, you had to ensure that all the data stored in your process keys was saved in the process instance. This required adding an extra parameter called "Data to send" to the "Save Data" node action. | Older versions | v4.2 | | :-------------------------------------------------------------------------------------: | :-------------------------------------------------------------------------------------: | |  |  | | | | Now, with the autocompute feature, this step is no longer necessary, as the data is automatically saved and sent on your process instance.
*** ### Autocomputed data to send In previous platform versions, when creating your UI screens and working with data, you had to ensure that all the data stored in your process keys was saved in the process instance. This required adding an extra parameter called "Data to send" to the "Save Data" node action. **Older versions** vs **v4.5**:
A Custom Component can now be implemented only by using the **[Compose](https://developer.android.com/compose)** UI system. This means that the `CustomViewComponent` is now ignored in the internals of the SDK and has been marked as `@Deprecated` and will be completely removed in the next release.
#### Conditional formatting for UI elements Dynamically update styling and properties of UI elements based on conditions, reducing the need for multiple prototypes. 
It is highly recommended that the container projects to be aligned with these versions to avoid any compatibility issues.
Refer to the following steps for detailed information about the authentication process migration
The exposed data has been reduced to the maximum required for executing the action:
These rules are automatically merged into the container app’s ProGuard/R8 configuration and applied during code shrinking and obfuscation.
The container app may add additional rules if its specific logic requires them. ## iOS SDK migration guide ### SDK API changes #### Start process The start process API require a `workspaceId`. ```swift theme={"system"} public func startProcess(navigationController: UINavigationController, workspaceId: String, projectId: String, name: String, params: [String: Any]?, isModal: Bool = false, showLoader: Bool = false, onProcessEnded: (() -> Void)? = nil) ``` ```swift theme={"system"} public func startProcess(tabBarController: UITabBarController, workspaceId: String, projectId: String, name: String, params: [String: Any]?, isModal: Bool = false, showLoader: Bool = false, onProcessEnded: (() -> Void)? = nil) ``` #### Setup theme The setup theme API requires a `workspaceId`. ```swift theme={"system"} public func setupTheme(withUuid uuid: String, workspaceId: String, localFileUrl: URL? = nil, appearance: SwiftUI.ColorScheme? = .light, completion: (() -> Void)?) ``` # FlowX.AI 5.0.0 Release Notes Source: https://docs.flowx.ai/release-notes/v5.x/v5.0.0-july-2025/v5.0.0-july-2025 Latest features, improvements, and bug fixes in our newest release
It is highly recommended that the container projects to be aligned with these versions to avoid any compatibility issues.
Refer to the following steps for detailed information about the authentication process migration
The exposed data has been reduced to the maximum required for executing the action:
These rules are automatically merged into the container app’s ProGuard/R8 configuration and applied during code shrinking and obfuscation.
The container app may add additional rules if its specific logic requires them. ## iOS SDK migration guide ### SDK API changes #### Start process The start process API require a `workspaceId`. ```swift theme={"system"} public func startProcess(navigationController: UINavigationController, workspaceId: String, projectId: String, name: String, params: [String: Any]?, isModal: Bool = false, showLoader: Bool = false, onProcessEnded: (() -> Void)? = nil) ``` ```swift theme={"system"} public func startProcess(tabBarController: UITabBarController, workspaceId: String, projectId: String, name: String, params: [String: Any]?, isModal: Bool = false, showLoader: Bool = false, onProcessEnded: (() -> Void)? = nil) ``` #### Setup theme The setup theme API requires a `workspaceId`. ```swift theme={"system"} public func setupTheme(withUuid uuid: String, workspaceId: String, localFileUrl: URL? = nil, appearance: SwiftUI.ColorScheme? = .light, completion: (() -> Void)?) ``` # Post-upgrade troubleshooting Source: https://docs.flowx.ai/release-notes/v5.x/v5.1.x-lts/v5.1.0-september-2025/migrating-from-v4.7.x-to-5.1/troubleshooting Common issues and solutions that may occur after upgrading from FlowX v4.7.x to v5.1.0. This section covers common issues that may occur after completing the upgrade to FlowX.AI 5.1.0 and their solutions. ## Designer login issues ### DataIntegrityViolationException error If you cannot login to FlowX Designer after the 5.x upgrade and encounter the following error in the authorization-system logs: ``` org.springframework.dao.DataIntegrityViolationException: could not execute statement [ERROR: duplicate key value violates unique constraint "cas_user_username_key" Detail: Key (username)=(admin@flowx.ai) already exists.] [insert into public.cas_user (created_by,created_date,email,first_name,issuer,last_name,modified_by,modified_date,subject_id,username,id) values (?,?,?,?,?,?,?,?,?,?,?)]; SQL [insert into public.cas_user (created_by,created_date,email,first_name,issuer,last_name,modified_by,modified_date,subject_id,username,id) values (?,?,?,?,?,?,?,?,?,?,?)]; constraint [cas_user_username_key] ``` **Root Cause**: This error occurs because the `sub` (subject ID) is missing from JWT tokens. Starting with Keycloak version 25, the `sub` claim is not added by default to lightweight access tokens. **Solution**: Ensure the `basic` Client Scope is created in your Keycloak Realm and added to all FlowX clients.
Therefore, the new signature of the method is `populateUi(data: Any?)`. As a consequence, type checking, casting and extracting the needed data must be part of the implementation details of the custom component.
 ### FlowX.AI Engine #### Autocomputed data to send In previous platform versions, when creating your UI screens and working with data, you had to ensure that all the data stored in your process keys was saved in the process instance. This required adding an extra parameter called "Data to send" to the "Save Data" node action. | Older versions | v4.2 | | :-------------------------------------------------------------------------------------: | :-------------------------------------------------------------------------------------: | |  |  | | | | Now, with the autocompute feature, this step is no longer necessary, as the data is automatically saved and sent on your process instance.
*** ### Autocomputed data to send In previous platform versions, when creating your UI screens and working with data, you had to ensure that all the data stored in your process keys was saved in the process instance. This required adding an extra parameter called "Data to send" to the "Save Data" node action. **Older versions** vs **v4.5**: