> ## Documentation Index
> Fetch the complete documentation index at: https://docs.flowx.ai/llms.txt
> Use this file to discover all available pages before exploring further.
# Configuring an IAM solution (EntraID)
> This guide provides step-by-step instructions for configuring a minimal EntraId setup to manage users, roles, and applications efficiently.
## Overview
Microsoft Entra is Microsoft’s unified identity and access management solution designed to protect access to applications, resources, and user data across an organization’s environment. It provides an identity and access management (IAM) framework, allowing secure access control, role management, and integration of various applications under a single directory. Entra is crucial for managing multi-cloud and hybrid environments securely, enforcing policies, and supporting both self-hosted and cloud resources.
## Prerequisites
* Application Administrator role
* Basic understanding of IAM and OIDC concepts
## Recommended EntraID setup
This setup configures Microsoft Entra to manage and secure access for FlowX.AI applications, handling user roles, custom attributes, and application-specific permissions. The setup covers these main components:
* Flowx-Web and Flowx-API are the core applications that act as entry points for the FlowX.AI platform. Additional applications like Flowx-Admin, Task Management Plugin, and Scheduler Core are registered to support specific functionalities.
* Each application registration includes settings for authentication, API permissions, and role assignments.
* Configures OAuth 2.0 and OIDC protocols, enabling secure access to resources.
* Roles and permissions are assigned through Entra, and single sign-on (SSO) is set up for ease of access across applications.
* Token Configuration includes defining claims (e.g., `email`, `groups`) for use in JWTs, which are used for secure identity validation across services.
* API Permissions are managed using Microsoft Graph, which governs access to resources like user profiles and groups within FlowX.AI.
Custom attribute extensions (e.g., `businessFilter`) allow organizations to apply additional filters or metadata to user and group profiles, configured and managed using Microsoft Graph CLI.
* Helm charts provide a structured setup for deploying FlowX.AI applications in containerized environments.
* Key values such as `tenant_id`, `client_id`, and `client_secret` are configured to support authentication and secure access.
JWT tokens are configured to carry user claims, roles, and custom attributes, ensuring that each token provides comprehensive identity details for FlowX.AI applications.
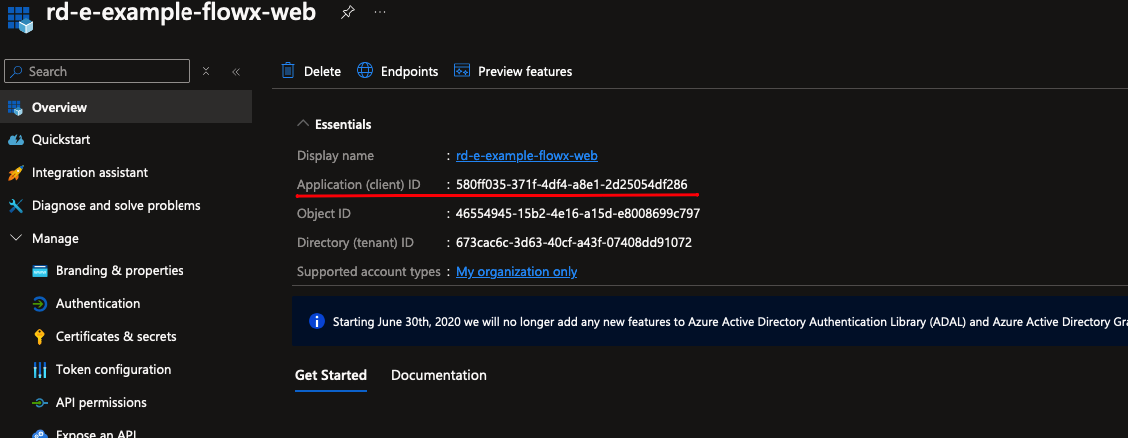
### Flowx-web app registration
The Flowx-web application serves as the main entry point for logging into FloWX Designer or container applications.
#### Appplication registration steps
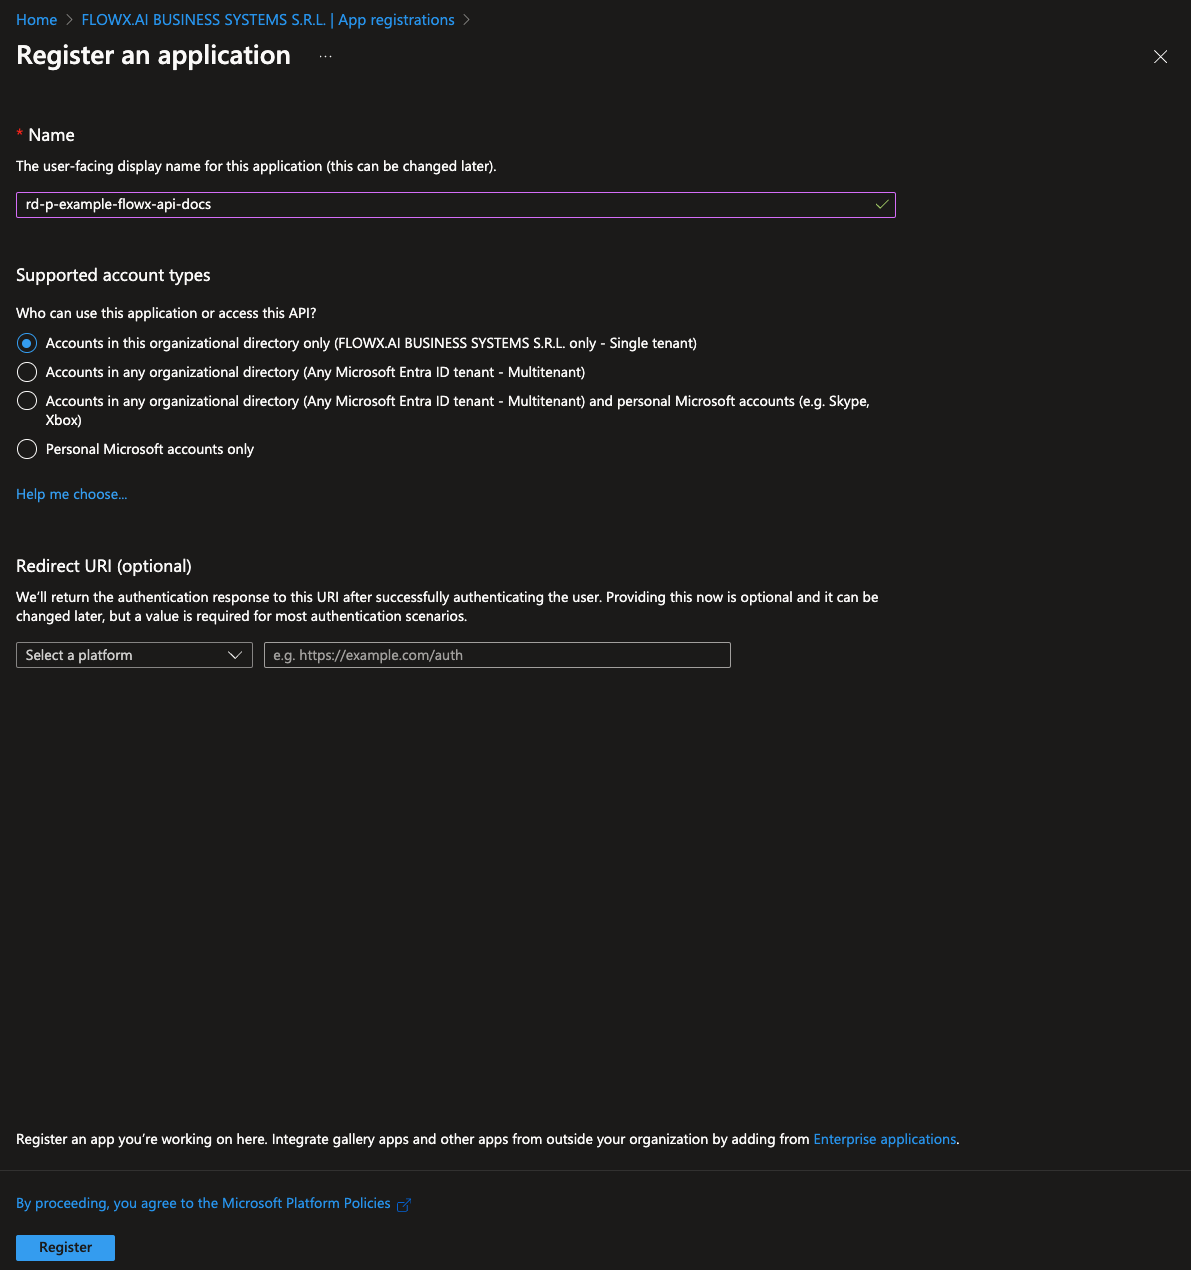
To register the Flowx-web application, follow these steps:
1. Navigate to [https://portal.azure.com](https://portal.azure.com) and log in to your EntraID directory, which will host your FlowX.AI application registrations.
2. Go to **Microsoft EntraID > App registrations > New registration**
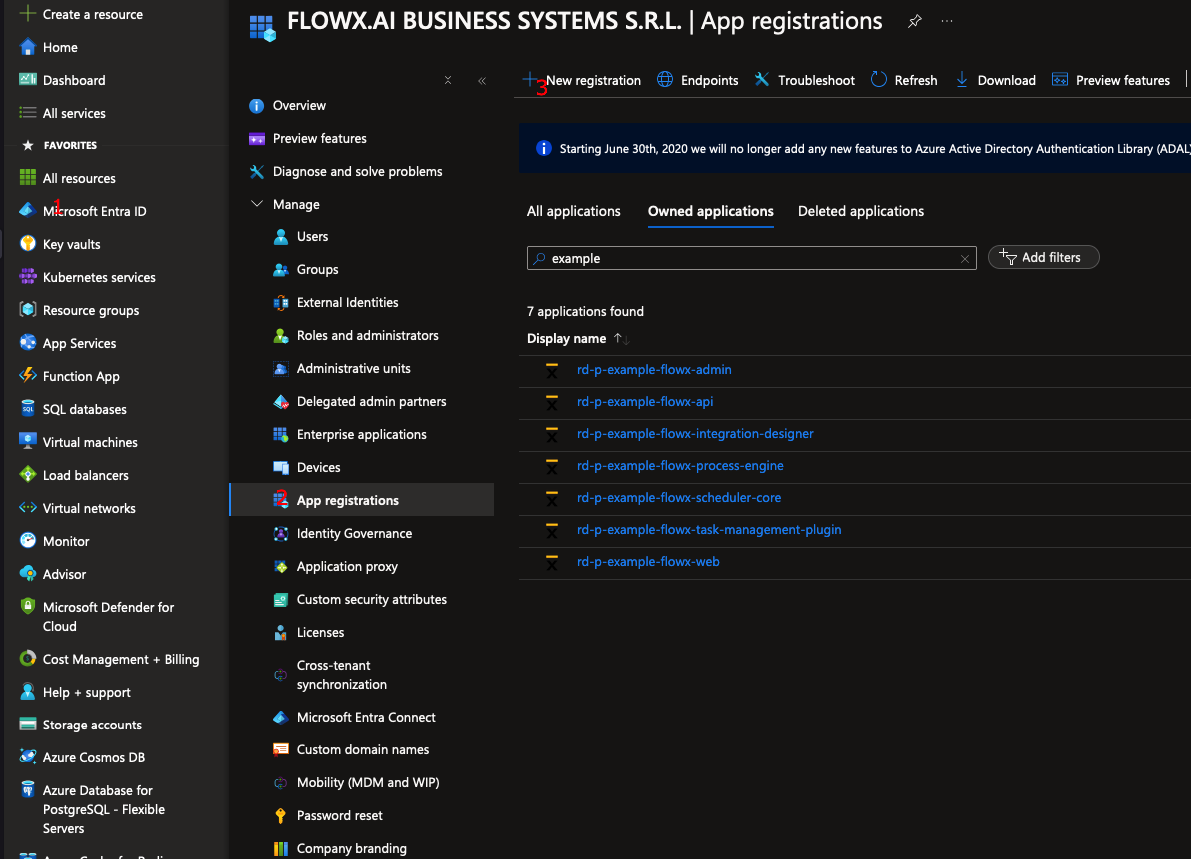
3. Enter a name for your application, then select **Accounts in this organizational directory only (Single tenant)** to limit access to your organization’s directory.

4. Click **Register** to complete the setup.
You will be redirected to the overview of the newly created app registration.
#### Authentication steps
Follow these steps to configure authentication for the Flowx-web application:
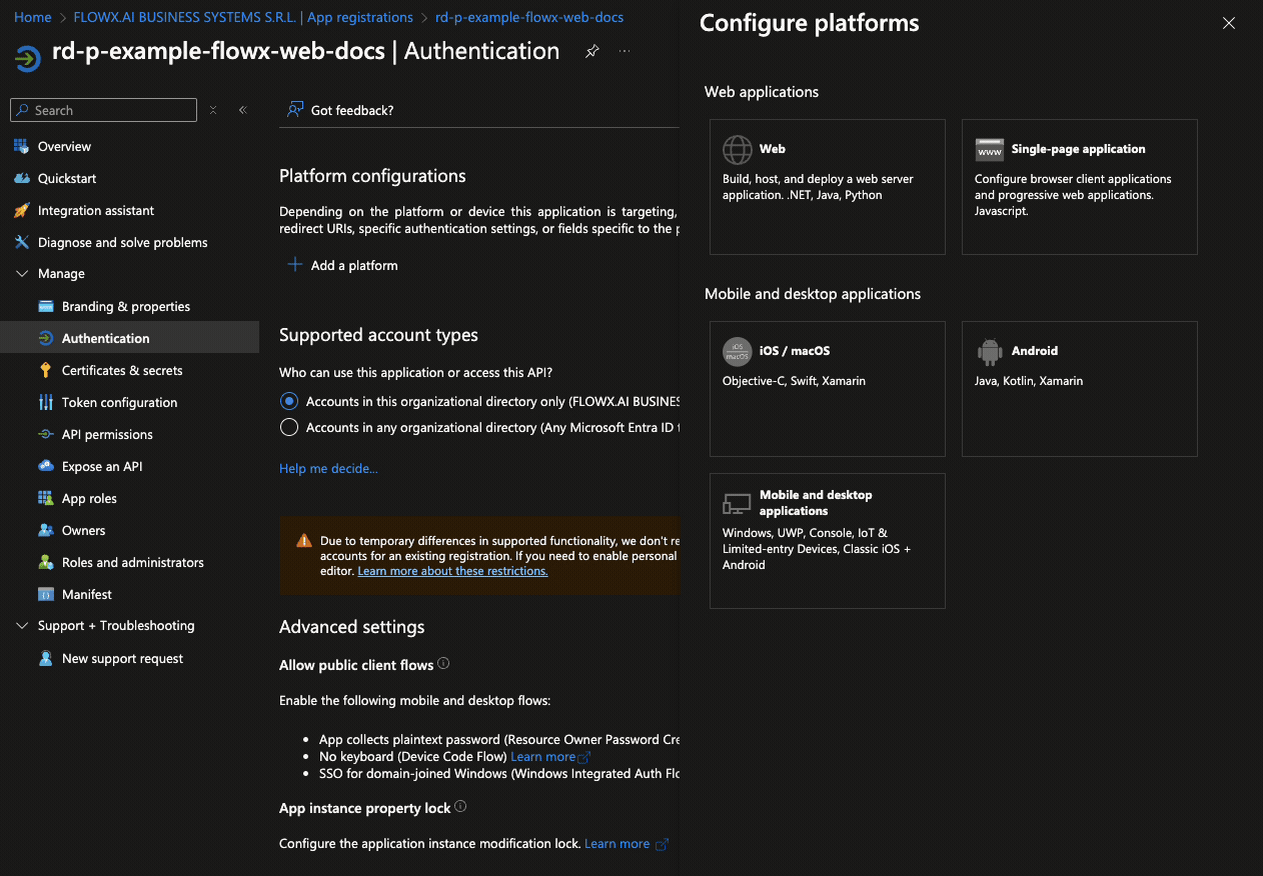
1. Go to the **Authentication** tab. Under **Platform configurations**, add a new platform by selecting **Single-page application (SPA)**. Then, set the **Redirect URIs** to point to the URIs of your Designer application.
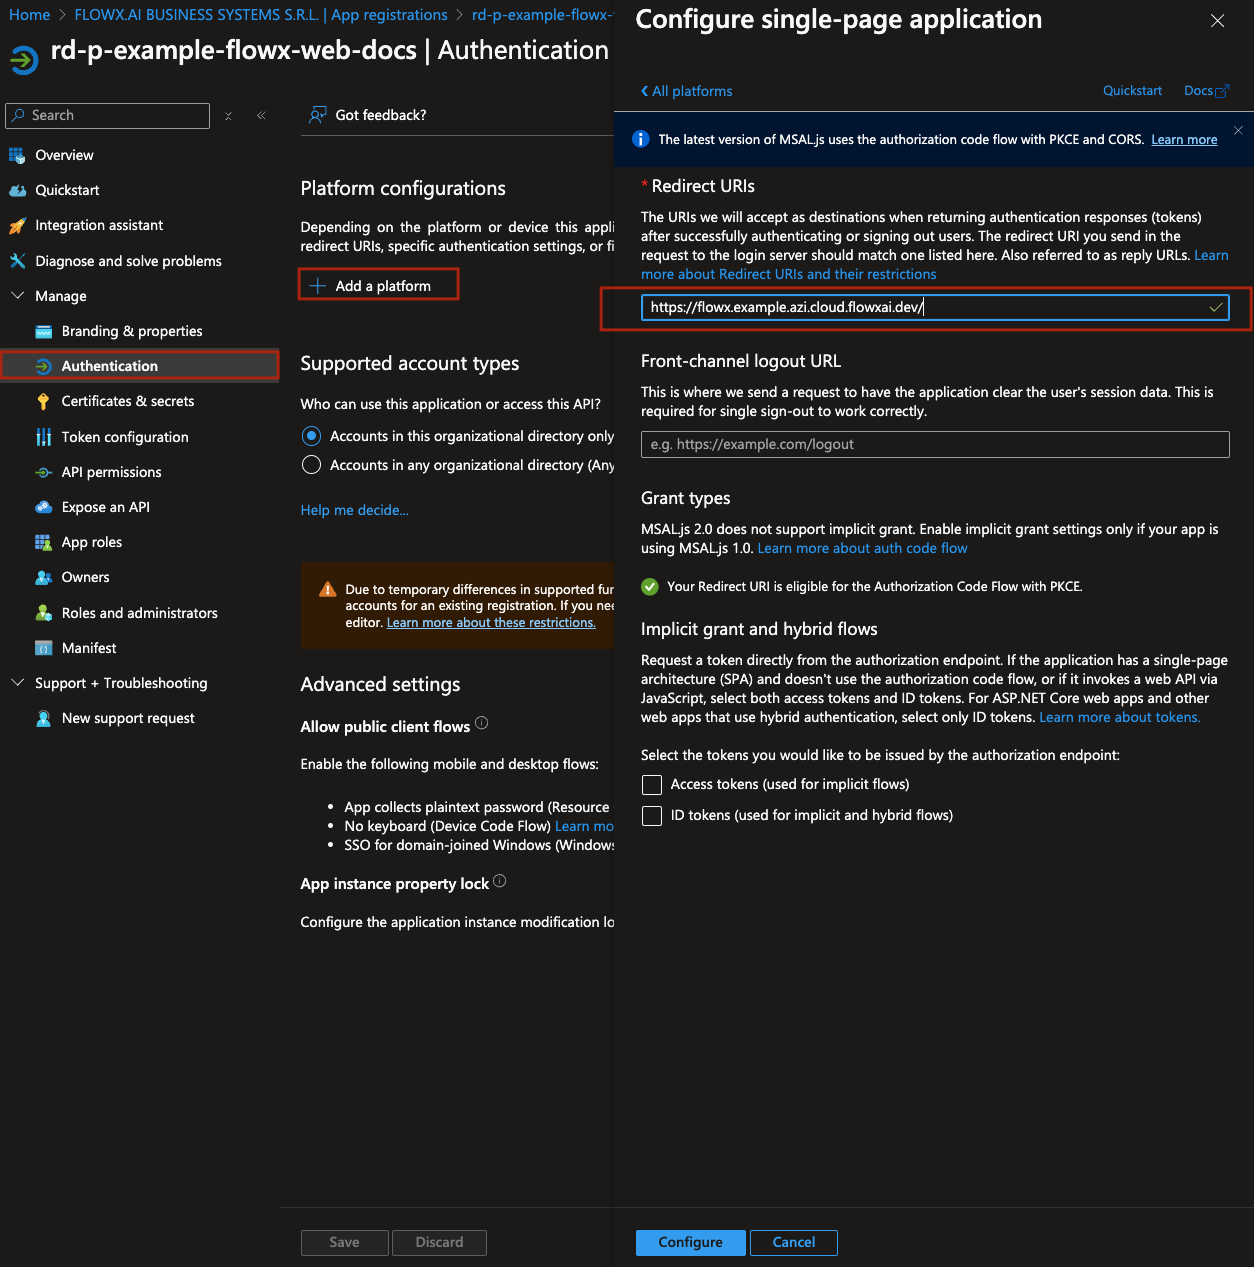
2. Click **Configure** to save the platform settings.
3. Next, click **Add URI** to include an additional redirect URI, this time pointing to your container application's URI.
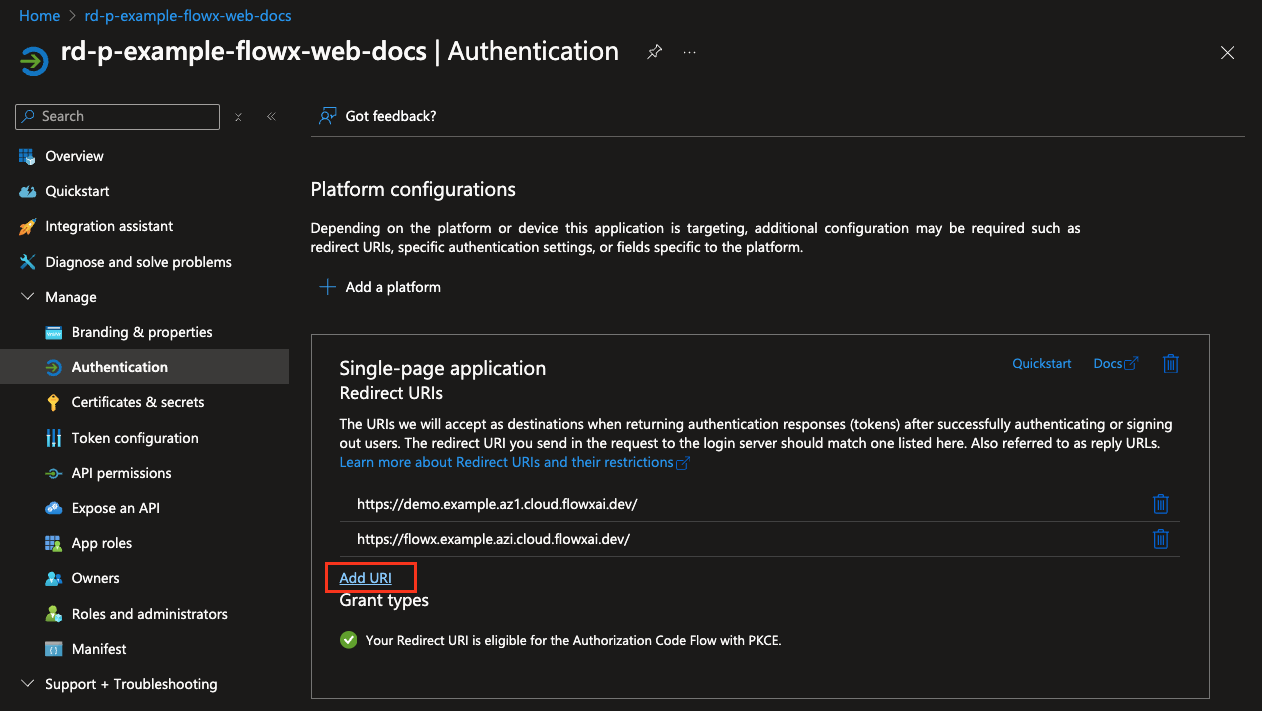
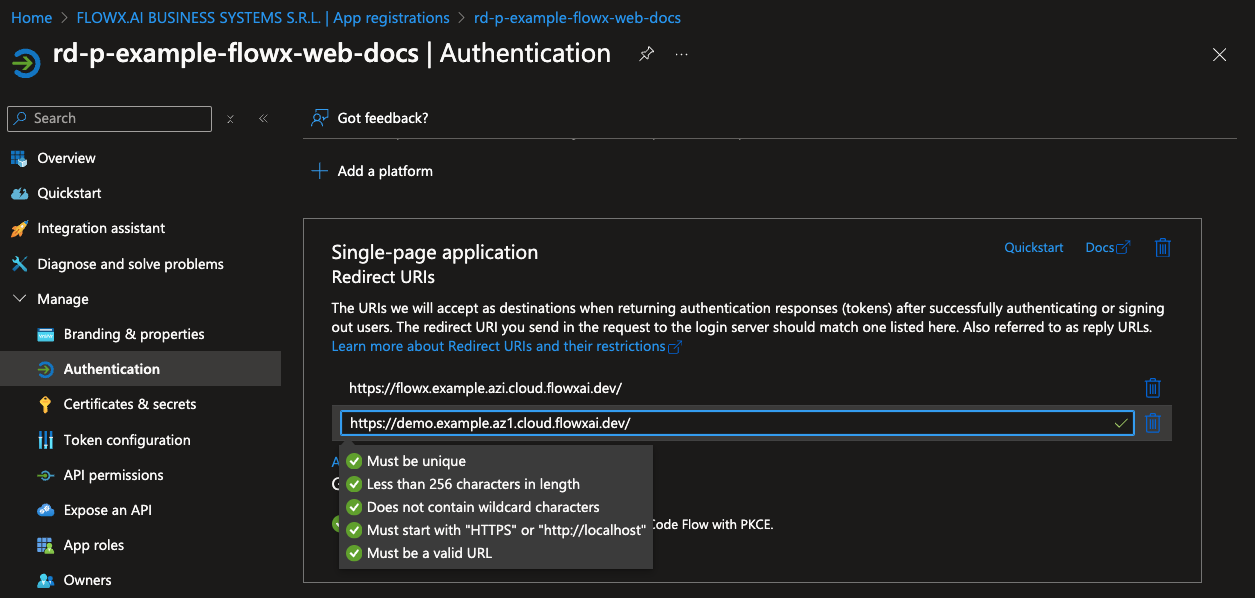
4. Click **Save** to confirm the redirect URI changes.
5. Scroll down to **Advanced Settings**. Under **Mobile and Desktop Applications**, toggle **Enable the following mobile and desktop flows** to **Yes**.
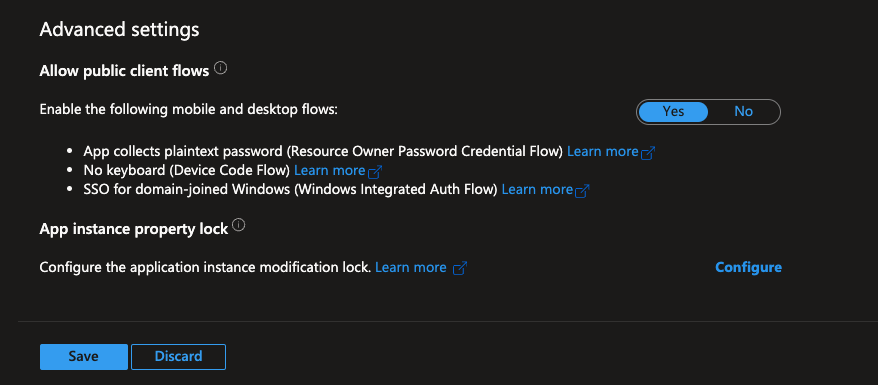
6. Click **Save** again to apply all changes.
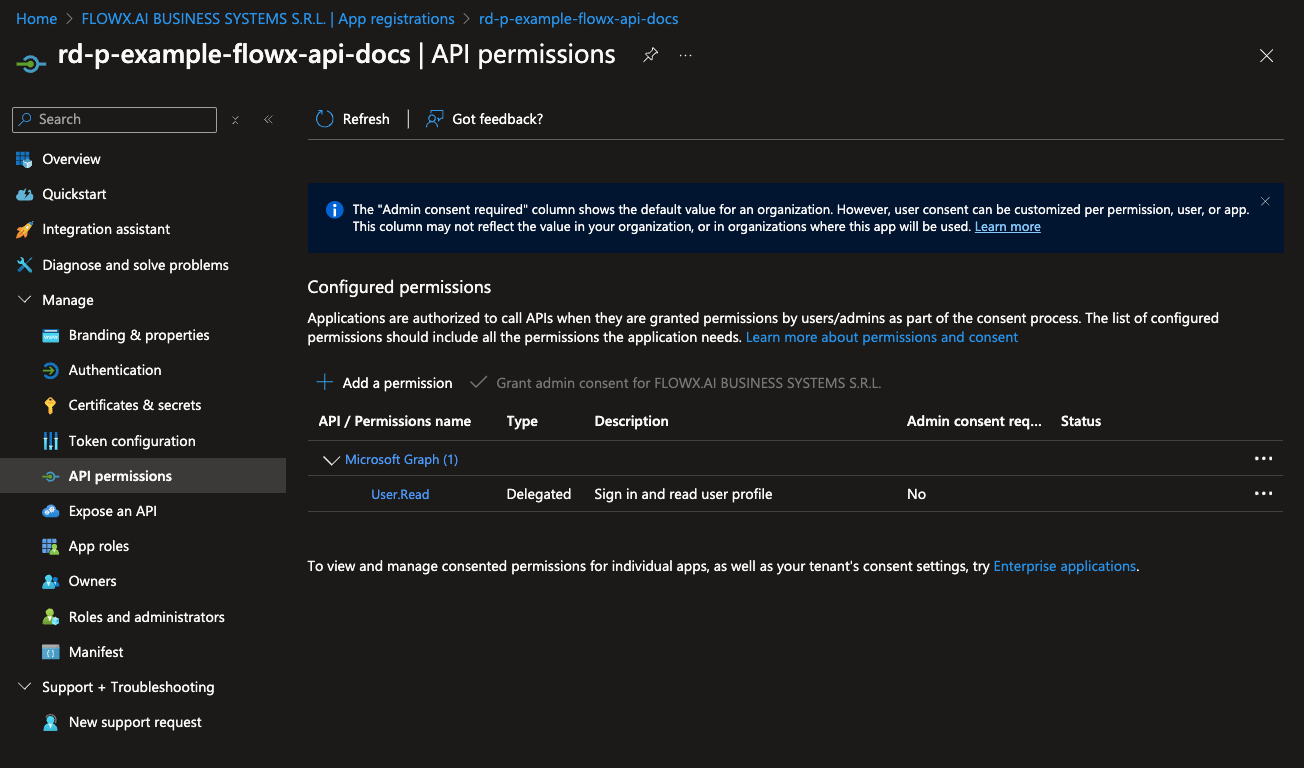
#### API permissions
To configure the necessary API permissions, follow these steps:
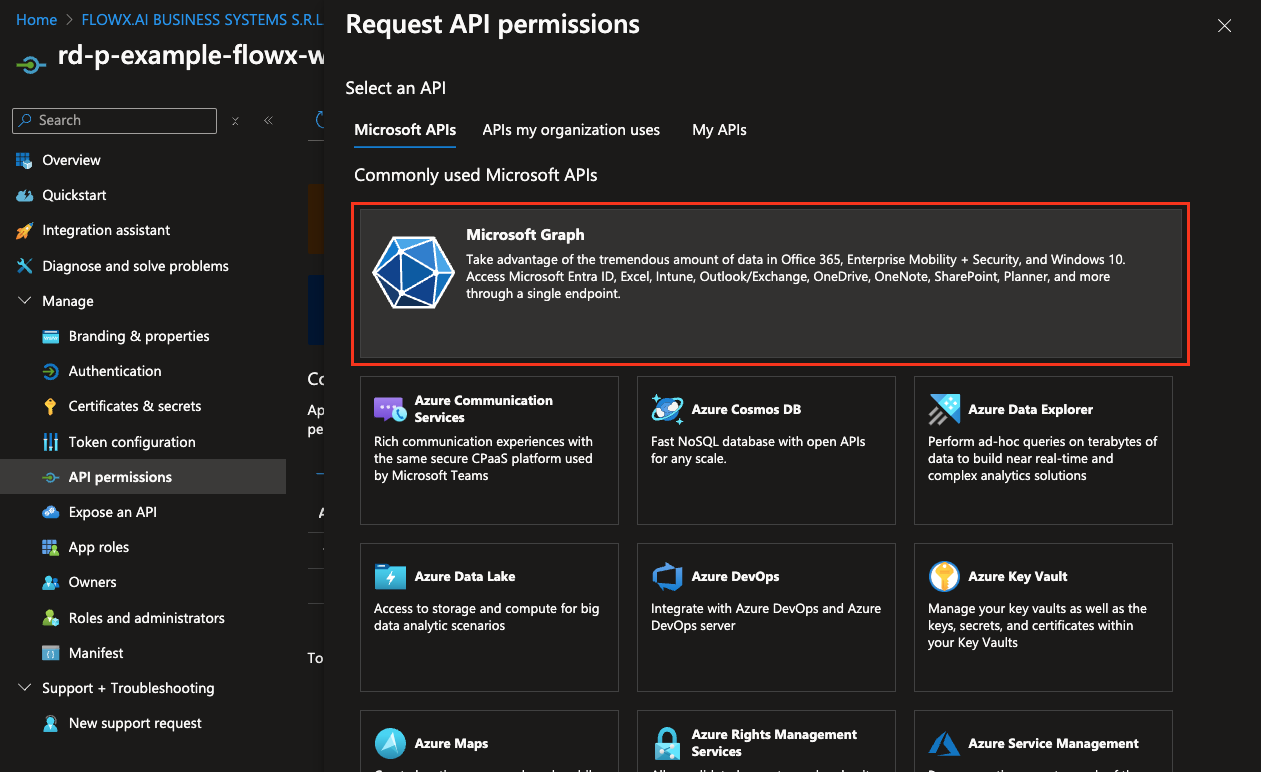
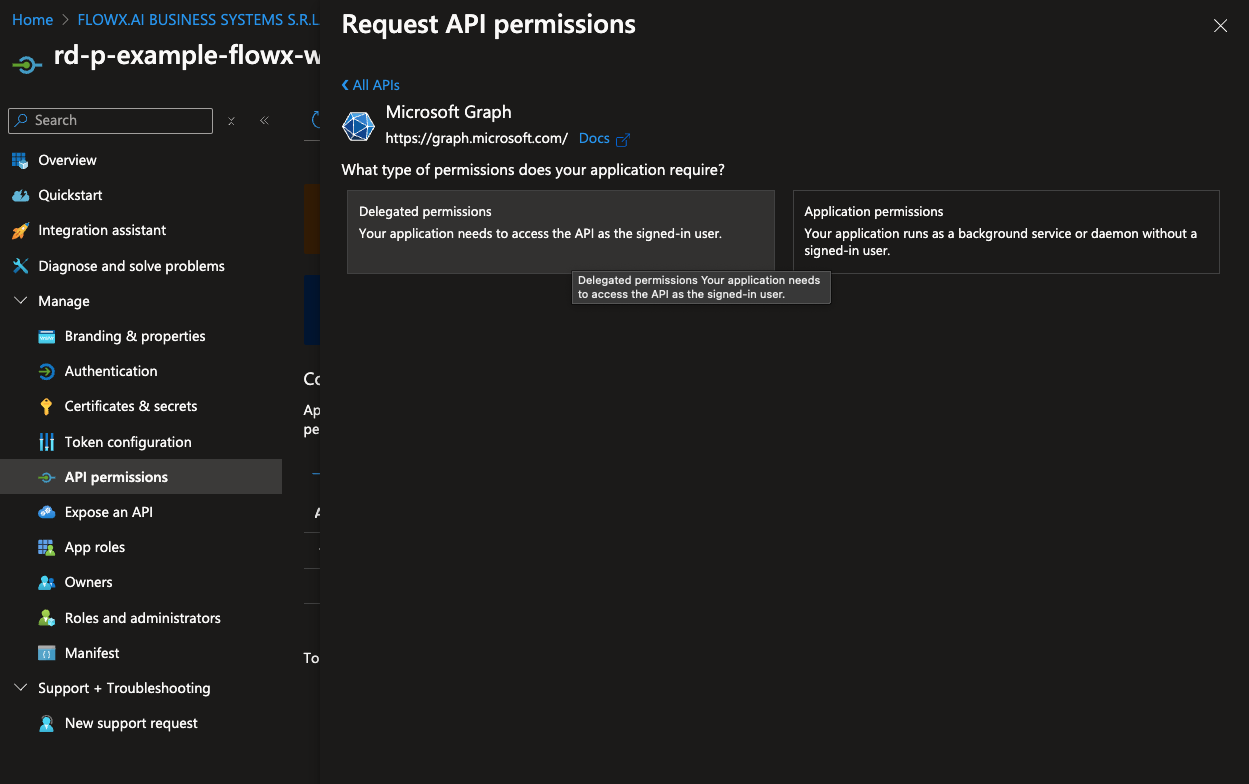
1. Navigate the **API permissions** tab and click **Add a permission**.

2. In the permissions menu, select **Microsoft Graph** and then choose **Delegated permissions**.
3. Add the following permissions by selecting each option under **OpenId permissions**:
* email
* offline\_access
* openid
* profile
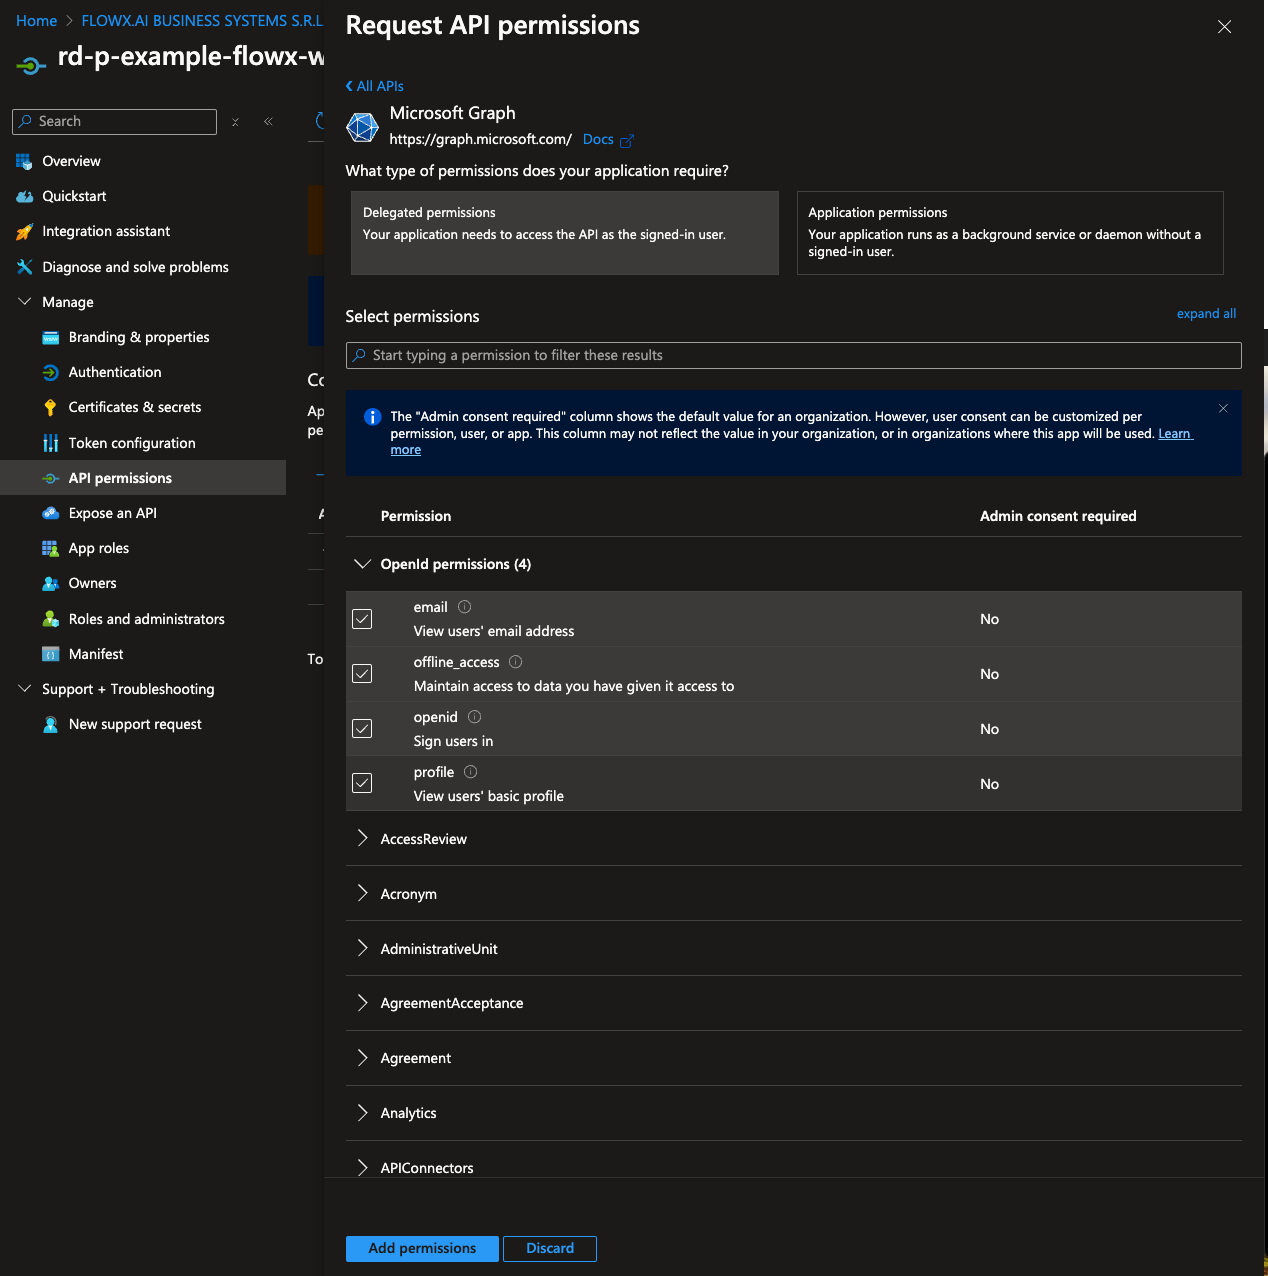
4. After adding these permissions, click **Add permissions** to confirm.
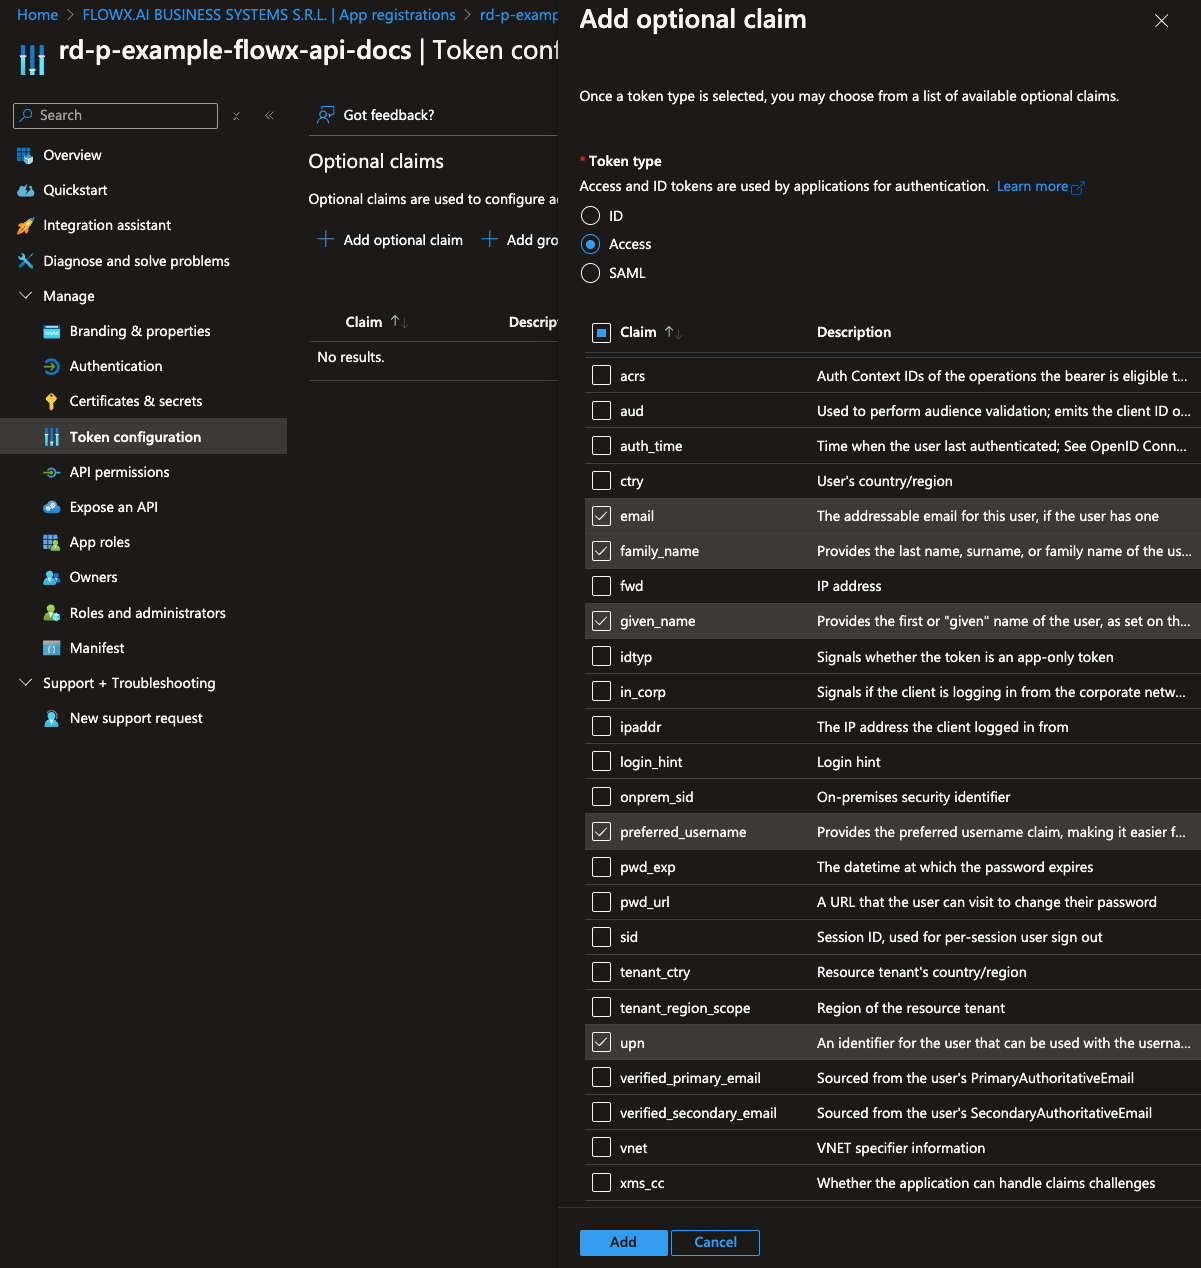
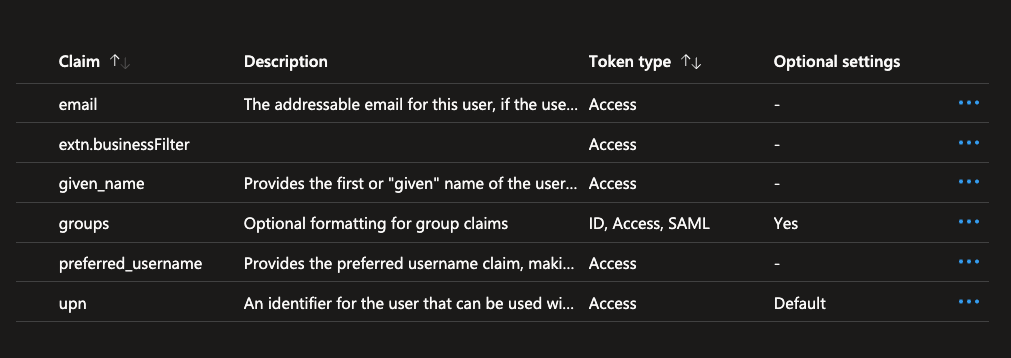
#### Token configuration
Configure the claims you want to include in the ID token.
1. Navigate to the **Token configuration** tab. Click **Add optional claim**, then select **Token type > Access**.
* Choose the following claims to include in the token:
* email
* family\_name
* given\_name
* preferred
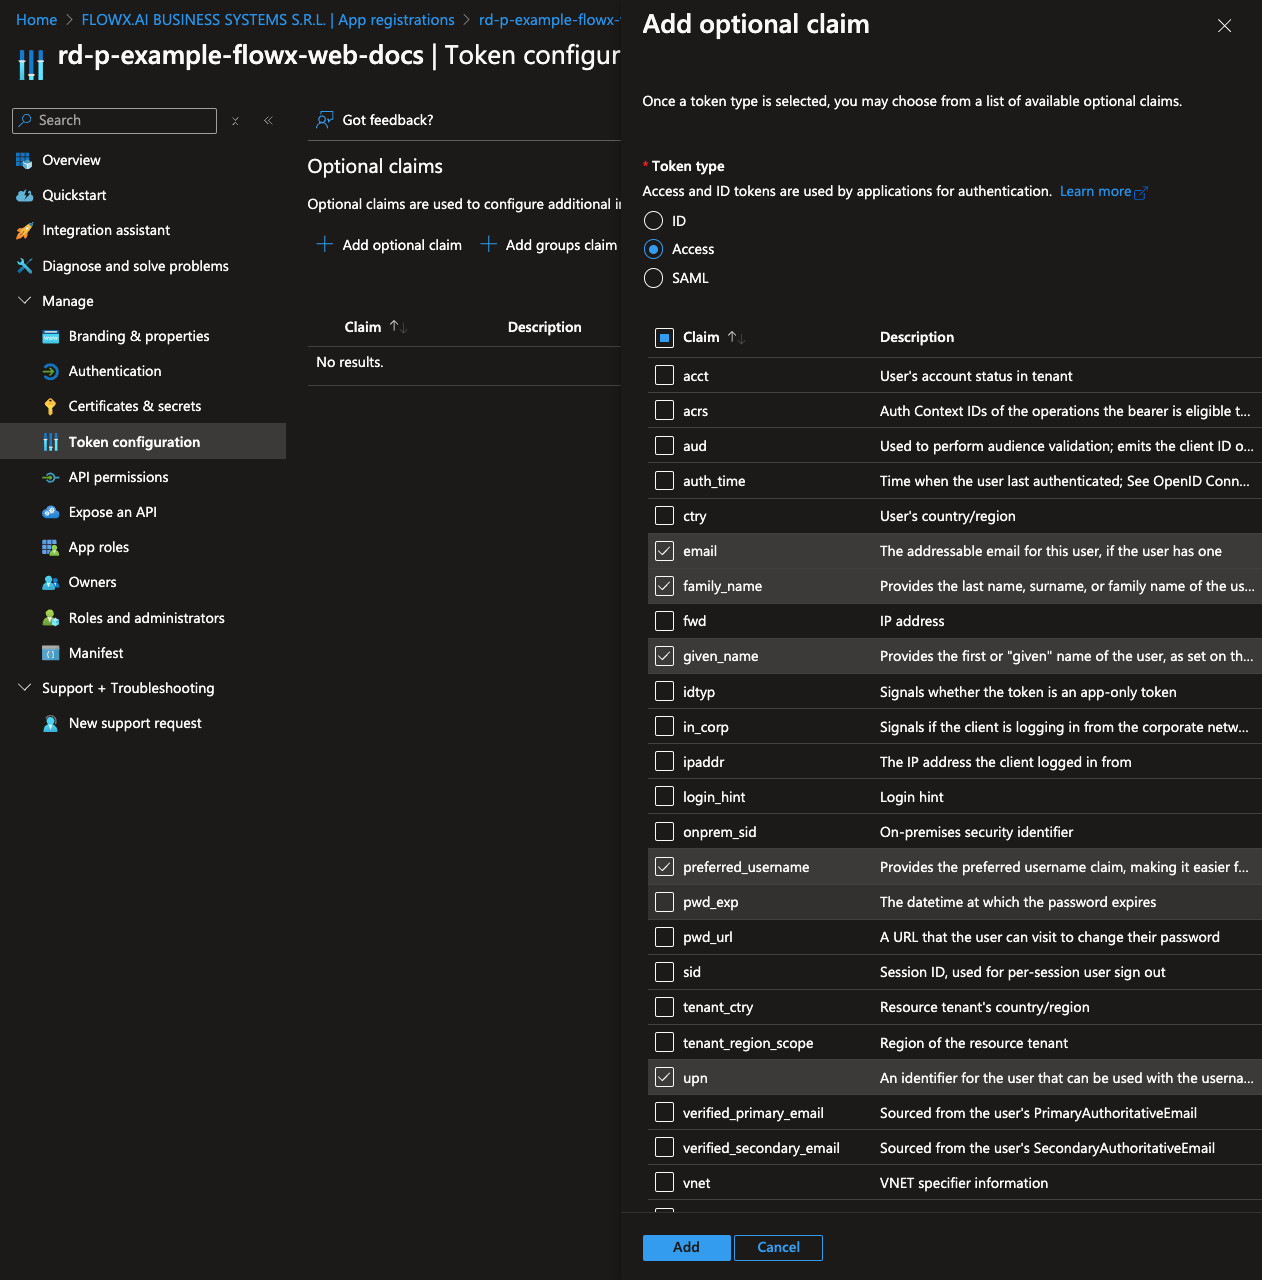
2. Click **Add** to save these optional claims.
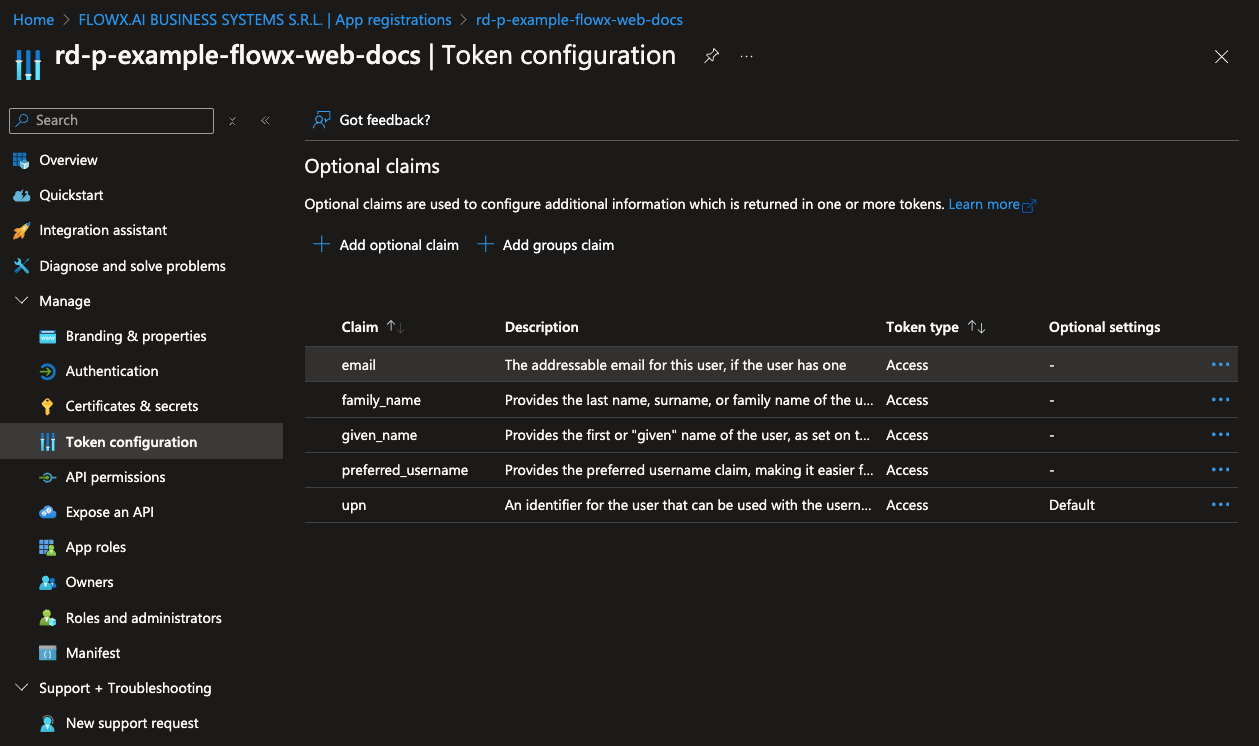
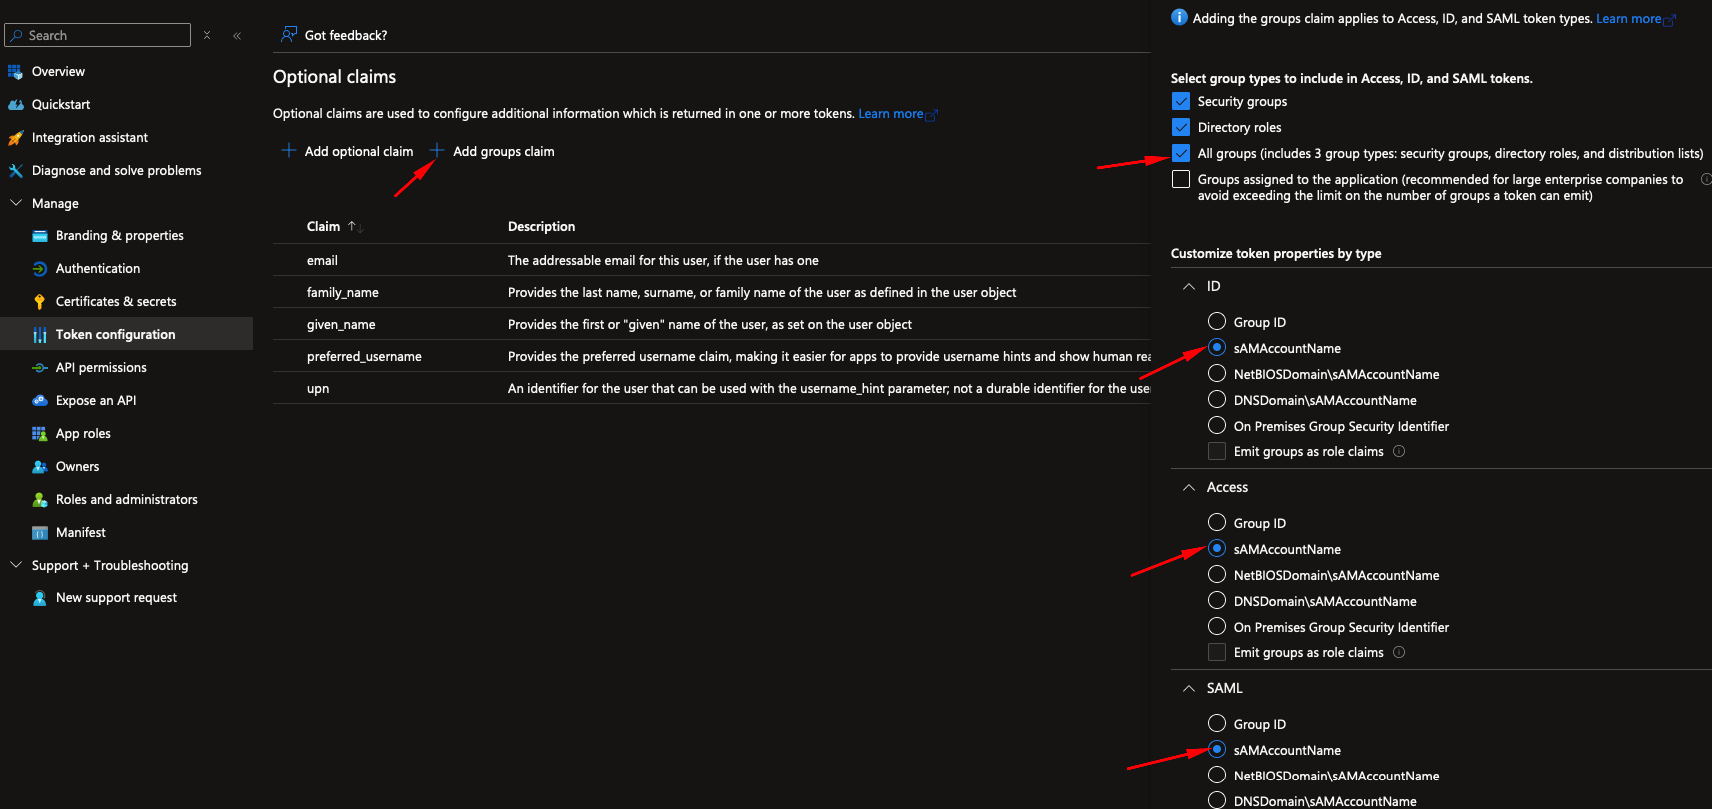
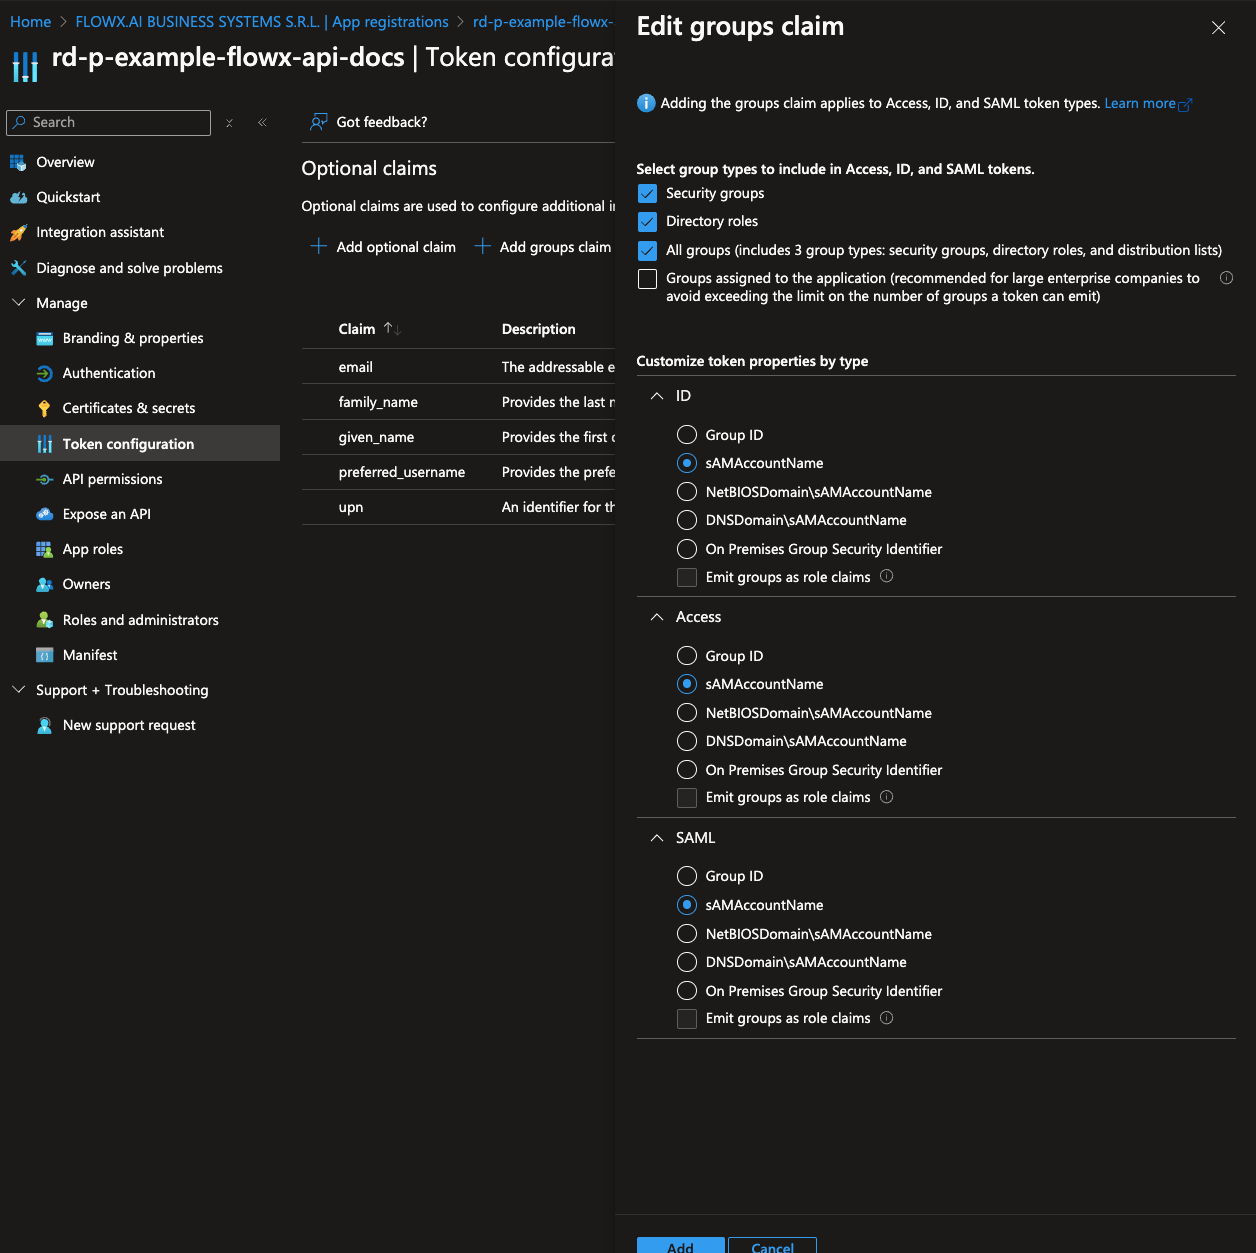
3. Next, add group claims to the token by clicking **Add groups claim**.
4. Select **All groups** and, under each token type, select **sAMAccountName** (this may differ for your specific organization).
#### Setting token expiration policies
For organizations that require specific control over token lifetimes, Microsoft Entra allows customization of token expiration policies.
1. **Create a Custom Token Lifetime Policy**: Define the desired expiration settings for access, ID, and refresh tokens in the policy.
2. **Assign the Policy to a Service Principal**: Apply the policy to your Flowx-web or Flowx-API app registrations to enforce token lifetime requirements.
For more details on creating and assigning policies for token expiration, refer to [**Microsoft's guide on configuring token lifetimes**](https://learn.microsoft.com/en-us/entra/identity-platform/configure-token-lifetimes#create-a-policy-and-assign-it-to-a-service-principal).
Adjusting token lifetimes can enhance security by reducing the window for unauthorized access.
***
### Flowx-API app registration
The Flowx-API application is used to configure the access token necessary for secure communication between the browser and all exposed FlowX APIs.
#### Appplication registration steps
To register the Flowx-API application, follow these steps:
1. Navigate to [https://portal.azure.com](https://portal.azure.com) and log in to your EntraID directory, which will host your FlowX.AI application registrations.
2. Go to **Microsoft EntraID > App registrations > New registration**

3. Enter a name for your application, then select **Accounts in this organizational directory only (Single tenant)** to limit access to your organization’s directory.
4. Click **Register** to complete the setup.
You will be redirected to the overview page of the newly created app registration.
#### API permissions
To configure the necessary API permissions, follow these steps:
1. Go to the **API permissions** tab and click **Add a permission**.
2. In the permissions menu, select **Microsoft Graph** and then choose **Delegated permissions**.


3. Add the following permissions by selecting each option under **OpenId permissions**:
* email
* offline\_access
* openid
* profile

4. After adding these permissions, click **Add permissions** to confirm.
#### Token configuration
Configure the claims you want to include in the ID token.
1. Navigate to the **Token configuration** tab. Click **Add optional claim**, then select **Token type > Access**.
* Choose the following claims to include in the token:
* email
* family\_name
* given\_name
* preferred
2. Click **Add** to save these optional claims.
3. Next, add group claims to the token by clicking **Add groups claim**.
4. Select **All groups** and, under each token type, select **sAMAccountName** (this may differ for your specific organization).
#### Expose an API
To configure the API exposure and define scopes:
1. In the **Expose an API** section, click **Add** under **Application ID URI**. It’s recommended to use the application’s name for consistency.
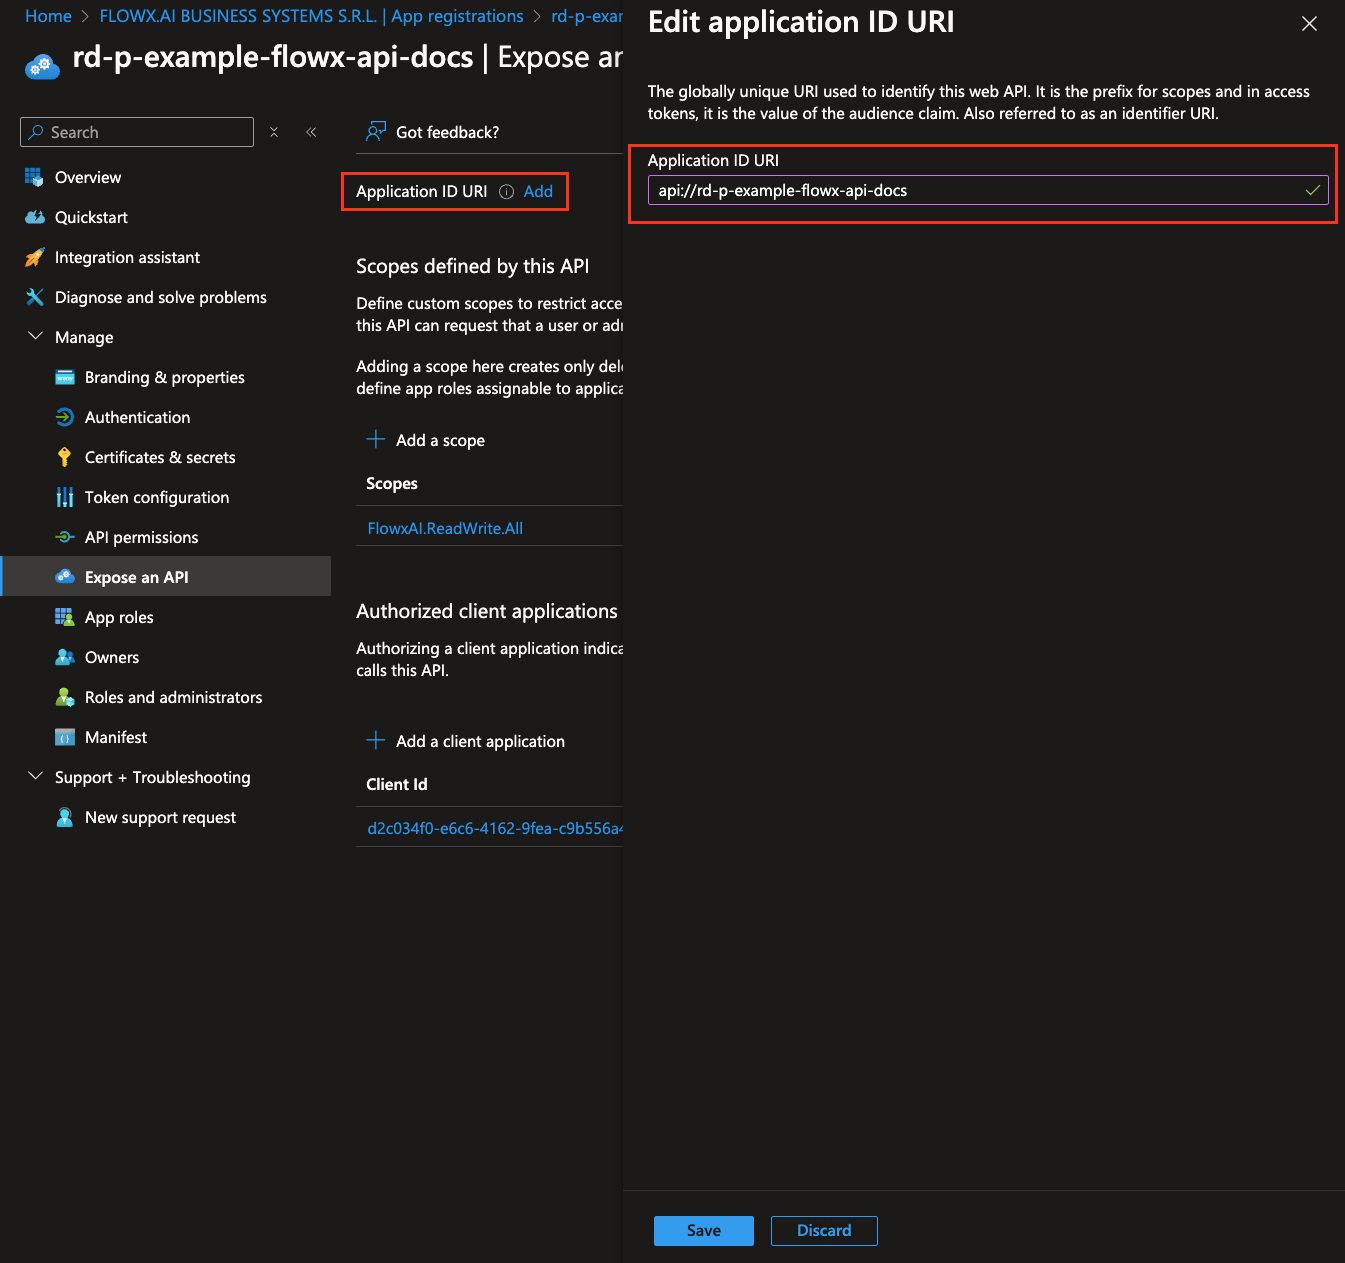
2. Click **Save**.
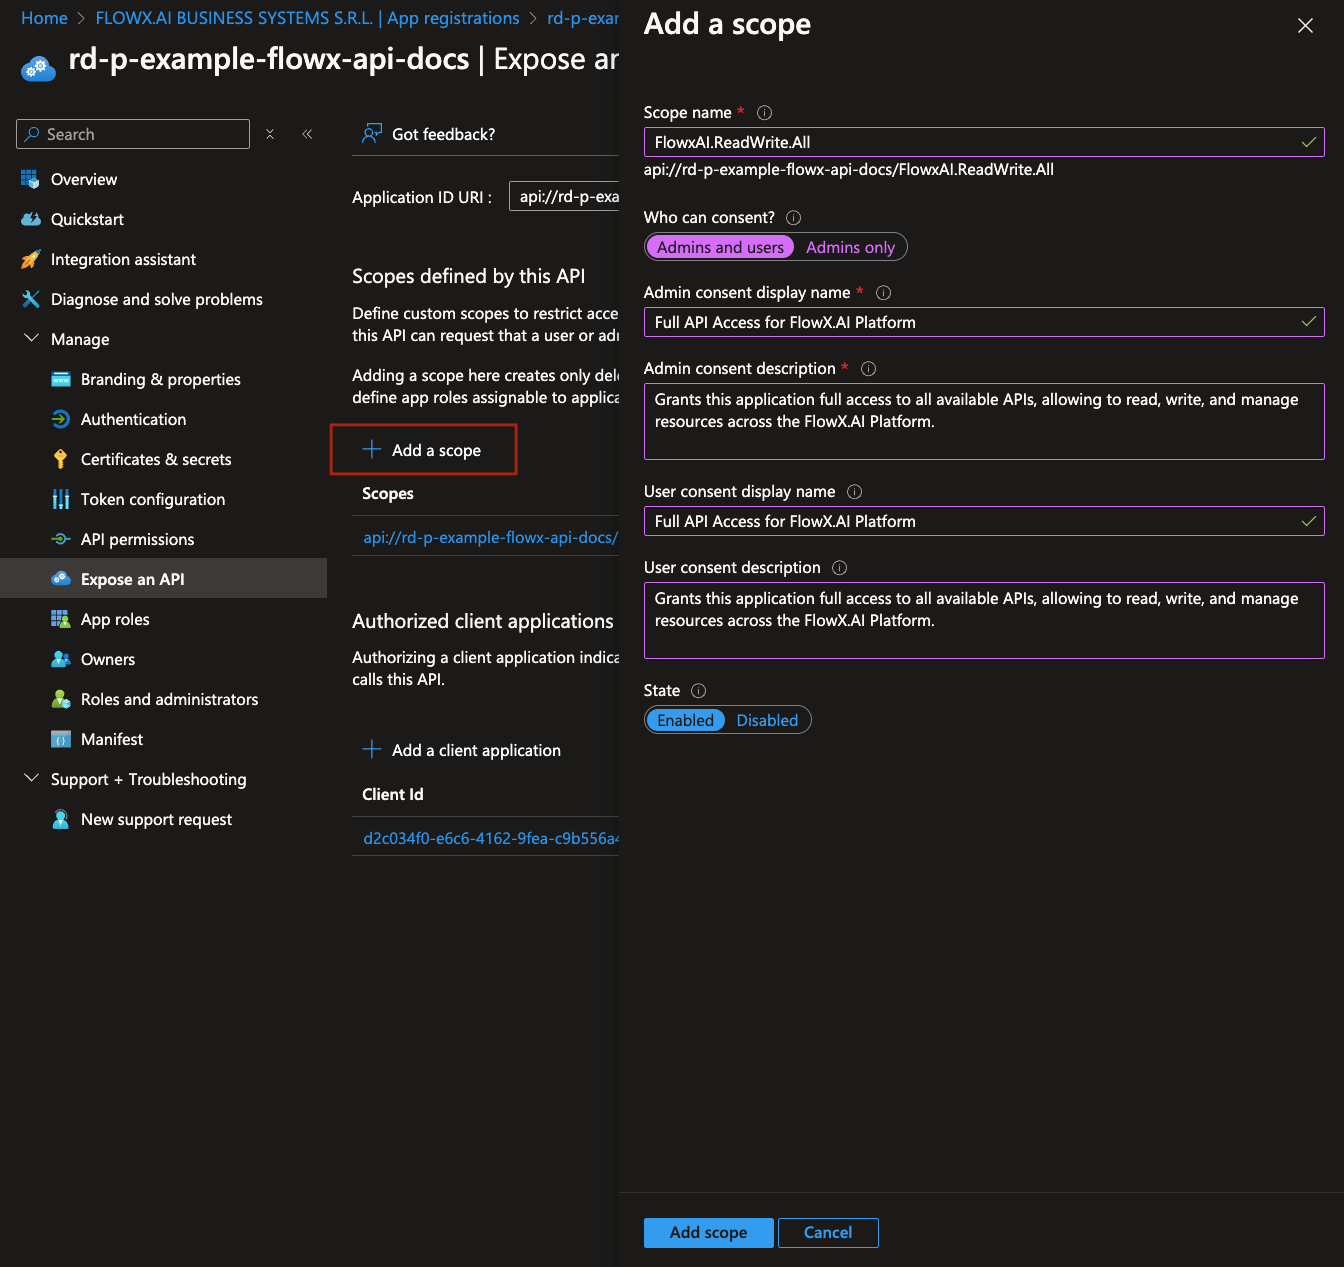
3. Under **Scopes defined by this API**, click **Add a scope** and configure it as follows:
* **Scope name**: `FlowxAI.ReadWrite.All`
* **Who can consent**: Admins and users
* **Admin consent display name**: Full API Access for FlowX.AI Platform
* **Admin consent description**: Grants this application full access to all available APIs, allowing it to read, write, and manage resources across the FlowX.AI platform.
* **User consent display name**: Same as admin consent display name
* **User consent description**: Same as admin consent description
* **State**: Enabled
This scope is not used directly to grant permissions. Instead, it is included in login requests made from a web client. When a client makes a login request with this scope, Entra ID uses it to identify and provide the appropriate access token configured here, ensuring secure access.
4. Under **Authorized client applications**, click **Add a client application**. Add each of the following client applications, selecting the `FlowxAI.ReadWrite.All` scope:
* flowx-web
* flowx-admin
* flowx-process-engine
* flowx-integration-designer
* flowx-task-management-plugin
* flowx-scheduler-core
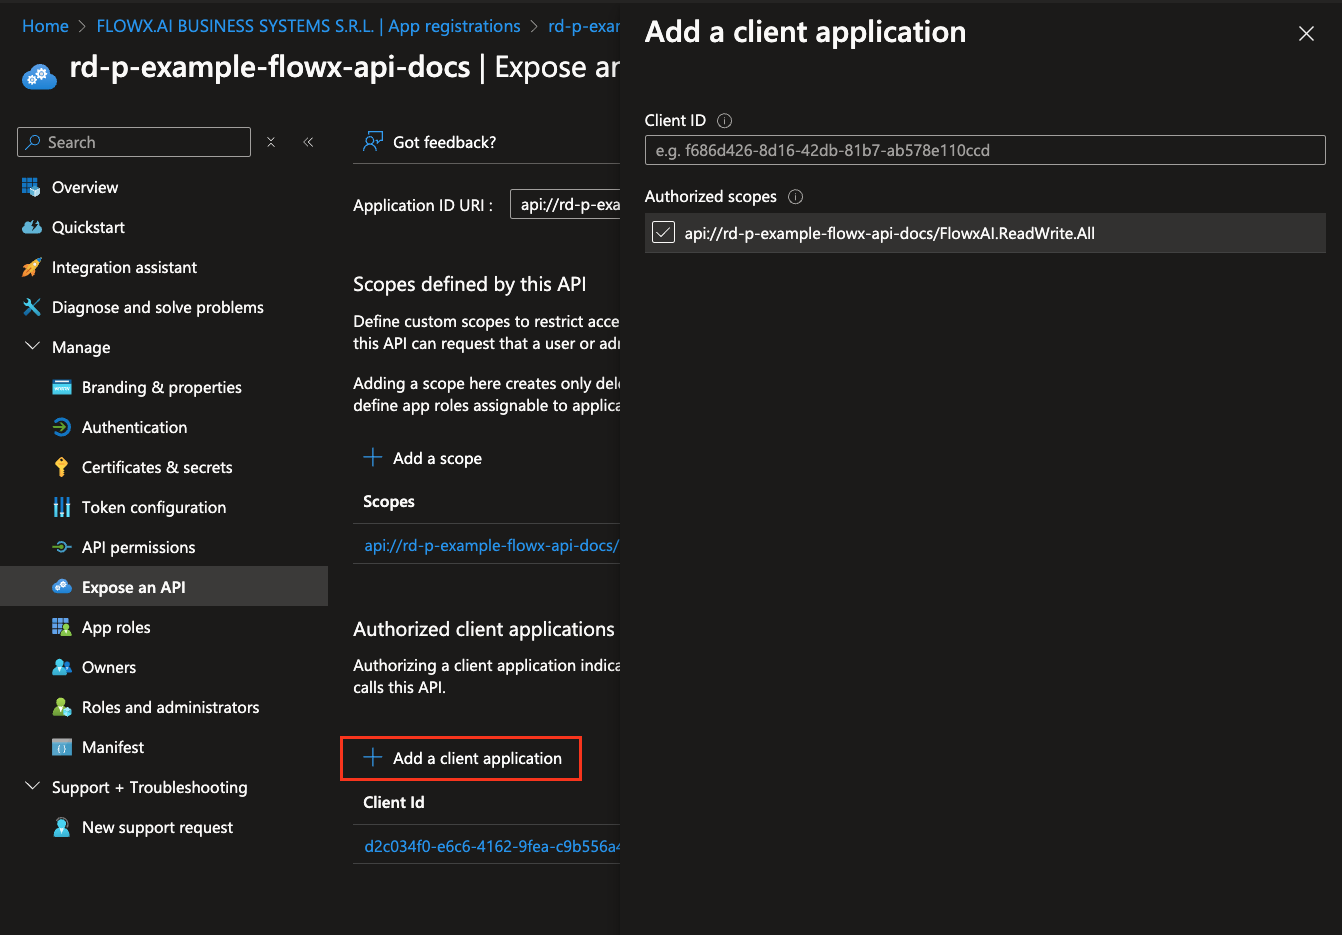
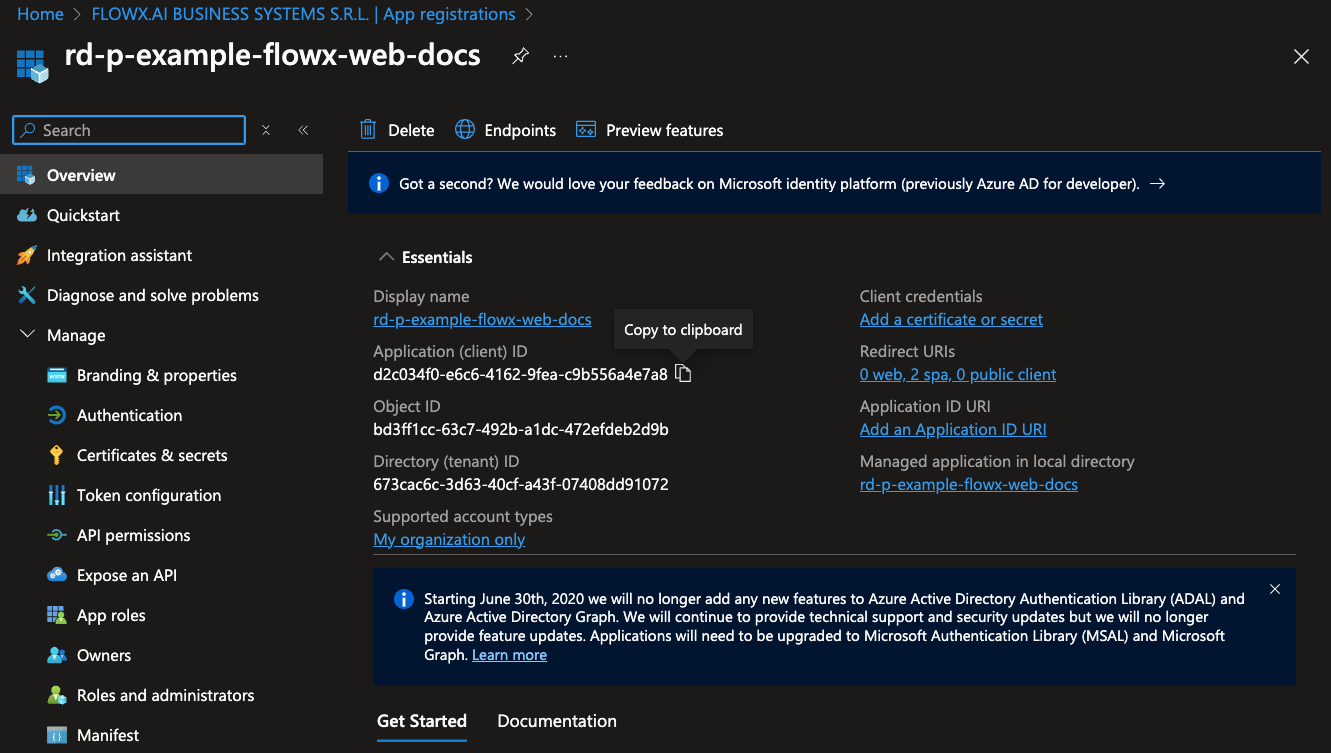
Client IDs for these applications can be found on the **Overview** page of each respective application. If some applications are not created yet, you can return and add them to this section after their creation.
#### Application roles
To configure application roles, follow these steps:
1. Navigate to **App roles** and click **Create app role**.
2. Select **Allowed member types** select **Both (Users/Groups + Applications)**.

3. Complete the role details with the following information:
* Display name: The name displayed for the role.
* Value: A unique identifier for the role within applications.
* Description: A description of the role’s purpose.
App role list should be the same as the Keycloak setup. A list of default roles can be found in the [Keycloak IAM configuration guide](./configuring-an-iam-solution).
### Other applications registration
The following FlowX.AI applications require similar steps for registration:
* Flowx-Admin
* Flowx-Process-Engine
* Flowx-Integration-designer
* Flowx-Task-Management-Plugin
* Flowx-Scheduler-Core
***
### Flowx-Admin app registration
1. **Create a New Application Registration**
* Go to [https://portal.azure.com](https://portal.azure.com) and log in to your Entra ID directory where you will host FlowX.AI application registrations.
2. **Register the Application**
* Navigate to **Microsoft Entra ID > App registrations > New registration**.
* Set the application name and select **Accounts in this organizational directory only (Single tenant)**.
* Click **Register**. You will be redirected to the overview page of the newly created app registration.
You will now see the overview for your new app registration.
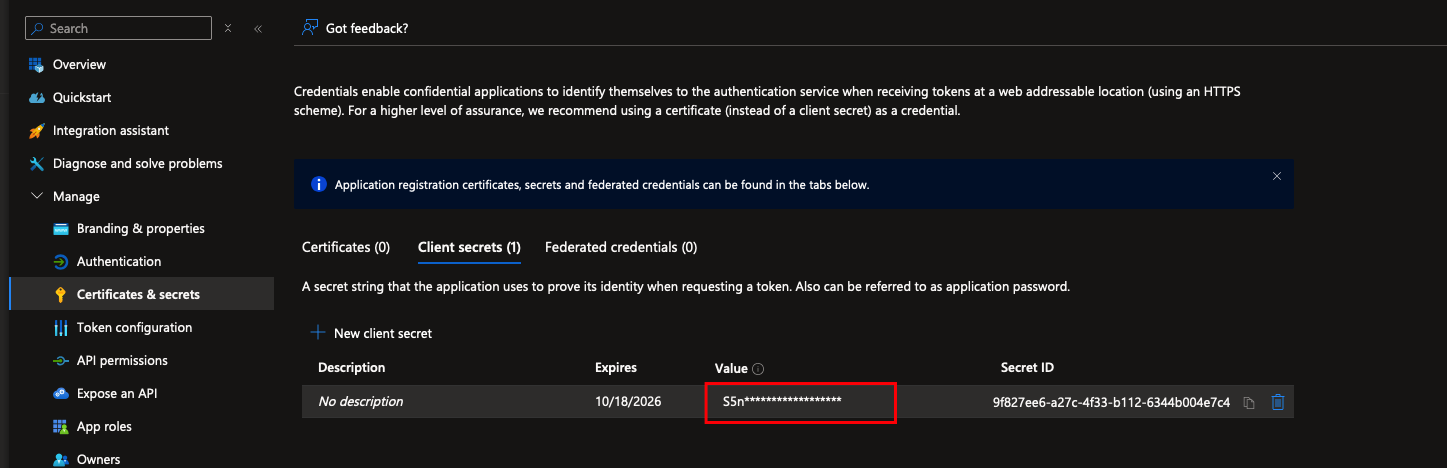
#### Configure client secrets
1. Navigate to **Certificates & secrets**.
2. Under **Client secrets**, click **New client secret**.
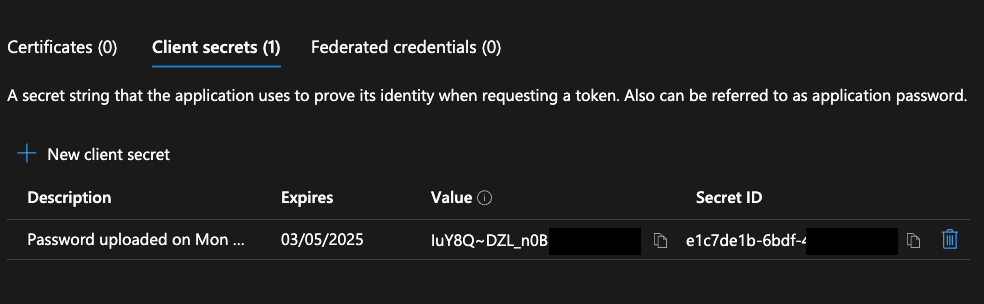
3. Set a **description** and choose an **expiration time** for the client secret, then click **Add**.
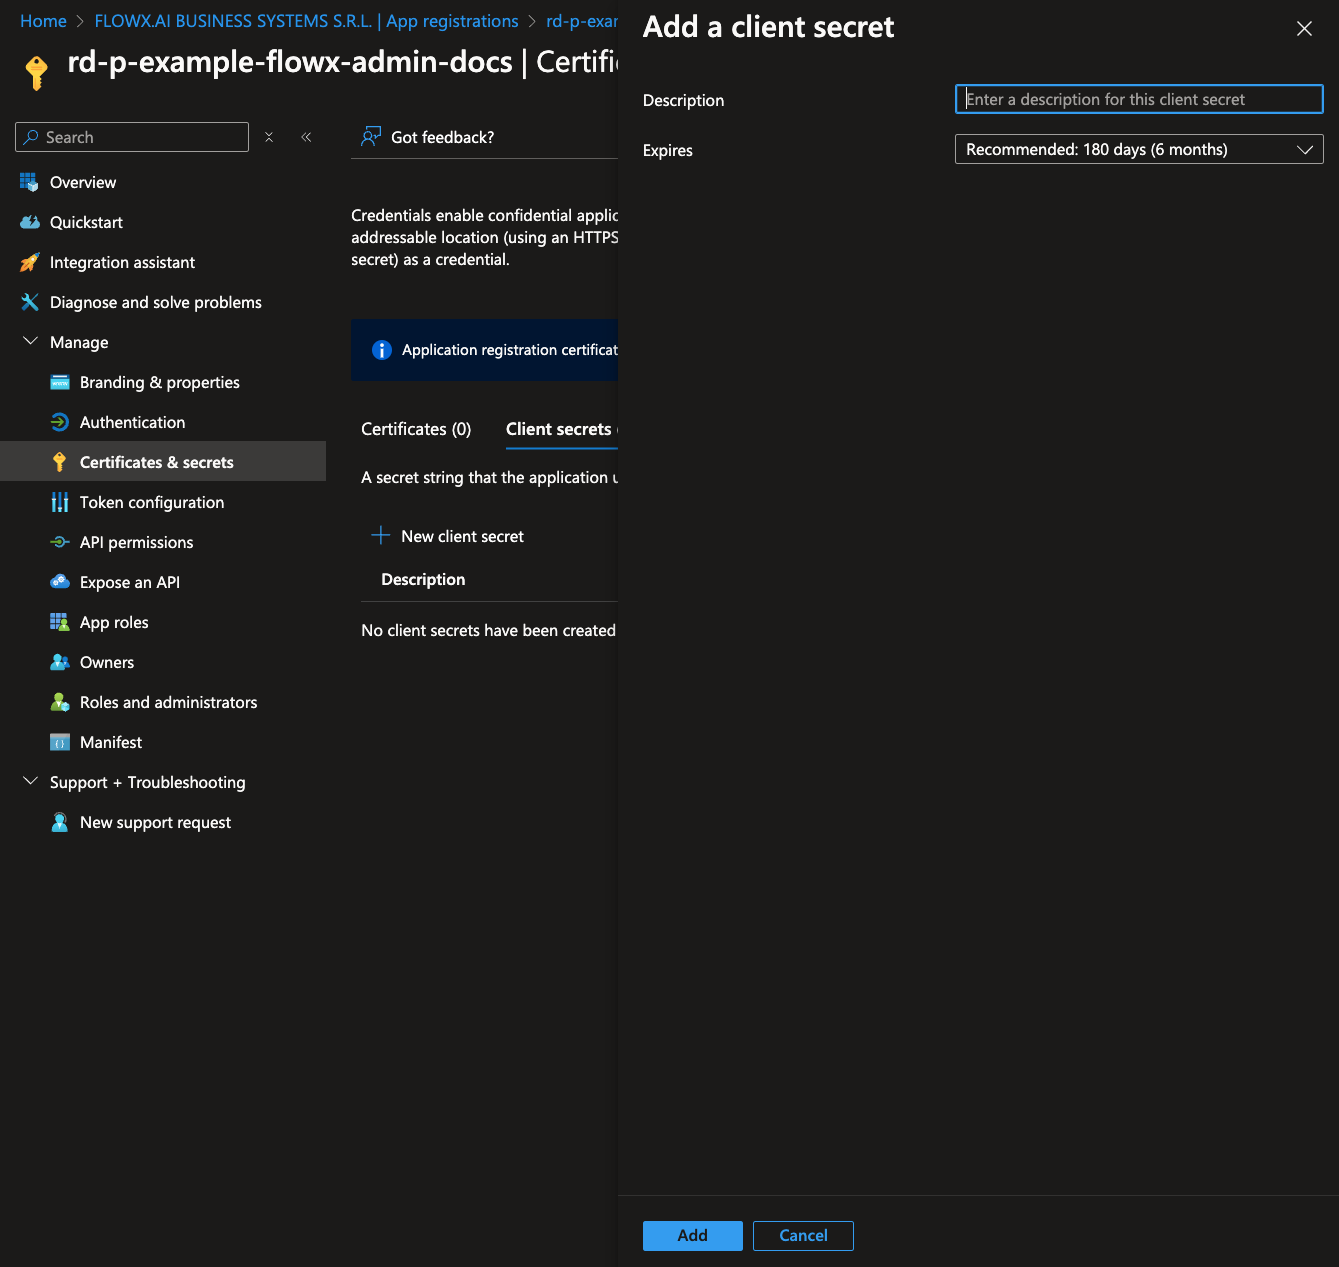
Copy the generated client secret value. This will be used to configure `SPRING_SECURITY_OAUTH2_CLIENT_REGISTRATION_MAINIDENTITY_CLIENT_SECRET`.
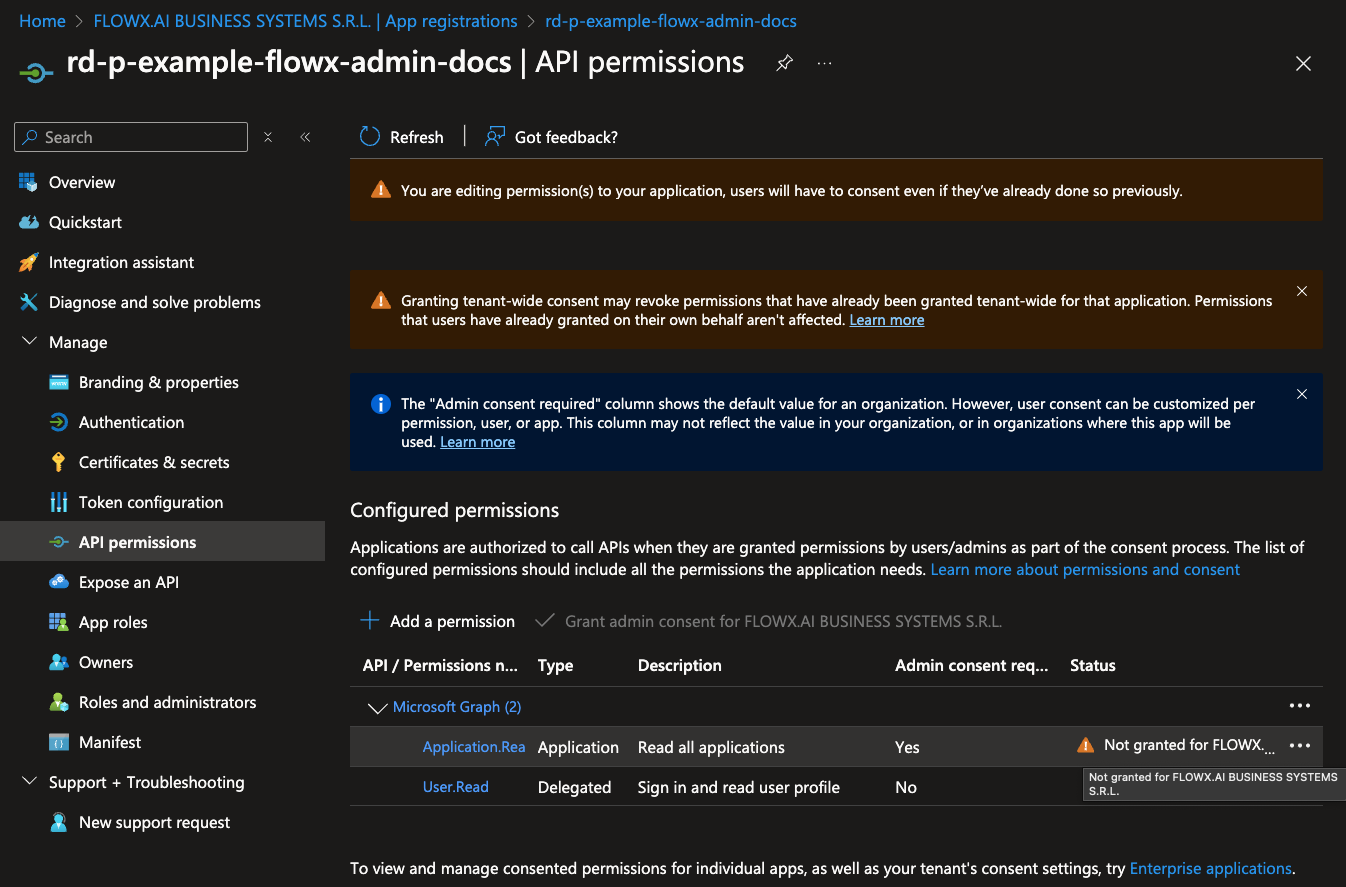
#### Configure API permissions
1. Go to the **API permissions** tab and click **Add a permission**.
2. Select **Microsoft Graph > Application permissions**.
3. Add the following permissions for **flowx-admin**:
* **Application.Read.All**
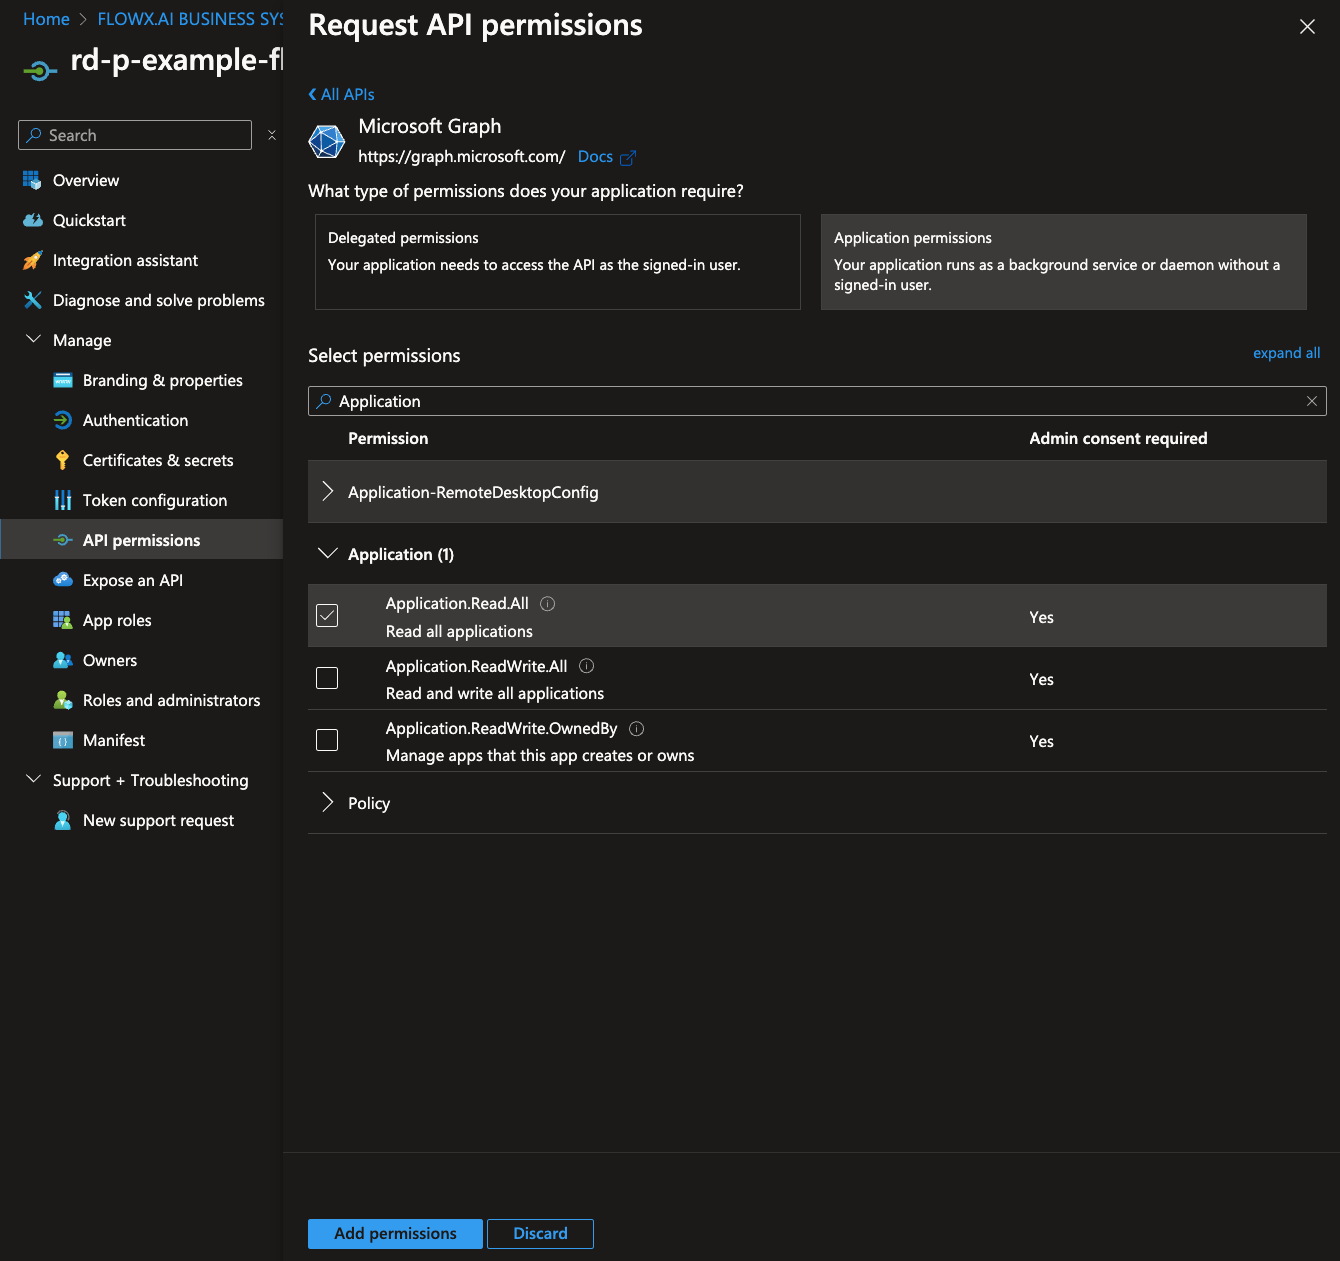
If you have admin privileges, you can click **Grant admin consent** to apply these permissions. If not, contact your tenant administrator to grant consent.
***
### Flowx-Process-Engine app registration
Follow the same **Application Registration Steps** and **Configure Client Secrets** steps as above.
#### Configure API permissions
* **API Permissions**: No additional permissions required.
***
### Flowx-Integration-Designer app registration
Follow the same **Application Registration Steps** and **Configure Client Secrets** steps as above.
#### Configure API permissions
* **API Permissions**: No additional permissions required.
***
### Flowx-Task-Management-Plugin app registration
Follow the same **Application Registration Steps** and **Configure Client Secrets** steps as above.
#### Configure API permissions
1. Go to the **API permissions** tab and click **Add a permission**.
2. Select **Microsoft Graph > Application permissions**.
3. Add the following permissions for **flowx-task-management-plugin**:
* **Application.Read.All**
* **Group.Read.All**
* **User.Read.All**
If you have admin privileges, you can click **Grant admin consent** to apply these permissions. If not, contact your tenant administrator to grant consent.
***
### Flowx-Scheduler-Core app registration
Follow the same **Application Registration Steps** and **Configure Client Secrets** steps as above.
#### Configure API permissions
* **API Permissions**: No additional permissions required.
***
### Assigning a role to a user/group
To assign a role to a user or group for your FlowX.AI applications, follow these steps:
1. Go to [https://portal.azure.com](https://portal.azure.com) and log in to your Entra ID directory that hosts your FlowX.AI application registrations.
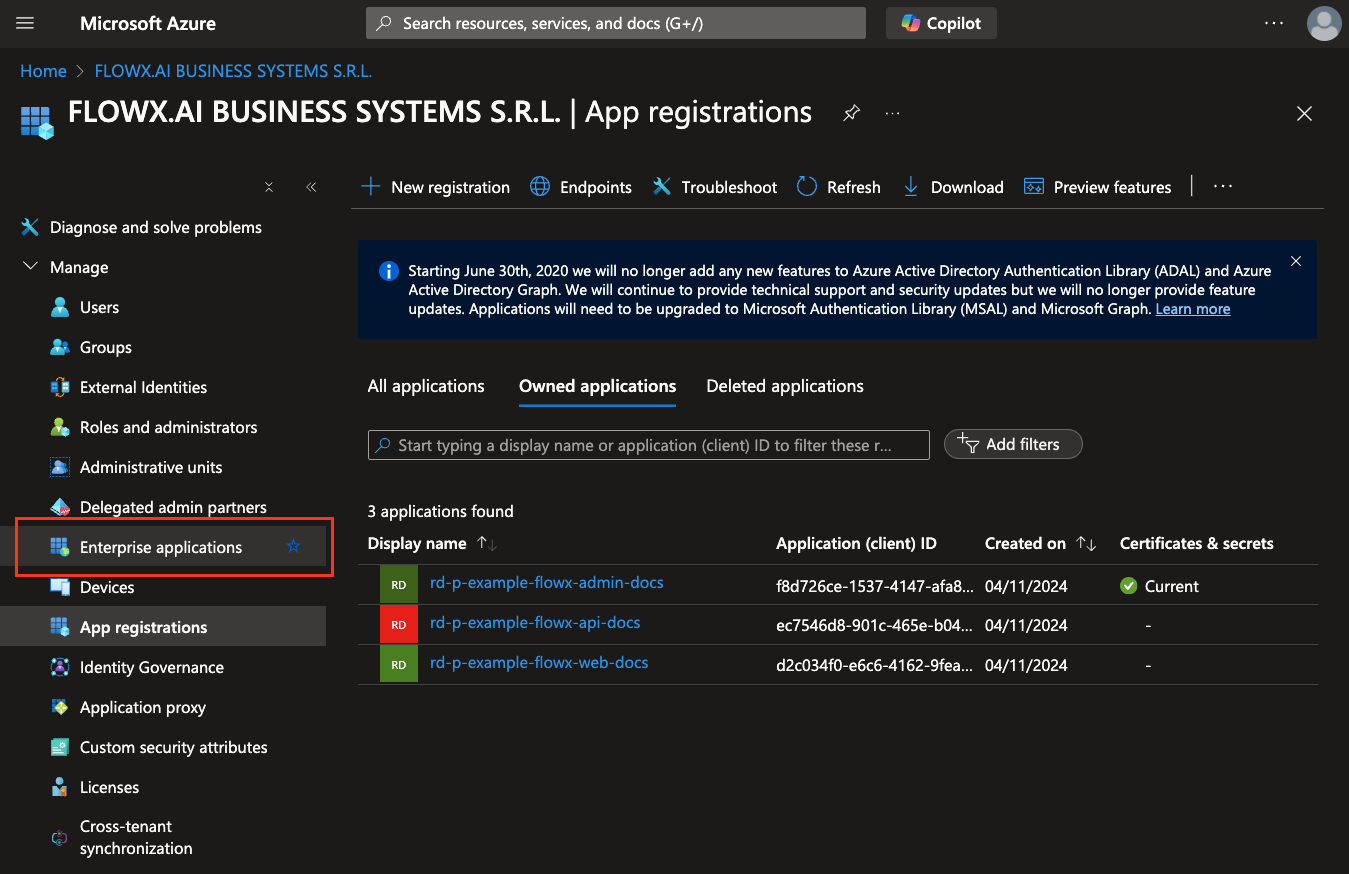
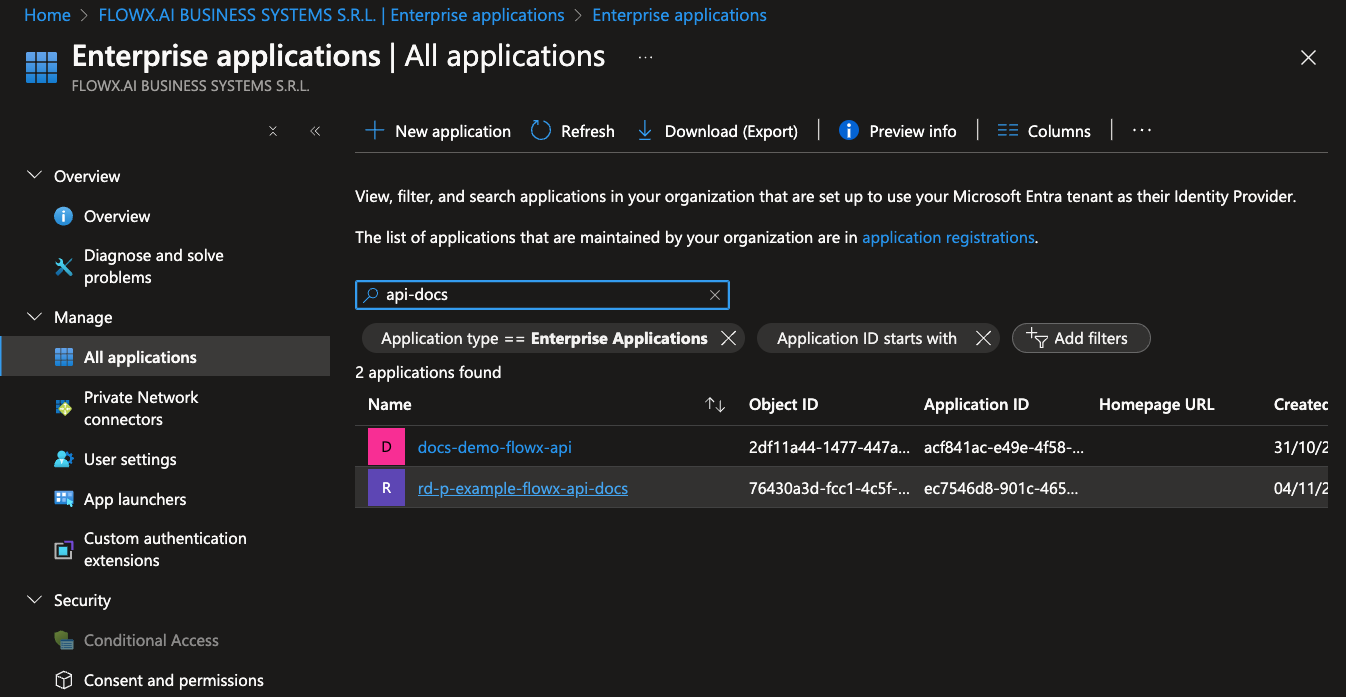
2. Navigate to **Microsoft Entra ID > Enterprise applications** and search for your **flowx-api** app registration name.\
(An enterprise application with the same name was automatically created when the app registration was set up.)
3. Under **Users and groups**, select **Add user/group**.
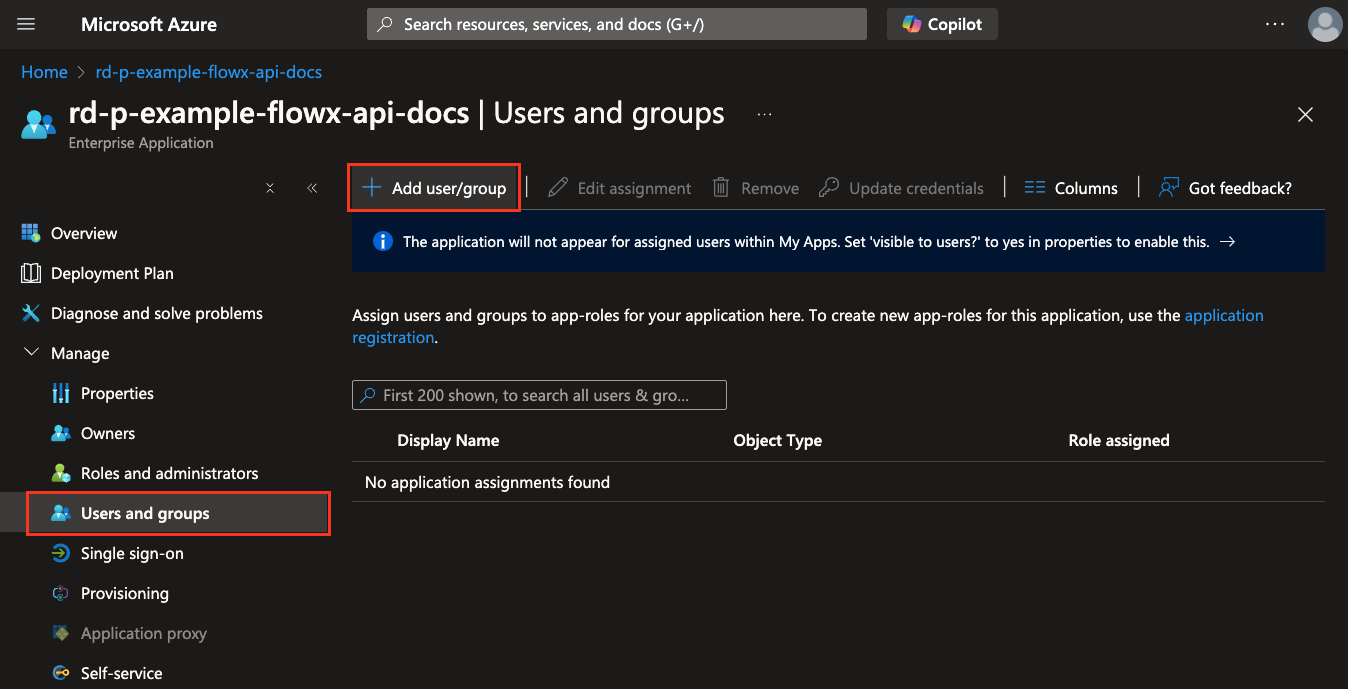
* Choose the user or group you want to assign.
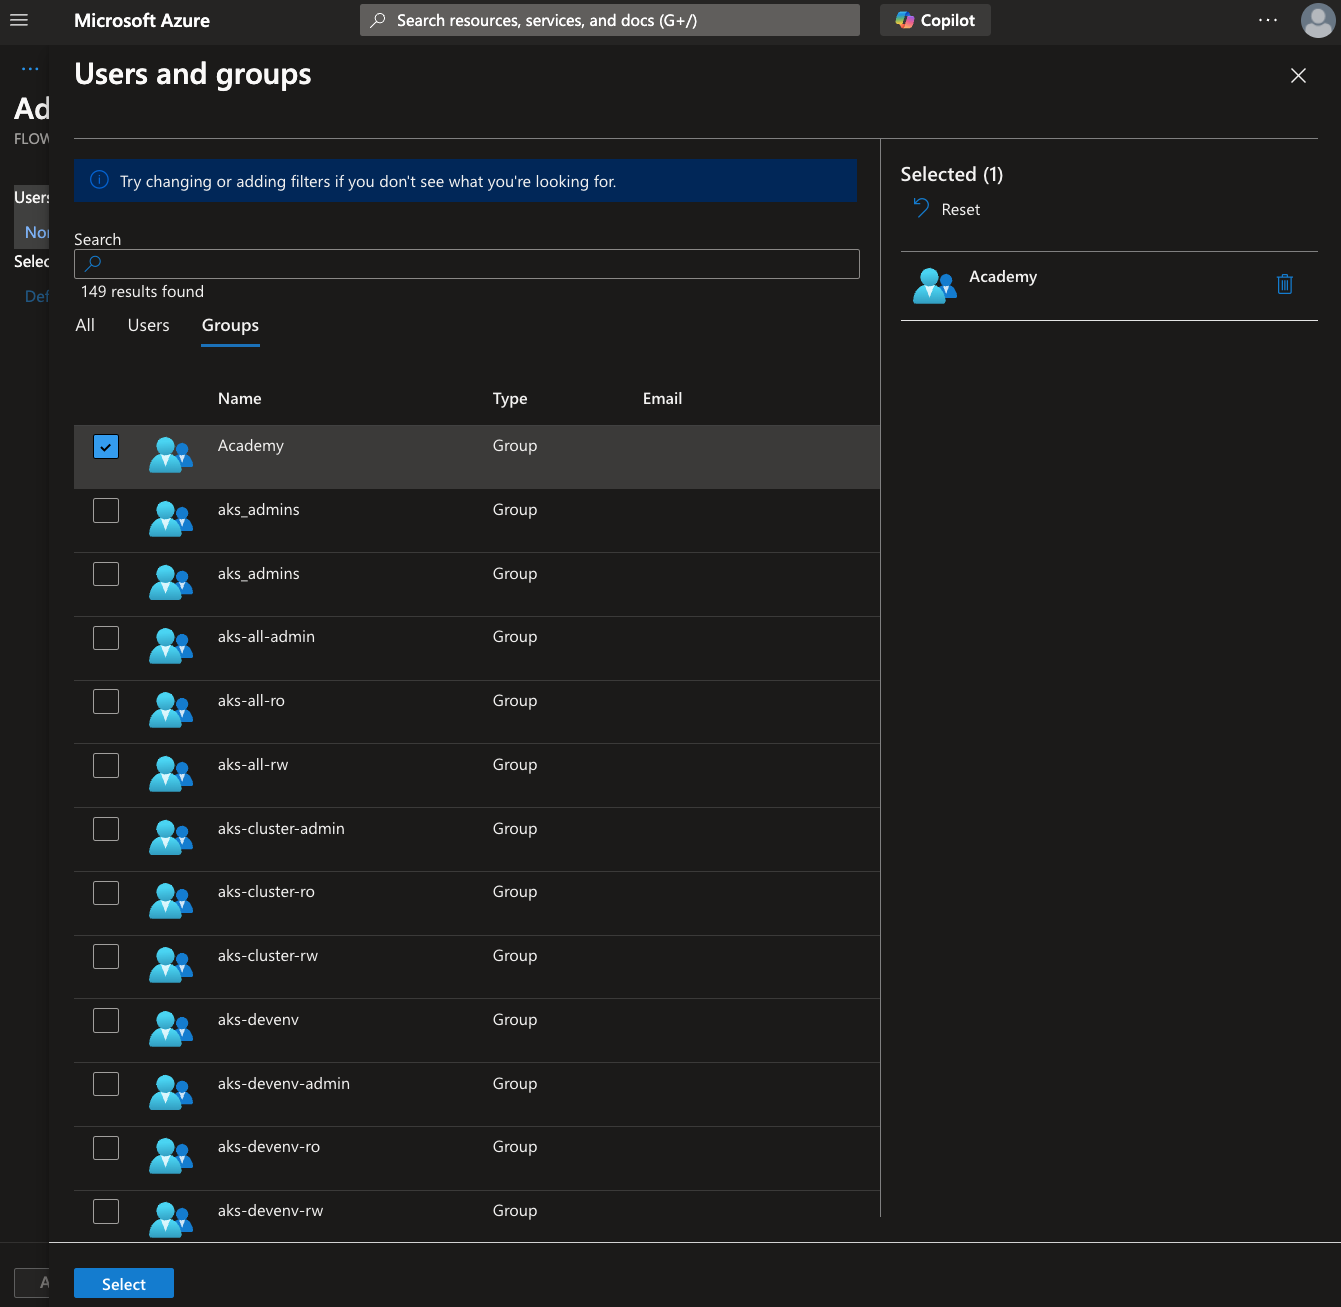
* Select the appropriate role from the available options.
4. Click **Assign** to complete the role assignment.
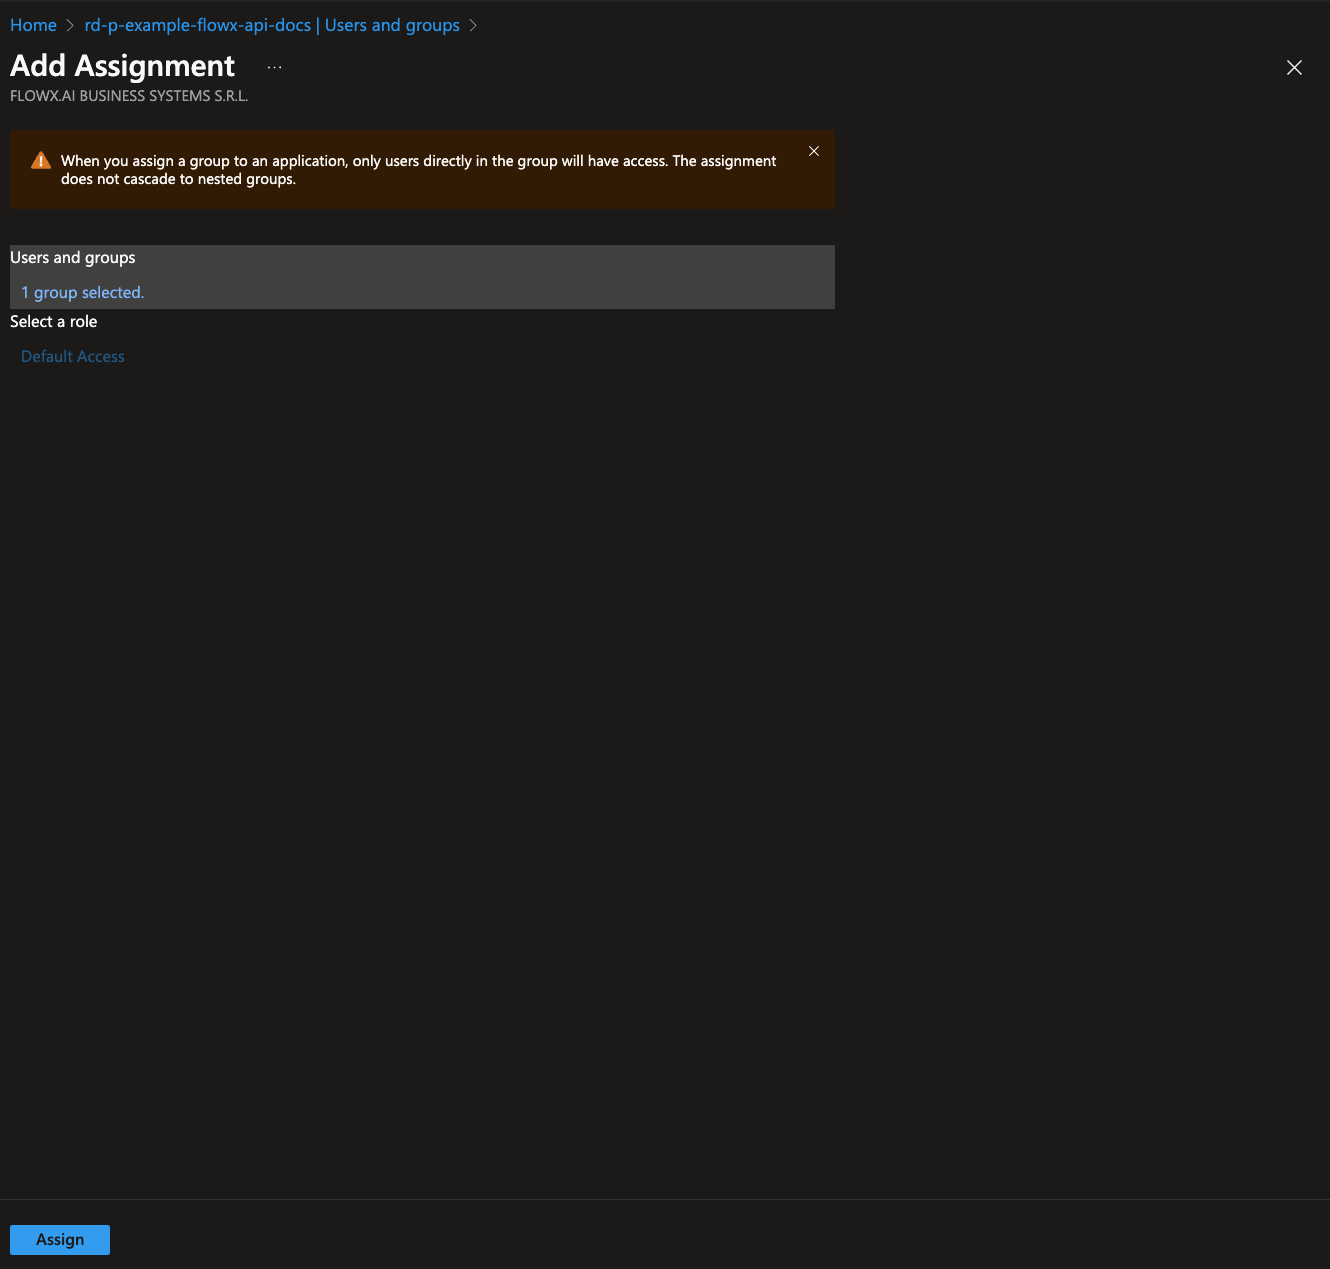
It is recommended to provide roles through group membership for easier management and scalability.
***
### Adding custom attributes
Using Microsoft Graph CLI, you can add custom attributes such as `businessFilter`.
For more information about Microsoft Graph CLI, check the following docs:
#### Prerequisites
* [Install the Microsoft Graph CLI](https://learn.microsoft.com/en-us/graph/cli/installation?tabs=macos).
#### Create an attribute extension property
Create an Attribute Extension Property on the flowx-api app registration:
1. Log in to Microsoft Graph CLI with the necessary permissions:
```bash theme={"system"}
$ mgc login --scopes Directory.Read.All
```
You can add additional permissions by repeating the mgc login command with the new permission scopes.
2. Create the attribute extension property by running the following command. Replace `` with the object ID of your flowx-api application:
```bash theme={"system"}
$ mgc applications extension-properties create --application-id --body '
{
"dataType": "String",
"name": "businessFilter",
"targetObjects": [
"User", "Group"
]
}'
```
#### Retrieve the attribute extension name
To confirm the attribute extension name, use the command below. This will output the exact name of the created extension property.
```bash theme={"system"}
$ mgc applications extension-properties list --application-id --select name
```
Example output:
```json theme={"system"}
{
"@odata.context": "https://graph.microsoft.com/v1.0/$metadata#applications(\u0027\u0027)/extensionProperties(name)",
"value": [
{
"name": "extension_ec959542898b42bcb6922e7d3f9df282_businessFilter"
}
]
}
```
#### Configure token claim
1. Go to the **flowx-api** app registration in the Azure portal.
2. Navigate to **Token configuration**.
3. Click **Add optional claim**.
* Select **Token type** as **Access**.
* Check the box for `extn.businessFilter`.
4. Click Add to save the changes.
#### Assign attribute extension to a user
1. Log in with the required permissions to modify user attributes:
```bash theme={"system"}
$ mgc login --scopes User.ReadWrite.All
```
2. Assign the `businessFilter` attribute to a user by running the command below. Replace `` with the user's `object ID`:
```bash theme={"system"}
$ mgc users patch --user-id --body '
{
"extension_ec959542898b42bcb6922e7d3f9df282_businessFilter": "docs"
}'
```
#### Assign attribute extension to a group
Follow similar steps to assign the `businessFilter` attribute to a group. Replace `` with the group’s `object ID` and use the following command:
1. Log in with the required permissions to modify group attributes:
```bash theme={"system"}
$ mgc login --scopes User.ReadWrite.All
```
2. Assign the custom attribute by the command below, replacing `` with the user’s object ID. The businessFilter attribute is set to "docs" in this example.
```bash theme={"system"}
$ mgc groups patch --group-id --body '
{
"extension_ec959542898b42bcb6922e7d3f9df282_businessFilter": "docs"
}'
```
***
## Example JWT token for user
To verify that the custom attributes and roles have been correctly applied, you can inspect a sample JWT token issued to a user. This token will include standard claims along with any custom attributes and roles configured in your Entra ID setup.
### Steps to retrieve a JWT token
1. **Login to the FlowX.AI Application**\
Log in to the FlowX.AI application as the user for whom the JWT token needs to be inspected.
2. **Retrieve the JWT Token**\
After logging in, retrieve the JWT token by one of the following methods:
* Using browser developer tools to inspect network requests (look for requests with an `Authorization` header).
* Accessing a token endpoint if available, using a tool like Postman.
3. **Decode the JWT Token**\
Use a JWT decoding tool, such as [jwt.io](https://jwt.io/), to decode and inspect the token.
***
### Sample JWT token structure
Below is an example JWT token structure that includes key claims, custom attributes, and roles:
```json theme={"system"}
{
"aud": "api://rd-p-example-flowx-api",
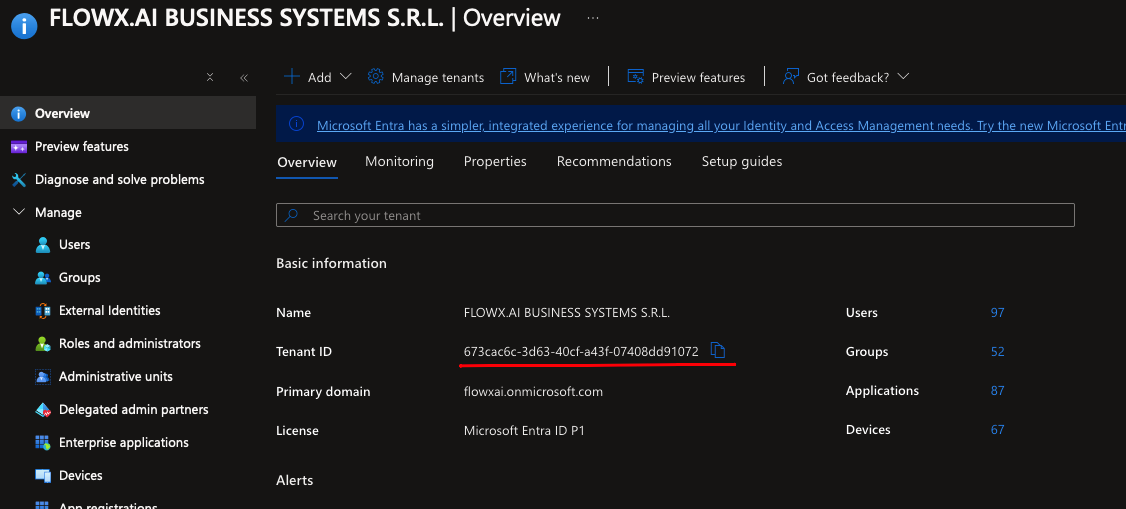
"iss": "https://sts.windows.net/673cac6c-3d63-40cf-a43f-07408dd91072/",
"iat": 1730720856,
"nbf": 1730720856,
"exp": 1730726397,
"acr": "1",
"aio": "ATQAy/8YAAAAj3ca5D/znraYUsif7RVc7TmWJPj66tqsUon0oon1xPamN1W7wN070R1JwaCwUQyQ",
"amr": [
"pwd"
],
"appid": "673b5314-a9c8-40ec-beb5-636fa9a781b4",
"appidacr": "0",
"email": "john.doe@flowx.ai",
"extn.businessFilter": [
"docs"
],
"family_name": "Doe",
"given_name": "John",
"groups": [
"ef731a0d-b44f-44da-bd78-67363c901bb1",
"db856713-0dfa-4d3d-aefa-bbb598257084",
"4336202b-6fc4-4132-afab-7f6573993325",
"5dc0b52e-823b-4ce9-b3e4-b3070912a4ef",
"ce006d40-555f-4247-890b-1053fa3cb172",
"291ac248-4e29-4c91-8e1d-19cbeec64eb8",
"b82dc551-f3f0-4d28-aaf0-a0a74fe3b3e3",
"42b39b5f-7545-48be-88d1-6e88716236db",
"cc0f776a-1cb2-4b8c-a472-8e1393764442",
"6eac9487-e04c-41e6-81ce-364f09c22bbf",
"01c30789-6862-4085-b5c4-f0cb02fb41b0",
"75ac188b-61c4-4aa9-ad7e-af1d543e199a",
"e726fda5-79f0-440b-b86c-8a9820d14d2e",
"259980bb-e881-4d93-9912-d2562441a257",
"9146edd4-6194-4487-b524-79956635f514",
"ce046ce2-6ef8-40f2-9f4e-a70f1ca14ecf",
"62d1f9f5-858c-43e2-af92-94bcc575681b",
"69df5ff6-1da9-49d1-9871-b7e62de2b212",
"043d25fc-a507-47ee-83e3-1d31ce0d9b35"
],
"ipaddr": "86.126.6.183",
"name": "Jonh Doe",
"oid": "61159071-3fd6-4373-8aec-77ee58675776",
"preferred_username": "john.doe@flowx.ai",
"rh": "1.AYEAbKw8Z2M9z0CkPwdAjdkQckKVleyLibxCtpIufT-d8oKBAAeBAA.",
{/* Most `ROLE_*` entries below are legacy realm roles that may exist in realms created from older FlowX realm exports. FlowX 5.x services do not evaluate them — Designer and platform access is governed by workspace and organization roles plus permissions; see the [Complete roles & permissions matrix](./roles-permissions-matrix). Realm roles are only evaluated where your own configuration references them (for example, swimlane access rules). */}
"roles": [
"ROLE_DOCUMENT_TEMPLATES_IMPORT",
"FLOWX_ROLE",
"ROLE_TASK_MANAGER_OOO_ADMIN",
"ROLE_ADMIN_MANAGE_CONFIG_IMPORT",
"ROLE_INTEGRATION_SYSTEM_READ",
"ROLE_INTEGRATION_WORKFLOW_READ_RESTRICTED",
"ROLE_ADMIN_MANAGE_PROCESS_ADMIN",
"ROLE_MANAGE_NOTIFICATIONS_ADMIN",
"ROLE_ADMIN_MANAGE_INTEGRATIONS_EDIT",
"ROLE_TASK_MANAGER_HOOKS_IMPORT",
"ROLE_THEMES_READ",
"ROLE_ENGINE_MANAGE_PROCESS_EDIT",
"ROLE_TASK_MANAGER_PROCESS_ALLOCATION_SETTINGS_ADMIN",
"ROLE_AI_OPTIMIZER_EDIT",
"ROLE_ENGINE_MANAGE_INSTANCE_READ",
"ROLE_ADMIN_MANAGE_INTEGRATIONS_ADMIN",
"ROLE_ADMIN_MANAGE_PROCESS_IMPORT",
"ROLE_COPO_TELLER",
"ROLE_CMS_CONTENT_READ",
"ROLE_CMS_CONTENT_IMPORT",
"ROLE_INTEGRATION_WORKFLOW_ADMIN",
"ROLE_AI_ARCHITECT_EDIT",
"ROLE_TASK_MANAGER_HOOKS_READ",
"ROLE_AI_WRITER_EDIT",
"ROLE_TASK_MANAGER_HOOKS_ADMIN",
"ROLE_MEDIA_LIBRARY_EDIT",
"ROLE_CMS_TAXONOMIES_READ",
"ROLE_AI_INSPECTOR_EDIT",
"FLOWX_FRONTOFFICE",
"ROLE_START_EXTERNAL",
"ROLE_DOCUMENT_TEMPLATES_READ",
"ROLE_TASK_MANAGER_PROCESS_ALLOCATION_SETTINGS_IMPORT",
"VIEW_INSTANCES",
"ROLE_ADMIN_MANAGE_INTEGRATIONS_IMPORT",
"ROLE_ADMIN_MANAGE_USERS_READ",
"ROLE_THEMES_ADMIN",
"ROLE_ADMIN_MANAGE_PLATFORM_READ",
"ROLE_TASK_MANAGER_OOO_EDIT",
"ROLE_CMS_TAXONOMIES_EDIT",
"ROLE_THEMES_IMPORT",
"ROLE_AI_DEVELOPER_EDIT",
"ROLE_MANAGE_NOTIFICATIONS_READ",
"ROLE_INTEGRATION_SYSTEM_EDIT",
"ROLE_MANAGE_NOTIFICATIONS_SEND",
"FLOWX_ADMIN",
"ROLE_INTEGRATION_READ",
"FLOWX_BACKOFFICE",
"ROLE_DOCUMENT_TEMPLATES_EDIT",
"ROLE_MEDIA_LIBRARY_IMPORT",
"ROLE_AI_ASSISTANT_READ",
"ROLE_ADMIN_MANAGE_CONFIG_EDIT",
"ROLE_CMS_TAXONOMIES_IMPORT",
"ROLE_ADMIN_MANAGE_CONFIG_ADMIN",
"ROLE_TASK_MANAGER_TASKS_READ",
"ROLE_DOCUMENT_TEMPLATES_ADMIN",
"ROLE_INTEGRATION_WORKFLOW_READ",
"ROLE_COPO_VIEWER",
"ROLE_MEDIA_LIBRARY_ADMIN",
"ROLE_NOTIFICATION_TEMPLATES_EDIT",
"ROLE_ADMIN_MANAGE_PROCESS_READ",
"ROLE_AI_INTEGRATOR_EDIT",
"ROLE_AI_SUPERVISOR_EDIT",
"ROLE_INTEGRATION_WORKFLOW_EDIT",
"ROLE_CMS_CONTENT_ADMIN",
"ROLE_CMS_CONTENT_EDIT",
"FLOWX_SUPERVISOR",
"ROLE_ADMIN_MANAGE_CONFIG_READ",
"ROLE_TASK_MANAGER_OOO_READ",
"ROLE_TASK_MANAGER_PROCESS_ALLOCATION_SETTINGS_EDIT",
"ROLE_INTEGRATION_ADMIN",
"ROLE_NOTIFICATION_TEMPLATES_READ",
"ROLE_AI_AUDITOR_EDIT",
"ROLE_ENGINE_MANAGE_INSTANCE_ADMIN",
"ROLE_INTEGRATION_SYSTEM_ADMIN",
"ROLE_ADMIN_MANAGE_PROCESS_EDIT",
"ROLE_INTEGRATION_EDIT",
"ROLE_AI_DESIGNER_EDIT",
"ROLE_TASK_MANAGER_HOOKS_EDIT",
"ROLE_AI_COMMAND_READ",
"ROLE_CMS_TAXONOMIES_ADMIN",
"ROLE_ADMIN_MANAGE_USERS_ADMIN",
"ROLE_AI_ANALYST_EDIT",
"ROLE_TASK_MANAGER_VIEWS_ADMIN",
"ROLE_ADMIN_MANAGE_PLATFORM_ADMIN",
"ROLE_TASK_MANAGER_PROCESS_ALLOCATION_SETTINGS_READ",
"ROLE_AI_STRATEGIST_EDIT",
"ROLE_THEMES_EDIT",
"ROLE_NOTIFICATION_TEMPLATES_ADMIN",
"ROLE_INTEGRATION_IMPORT",
"ROLE_NOTIFICATION_TEMPLATES_IMPORT",
"ROLE_ADMIN_MANAGE_INTEGRATIONS_READ",
"ROLE_ADMIN_MANAGE_USERS_EDIT",
"ROLE_MEDIA_LIBRARY_READ"
],
"scp": "FlowxAI.ReadWrite.All",
"sub": "tMG9A1npM9hK89AV9rdUvTAKVlli3oLkyI1E8F7bV5Y",
"tid": "673cac6c-3d63-40cf-a43f-07408dd91072",
"unique_name": "john.doe@flowx.ai",
"upn": "john.doe@flowx.ai",
"uti": "v3igRE_kEUqZC4nbXII3AA",
"ver": "1.0",
"wids": [
"9b895d92-2cd3-44c7-9d02-a6ac2d5ea5c3",
"fe930be7-5e62-47db-91af-98c3a49a38b1",
"e3973bdf-4987-49ae-837a-ba8e231c7286",
"158c047a-c907-4556-b7ef-446551a6b5f7",
"e8611ab8-c189-46e8-94e1-60213ab1f814",
"b79fbf4d-3ef9-4689-8143-76b194e85509"
]
}
```
## Configure helm charts
This section provides details on configuring Helm charts for FlowX.AI applications, including where to retrieve required values and setting environment variables for different application components.
***
### Where to get the values
* **tenant\_id**: The unique identifier for your Entra ID tenant.
* **client\_id**: The client ID for the specific FlowX.AI application.
* **client\_secret**: The client secret generated during app registration (only visible at creation).
***
### Helm chart values
These configurations are required for different FlowX.AI application components. Substitute ``, ``, and `` with your specific values.
***
#### Designer
For the Designer component, use the following settings:
```yaml theme={"system"}
SKIP_ISSUER_CHECK: true
STRICT_DISCOVERY_DOCUMENT_VALIDATION: false
KEYCLOAK_ISSUER: https://login.microsoftonline.com//v2.0
KEYCLOAK_CLIENT_ID:
KEYCLOAK_SCOPES: "openid profile email offline_access api://rd-e-example-flowx-api/FlowxAI.ReadWrite.All"
KEYCLOAK_REDIRECT_URI: https://flowx.example.az1.cloud.flowxai.dev
```
#### All Java application
```yaml theme={"system"}
SECURITY_TYPE: jwt-public-key
SPRING_SECURITY_OAUTH2_RESOURCESERVER_JWT_ISSUER_URI: https://sts.windows.net//
SPRING_SECURITY_OAUTH2_RESOURCESERVER_JWT_JWK_SET_URI: https://login.microsoftonline.com//discovery/v2.0/keys
```
#### Java applications with a Service Principal
These settings apply to Java applications that require a service principal, such as Admin, Integration Designer, Process Engine, Scheduler Core, and Task Management Plugin.
```yaml theme={"system"}
SPRING_SECURITY_OAUTH2_CLIENT_PROVIDER_MAINAUTHPROVIDER_TOKEN_URI: https://login.microsoftonline.com//oauth2/v2.0/token
SPRING_SECURITY_OAUTH2_CLIENT_REGISTRATION_MAINIDENTITY_CLIENT_ID:
SPRING_SECURITY_OAUTH2_CLIENT_REGISTRATION_MAINIDENTITY_CLIENT_SECRET:
SPRING_SECURITY_OAUTH2_CLIENT_REGISTRATION_MAINIDENTITY_SCOPE: api://rd-p-example-flowx-api/.default
```
#### Java applications with access to Microsoft Graph API
The following configuration is required for Java applications that need access to the Microsoft Graph API, such as Admin and Task Management Plugin.
```yaml theme={"system"}
OPENID_PROVIDER: entra
OPENID_ENTRA_TENANT_ID:
OPENID_ENTRA_PRINCIPAL_ID:
```