> ## Documentation Index
> Fetch the complete documentation index at: https://docs.flowx.ai/llms.txt
> Use this file to discover all available pages before exploring further.
# Scheduled processes
> Automate process instance creation on specific dates, times, or intervals using Start Timer Event nodes and predefined schedules.
## Overview
The **Scheduled Processes** feature automatically triggers process instances using Timer Start Events. In the **Runtime** tab, you can view scheduled processes and activate/deactivate timers without a redeployment. This feature is especially useful in upper environments, where you might need to pause or resume cron jobs without modifying the project build.
Check this section for more details about Timer Start Events and how to configure them.
## Key components
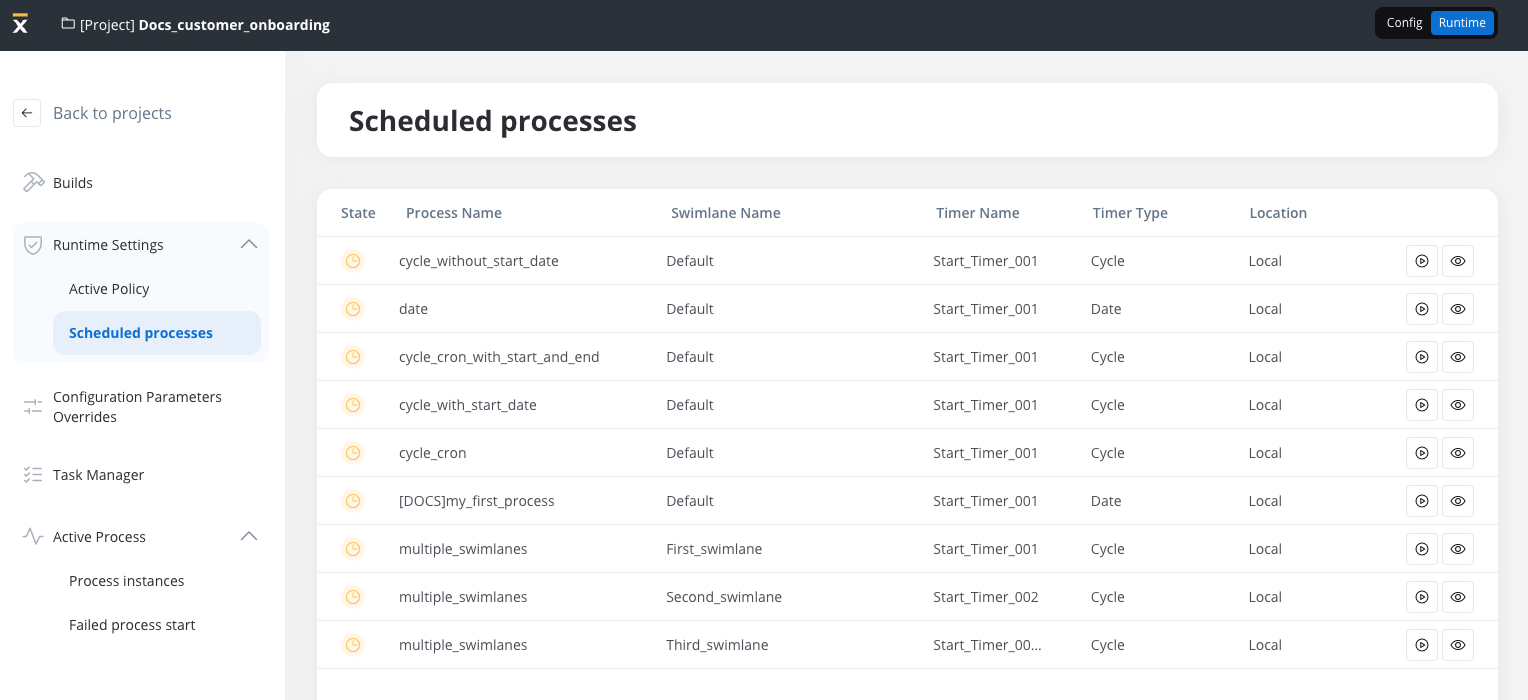
### 1. List of scheduled processes
The **Scheduled Processes** tab displays all timers that trigger process instances. Each row in the list shows:
* **Process Name:** The process linked to the timer.
* **Swimlane Name:** In multi-swimlane processes, each swimlane may have its own timer.
* **Timer Name:** The name of the timer node.
* **Timer Type:**
* **Date-based:** Triggers at a specific date and time.
* **Cycle-based:** Repeats at defined intervals (for example, every 10 seconds).
* **Location:** The execution environment (e.g., **Local**).
From this interface, you can view timer details or activate/deactivate timers as needed.
### 2. Timer Events schedule
To view a timer’s configuration, click the **View** icon next to the scheduled timer in the list.

### 3. Activating and deactivating timers
Manage timer activation directly from the UI:
* **Activate:** Click the activate button in the Scheduled Processes tab.
* **Deactivate:** Click the same button to suspend the timer.
You cannot edit timer configurations in the **Runtime** tab. To modify settings, update the process definition and redeploy.
***
## Use cases
A Timer Start Event can be scheduled to **automatically trigger** an onboarding process at a predefined time.
**Example**: Process starts on **January 28, 2025, at 12:14 PM**, sending onboarding notifications.
A Cycle timer can execute a job **every 10 seconds for 60 repetitions**, ensuring periodic execution.
A cycle timer with a cron expression can generate a report at **1 AM every day**.
***
## Additional notes
* **Runtime Timer Control:**\
Manage timers in the **Runtime** tab without changing the application build. Previously, timer activation was controlled by a checkbox in the **Start Timer node**, which is now read-only after deployment.
* **Timers in Multi-Swimlane Processes:**\
Each swimlane can have its own timer. The **Scheduled Processes** tab displays each timer separately for clear management.
* **Exporting and Importing Builds:**\
Timer activation settings are not editable during build export/import. All timer management occurs in the **Runtime** tab.