> ## Documentation Index
> Fetch the complete documentation index at: https://docs.flowx.ai/llms.txt
> Use this file to discover all available pages before exploring further.
# Manage Triggers
> Monitor and control event-based triggers that automatically start process instances. Manage Triggers provides a centralized interface to view, activate, and deactivate triggers configured in your project builds.
## Overview
The **Manage Triggers** feature provides a centralized interface for monitoring and controlling event-based triggers that automatically start process instances. Triggers connect external events (such as email arrivals, message events, or other data sources) to your process definitions, enabling event-driven automation.
Supported trigger types:
* **Email Trigger** (IMAP): Start processes when emails arrive via [Email Trigger](../../docs/platform-deep-dive/integrations/email-trigger) data sources
* **Microsoft Outlook** (MS Graph): Start processes when emails arrive via [Microsoft Outlook](../../docs/platform-deep-dive/integrations/microsoft-outlook-data-source) data sources
## Accessing manage triggers
Navigate to **Runtime Settings** → **Manage Triggers** from your project's Runtime view to access the triggers management interface.
You must have appropriate runtime permissions to view and manage triggers. See [Workspace runtime editor](/5.9/setup-guides/access-management/workspaces-access-rights#workspace-runtime-editor) for details.
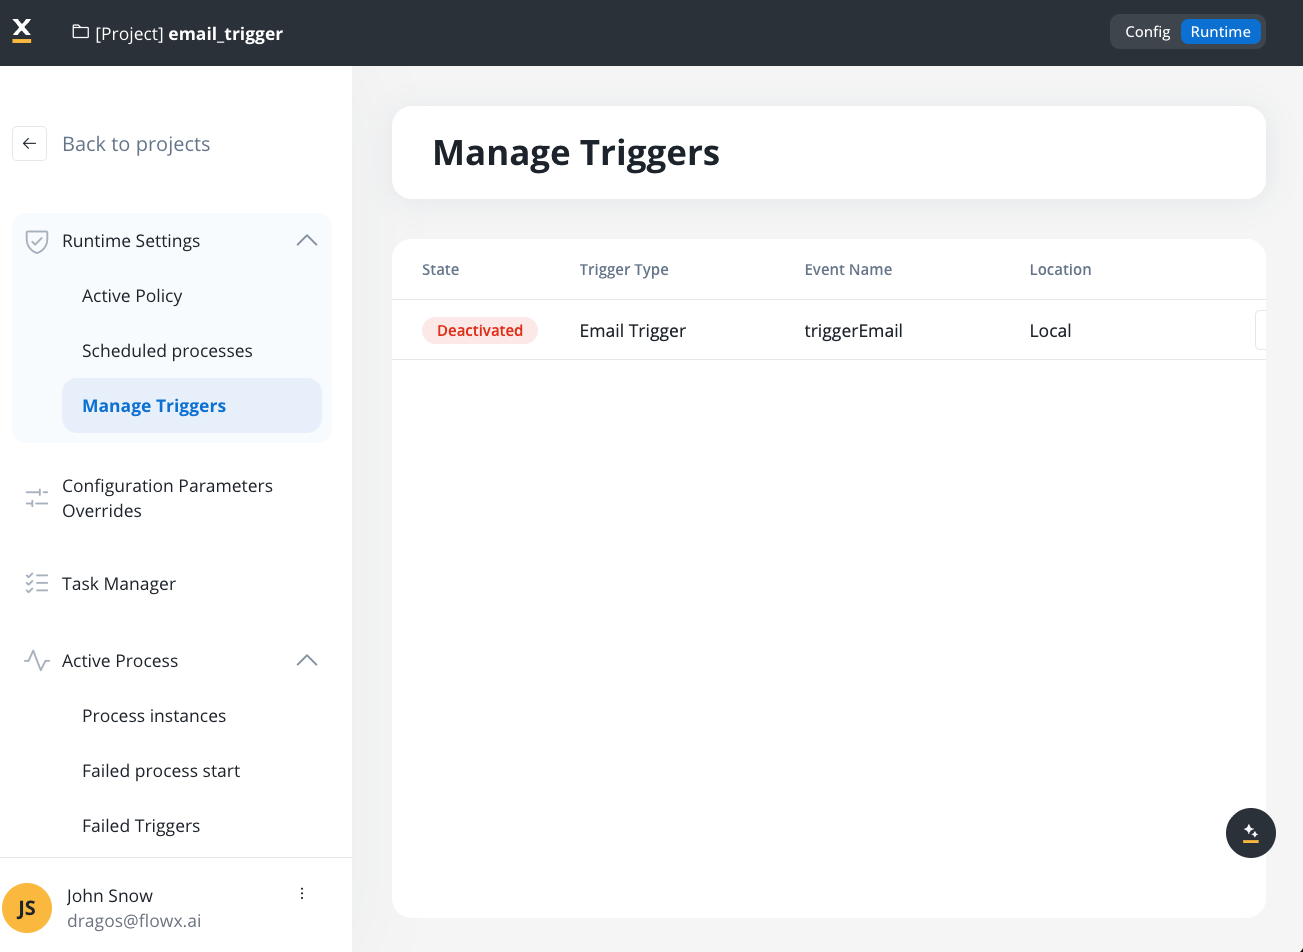
## Trigger list
The **Manage Triggers** interface displays all triggers configured in your active build. Each trigger appears as a row in the table with the following information:
| Column | Description |
| ---------------- | ------------------------------------------------------------------------------- |
| **State** | Current status: `Active` (monitoring enabled) or `Inactive` (monitoring paused) |
| **Trigger Type** | The type of trigger (for example, "Email Trigger") |
| **Event Name** | The name of the trigger data source or event configuration |
| **Location** | Project and build information where the trigger is configured |
### Empty state
When no triggers are configured for your project, the interface displays an empty state message: **"There are no triggers on this project yet."**
Triggers appear in this list once:
1. ✅ A trigger data source is created (for example, Email Trigger in Integration Designer)
2. ✅ The trigger is linked to a Message Start Event node in a process definition
3. ✅ The process is included in a build that is part of the **Active Policy**
## Activating and deactivating triggers
You can control trigger monitoring directly from the **Manage Triggers** interface:
Navigate to **Runtime Settings** → **Manage Triggers** to see all available triggers for your active build.
Use the toggle control in the **State** column to activate or deactivate monitoring:
* **Active**: The system monitors for events and creates process instances automatically
* **Inactive**: Monitoring is paused; no new process instances are created from this trigger

When you change the **Active Policy** (switch to a different build), triggers retain their previous activation state. If a trigger is removed from the new active build, it will be automatically deactivated.
## Trigger activation requirements
For a trigger to appear in **Manage Triggers**, it must meet all of the following requirements:
1. **Trigger data source exists**: The trigger must be configured as a data source (for example, Email Trigger in Integration Designer)
2. **Linked to process**: The trigger must be connected to a Message Start Event node in a process definition
3. **In active build**: The process containing the trigger must be part of a build that is set as the **Active Policy**
Triggers are read-only in the Runtime view. To modify trigger configurations (for example, change email server settings, update filters), you must edit the data source in Integration Designer and create a new build.
## Use cases
Automatically start customer support processes when emails arrive in monitored mailboxes. Email Triggers enable event-driven workflows for support ticket creation, document processing, and request handling.
Connect external systems to FlowX processes through event triggers. When external events occur (emails, messages, API calls), processes start automatically without manual intervention.
Pause or resume trigger monitoring in production environments without redeploying builds. This is especially useful for maintenance windows or when troubleshooting issues.
Manage trigger states independently across different environments (dev, staging, production) while using the same build configuration.
## Monitoring trigger activity
### Failed triggers
When triggers fail to process events (for example, email validation errors, connection issues), they appear in the **Failed Triggers** section.
Navigate to **Runtime Settings** → **Failed Triggers** to view:
* Timestamp of the failure
* Trigger type and name
* Cause type (for example, "File type not permitted," "File size exceeded")
* Context information (for example, sender email, file details)
See the Failed Process Start documentation for details on handling trigger failures.
## Best practices
Always test triggers in development environments before activating them in production. Verify that process instances start correctly and handle edge cases.
Regularly check the Failed Triggers section to identify and resolve issues. Common causes include file size limits, connection problems, and validation errors.
Give triggers descriptive names in Integration Designer to make them easily identifiable in the Manage Triggers list.
Document which processes are triggered by each trigger and under what conditions. This helps with troubleshooting and maintenance.
## Related resources
Learn how to configure Email Triggers in Integration Designer and connect them to Message Start Events.
Understand how Message Start Events work and how to configure them in process definitions.
Learn how to set the Active Policy to control which build's triggers are available for management.
Troubleshoot trigger failures and understand error handling for failed process starts.