> ## Documentation Index
> Fetch the complete documentation index at: https://docs.flowx.ai/llms.txt
> Use this file to discover all available pages before exploring further.
# Versioning
> Easily track and manage your project's evolution with comprehensive versioning features.
Versioning enables you to manage changes, track progress, and collaborate effectively by capturing snapshots of your project's state at any point in time. The versioning system ensures that resources are grouped and tracked as part of the project, providing a comprehensive and structured approach to development.
## Project version
A **Project Version** is an editable snapshot of your project at a specific moment. It contains all resources (e.g., processes, integrations, templates) and configurations grouped under the project.
* **Project**: The main project entity that contains all your resources (processes, integrations, templates, etc.)
* **Project Branch**: Branches within a project (similar to Git branches) that allow parallel development
* **Project Version**: Individual versions within branches that track the state of your project
Each version can have one of the following statuses:
* **WIP (Work In Progress)**: Draft versions that are actively being edited
* **COMMITTED**: Finalized versions that have been submitted with a commit message
* **MERGE\_IN\_PROGRESS**: Versions currently being merged between branches
The tab above provides a summary of all accessible project versions and branches available in the current environment.
Resources within a project (e.g., processes, integrations, templates) are versioned as part of the project, not individually.
Certain resources are considered **global** and are not included in project-specific versioning. These resources are shared across projects and environments to maintain consistency and simplify their management. Examples of such global resources include:
* **Themes**: Predefined design themes used across multiple projects.
* **Fonts**: A library of fonts accessible globally.
* **Global Media Files**: Shared media assets.
* **Out of Office Settings**: Configurations for user availability and auto-responses that are managed at the platform level.
***
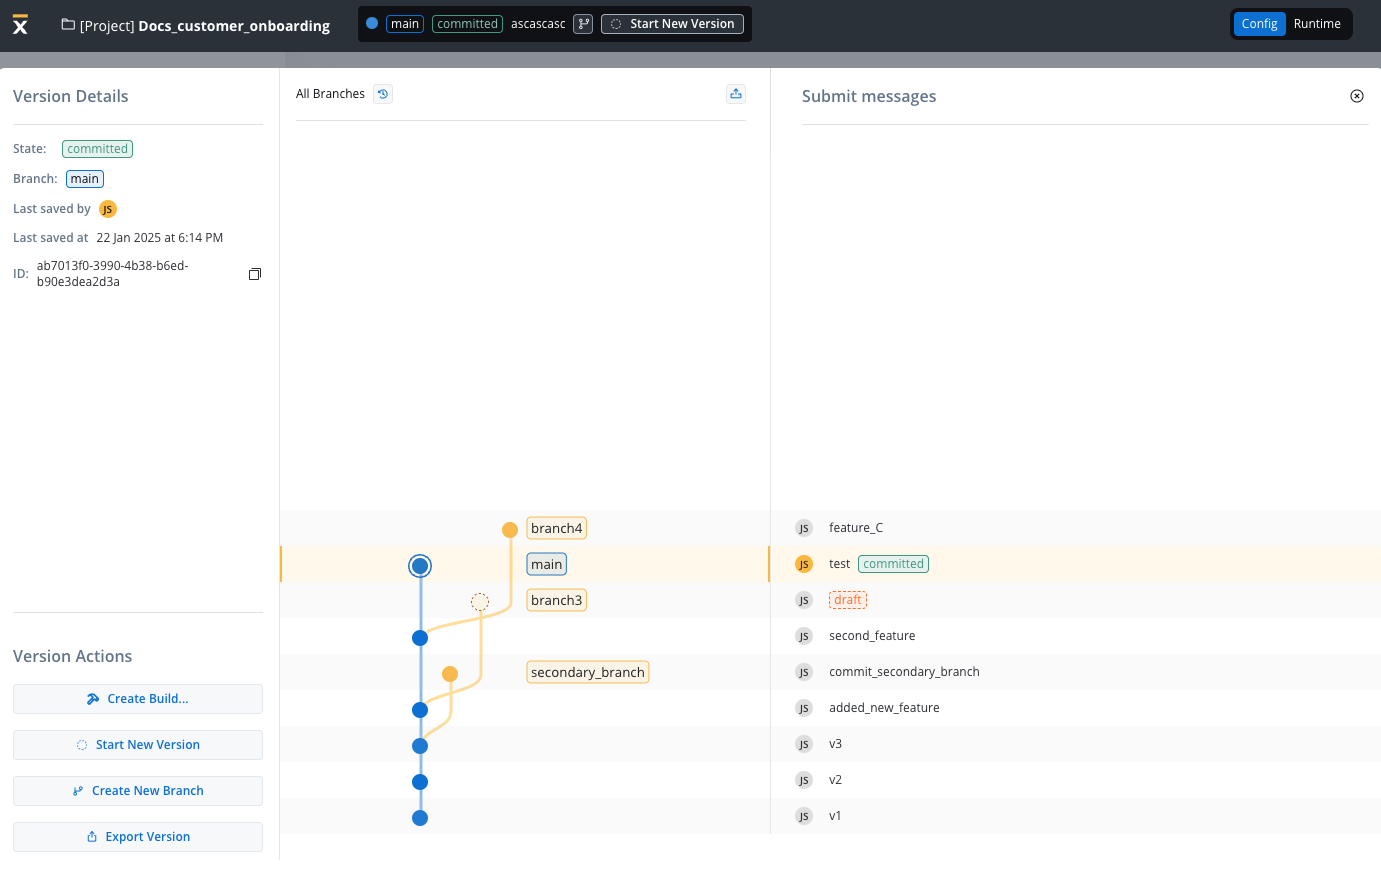
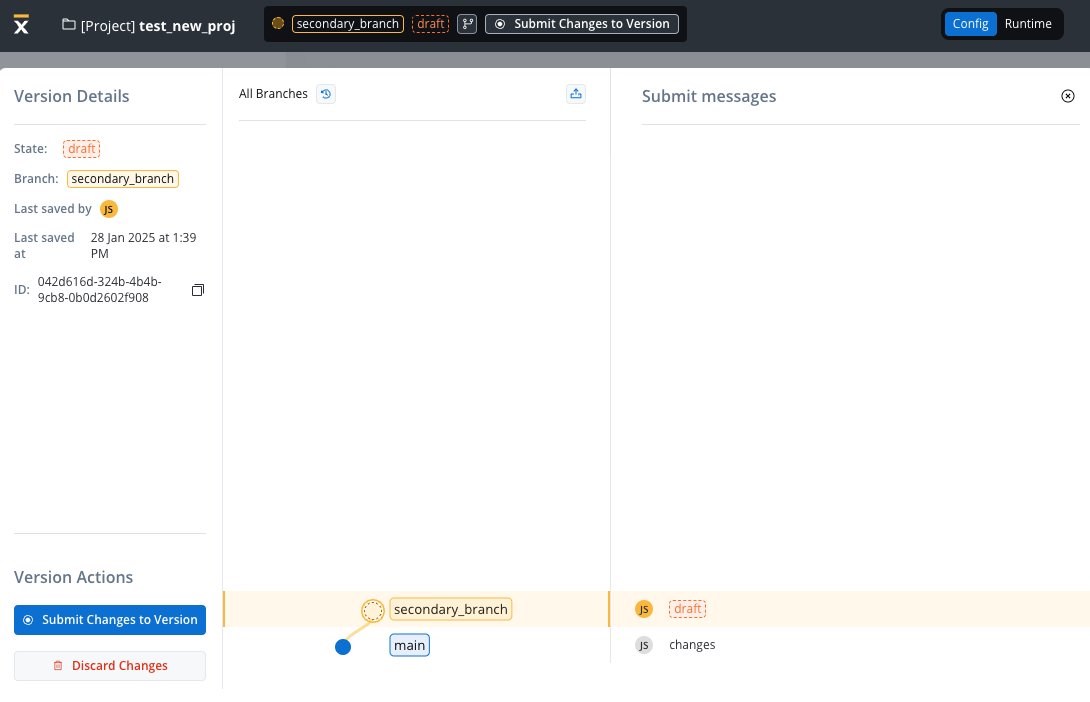
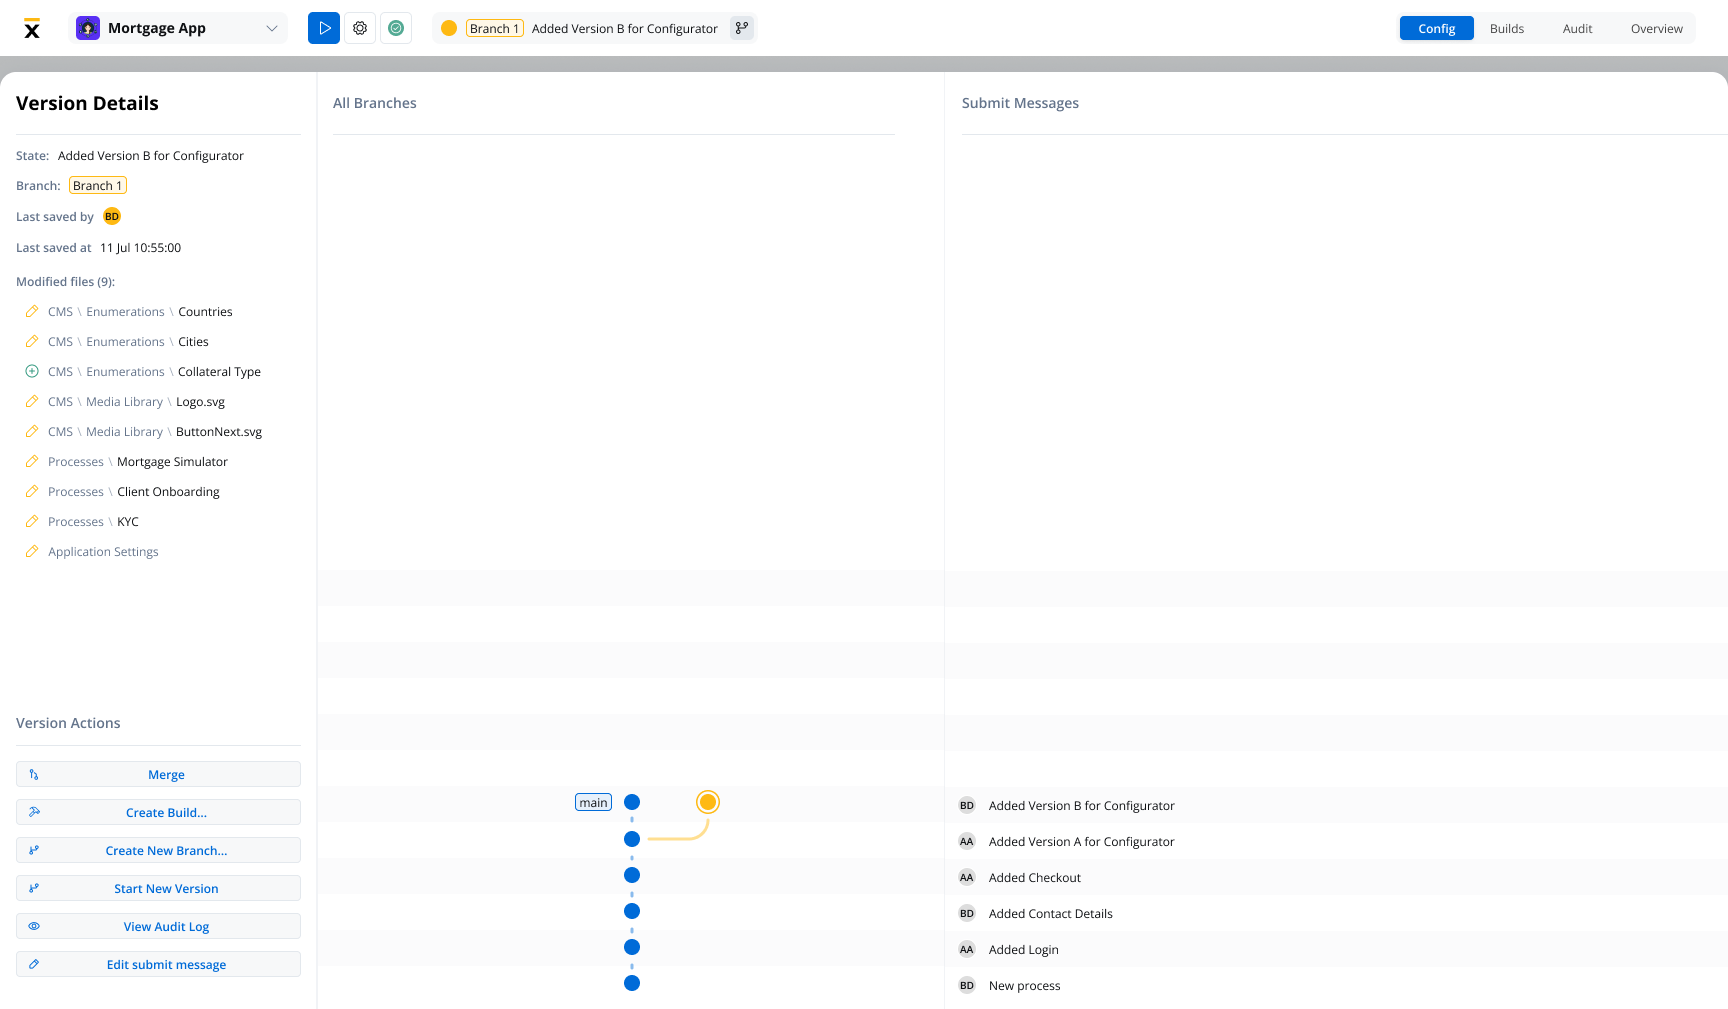
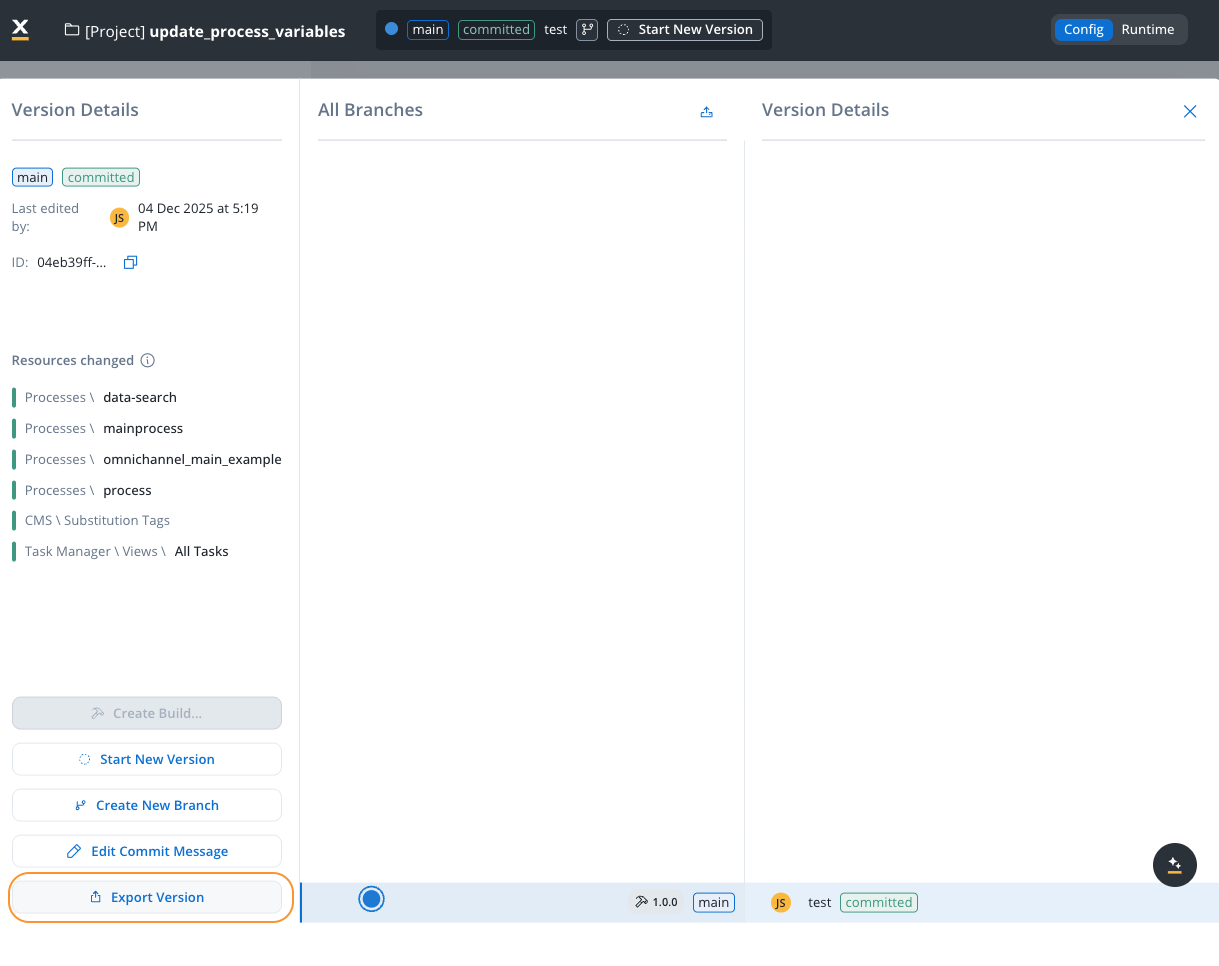
## Version details
* **State**: Displays the current state of the version (e.g., `draft`, `committed`).
* **Branch**: Indicates the currently selected branch (e.g., `main`).
* **Last Saved By**: Shows the username of the person who last saved changes (e.g., "JS").
* **Last Saved At**: Displays the timestamp of the most recent save (e.g., "23 Jan 2025 at 10:11 AM").
* **ID**: A unique identifier for the version, with a copy button for convenience.
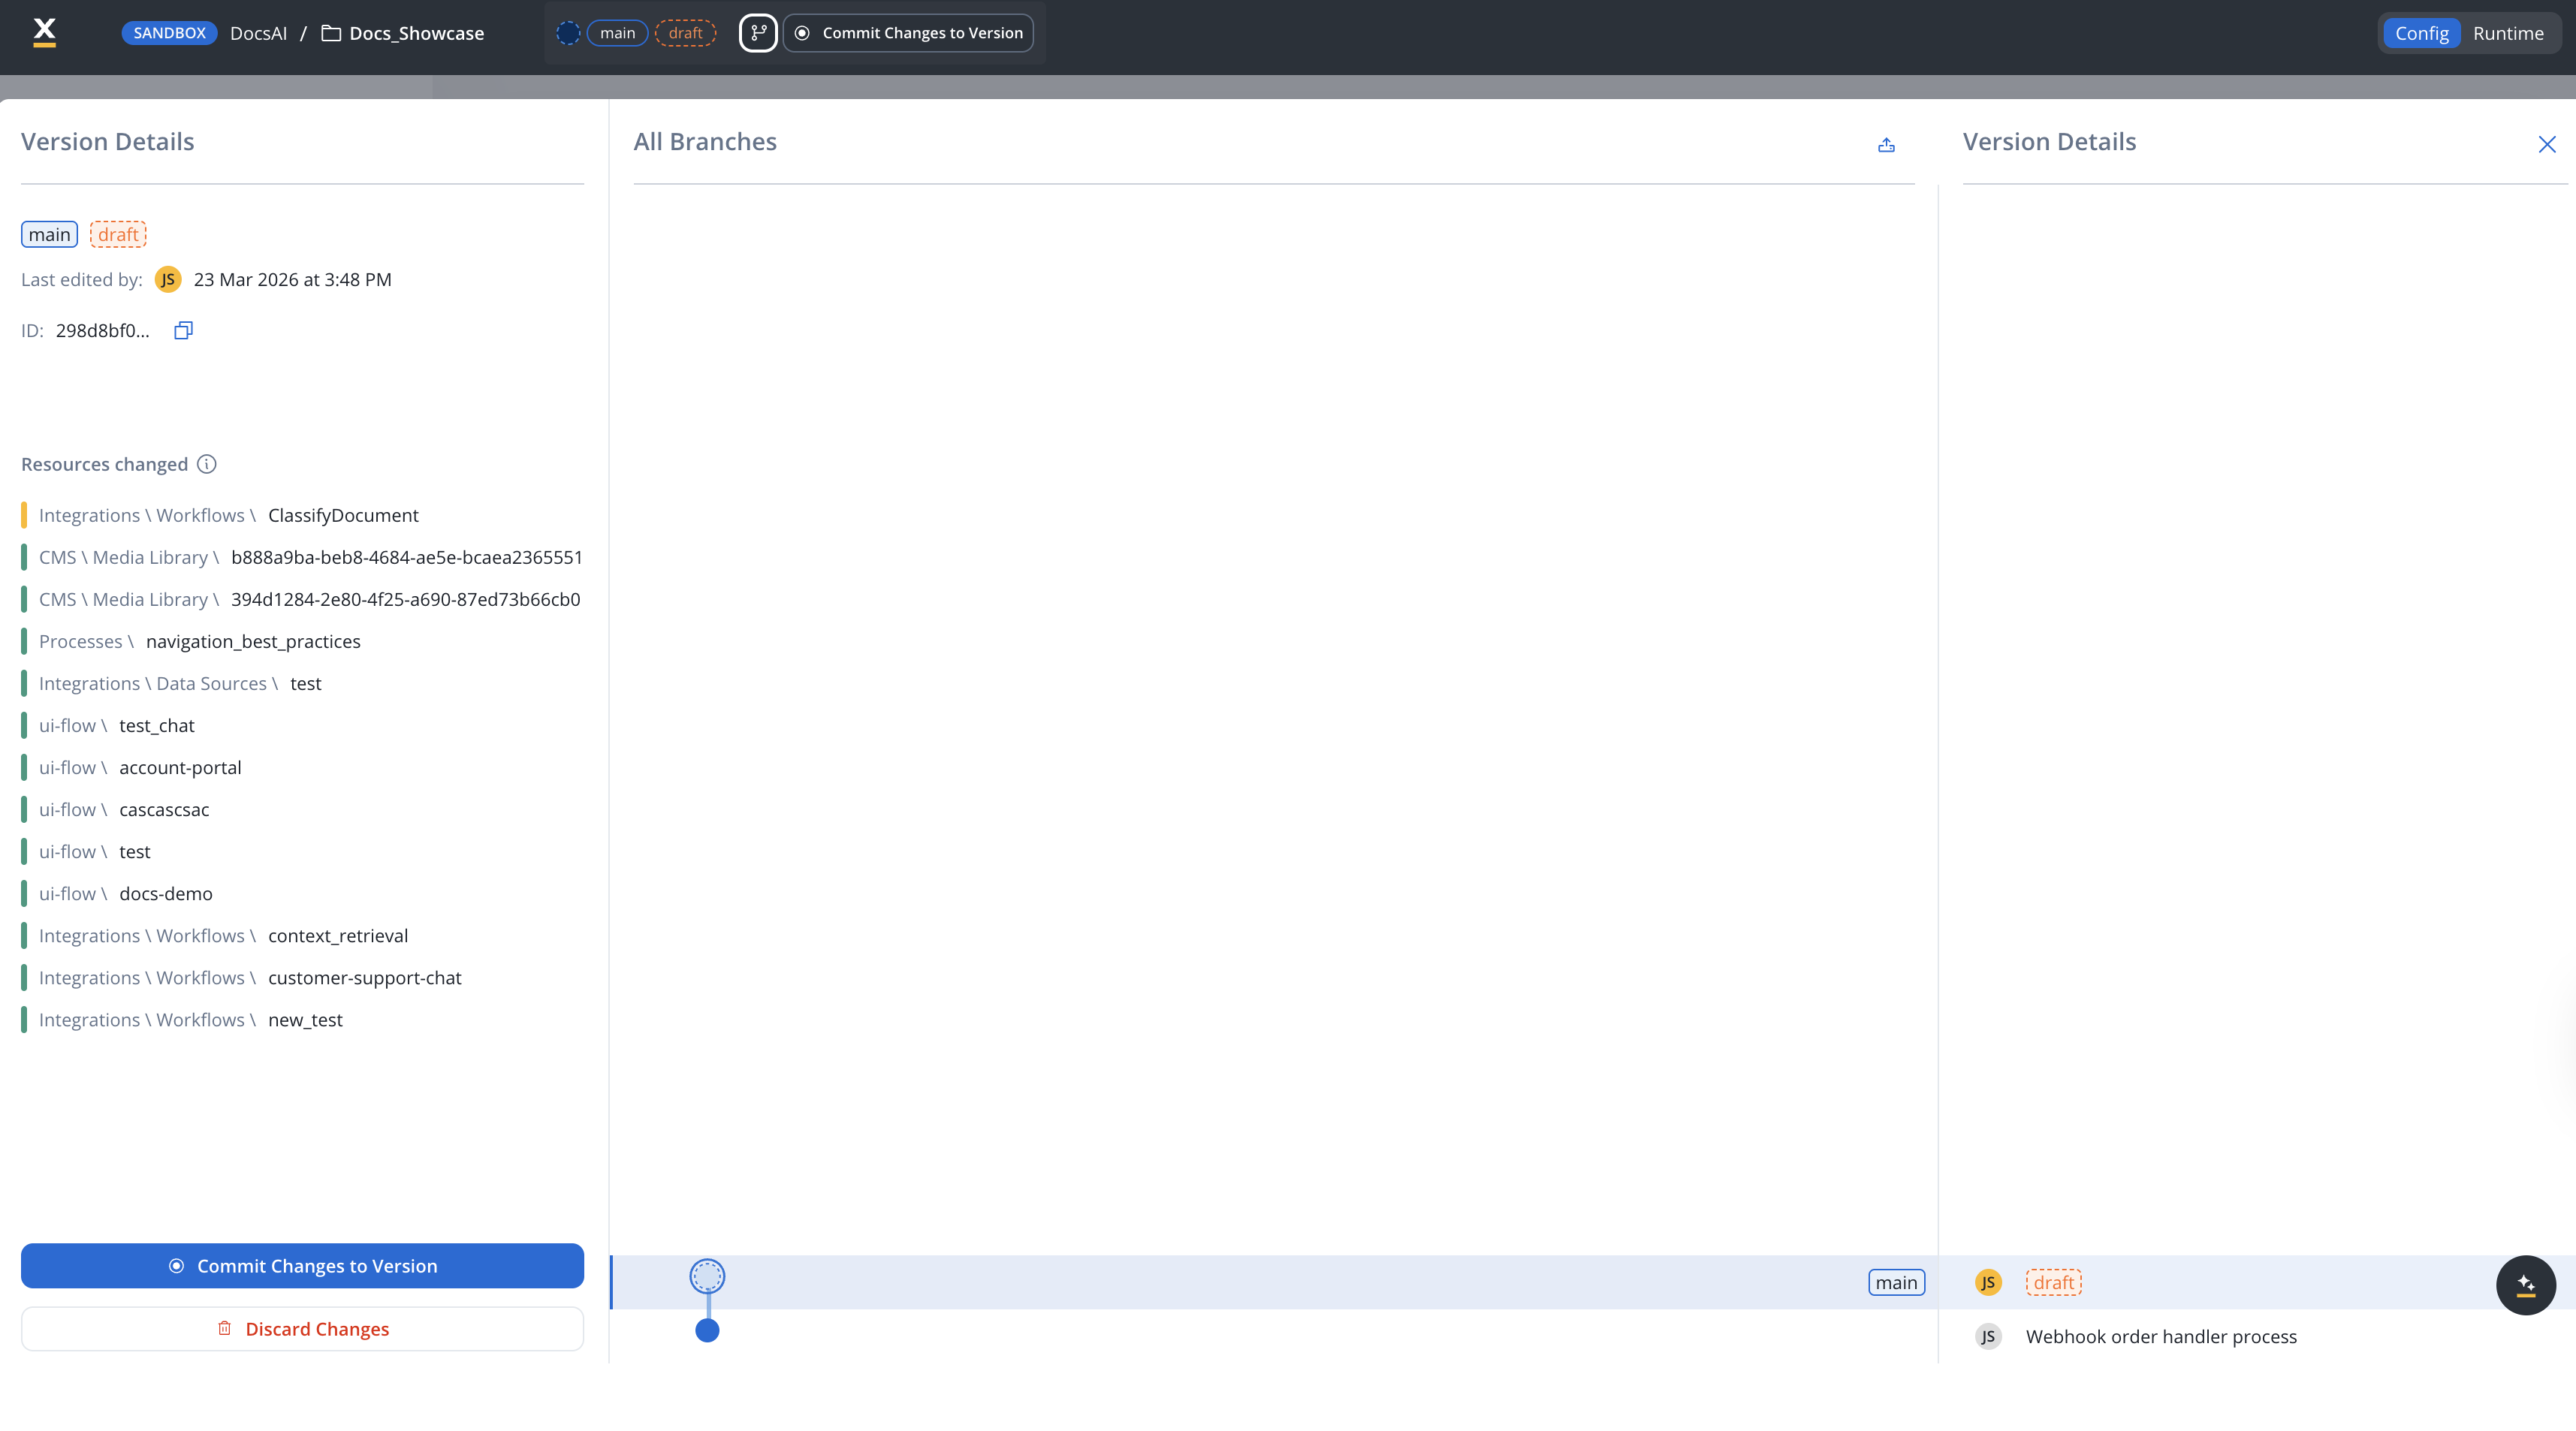
* **Resources Changed**: Displays a summary of modified, added, or deleted resources compared with the previous version (visible only for draft versions with changes).
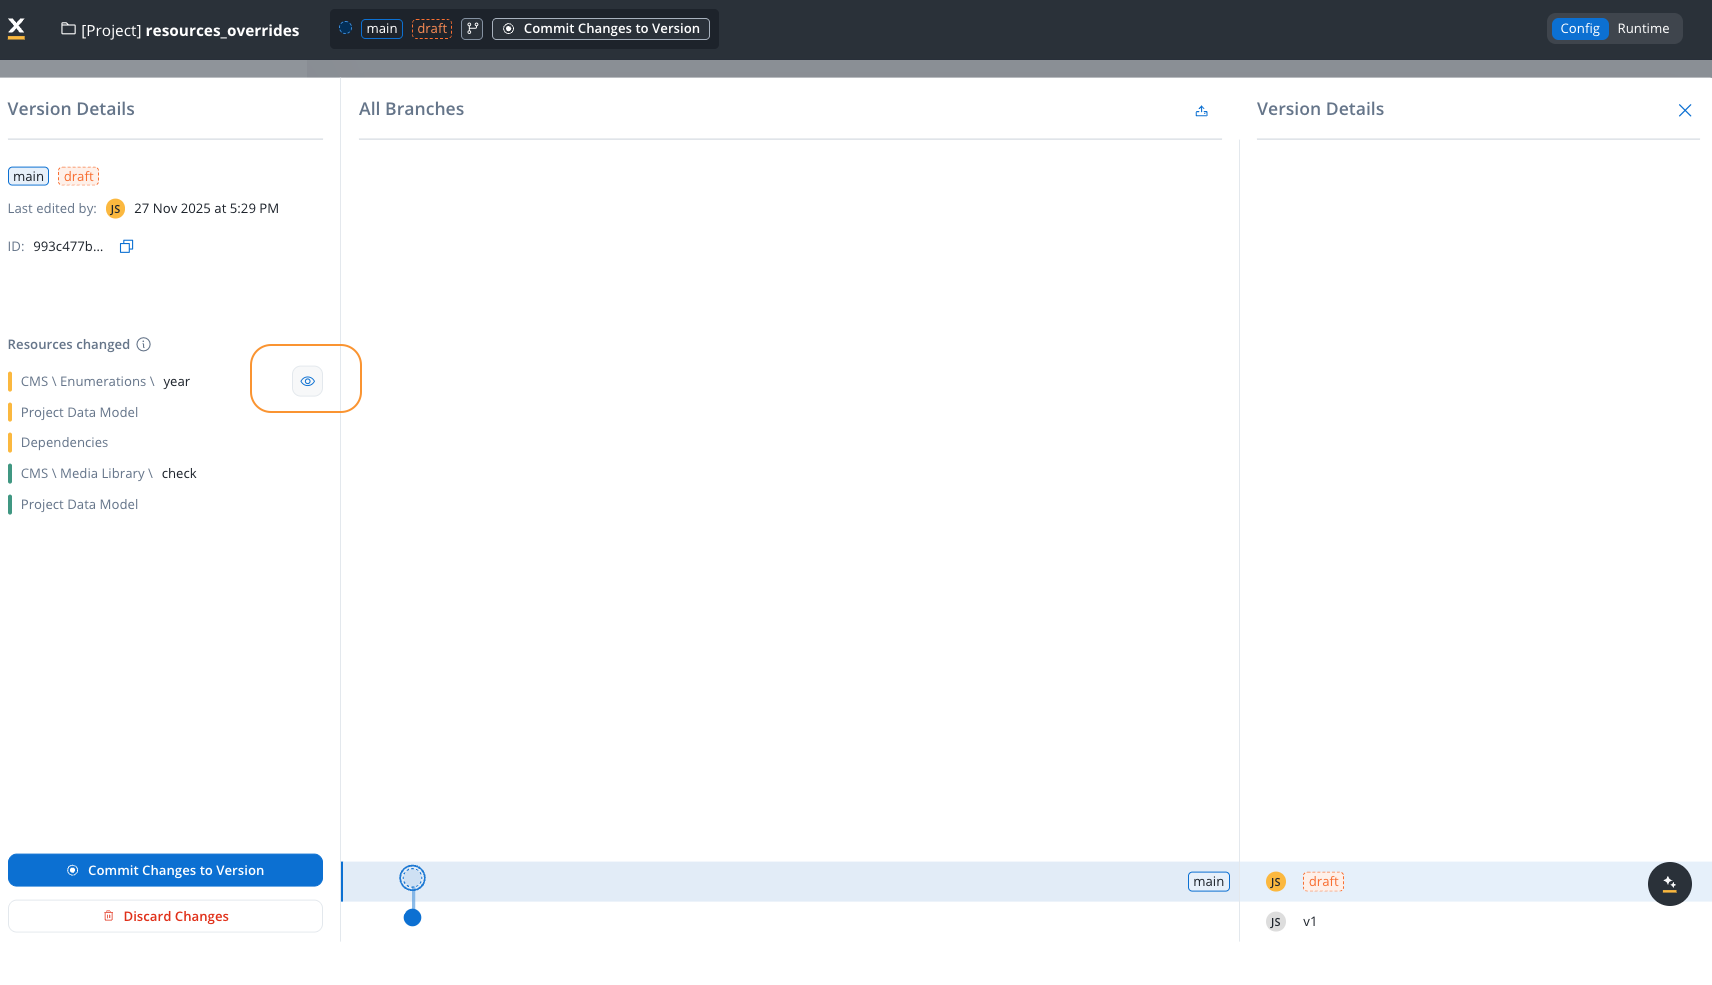
### Resources changed
The **Resources Changed** section provides a clear overview of all modifications made in the current draft version compared to the last committed version. This helps you track exactly what has been modified before committing your changes.
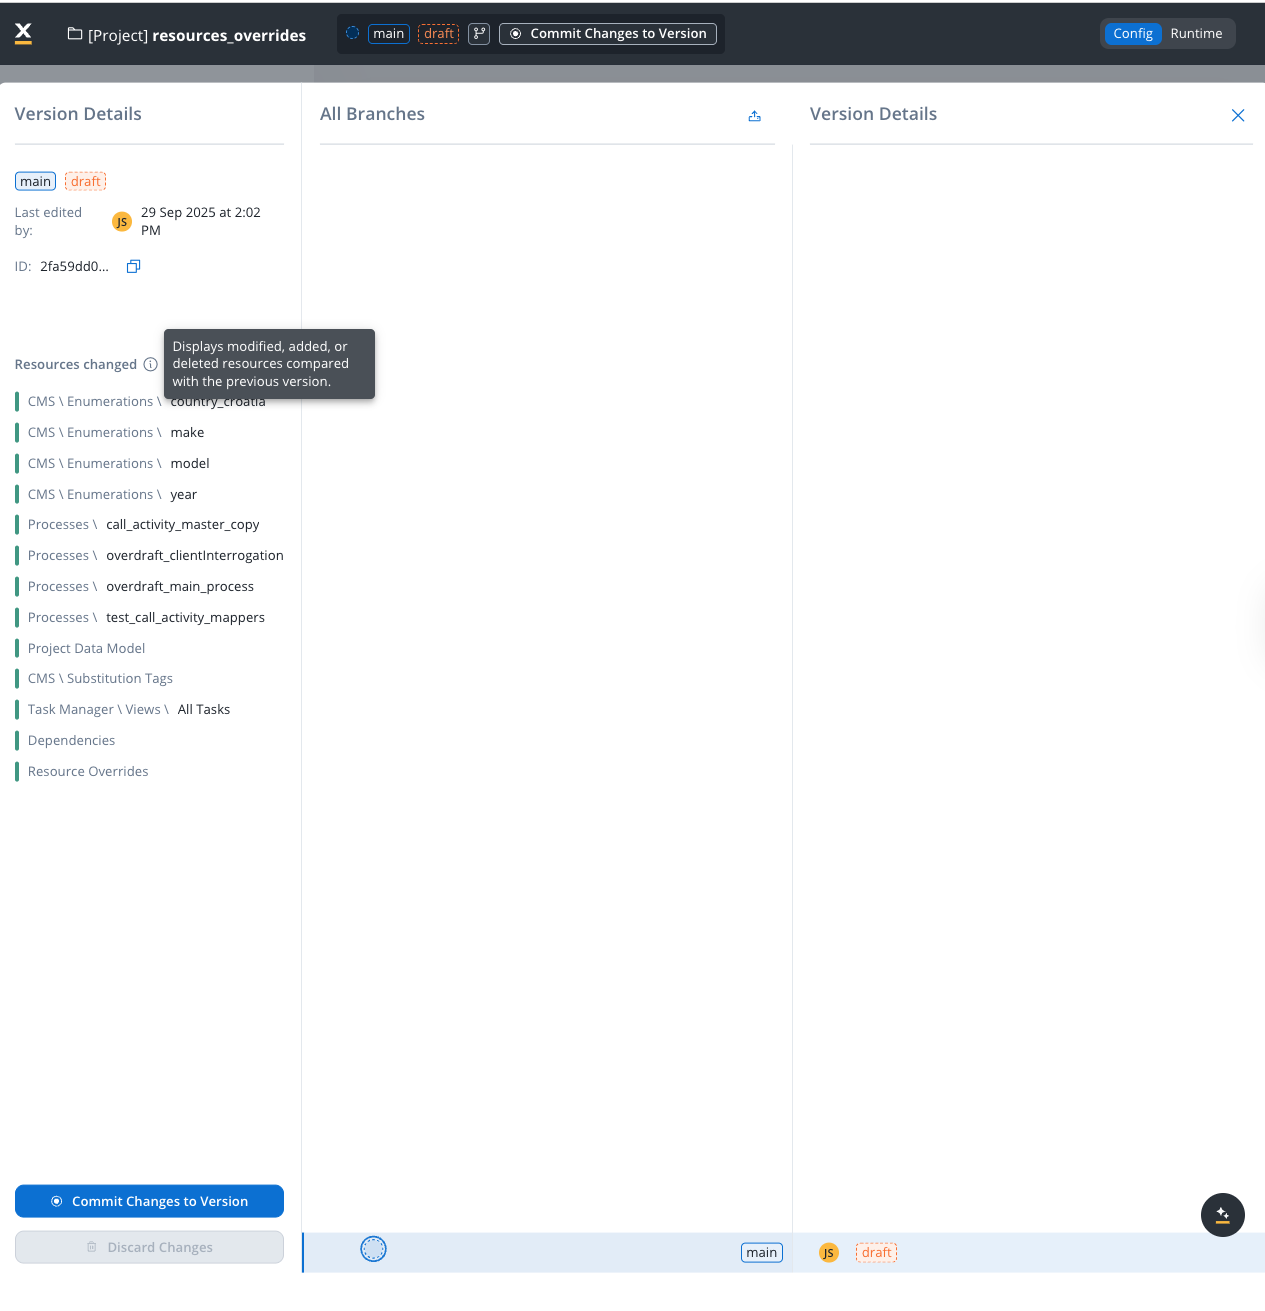
The list groups changes by resource type, including:
* **CMS \ Enumerations**: Modified enumeration values (for example, country lists, dropdown options)
* **Processes**: Changed process definitions
* **Project Data Model**: Updates to the data model structure
* **CMS \ Substitution Tags**: Modified substitution tags
* **CMS \ Media Library**: Added, modified, or deleted media assets
* **Task Manager \ Views**: Changes to task manager view configurations
* **Dependencies**: Updated project dependencies
* **Resource Overrides**: Modified resource override configurations
Each resource is color-coded to indicate the type of change:
| Color | Meaning |
| -------------------------------------------------- | ----------------- |
| **Yellow** | Modified resource |
| **Green** | Added resource |
| **Red** | Deleted resource |
Use the Resources Changed list to review all pending modifications before committing. This ensures you have a complete understanding of what will be included in the commit.
### Compare versions
The **Compare Versions** feature allows you to select two versions and view the differences between them. This is useful for understanding what changes were made between any two points in your project's history.
To compare versions:
1. Select a version in the branch graph
2. Click on the **Compare with current version** button at the bottom of the graph to quickly compare any committed version with the current draft version.
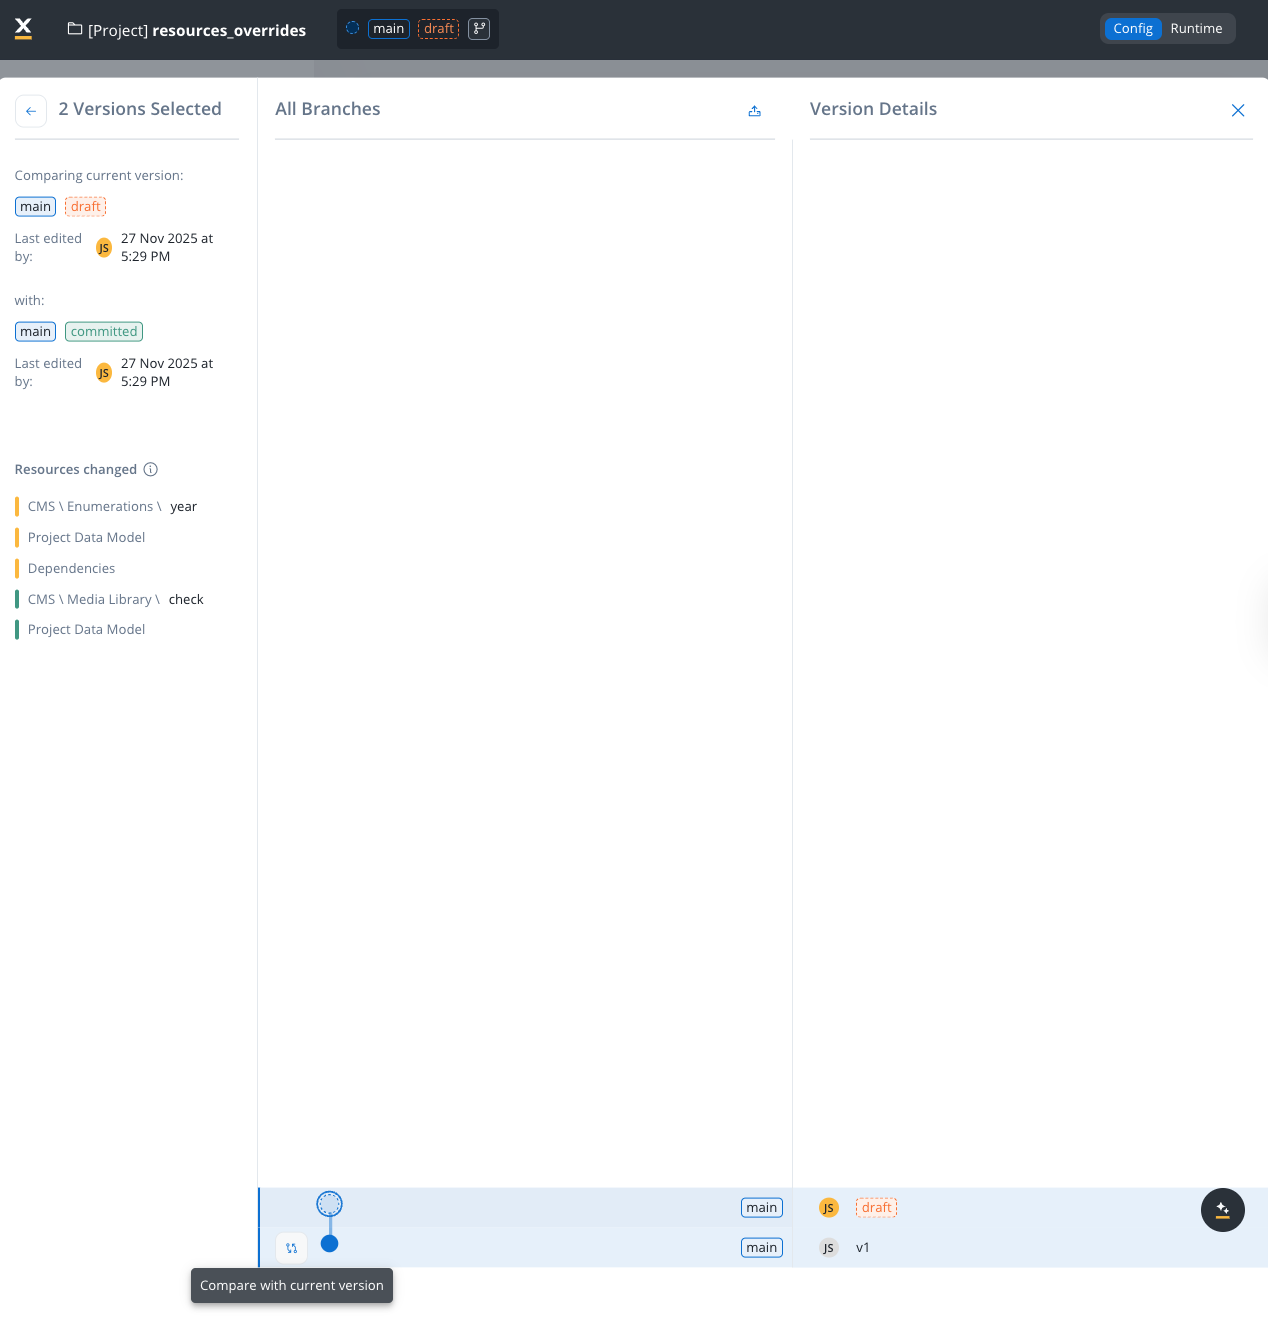
The comparison view displays:
* **Comparing current version**: Shows the first selected version with its branch, state, and last edited timestamp
* **with**: Shows the second selected version being compared against
* **Resources changed**: Lists all resources that differ between the two versions
#### Viewing detailed resource changes
To inspect the specific changes made to a resource, hover over any item in the **Resources changed** list and click the **eye icon** that appears. This opens a detailed comparison modal.
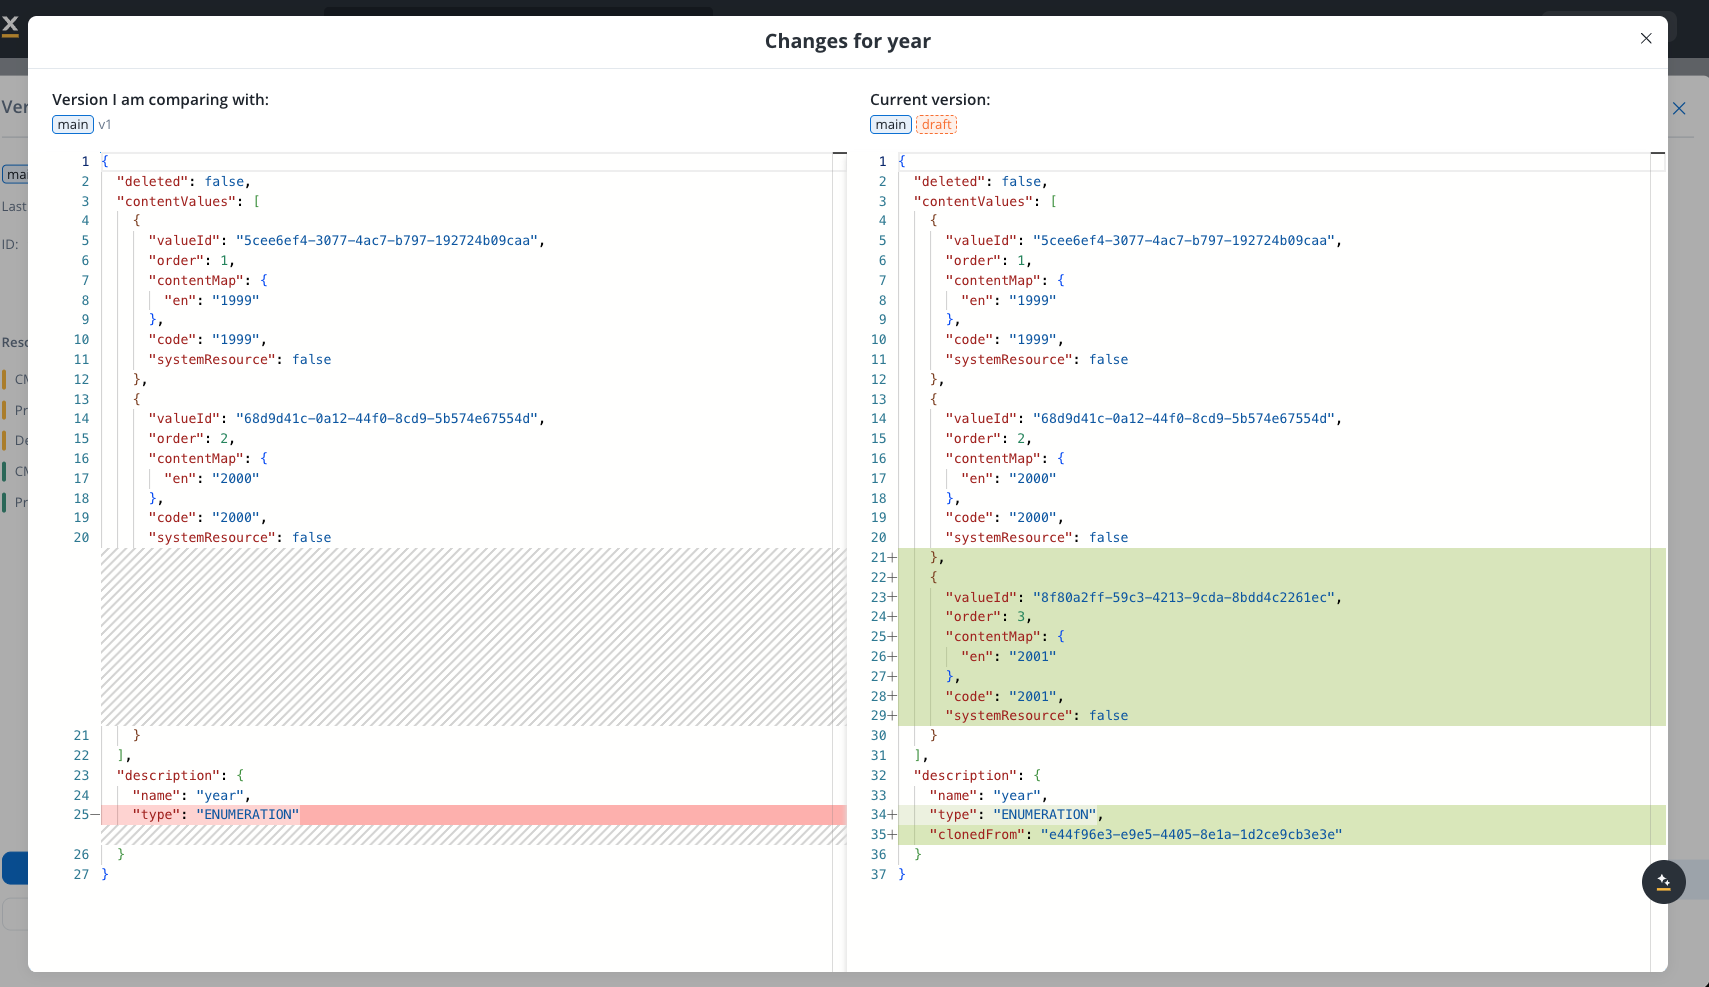
The **Changes** modal provides a side-by-side JSON comparison:
* **Left panel**: Shows the version you are comparing with (the previous/committed version)
* **Right panel**: Shows the current draft version
* **Highlighted lines**: Added or modified content is highlighted in green, making it easy to identify what changed
This feature helps you track changes across multiple commits, review what was modified before a specific release, or understand the evolution of your project over time.
### Resource history
The **Resource History** feature lets you view the version history for a specific resource, showing which project versions included changes to that resource.
To access it, right-click any resource (process, enumeration, substitution tag, media asset, integration, etc.) and select **View History**. This opens the Resource History modal.
The modal displays a table with the following columns:
| Column | Description |
| ------------------ | ----------------------------------------------------------- |
| **Version** | The project version that included a change to this resource |
| **Last edited by** | The user who last modified the resource in that version |
| **Last edited at** | The timestamp of the last modification |
For each version in the list, you can:
* **See changes** — Opens a comparison view showing what changed in this resource between the selected version and the previous one
* **Open version in new tab** — Navigates to the full project version in a new browser tab
Resource history tracks changes at the project version level. Individual resources do not have their own independent version history — they are always versioned as part of the project.
### Branch and commit graph
The graph visually organizes the project’s versioning structure, showing relationships between branches and commits.
* **Graph View**:
* Provides a visual representation of branches and commits.
* **Main Branch** (blue): The main development branch.
* **Secondary Branches** (yellow): Feature or development branches such as `branch3`, `branch4`, and `secondary_branch`.
* **Markers**:
* **Dotted Circles**: Represent draft versions.
* **Solid Circles**: Represent committed versions.
### Commit history
* Displays a chronological list of commit messages for the selected branch.
* **Details**:
* Commit messages (e.g., `v1`, `commit_secondary_branch`) are aligned with their respective branches.
* Each commit shows:
* The user responsible (e.g., "JS").
* The state of the commit (e.g., `draft`, `commited`).
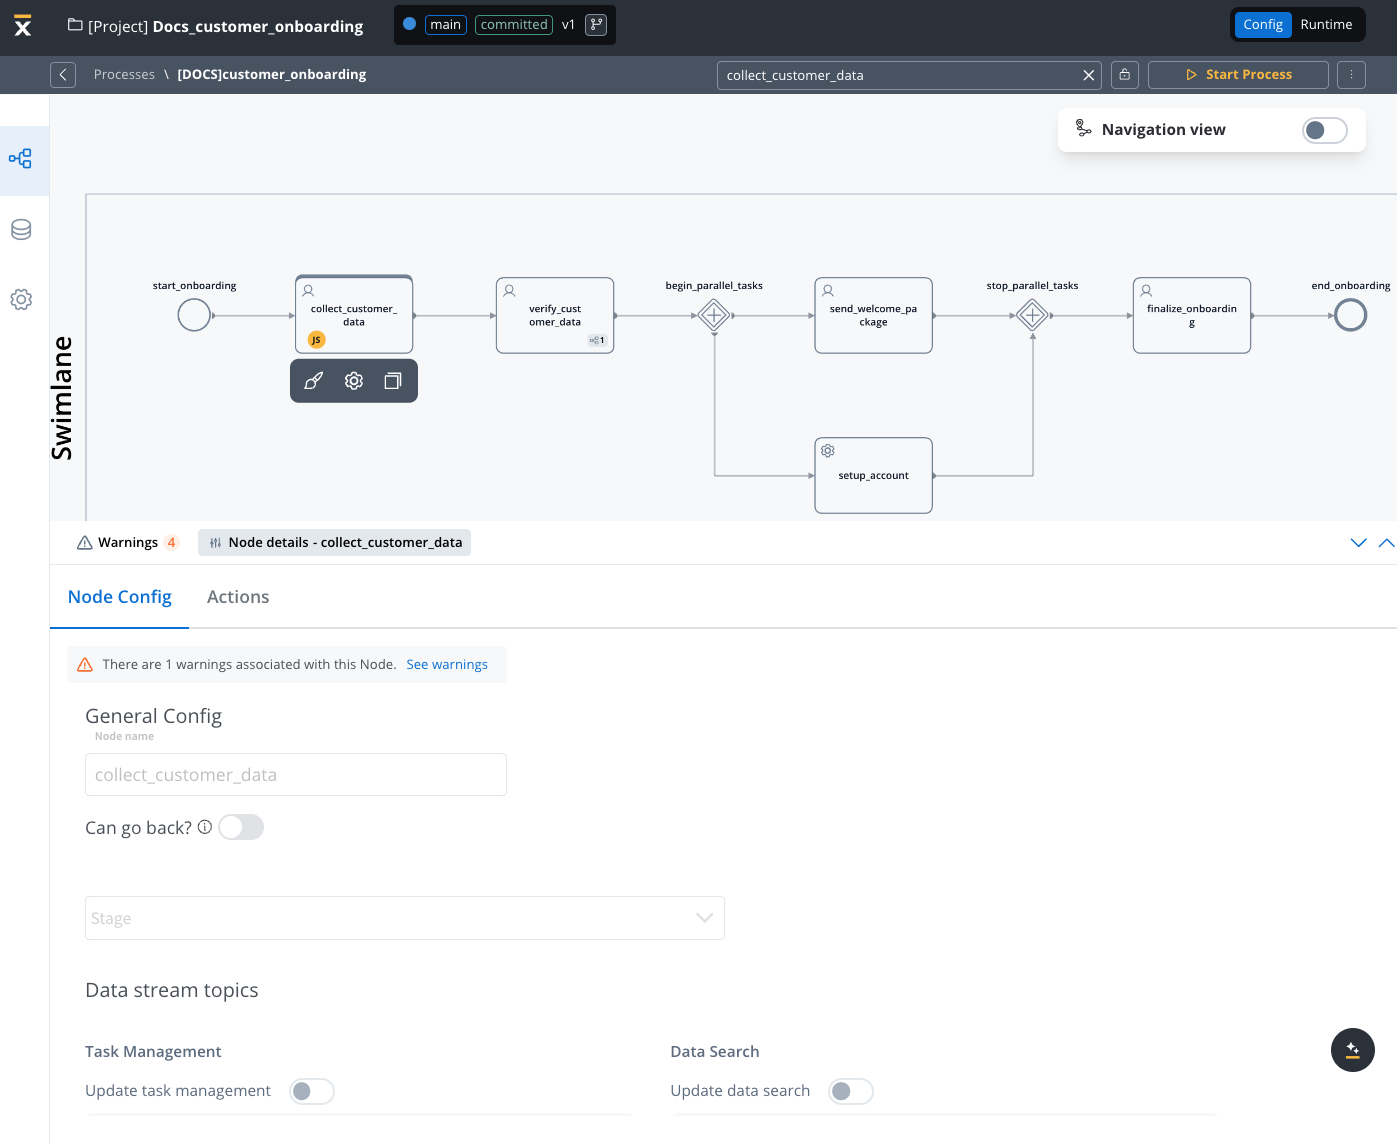
### Top bar: global controls
* **Project Name**: Displays the current project name (`Docs_customer_onboarding`).
* **Branch Selector**: Dropdown to navigate between branches.
* **State Indicator**: Highlights the state of the current branch (e.g., `draft` for `main`).
* **Commit Changes to Version**: Button for committing draft changes globally.
* **Config/Runtime Tabs**:
* **Config**: For managing version configuration.
* **Runtime**: For runtime options or monitoring.
***
## Core versioning operations
The table below summarizes key versioning operations and their functions:
| Operation | Description |
| ------------------- | ---------------------------------------------------------------------------------------- |
| **Create Project** | Creates a project and its initial draft version. |
| **Create Resource** | Adds a new resource in draft status to the current project version. |
| **Edit Resource** | Creates a deep copy of a resource for editing if the original is COMMITTED. |
| **Commit Project** | Updates the statuses of the project, its manifest, and resources to COMMITTED. |
| **Discard draft** | Deletes draft resources and the draft project version. |
| **Start New draft** | Creates a new draft version by copying the last COMMITTED project version. |
| **Create Branch** | Creates a new branch and a corresponding draft project version from the selected commit. |
### Detailed steps for operations
* A new project is created in draft (WIP) state.
* An initial draft project version is automatically generated.
* Adds a resource in draft status to the current project version.
* Updates the project manifest to include:
* **UUID** of the new resource.
* `last_change_time`: Set to the current timestamp.
* `last_committed_time`: Null (since the resource is WIP).
* **Scenario A**: Editing a draft Resource
* No new resource version is created.
* Updates the project manifest:
* `last_change_time`: Current timestamp.
* **Scenario B**: Editing a `COMMITTED` Resource
* A deep copy of the `COMMITTED` resource is created as draft.
* Updates the project manifest:
* Links to the new draft resource.
* `last_change_time`: Current timestamp.
* Commits the current draft project version:
1. **draft Resources**:
* Status: Updated to `COMMITTED`.
* `last_change_time` and `last_committed_time`: Set to the current timestamp.
2. **Project Version**:
* Status: Updated to `COMMITTED`.
* Deletes draft resources and the draft project version.
* Available only when there are changes after the last commit.
* Creates a new draft project version by copying:
* The last `COMMITTED` project version.
* Its manifest, linking to `COMMITTED` resources.
* Creates a new branch and draft project version:
* Copies the selected `COMMITTED` project version.
* Updates the manifest to reference existing `COMMITTED` resources.
***
## Lifecycle of a project version
1. **Create Project**: Automatically starts with a draft (work-in-progress) project version.
2. **Modify Resources**: Draft (WIP) resources can be edited directly, while `COMMITTED` resources are cloned into draft (WIP) before editing.
3. **Commit Changes**: Promotes the project version and its resources to `COMMITTED` status.
4. **Start New WIP**: Allows iterative development by creating a new draft version.
5. **Create Branch**: Enables parallel development with isolated draft versions.
***
## Starting a new draft version
You can initiate a new draft (work-in-progress) version while keeping the committed version intact. A draft version is automatically created under the following circumstances:
* **New Project**: When you create a new project, a corresponding draft version is initiated. This ensures that ongoing changes are tracked separately from the committed version.
* **New Branch Creation**: The creation of a new branch in the system also triggers the creation of a draft version (from a committed version only). This simplifies the process of branching and development, allowing for parallel progress without impacting the main committed version.
* **Manual Draft Version Creation**: You have the flexibility to initiate a new draft version manually. This is particularly useful when building upon the latest version available on a branch.
***
## Advanced features
### Committing changes
You can commit changes exclusively on work-in-progress (WIP) versions. Changes can be committed using the designated action within the version menu. Upon triggering the commit action, a modal window appears, prompting you to provide a commit message.
A string of maximum 50 characters, mandatory for commit. Only letters, numbers, and characters \[] () . \_ - / are allowed.
The placeholder indicating work-in-progress is replaced with a "committed" state within the graph view.
#### Updating commit messages
You have the flexibility to modify commit messages after changes are committed. This can be accomplished using the action available in the version menu.
### Creating a new branch
Using versioning you can work on a stable copy of the project, isolated from ongoing updates by other users. You can create a new branch starting from a specific commit point.
The initiation of new branches is achieved using the dedicated action located in the left menu of the chosen commit point (used as the starting point for the branch).
A string of maximum 16 characters, mandatory for branch creation.
### Merging changes
You can incorporate updates made on a secondary branch into the main branch or another secondary branch. To ensure successful merging of changes, adhere to the following criteria:
* You can merge the latest version from a secondary branch into either its direct or indirect parent branch.
* Upon triggering the merge action, a modal window appears, giving the possibility to make the following selection:
* **Branch**: Displays the branches to which the current branch is a child (direct or indirect).
* **Message**: A string of maximum 50 characters (limited to letters), numbers and the following characters: \[] () . \_ - /.

The graph representation is updated to display the new version on the selected parent branch and the merged version is automatically selected, facilitating further development and tracking.
### Managing conflicts
The Conflict Resolution and Version Comparison feature provides a mechanism to identify and address conflicts between two process versions that, if merged, could potentially disrupt the integrity of a project.
The system displays both the version to be merged and the current version on a single screen, providing a clear visual representation of the differences. Conflicts and variations between the two versions are highlighted, enabling users to readily identify areas requiring attention.
Unless specified otherwise, changes from the source branch will be prioritized.
Not all changes are considered conflicts, changes in node positions are not treated as conflicts. Primary causes lie in identifying differences within business rules, expressions, and other scripts.
#### Merging without conflicts
Easily merge secondary branches into the main branch or other branches when no conflicts are detected. The updated merge modal includes:
* A clean interface for branch selection.
* A mandatory, validated commit message field (max 50 characters).
* Real-time feedback for successful merges and updates to the branching graph.
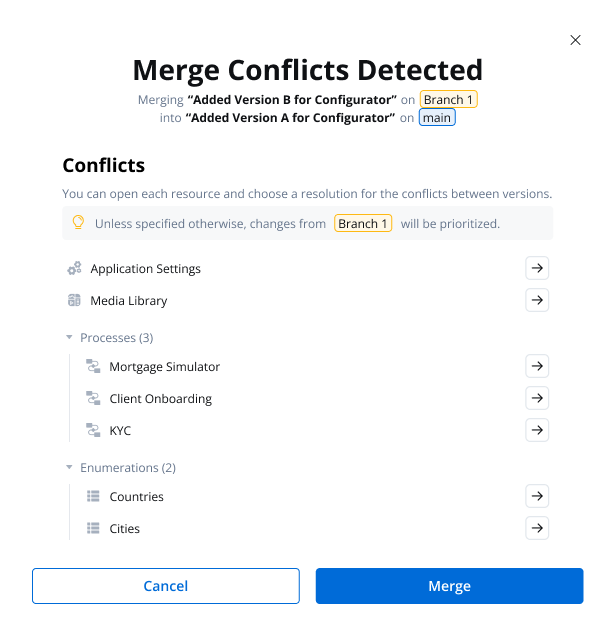
#### Advanced conflict detection
The new **Conflicts Detected Modal** provides a detailed overview of conflicting changes, with features such as:
* Clear grouping by resource type (e.g., Processes, Enumerations, Media Library).
* Scrollable lists and clickable entries to resolve conflicts efficiently.
* A comprehensive comparison of source and target branch differences for context.
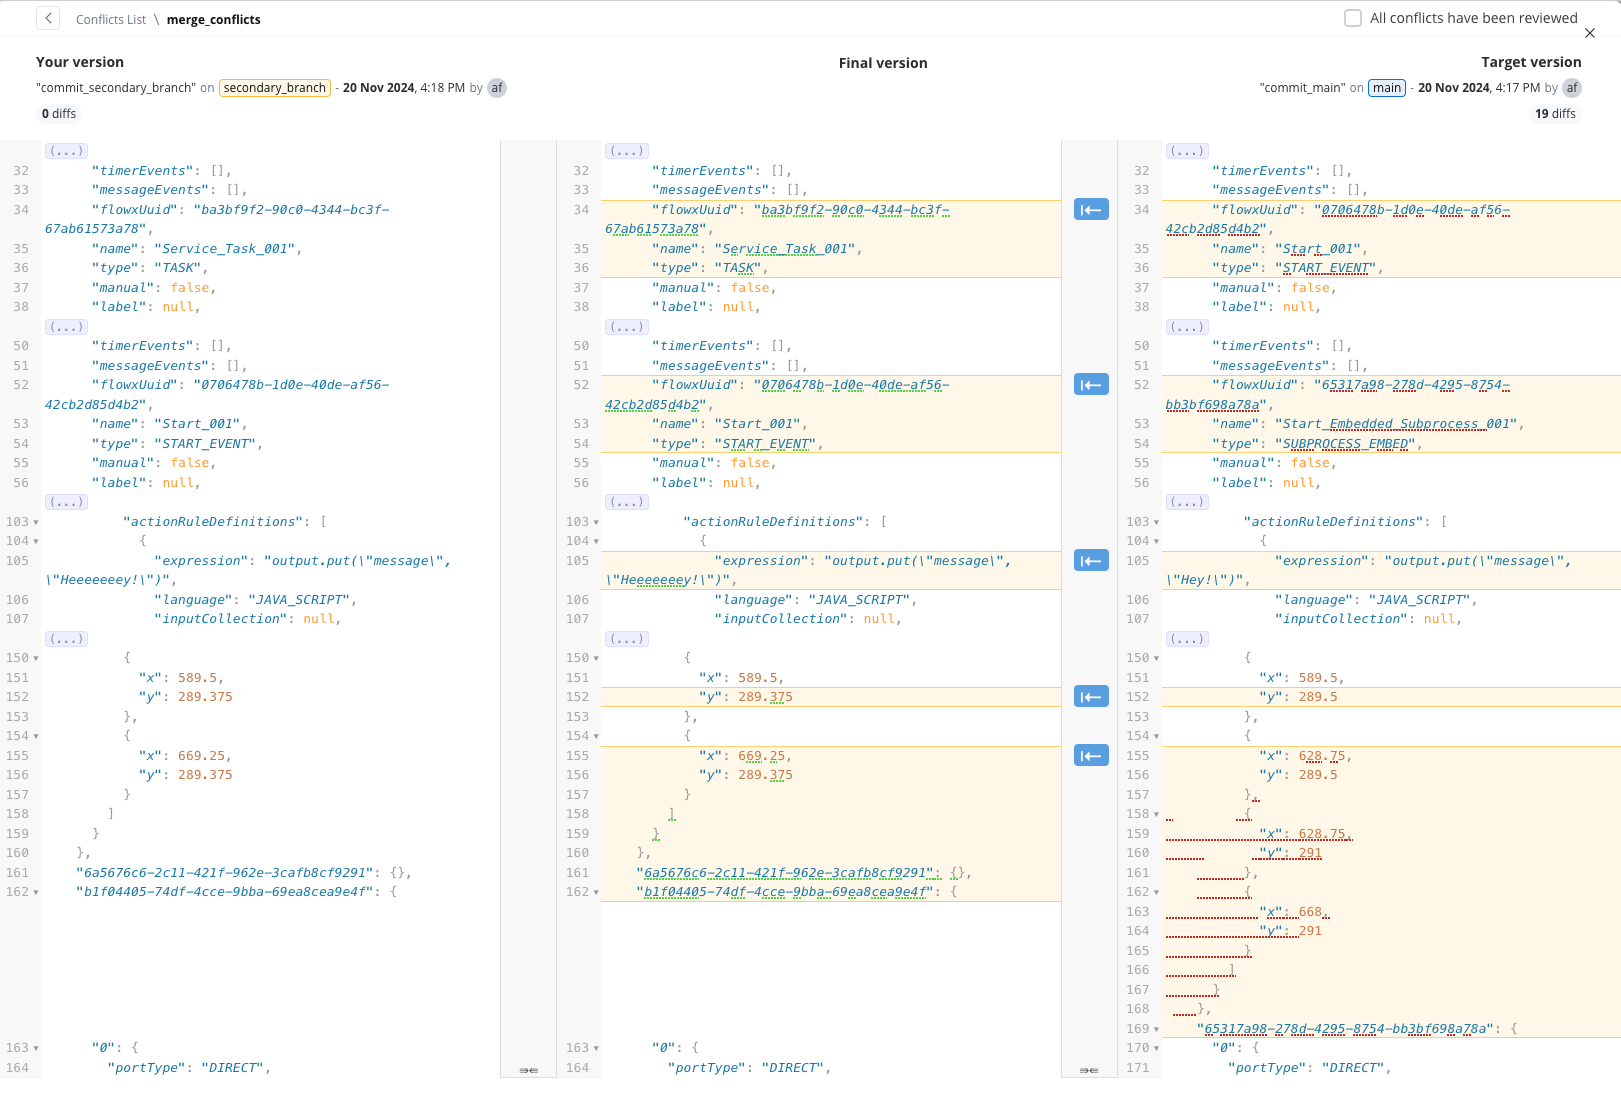
#### Resource-level conflict resolution
Resolve conflicts directly at the resource level with an intuitive interface:
* **JSON Comparisons:** Visualize differences with color-coded highlights (source: yellow, target: blue).
* **Navigation Support:** Quickly jump between differences for efficient resolution.
* **Progress Tracking:** Mark resources as “Reviewed” or “Seen” to monitor resolution progress.

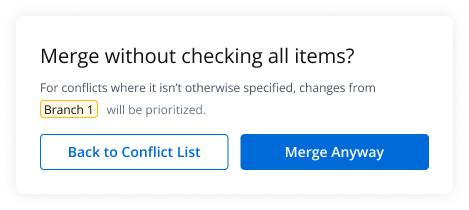
#### Flexible merge overrides
Handle unresolved conflicts with the **Merge Anyway** option, which provides flexibility while maintaining control over outcomes:
* A confirmation modal explains how unresolved conflicts will be handled (e.g., prioritizing source branch changes).
* Allows merging to continue even when some conflicts remain unresolved.
### Read-only state
The Read-Only State feature allows you to access and view committed versions of your projects while safeguarding the configuration from unintended modifications. By recognizing the visual indicators of the read-only state, you can confidently work within a controlled environment, ensuring the integrity of project's process definitions.
***
## Builds
A **build** is a deployable snapshot of a committed project version, packaged and prepared for deployment to a runtime environment. Builds enable you to create immutable, versioned packages that can be deployed consistently across different environments.
You can create multiple versions of a project before creating a build. You can create a build for any committed project version. Once created, a build cannot be edited—you'll need to create a new project version and generate a new build to incorporate changes.
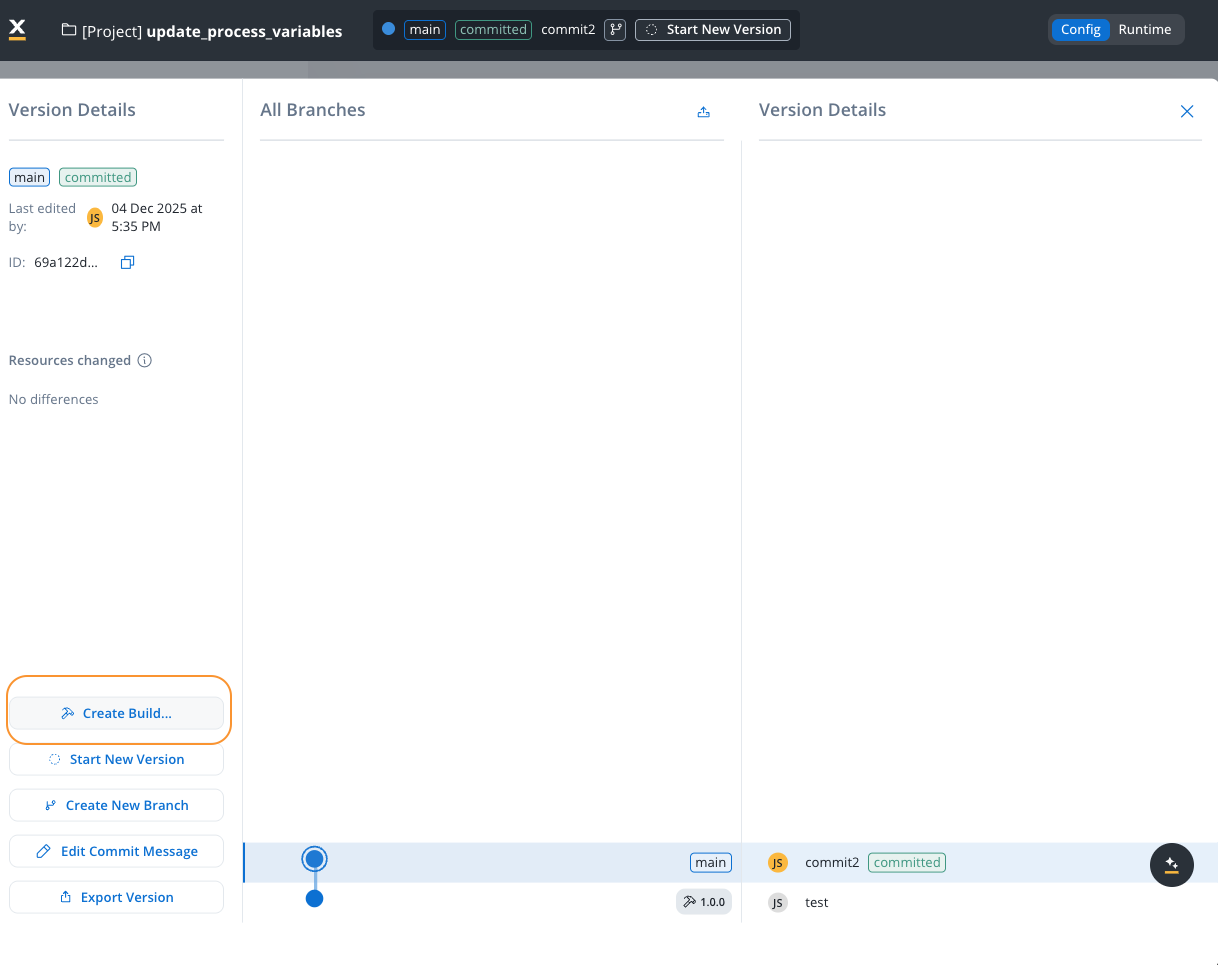
### Creating a build
To create a build from a committed project version:
Access the version details panel for the committed version you want to build. You can only create builds from committed versions, not from draft (WIP) versions.
Click the **Create Build...** button in the version details panel. This opens the build creation modal.
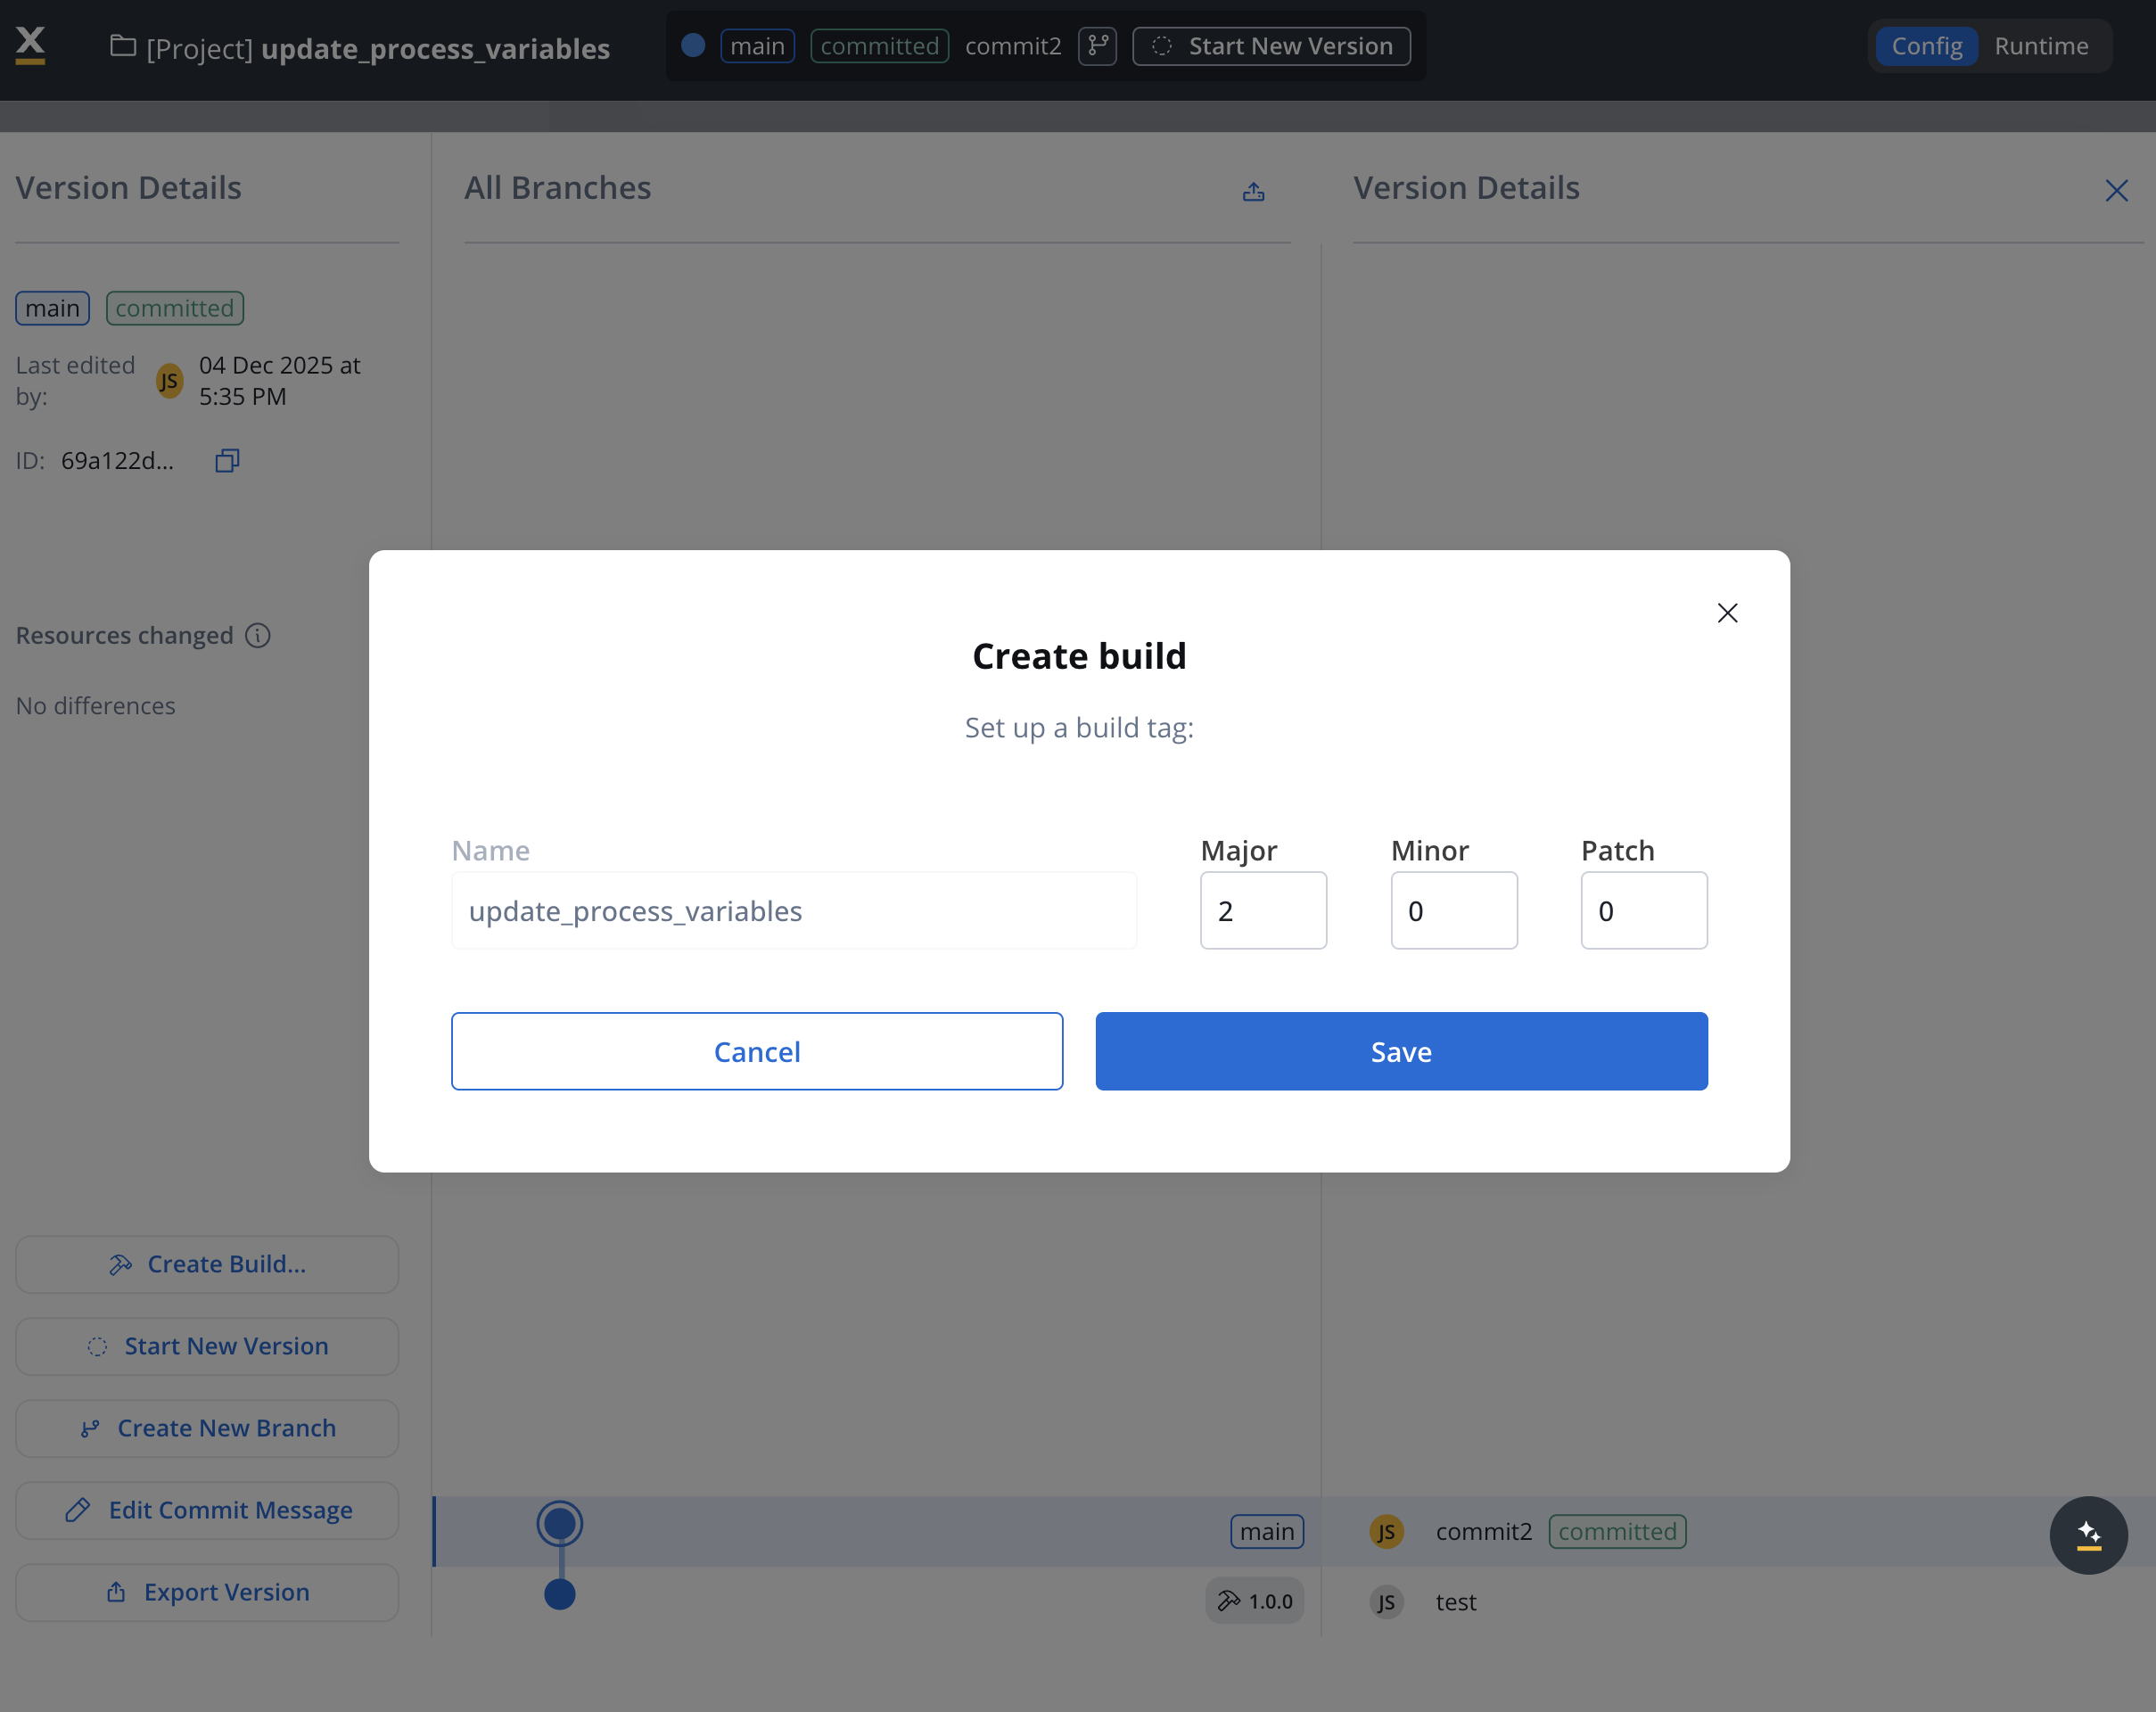
In the **Create build** modal, configure the following settings:
* **Name**: The build name (defaults to the project name). This helps identify the build in the builds list.
* **Build Tag Version**: Set the semantic version for this build:
* **Major**: Major version number (e.g., `1`)
* **Minor**: Minor version number (e.g., `0`)
* **Patch**: Patch version number (e.g., `0`)
The build tag follows semantic versioning format (e.g., `1.0.0`) and helps track different builds of the same project version.
Click **Save** to create the build. The build is now available in the Builds section and can be deployed to runtime environments.
### Managing builds
The **Builds** section provides a centralized interface for viewing and managing all builds for your project.
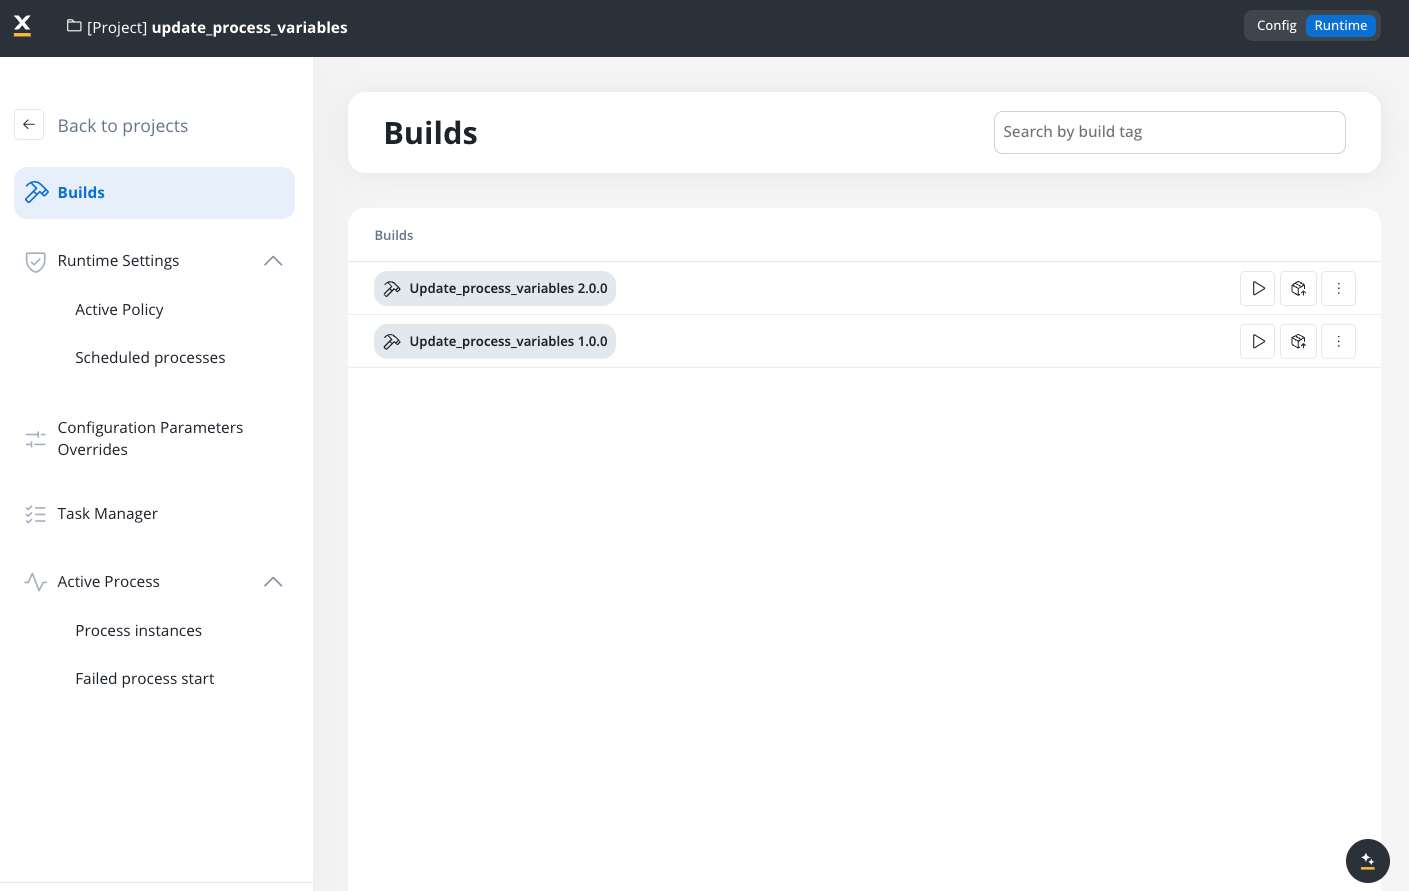
#### Builds list
The builds list displays all builds created for the project, showing:
* **Build name and version**: Displays the build name and tag version (e.g., `Update_process_variables 1.0.0`)
* **Build actions**: Each build entry provides quick access to:
* **Play/Run**:
* Test build
* Test endpoint
* Test workflow
* Test operation
* **Export**:
* Export the build
* **More options**: Additional actions via the context menu
* View contents
* Workflow test instances
* Audit log
* Apply indexes
#### Searching builds
Use the **Search by build tag** field to quickly find specific builds by their version tag or name.
### Exporting versions
You can export project versions for backup, migration, or sharing across environments. The export process includes an option to include binary files.
Navigate to the version details panel and select the version you want to export.
Click the **Export Version** button in the version details panel.
When exporting, a modal appears asking whether to include binary files:
* **Include**: Includes binary files (e.g., images, documents) in the export. This may increase the export size and import time.
* **Don't include**: Exports only the project structure and configurations without binary files.
Including binary files may significantly increase the export file size and the time required to import the version in another environment.
Click **Continue** to proceed with the export. The exported file can be imported into other environments or workspaces.
For detailed information about importing exported versions and builds, see the [Export/Import documentation](../../flowx-designer/managing-a-project-flow/export-import-a-process-definition).
### Build immutability
Once a build is created, it becomes immutable—you cannot modify its contents. This ensures:
* **Consistency**: The same build behaves identically across all environments
* **Traceability**: You can always identify exactly which project version is running
* **Stability**: Prevents accidental changes that could affect production systems
To incorporate changes into a build:
1. Make your changes in the project (creating a new draft version)
2. Commit the changes to create a new project version
3. Create a new build from the updated committed version
***
## Audit view
The "Open Audit View" provides you with a detailed audit log of actions related to work-in-progress (WIP) versions of a process. The primary goal is to ensure transparency and accountability for actions taken before the commit or save process.
You can quickly access and review the history of WIP versions, facilitating efficient decision-making and collaboration.