> ## Documentation Index
> Fetch the complete documentation index at: https://docs.flowx.ai/llms.txt
> Use this file to discover all available pages before exploring further.
# Overview
> Integrations connect legacy systems, third-party applications, and external data sources to the FlowX Engine through two complementary approaches.
FlowX.AI supports two integration approaches, each suited to different scenarios:
* **Integration Designer** — a visual, low-code environment for building integration workflows and connecting to data sources such as REST APIs, databases, MCP servers, and knowledge bases. Suitable for most integration scenarios without requiring custom code.
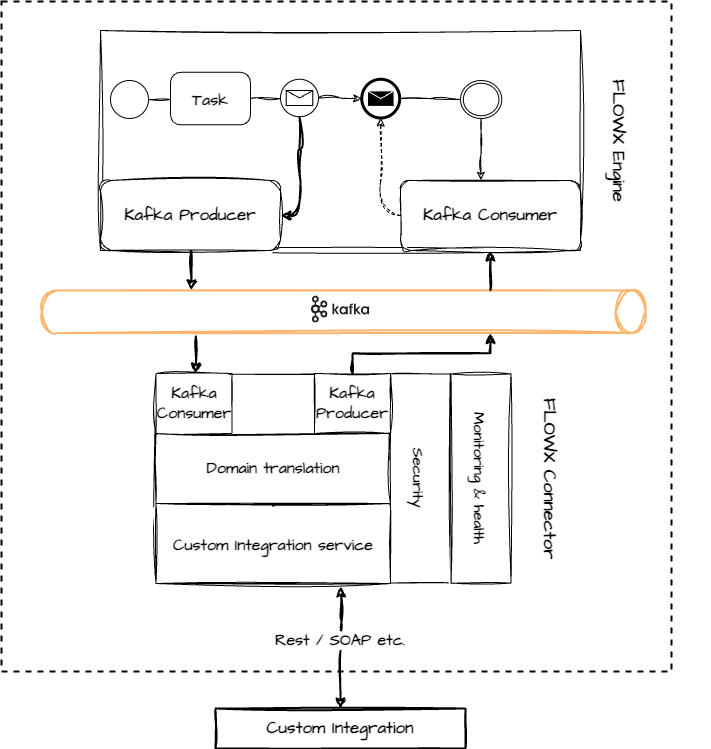
* **Custom integrations** — Kafka-based microservices (Connectors) you develop and deploy when working with legacy systems, RPAs, or custom file exchange solutions that require bespoke logic.
The sections below focus on custom (Kafka-based) integrations. For Integration Designer, see the [Integration Designer](./integration-designer) guide.
***

#### High-level architecture
## Developing a custom integration
Developing custom integrations for the FlowX.AI platform is a straightforward process. You can use your preferred technology to write the necessary custom code, with the requirement that it can send and receive messages from the **Kafka** cluster.
#### Steps to create a custom integration
Follow these steps to create a custom integration:
1. Develop a microservice, referred to as a "Connector," using your preferred tech stack. The Connector should listen for Kafka events, process the received data, interact with legacy systems if required, and send the data back to Kafka.
2. Configure the [process definition](../../building-blocks/process/process-definition) by adding a [message](../../building-blocks/node/message-send-received-task-node) send action in one of the [nodes](../../building-blocks/node/node). This action sends the required data to the Connector.
3. Once the custom integration's response is ready, send it back to the FlowX.AI Engine. Keep in mind that the process will wait in a receive message node until the response is received.
For Java-based Connector microservices, you can use the following startup code as a quickstart guide:
## Managing an integration
#### Managing Kafka topics
It's essential to configure the engine to consume events from topics that follow a predefined naming pattern. The naming pattern is defined using a topic prefix and suffix, such as "*ai.flowx.dev.engine.receive*."
We recommend the following naming convention for your topics:
```yaml theme={"system"}
topic:
naming:
package: "ai.flowx."
environment: ""
version: ".v1"
prefix: ${kafka.topic.naming.package}${kafka.topic.naming.environment}
suffix: ${kafka.topic.naming.version}
engineReceivePattern: engine.receive
pattern: ${kafka.topic.naming.prefix}${kafka.topic.naming.engineReceivePattern}*
```
## Integration types
FlowX.AI supports multiple integration approaches to connect with external systems and data sources:
### Integration Designer
The Integration Designer provides a visual interface for managing data sources and building integration workflows without extensive coding.
Connect to external REST APIs for data exchange and system integration
Store and retrieve data using the FlowX internal database
Connect to Model Context Protocol servers to enable AI agents to use external tools
Create contextual knowledge repositories for AI agents to query
Start process instances automatically when emails arrive in a monitored mailbox
Send emails and reply to received emails directly from process nodes via SMTP
Trigger processes from external HTTP POST requests with API key authentication
Connect to Outlook via MS Graph API for reading and sending emails
Move files in and out of external FTP, SFTP, S3, or Azure Blob storage
### Custom integrations
For more complex scenarios or when working with legacy systems, you can develop custom integrations using Kafka messaging.