> ## Documentation Index
> Fetch the complete documentation index at: https://docs.flowx.ai/llms.txt
> Use this file to discover all available pages before exploring further.
# Integration Designer
> Connect FlowX to external systems via REST APIs using a drag-and-drop interface for data models, workflows, and endpoints.
Unlike [Postman](https://www.postman.com/), which focuses on API testing, the Integration Designer automates workflows between systems. With drag-and-drop ease, it handles REST API connections, real-time processes, and error management, making integrations scalable and maintainable.
## Overview
Integration Designer facilitates the integration of the FlowX platform with external systems, applications, and data sources.
Integration Designer supports multiple data source types including RESTful Systems, FlowX Database, MCP Integration, Knowledge Base, Email Trigger, Email Sender, and Microsoft Outlook.
Integration resources (data sources, workflows, systems) are versioned as part of your project version, not individually. Changes are tracked in the project's [**Resources Changed**](/5.9/docs/projects/managing-applications/versioning#resources-changed) view. To view the change history for a specific integration resource, right-click it and select **View History**.
***
## Key features
You can build complex API workflows using a drag-and-drop interface, making it accessible for both technical and non-technical audience.
Specifically tailored for creating and managing REST API calls through a visual interface, streamlining the integration process without the need for extensive coding.
Allows for immediate testing and validation of REST API calls within the design interface.
***
## Managing integration endpoints
### Data Sources
A data source is a collection of resources—endpoints, authentication, and variables—used to define and run integration workflows.
### Creating a new data source definition
With **Data Sources** feature you can create, update, and organize endpoints used in API integrations. These endpoints are integral to building workflows within the Integration Designer, offering flexibility and ease of use for managing connections between systems. Endpoints can be configured, tested, and reused across multiple workflows, streamlining the integration process.
Go to the **Data Sources** section in FlowX Designer at **Workspaces** -> **Your workspace** -> **Projects** -> **Your project** -> **Integrations** -> **Data Sources**.
The data sources resource page uses a tile-based creation flow and a unified details view.
* **Creation modal**: clicking **New Data Source** opens a modal where each connector type appears as its own tile with an icon. Use the search box to filter tiles by name. Pick a tile, give the data source a name, and click **Create** to open the configuration page.
* **List view**: each entry shows the connector's icon and type. Use the type filter at the top to scope the list to a specific connector (REST, FlowX Database, Email, MCP Server, Knowledge Base, etc.).
* **Unified settings layout**: every data source type now uses the same card-based settings layout, so the configuration experience is consistent across connectors.
* **Save with incomplete configuration**: you can create and save a data source even when some fields (credentials, endpoints) are not yet available. The data source can be referenced in workflows and processes immediately, but it will only operate at runtime once required fields are filled in.
### Data sources types
There are multiple types of data sources available:
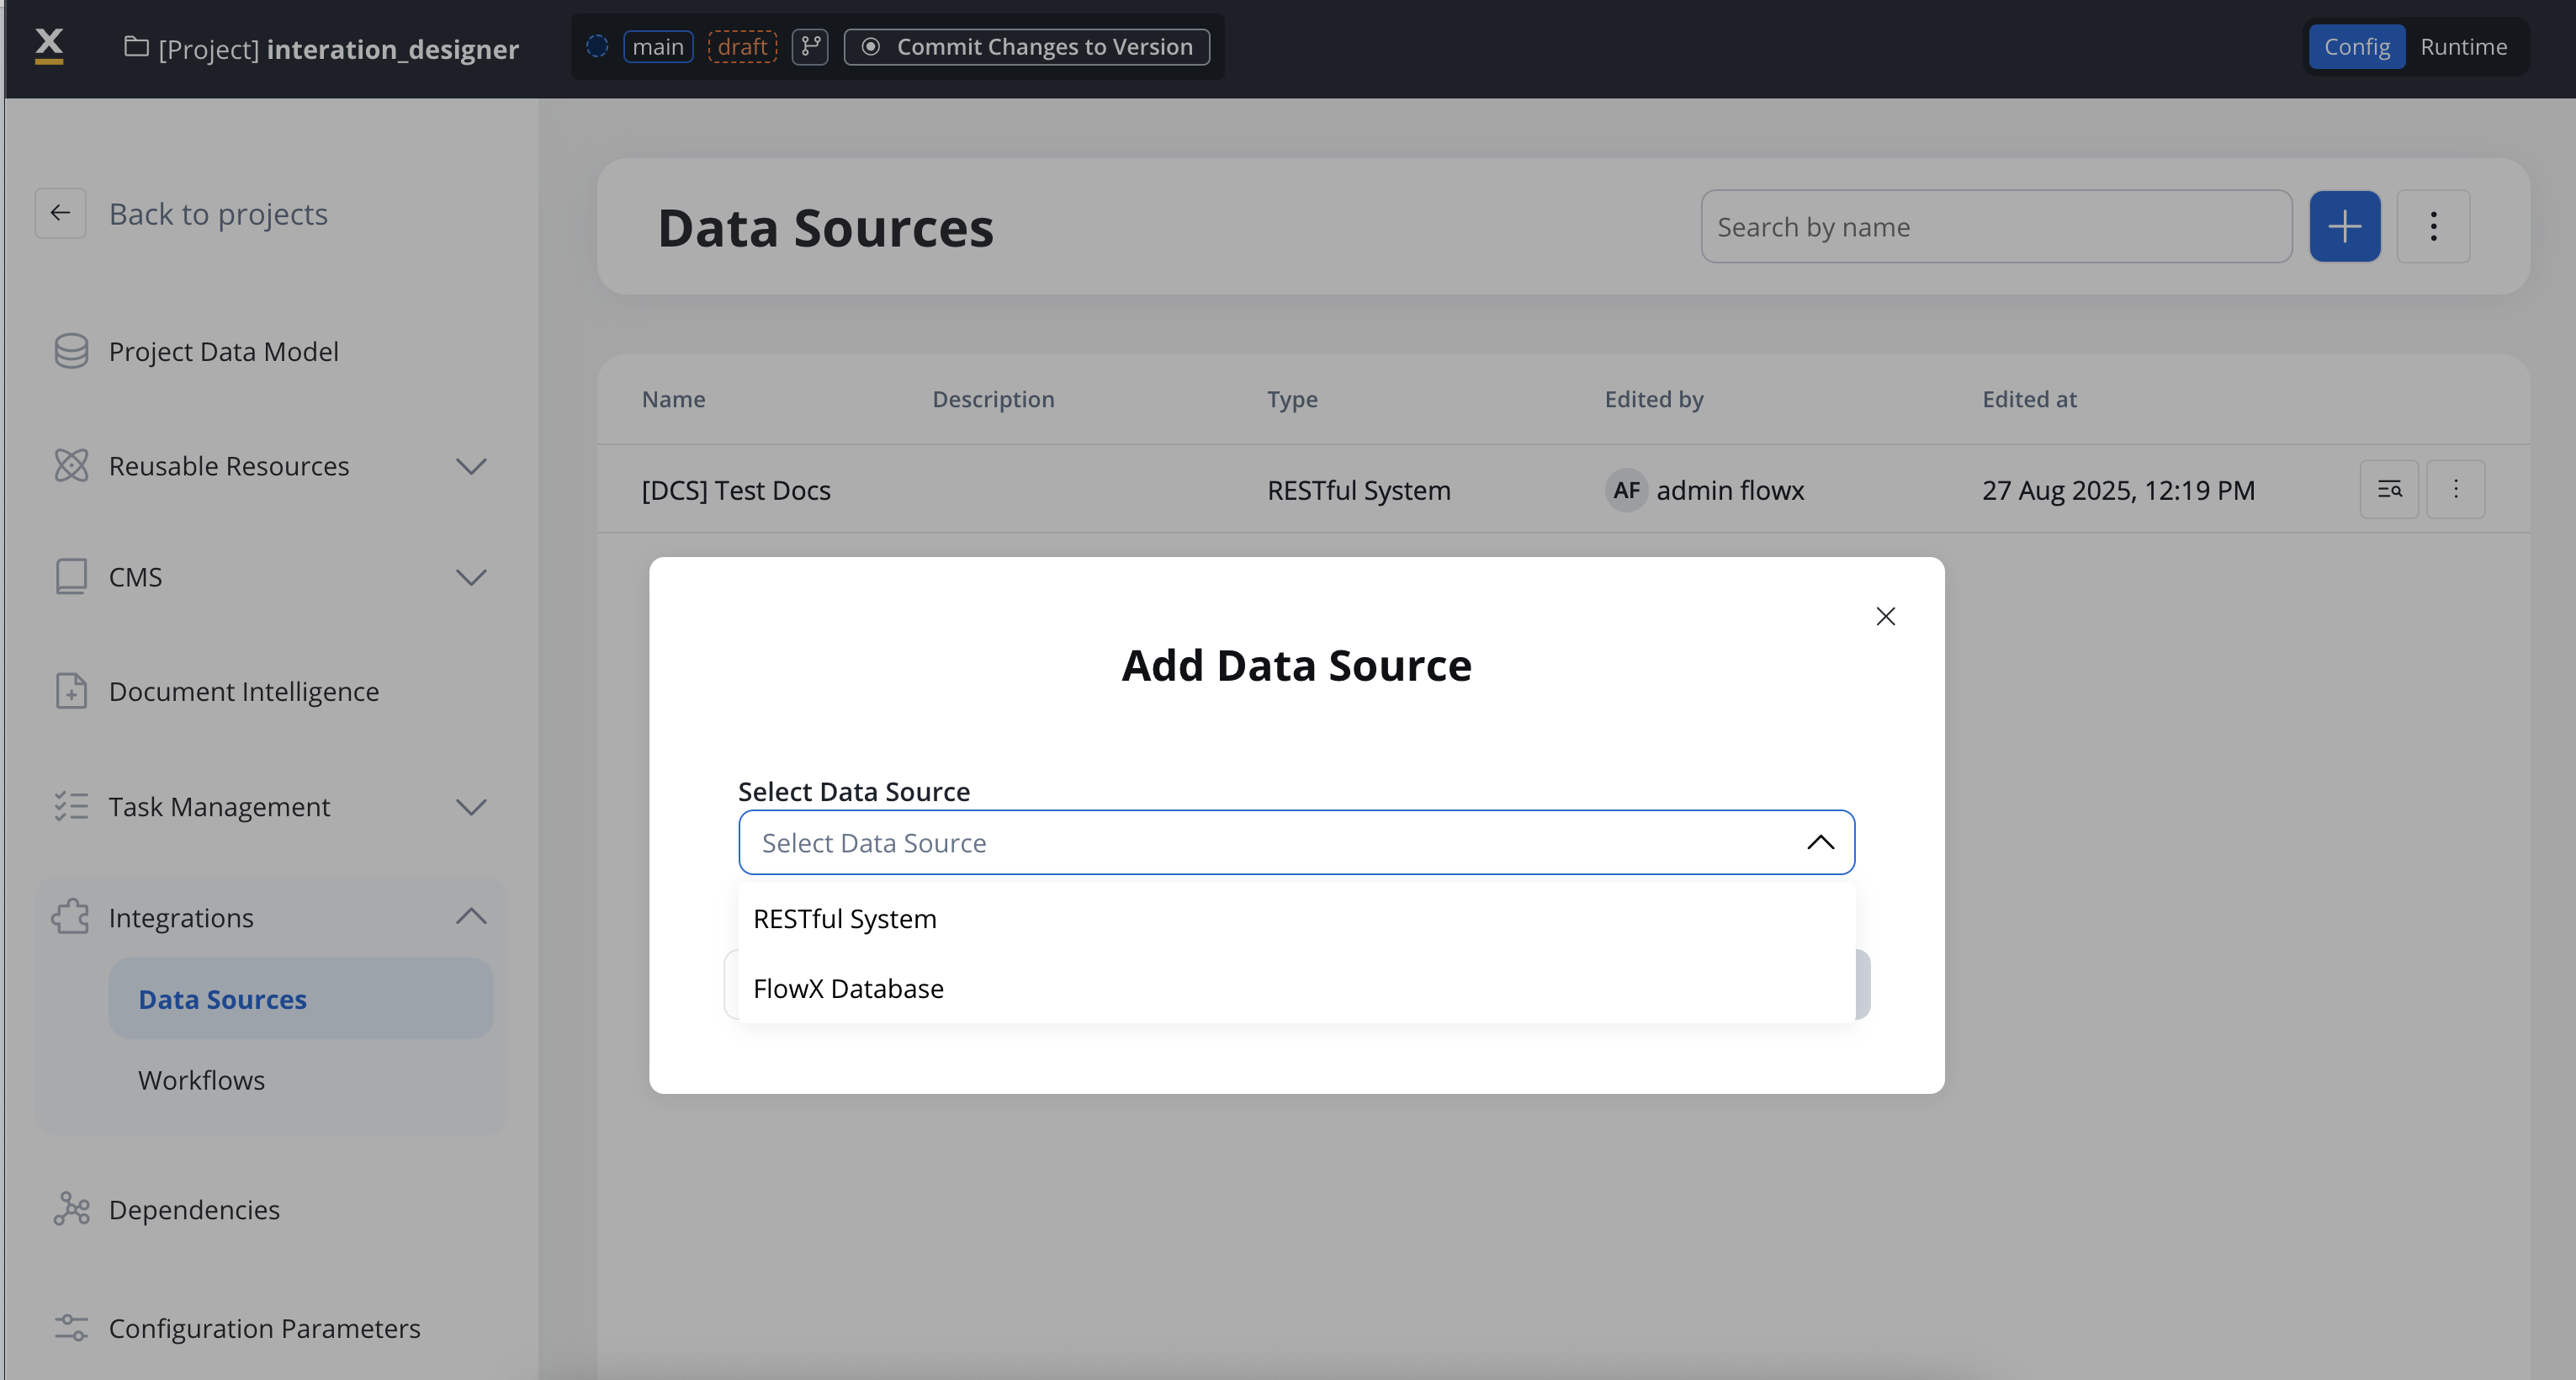
Connect to external REST APIs. Configure endpoints, authentication, and parameters for HTTP-based integrations. **Detailed in this document below.**
Store and retrieve structured data within FlowX using MongoDB collections. Share data across processes without external dependencies.
Connect to externally managed MongoDB instances. Use your existing MongoDB infrastructure with the same CRUD operations as FlowX Database.
Connect Model Context Protocol servers to enable AI agents to use external tools, databases, and services.
AI-powered contextual knowledge repositories for intelligent document search and retrieval in workflows.
Start process instances automatically when emails are received. Connect to IMAP servers and monitor mailboxes for event-driven automation.
Configure SMTP connections to send emails directly from processes, including replies to received emails.
Trigger processes from external systems via HTTP POST requests with API key authentication.
#### RESTful System
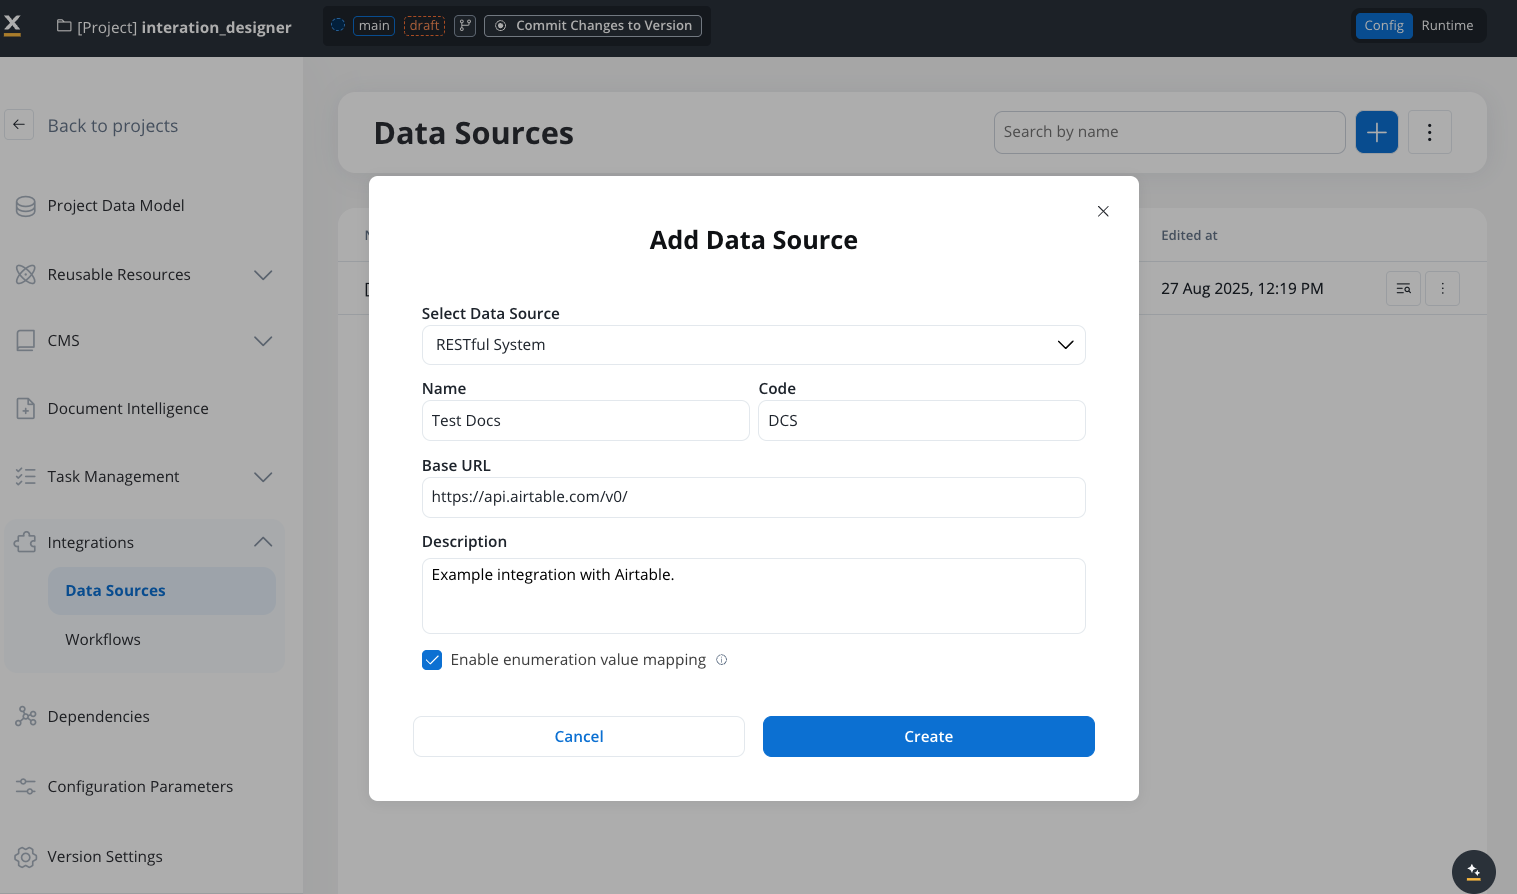
Add a **New Data Source**, set the data source's unique code, name, and description:
* **Select Data Source**: RESTful System
* **Name**: The data source's name.
* **Code**: A unique identifier for the external data source.
* **Base URL**: The base URL is the main address of a website or web application, typically consisting of the protocol (`http` or `https`), domain name, and a path.
* **Description**: A description of the data source and its purpose.
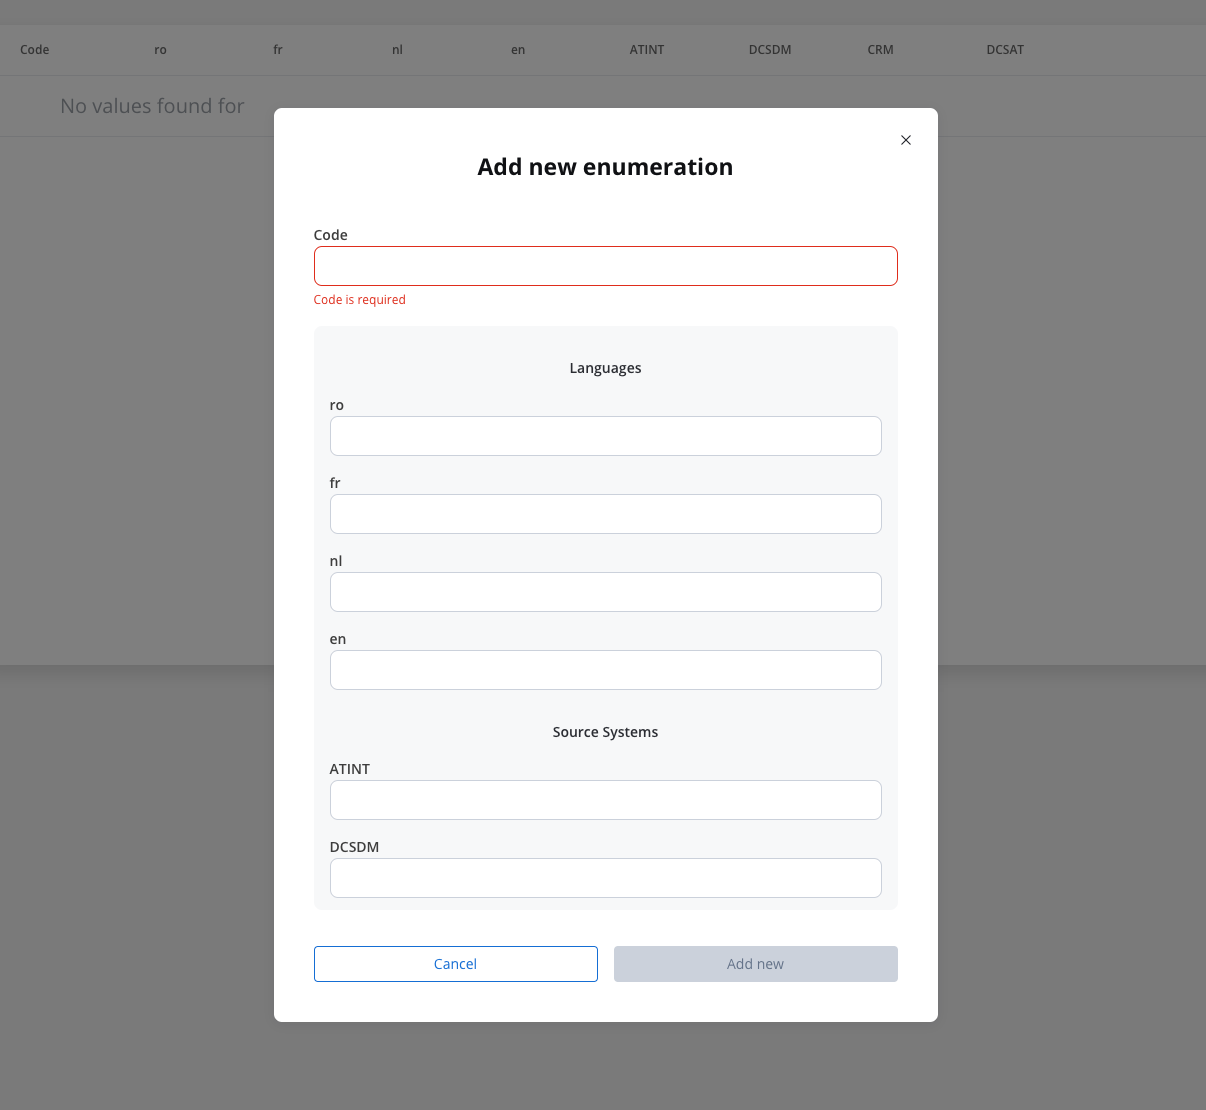
* **Enable enumeration value mapping**: If checked, this system will be listed under the mapped enumerations. See [enumerations](../core-extensions/content-management/enumerations) section for more details.
To dynamically adjust the base URL based on the upper environment (e.g., dev, QA, stage), you can use environment variables and configuration parameters. For example: `https://api.${environment}.example.com/v1`.
Additionally, keep in mind that the priority for determining the configuration parameter (e.g., base URL) follows this order: first, input from the user/process; second, configuration parameters overrides (set directly on FlowX.AI designer or environment variables); and lastly, configuration parameters.
2. Set up authorization (Service Token, Bearer Token, or No Auth). In our example, we will set the auth type as a bearer and we will set it at system level:
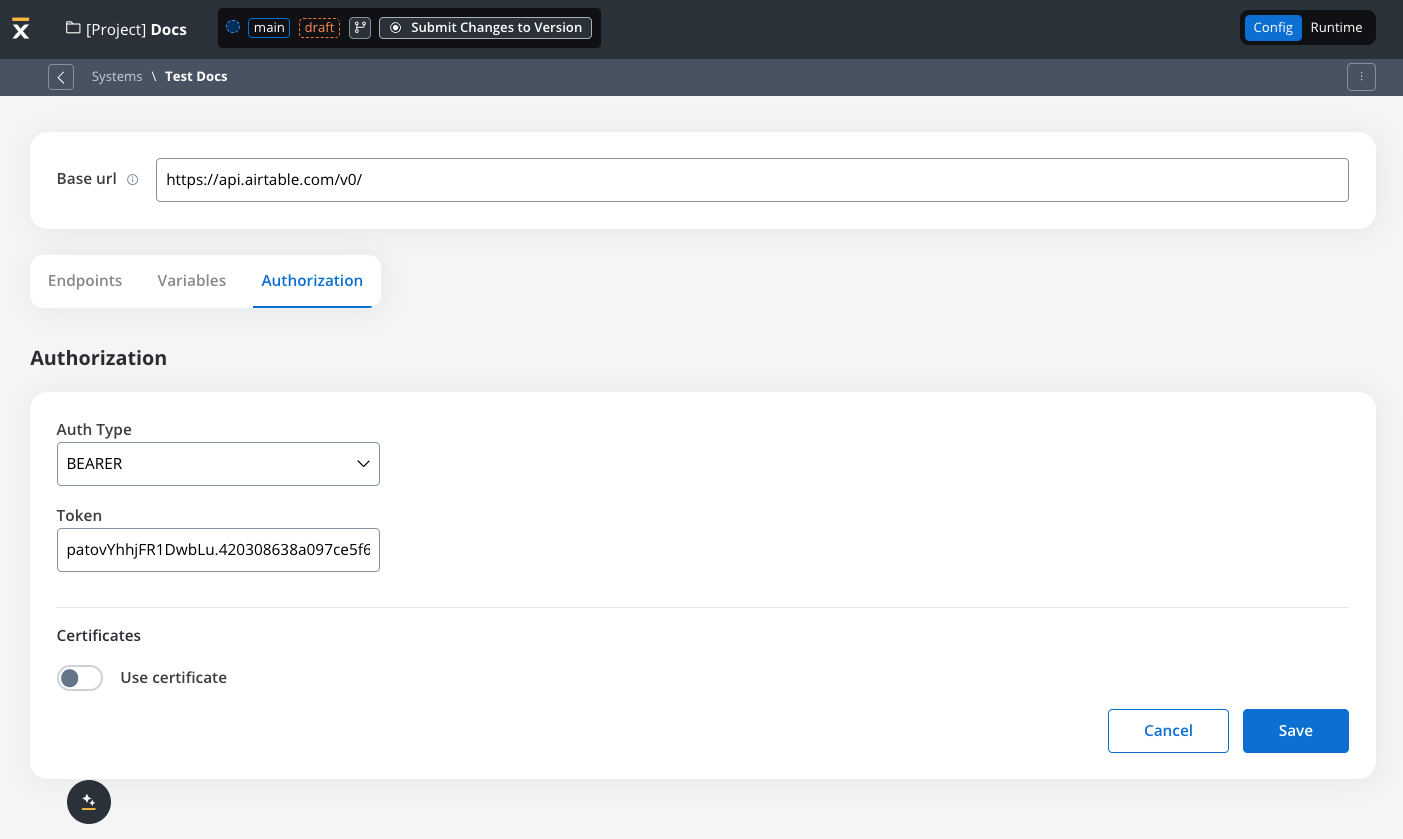
The value of the token might change depending on the environment so it is recommended to define it at system level and apply [Configuration Parameters Overrides](../../projects/runtime/configuration-parameters-overrides) at runtime.
### Defining REST integration endpoints
In this section you can define REST API endpoints that can be reused across different workflows.
1. Under the **Endpoints** section, add the necessary endpoints for system integration.
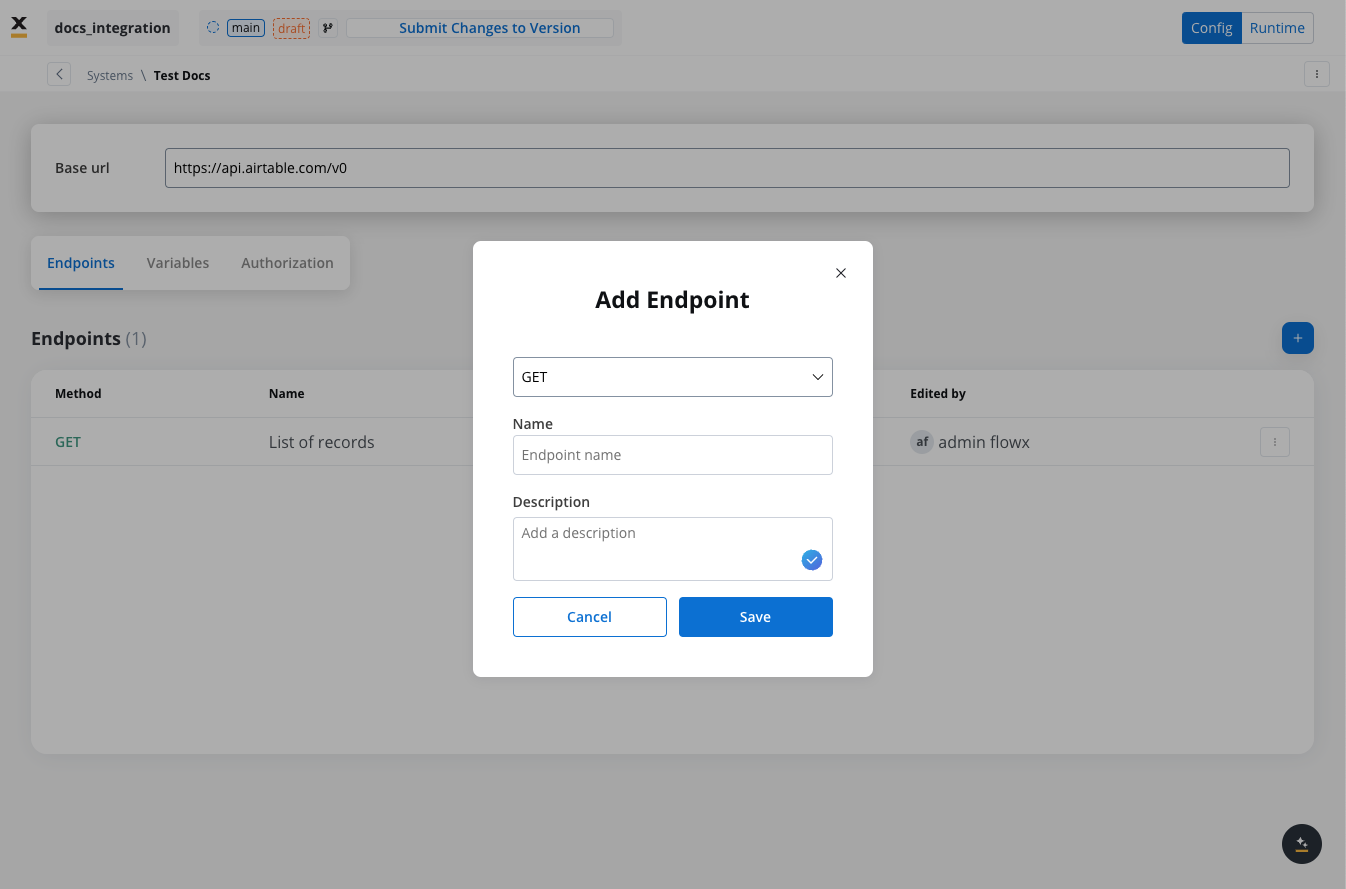
2. Configure an endpoint by filling in the following properties:
* **Method**: GET, POST, PUT, PATCH, DELETE.
* **Path**: Path for the endpoint.
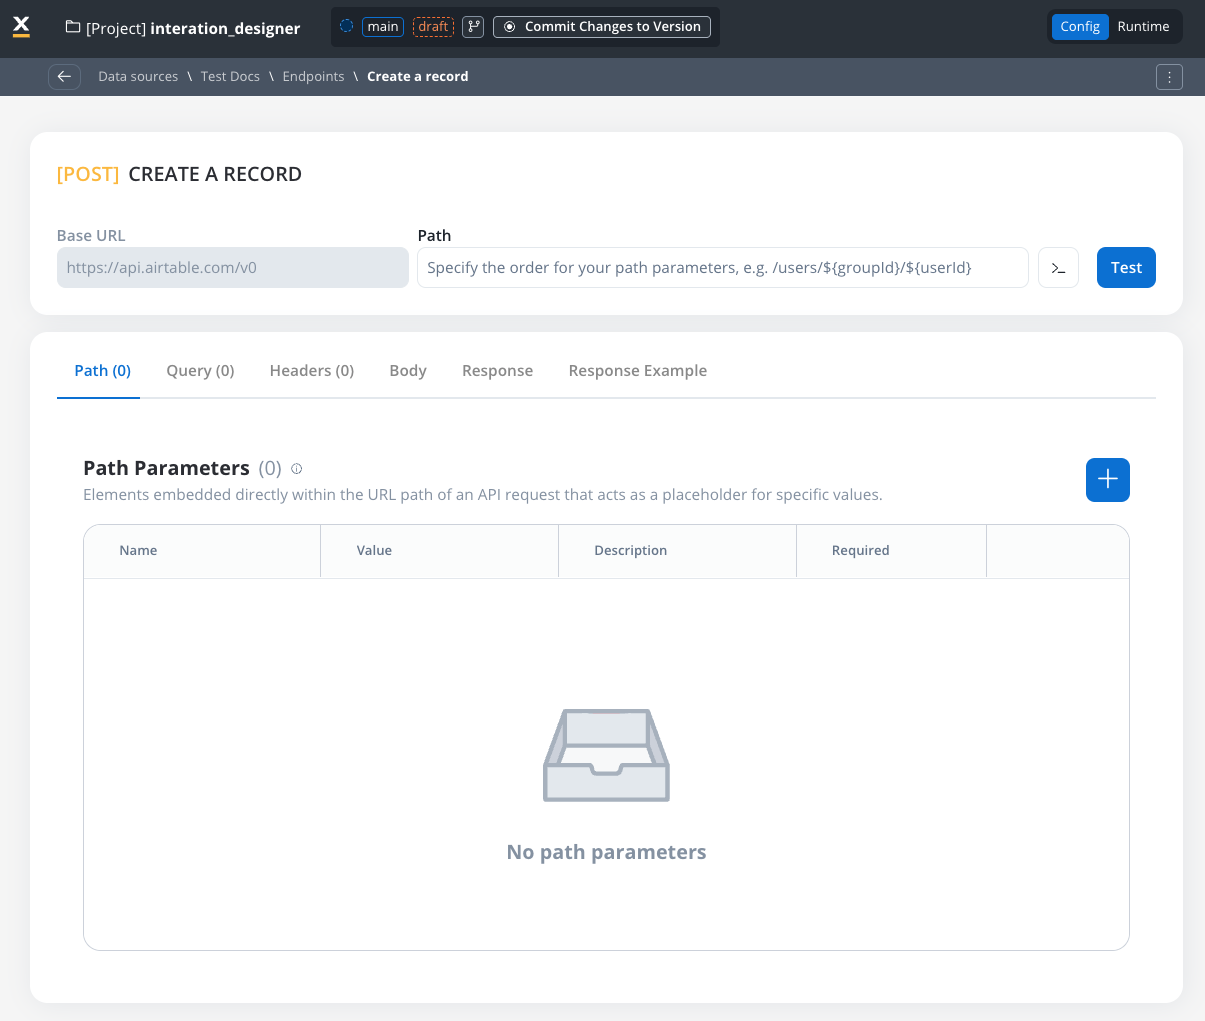
* **Parameters**: Path, query, and header parameters.
* **Content type** (POST endpoints): **JSON**, **Raw**, **Multipart/Form-Data**, or **Binary**.
* **Response**: JSON or Single binary file.
* **Response example**: Body or headers.
**Sending non-JSON text bodies** (XML, SOAP, plain text, `application/x-www-form-urlencoded`): set the **Content type** to **Raw**. The body is sent as-is, and FlowX preserves the `Content-Type` you set in the endpoint's request **Headers** rather than forcing one. (Earlier releases offered only JSON, Multipart/form-data, or Binary, so these payloads had to be wrapped as multipart.)
For OAuth token endpoints that expect a form-urlencoded payload (e.g. `client_credentials` or `password` grant), prefer configuring the data source's **Authorization** settings instead of building the call by hand — FlowX handles the token request internally and applies the resulting access token to subsequent calls.
### REST endpoint caching
For GET endpoints, you can configure response caching to reduce redundant API calls, avoid rate limits, and lower operational costs. When data is stable for a defined period, caching eliminates unnecessary external API calls and improves workflow performance.
#### Configuring cache Time-To-Live (TTL)
Choose between two TTL policies based on your use case:
Cache responses for a specific duration after each request.
**Configuration Options**:
* **ISO Duration**: Use ISO 8601 duration format
* `PT1H` - Cache for 1 hour
* `PT30M` - Cache for 30 minutes
* `P1D` - Cache for 1 day
* `P1W` - Cache for 1 week
* **Dynamic Duration**: Reference configuration parameters using `${myConfigParam}`
* **Default**: `R/P1D` (1 day)
**Use Case**: Ideal when you want consistent cache duration regardless of time of day.
**Example**: Cache country list for 24 hours after each request
```
P1D
```
Cache responses until a specific time with recurring patterns.
**Configuration Options**:
* **Expire Time**: Set the time when cache expires (format: `HH:MM`)
* `00:00` - Midnight
* `18:00` - 6 PM
* `08:00` - 8 AM
* **Recurrency**: How often the pattern repeats (integer > 0, default: 1)
* **Time Unit**: Choose from Day, Week, or Month (default: Day)
**Use Cases**:
* Data that updates at specific times (e.g., daily reports at midnight)
* Batch processes that refresh data on schedule
* Business hours data that changes after 5 PM
**Example 1**: Cache until midnight every day
```
Expire Time: 00:00
Recurrency: 1
Time Unit: Day
```
**Example 2**: Cache until 6 PM every Friday
```
Expire Time: 18:00
Recurrency: 1
Time Unit: Week
```
#### Cache visibility and management
**Testing Modal**
When testing endpoints, you can view:
* **Cache Status**: Whether results came from cache (hit) or external API (miss)
* **Cache Key**: Unique identifier for the cached response
* **TTL Information**: When the cache will expire
* Duration-based: "Expires after PT10M" (10 minutes)
* Time-based: "Expires at 23:00 on 2025-11-04"
**Workflow Console**
Monitor cache usage during workflow execution with the same detailed information visible in logs.

**Clear Cache**
Manually invalidate cached responses when needed:
* Available in the endpoint testing modal
* Available from the endpoint definition page
* Only visible when caching is configured
Clear cache after updating data in the external system to ensure workflows fetch fresh data on the next request.
#### How caching works
When a GET endpoint is called for the first time, FlowX.AI:
1. Calls the external API
2. Stores the response in cache with the configured TTL
3. Returns the response to the workflow
If the cache is still valid (within TTL):
1. FlowX.AI returns the cached response immediately
2. No external API call is made
3. Response time is significantly faster
Once the TTL expires:
1. Next request fetches fresh data from the external API
2. Cache is updated with the new response
3. New TTL period begins
#### Error handling
**Reliability First**: If any issue occurs with cache retrieval or storage, FlowX.AI automatically falls back to calling the external API directly. Your workflows always receive correct data.
Automatic fallback scenarios:
* Cache service unavailable → Direct API call
* Cache corruption or invalid data → Direct API call
* Cache storage failure → Direct API call (with warning logged)
#### Use cases
Cache country lists, product catalogs, currency rates, or other reference data that changes infrequently
Stay within third-party API rate limits by reducing the number of requests
Lower operational costs by reducing billable API calls to external services
Improve workflow execution speed by eliminating network latency for cached responses
**Example**: An e-commerce platform caches product catalog data for 1 hour. With 1000 workflow executions per hour, caching reduces API calls from 1000 to just 1, saving 999 external calls while ensuring data freshness every hour.
### SQL operation caching
SQL data source operations support response caching with the same TTL policies as REST endpoints. On a SQL operation's details page, open the **Response Caching** section and toggle **Caching Enabled**, then choose a return policy (**Expires After** duration or **Expires At** time-based), exactly as for REST GET endpoints above. A **Clear cache** button invalidates cached responses on demand.
Caching is governed by three platform-wide settings on the `integration-designer` service:
| Environment Variable | Description | Default |
| ----------------------------------- | -------------------------------------------------------------------------------------------------------------------- | --------- |
| `FLOWX_SQL_CACHE_ENABLED` | Global master switch for SQL operation caching. When `false`, per-operation caching is skipped and queries run live. | `true` |
| `FLOWX_SQL_CACHE_MAX_PAYLOAD_BYTES` | Maximum size of a cacheable result payload | `5242880` |
| `FLOWX_SQL_CACHE_MAX_DURATION` | Upper bound on the cache duration a single operation can request | `PT24H` |
Per-operation caching only takes effect when `FLOWX_SQL_CACHE_ENABLED` is `true`. If an operation has caching enabled while the global switch is off, the query runs live and a warning is logged.
### Defining variables
The Variables tab allows you to store system-specific variables that can be referenced throughout workflows using the format `${variableName}`.
These declared variables can be utilized not only in workflows but also in other sections, such as the Endpoint or Authorization tabs.
For example:
* For our integration example, you can declare configuration parameters and use the variables to store your `tableId` and `baseId` and reference them the **Variables** tab.
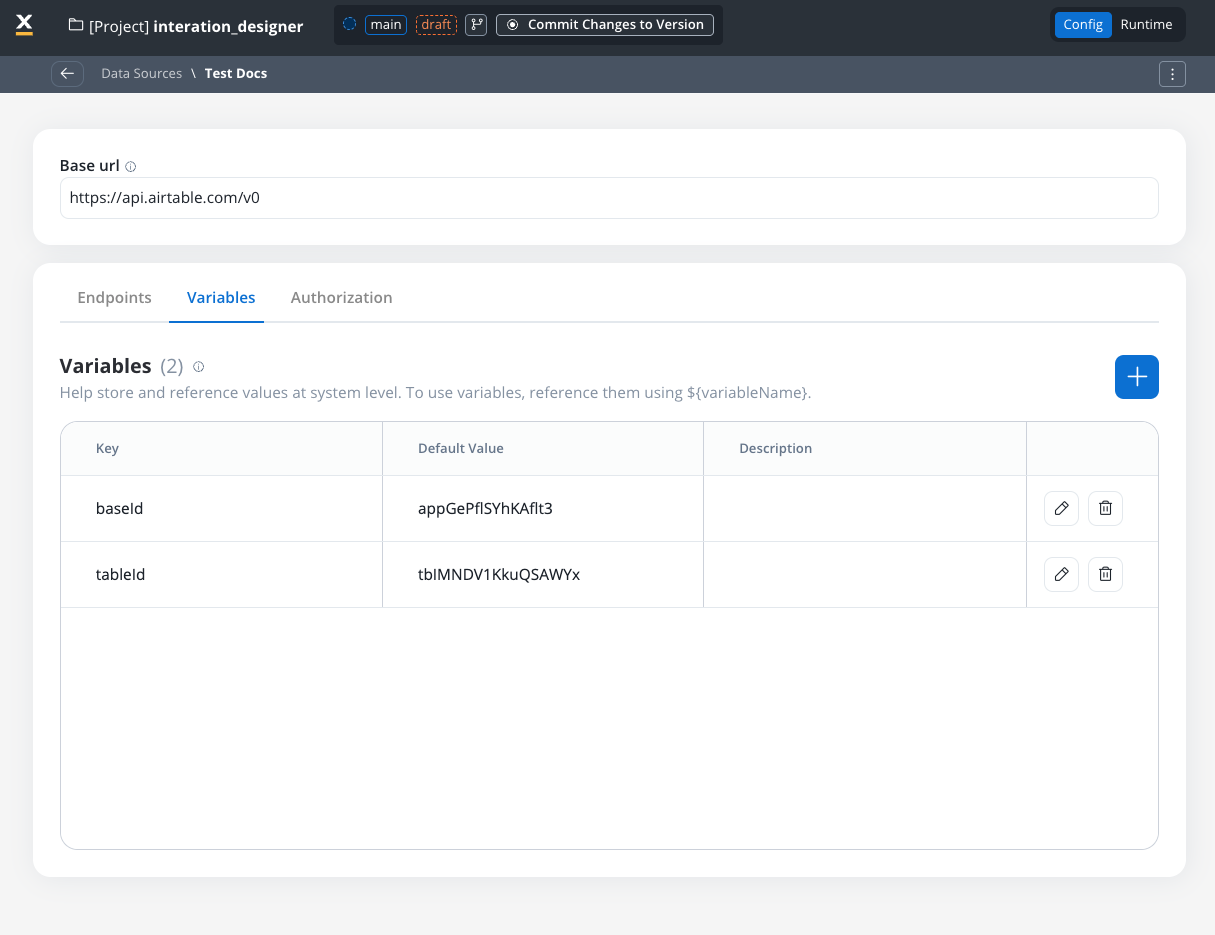
* Use variables in the **Base URL** to switch between different environments, such as UAT or production.
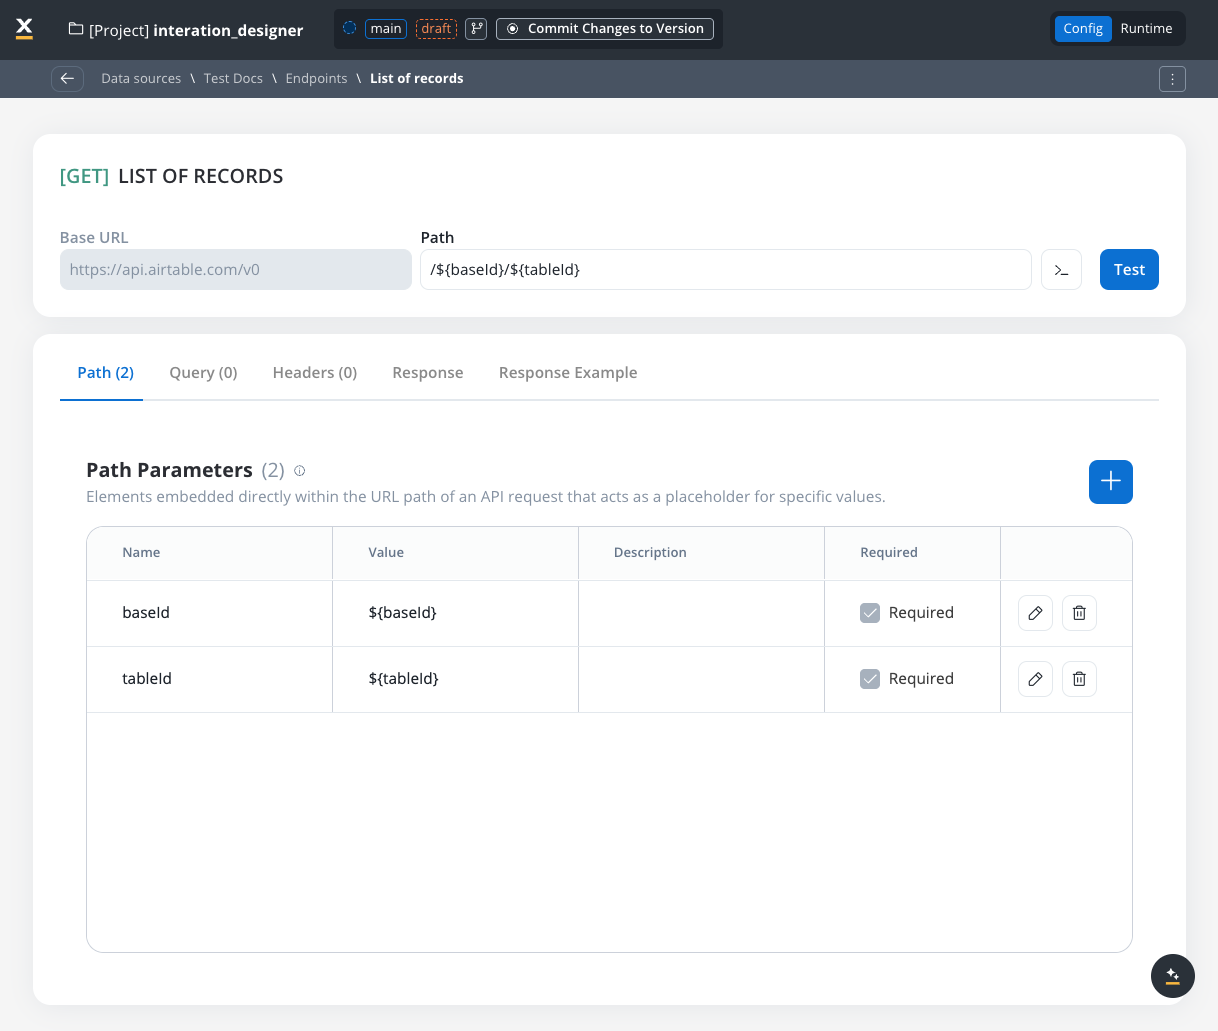
### Endpoint parameter types
When configuring endpoints, several parameter types help define how the endpoint interacts with external systems. These parameters ensure that requests are properly formatted and data is correctly passed.
#### Path parameters
Elements embedded directly within the URL path of an API request that acts as a placeholder for specific value.
* Used to specify variable parts of the endpoint URL.
* Defined with `${parameter}` format.
* Mandatory in the request URL.
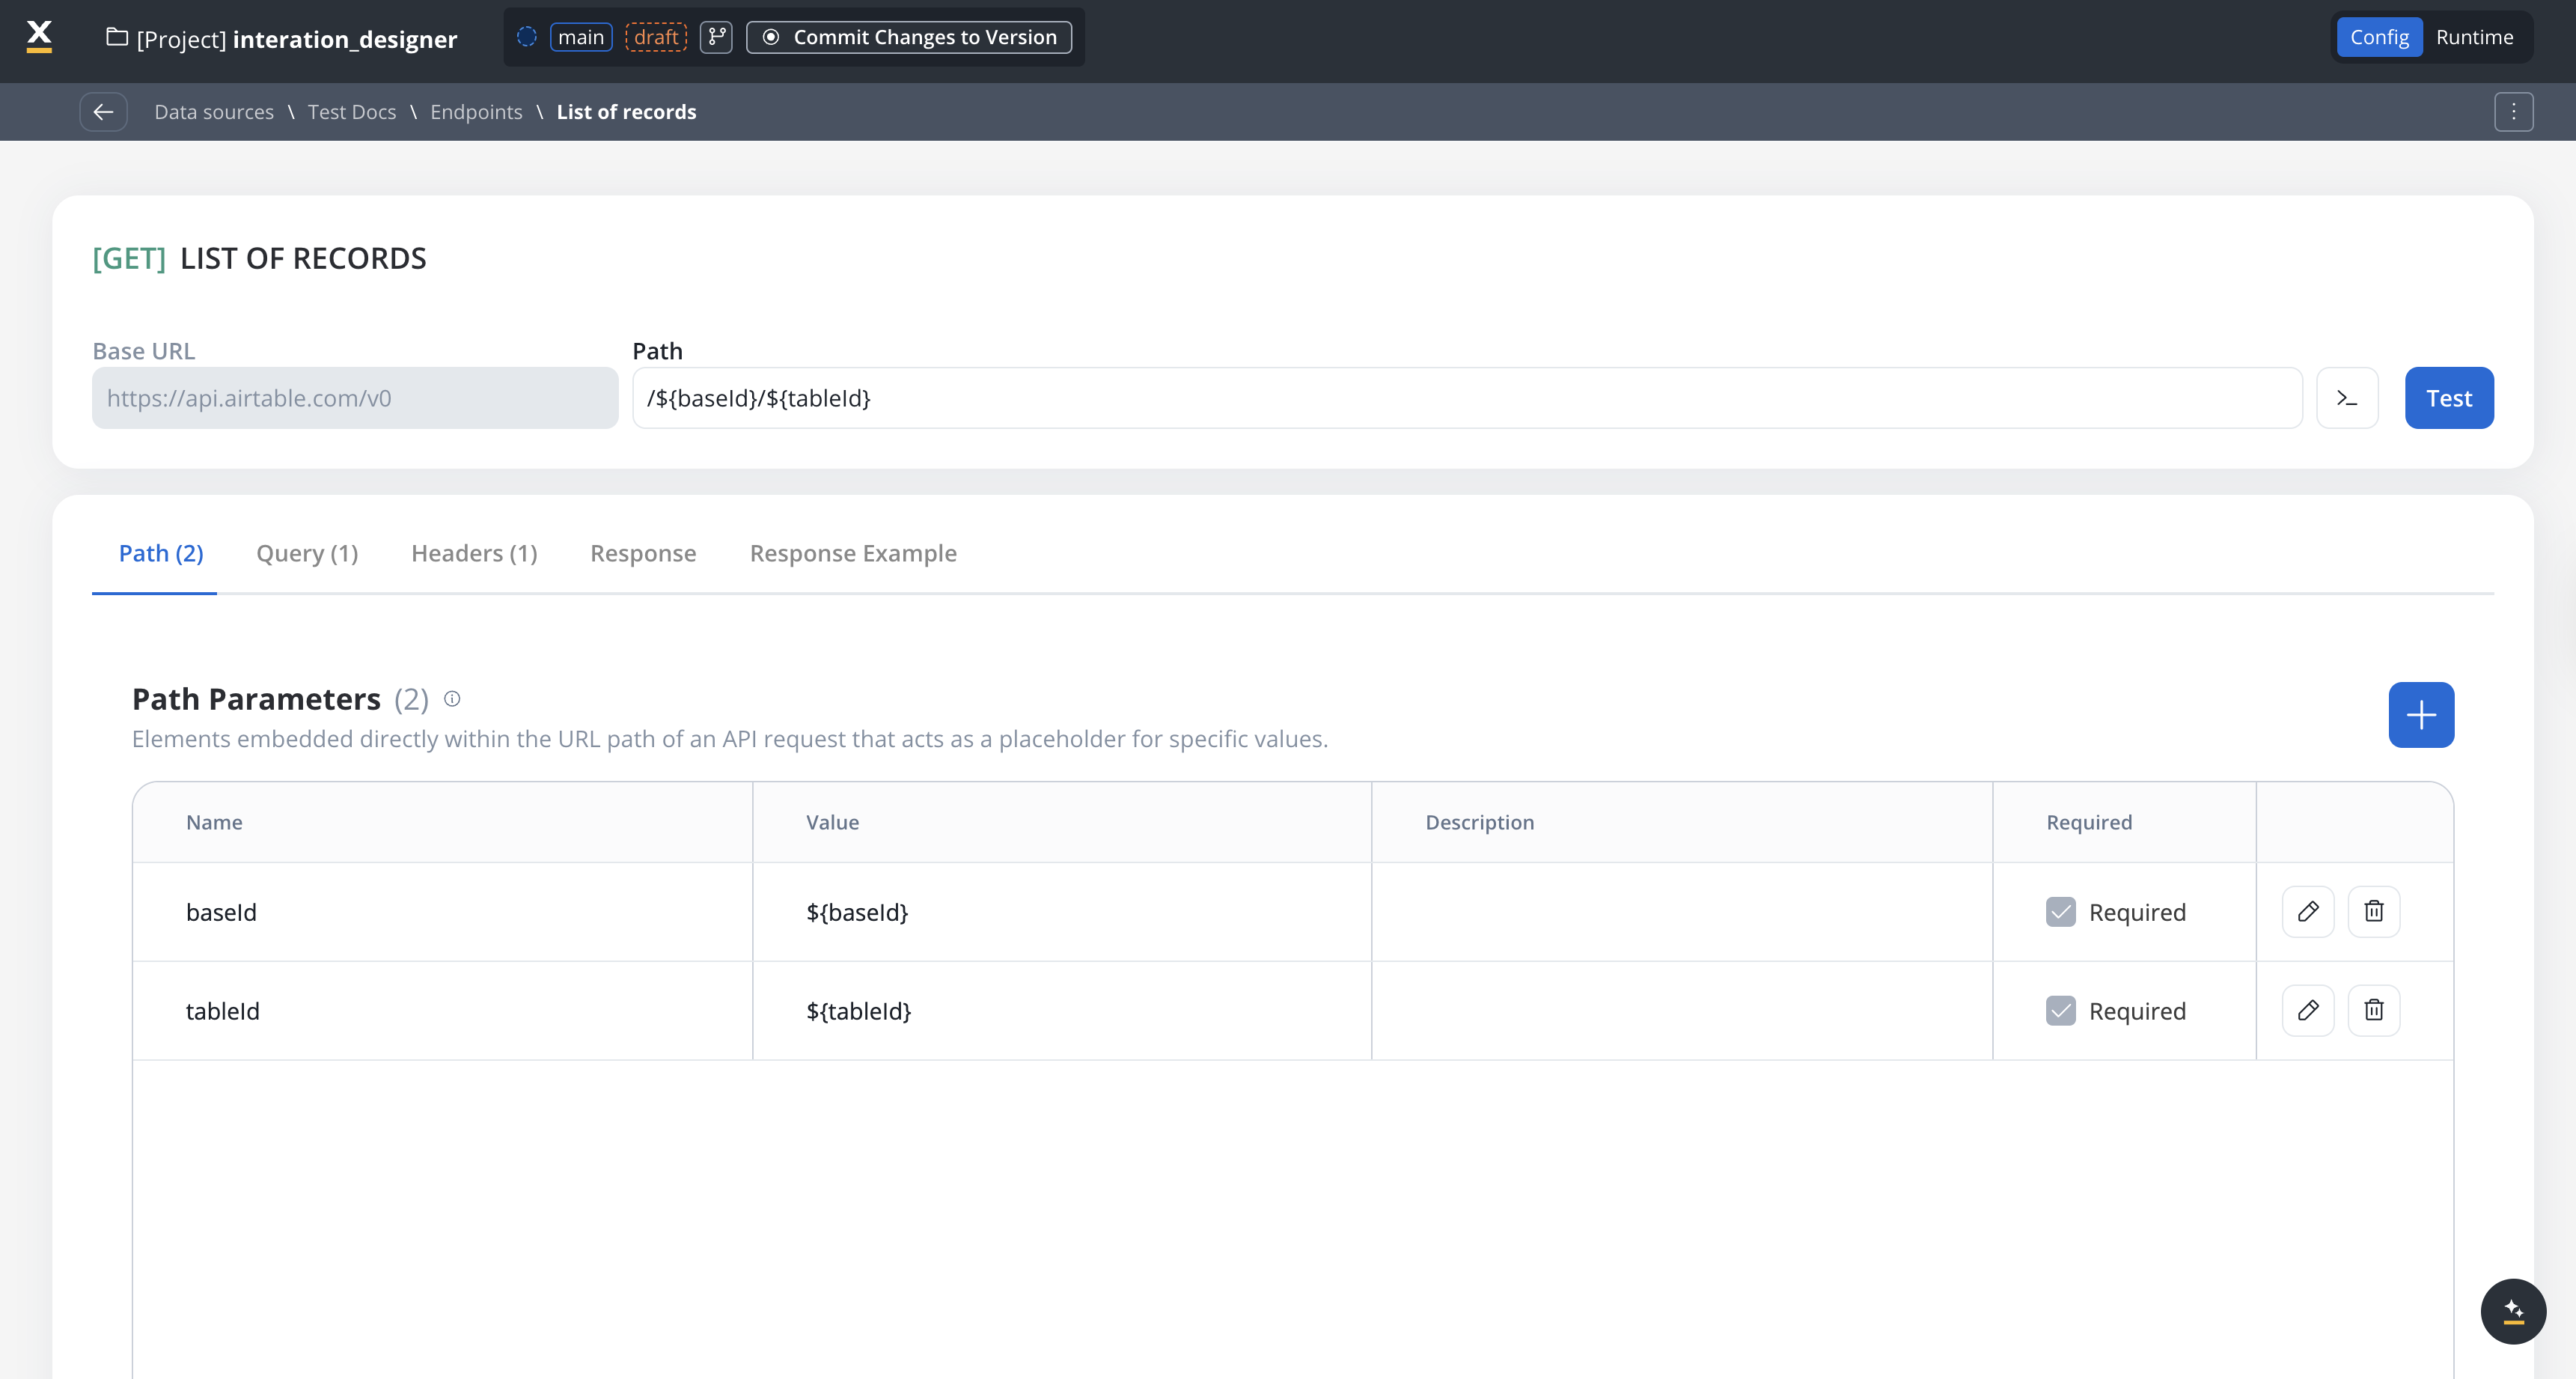
Path parameters must always be included, while query and header parameters are optional but can be set as required based on the endpoint's design.
#### Query parameters
Query parameters are added to the end of a URL to provide extra information to a web server when making requests.
* Query parameters are appended to the URL after a `?` symbol and are typically used for filtering or pagination (for example, `?search=value`)
* Useful for filtering or pagination.
* Example URL with query parameters: [https://api.example.com/users?search=johndoe\&page=2](https://api.example.com/users?search=johndoe\&page=2).
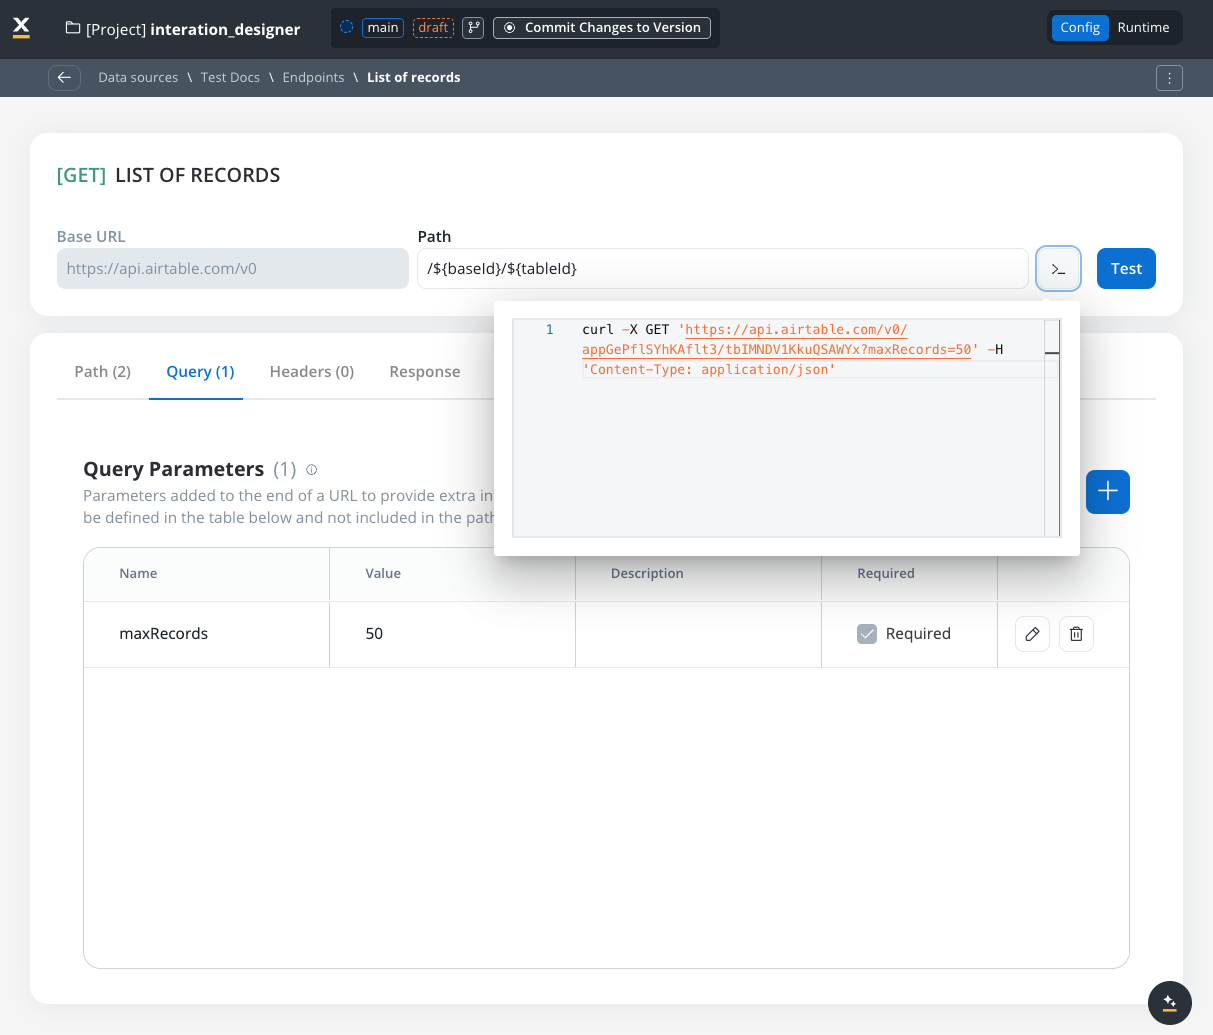
These parameters must be defined in the Parameters table, not directly in the endpoint path.
##### URL encoding option
Each query parameter has an **Encode** option that controls whether the value is URL-encoded before being sent:
* **Encode enabled**: The system automatically URL-encodes the parameter value (special characters like spaces, `&`, `=` are converted to their encoded equivalents like `%20`, `%26`, `%3D`)
* **Encode disabled** (default): The value is sent as-is, allowing you to provide pre-encoded values
Use the **Encode** option when your parameter values may contain special characters that need encoding. Disable it if you're already providing URL-encoded values or if the external API expects raw values.
To preview how query parameters are sent in the request, you can use the **Preview** feature to see the exact request in cURL format. This shows the complete URL, including query parameters.
#### Header parameters
Used to give information about the request and to give instructions to the API of how to handle the request
* Header parameters (HTTP headers) provide extra details about the request or its message body.
* They are not part of the URL. Default values can be set for testing and overridden in the workflow.
* Custom headers sent with the request (for example, `Authorization: Bearer token`).
* Define metadata or authorization details.
#### Body parameters
The data sent to the server when an API request is made.
* These are the data fields included in the body of a request, usually in JSON format.
* Body parameters are used in POST, PUT, and PATCH requests to send data to the external system (for example, creating or updating a resource).
#### Response body parameters
The data sent back from the server after an API request is made.
* These parameters are part of the response returned by the external system after a request is processed. They contain the data that the system sends back.
* Typically returned in GET, POST, PUT, and PATCH requests. Response body parameters provide details about the result of the request (for example, confirmation of resource creation, or data retrieval)
### Enum mapper
The enum mapper for the request body enables you to configure enumerations for specific keys in the request body, aligning them with values from the External System or translations into another language.
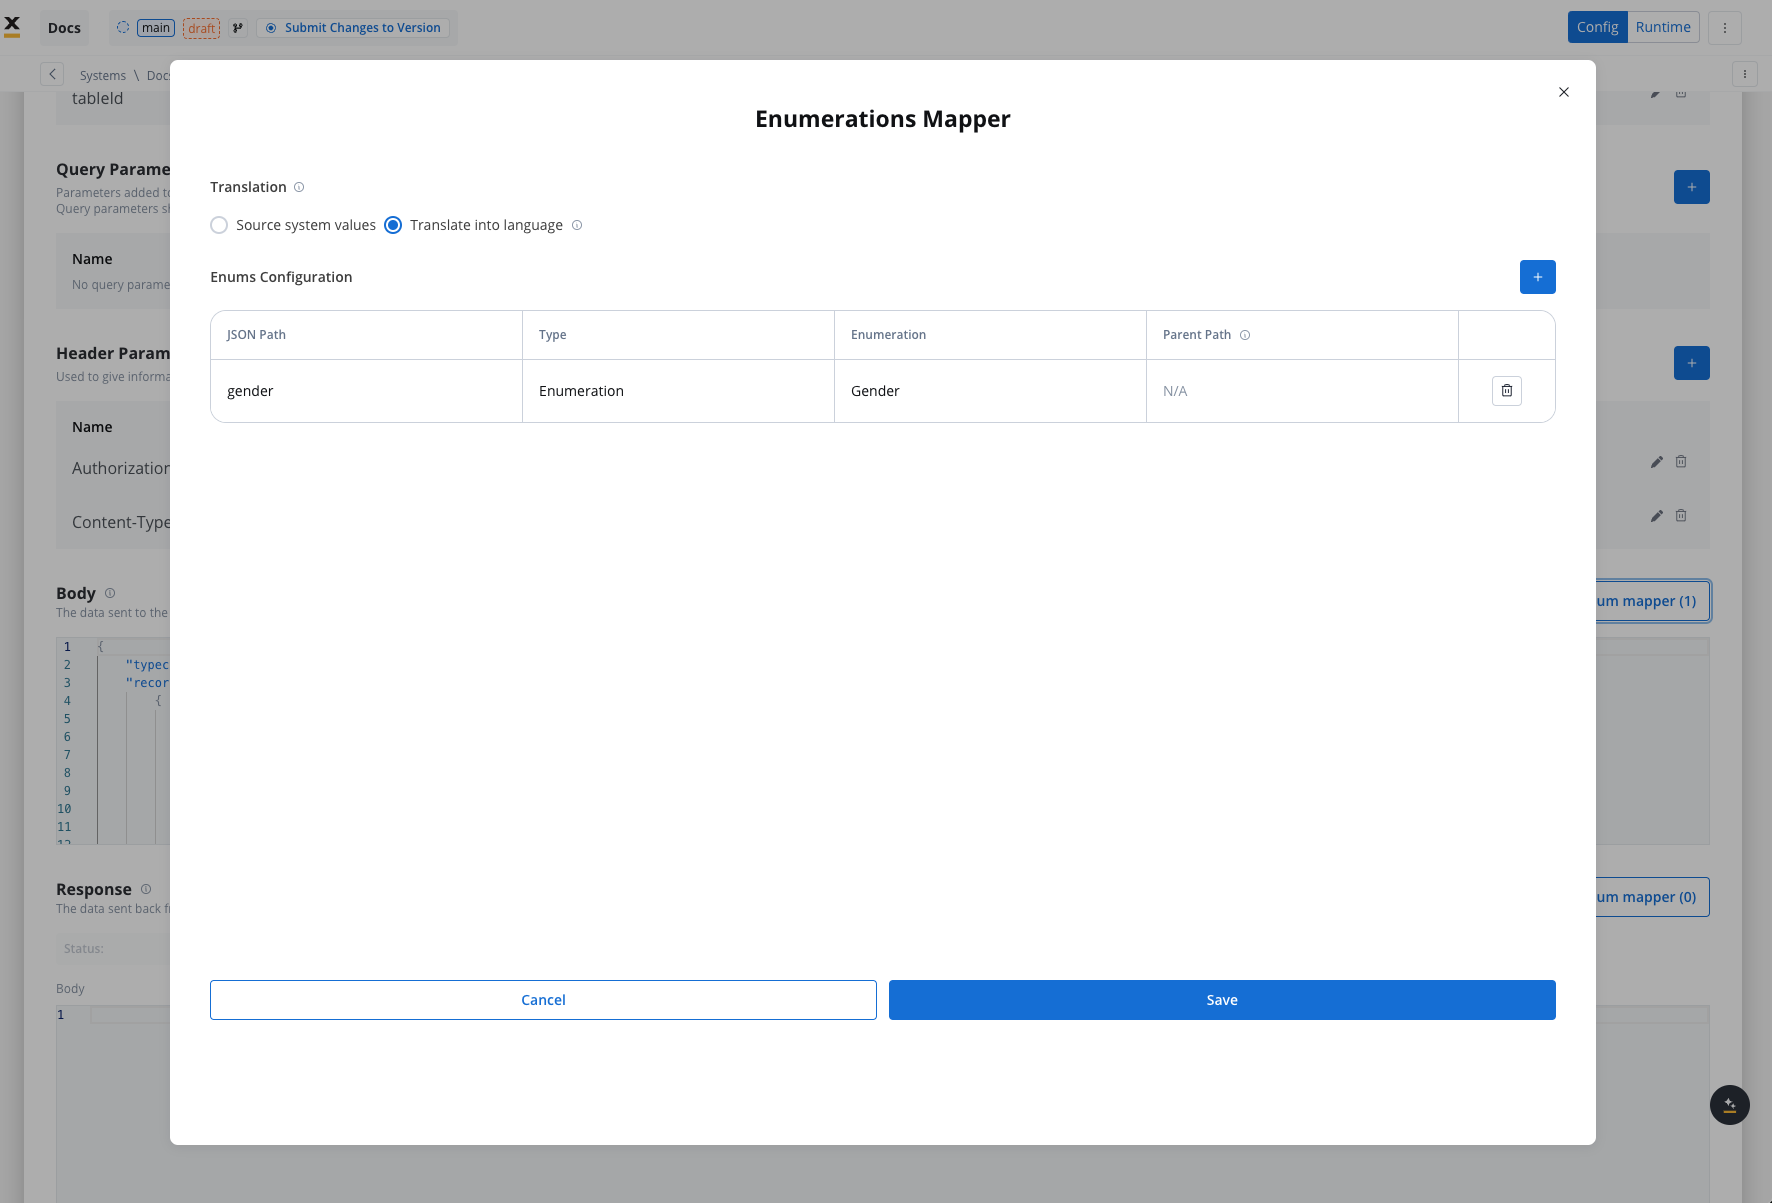
On enumerations you can map both translation values from different languages or values for different source systems.
Make sure you have the enumerations created with corresponding translations and system values in your application already:
Select whether to use in the integration the enumeration value corresponding to the External System or the translation into another language.
For translating into language a header parameter called 'Language' is required to specify the language for translation.
### Configuring authorization
* Select the required **Authorization Type** from a predefined list.
* Enter the relevant details based on the selected type (for example, Realm and Client ID for Service Accounts).
* These details will be automatically included in the request headers when the integration is executed.
### Authorization methods
The Integration Designer supports several authorization methods, allowing you to configure the security settings for API calls. Depending on the external system's requirements, you can choose one of the following authorization formats:

#### Service account
Service Account authentication requires the following key fields:
* **Identity Provider Url**: The URL for the identity provider responsible for authenticating the service account.
* **Client Id**: The unique identifier for the client within the realm.
* **Client secret**: A secure secret used to authenticate the client alongside the Client ID.
* **Scope**: Specifies the access level or permissions for the service account.
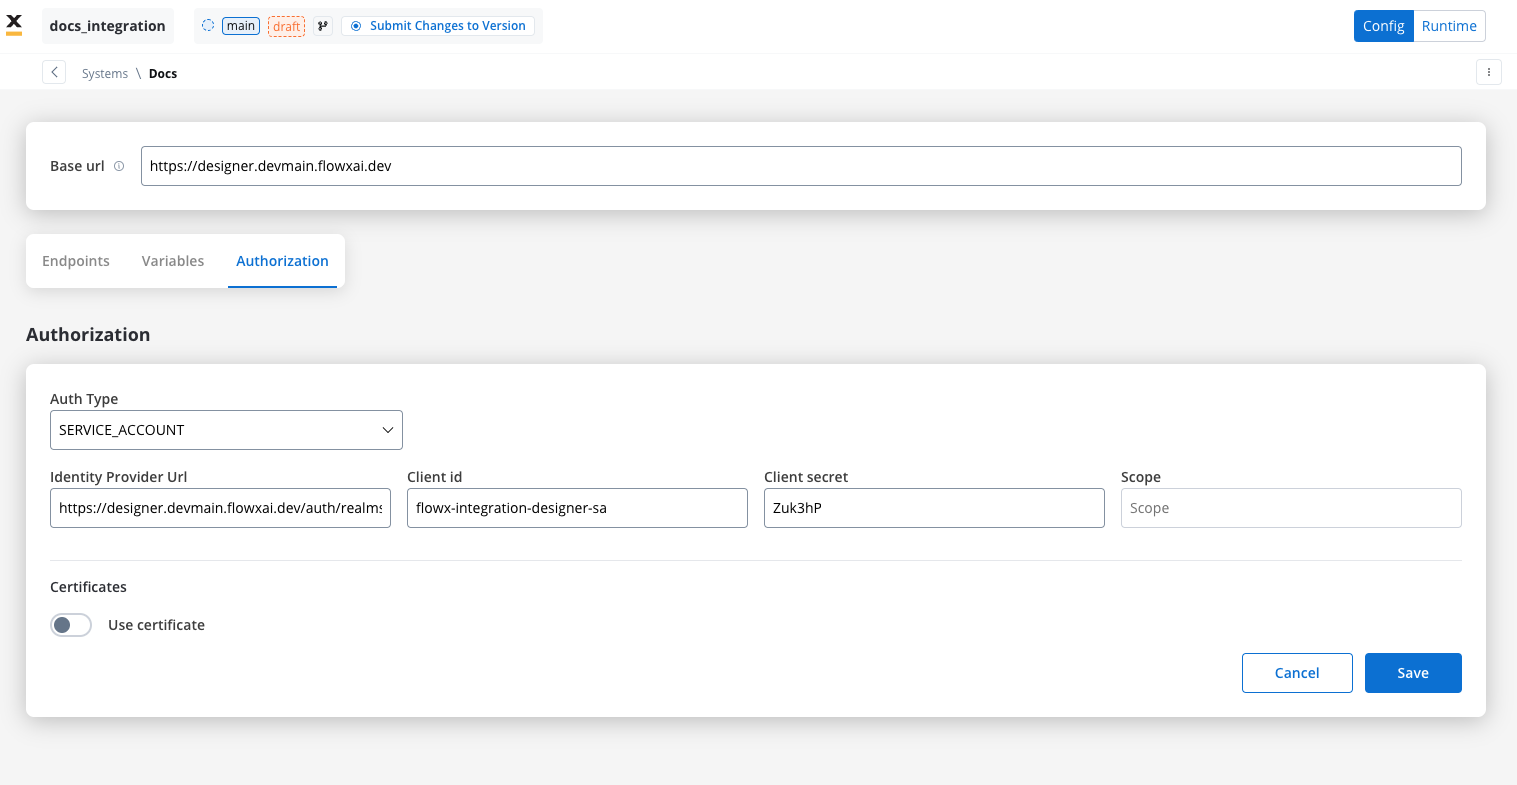
When using Entra as an authentication solution, the **Scope** parameter is mandatory. Ensure it is defined correctly in the authorization settings.
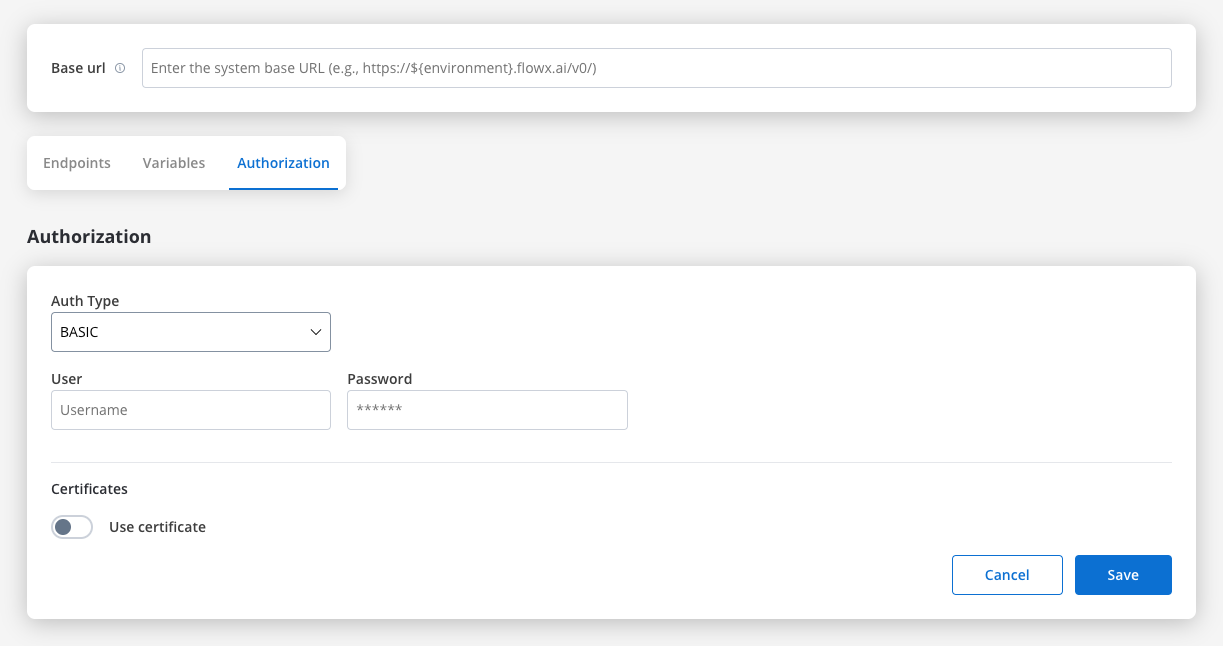
#### Basic authentication
* Requires the following credentials:
* **Username**: The account's username.
* **Password**: The account's password.
* Suitable for systems that rely on simple username/password combinations for access.
#### Bearer
* Requires an **Access Token** to be included in the request headers.
* Commonly used for OAuth 2.0 implementations.
* Header Configuration: Use the format `Authorization: Bearer {access_token}` in headers of requests needing authentication.
* System-Level Example: You can store the Bearer token at the system level, as shown in the example below, ensuring it's applied automatically to future API calls:
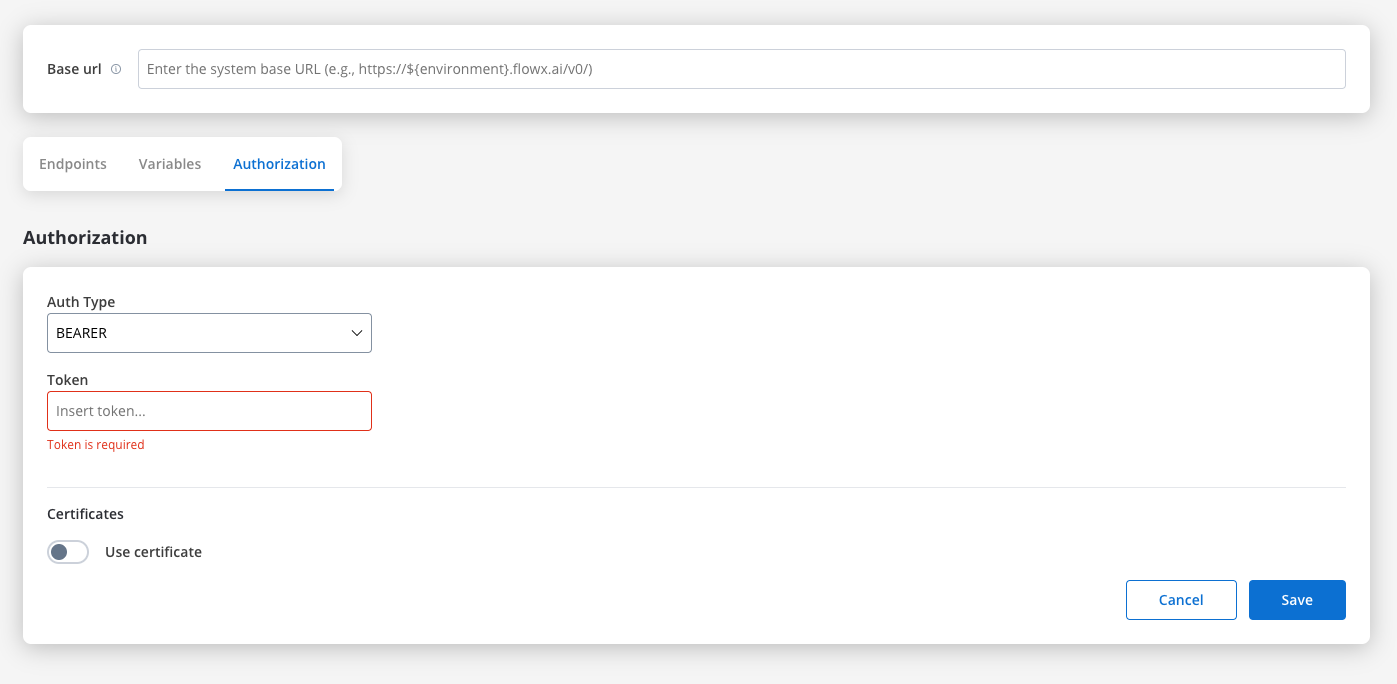
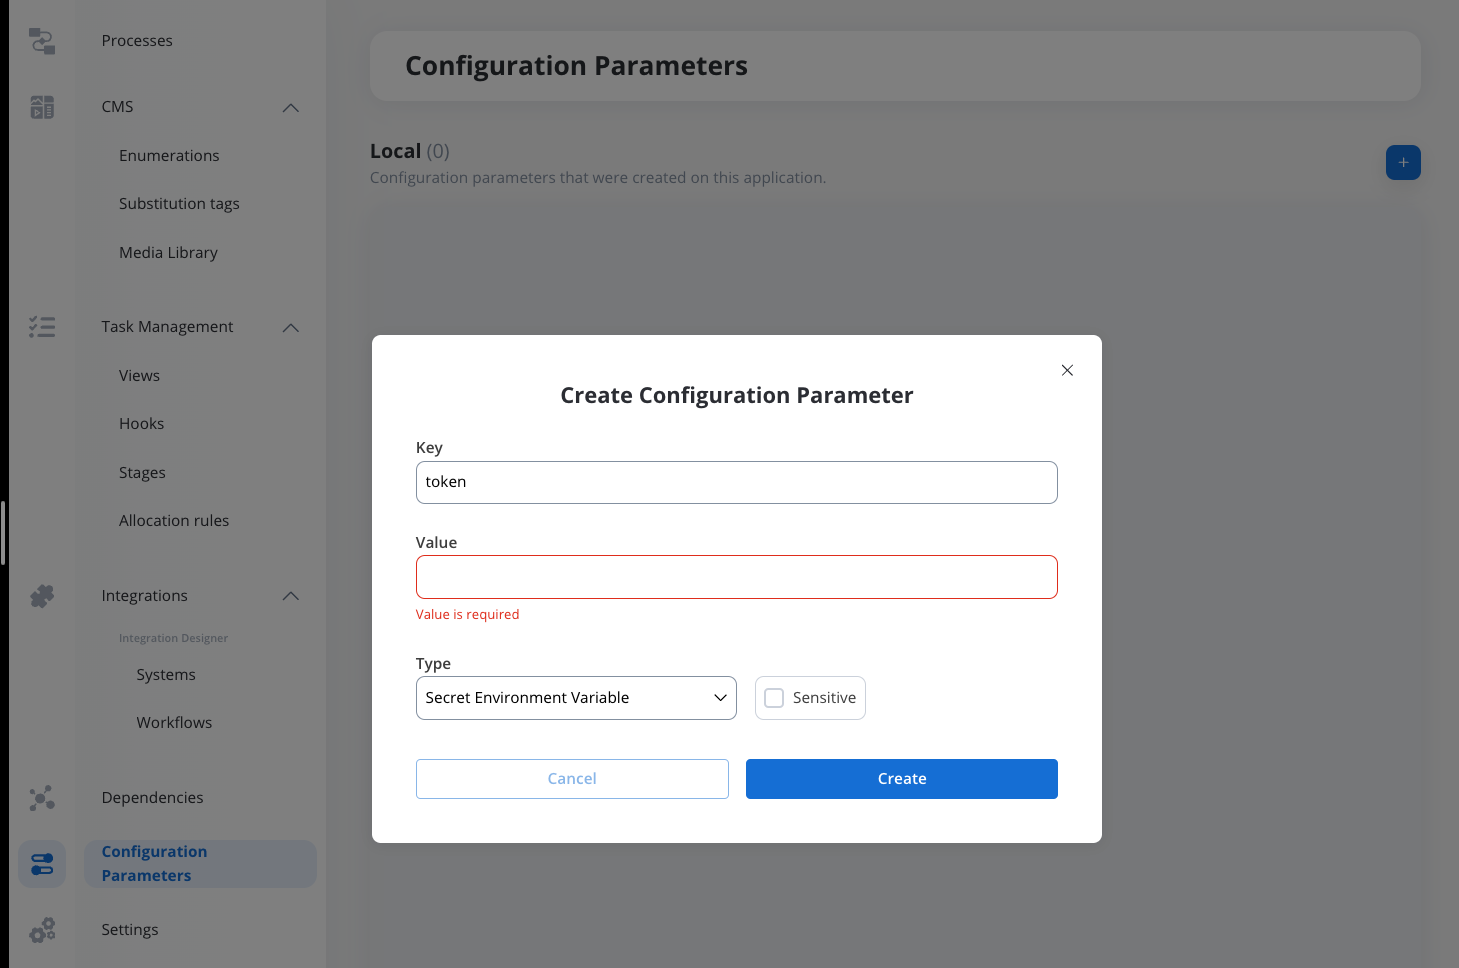
Store tokens in a configuration parameter so updates propagate across all requests when tokens are refreshed or changed.
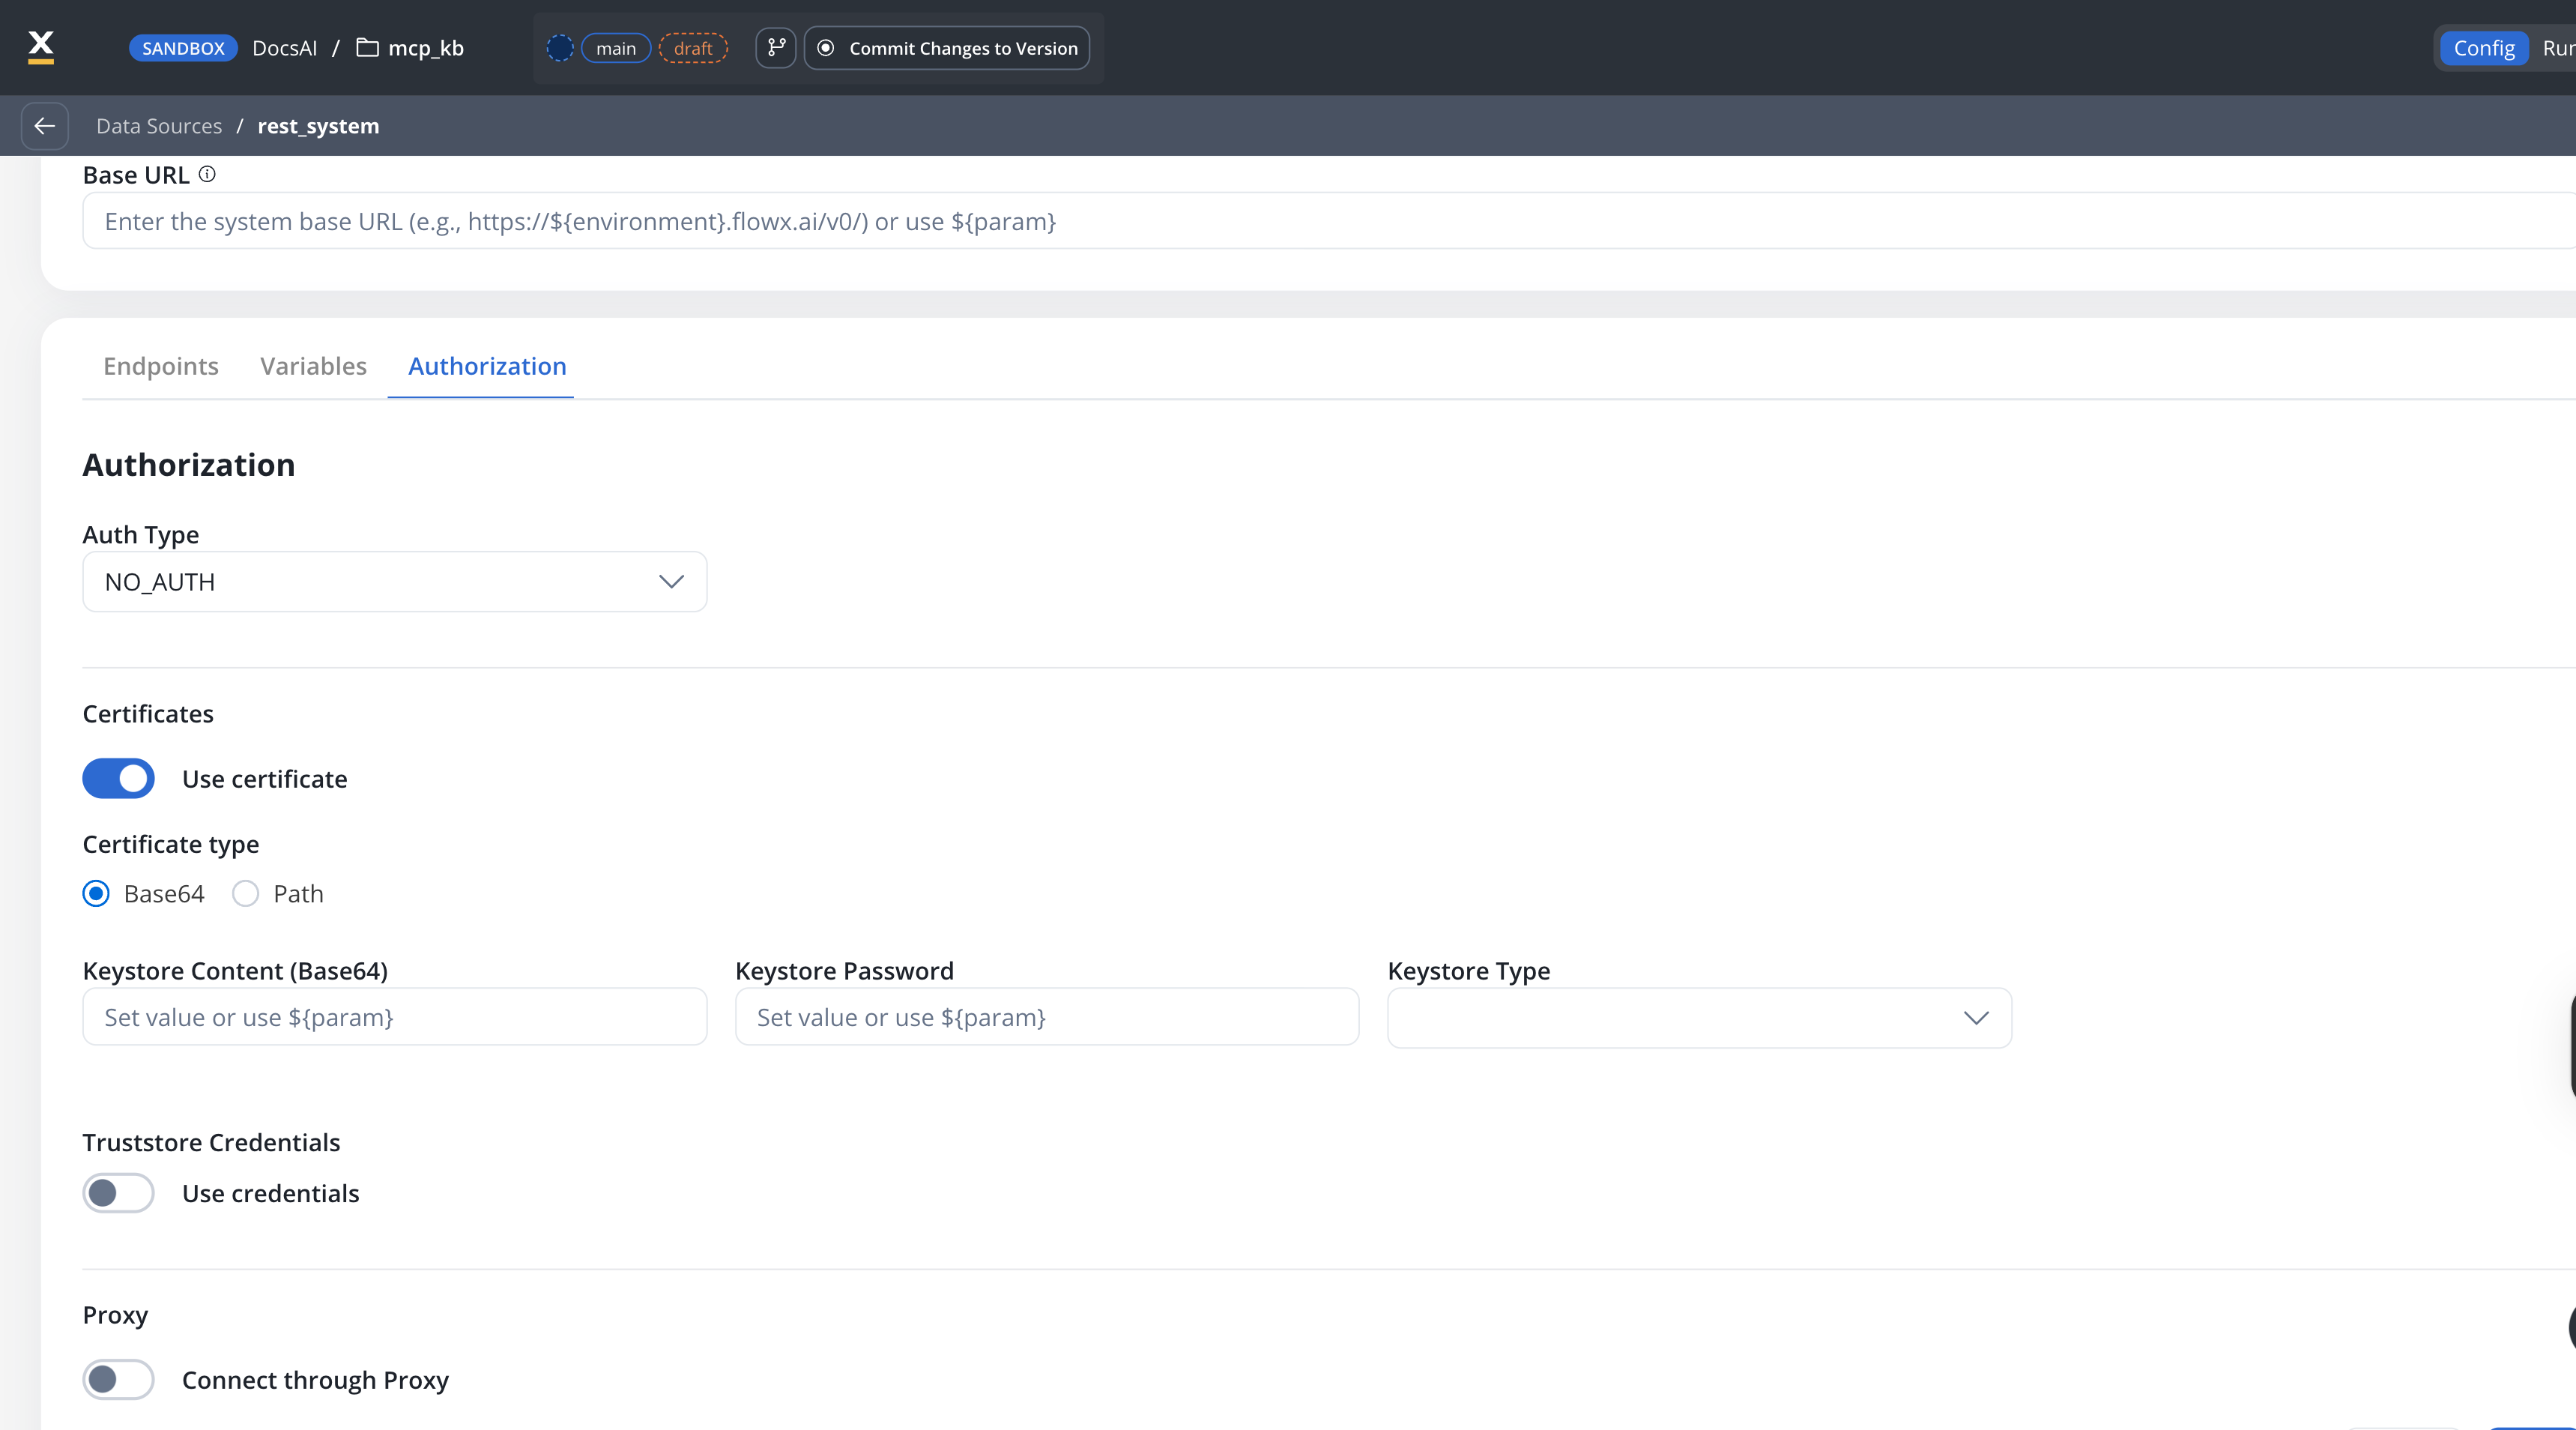
#### Certificates
Use this setup to configure secure communication with external systems that require certificates. It includes a Keystore (which holds the client certificate) and a Truststore (which holds trusted certificates). You can toggle these features based on the security requirements of the integration.
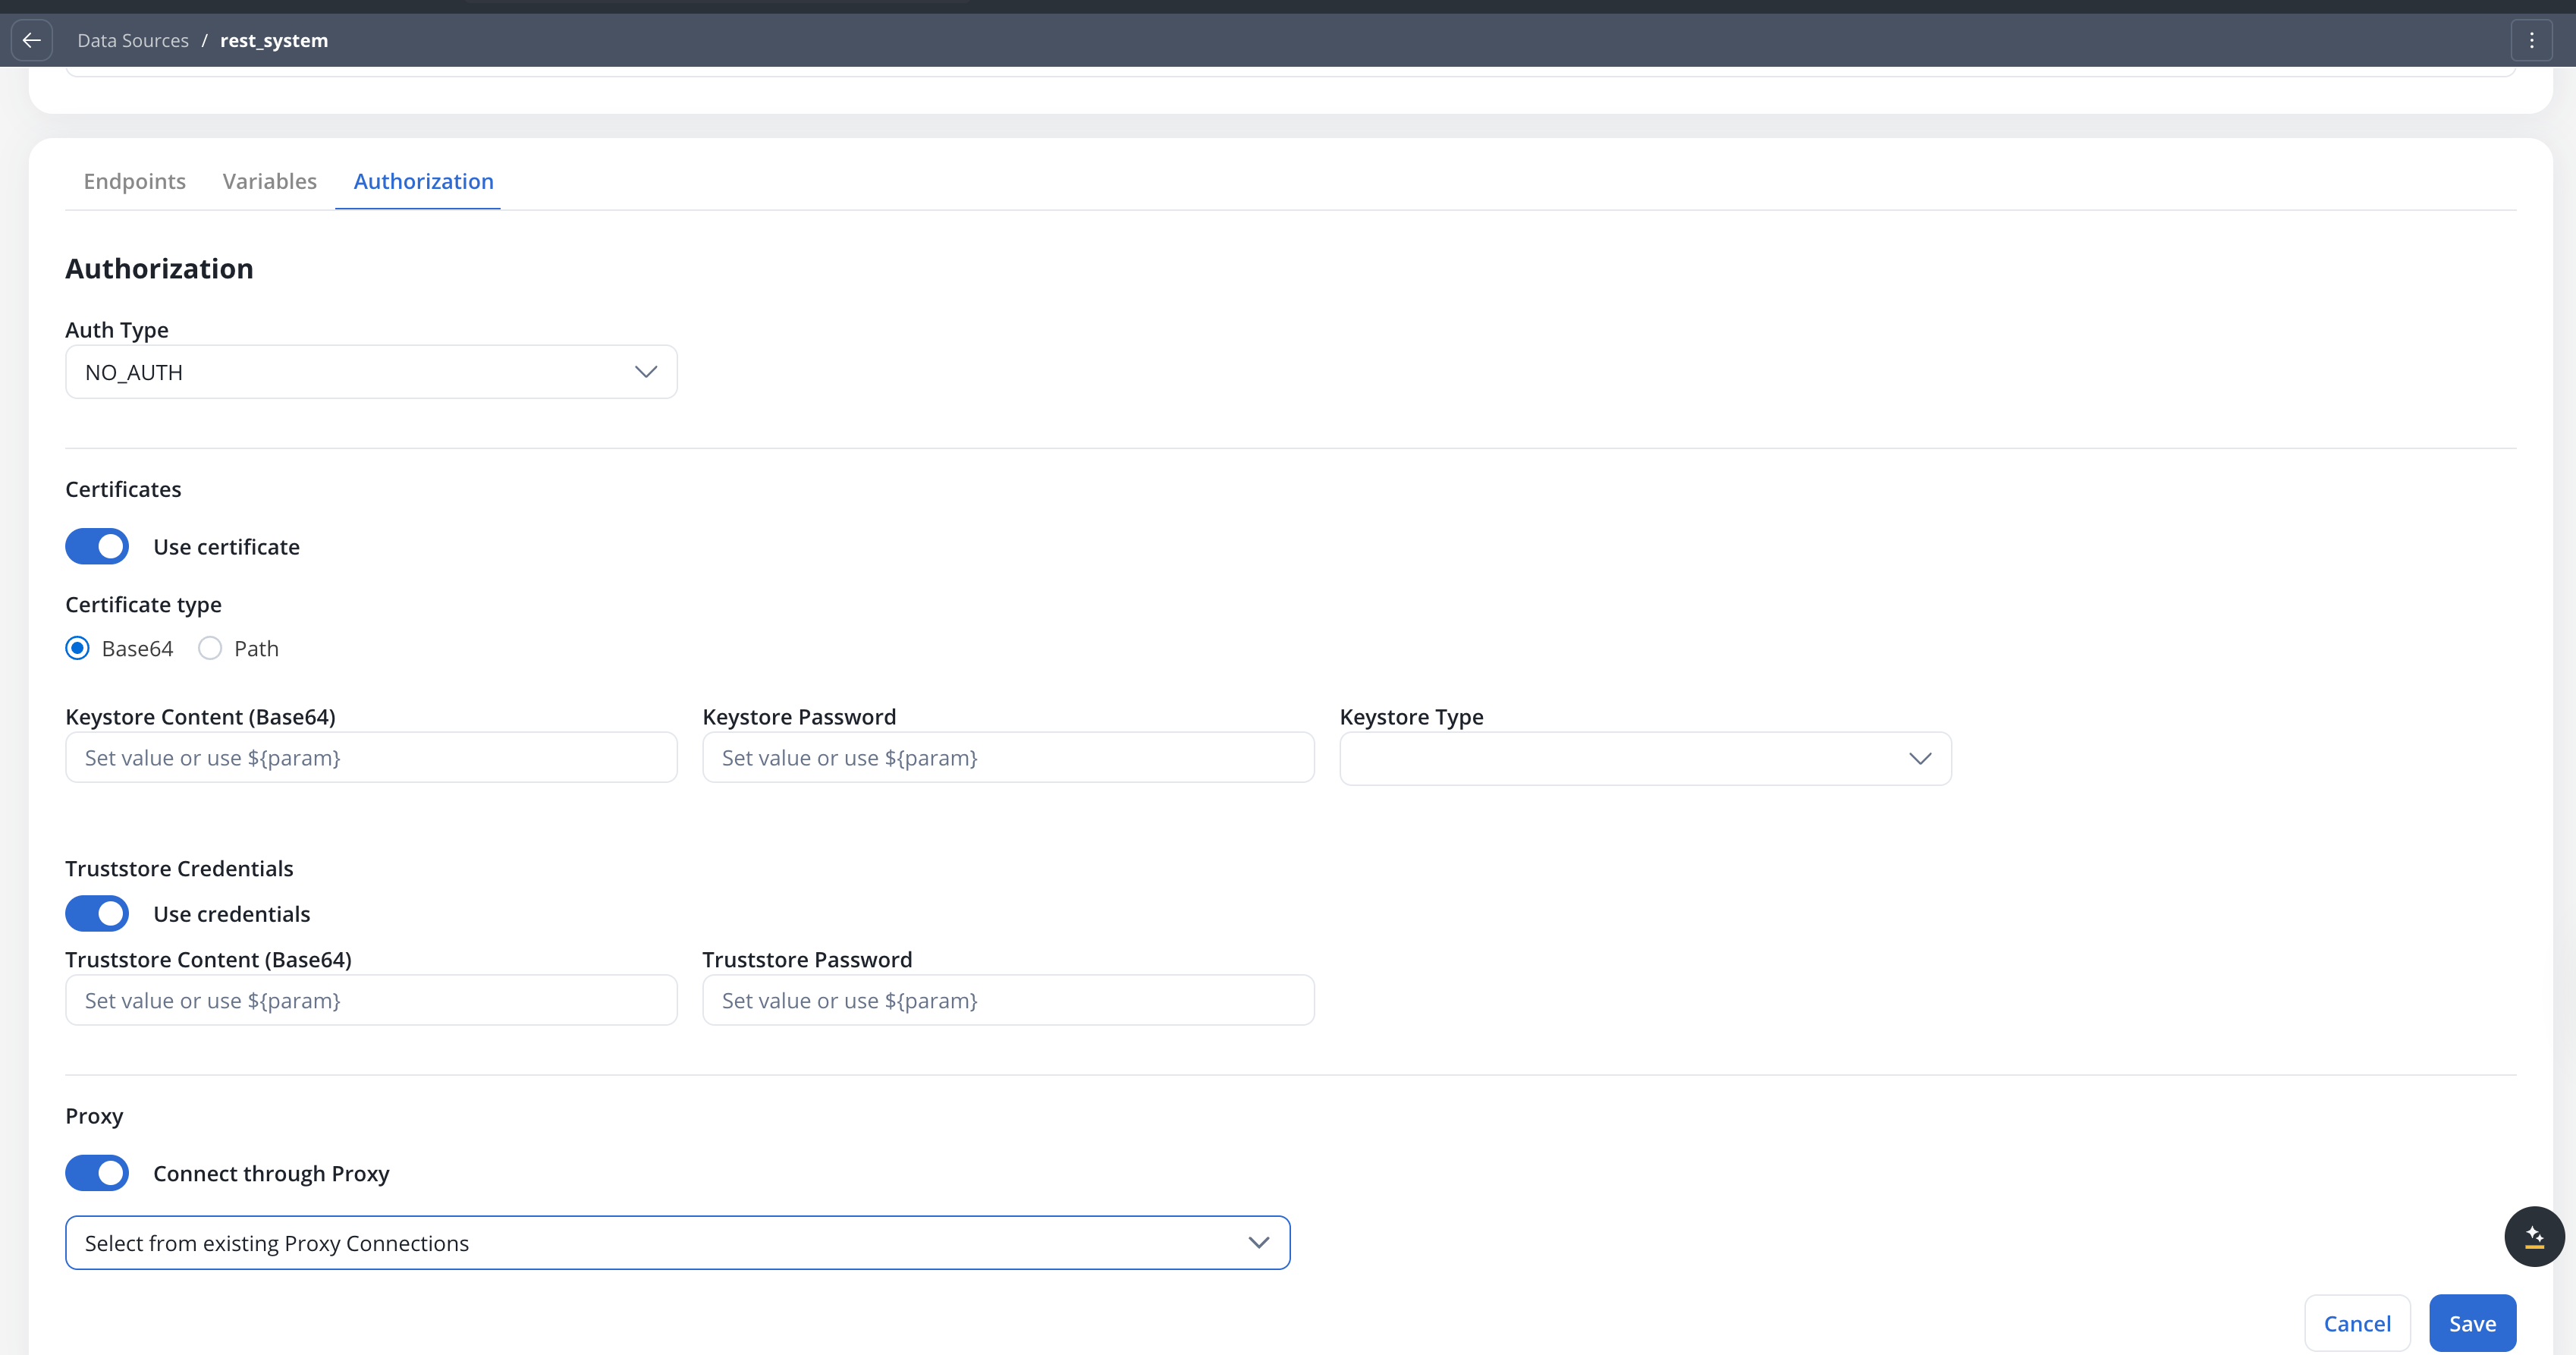
When the **Use Certificate** option is turned on, select a **Certificate type**:
* **Base64** (default for new configurations) — provide the certificate content directly as a base64-encoded string
* **Path** — provide the file system path to the certificate file
**Keystore credentials**
| Field | Base64 mode | Path mode |
| ----------------------------- | ------------------------------- | ----------------------------------------------------- |
| **Keystore Content (Base64)** | Base64-encoded keystore content | — |
| **Keystore Path** | — | File path, e.g., `/opt/certificates/testkeystore.jks` |
| **Keystore Password** | Password to unlock the keystore | Password to unlock the keystore |
| **Keystore Type** | `JKS` or `PKCS12` | `JKS` or `PKCS12` |
**Truststore credentials**
| Field | Base64 mode | Path mode |
| ------------------------------- | --------------------------------- | ------------------------------------------------------- |
| **Truststore Content (Base64)** | Base64-encoded truststore content | — |
| **Truststore Path** | — | File path, e.g., `/opt/certificates/testtruststore.jks` |
| **Truststore Password** | Password to access the truststore | Password to access the truststore |
All fields support `${configParam}` placeholders for dynamic per-environment resolution.
Use [Configuration Parameters Overrides](../../projects/runtime/configuration-parameters-overrides) to manage certificate content and passwords across environments (Dev, UAT, Production) without changing the data source configuration. For example, store the base64 keystore content in a config parameter and reference it with `${keystoreContent}`.
***
## File handling
You can now handle file uploads and downloads with external systems directly within Integration Designer. This update introduces native support for file transfers in RESTful connectors, reducing the need for custom development and complex workarounds.
**Important: Document replacement behavior**
When saving files to the Document Plugin, if you upload a file with the **same `customId` AND `documentType` combination** as an existing document, the previous document will be automatically **marked as deleted** and replaced by the new file.
This means:
* The previous file's URLs will stop working
* Only the most recent file with that `customId` + `documentType` combination will be accessible
**Best practices:**
* Always use **unique, dynamic values** for `customId` (for example, `${processInstanceId}`, `${clientId}`, `${uuid}`)
* Never copy examples with hardcoded values like `customId: "1234"` or `documentType: "BULK"` without changing them
* If you need to store multiple documents of the same type, ensure each has a unique `customId`
```json Example: Using dynamic customId theme={"system"}
{
"customId": "${processInstanceId}_${timestamp}",
"documentType": "CONTRACT"
}
```
### Core scenarios
Integration Designer supports two primary file handling scenarios:
Can call an external API (`GET` or `POST`) and receives a response containing one or more files. Integration Designer saves these files to a specified location and returns their new paths to the workflow for further processing.
Can send a file that is already stored in the **Document Plugin** or a custom **S3 Bucket** to an external API via a `POST` request. The workflow transmits the file path, enabling file transfer without manual handling.
Common use cases include contract generation workflows where data is sent to external document services and the generated files are retrieved back into the process.
***
### Receiving XML and SOAP responses
**Available starting with FlowX.AI 5.9.0**
Earlier releases assumed every response body was JSON — any other format failed the node even on a valid `2xx`. From 5.9.0, the engine honours the content type the endpoint declares and parses XML responses automatically.
REST endpoints can consume **JSON**, **XML** (including **SOAP** envelopes), and **plain text** responses. You don't pick the response format in a dropdown — the engine resolves it from the endpoint's request **Headers**:
1. The **`Accept`** header wins (what the integration expects back).
2. If `Accept` is absent, the request **`Content-Type`** is used as a fallback.
3. If neither is set, the engine runs in **automatic** mode and infers the format from the upstream's response `Content-Type`.
4. Wildcard `Accept` values (`*/*`, `application/*`, `text/*`) are treated as automatic — they don't commit to a format.
Media types are categorised as follows:
| Declared / received type | Parsed as | Resulting body |
| -------------------------------------------------------------------------------------- | --------- | ------------------------------------------- |
| `application/json`, `application/hal+json`, anything ending in `+json` | JSON | Object you map with `${...}` paths |
| `application/xml`, `text/xml`, anything ending in `+xml` (e.g. `application/soap+xml`) | XML | Object you map the same way as JSON |
| `text/*` (plain text, HTML) | Text | The raw string |
| Anything else / unset | Automatic | JSON if parseable, otherwise the raw string |
When an XML or SOAP response is parsed, you map its fields exactly like a JSON response (for example `${response.body.Envelope.Body.result}`). The original XML is preserved alongside the parsed object, so flows that need the raw markup can still access it.
The engine fails the node with a clear error when the response does not match what the endpoint declared:
* **Content type mismatch** — declared `application/json` but the upstream returned `text/plain`: `Expected response content type "application/json" but received "text/plain".`
* **Parse failure on a declared type** — declared XML but the body is malformed: `Response declared as XML but could not be parsed as XML.`
In automatic mode (or when XML was only *inferred* from the upstream's `Content-Type`), a parse failure does **not** fail the node — the raw string is returned instead, so a mislabelled upstream doesn't break the flow.
XML parsing is XXE-safe: external entity resolution and DTD processing are disabled, so XXE and entity-expansion payloads cannot read local files or exhaust memory.
XML bodies larger than 5 MiB are returned as raw strings without parsing.
To **send** a SOAP or XML request body, set the endpoint **Content type** to **Raw** and add the matching `Content-Type` header — see [Defining REST integration endpoints](#defining-rest-integration-endpoints) above.
***
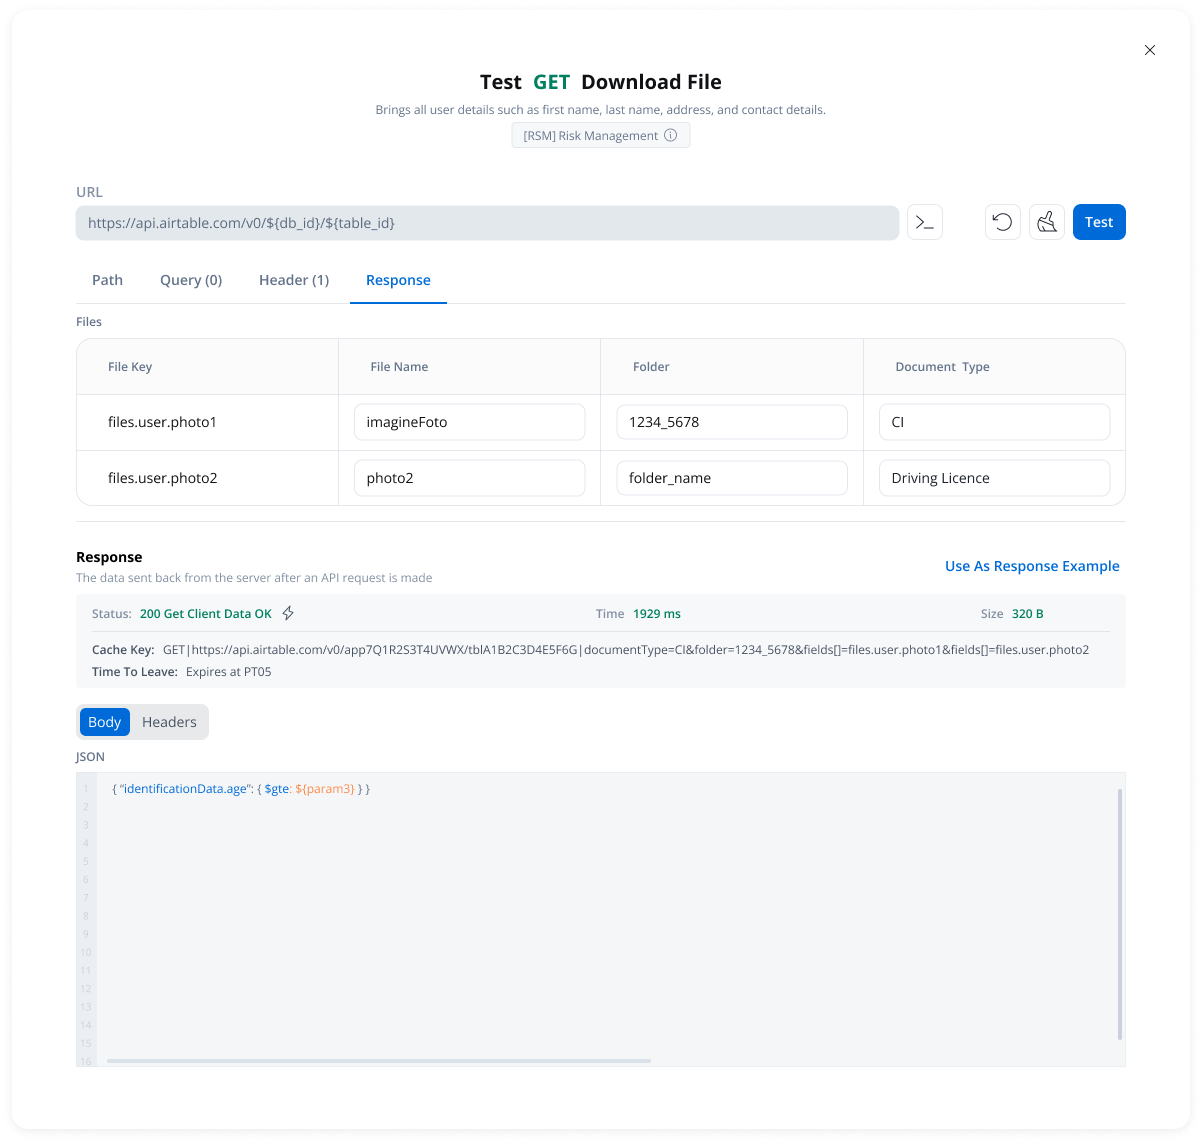
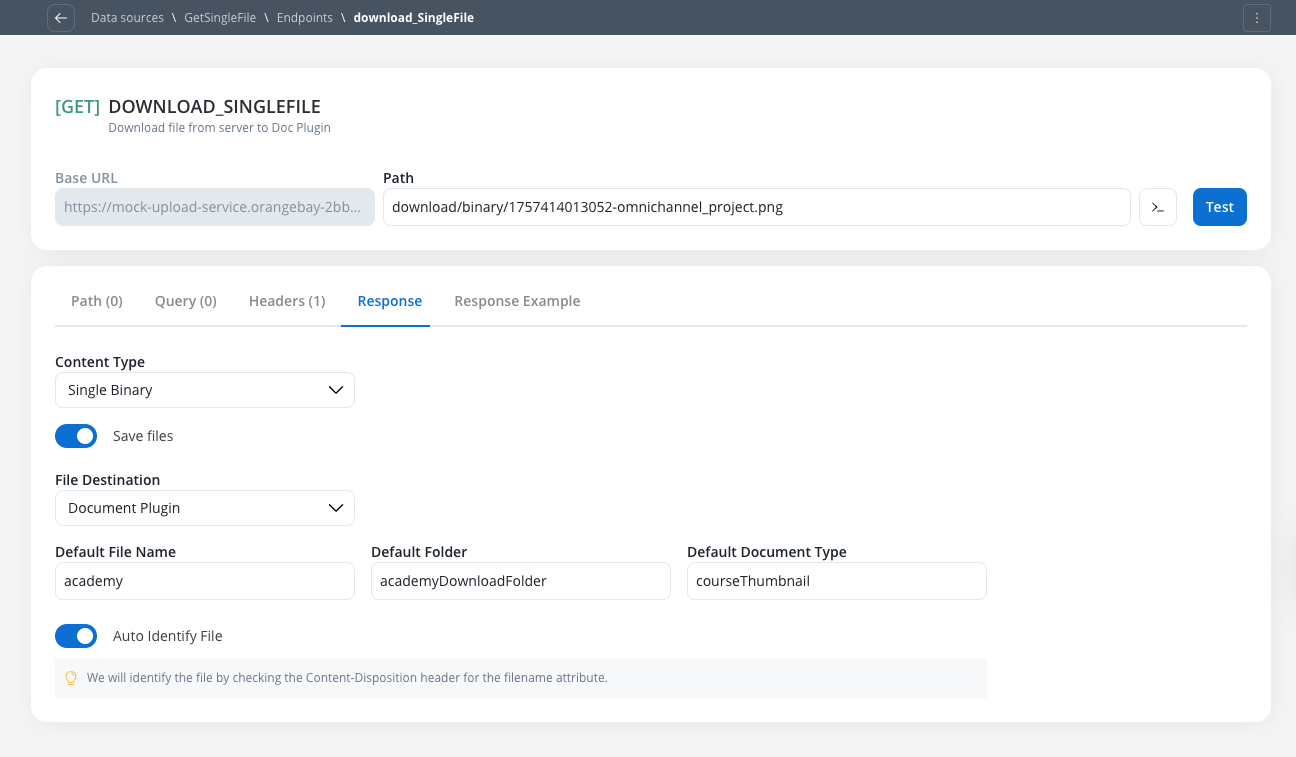
### Receiving files (endpoint response configuration)
To configure an endpoint to handle incoming files from an external system, navigate to its **Response** tab. This functionality is available for both `GET` and `POST` methods.
#### Enabling and configuring file downloads
Switch the **Save Files** toggle to the "on" position to activate file processing for the response.
If this toggle is **off**, the system will not process files. A `Single Binary` response will result in an error, and a `JSON` response with Base64 data will be passed through as a raw string.
Select the expected format of the successful API response from the **Content-Type** dropdown:
* `JSON` (Default): For responses containing Base64 encoded file data
* `Single Binary`: For responses where the body is the file itself
#### Handling JSON content-type
This option is used when the API returns a JSON object containing one or more Base64 encoded files.
**File Destination Configuration:**
Saves files to the platform's managed storage, linking them to a specific process instance. The Document Plugin acts as a wrapper over the file system and provides special integration capabilities with document templates.
The ID of the process instance. This field defaults to `${processInstanceId}` to be mapped dynamically at runtime.
When using Document Plugin for file operations, you typically send only the document reference (ID) rather than the entire file content. The Integration Designer handles the special integration with document templates automatically.
**Files Mapping Table:**
| Column | Description | Example |
| --------------------- | ----------------------------------------------------------- | ------------------ |
| **Base 64 File Key** | The JSON path to the Base64 encoded string | `files.user.photo` |
| **File Name Key** | *Optional.* The JSON path to the filename string | `files.photoName` |
| **Default File Name** | A fallback name to use if the File Name Key is not found | `imagineProfil` |
| **Default Folder** | The business-context folder, such as a client ID (`CNP`) | `folder_client` |
| **Default Doc Type** | The document type for classification in the Document Plugin | `Carte Identitate` |
Saves files to a custom S3 bucket, ideal for files not tied to a specific process instance or when Document Plugin is not available.
This configuration requires the same **Files** table but omits the `Process Instance` and `Default Document Type` fields since S3 storage operates independently of the FlowX document management system.
Use S3 Protocol when you want to manipulate files at the workflow level for scenarios like AI processing, report generation, or CMS integrations with unassociated documents.
The `Translate or Convert Enumeration Values` toggle can be used in conjunction with the `Save Files` feature.
#### Handling Single Binary content-type
This option is used when the entire API response body is the file itself. The Single Binary content-type is ideal for endpoints that return raw file data directly in the response body.
In the **Response** tab of your endpoint configuration:
1. Enable the **Save Files** toggle
2. Select **Single Binary** from the **Content-Type** dropdown
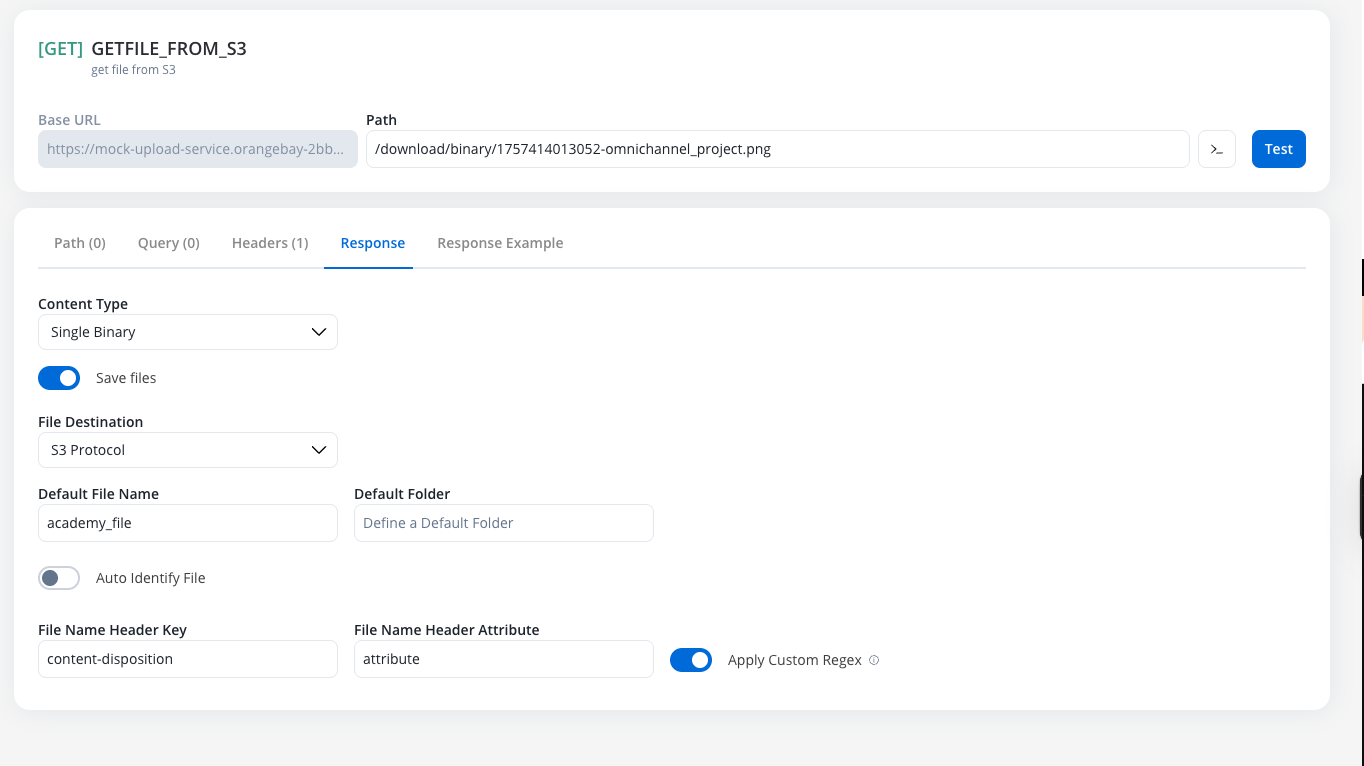
If the **Save Files** toggle is disabled, attempting to handle a Single Binary response will result in an error.
Select your preferred file storage destination:
For files stored in custom S3 buckets, ideal for files not tied to specific process instances.
For files managed by FlowX's document system, linked to process instances with additional metadata.
Choose how the system should identify the filename from the response.
**File Name Identification Methods:**
The system automatically parses the `Content-Disposition` HTTP header to extract the `filename` attribute. This is the standard approach for most file download endpoints.
**When to use:** When the external API follows standard HTTP conventions and includes file information in the `Content-Disposition` header.
**Example of standard Content-Disposition header:**
```
Content-Disposition: attachment; filename="document.pdf"
```
The system will automatically extract `document.pdf` as the filename.
Configure custom header parsing when the external system doesn't follow standard conventions or uses custom headers for file information.
Turn off the **Auto Identify File** toggle to enable manual configuration options.
The name of the HTTP header that contains the filename information.
**Examples:**
* `X-Dctm-Object-Name`
* `X-File-Name`
* `Custom-Filename-Header`
The specific attribute or value within the header to extract as the filename.
**Examples:**
* For simple headers: leave empty or use the full header value
* For complex headers: specify the attribute name
Enable the **Apply Custom Regex** toggle when you need to extract the filename using pattern matching.
**When to use regex:** When the filename is embedded within a larger header value and needs to be extracted using pattern matching.
**Example scenarios:**
* Header value: `filename=document.pdf; size=1024`
* Regex pattern: `filename=([^;]+)`
* Extracted result: `document.pdf`
**Common regex patterns:**
```regex theme={"system"}
# Extract filename from "filename=document.pdf"
filename=(.+)
# Extract filename with extension from complex header
([a-zA-Z0-9_-]+\.[a-zA-Z]{2,4})
# Extract quoted filename: filename="my document.pdf"
filename="([^"]+)"
```
Use manual configuration when working with legacy systems, custom APIs, or when the external server provides file information through non-standard headers.
**File Destination Configuration:**
For files managed within FlowX's document system with full process integration:
Fallback filename if header extraction fails
Business context folder (e.g., client ID, case number)
Document classification for the Document Plugin
Files stored via Document Plugin are automatically linked to process instances and can be used with document templates and other FlowX document features.
For files stored in custom S3 buckets with flexible storage options:
Fallback filename if header extraction fails
Optional folder structure within the S3 bucket
S3 Protocol storage is ideal for files that need to be processed by external systems, used in AI workflows, or when Document Plugin is not available.
**Configuration Examples:**
```json Auto Identify Example theme={"system"}
{
"contentType": "Single Binary",
"saveFiles": true,
"autoIdentifyFile": true,
"fileDestination": "S3 Protocol",
"defaultFileName": "downloaded_file",
"defaultFolder": "client_${clientId}"
}
```
```json Manual Configuration Example theme={"system"}
{
"contentType": "Single Binary",
"saveFiles": true,
"autoIdentifyFile": false,
"fileNameHeaderKey": "X-Document-Name",
"fileNameHeaderAttribute": "filename",
"applyCustomRegex": true,
"customRegex": "filename=\"([^\"]+)\"",
"fileDestination": "Document Plugin",
"defaultFileName": "fallback_document",
"defaultFolder": "documents",
"defaultDocumentType": "Contract",
}
```
***
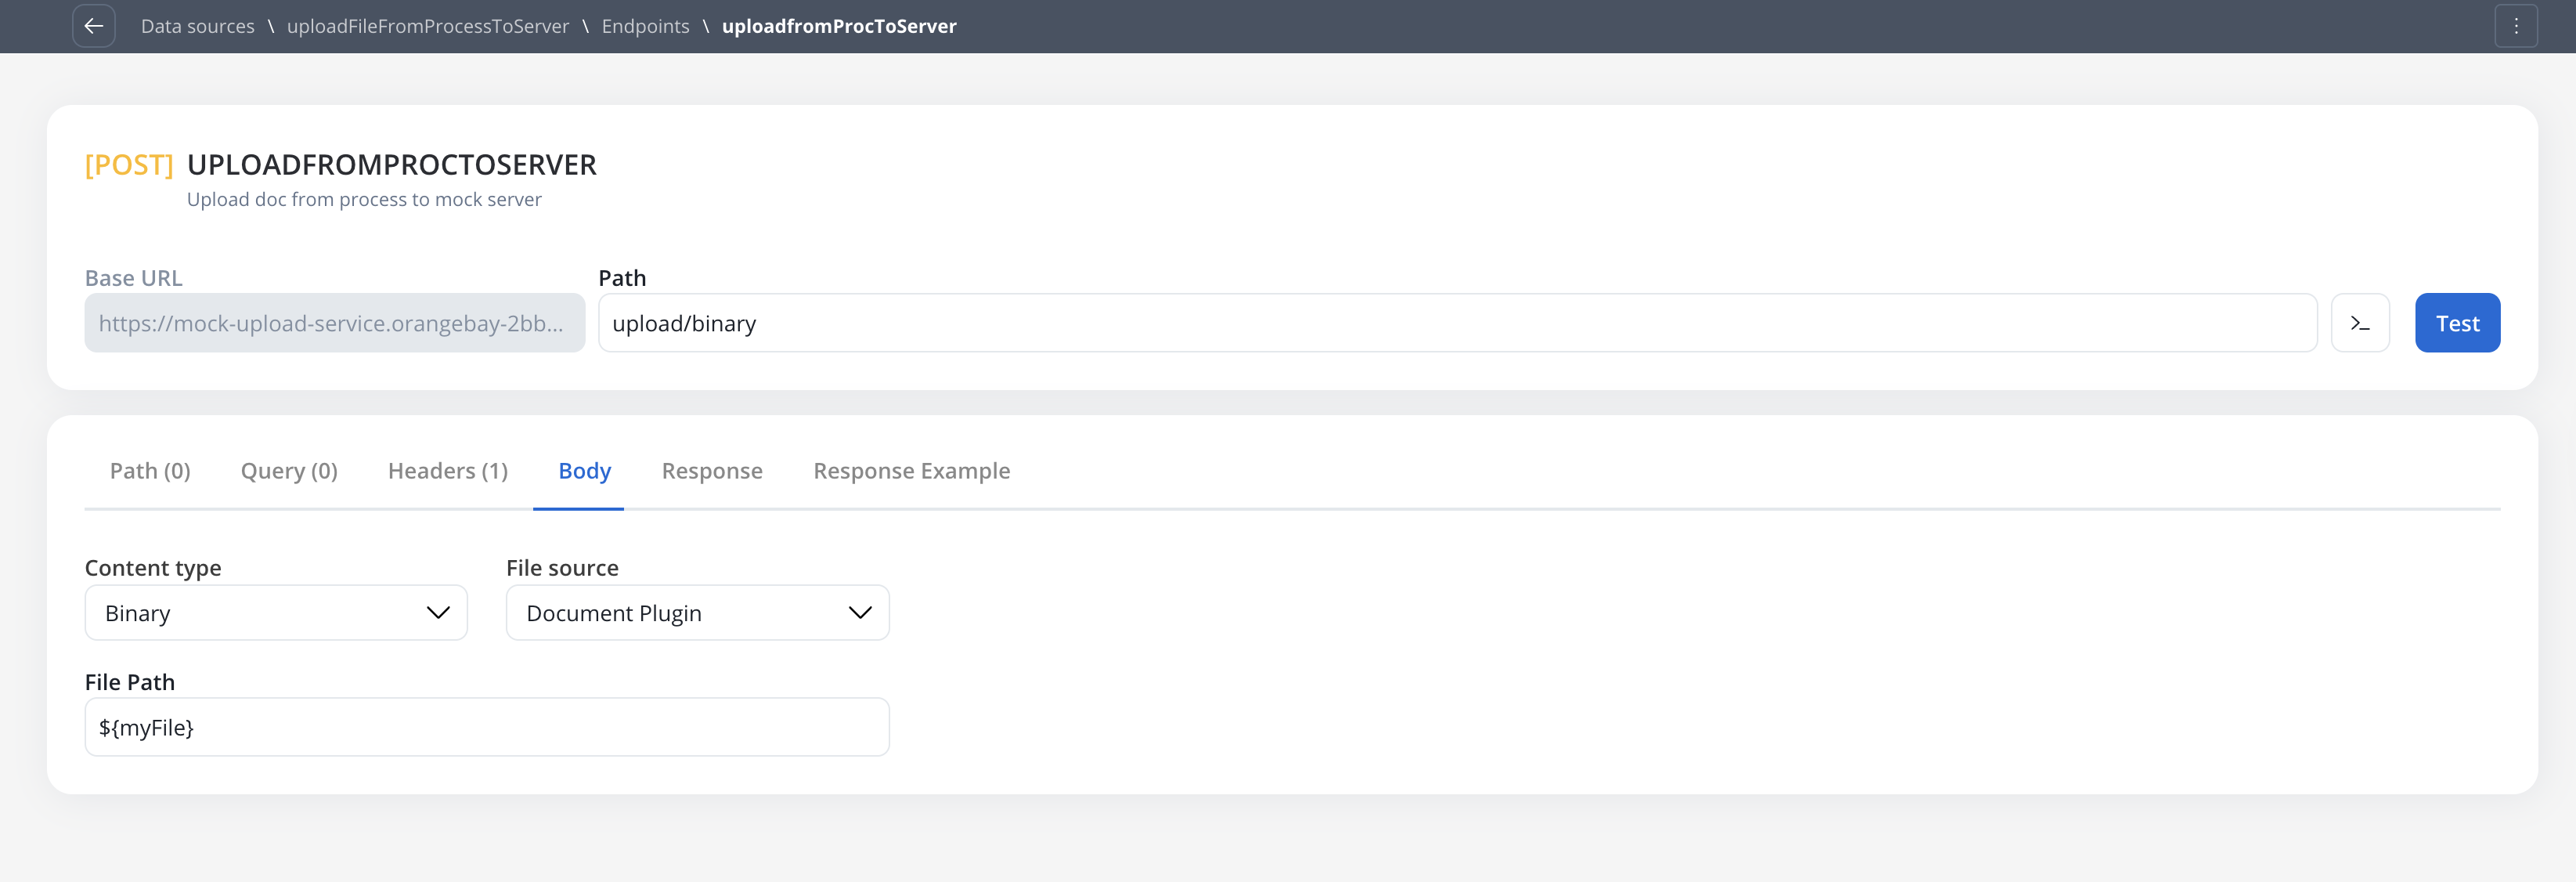
### Sending files (endpoint POST body configuration)
To configure an endpoint to send a file, navigate to the **Body** tab and select the appropriate **Content Type**.
#### Content Type: Multipart/Form-data
Use this to send files and text fields in a single request. This format is flexible and can handle mixed content types within the same POST request.
Select where the file originates:
* `Document Plugin`
* `S3 Protocol`
Add rows to the resource table, defining each part of the form:
* **Key Type**: Choose `File` or `Text`
* **Value**:
* For files: Provide the `filePath` (Minio path for S3 or Document Plugin reference)
* For text: Provide the string value or variable reference
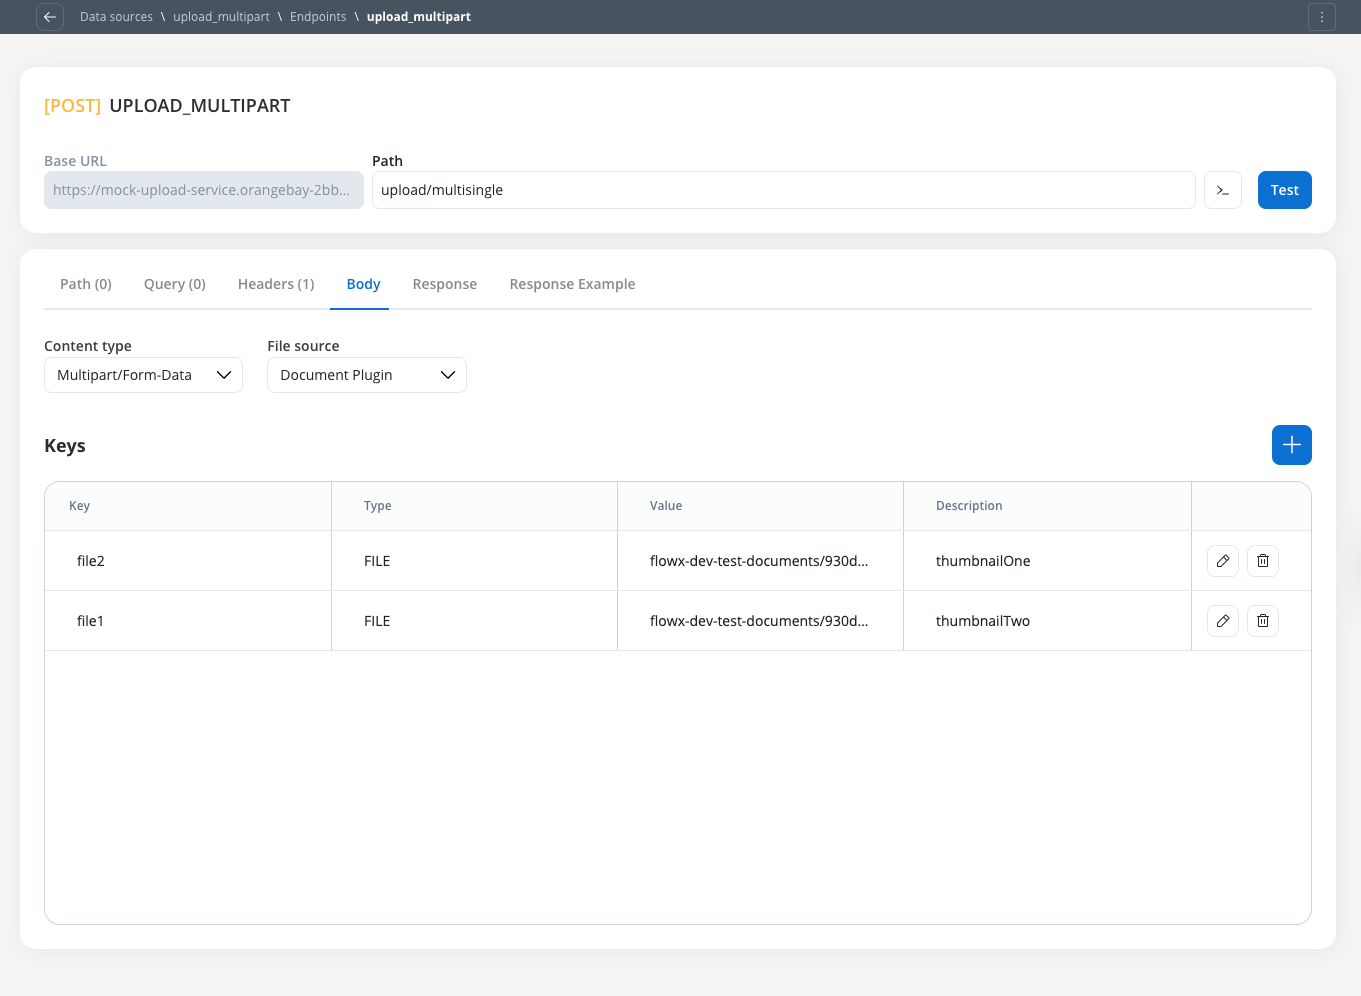
Multipart requests can be sent even without files - you can include only text fields by setting all Key Types to `Text`. The difference between content types is primarily in how data is packaged for transmission to the target server.
#### Content Type: Single binary
Use this to send the raw file as the entire request body. This method sends only the file content without any additional form data or metadata.
Select `Document Plugin` or `S3 Protocol`
Specify the path of the file to be sent (Minio path for the file location)
When using Single Binary, only the Minio path is required since the entire request body will be the file content itself, without any additional packaging or metadata.
#### Content Type: JSON
This option should be used for standard JSON payloads **only**. It does not support embedding files for uploads; use `Multipart/Form-Data` or `Single Binary` for that purpose.
***
### Runtime behavior & testing
#### Workflow node configuration
All configured file settings (for example, `File Path`, `Folder`, `Process Instance ID`) are exposed as parameters on the corresponding workflow nodes, allowing them to be set dynamically using process variables at runtime.
#### Response payload & logging
When a node successfully downloads and saves a file, its output will contain the **`filePath`** to the stored file, **not** the raw Base64 string or binary content.
For security and performance, runtime logs will also only contain the `filePath`, not the raw file content.
#### Error handling
If a node is configured to receive a `Single Binary` file but the external system returns a `JSON` error (for example, file not found), the JSON error will be correctly passed through to the workflow for handling.
#### Testing guidelines
The **Test Modal** is context-aware. It will only display input fields for file parameters (`Process Instance ID`, `Folder`, etc.) if `Save Files` is enabled on the endpoint.
If you test an endpoint that returns a binary file without configuring it as `Single Binary`, the test will fail with the error: "*Endpoint returns a binary file. Please configure the Content-Type to handle binary responses.*"
The **Response Example** tab is now separate from the **Response** configuration tab and includes both `Body` and `Headers` sections for better clarity.
### Example: sending files to an external system after uploading a file to the Document Plugin
In this example, we'll send a file to an external system using the Integration Designer.
Configure a process where you will upload a file to the Document Plugin.
* Configure a User Task node where you will upload the file to the Document Plugin.
* Configure an Upload File Action node to upload the file to the Document Plugin.
* Configure a Save Data Action node to save the file to the Document Plugin.
Configure the Integration Designer to send the file to an external system:
* Configure a REST Endpoint node to send the file to an external system.
***
## Workflows
A workflow defines a series of tasks and processes to automate system integrations. Within the Integration Designer, workflows can be configured using different components to ensure efficient data exchange and process orchestration.
### Creating a workflow
1. Navigate to Workflow Designer:
* In FlowX.AI Designer to **Projects -> Your application -> Integrations -> Workflows**.
* Create a New Workflow, provide a name and description, and save it.
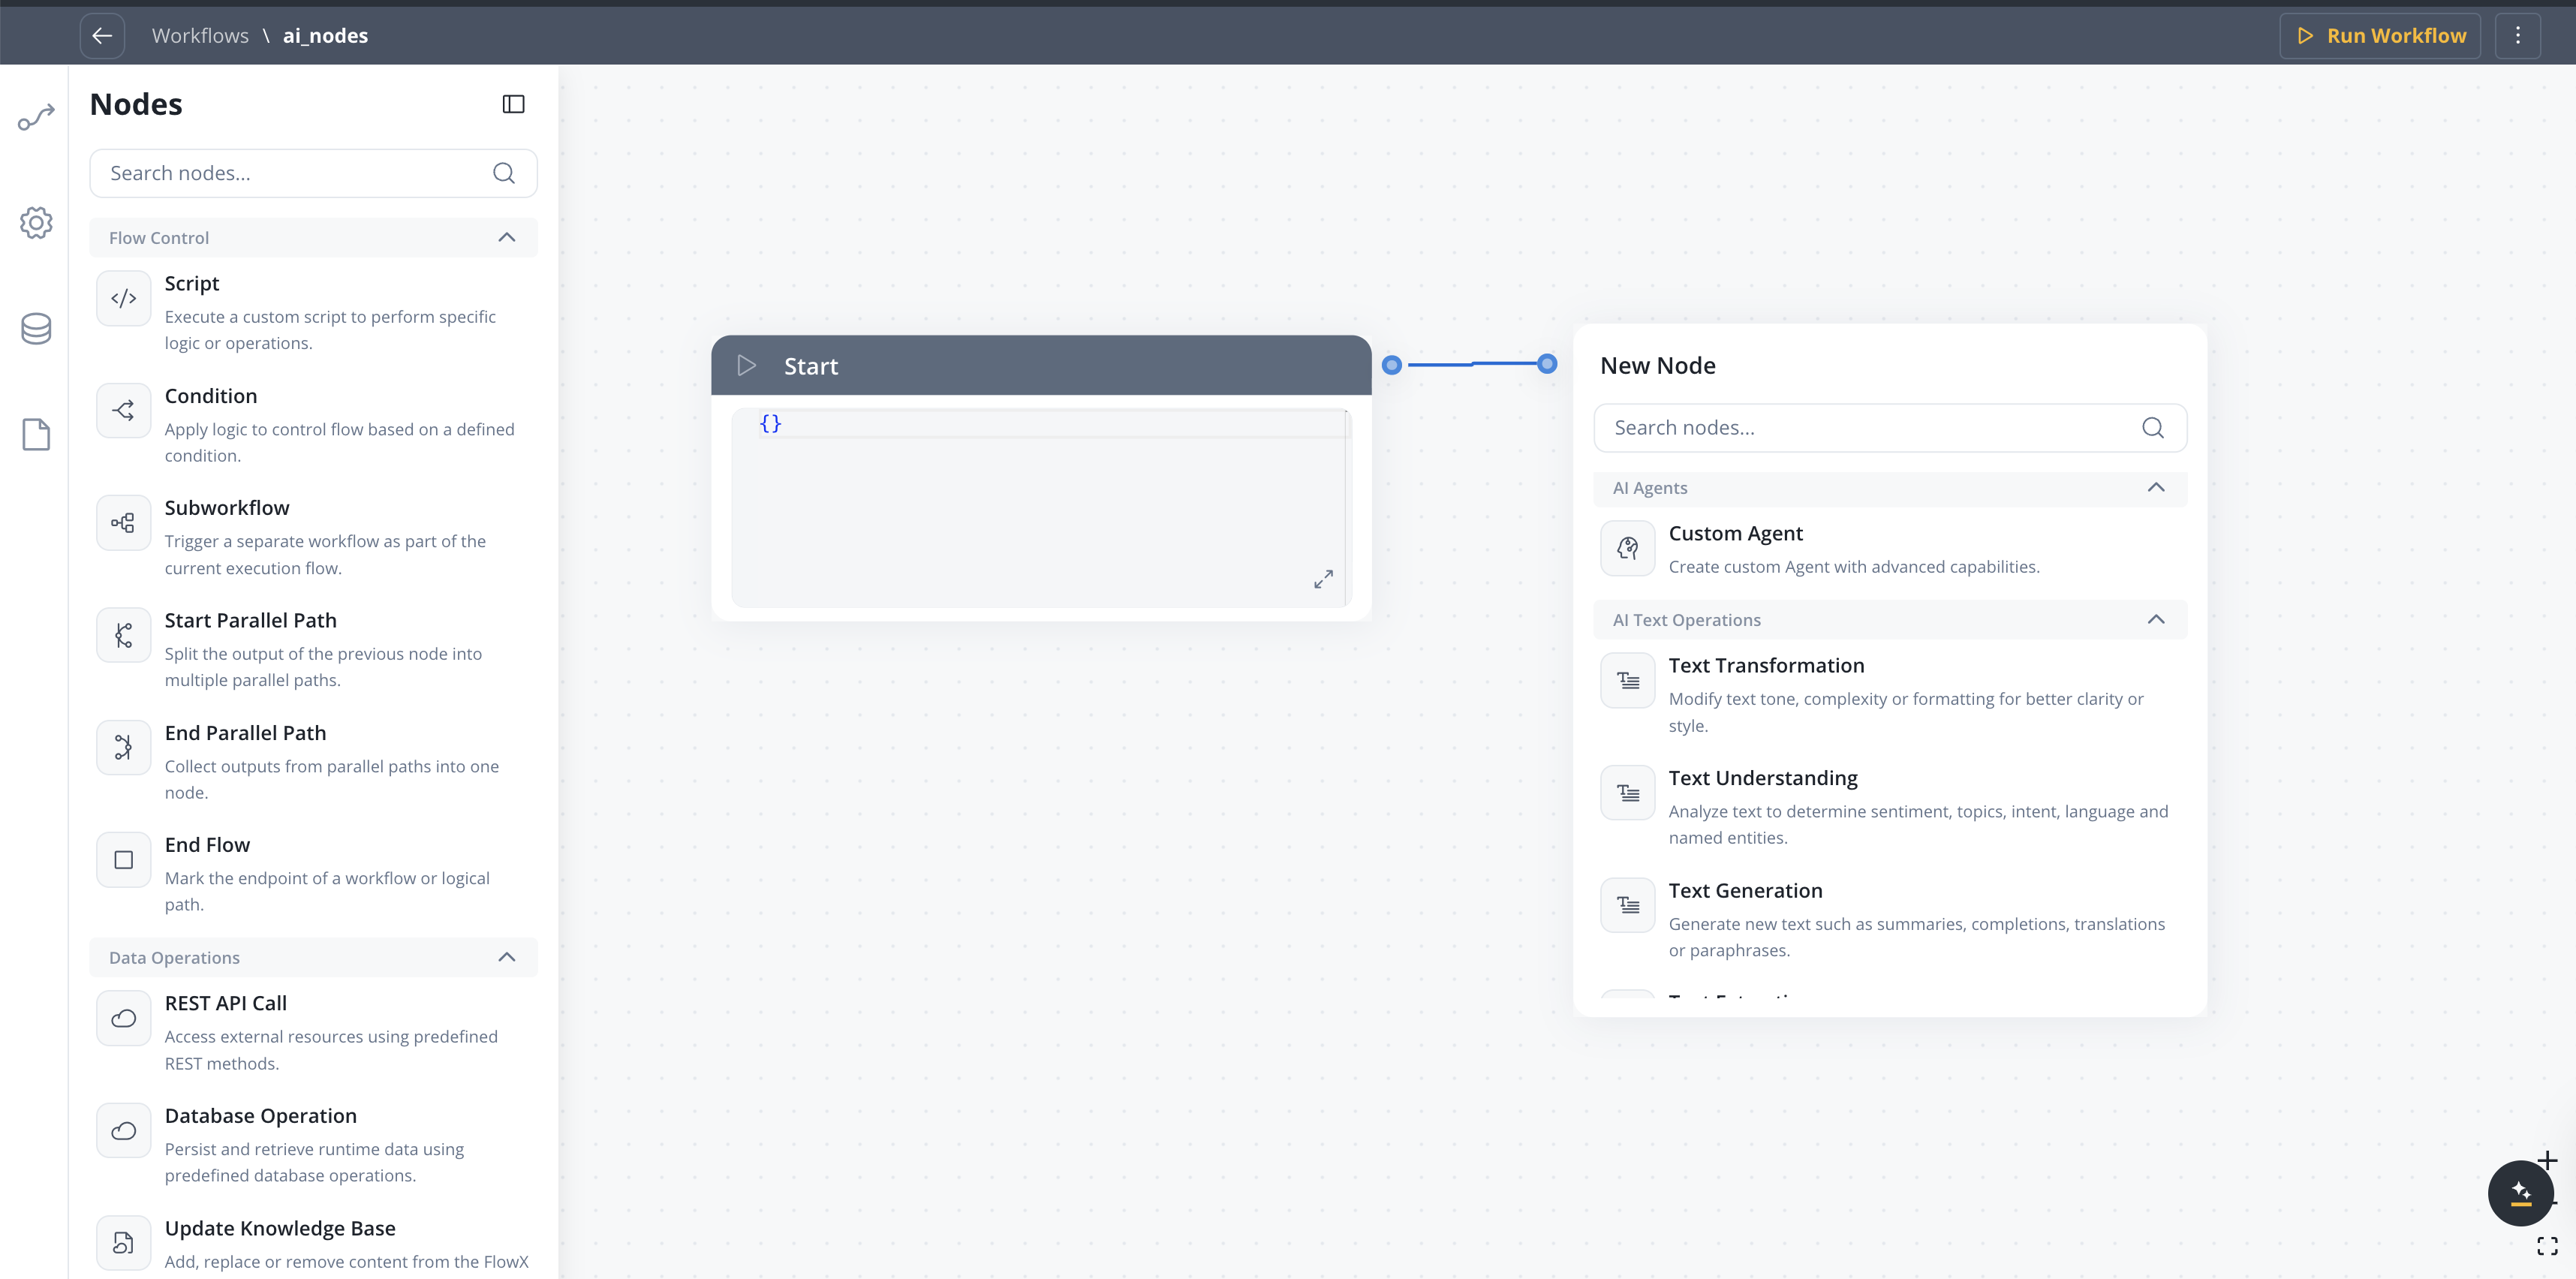
2. Start to design your workflow by adding nodes to represent the steps of your workflow:
* **Start Node**: Defines where the workflow begins and also defines the input parameter for subsequent nodes.
* **REST endpoint nodes**: Add REST API calls for fetching or sending data.
* **FlowX Database nodes**: Read and write data to FlowX Database collections.
* **Custom Agent nodes**: Enable AI agents to use MCP tools for intelligent task automation.
* **Intent Classification nodes**: Classify user messages using AI and route the workflow to the matching intent branch.
* **Context Retrieval nodes**: Perform RAG searches against Knowledge Bases to retrieve relevant chunks without calling an LLM.
* **Parallel workflow execution**: Execute multiple workflow branches concurrently to improve performance and reduce total execution time.
* **Fork nodes (conditions)**: Add conditional logic for decision-making.
* **Data mapping nodes (scripts)**: Write custom scripts in JavaScript or Python.
* **Subworkflow nodes**: Invoke other workflows as reusable components.
* **Navigate in UI Flow nodes**: Navigate users to specific UI Flow screens from conversational workflows, passing dynamic parameters.
* **Web Page Extractor nodes**: Crawl web pages, follow links up to a configurable depth, and extract content for use in workflows or Knowledge Bases.
* **End Nodes**: Capture output data as the completed workflow result, ensuring the process concludes with all required information.
* **Update Knowledge Base**: Update the Knowledge Base with the results of the workflow.
### Workflow nodes overview
Workflow nodes are the building blocks of your integration logic. Each node type serves a specific function, allowing you to design, automate, and orchestrate complex processes visually.
| Node Type | Purpose |
| --------------------------- | ------------------------------------------------------------------------------------------------------ |
| Start Node | Defines workflow input and initializes data |
| REST Endpoint Node | Makes REST API calls to external systems |
| FlowX Database Node | Reads/writes data to the FlowX Database |
| Custom Agent Node | Enables AI agents to use MCP tools for intelligent automation |
| Intent Classification Node | Classifies user messages using AI and routes to matching intent branches |
| Context Retrieval Node | Retrieves relevant data from Knowledge Bases or memory using semantic, keyword, or hybrid search |
| AI Nodes | Process text, documents, images, and data using AI-powered capabilities |
| Condition (Fork) | Adds conditional logic and parallel branches |
| Script Node | Transforms or maps data using JavaScript or Python |
| Update Knowledge Base | Update the Knowledge Base with the results of the workflow |
| Subworkflow Node | Invokes another workflow as a modular, reusable subcomponent |
| Navigate in UI Flow | Navigates the user to a specific screen in a UI Flow from a conversational workflow |
| Web Page Extractor | Crawls web pages, follows links up to a configurable depth, and extracts content |
| End Node | Captures and outputs the final result of the workflow |
| Parallel Workflow Execution | Execute multiple workflow branches concurrently to improve performance and reduce total execution time |
***
### Workflow data models
Workflow Data Models bring structured data management to Integration Designer workflows, enabling you to define input and output parameters at the workflow level, similar to Process Data Models.
#### Key benefits
Input parameters automatically pre-fill the Start Node from the data model—no manual JSON editing
Ensure data consistency across processes and workflows with structured data models
Define data types and validation rules at the workflow level for runtime safety
Map data bidirectionally between processes and workflows using data mappers
#### Quick start
Create entities and attributes for your workflow data structure
Select which attributes will be workflow input parameters
Start Node is automatically populated with structured data from your data model
Use data mappers to pass data between processes and workflows
Learn how to create workflow data models, configure input/output parameters, and integrate with processes
***
### Start node
The Start node is the mandatory first node in any workflow. It defines the input data model and passes this data to subsequent nodes.
Define all required input fields in the Start node to ensure data mapping from processes or user tasks.
Use [Workflow Data Models](./workflow-data-models) to define structured input and output parameters at the workflow level. Input parameters automatically pre-fill the Start Node from the data model.
***
### REST endpoint node
Enables communication with external systems via REST API calls. Supports GET, POST, PUT, PATCH, and DELETE methods. Endpoints are selected from a dropdown, grouped by system.
* **Params**: Configure path, query, and header parameters.
* **Input/Output**: Input is auto-populated from the previous node; output displays the API response.
You can test REST endpoint nodes independently to validate connections and data retrieval.
***
### FlowX database node
Allows you to read and write data to the FlowX Database within your workflow.
Learn more about FlowX Database operations, collections, and usage
***
### Context Retrieval node
Retrieves relevant data from Knowledge Bases or conversation memory using semantic and keyword search. Available under **Data Operations** in the workflow node palette.
**Configuration:**
* **Source** — choose between Knowledge Base or Memory (Memory is available only in conversational workflows)
* **Knowledge Base** — select a Knowledge Base to search (when source is Knowledge Base)
* **User Query** — the search query, supports process variable expressions (e.g., `${userMessage}`)
* **Search Type** — Hybrid (default), Semantic, or Keywords
* **Max Number of Chunks** — how many chunks to return (1-10, default: 5)
* **Min Relevance Score** — minimum relevance threshold (0-100%, default: 70%)
* **Metadata Filters** — filter chunks by metadata properties using the query builder: typed operators per key type and AND/OR grouping
* **Use advance metadata filters** — toggle to enable expression-based filtering for complex logic
* **Use Re-rank** — toggle to re-rank retrieved chunks before returning
Learn how to configure Context Retrieval and Custom Agent nodes with Knowledge Bases
***
### Custom Agent node
Enables AI agents to perform intelligent, autonomous tasks using Model Context Protocol (MCP) tools within your workflow. Custom Agent nodes apply ReAct (Reasoning and Acting) to decide which tools to use and execute multi-step operations.
**Key capabilities:**
* Access external systems through MCP servers
* Execute complex, multi-step operations autonomously
* Make intelligent decisions based on available tools
* Return structured responses for downstream processing
**Use cases:**
* Customer support automation with CRM integration
* Data analysis across multiple systems
* Dynamic integration orchestration
* Autonomous problem-solving workflows
Learn how to configure Custom Agent nodes, write effective prompts, and monitor AI agent execution
***
### Intent Classification node
Classifies user messages using an LLM and automatically routes the workflow to the matching intent branch — combining AI classification and conditional branching in a single node. Works like a [Condition (Fork)](#condition-fork-node) node, but uses natural language intent descriptions instead of code expressions.
**Key capabilities:**
* Define up to 10 intents as plain-text descriptions
* Automatic "If No Intent Matches" fallback branch
* Optional conversation memory for context-aware classification
* Optional rationale output explaining the classification decision
**Common use cases:**
* Chatbot message routing
* Email triage and classification
* Customer support ticket categorization
Learn how to configure intents, output format, and routing behavior
***
### Context Retrieval node
Performs a RAG (Retrieval-Augmented Generation) search against a Knowledge Base and returns relevant chunks — without calling an LLM. Use this node when you need to retrieve information from a Knowledge Base and pass it to downstream nodes for further processing.
**Key capabilities:**
* Query Knowledge Bases using semantic, keyword, or hybrid search
* Configure relevance thresholds and result limits
* Apply property-based filters to narrow results
* Optional re-ranking for improved result quality
* Returns structured chunk data (content, metadata, relevance score, store)
**Common use cases:**
* Feeding context into a downstream Custom Agent or Text Generation node
* Building multi-step RAG pipelines with custom processing between retrieval and generation
* Retrieving relevant documentation chunks for further analysis
Learn how to configure Context Retrieval nodes, search types, and output format
***
### AI Nodes
AI nodes enable intelligent processing of text, documents, images, and data directly within your Integration Designer workflows.
#### AI Text Operations
| Node | Description |
| ----------------------- | -------------------------------------------------------------------------------- |
| **Text Transformation** | Modify text tone, complexity or formatting for better clarity or style |
| **Text Understanding** | Analyze text to determine sentiment, topics, intent, language and named entities |
| **Text Generation** | Generate new text such as summaries, completions, translations or paraphrases |
| **Text Extraction** | Extract structured information, keywords or metadata from text |
#### AI Document Operations
| Node | Description |
| -------------------------- | --------------------------------------------------------------------------------- |
| **Document Generation** | Automatically build reports or complete templates based on given inputs |
| **Document Extraction** | Identify and extract structured data, entities or metadata from documents |
| **Document Understanding** | Analyze documents to extract meaning, topics, sentiment, or important information |
| **Extract Data from File** | Extract text and data from documents and images using LLM, OCR, or text parsing |
#### AI Image Operations
| Node | Description |
| --------------------- | ----------------------------------------------------------------------------- |
| **Image Description** | Generate captions or extract detailed information from visual content |
| **Image Analysis** | Recognize objects, emotions and scenes in images for contextual understanding |
#### AI Data Operations
| Node | Description |
| ----------------------- | -------------------------------------------------------------------------- |
| **Data Enrichment** | Add annotations, context or relationships to enhance raw data value |
| **Data Generation** | Produce synthetic or structured data using templates and logic-based rules |
| **Data Transformation** | Clean, normalize, aggregate, or restructure datasets into usable formats |
Learn more about AI node types and configuration options
#### Personal Information Guard
The Personal Information Guard is a configuration block on every AI workflow node. Iteration 1 covers Custom Agent, Intent Classification, Extract Data from File, and all AI Text, Document, Image, and Data Operations.
**Configuration**
| Field | Description |
| ------------------- | ------------------------------------------------------------------------------------------------------------------------------------------------------------------------------------------------------------------------------------------------------------------------------------- |
| `enabled` | Turn the guard on for the node. |
| `sensitivityPreset` | One of `STRICT`, `BALANCED`, `RELAXED`, `CUSTOM`. Maps to a server-side detection threshold; `CUSTOM` exposes the `customSensitivity` slider (0.00–1.00). |
| `customSensitivity` | Threshold value used when `sensitivityPreset = CUSTOM`. |
| `scanDirections` | Set of `INPUT` and/or `OUTPUT`. Both can be enabled. Empty sets are rejected. |
| `entityKeys` | Entity types to detect (e.g., `EMAIL_ADDRESS`, `PHONE_NUMBER`, `IBAN_CODE`). The Designer modal groups them under three scopes: **Universal**, **Regional EN**, and **Regional RO**. The catalog is served from `GET /integration/api/workflows/personal-information-guard/entities`. |
**How it works**
* **Input scan** runs before the AI request is built, so placeholder substitution and the user-message extraction both see redacted data. The `systemPrompt` is scanned alongside inputs because operation-prompt templates may carry PII from earlier nodes.
* **Source-file scan** runs for document and image AI nodes. The Data Privacy service uploads the redacted artifact back to the same storage as the source (so `filePathForRequest` is swapped without changing the data source binding).
* **Output scan** runs after the LLM completes, on a bounded-elastic scheduler so the Data Privacy WebClient call does not pin the reactor-netty event loop.
* **System-prompt appender** — for Custom Agent nodes, the runner appends a non-editable segment teaching the LLM how to handle `` placeholders. The appender runs after the prompt scan so its literal tags are not mistaken for PII.
* **Fail-closed** — any error from the Data Privacy service stops execution. The error surfaces on the node run log; redacted artifacts are not produced on failure.
**Run-log fields**
Each enabled scan adds a `personalInformationGuard` block on the node response (`AiNodeResponseDetailsDTO`):
| Field | Description |
| -------------------------------------------- | ----------------------------------------------------------------------------------------------- |
| `scanStatus` | `COMPLETED`, `SKIPPED`, or `FAILED`. |
| `totalDetections` | Total number of entities detected across `detections`. |
| `detections` | List of per-entity detection items (see below). Empty when nothing was detected. |
| `errorMessage` | Populated when `scanStatus = FAILED`. |
| `sourceType` | `TEXT`, `DOCUMENT`, or `IMAGE`. Identifies what the scan ran against. Null for text-only scans. |
| `originalStoragePath`, `redactedStoragePath` | Set for `DOCUMENT` and `IMAGE` scans; both point at the data source bound to the node. |
Each item in `detections` carries:
| Field | Description |
| --------------- | ------------------------------------------------------------------------------------------------------------ |
| `entityKey` | Entity type detected (e.g., `EMAIL_ADDRESS`, `PHONE_NUMBER`, `IBAN_CODE`). |
| `confidence` | Detector confidence score, `0.00`–`1.00`. |
| `originalValue` | The exact substring that was matched in the source. |
| `replacement` | The placeholder string that replaced `originalValue` before the LLM call. |
| `direction` | `INPUT` or `OUTPUT` — which scan direction produced this detection. |
| `sourceType` | `TEXT`, `DOCUMENT`, or `IMAGE` — matches the wrapper's `sourceType` and indicates which payload was scanned. |
| `timestamp` | When the detection was made. |
| `regions` | List of bounding boxes (`x`, `y`, `width`, `height`) for `DOCUMENT` and `IMAGE` detections. Null for `TEXT`. |
Document and image scans surface the same per-entity detail as text scans, so the run console shows the matched values, replacements, and confidences regardless of which AI node type produced them.
The Data Privacy service connection is configured by `FLOWX_DATAPRIVACY_BASEURL` and `FLOWX_DATAPRIVACY_TIMEOUTSECONDS` in the [Integration Designer setup guide](../../../setup-guides/integration-designer-setup#service-communication).
***
### Condition (Fork) node
Evaluates logical conditions (JavaScript or Python) to direct workflow execution along different branches.
* **If/Else**: Routes based on condition evaluation.
* **Parallel Processing**: Supports multiple branches for concurrent execution.
Use fork nodes to implement business rules, error handling, or multi-path logic.
#### Available bindings
Condition expressions have access to the following data bindings:
| Binding | Description |
| ----------------------------------------- | ----------------------------------------------------------------------------------------------------------------- |
| `input` | Workflow input data from the previous node |
| `additionalData.securityDetails` | Current user's identity (username, identifier, details including roles, groups, and attributes from 5.7.0 onward) |
| `additionalData.applicationConfiguration` | Configuration parameters from the app build |
#### Condition examples
```javascript theme={"system"}
// Route based on user identity
additionalData.securityDetails.username === 'admin@company.com'
// Route based on configuration parameter
additionalData.applicationConfiguration.featureEnabled === true
// Combine input data with config parameters
input.amount > additionalData.applicationConfiguration.approvalThreshold
// Check user and input together
input.priority === 'high' && additionalData.securityDetails.details.email.endsWith('@company.com')
```
```python theme={"system"}
# Route based on user identity
additionalData["securityDetails"]["username"] == "admin@company.com"
# Route based on configuration parameter
additionalData["applicationConfiguration"]["featureEnabled"] == True
# Combine input data with config parameters
input["amount"] > additionalData["applicationConfiguration"]["approvalThreshold"]
# Check user and input together
input["priority"] == "high" and additionalData["securityDetails"]["details"]["email"].endswith("@company.com")
```
For details on the `securityDetails` and `applicationConfiguration` structure, see [Extracting additional data in business rules](../../building-blocks/actions/business-rule-action/extracting-additional-data).
***
### Parallel workflow execution
Execute multiple workflow branches concurrently to improve performance and reduce total execution time. The Integration Designer supports parallel execution using Start Parallel and End Parallel nodes.
#### Key concepts
Split workflow execution into multiple concurrent branches that run independently
Merge parallel branches back together, waiting for all branches to complete before continuing
Visual path indexing in the workflow diagram shows which nodes belong to which parallel branch
Track parallel path execution with timing information for each branch and merge points
#### How to use parallel workflows
Add a Start Parallel node and create multiple sequences from it, each representing an independent execution path
Add workflow nodes to each parallel branch - API calls, transformations, database operations, or any other node type
Close parallel branches with an End Parallel node that waits for all branches to complete before continuing
At runtime, all branches execute concurrently. The End Parallel node completes when the slowest branch finishes
#### Use cases
Call multiple independent APIs concurrently instead of sequentially, reducing total execution time
Fetch data from multiple sources in parallel for comprehensive data aggregation
Send notifications through multiple channels (email, SMS, push) simultaneously
Process different document types or sections in parallel for faster throughput
#### Runtime behavior
When the Start Parallel node executes, each branch receives a **deep copy** of the parent's data. Branches work on independent copies — changes in one branch do not affect another branch during execution.
When all branches complete, the End Parallel node merges each branch's changes back into the parent using a **recursive deep merge** with **last-write-wins** semantics:
* Each branch's modified keys are merged into the parent data
* If two branches modify **different keys**, both changes are preserved
* If two branches modify the **same key**, the last branch to finish overwrites the earlier value
* For **nested objects**, the merge is recursive — only conflicting leaf values are overwritten
* For **arrays**, no element-level merge occurs — the entire array is replaced by the last branch's version
Since merge order depends on which branch finishes last, avoid modifying the same keys in multiple branches. If branches must write to the same structure, use distinct keys per branch and merge them in a Script node after the End Parallel.
* **Path Time**: Sum of all node execution times within that branch
* **End Parallel Time**: Node processing time + maximum time across all parallel paths
* **Example**: If Branch A takes 2s and Branch B takes 5s, the End Parallel node completes after 5s (plus its own processing time)
* **Start Parallel Node**: Displays Input tab showing data split across branches
* **End Parallel Node**: Displays Output tab showing merged results from all branches
* **Path Grouping**: Nodes within each parallel path are grouped for easy monitoring
* If any branch fails, the workflow handles it according to standard error handling rules
* The End Parallel node waits for all non-failed branches to complete before merging
* If branches do not converge to the same End Parallel node, the workflow fails with a `Missing end parallel gateway` error
#### Limitations and considerations
Keep the following constraints in mind when designing parallel workflows:
* **Last-write-wins merge**: When multiple branches modify the same data key, the final value depends on which branch completes last. This is non-deterministic if branch durations vary. To preserve data from all branches, write to different keys and merge manually in a Script node after the End Parallel
* **Array handling**: Arrays are not merged element-by-element. The entire array is replaced by the last branch's version. You cannot process individual array elements in separate branches (e.g., first element in branch 1, second element in branch 2)
* **Branch closure**: All branches from a Start Parallel must converge to the **same** End Parallel node. The End Parallel node can have only one outgoing sequence
* **Nested parallel paths**: Start Parallel nodes can be nested inside other parallel branches for multi-level concurrency
* **No cross-branch dependencies**: Branches execute concurrently on independent data copies. One branch cannot read data written by another branch during execution
Design parallel branches to write to **distinct keys** in the data model. For example, if calling three APIs in parallel, store results in `apiResultA`, `apiResultB`, and `apiResultC` rather than writing all results to the same `apiResult` key.
***
### Script node
Executes custom JavaScript or Python code to transform, map, or enrich data between nodes.
#### Testing a script in isolation
A Script node ships with a **Test modal** that lets you exercise the script against sample input without running the full workflow. Open it with the **expand** icon at the top-right corner of the code editor, next to the expand/collapse chevron.
The modal has three side-by-side panels:
| Panel | Purpose |
| ---------- | ------------------------------------------------------------------------------------------------------------------------- |
| **Input** | JSON input passed to the script. Load from a past individual node run or from a past workflow run via the input selector. |
| **Code** | The script body. Inline warnings are surfaced as you type. Includes **Save** and **Test** buttons. |
| **Output** | The JSON returned by the script after running **Test**. Runtime errors are shown here. |
The **Test** button runs the current contents of the Code panel, even if you have not clicked **Save** yet. Use this to iterate on a fix without committing changes to the Script node.
Runs triggered from the Test modal are excluded from the Console log History panel, because they may be running unsaved code.
#### Run instance IDs in the Logs tab
The Logs tab of a workflow run displays the **node run instance ID** alongside the workflow instance ID for each Script node execution. A copy button is rendered next to every instance ID. Use this to grab a node-run identifier and paste it into the Test modal's input selector to replay the exact past run.
***
### Subworkflow node
The Subworkflow node allows you to modularize complex workflows by invoking other workflows as reusable subcomponents. This approach simplifies process design, promotes reuse, and simplifies maintenance.
Select Start Subworkflow from the Select Next Node dropdown. Choose from workflows categorized as Local or Libraries.
* Workflow Selection: Pick the workflow to invoke.
* Open: Edit the subworkflow in a new tab.
* Preview: View the workflow canvas in a popup.
* Response Key: Set a key (e.g., response\_key) for output.
* Input: Provide input in JSON format.
* Output: Output is read-only JSON after execution.
Use subworkflows for reusable logic such as data enrichment, validation, or external system calls.
#### Execution logic and error handling
* Parent workflow waits for subworkflow completion before proceeding.
* If the subworkflow fails, the parent workflow halts at this node.
* Subworkflow output is available to downstream nodes via the response key.
* Logs include workflow name, instance ID, and node statuses for both parent and subworkflow.
If a subworkflow is deleted, an error displays: \[name] subworkflow not found.
Subworkflow runs are recorded in workflow instance history for traceability.
#### Console logging, navigation, and read-only mode
* Console shows input/output, workflow name, and instance ID for each subworkflow run.
* Open subworkflow in a new tab for debugging from the console.
* Breadcrumbs enable navigation between parent and subworkflow details.
* In committed/upper environments, subworkflow configuration is read-only and node runs are disabled (preview/open only).
Subworkflow instances are logged in history, and you can navigate between parent and child workflow runs for comprehensive debugging.
#### Use case: CRM Data Retrieval with subworkflows
Suppose you need to retrieve CRM details in a subworkflow and use the output for further actions in the parent workflow.
Design a workflow that connects to your CRM system, fetches user details, and outputs the data in a structured JSON format.
In your main workflow, add a Subworkflow Node and select the CRM retrieval workflow. Map any required input parameters.
Downstream nodes in the parent workflow can reference the subworkflow's output using the defined responseKey.
```json theme={"system"}
{
"crmData": "${responseKey}"
}
```
Use the console to view input/output data, workflow names, and instance IDs. Open subworkflow runs in new tabs for detailed debugging.
This modular approach allows you to build scalable, maintainable integrations by composing workflows from reusable building blocks.
***
### End node
The End node signifies the termination of a workflow's execution. It collects the final output and completes the workflow process.
* Receives input in JSON format from the previous node.
* Output represents the final data model of the workflow.
* Multiple End nodes are allowed for different execution paths.
If the node's output doesn't meet mandatory requirements, it will be flagged as an error to ensure all necessary data is included.
***
### Running and stopping workflows
You can run a workflow directly from the editor to test and debug it, and stop it while it is running.
* **Run Workflow**: Click **Run Workflow** in the workflow editor toolbar to start a new workflow instance. You can provide start data in JSON format before running.
* **Stop Run**: While a workflow instance is running, the button changes to **Stop Run**. Click it to cancel the instance. All in-progress and scheduled nodes are marked as cancelled.
Workflow instances can have the following statuses:
| Status | Description |
| ------------- | ------------------------------------------------------ |
| **Started** | The workflow instance is currently running |
| **Finished** | The workflow instance completed successfully |
| **Failed** | The workflow instance encountered an error |
| **Cancelled** | The workflow instance was manually stopped by the user |
***
## Integration with external systems
This example demonstrates how to integrate FlowX with an external system, in this example, using Airtable, to manage and update user credit status data. It walks through the setup of a data source, defining API endpoints, creating workflows, and linking them to BPMN processes in FlowX Designer.
Before going through this example of integration, we recommend:
* Create your own base and table in Airtable. For more information, see the [Airtable base creation guide](https://www.airtable.com/guides/build/create-a-base).
* Review the [Airtable Web API documentation](https://airtable.com/developers/web/api/introduction) to get familiarized with the Airtable API.
### Integration in FlowX.AI
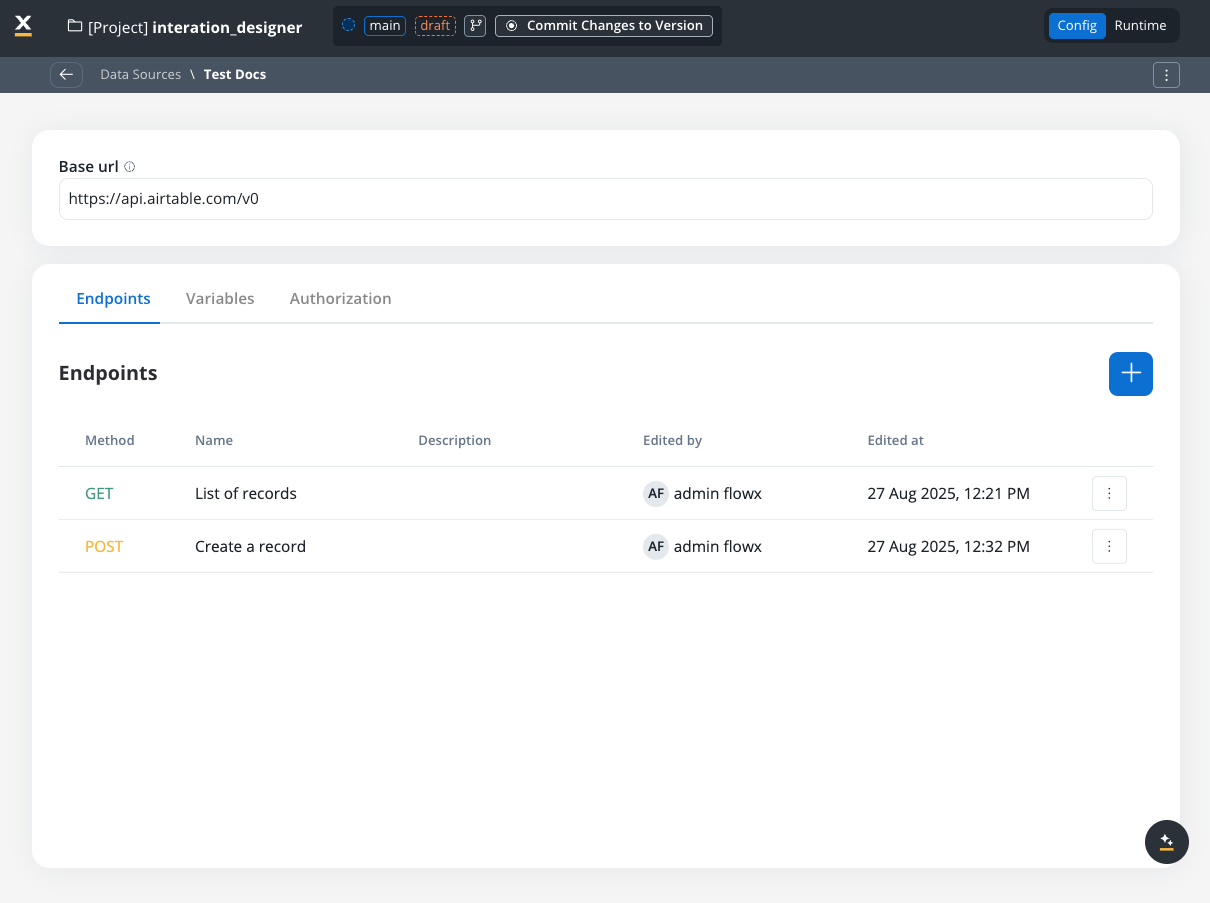
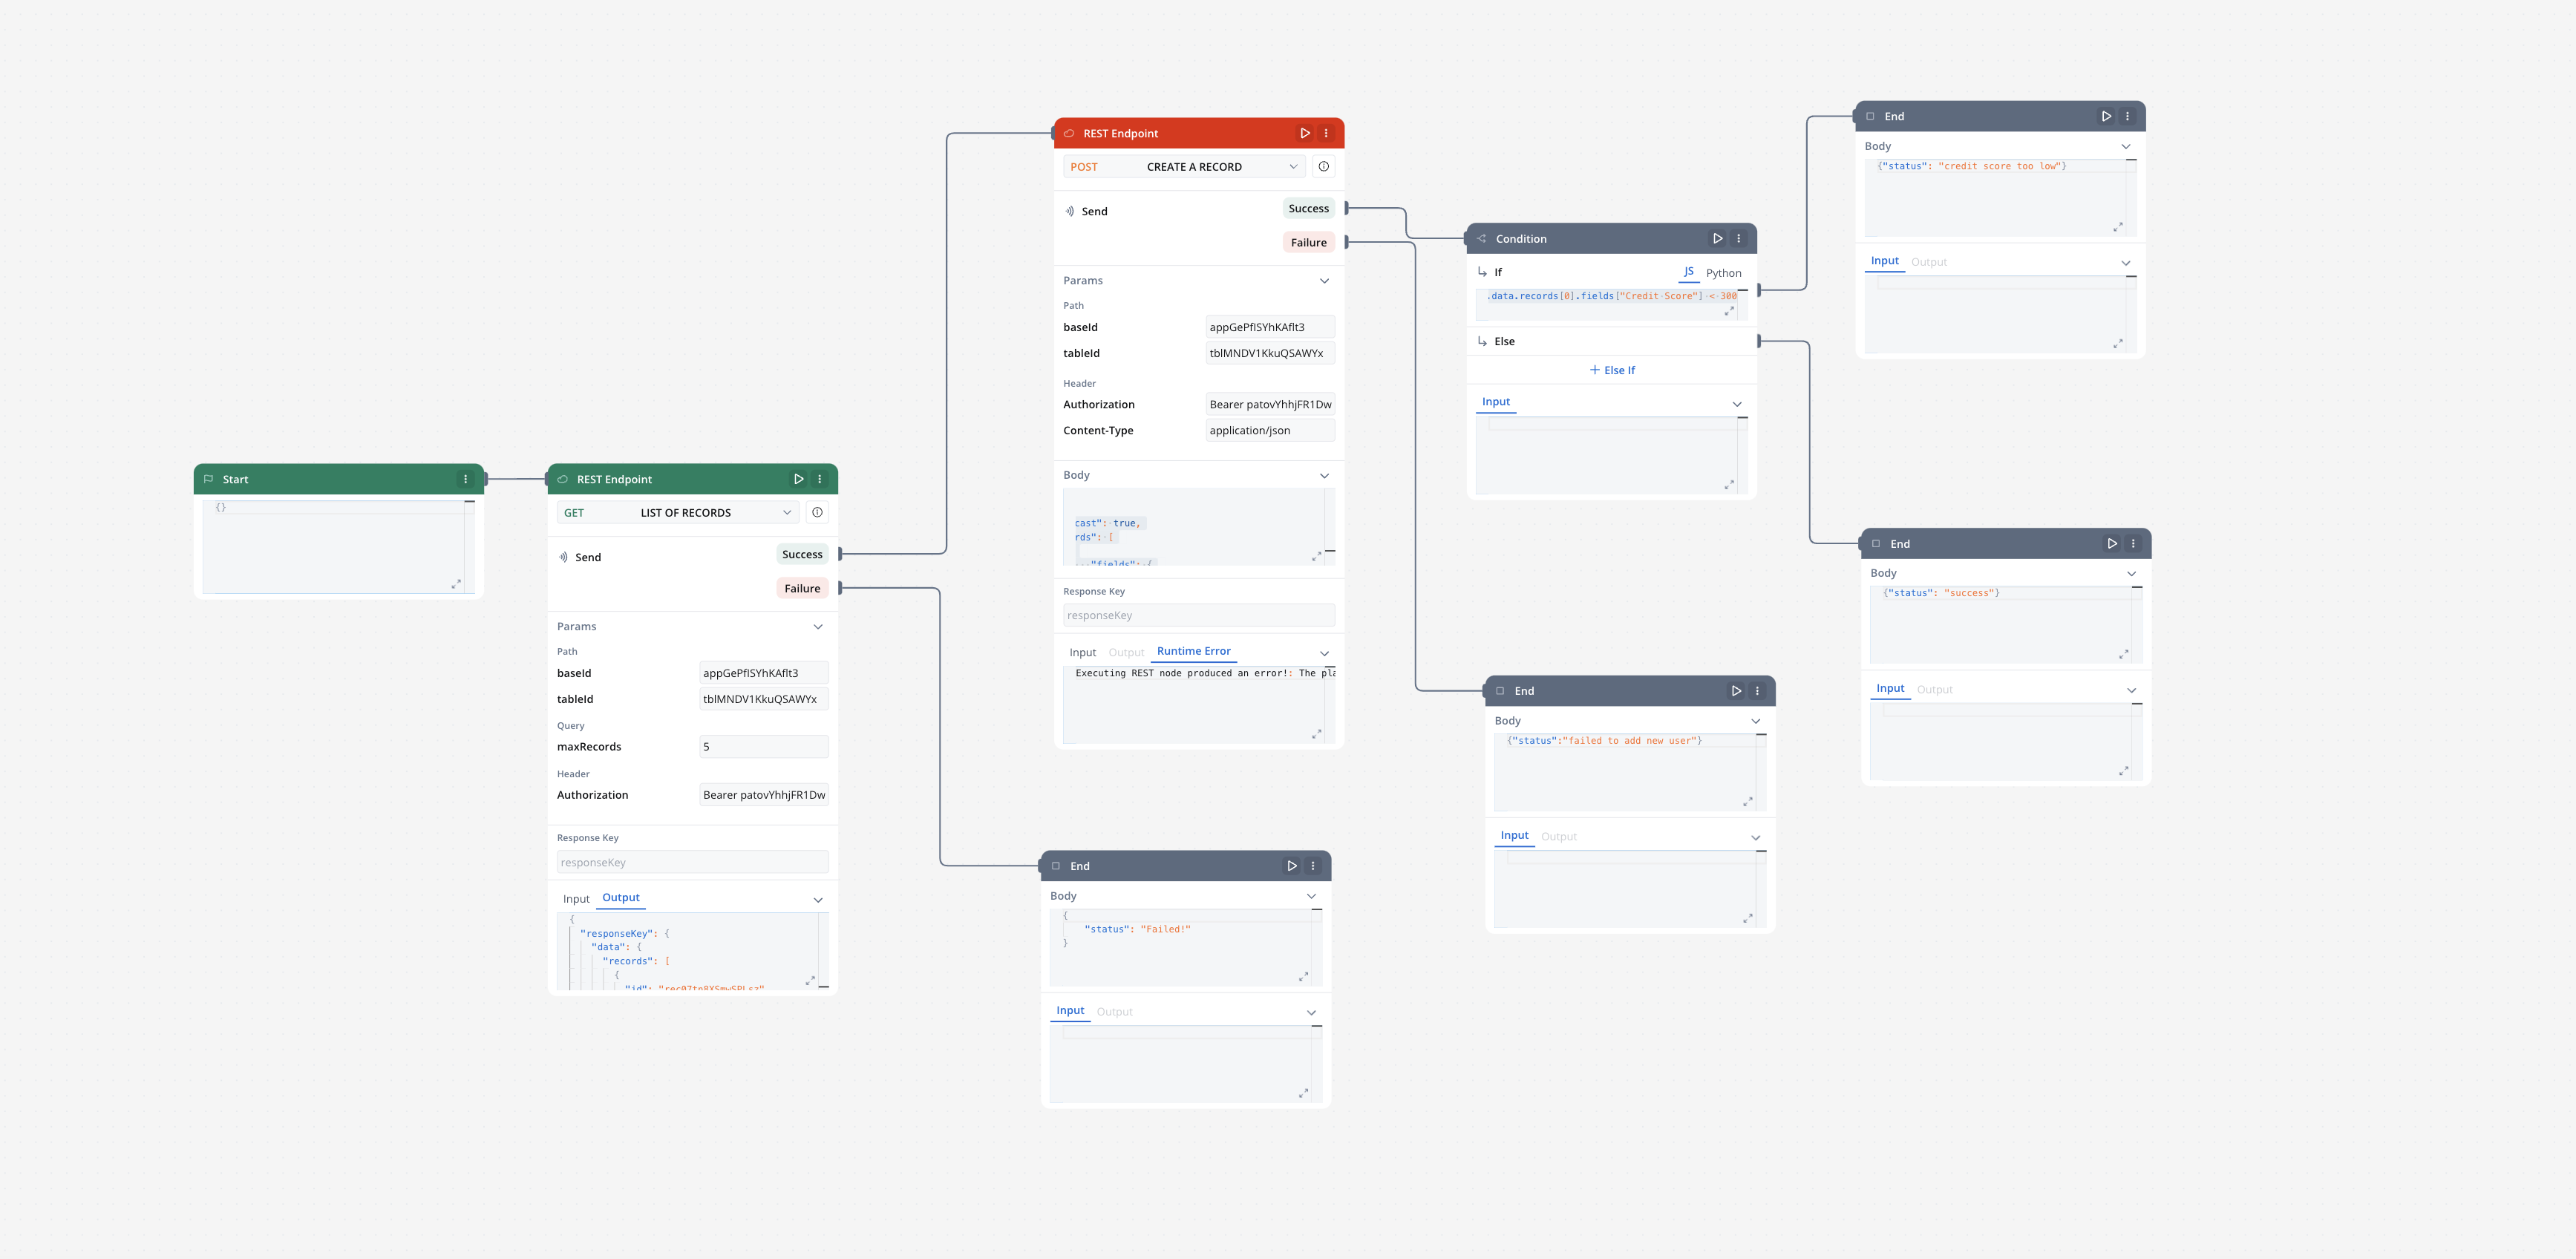
Navigate to the **Integration Designer** and create a new data source:
* Name: **Airtable Credit Data**
* **Base URL**: `https://api.airtable.com/v0/`
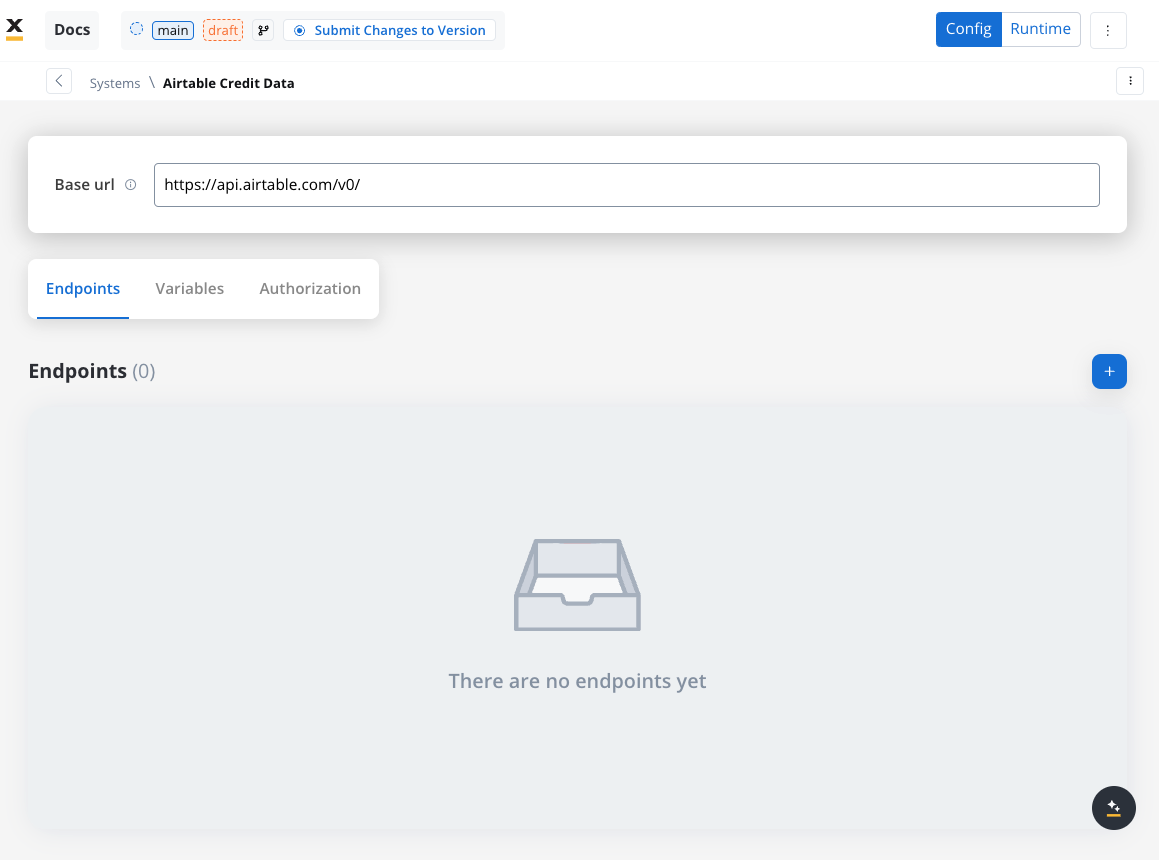
In the **Endpoints** section, add the necessary API endpoints for system integration:
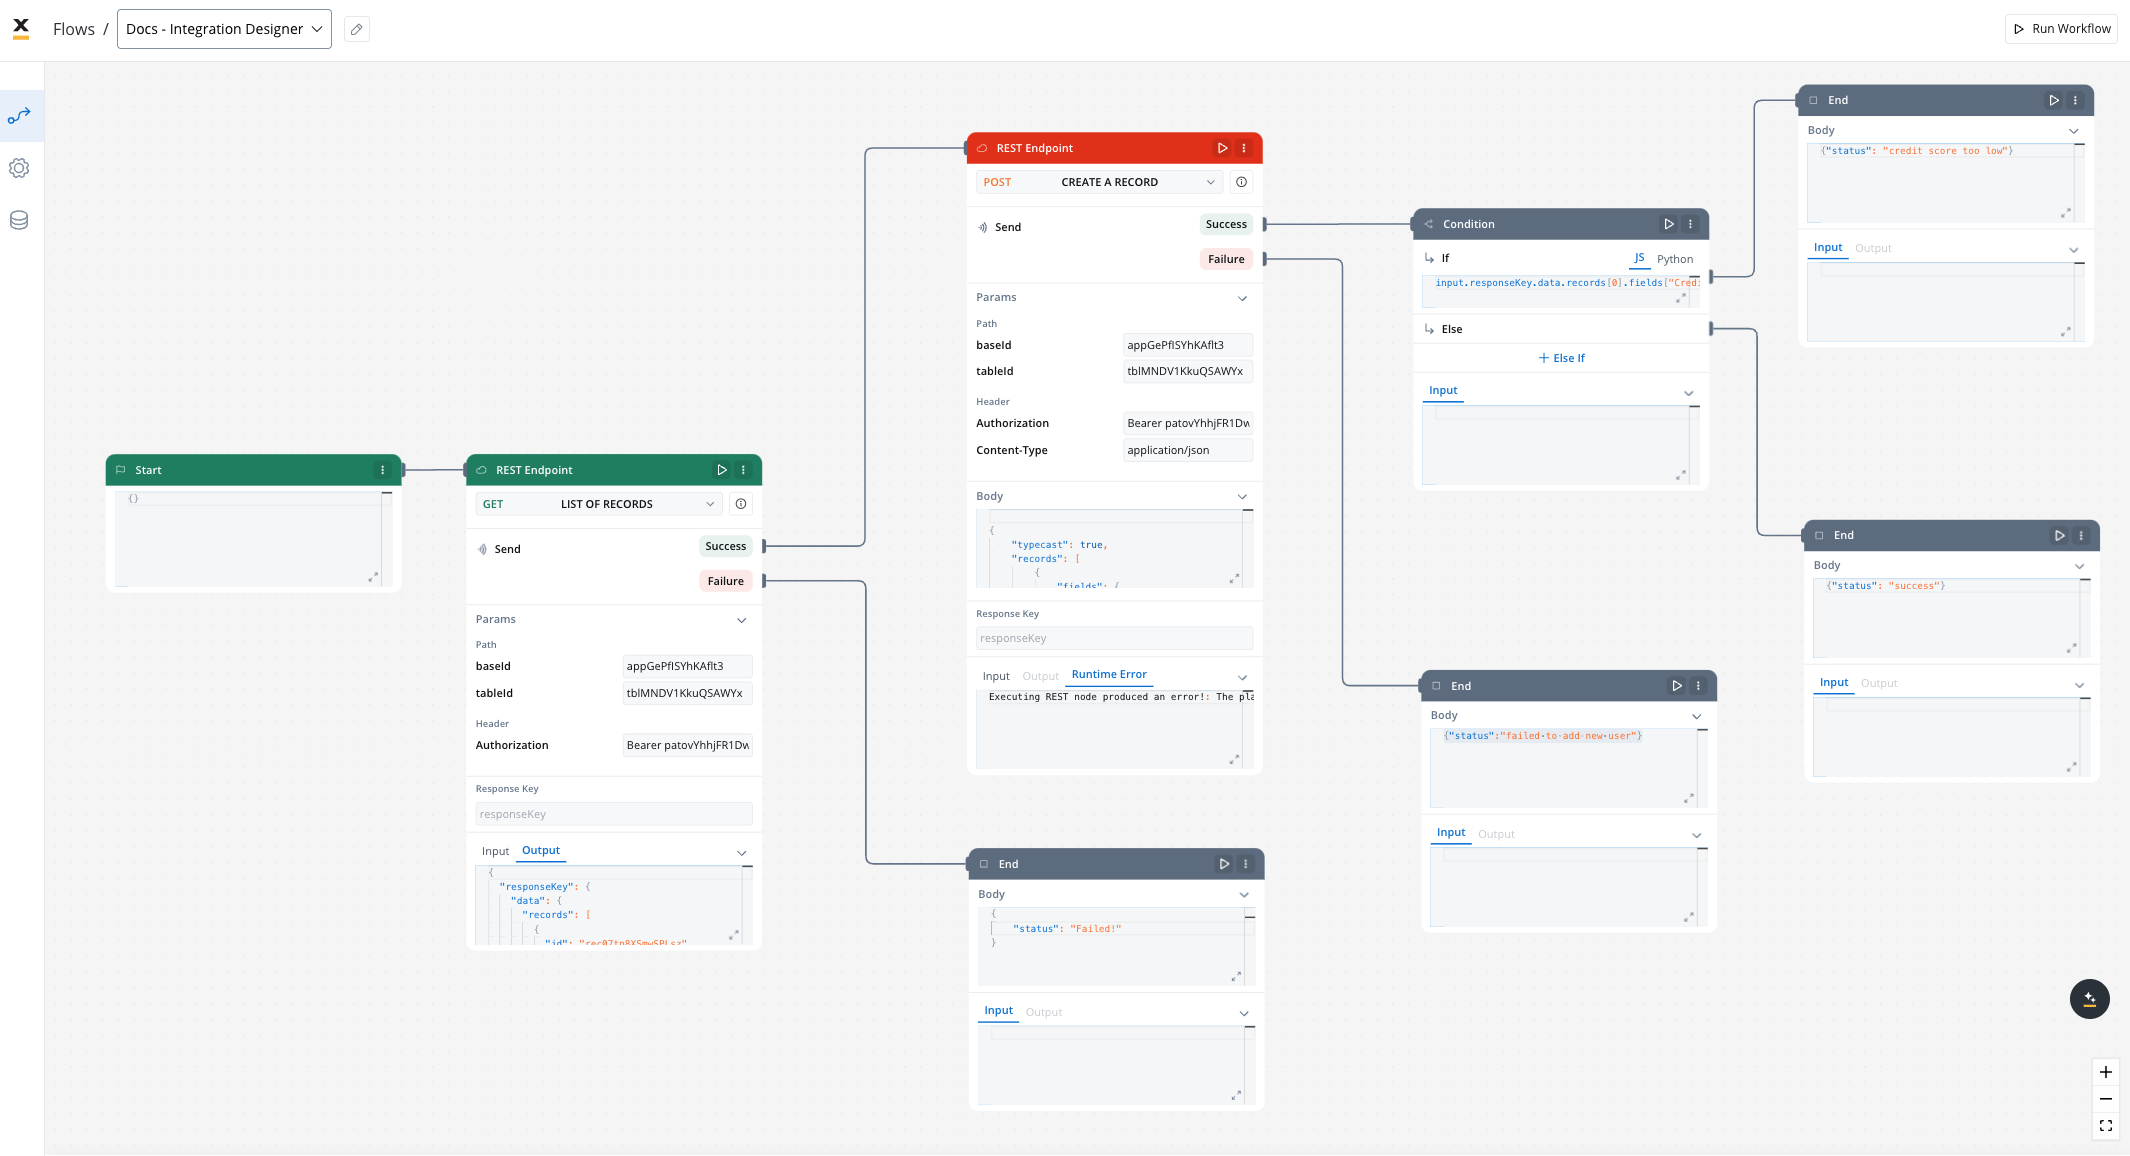
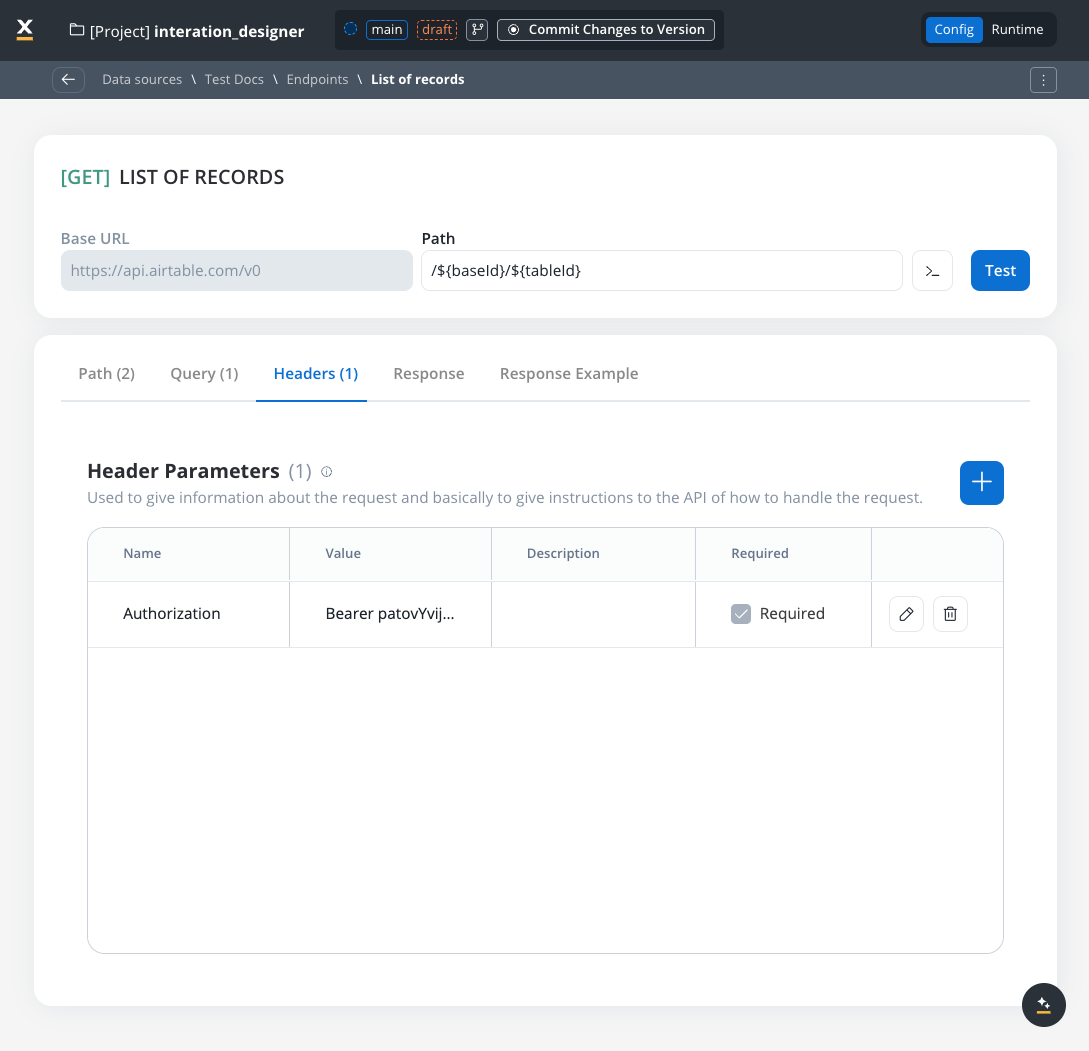
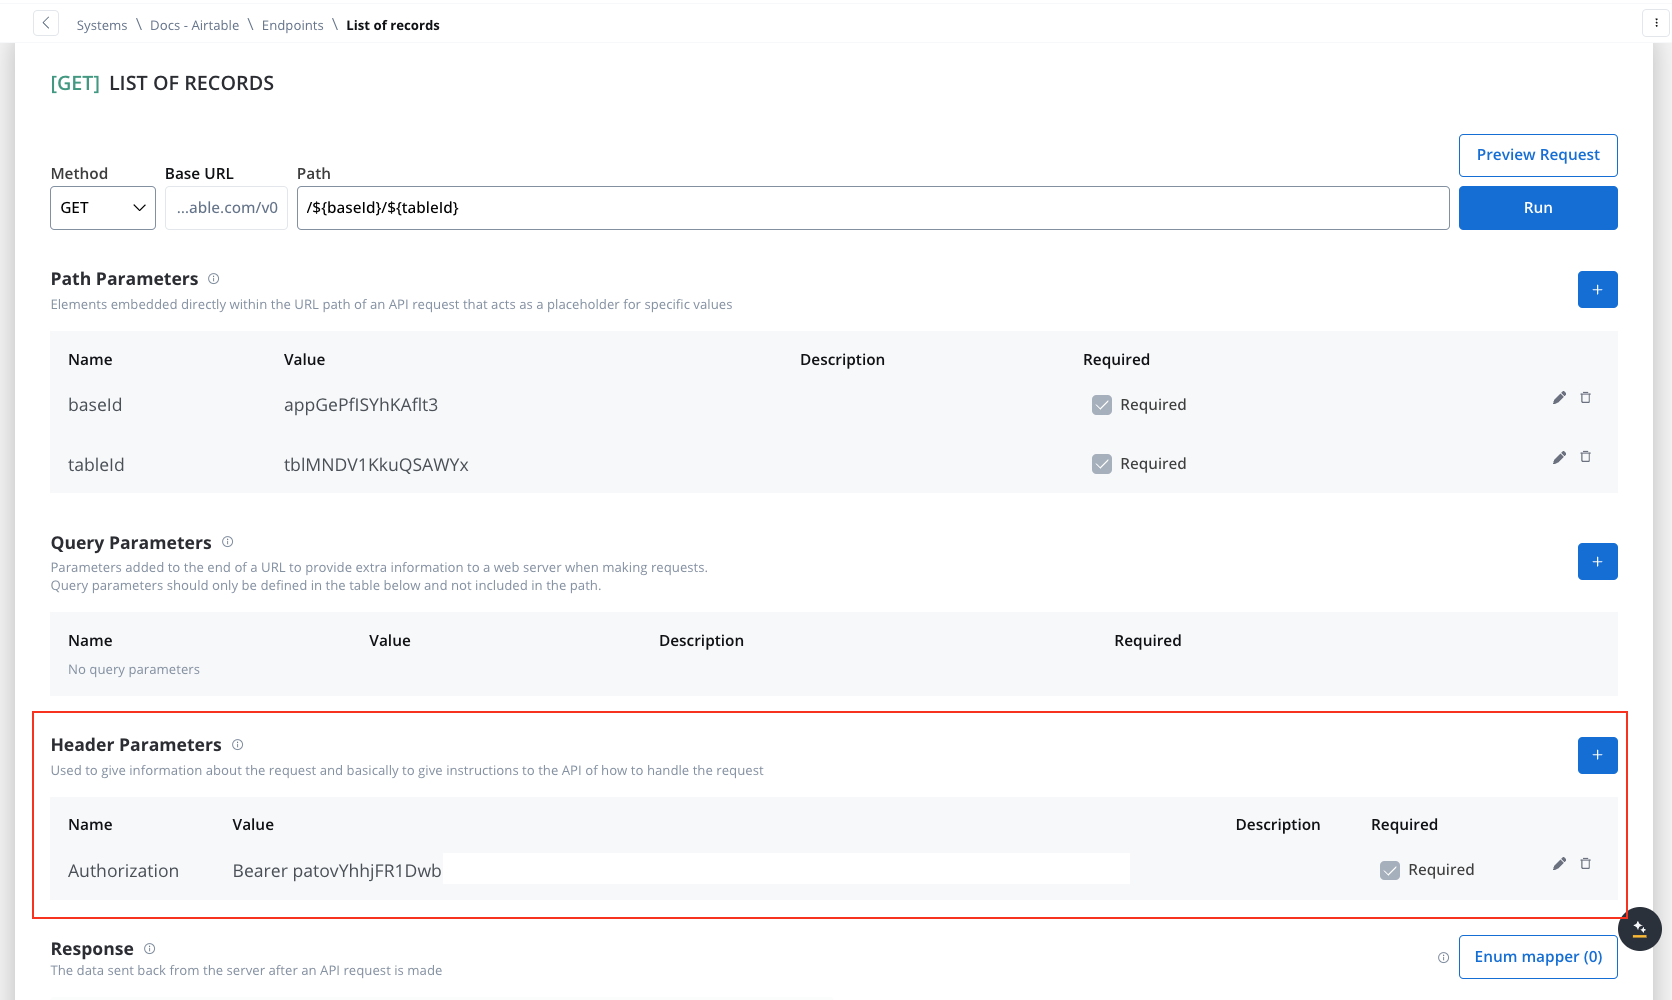
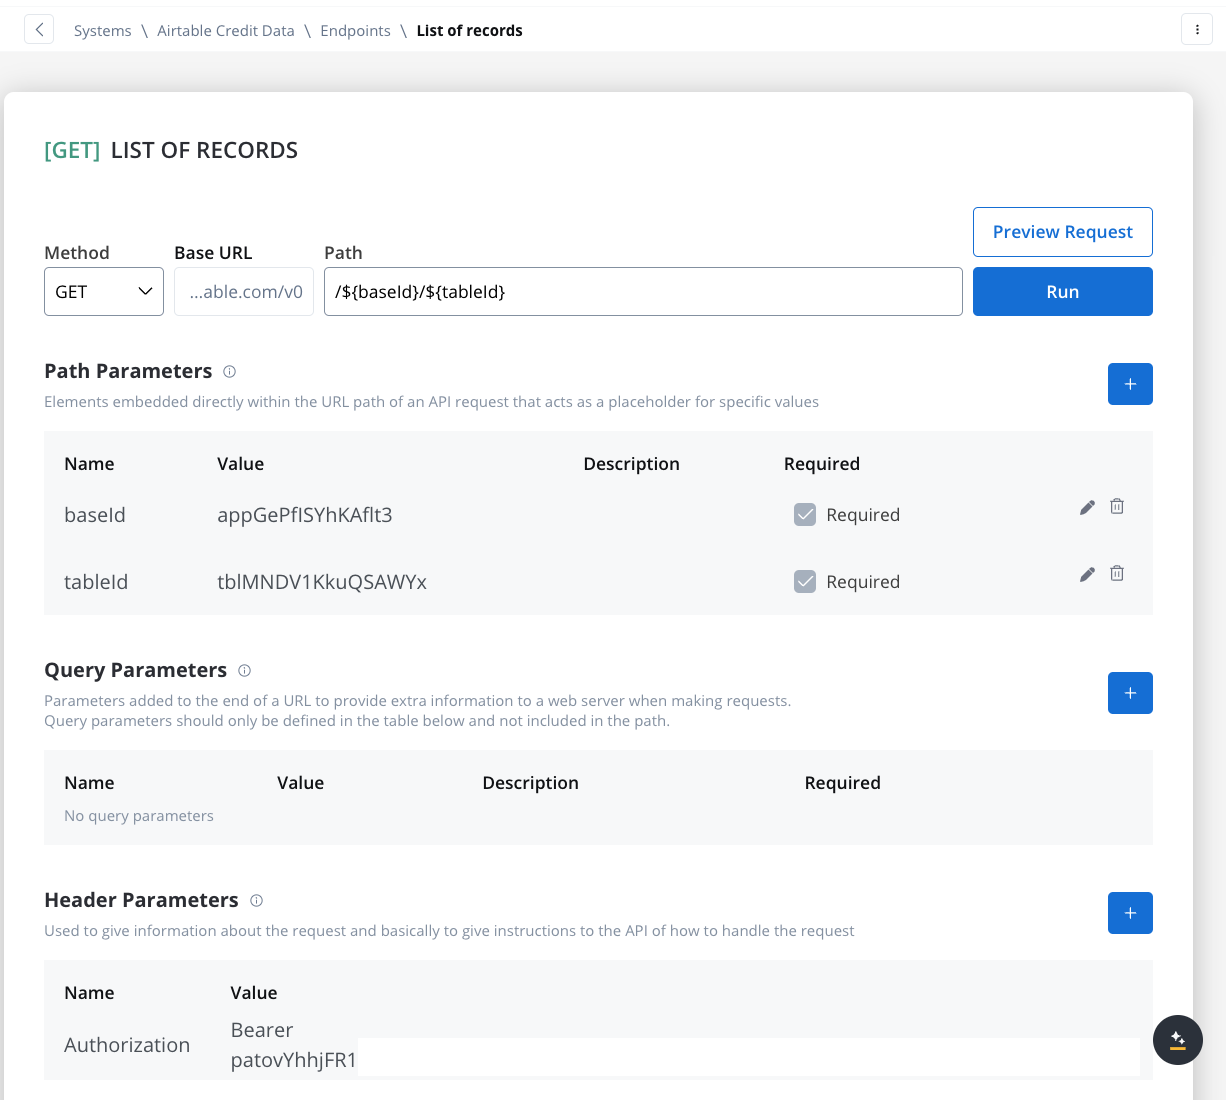
1. **Get Records Endpoint**:
* **Method**: GET
* **Path**: `/${baseId}/${tableId}`
* **Path Parameters**: Add the values for the baseId and for the tableId so they will be available in the path.
* **Header Parameters**: Authorization Bearer token
See the [API docs](https://airtable.com/developers/web/api/list-records).
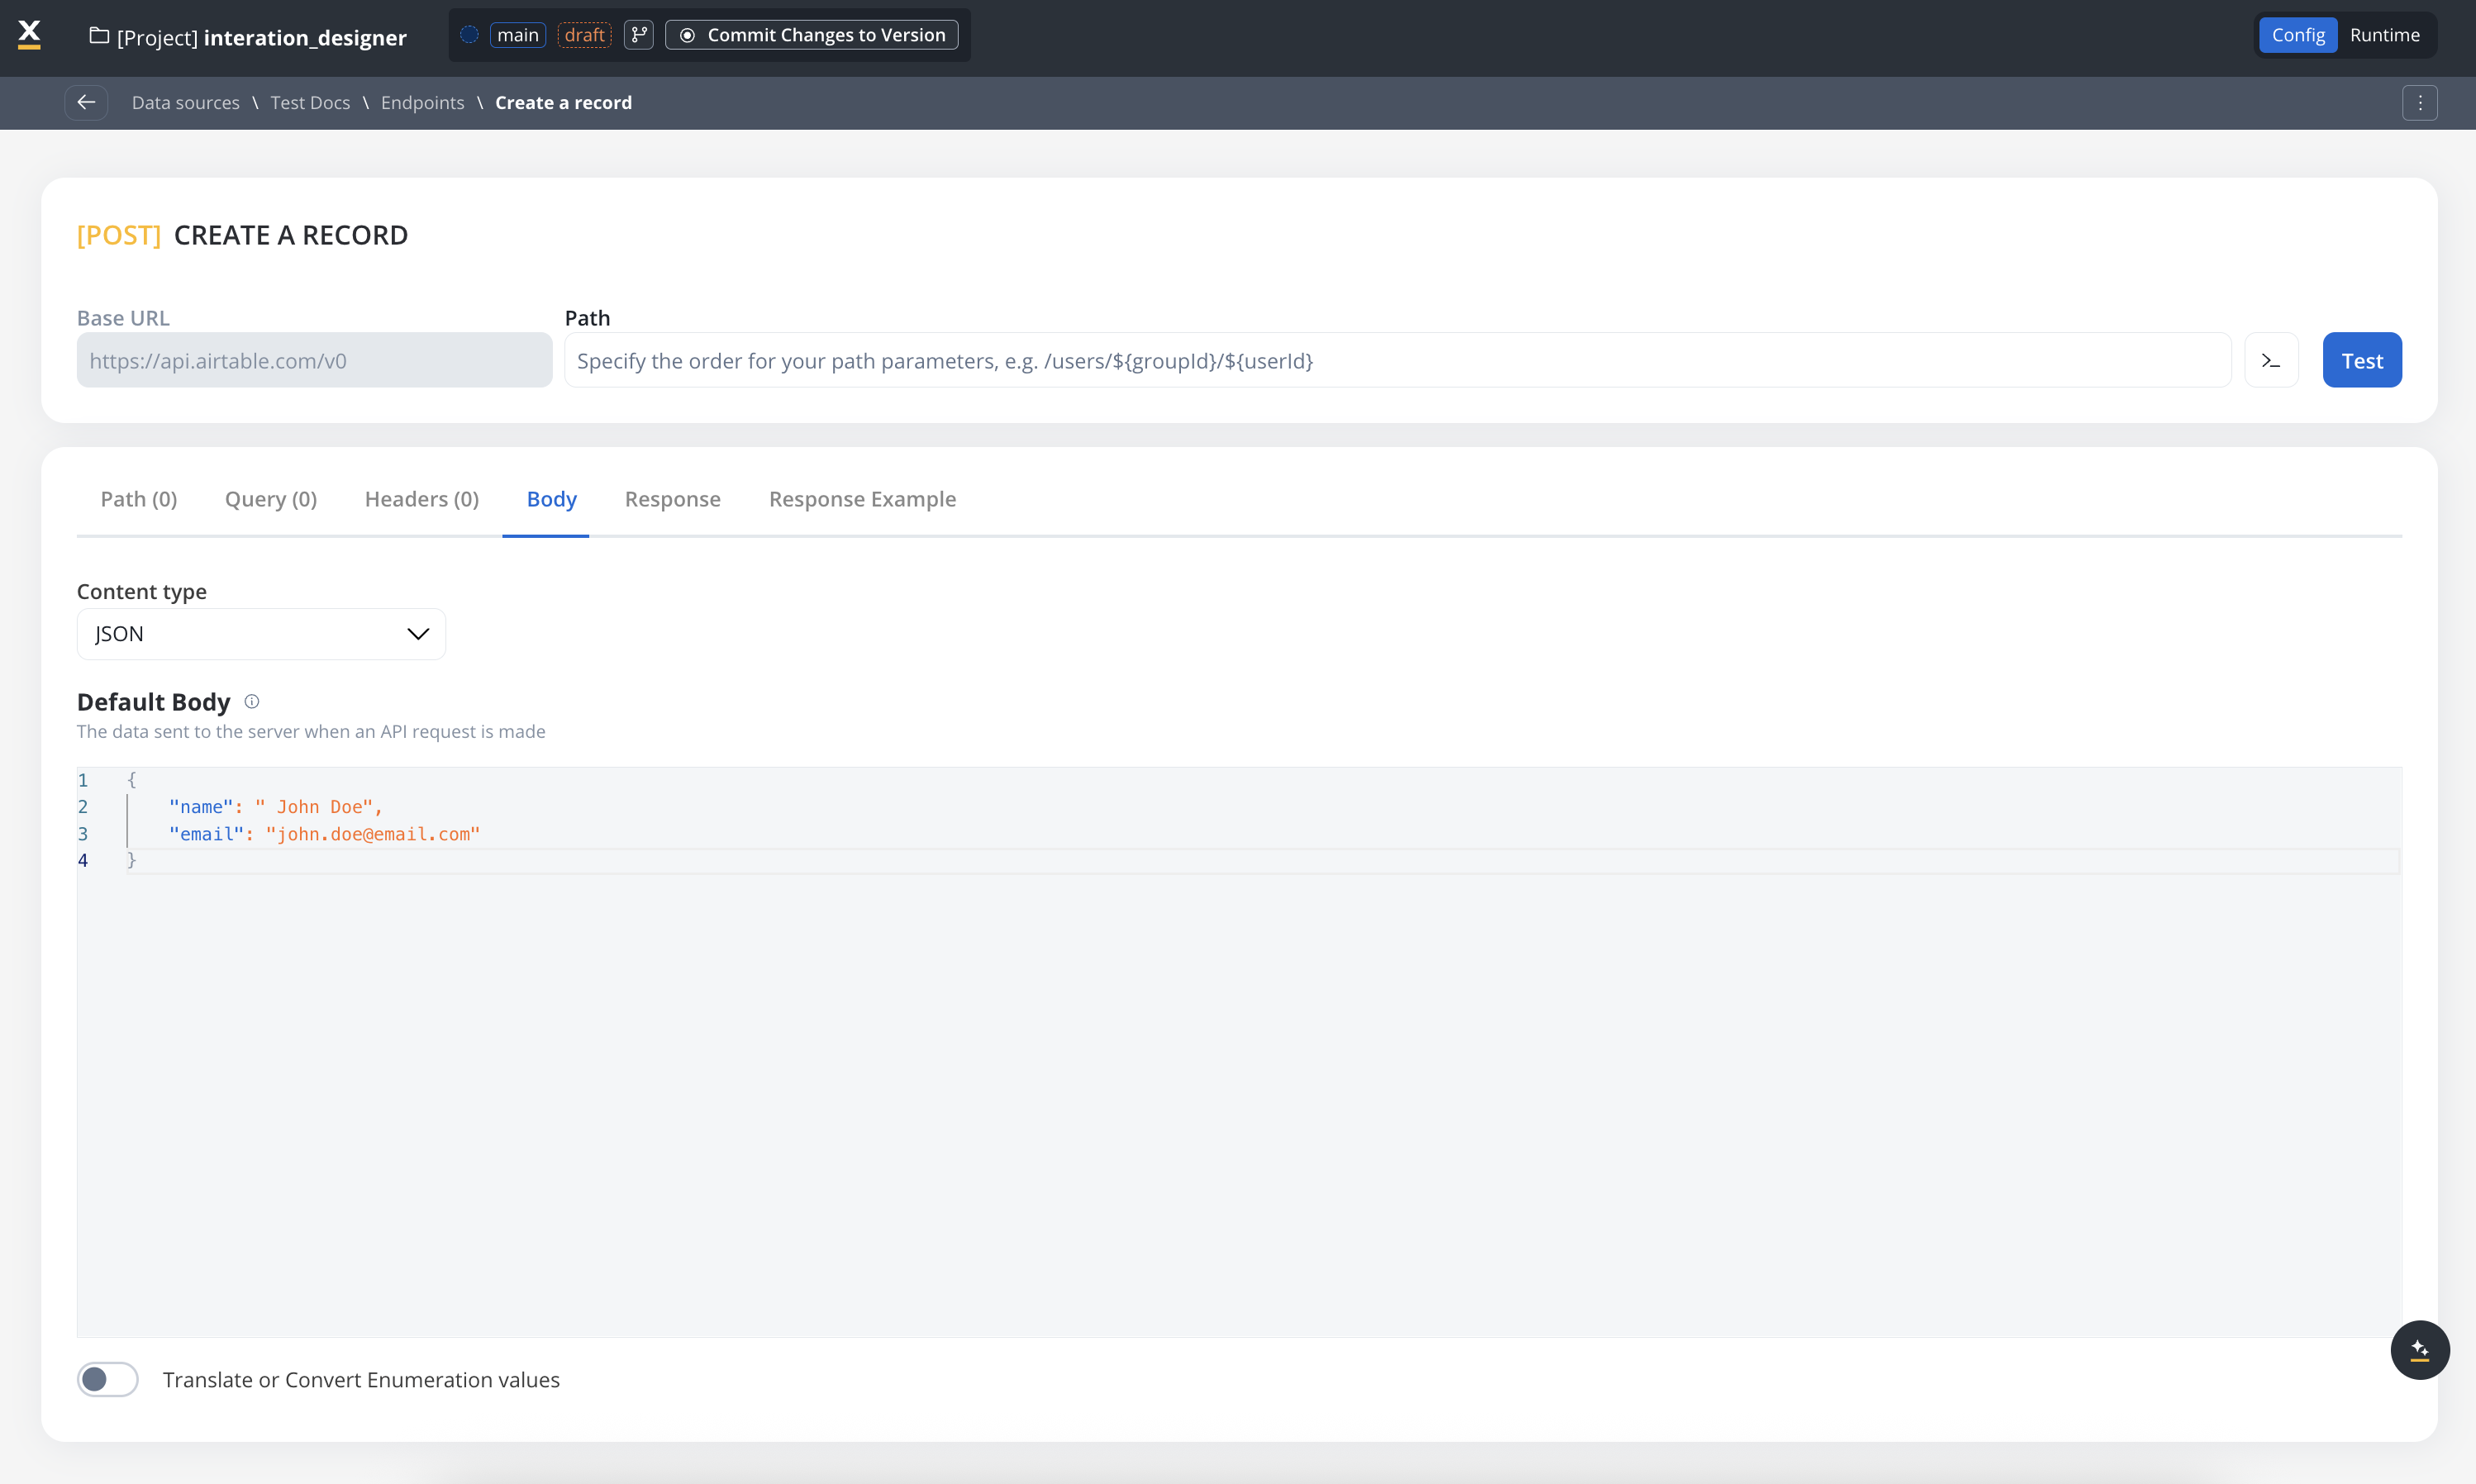
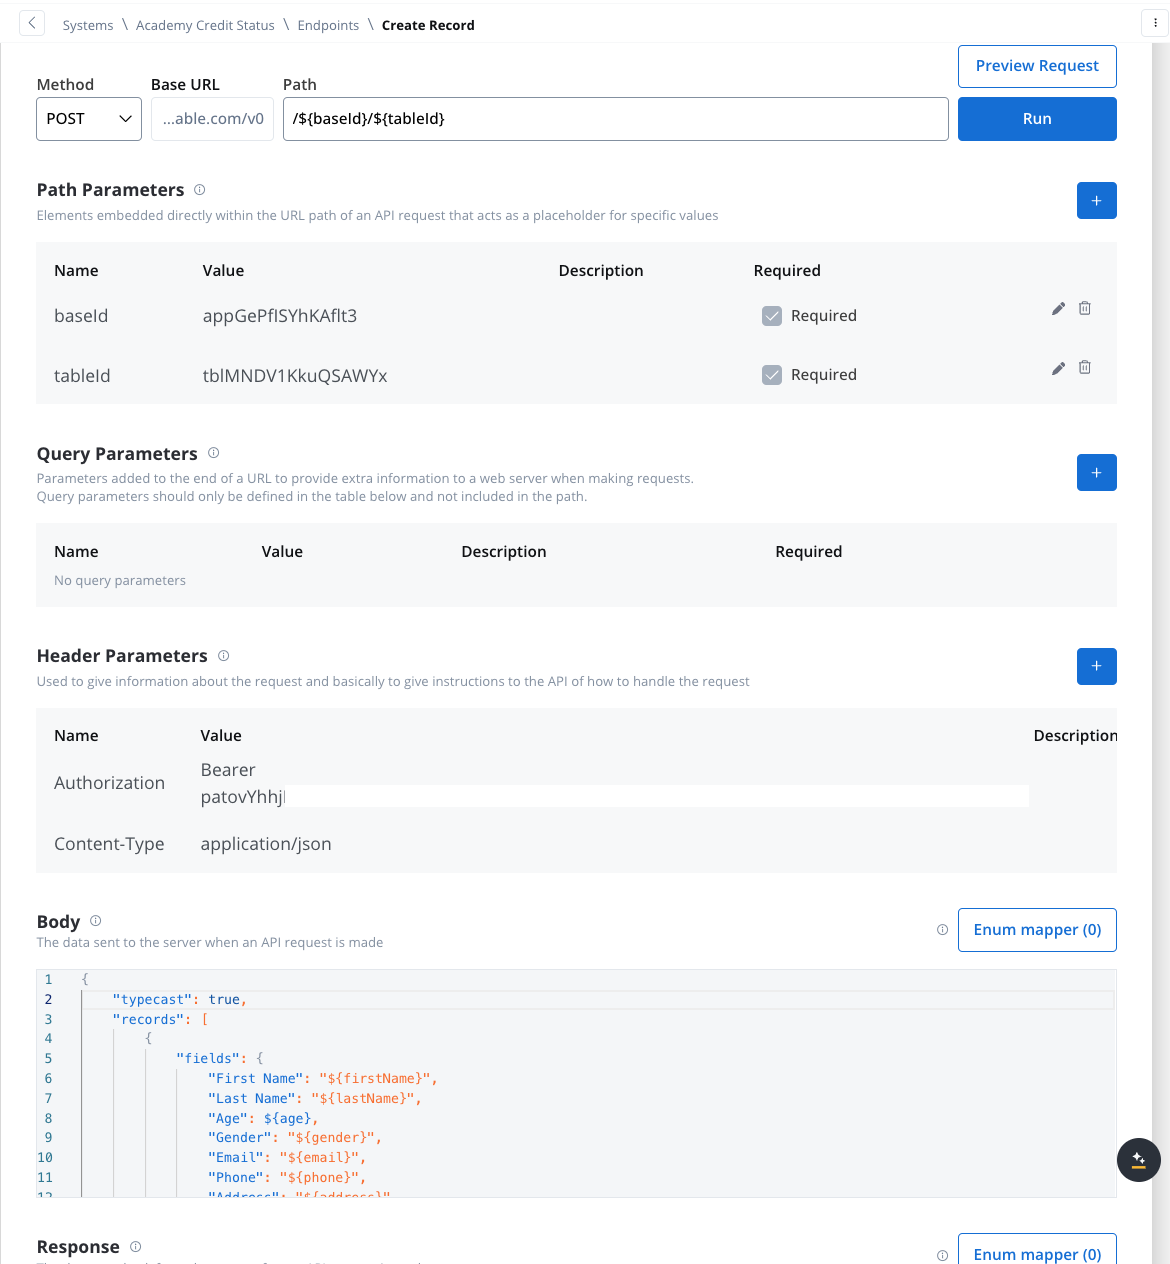
2. **Create Records Endpoint**:
* **Method**: POST
* **Path**: `/${baseId}/${tableId}`
* **Path Parameters**: Add the values for the baseId and for the tableId so they will be available in the path.
* **Header Parameters**:
* `Content-Type: application/json`
* Authorization Bearer token
* **Body**: JSON format containing the fields for the new record. Example:
```json theme={"system"}
{
"typecast": true,
"records": [
{
"fields": {
"First Name": "${firstName}",
"Last Name": "${lastName}",
"Age": ${age},
"Gender": "${gender}",
"Email": "${email}",
"Phone": "${phone}",
"Address": "${address}",
"Occupation": "${occupation}",
"Monthly Income ($)": ${income},
"Credit Score": ${creditScore},
"Credit Status": "${creditStatus}"
}
}
]
}
```
1. **Open the Workflow Designer** and create a new workflow.
* Provide a name and description.
2. **Configure Workflow Nodes**:
* **Start Node**: Initialize the workflow.
On the start node add the data that you want to extract from the process. This way when you will add the **Start Workflow Integration** node action it will be populated with this data.
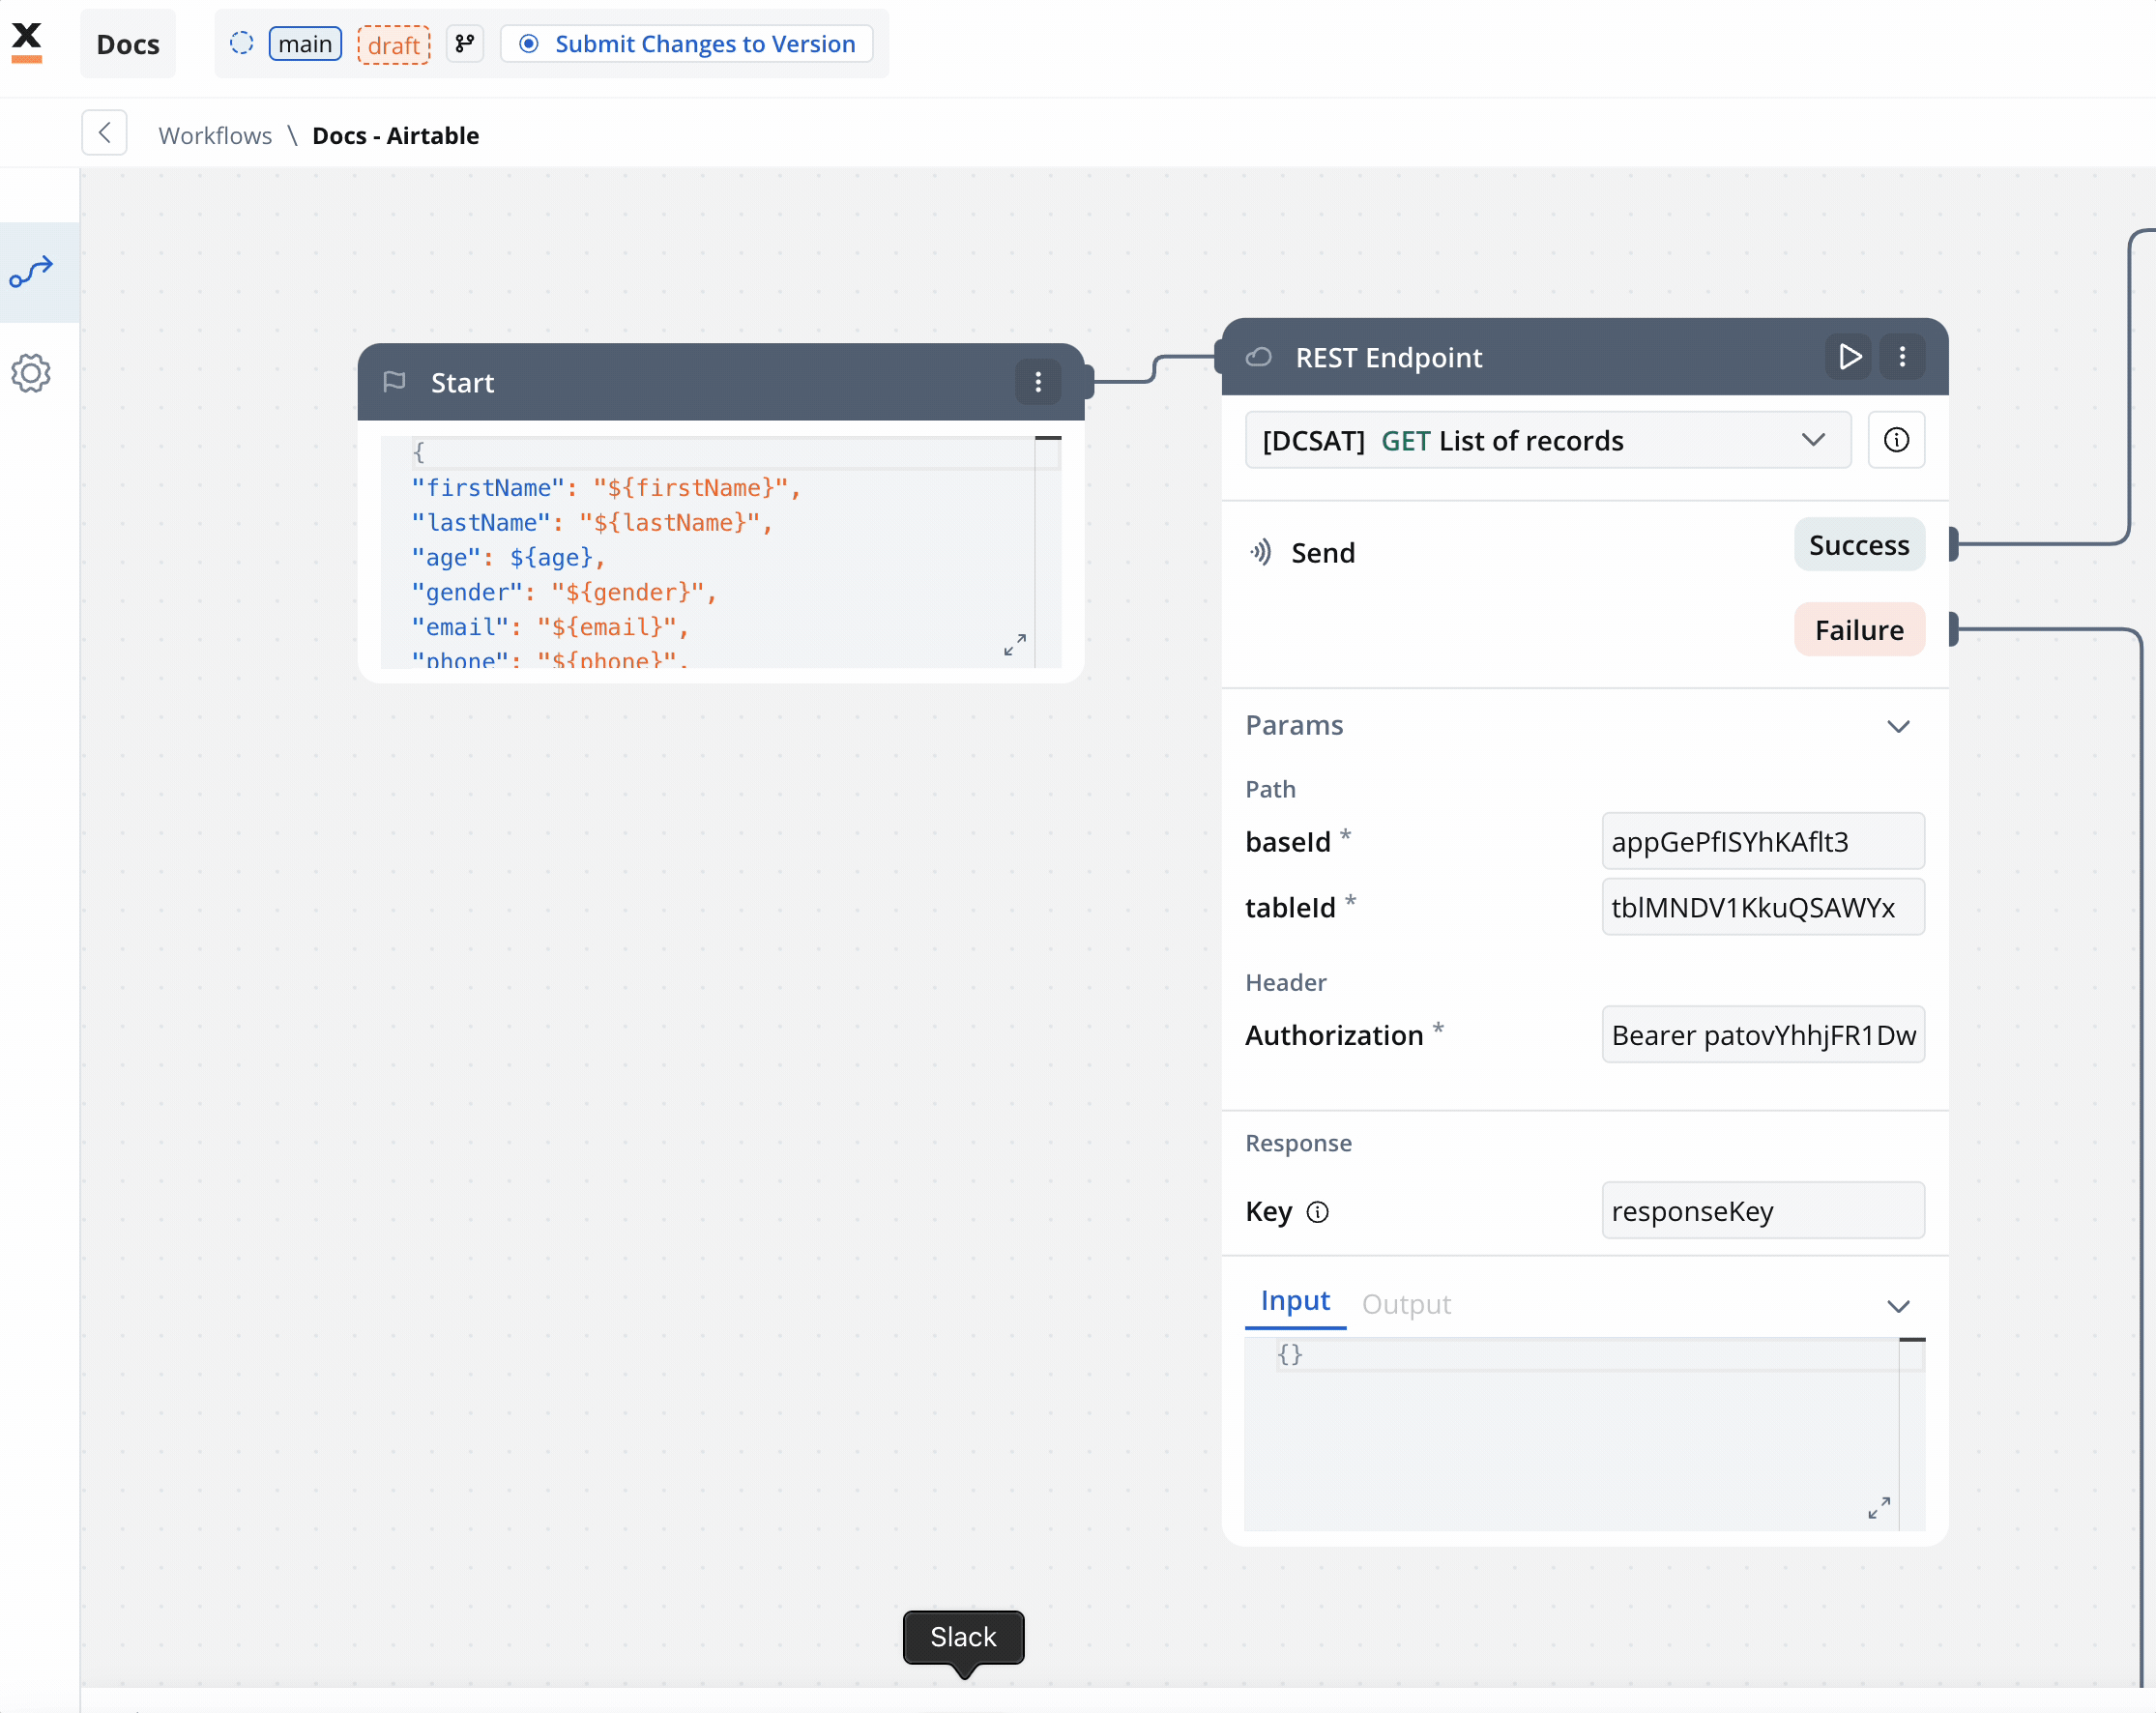
```json theme={"system"}
{
"firstName": "${firstName}",
"lastName": "${lastName}",
"age": ${age},
"gender": "${gender}",
"email": "${email}",
"phone": "${phone}",
"address": "${address}",
"occupation": "${occupation}",
"income": ${income},
"creditScore": ${creditScore},
"creditStatus": "${creditStatus}"
}
```
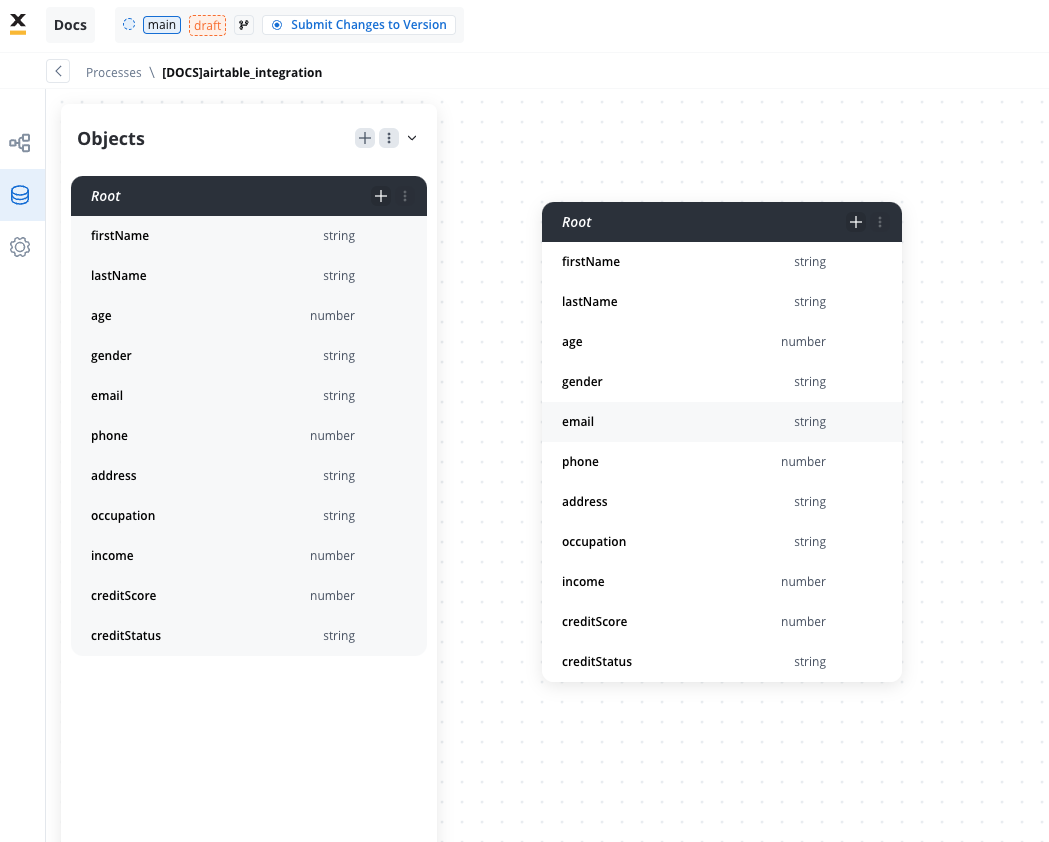
Make sure these keys are also mapped in the data model of your process with their corresponding attributes.
* **REST Node**: Set up API calls:
* **GET Endpoint** for fetching records from Airtable.
* **POST Endpoint** for creating new records.
* **Condition Node**: Add logic to handle credit scores (e.g., triggering a warning if the credit score is below 300).
Condition example:
```json theme={"system"}
input.responseKey.data.records[0].fields["Credit Score"] < 300
```
* **Script Node**: Include custom scripts if needed for processing data (not used in this example).
* **End Node**: Define the end of the workflow with success or failure outcomes.
1. **Integrate the workflow** into a BPMN process:
* Open the process diagram and include a **User Task** and a **Receive Message Task**.
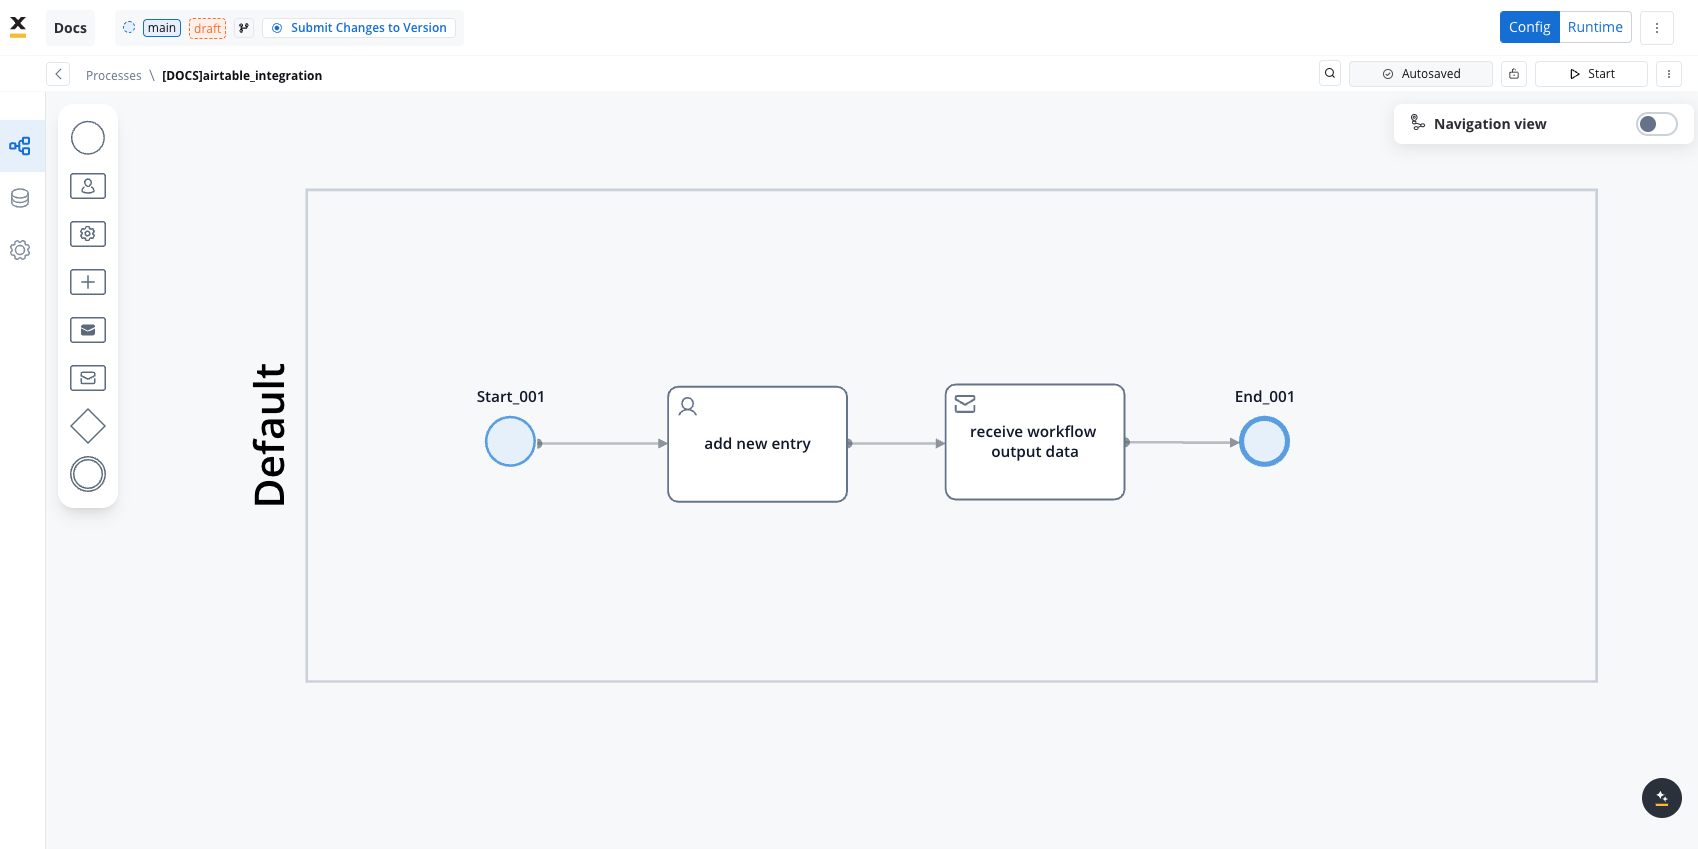
In this example, we'll use a User Task because we need to capture user data and send it to our workflow.
2. **Map Data** in the **UI Designer**:
* Create the data model
* Link data attributes from the data model to form fields, ensuring the user input aligns with the expected parameters.

3. **Add a Start Integration Workflow** node action:
* Make sure all the input will be captured.
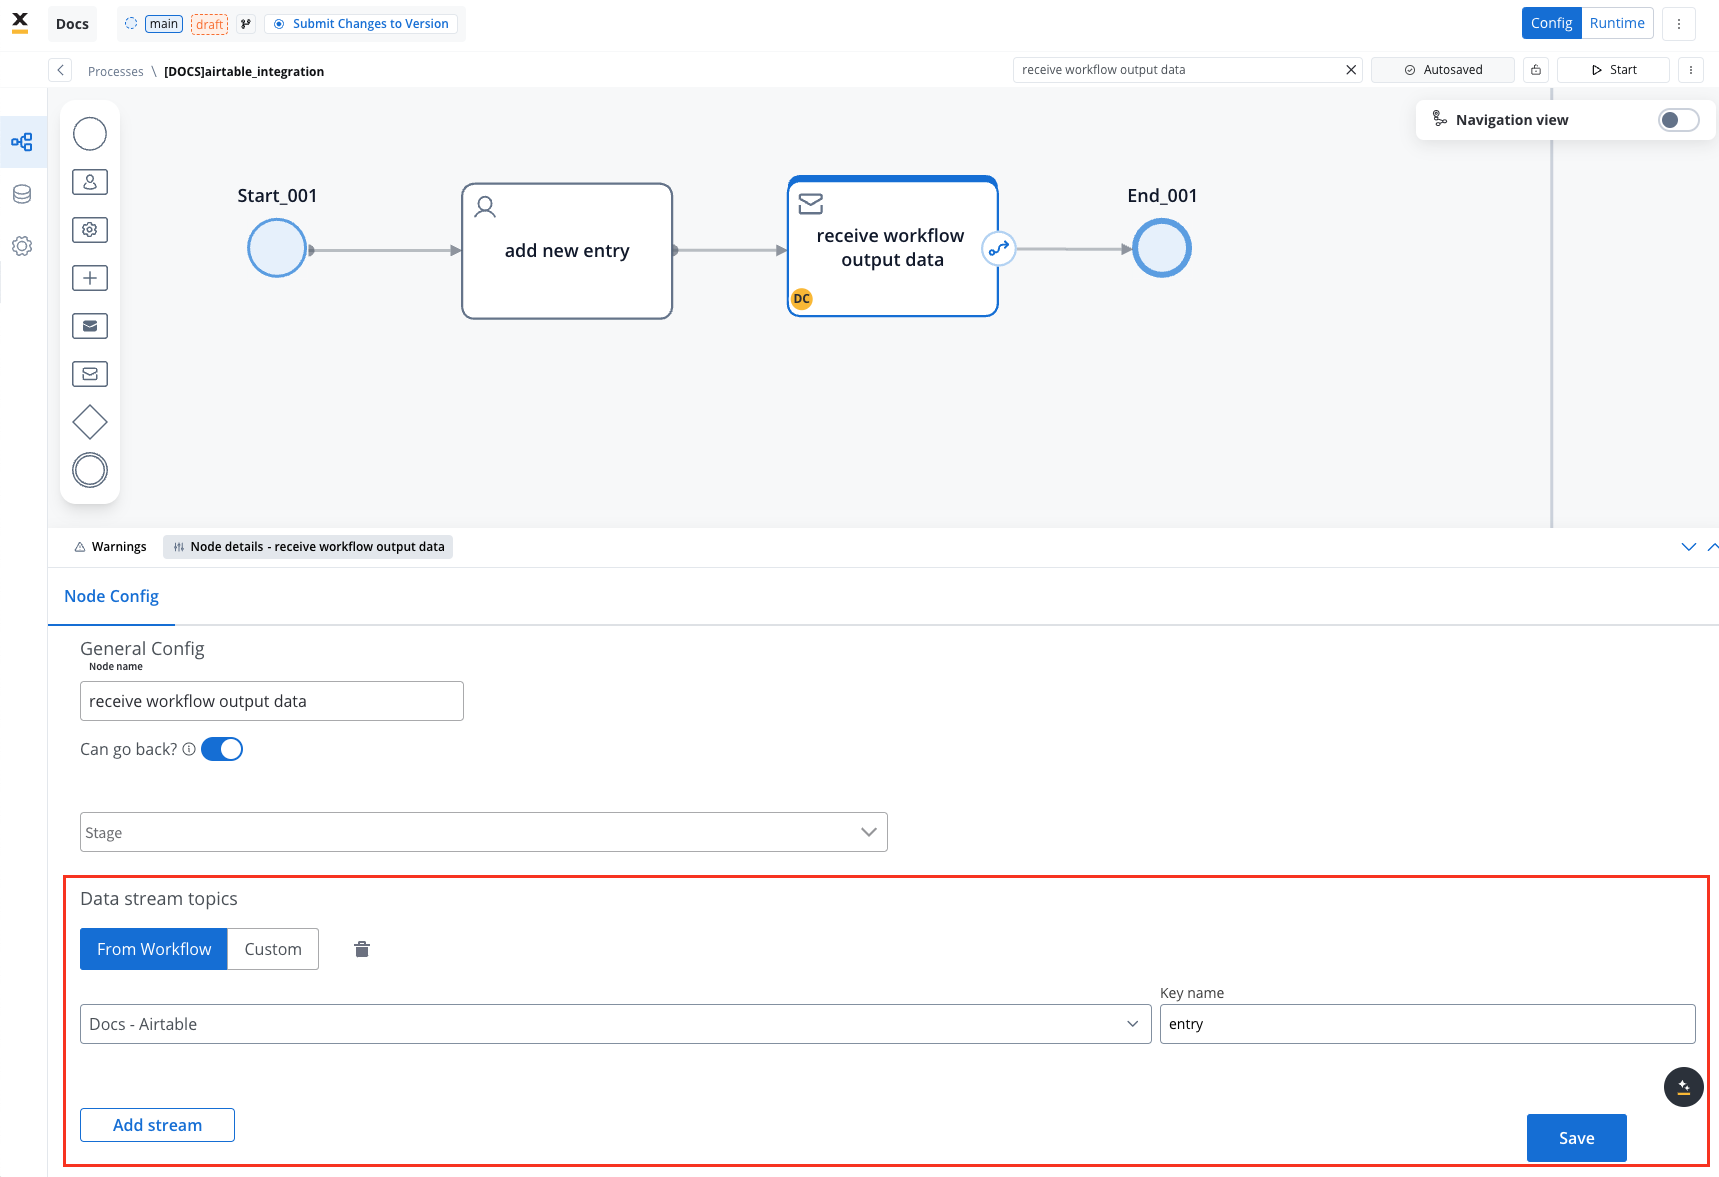
**Receive Workflow Output**:
* Use the **Receive Message Task** to capture workflow outputs like status or returned data.
* Set up a **Data stream topic** to ensure workflow output is mapped to a predefined key.
* Start your process to initiate the workflow integration. It should add a new user with the details captured in the user task.
* Check if it worked by going to your base in Airtable. You can see, our user has been added.
***
This example demonstrates how to integrate Airtable with FlowX to automate data management. You configured a data source, set up endpoints, designed a workflow, and linked it to a BPMN process.
***
## Export and import
You can export and import both **data sources** and **workflows** as ZIP files to transfer them between projects or environments (for example, from development to UAT to production).
### Exporting
To export a data source or workflow:
1. Navigate to the **Data Sources** or **Workflows** list in Integration Designer
2. Open the context menu for the resource you want to export
3. Select **Export**
4. The resource is downloaded as a ZIP file containing the full configuration
**What's included in the export:**
* **Data Sources** - data source configuration, endpoints, NoSQL operations, MCP tools
* **Workflows** - workflow nodes and their configurations
### Importing
To import a data source or workflow:
1. Navigate to the **Data Sources** or **Workflows** list in Integration Designer
2. Open the context menu and select **Import from ZIP**
3. Select the ZIP file exported from another project or environment
4. If resources with the same identifiers already exist, a **Review Resource Identifiers Conflicts** modal appears
5. Choose a strategy for each conflicting resource (or use **Apply to all**):
* **Keep both** - imports the resource as a new copy alongside the existing one
* **Replace** - overwrites the existing resource with the imported version
* **Skip this one** - keeps the existing resource unchanged
6. Click **Continue** to complete the import
Importing is only available for work-in-progress (WIP) project versions. You cannot import into a committed version.
## FAQs
**A:** For external API calls, the Integration Designer uses **REST (HTTP)** as the communication protocol. There is no dedicated GraphQL, SOAP, gRPC, or JDBC data source type — but protocols that run over HTTP can be called through a REST data source.
You can call a **GraphQL** endpoint by using a REST data source configured with the **POST** method, sending the GraphQL query as a JSON body:
```json theme={"system"}
{
"query": "mutation { updatePerson(input: { name: \"${input.name}\" }) { id status } }"
}
```
Set the endpoint content type to `application/json` and map the response as you would for any REST call.
You can call a **SOAP** web service the same way: configure a **POST** REST endpoint, set the **Content type** to **Raw**, put the SOAP envelope in the request body, and add the `Content-Type` (`text/xml` or `application/soap+xml`) and `SOAPAction` request headers. The XML response is parsed automatically, so you can map its fields like any JSON response — see [Receiving XML and SOAP responses](#receiving-xml-and-soap-responses). There is no WSDL import or automatic envelope/fault generation; you build the envelope yourself.
**gRPC** and **JDBC** are not supported — they are not HTTP-based and have no data source type.
The Integration Designer also supports specialized data source types beyond REST: FlowX Database, Unmanaged MongoDB, MCP Server, Knowledge Base, Email Trigger, Email Sender, Incoming Webhook, and Microsoft Outlook. See [Data sources](#data-sources) for details.
**A:** The Integration Service handles all security aspects, including certificates and secret keys. Authorization methods like Service Token, Bearer Token, and OAuth 2.0 are supported.
**A**: Errors are logged within the workflow and can be reviewed in the monitoring dedicated console for troubleshooting and diagnostics
**A**: You can import full data sources (including their endpoints) and workflows via ZIP files using the **Import from ZIP** option in the context menu. See the [Export and import](#export-and-import) section for details.
Importing endpoint specifications from external formats like Swagger/OpenAPI is not yet supported. Endpoints must be defined manually within the data source configuration.
**A**: No, caching is only available for GET endpoints. POST, PUT, PATCH, and DELETE methods cannot be cached as they are designed to modify data rather than retrieve it.
**A**: FlowX.AI automatically falls back to calling the external API directly. Your workflows always receive correct data even if caching fails. The failure is logged for monitoring purposes.
**A**: No, the cache policy is configured at the endpoint level in the Data Source definition. All workflows using that endpoint share the same cache. If you need different caching behavior, create separate endpoint definitions.
**A**: Cache status is visible in both the endpoint testing modal and the workflow console logs. You'll see whether the response came from cache (hit) or from the external API (miss), along with the cache key and TTL information.
***
## Academy courses
Hands-on course covering systems, data sources, workflows, and REST integration patterns
Learn Kafka data mapping and transformation between process and integration workflows
**Academy playground projects** — if you're enrolled in the FlowX Academy, explore working examples:
* [**integrationDesigner**](https://designer-workshop-51x.playground.flowxai.dev/workspace/00000000-0000-0000-0000-000000000001/projects/d5221a29-1d95-4f7f-a38d-a3446013ce23/config/cf068a44-a551-4eb2-9e96-593726d7c50a/processes) — REST API integration workflow patterns
* [**dataMappers**](https://designer-workshop-51x.playground.flowxai.dev/workspace/00000000-0000-0000-0000-000000000001/projects/ee7acc40-9f7d-4b61-adf4-e391f013b33a/config/39c9ceda-e694-46a0-a985-76d4d7c4fcd3/processes) — data mapping between process and workflows
* [**database**](https://designer-workshop-51x.playground.flowxai.dev/workspace/00000000-0000-0000-0000-000000000001/projects/f69d3816-8746-43bc-ac89-121a28710ee5/config/4082e8f4-2f17-4071-84ea-a0692b34fc83/processes) — FlowX Database operations (find, insert, update)
* [**file\_handling\_ID**](https://designer-workshop-51x.playground.flowxai.dev/workspace/00000000-0000-0000-0000-000000000001/projects/e00957d9-f8cb-490b-9d6c-23f1c4537e88/config/60cd1ae2-b856-4583-8227-f728368f0d23/processes) — file upload and handling in integration workflows