> ## Documentation Index
> Fetch the complete documentation index at: https://docs.flowx.ai/llms.txt
> Use this file to discover all available pages before exploring further.
# Custom Agent node
> Create AI agents with advanced capabilities using MCP tools to execute complex tasks in Integration Designer workflows.
## Overview
The **Custom Agent Node** is a specialized Integration Designer workflow node that enables you to create AI agents with custom capabilities powered by Model Context Protocol (MCP) tools. Custom Agent nodes can interact with external systems, databases, and services through MCP servers, allowing them to perform complex, multi-step operations autonomously within your integration workflows.

## Key features
* **Tool Access**: Connect to one or more MCP servers to provide tools to the AI agent
* **Reasoning & Acting**: Built-in ReAct (Reasoning and Acting) model for intelligent decision-making
* **Multi-Step Execution**: Agent can use multiple tools in sequence to accomplish complex tasks
* **Structured Responses**: Define expected response schemas for consistent output
* **Execution Tracking**: Monitor tool usage and agent reasoning in console logs
Custom Agent nodes automatically apply the ReAct (Reasoning and Acting) model, which enables the AI agent to think through problems, decide which tools to use, and take actions based on the results.
## When to use custom agent nodes
Custom Agent nodes are ideal for scenarios where you need:
* **Dynamic Decision Making**: The agent determines which tools to use based on the task
* **External System Integration**: Access external APIs, databases, or services through MCP tools
* **Complex Multi-Step Operations**: Execute workflows that require multiple tool interactions
* **Autonomous Problem Solving**: Let the AI agent figure out how to accomplish a goal using available tools
### Example use cases
Create an agent that can:
* Look up customer information from a CRM system
* Check order status from an order management system
* Generate personalized responses based on the gathered data
* Create support tickets if needed
Build an agent that:
* Queries multiple databases for relevant data
* Performs calculations and aggregations
* Generates charts and visualizations
* Produces formatted reports
Design an agent that:
* Monitors external systems for events
* Validates data across multiple sources
* Triggers actions in integrated systems
* Handles exceptions and error cases
Implement an agent that:
* Coordinates operations across multiple systems
* Transforms data between different formats
* Handles complex business logic
* Manages transaction workflows
## Adding a Custom Agent node
To add a Custom Agent node to an Integration Designer workflow:
1. Open **Integration Designer** and navigate to your workflow
2. Click **Select Next Node** dropdown
3. Select **Custom Agent** from the available node types
4. Configure the node settings

Custom Agent nodes are available in Integration Designer workflows, alongside other node types like REST Endpoint, Script, Condition, and Subworkflow nodes.
The Custom Agent node is specifically designed for Integration Designer workflows. For BPMN process workflows, use the **Start Integration Workflow** action to invoke workflows that contain Custom Agent nodes.
## Configuring a Custom Agent node
After adding a Custom Agent node to your Integration Designer workflow, configure it through the node configuration panel:
The agent's role, tasks, and expected input/output. Sent to the LLM as the **System message** and **cached** between executions to reduce cost and latency, so `${variable}` placeholders are not allowed in this field — use **Context** for dynamic values.
Describe:
* The agent's role and the task it should accomplish
* Specific requirements or constraints
* Expected output format and edge-case handling
**Example:**
```
You are a customer order assistant. For each request, retrieve the
customer's recent order history and summarize it as a JSON object
with fields: customerId, totalOrders, totalValue, recentOrders.
If the customer is not found, return an error explaining the
customer ID is invalid.
```
The per-execution prompt text, located inside the **Background** section of the node configuration panel. Supports `${variable}` placeholders for values from process data. Sent to the LLM as the **User message** on every execution and is **not** cached.
**Example:**
```
Customer ID: ${application.customerId}
Look back window: last 6 months
```
The **Background** section also exposes the Knowledge Base selector and the **Use only referenced values as input** toggle. In Chat Driven workflows, it additionally contains the **Use conversation memory** toggle.
One or more MCP servers whose tools will be available to the AI agent.
**Configuration:**
* Select from locally defined MCP servers
* Include MCP servers from dependency libraries
* Multiple selections allowed
Only enabled tools from the selected MCP servers will be available to the agent. Tools can be managed in the MCP server details page.
JSON Schema defining the expected structure of the agent's response.
This ensures the agent returns data in a consistent, predictable format that can be easily processed by subsequent nodes.
**Example Schema:**
```json theme={"system"}
{
"type": "object",
"properties": {
"customerInfo": {
"type": "object",
"properties": {
"id": { "type": "string" },
"name": { "type": "string" },
"email": { "type": "string" }
}
},
"orderSummary": {
"type": "object",
"properties": {
"totalOrders": { "type": "number" },
"totalValue": { "type": "number" },
"recentOrders": {
"type": "array",
"items": {
"type": "object",
"properties": {
"orderId": { "type": "string" },
"date": { "type": "string" },
"total": { "type": "number" }
}
}
}
}
}
},
"required": ["customerInfo", "orderSummary"]
}
```
The key in the process data where the agent's response will be stored.
**Example**: `agentResponse`, `customerData`, `analysisResults`
If the key already exists in the process data, it will be overwritten with the agent's response.

## How custom agent nodes execute
When a Custom Agent node is executed in an Integration Designer workflow, the following process occurs:
The FlowX Engine sends the Instructions (as the System message), the Context (as the User message), and the available tools to the AI Service.
The AI agent analyzes the prompt and determines which tools it needs to use and in what order.
The agent requests tool execution through the MCP server:
* Agent provides input parameters based on its reasoning
* MCP server executes the tool
* Results are returned to the agent
The agent evaluates the results and decides whether to:
* Use additional tools to gather more information
* Process the data and formulate a response
* Handle any errors or unexpected results
Once the agent has all necessary information, it generates a structured response according to the defined schema.
The response is stored in the process data at the specified response key and the workflow continues.
The agent's reasoning process, tool invocations, and results are all logged in the console for debugging and monitoring purposes.
## Monitoring agent execution
After running a workflow with a Custom Agent node, you can monitor its execution in the **Console Logs**:
### Node logs tab
The **Logs** tab displays:
* **Execution Status**: Success, failure, or in-progress
* **Duration**: Time taken to complete the node execution
* **Tool Usage Summary**: Quick overview of which tools are used during the execution
* **Standard Output**: Agent's final response

### Tools tab
The **Tools** tab is only displayed when MCP tools have been used during execution.
For each tool invocation, you can see:
The name of the tool that was invoked.
The AI agent's reasoning for using this tool - why it decided this tool was necessary and what it hoped to accomplish.
**Example**: "I need to retrieve the customer's information from the CRM system to get their contact details and account status."
The parameters sent by the AI agent to the MCP tool.
**Example**:
```json theme={"system"}
{
"customerId": "CUST-12345",
"includeOrders": true
}
```
The response received from the MCP tool for the AI agent to interpret.
**Example**:
```json theme={"system"}
{
"customer": {
"id": "CUST-12345",
"name": "John Doe",
"email": "john.doe@example.com",
"tier": "premium"
},
"orders": [
{
"orderId": "ORD-001",
"date": "2025-03-15",
"total": 299.99
}
]
}
```

### Workflow-level logs
If the Custom Agent node is part of a larger workflow, tool usage information is also displayed at the workflow level:
1. Navigate to the workflow instance in Console Logs
2. View the workflow's **Tools** tab for an aggregated view of all tool usage
3. Drill down into specific nodes to see detailed tool execution
## Best practices
### Writing effective Instructions
**Be Specific**: Clearly define what the agent should accomplish
```
Good: "Retrieve customer order history for the last 6 months and calculate total spend"
Avoid: "Get customer info"
```
**Set Expectations**: Describe the expected output format
```
"Return a summary with: customer name, total orders, and average order value"
```
**Handle Edge Cases**: Include guidance for error scenarios
```
"If the customer is not found, return an error message explaining that
the customer ID is invalid"
```
Don't put `${variable}` placeholders in Instructions — they're rejected by the form because Instructions is the cached System message. Put per-execution values in **Context** instead.
### Writing effective Context
**Pass per-request values via placeholders**: keep the dynamic surface area small and named
```
"For customer ${application.customerId}, check pending orders
from the ${application.orderSystem} system"
```
**Use "Use only referenced values as input"** to send just the placeholders you reference, instead of the entire node input — narrows the model's context window and reduces token cost.
### Selecting MCP servers
**Relevance**: Only include MCP servers whose tools are relevant to the agent's task
**Minimize Scope**: Fewer tools = faster decision-making and more predictable behavior
**Tool Availability**: Ensure required tools are enabled in the MCP server configuration
### Defining response schemas
**Match Use Case**: Design the schema to match downstream data requirements
**Required Fields**: Mark essential fields as required in the schema
**Type Safety**: Use appropriate JSON Schema types for validation
**Documentation**: Add descriptions to schema properties for clarity
## Prompt suggestions
When a Custom Agent node has **Send as chat reply** enabled, you can configure it to generate recommended follow-up prompts alongside its chat response. These appear as clickable suggestion chips in the chat UI, guiding users toward relevant next steps in the conversation.
### How it works
When prompt suggestions are enabled:
1. The agent generates both a text reply and a list of follow-up suggestions in a single response
2. Suggestions appear as clickable chips below the agent's reply in the chat UI
3. Clicking a suggestion sends its content as the user's next message, continuing the conversation
4. Suggestions are one-time use — they disappear after one is clicked
### Configuring prompt suggestions
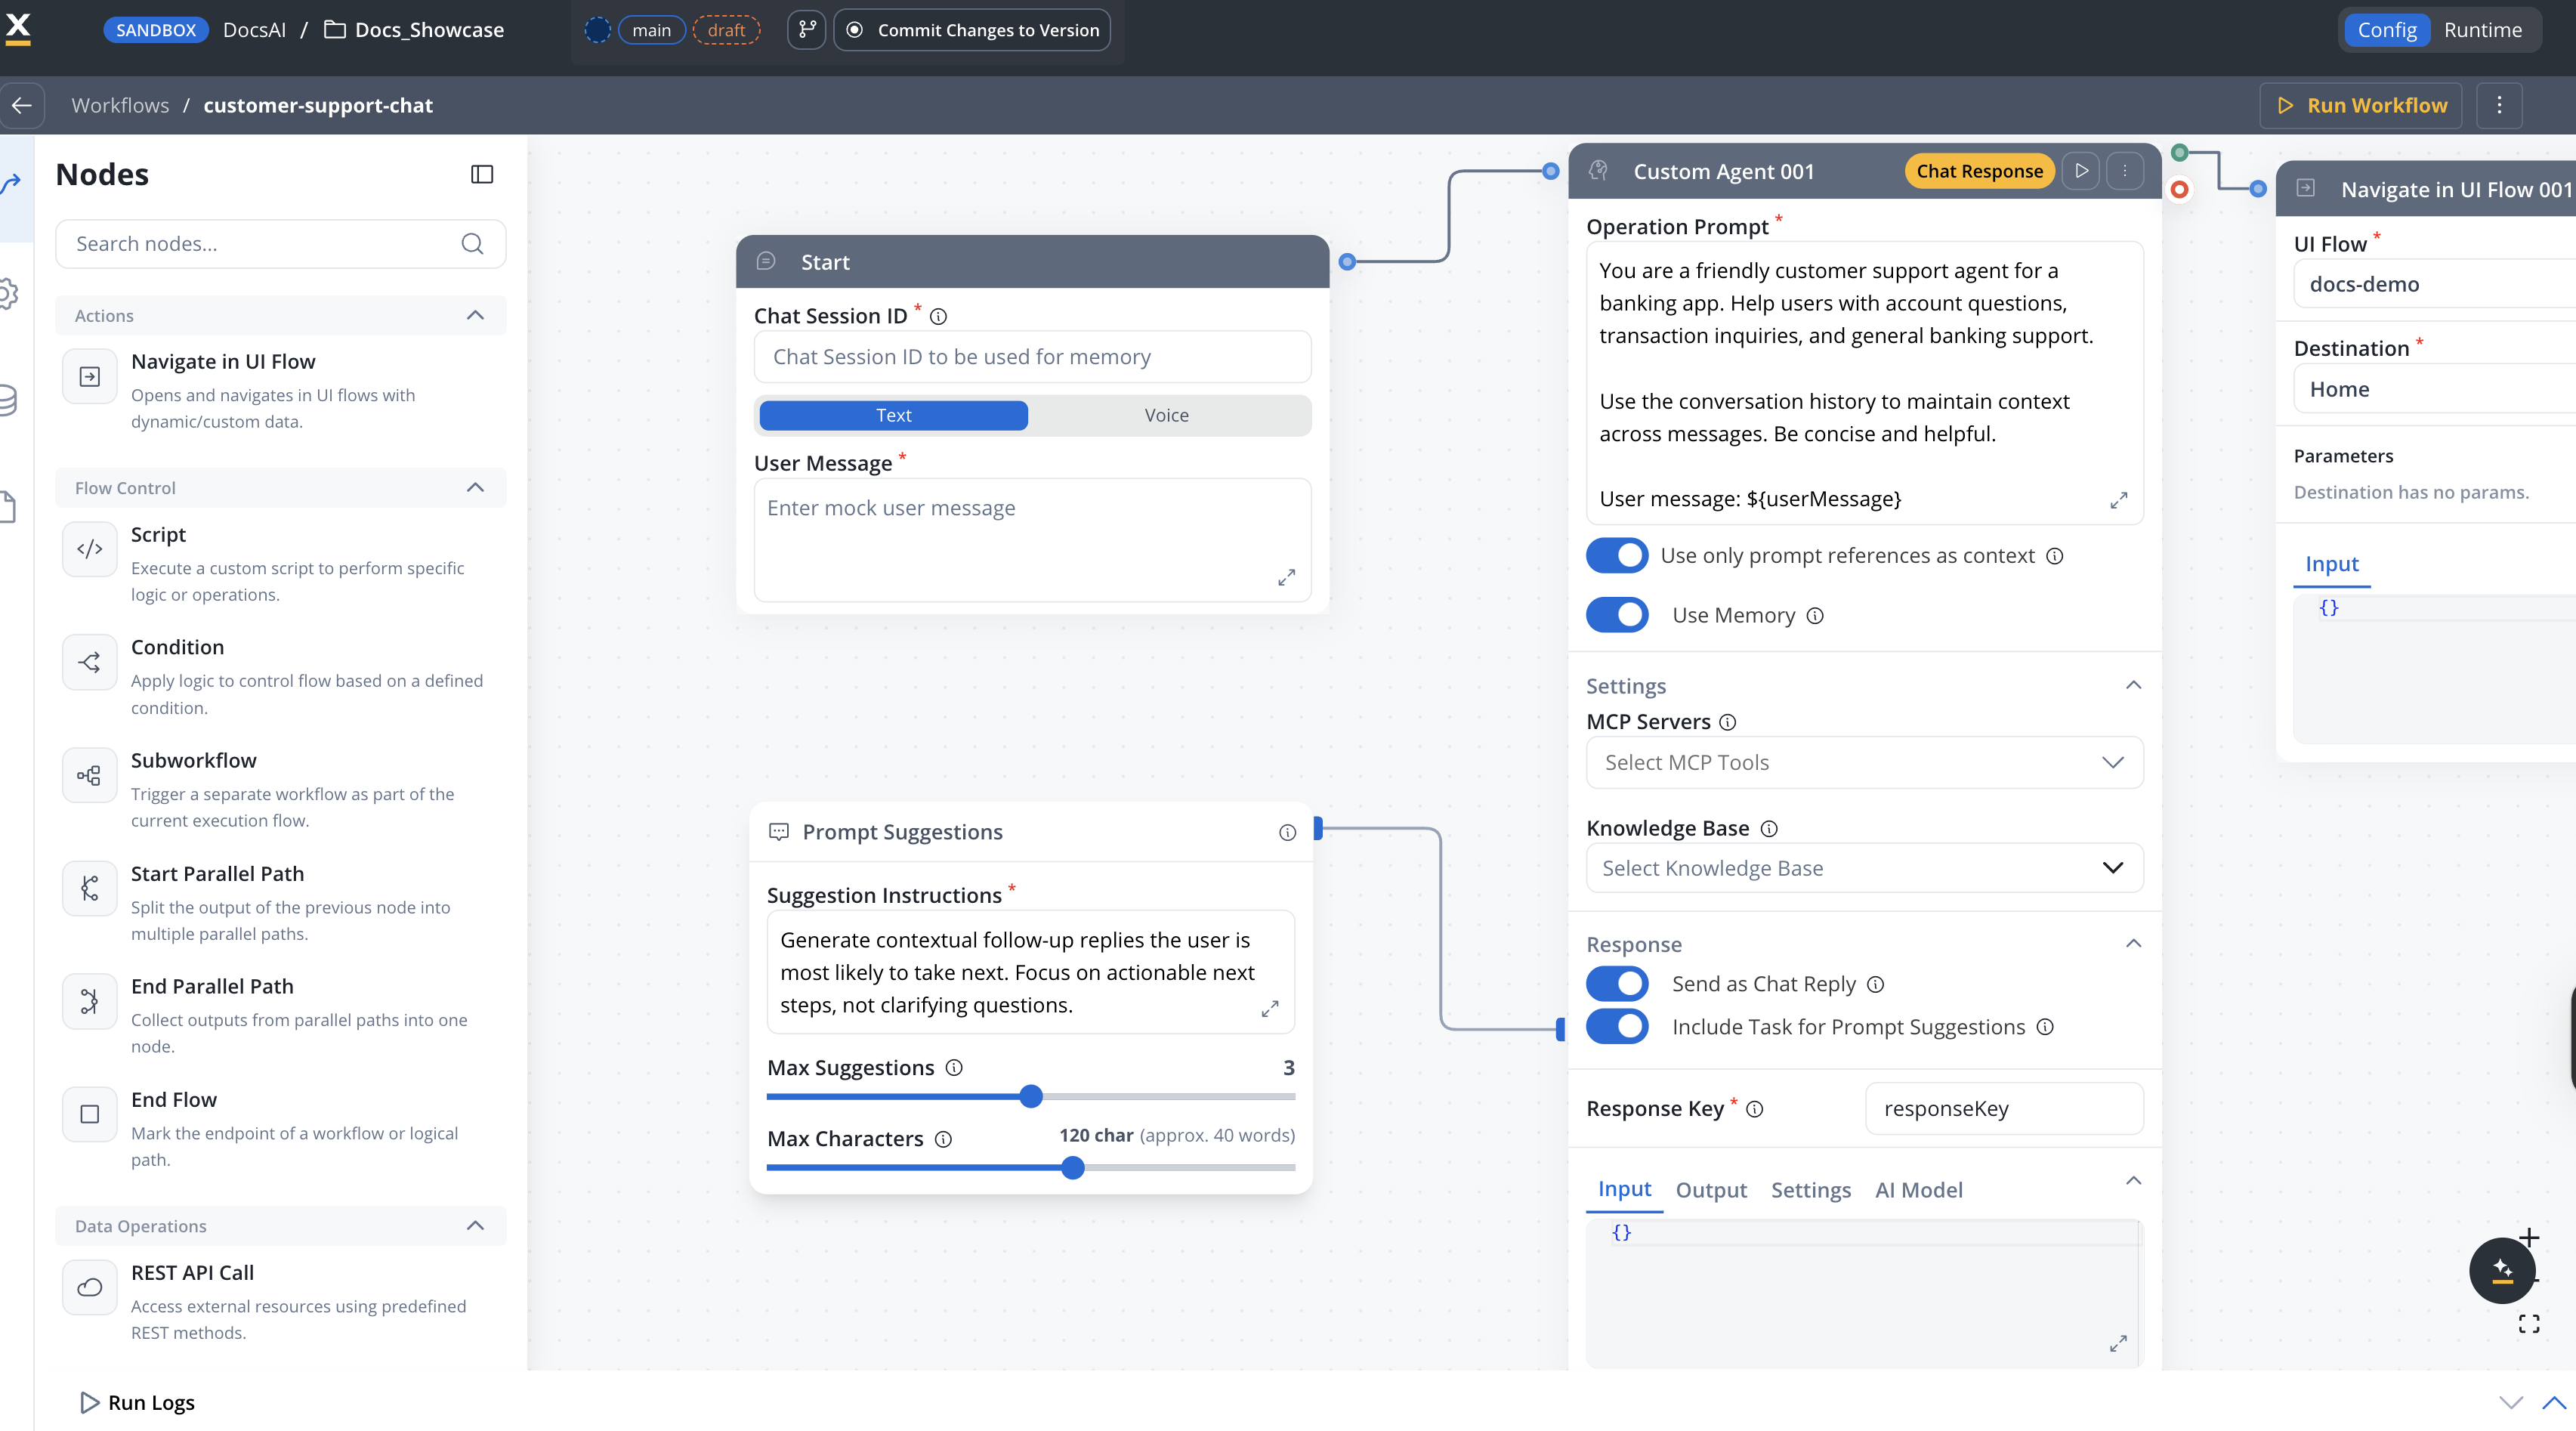
Prompt suggestions are configured through a **satellite panel** that appears on the workflow canvas, connected to the Custom Agent node.
In the Custom Agent node configuration, toggle **Send as chat reply** to **ON**. This is required for prompt suggestions to be available.
Toggle **Prompt Suggestions** to **ON** in the Response section. A satellite panel appears on the canvas, connected to the Custom Agent node.
The satellite panel contains the following settings:
Instructions that guide the agent on what kind of follow-up prompts to generate.
**Default:** `Generate contextual follow-up replies the user is most likely to take next. Focus on actionable next steps, not clarifying questions.`
Supports `${paramName}` interpolation for dynamic values from the process data.
Maximum number of suggestions the agent should generate per reply.
**Default:** `3` (range: 1-5)
Maximum character length for each suggestion label displayed in the chat UI.
**Default:** `120` (range: 10-200)
The satellite panel is draggable on the canvas. Its position is saved automatically. When you move the parent Custom Agent node, the satellite moves with it.
### Response structure
When prompt suggestions are enabled, the response schema is auto-generated. The agent's output is stored at the configured response key as a structured object instead of a plain string:
```json theme={"system"}
{
"reply": "The Pro plan costs $49/month and includes unlimited agents...",
"suggestions": [
{
"label": "Compare all plans",
"content": "Show me a detailed comparison of the Starter, Pro, and Enterprise plans."
},
{
"label": "How do I upgrade?",
"content": "What are the steps to upgrade my current account to the Pro plan?"
}
]
}
```
| Field | Description |
| ----------------------- | ---------------------------------------------------------------------------------------------- |
| `reply` | The agent's text response displayed in the chat |
| `suggestions[].label` | Short text displayed on the suggestion chip in the chat UI |
| `suggestions[].content` | Full prompt sent to the agent when the user clicks the suggestion. If omitted, `label` is used |
When prompt suggestions are enabled, the response schema is managed automatically — you cannot edit it manually. Turning off prompt suggestions restores the standard editable response schema.
### Chat behavior
* **Display**: Suggestions render as clickable chips below the agent's reply message
* **Click**: Clicking a chip displays the `label` as the user's message and sends the `content` to the agent as the next input
* **Memory**: The `content` (not the label) is stored in conversation memory for context continuity
* **Conversation restore**: When restoring a previous conversation, suggestion labels are shown for past user selections, but active suggestions on the last message are not re-displayed
***
## Limitations
| Constraint | Value | Details |
| ------------------------------------ | ----- | --------------------------------------------------------------------------------------------------------------------------------------------------------------------------------------------------------------------------------------------------------------- |
| **Maximum tool calls per execution** | `20` | The agent can make up to 20 tool calls in a single workflow execution. If the limit is reached, the execution stops and returns the last available result. Configurable via the `AGENT_BUILDER_MAX_TOOL_CALLS` environment variable on the AI platform service. |
***
## Troubleshooting
**Problem**: The agent doesn't use the tools you expected.
**Possible Causes**:
* Instructions don't clearly indicate the need for specific tools
* Tools are disabled in the MCP server configuration
* Agent found an alternative approach
**Solutions**:
* Review and refine the Instructions to be more specific about when each tool should be used
* Check MCP server tool status (enabled/disabled)
* Review agent reasoning in the Tools tab to understand its decision-making
**Problem**: The agent's response doesn't conform to the defined schema.
**Possible Causes**:
* Schema is too restrictive or doesn't match the prompt
* Tools return unexpected data structures
* Agent encountered errors during execution
**Solutions**:
* Verify schema matches what the prompt asks for
* Test tools independently to verify their outputs
* Review error logs for execution issues
* Adjust schema or prompt to align better
**Problem**: The Custom Agent node takes too long to execute.
**Possible Causes**:
* Too many MCP servers/tools available
* Complex multi-step operations
* External systems responding slowly
**Solutions**:
* Limit MCP servers to only those needed
* Break complex tasks into multiple simpler agent nodes
* Optimize external system performance
* Increase timeout configuration if appropriate
**Problem**: A tool invocation fails during agent execution.
**Possible Causes**:
* MCP server connection issues
* Invalid parameters sent by agent
* Tool authentication or permission errors
**Solutions**:
* Test MCP server connection in Integration Designer
* Review tool input schema and agent's input in the Tools tab
* Verify authentication credentials for the MCP server
* Check tool-specific error messages in console logs
## Next steps
Learn about MCP integration capabilities
Add, configure, and manage MCP servers and tools
Learn about Integration Designer workflows
## Related resources
Learn how to call Integration Designer workflows from BPMN processes