> ## Documentation Index
> Fetch the complete documentation index at: https://docs.flowx.ai/llms.txt
> Use this file to discover all available pages before exploring further.
# Tutorial: Build your first UI Flow
> Build a two-page loan estimator UI Flow in FlowX Designer, with a form that starts a workflow, displays its result, and navigates between pages.
export const date_0 = "October 2026"
export const scope_0 = "The workflow ran on its own, then the UI Flow validated the form, started the workflow, showed the result on both pages, and kept it in the session data."
Tested · {date_0}
**Built and run by the FlowX docs team on a live FlowX environment.** {scope_0}
In this tutorial you build your first **UI Flow**: a small two-page app where a user enters a loan amount and a term, clicks **Calculate**, and sees the monthly payment and a repayment breakdown. A workflow does the math. By the end, you'll know how to:
* Create a UI Flow with two pages and choose which one opens first
* Build a form with required fields and bind it to the UI Flow data model
* Start a workflow from a button and pass it the form values
* Show the workflow's output on a page and navigate between pages
* Run the UI Flow and inspect its session data
**Available starting with FlowX.AI 5.9.0**
Everything in this tutorial works on FlowX.AI 5.9.0 and later releases. The screenshots come from a later release, so some panels can look slightly different on 5.9.x.
**Time required:** about 25 minutes
**Prerequisites:**
* Access to FlowX Designer
* A workspace and project set up ([create one here](/5.9/docs/projects/workspaces))
A **UI Flow** is a standalone user interface with its own pages, navigation, and data model, separate from any process. A **workflow** is integration logic built in the Integration Designer. In this tutorial the UI Flow collects input and shows results, and the workflow computes them. See the [Glossary](./glossary) if any term here is new.
***
## What you'll build
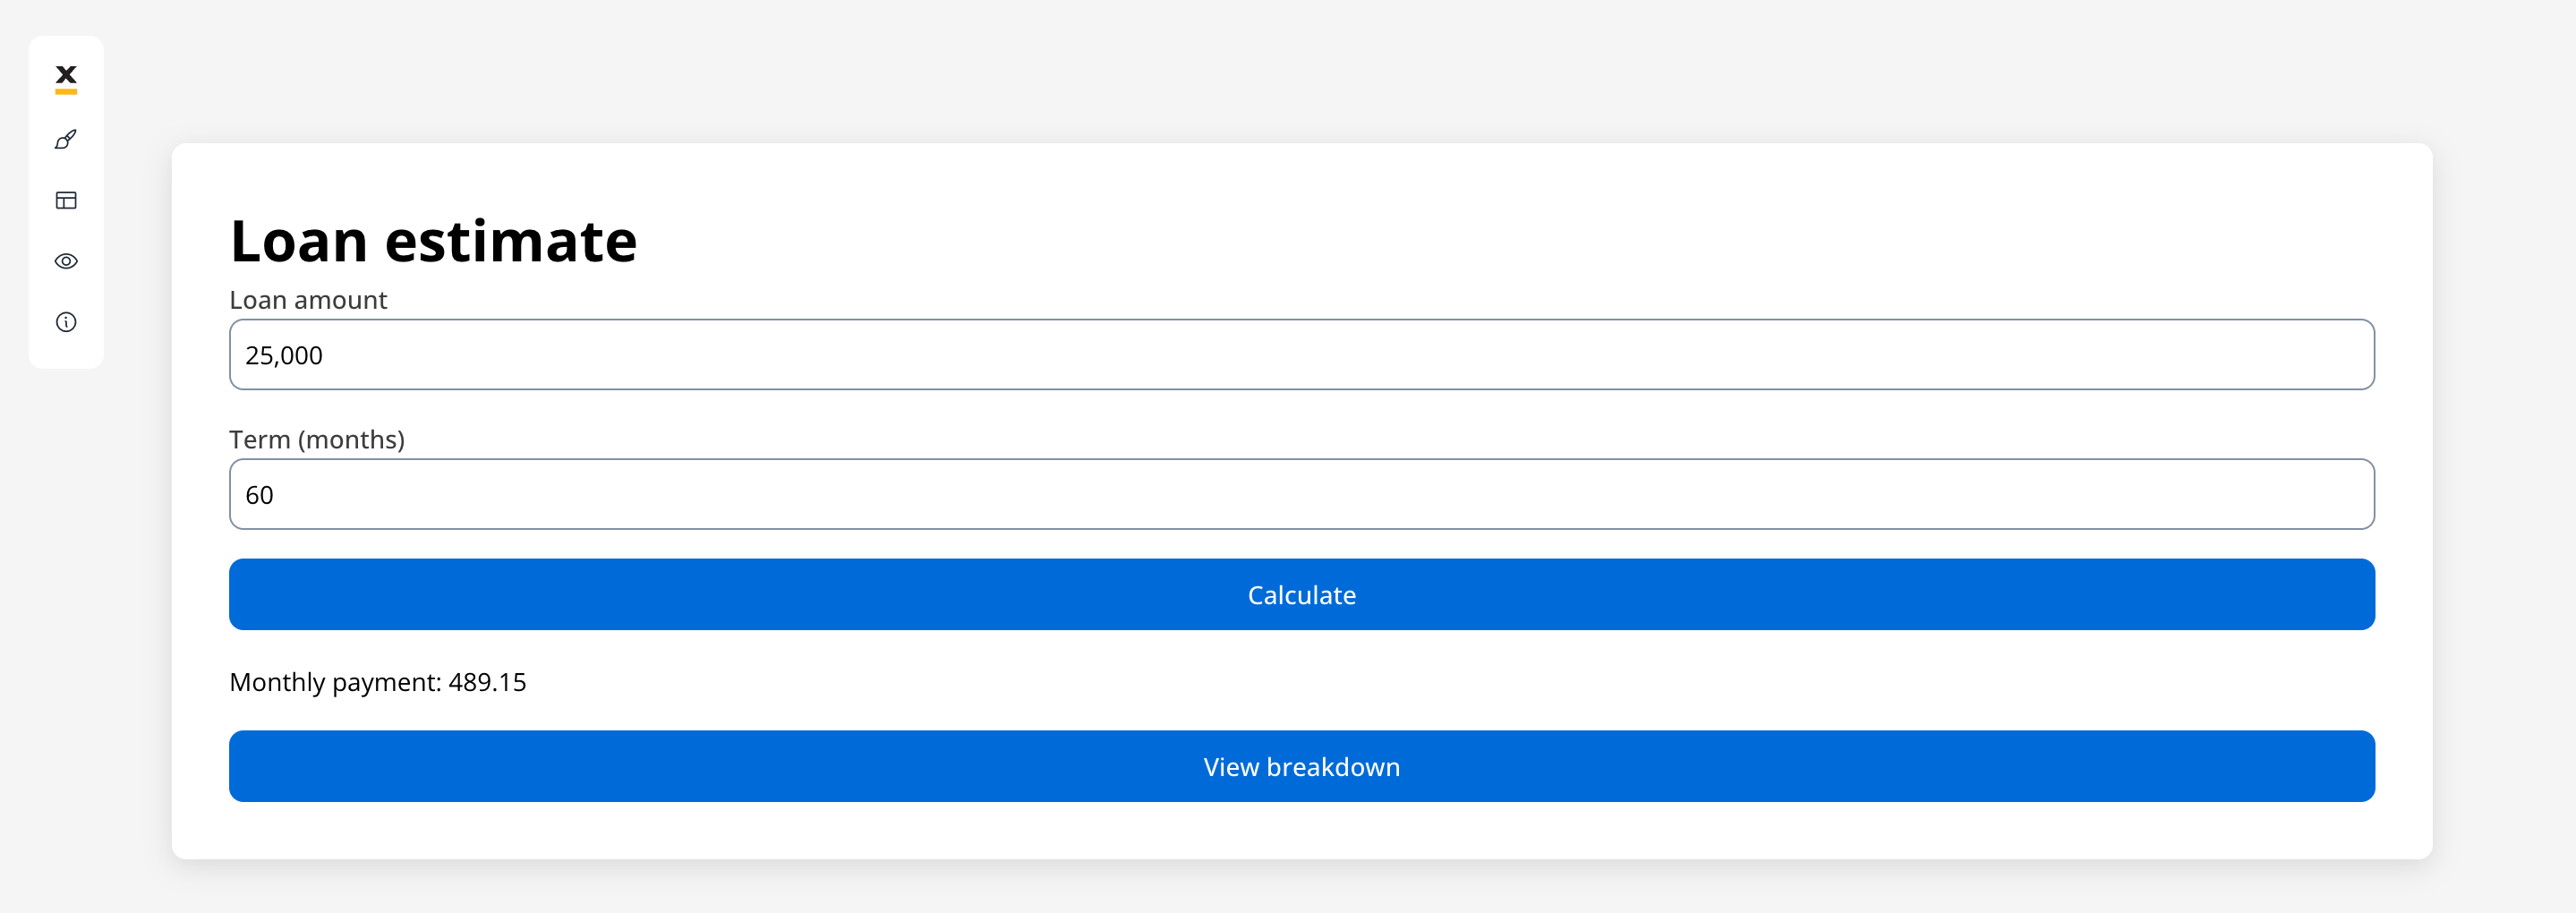
A loan estimator for Acme Bank. The **estimateForm** page holds a form with two fields. Its **Calculate** button validates the form and starts the `calculateLoanEstimate` workflow with the two values. The workflow returns a `loanEstimate` object, and the page shows the monthly payment from it. A second page, **estimateBreakdown**, shows the total repayment and the total interest from the same object.
```mermaid theme={"dark"}
flowchart LR
subgraph U [UI Flow: LoanEstimator]
P1[estimateForm page
Loan amount, Term, Calculate] -- View breakdown --> P2[estimateBreakdown page
Total repayment, Total interest]
P2 -- Back --> P1
end
subgraph W [Workflow: calculateLoanEstimate]
WS((Start)) --> SC[Calculate payment]
SC --> WE((End))
end
P1 -. amount, termMonths .-> WS
WE -. loanEstimate .-> P1
```
This is the finished first page at runtime, after a calculation:
***
## Step 1: Build the workflow
The UI Flow needs something to call, so start with the workflow. It takes an amount and a term, applies a fixed annual interest rate of 6.5%, and returns three amounts ready to display. If you haven't built a workflow before, [Build your first workflow](./building-your-first-workflow) covers each of these screens in detail.
Go to **Projects** → your project → **Integrations** → **Workflows** and click **Add Workflow**. Set the **Name** to `calculateLoanEstimate`. The workflow editor opens with a **Start** node already on the canvas.
Open the workflow's **Data Model** page from the left rail and add these attributes:
* `amount`: **Number**, **Floating Point**
* `termMonths`: **Number**, **Integer**
* `loanEstimate`: an object with three **String** attributes, `monthlyPayment`, `totalRepayment`, and `totalInterest`
Add `amount` and `termMonths` under **Input Parameters**. On the **Output Parameters** tab, select `loanEstimate`; its three fields are selected with it.
The three results are **String**, not **Number**, so they keep exactly two decimals. An output parameter of type **Number** (**Floating Point**) is stored with single precision, so `489.15` would reach the page as `489.1499938964844`.
Back in the editor, set the **Start** node's JSON to:
```json theme={"dark"}
{
"amount": 25000,
"termMonths": 60
}
```
At runtime the UI Flow supplies these values. The sample is what **Run Workflow** uses inside the editor.
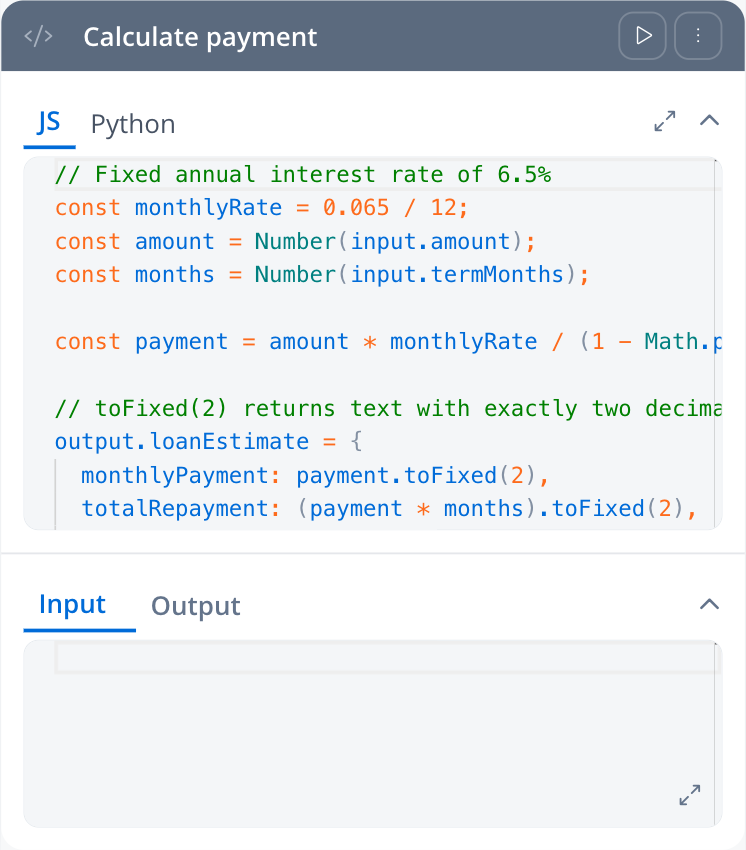
Drag a **Script** node after **Start**, connect the two, and name it `Calculate payment`. Keep the **JS** language tab and paste:
```javascript theme={"dark"}
// Fixed annual interest rate of 6.5%
const monthlyRate = 0.065 / 12;
const amount = Number(input.amount);
const months = Number(input.termMonths);
const payment = amount * monthlyRate / (1 - Math.pow(1 + monthlyRate, -months));
// toFixed(2) returns text with exactly two decimals, ready to display
output.loanEstimate = {
monthlyPayment: payment.toFixed(2),
totalRepayment: (payment * months).toFixed(2),
totalInterest: (payment * months - amount).toFixed(2)
};
```
The script reads the workflow input from `input` and publishes its result by assigning `output.loanEstimate`. `Number()` makes the math work whether the values arrive as numbers or as numeric strings.
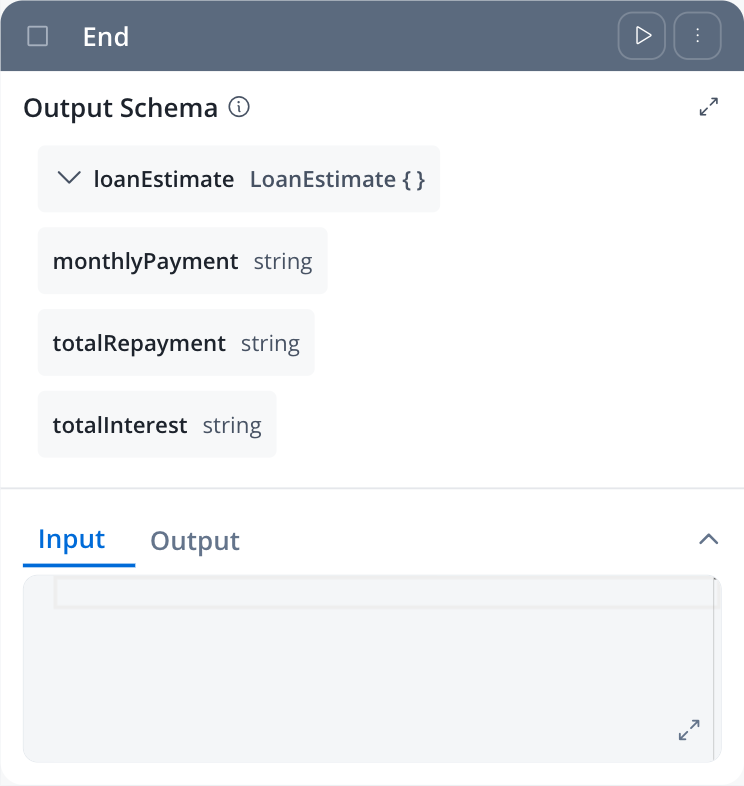
Drag an **End Flow** node after the script and connect it. Its **Output Schema** shows `loanEstimate` and its three fields, taken from the output parameters you selected. This is what the UI Flow receives.
Click **Run Workflow** and open the **Output** tab of the **Run Logs** panel:
```json theme={"dark"}
{
"loanEstimate": {
"monthlyPayment": "489.15",
"totalRepayment": "29349.22",
"totalInterest": "4349.22"
}
}
```
The run finishes with no errors and the Output tab shows the three values above. The workflow is ready for the UI Flow.
***
## Step 2: Create the UI Flow and its pages
Go to **Projects** → your project → **UI Flows** and click **+**. In the **Create UI Flow** dialog, fill in:
* **Name**: `LoanEstimator`
* **Platform**: **Web**
* **Experience Type**: **Flow-Based**
Click **Create**. The UI Flow editor opens.
Platform and experience type can't be changed after creation. **Chat-Driven** UI Flows are built around an AI conversational workflow and are out of scope for this tutorial.
In the left rail, open **Data Model**. On the **Data Model** tab, click **Create Attribute** and add:
* `loanAmount`: **Number**, **Floating Point**
* `termMonths`: **Number**, **Integer**
These are the keys the form fields bind to. Define them before you add the fields, because the field's **Data key** setting searches the data model.
In the left rail, open **Designer**, then the **Navigation** tab of the left panel. Click **+** (**Add Root Component**) and pick **Page**. Do it twice, so the tree holds two pages.
Select the first page and, in the **Settings** tab on the right, set **Component Identifier** to `estimateForm`. Select the second page and set it to `estimateBreakdown`. The identifier is the name you pick later as a navigation destination.
Right-click `estimateForm` in the tree and choose **Set as Home**. The home page is the one the UI Flow opens on when it starts.
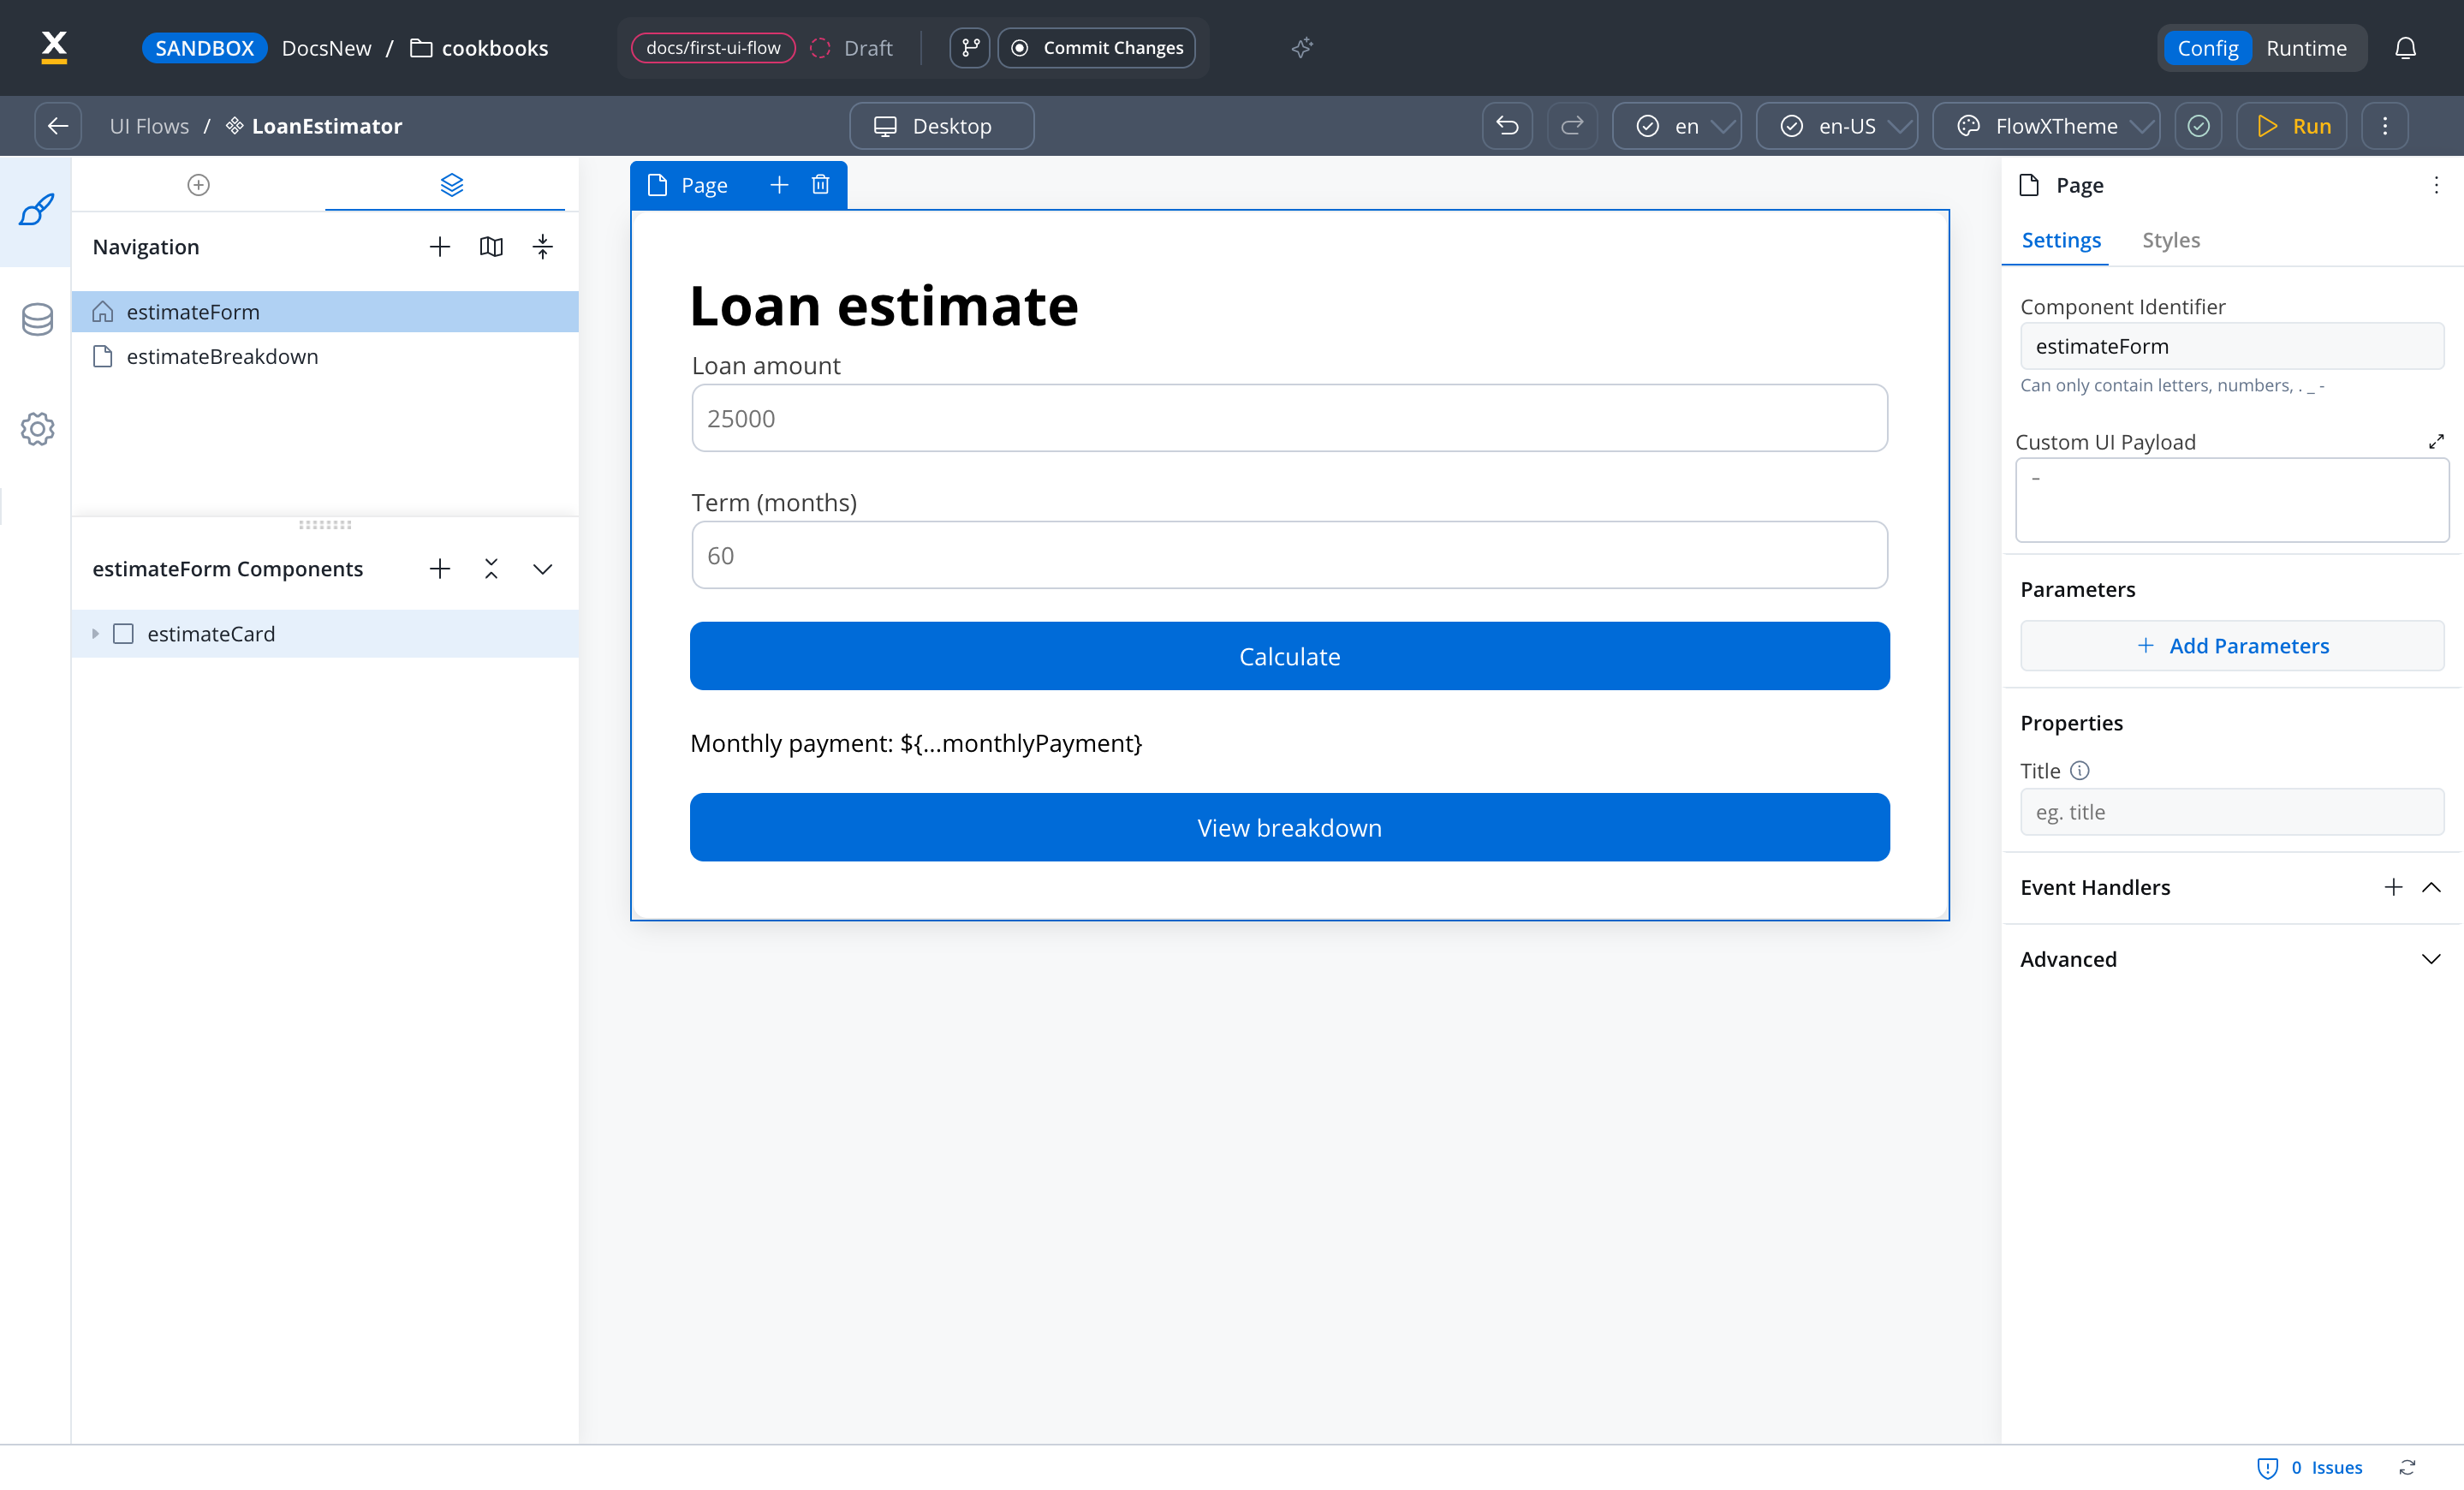
The **Navigation** tab lists `estimateForm` and `estimateBreakdown`, with `estimateForm` marked as home.
***
## Step 3: Build the form page
Components are added from the **UI Assets** tab of the left panel (**UI Components**), by dragging them onto a node in the tree. You can also right-click a node and choose **Add UI components**. A page holds layout components such as cards, and a card holds the form, the buttons, and the text.
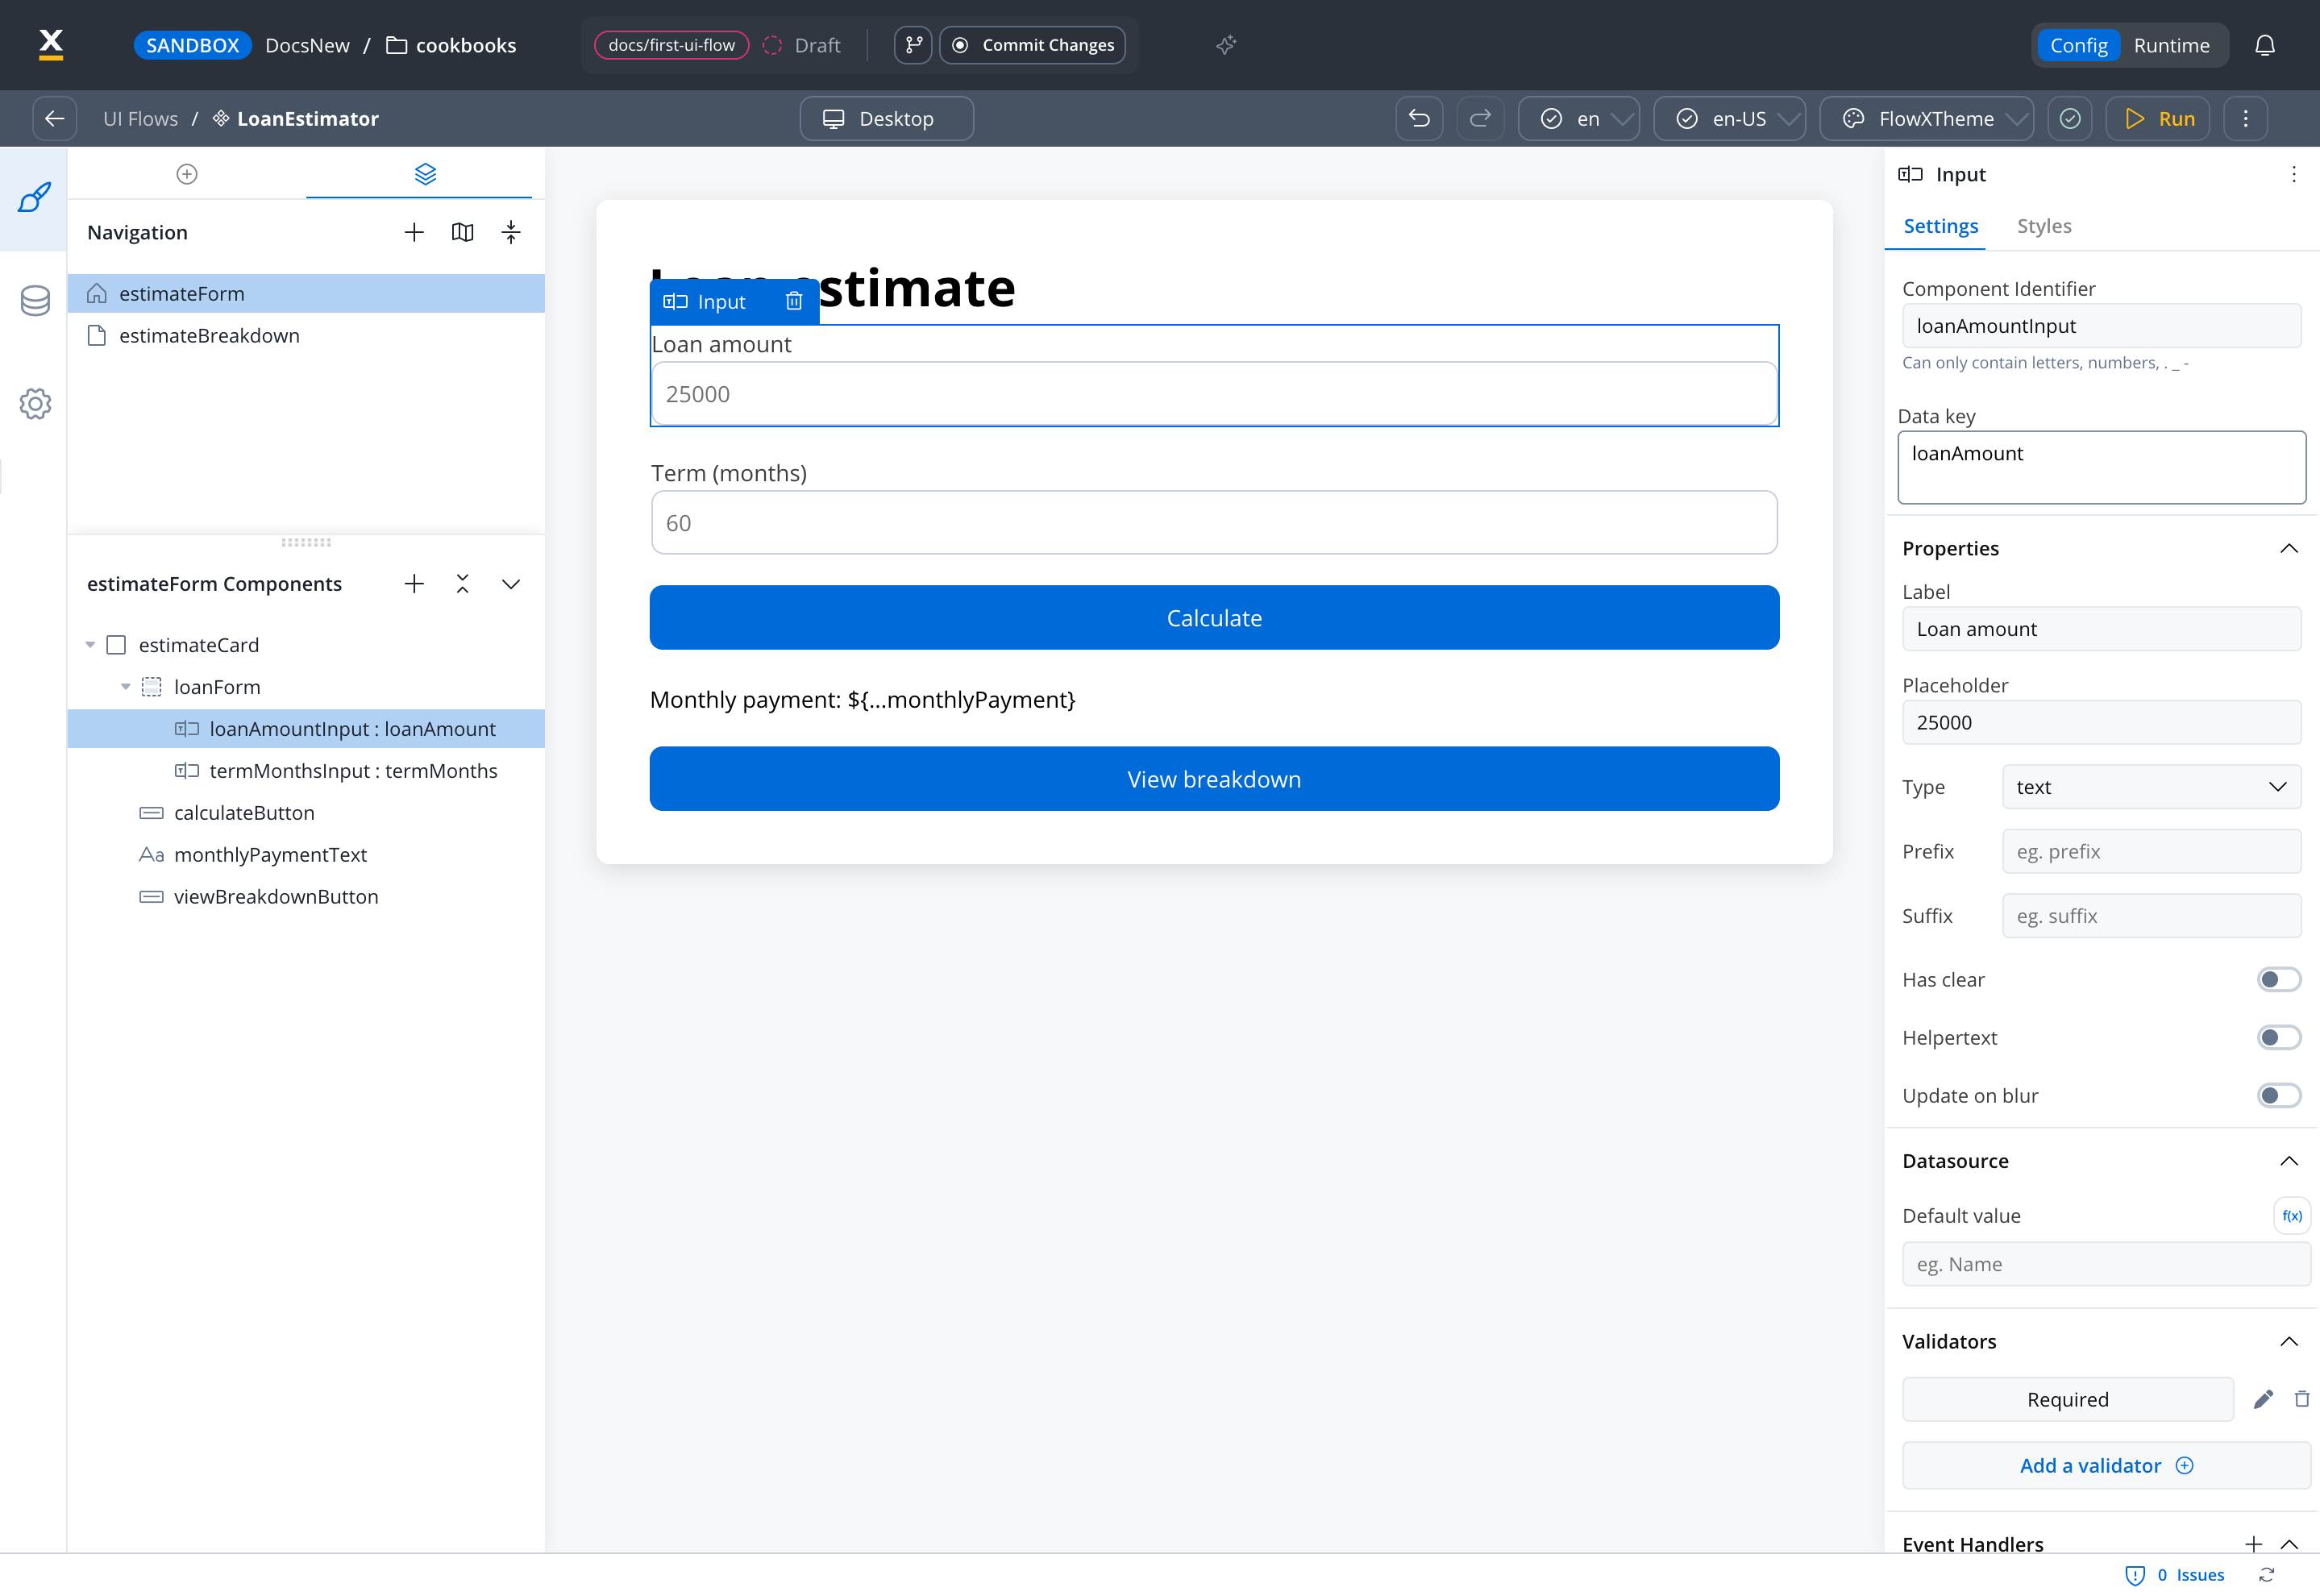
From **Layout**, drag a **Card** onto `estimateForm`. In **Settings**, set its **Title** to `Loan estimate`.
From **Form Components**, drag a **Form** into the card. Set its **Component Identifier** to `loanForm`, and leave **Validate on** at `submit`.
Drag two **Input** components into the form and configure them in **Settings**:
| Setting | First input | Second input |
| - | - | - |
| **Data key** | `loanAmount` | `termMonths` |
| **Label** | `Loan amount` | `Term (months)` |
| **Placeholder** | `25000` | `60` |
| Validator | `required`, **Error Message** `Enter the loan amount` | `required`, **Error Message** `Enter the term in months` |
In the **Data key** field, type at least three characters and pick the key from the data model. To add the validator, click **Add a validator** in the **Validators** section, set **Validator type** to `required`, and fill in the **Error Message**.
From **Basic**, drag a **Button** into the card, below the form and outside it. Set its **Label** to `Calculate`. You wire it to the workflow in Step 4.
Keep buttons as siblings of the form, not inside it. The button's action decides which forms to validate.
From **Basic**, drag a **Text** component into the card, below the button. Set its **Text** to:
```text theme={"dark"}
Monthly payment: ${loanEstimate.monthlyPayment}
```
`${...}` reads a value from the UI Flow session data. `loanEstimate` doesn't exist until the workflow returns it, and you don't have to declare it in the data model: workflow output is added to the session data when it arrives.
Drag a second **Button** into the card, below the text, and set its **Label** to `View breakdown`.
***
## Step 4: Start the workflow from the Calculate button
Actions on UI Flow components are configured as **event handlers**: a trigger, such as a click, and an action that runs when it fires.
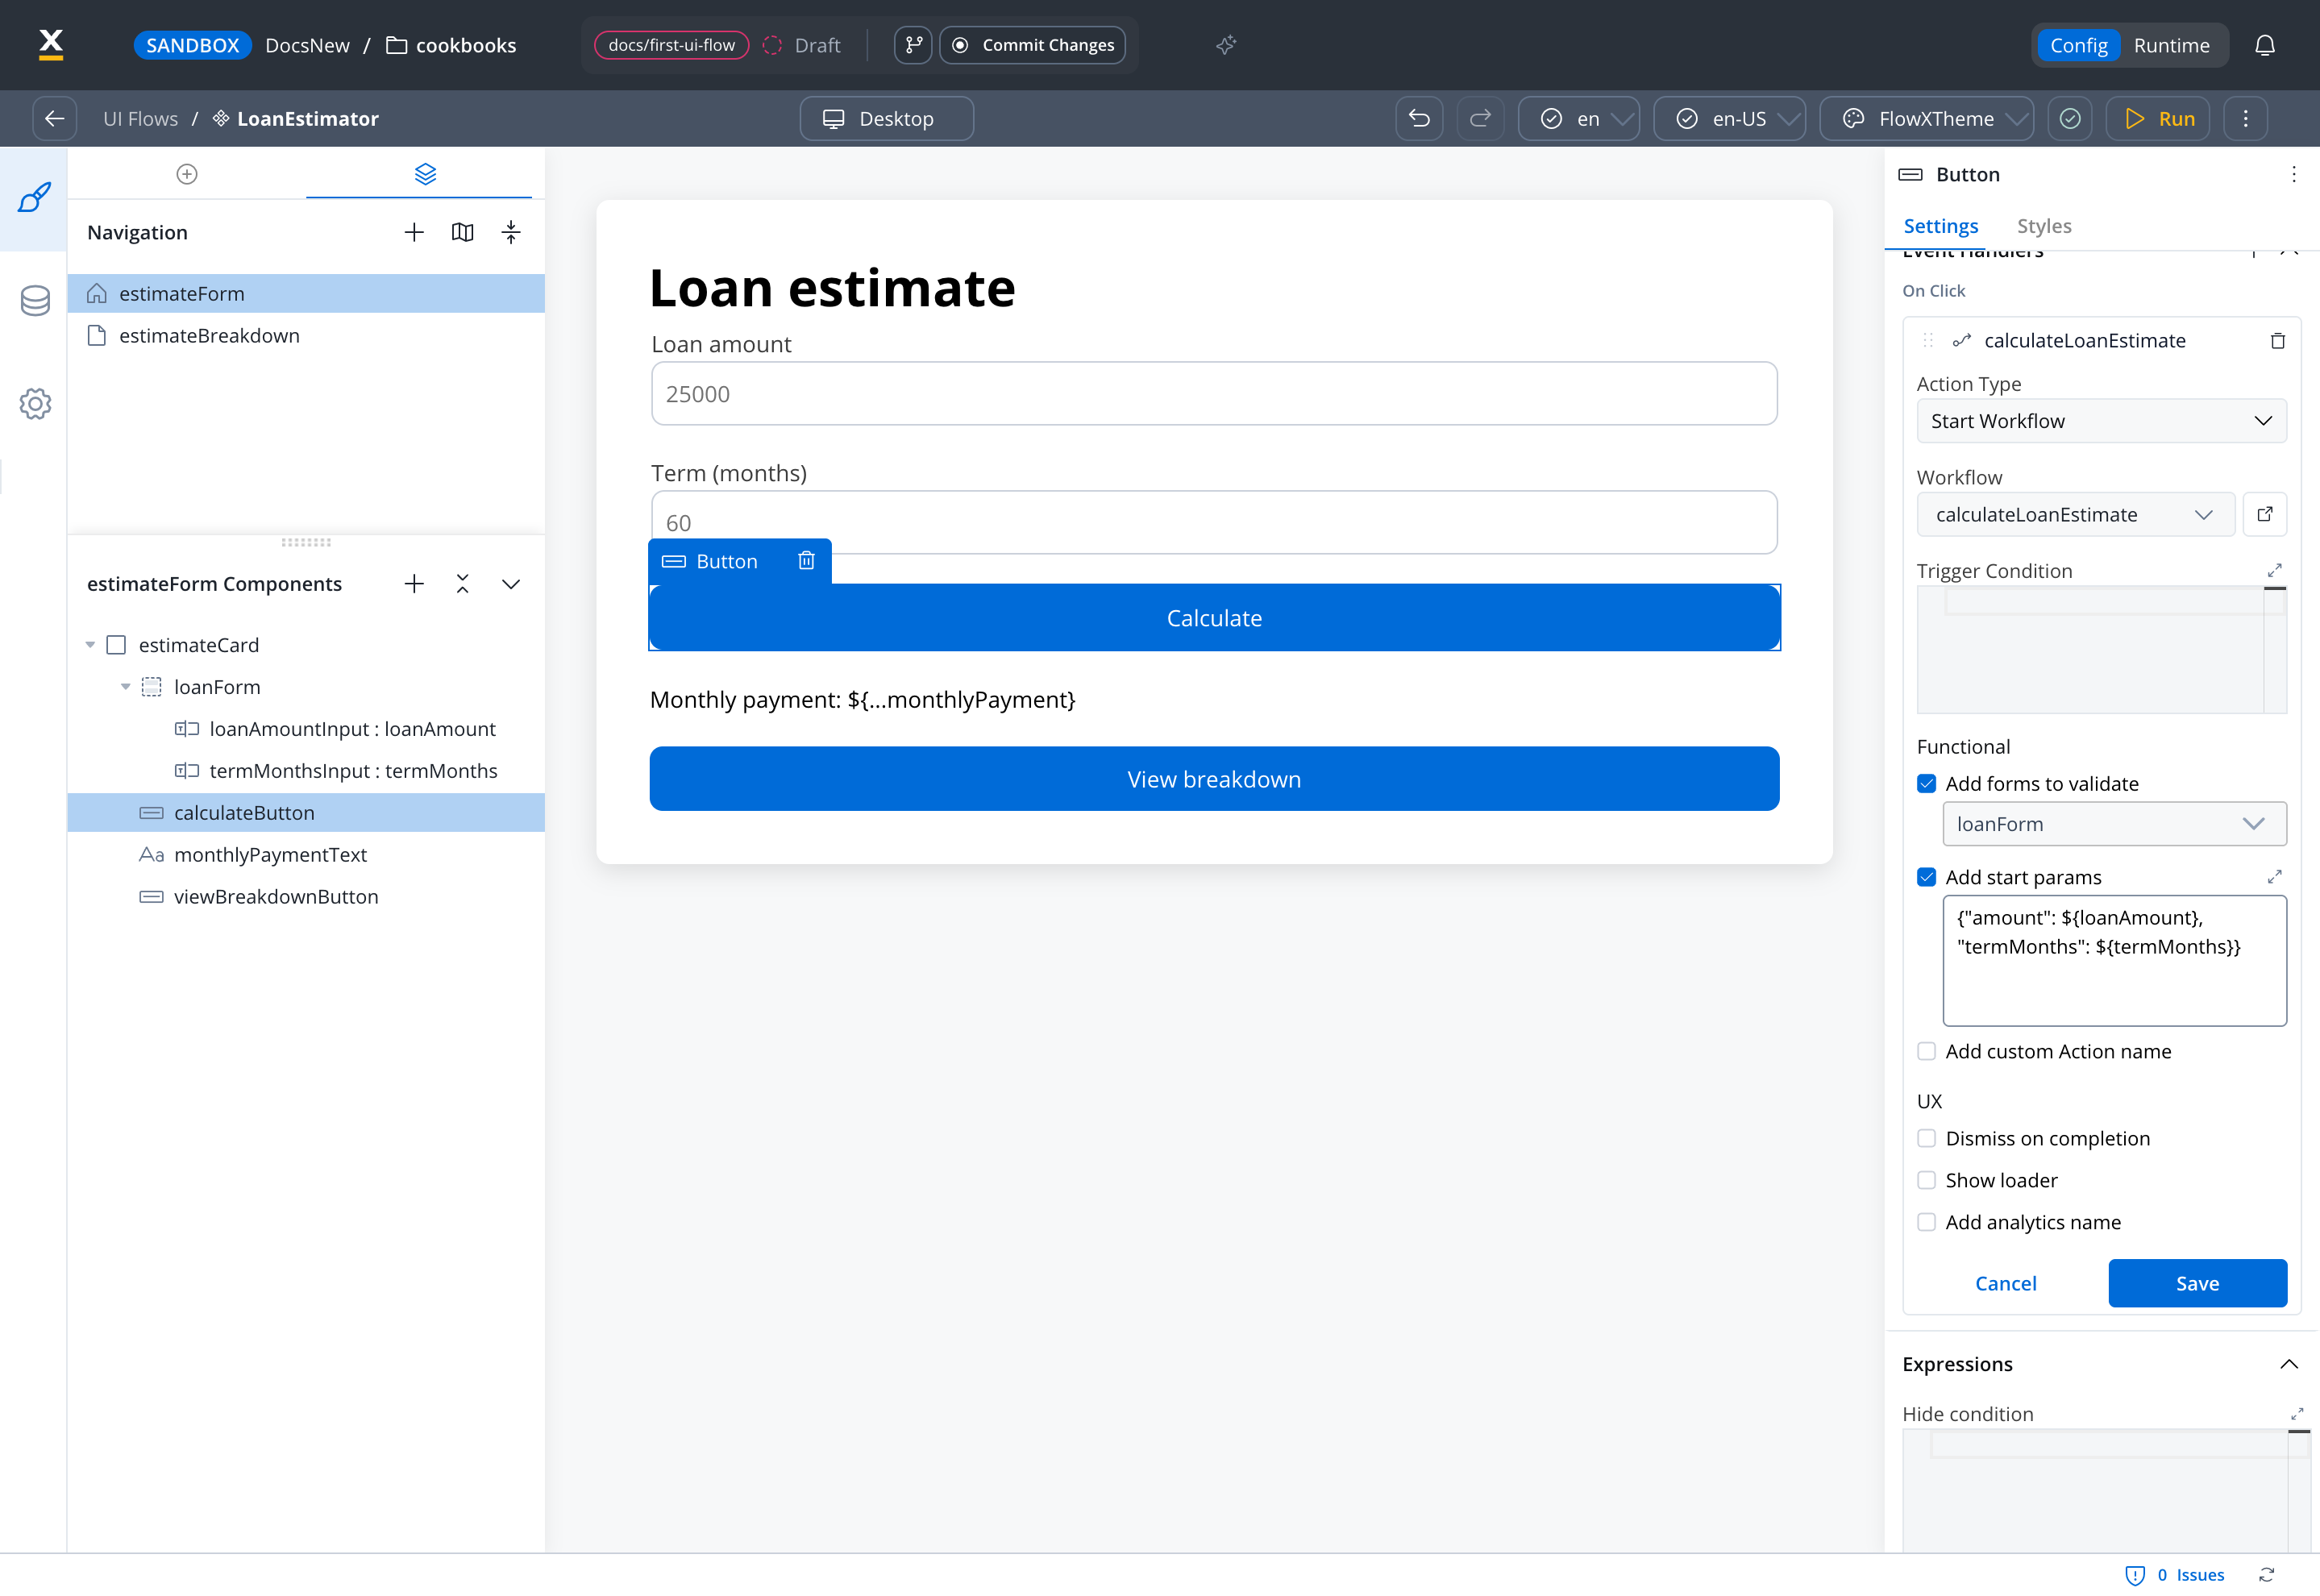
Select the **Calculate** button. On the **Settings** tab, find the **Event Handlers** section, click **+**, and choose **On Click**.
Set **Action Type** to **Start Workflow**, and in **Workflow** pick `calculateLoanEstimate`.
In the **Functional** section, tick **Add forms to validate** and pick `loanForm`. The handler then runs only when both required fields hold a value.
Tick **Add start params** and enter:
```json theme={"dark"}
{"amount": ${loanAmount}, "termMonths": ${termMonths}}
```
The keys on the left are the workflow's input parameters; the `${...}` expressions read the form values from the session data. Don't put quotes around `${...}`: each value is inserted already JSON-encoded.
In a UI Flow, validating a form doesn't send its values anywhere. Start params are how the workflow receives them. If you leave start params empty, the workflow starts with no input.
Click **Save**. Optionally, tick **Show loader** in the **UX** section first, to show a loading indicator while the workflow runs.
When the workflow finishes, its output (`loanEstimate`) is added to the UI Flow session data, and the **Monthly payment** text updates.
***
## Step 5: Build the breakdown page and connect the pages
Drag a **Card** onto `estimateBreakdown` and set its **Title** to `Repayment breakdown`. Inside it, add two **Text** components:
```text theme={"dark"}
Total repayment: ${loanEstimate.totalRepayment}
```
```text theme={"dark"}
Total interest: ${loanEstimate.totalInterest}
```
Then add a **Button** below them with the **Label** `Back`.
Both pages read the same session data, so the breakdown page shows the result the first page received without calling the workflow again.
Select the **View breakdown** button on `estimateForm`. Under **Event Handlers**, click **+**, choose **On Click**, set **Action Type** to **Navigate To**, and in **Destination** pick `estimateBreakdown`. Click **Save**.
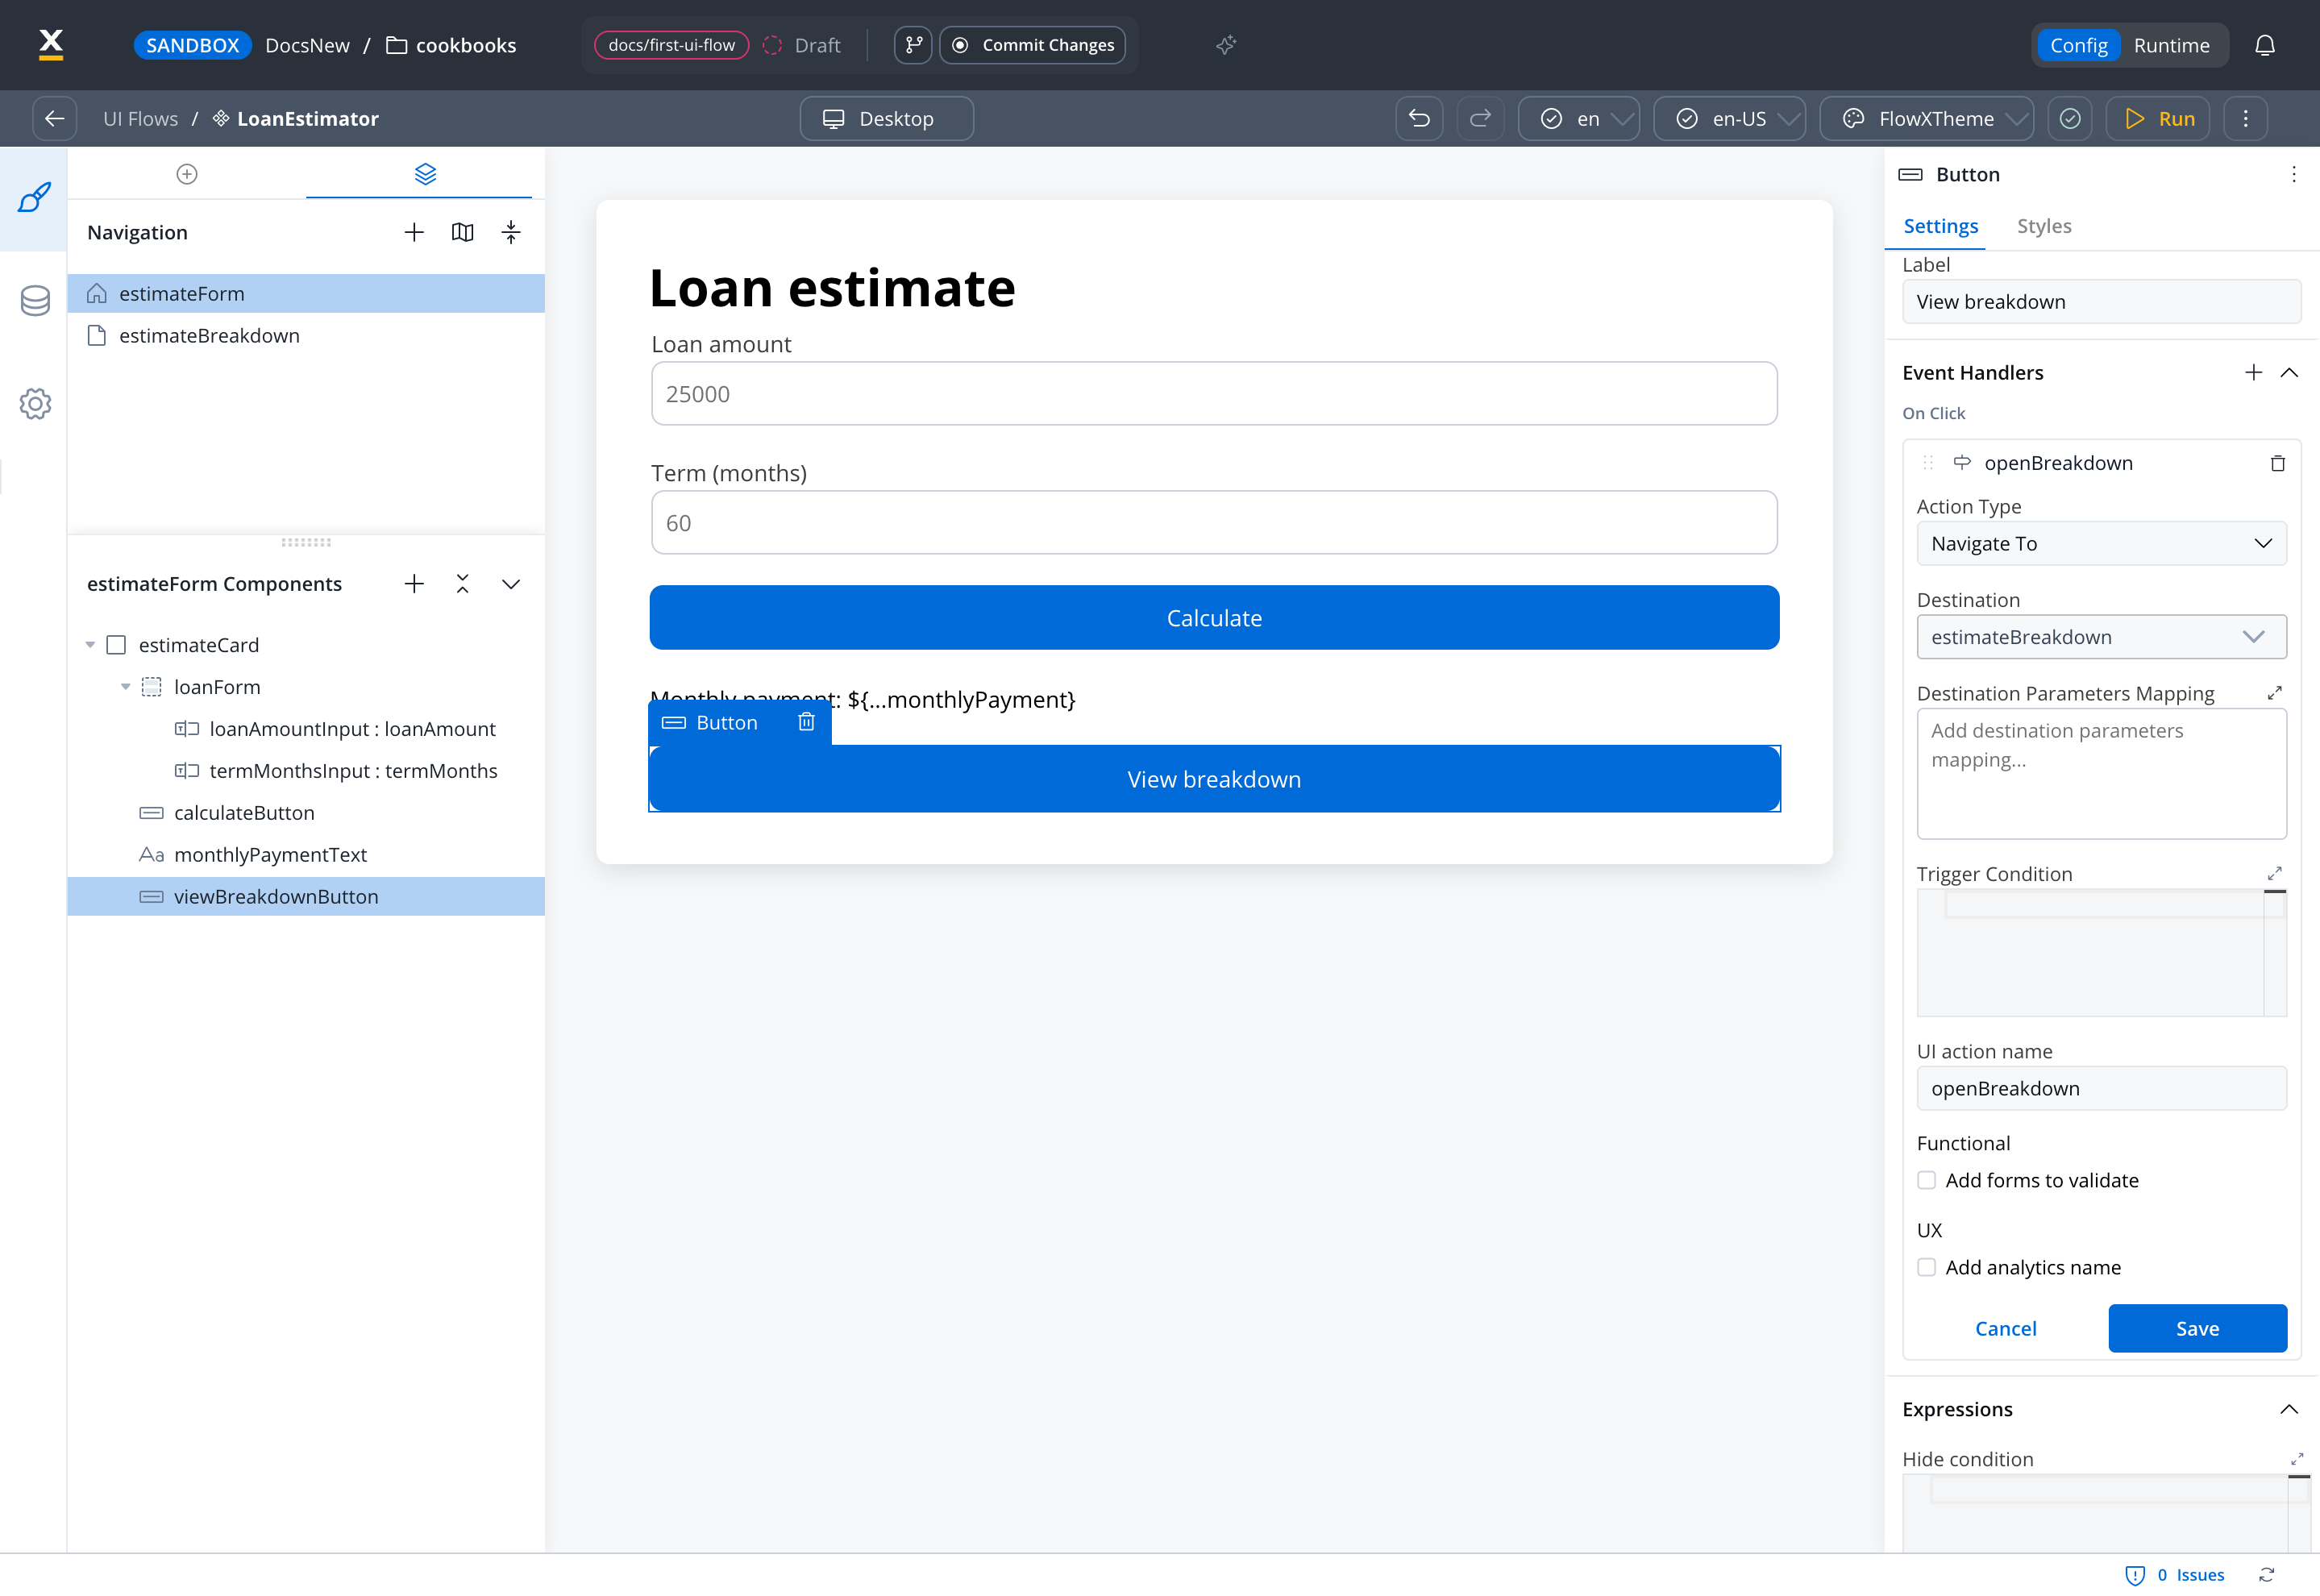
Select the **Back** button on `estimateBreakdown` and add the same kind of handler, with **Destination** set to `estimateForm`. Click **Save**.
***
## Step 6: Run it and inspect the session
Click **Run** in the top-right corner of the UI Flow editor. The **Run Ui Flow** dialog opens. **Input Parameters** holds the variables the UI Flow expects at start; this one expects none, so leave `{}`. Keep the default **Theme** and click **Run**.
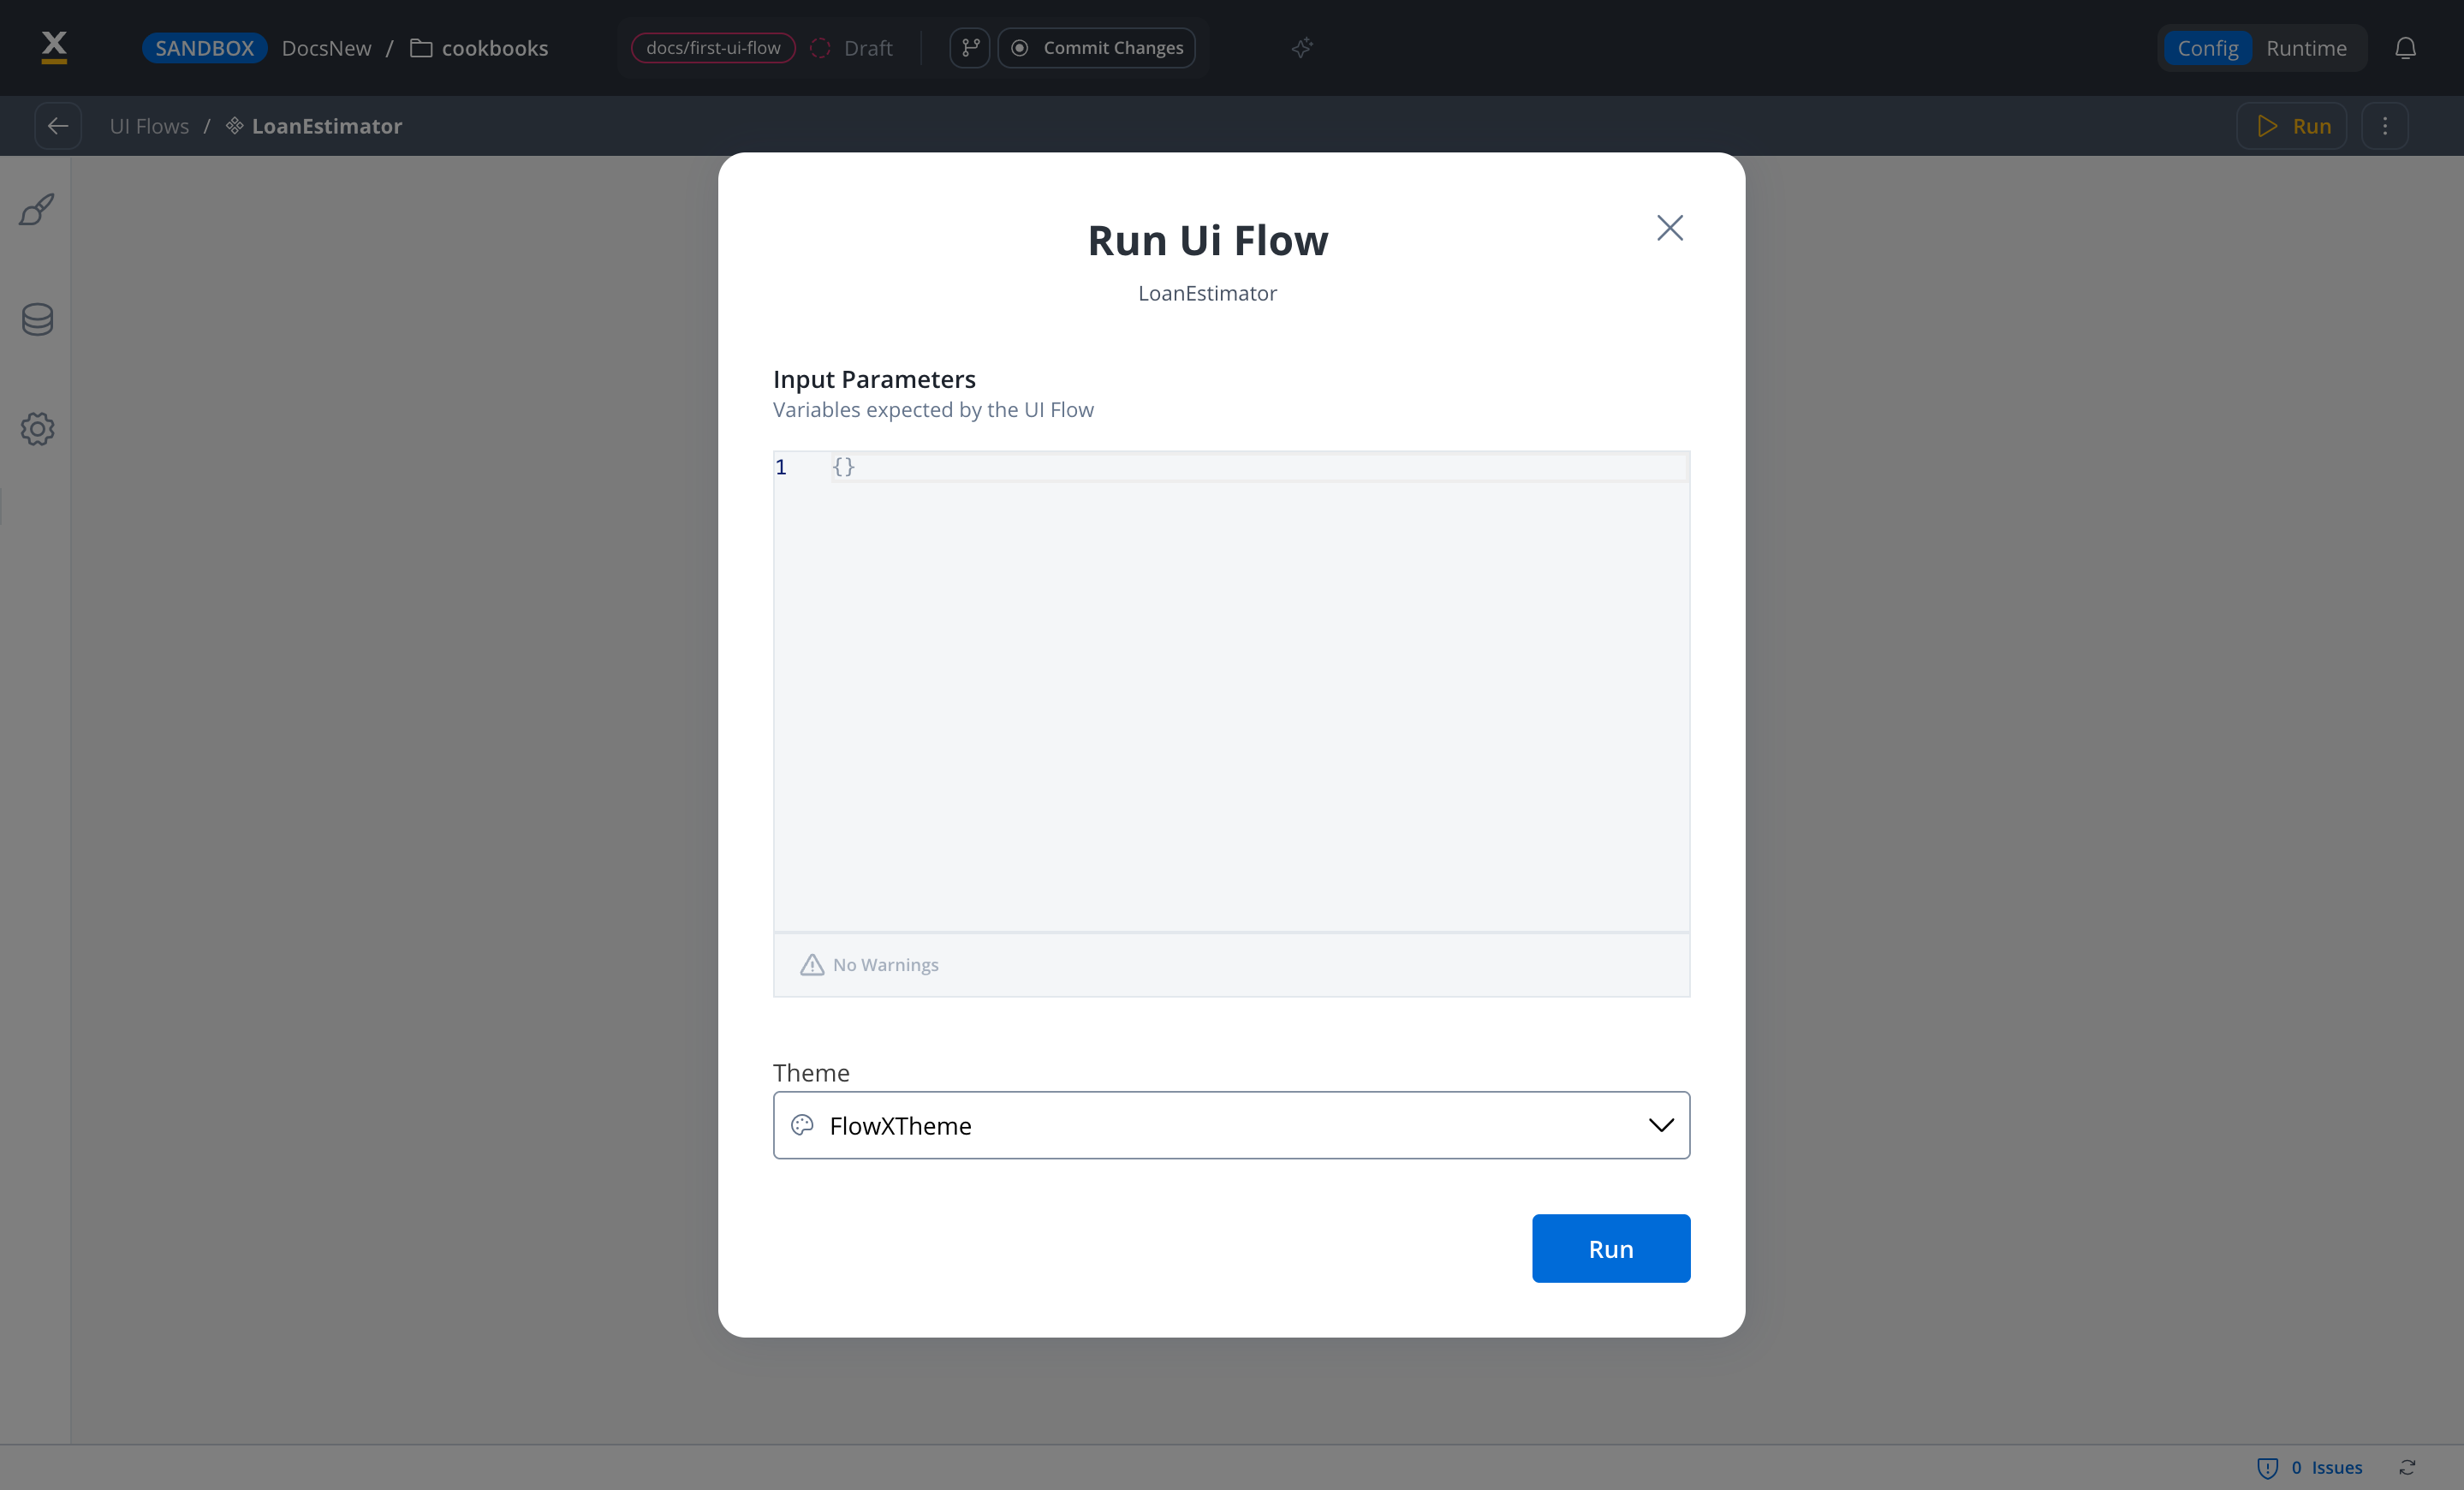
The UI Flow opens on `estimateForm`, the home page.
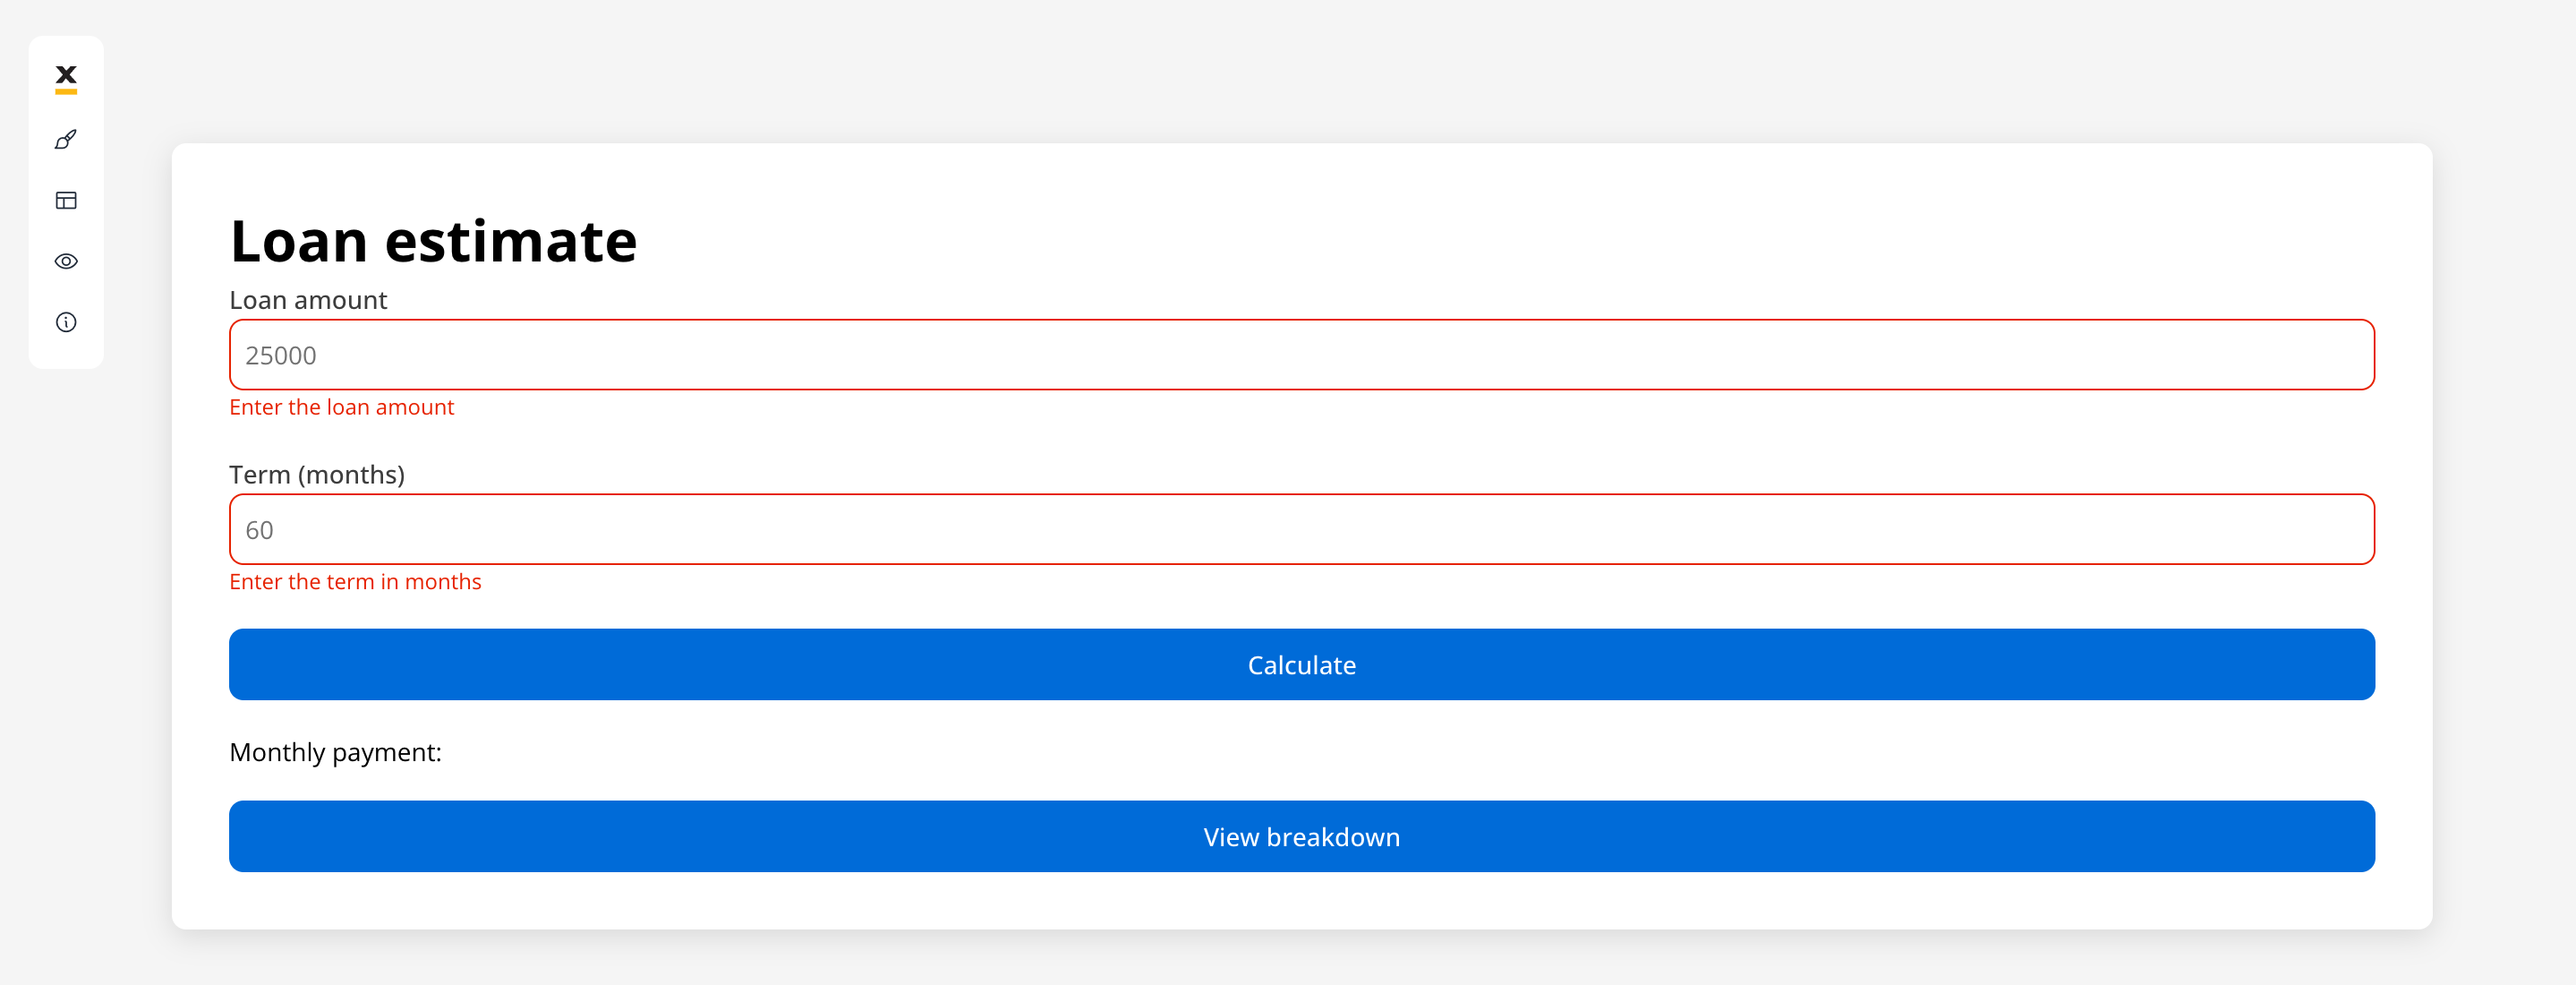
Click **Calculate** with both fields empty. The workflow doesn't start, and each field shows its required message.
Enter `25000` and `60` and click **Calculate**. The page shows **Monthly payment: 489.15**.
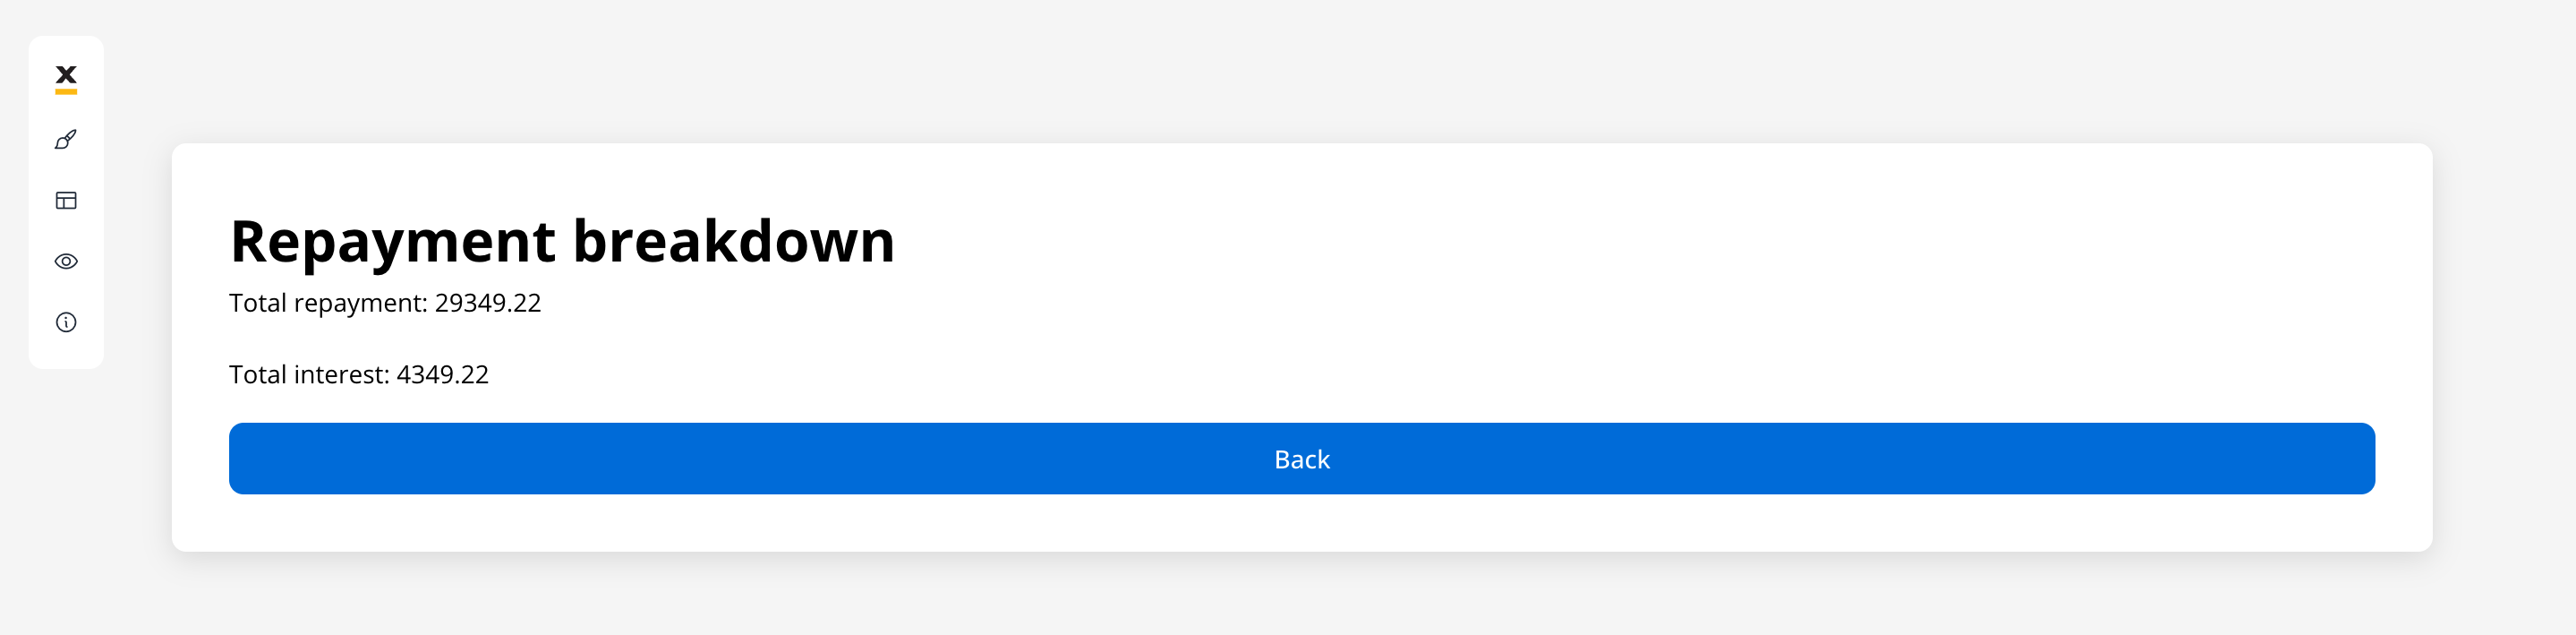
Click **View breakdown**. The second page shows the totals from the same result:
Click **Back**. The first page still shows the monthly payment.
In the toolbar on the left of the running UI Flow, click the eye icon (**View UI Flow instance**). A panel opens with the UI Flow name, the session ID, its status, and the tabs **Variables**, **Audit Log**, **Processes**, and **Workflows**. The **Variables** tab shows `loanEstimate` with the three values the workflow returned.
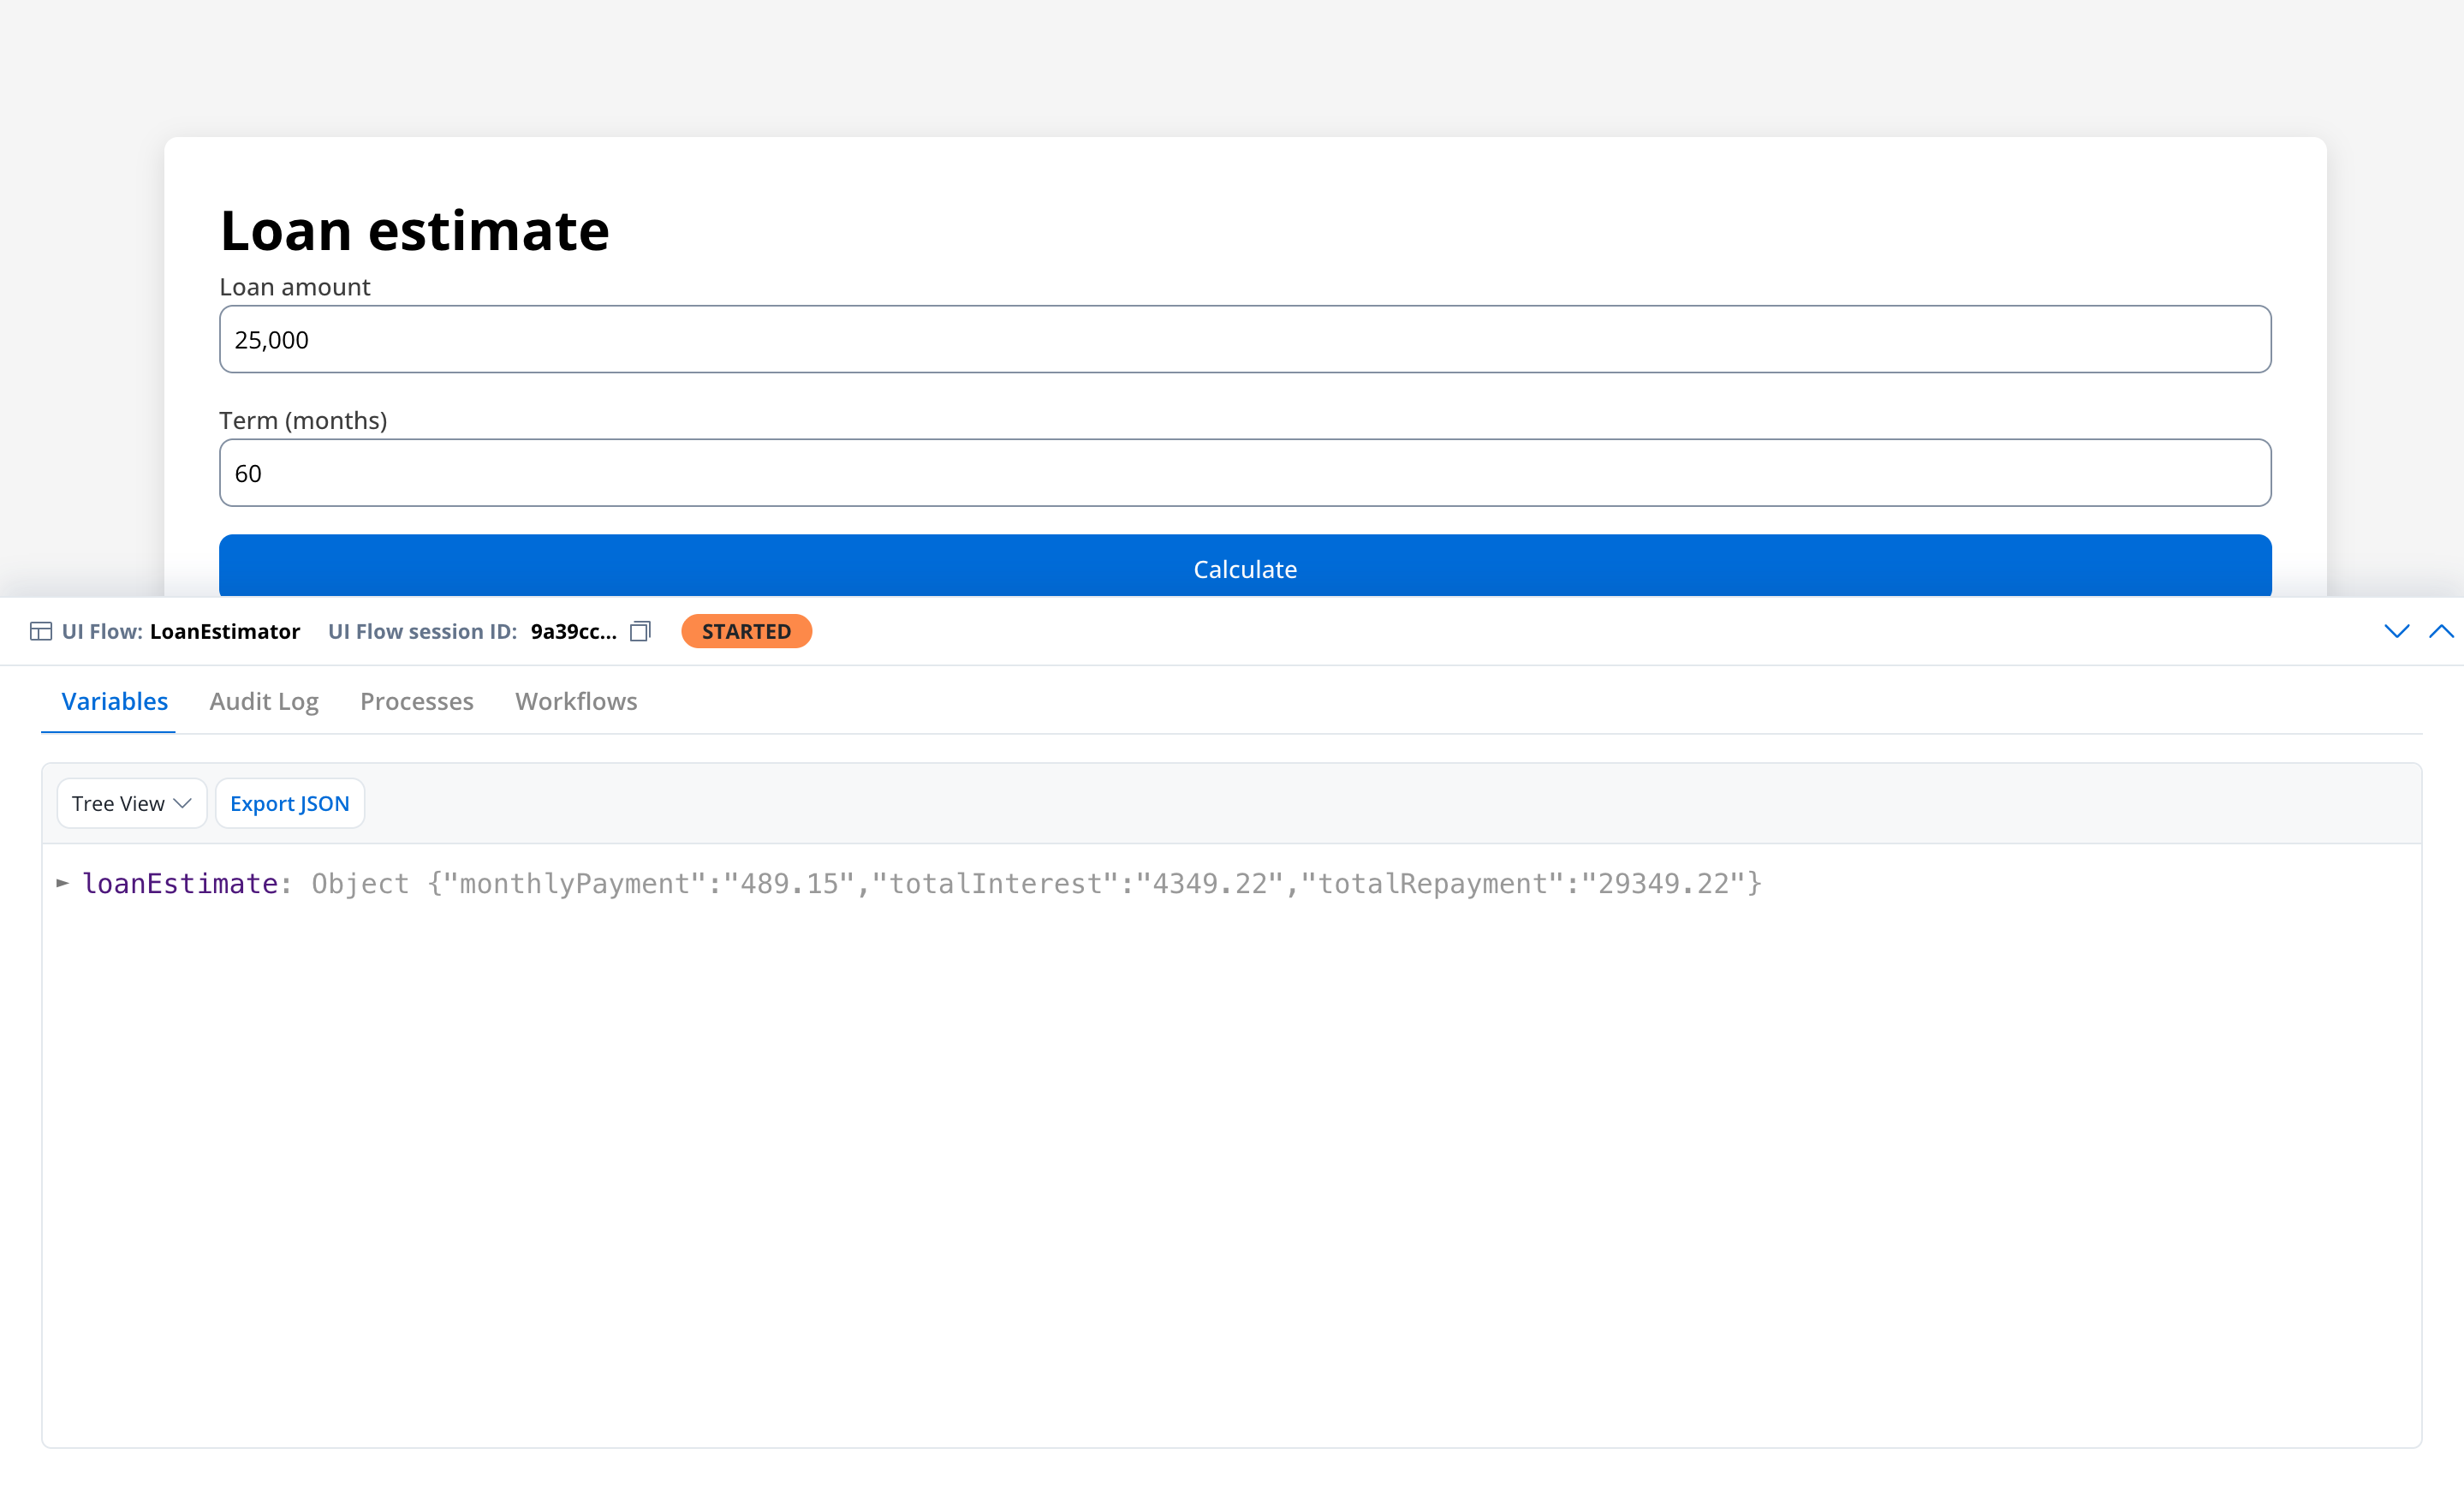
Use **Export JSON** to copy the whole session data, for example when comparing two runs.
The form refuses empty input, **Calculate** shows 489.15, the breakdown page shows 29349.22 and 4349.22, and the **Variables** tab holds `loanEstimate`. That loop, page to workflow and back into the session data, is the pattern behind most UI Flow screens.
***
## Troubleshooting
The workflow ran without the values it needs, or its output didn't reach the UI Flow. Check, in order:
* The start params keys are exactly `amount` and `termMonths`, the workflow's input parameter names.
* The `${...}` expressions name the form's data keys, `loanAmount` and `termMonths`, and have no quotes around them.
* The workflow's **End Flow** node lists `loanEstimate` in its **Output Schema**.
* The **Text** reads `${loanEstimate.monthlyPayment}`, with the same spelling as the script's output.
Open the **Workflows** tab of the **View UI Flow instance** panel to see whether the workflow ran.
The `loanEstimate` fields are typed **Number** (**Floating Point**) in the workflow's **Data Model**. Change all three to **String** and return them with `toFixed(2)`, as in the `Calculate payment` script.
That's expected. In a UI Flow, **Add forms to validate** only validates the form; the values reach the workflow through the start params. The **Variables** tab shows what was stored in the session, such as the workflow output.
`estimateBreakdown` is the home page. Right-click `estimateForm` in the **Navigation** tab and choose **Set as Home**, then run the UI Flow again.
The key isn't in the UI Flow's data model yet. Open **Data Model**, add `loanAmount` and `termMonths` with **Create Attribute**, and pick the key again. The search starts after three characters.
The dropdown lists the workflows of the project you're working in. Create `calculateLoanEstimate` in the same project as the UI Flow.
***
## What you learned
| Concept | How you used it |
| - | - |
| **UI Flow** | A standalone app with its own pages, data model, and session |
| **Home page** | **Set as Home** decides which page opens when the UI Flow starts |
| **Form and validators** | Two inputs bound with **Data key**, each with a `required` validator |
| **Start Workflow handler** | **Add forms to validate** to gate the click, **Add start params** to pass the values |
| **Session data** | Workflow output added under `loanEstimate` and read by `${...}` in text on both pages |
| **Navigate To handler** | Moving between pages by **Destination** |
| **UI Flow instance panel** | Checking the session data in the **Variables** tab |
***
## Where to go next
The full reference: experience types, navigation, Start Process and Start Workflow actions, and embedded processes.
Every trigger and action type you can attach to a UI component.
Built-in and custom validators for form fields.
Call a real REST API from a workflow and start it from a process.
## Related topics
- [Tutorial: Build your first workflow](/5.9/docs/getting-started/building-your-first-workflow.md)
- [Tutorials](/5.9/ai-platform/tutorials/overview.md)
- [Tutorial: Build a credit card application](/5.9/docs/getting-started/building-your-first-proc.md)
- [Event Handlers](/5.9/docs/building-blocks/ui-designer/event-handlers.md)
- [Cookbooks](/5.9/cookbooks/overview.md)
This documentation is built and hosted on [Mintlify](https://mintlify.com), a developer documentation platform.