> ## Documentation Index
> Fetch the complete documentation index at: https://docs.flowx.ai/llms.txt
> Use this file to discover all available pages before exploring further.
# Adding parallel flow branches
> Learn how to create concurrent process flows using parallel gateways to execute multiple activities simultaneously.
In many business processes, certain activities can or should be performed simultaneously rather than sequentially. FlowX.AI's parallel gateway nodes allow you to split your process flow into multiple concurrent branches, enabling parallel execution of different activities.

## What is a parallel gateway?
A parallel gateway (also known as an AND gateway) creates multiple concurrent paths in your process flow. Unlike exclusive gateways which follow only one path, parallel gateways activate all outgoing paths simultaneously. This allows multiple activities to be performed in parallel, improving process efficiency.
Complete reference for parallel gateway configuration
Learn more about how tokens drive process flow execution
## How parallel gateways work
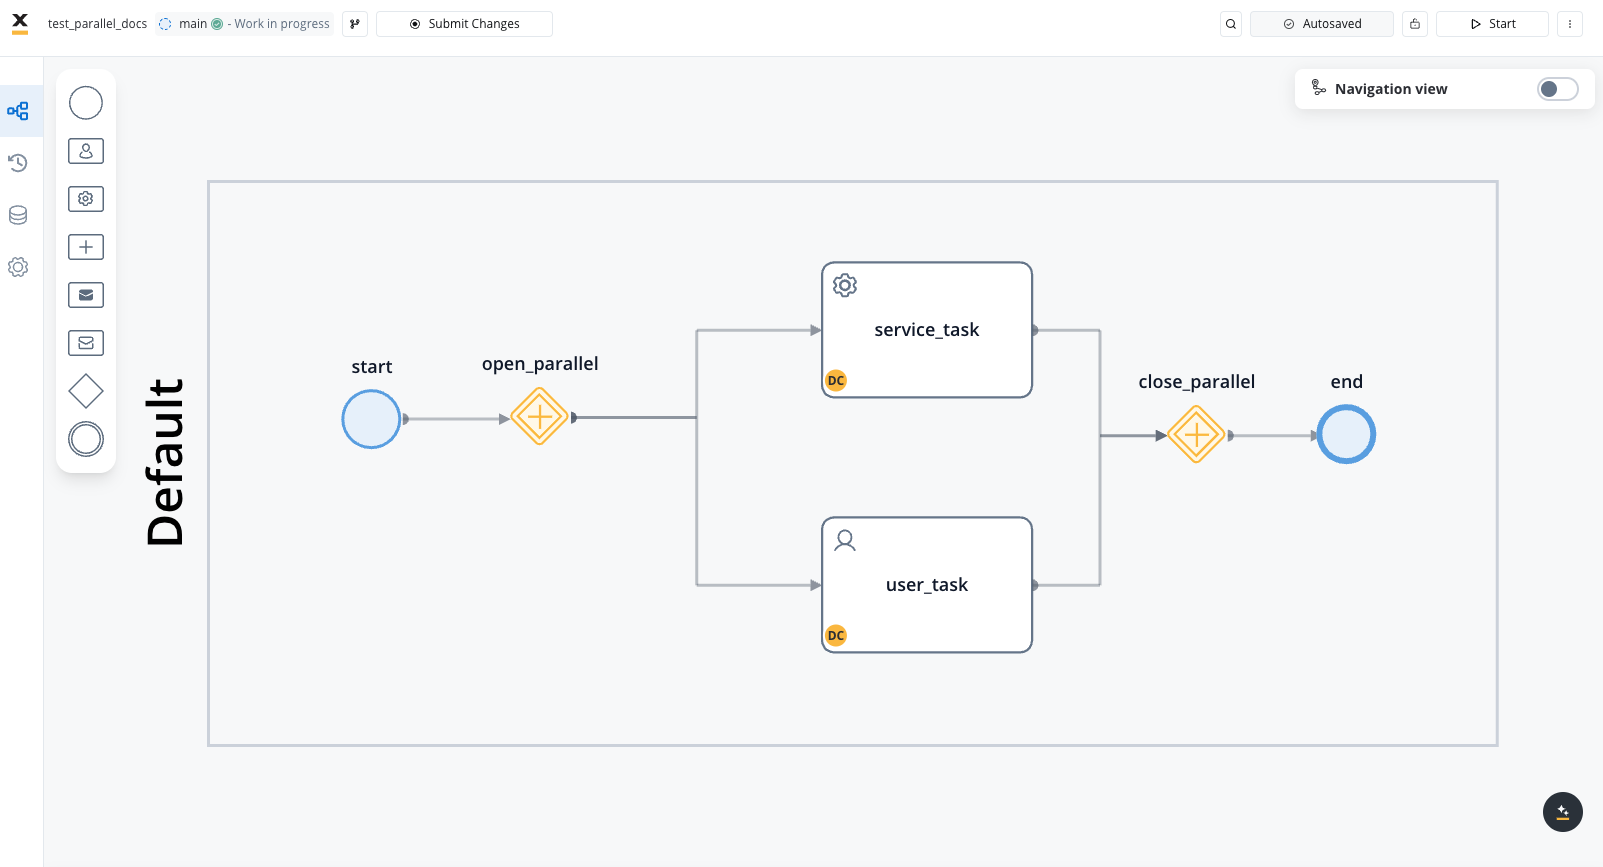
Parallel gateways function as fork and join points in your process:
1. **Fork (Diverging Gateway)**: Splits the process flow into multiple concurrent paths
2. **Parallel Execution**: All branches execute simultaneously and independently
3. **Join (Converging Gateway)**: Merges the parallel branches back into a single flow
4. **Synchronization**: The process waits until all parallel branches complete before proceeding
A process must have both a diverging parallel gateway (fork) and a converging parallel gateway (join) that brings all branches back together. All branches must be completed before the process can continue past the converging gateway.
## Token behavior in parallel gateways
Tokens are fundamental to understanding how parallel flows work in FlowX.AI:
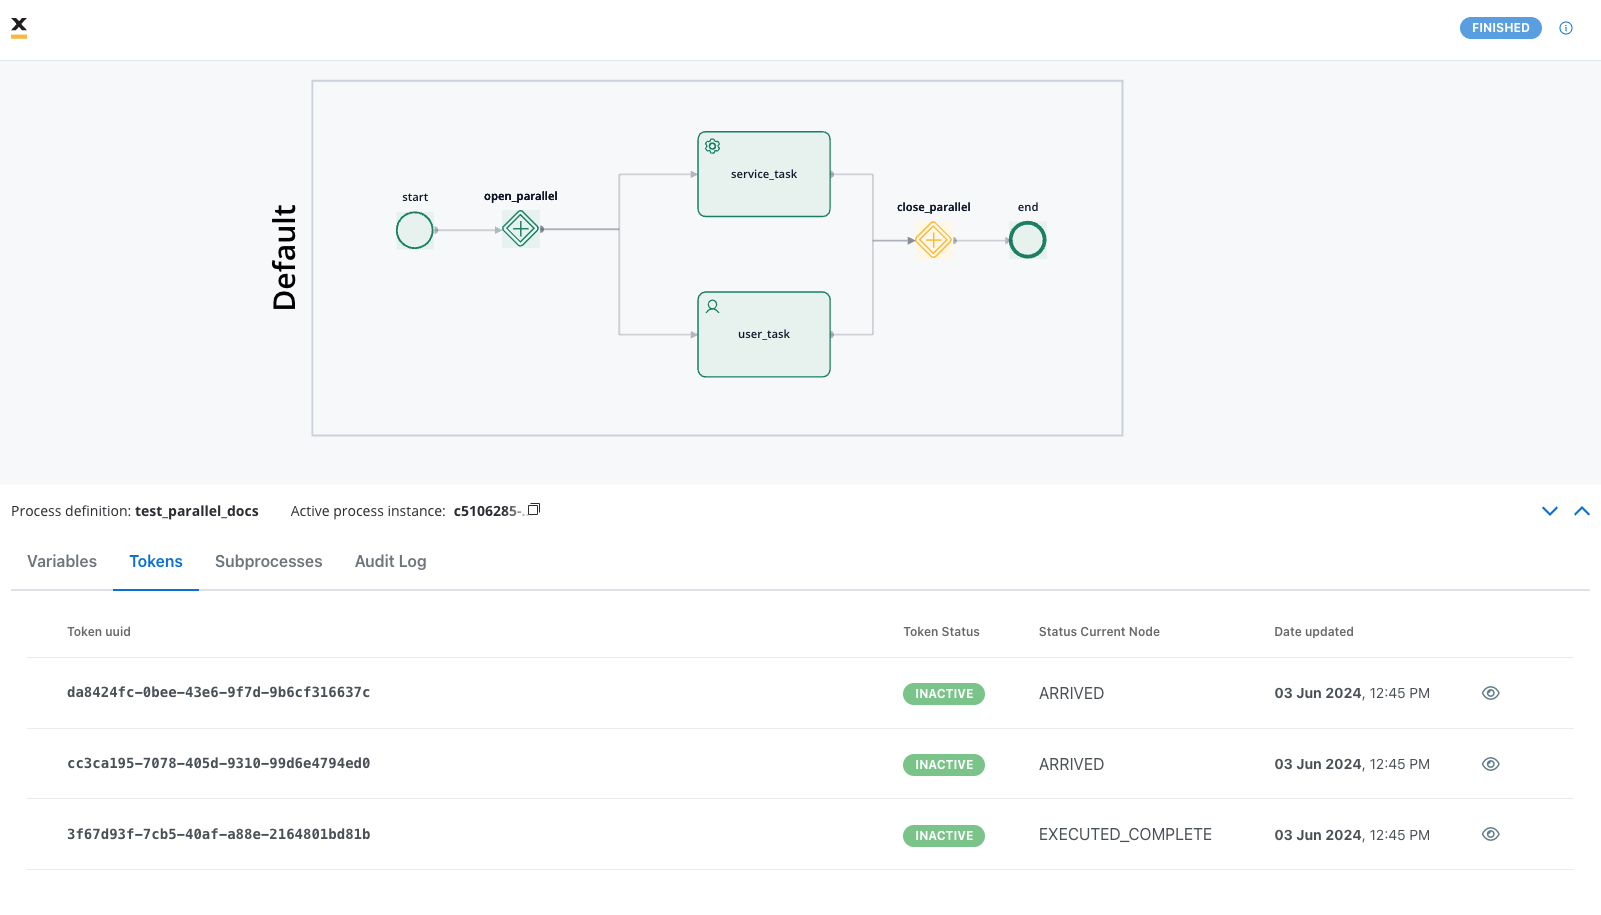
When a process reaches a parallel gateway, the gateway creates child tokens for each outgoing branch. Each branch receives its own token.
Each child token advances through its respective branch independently, proceeding from one node to the next based on the sequence and actions defined in the process.
A converging parallel gateway waits for all child tokens to arrive. The parent token remains at this gateway until all child tokens have completed their respective paths.
Once all child tokens have arrived at the converging gateway, they are merged back into the parent token, and the process continues with a single token.
If any parallel branch gets stuck or never completes, the entire process will wait indefinitely at the converging gateway. Always ensure all branches can complete successfully.
## Creating a flow with parallel branches
1. Open **FlowX.AI Designer** and navigate to your project
2. Go to the **Processes** section and select your process or create a new one
3. Click the **Edit Process** button to open the Process Designer
1. Add a **Start Node** to your process canvas (if creating a new process)
2. Add initial nodes for any process steps that should occur before the parallel branches
Plan your parallel branches carefully. Activities in parallel branches should be independent of each other and not rely on results from other branches.
1. From the node palette, drag a **Parallel Gateway** node onto your canvas
2. Connect your previous node to this gateway
3. Give your gateway a descriptive name (e.g., "Start Parallel Processing")
1. Add the nodes for each parallel branch that will execute simultaneously
2. Connect the diverging parallel gateway to the first node of each branch
3. Build out each branch with the necessary nodes and actions
You can have any number of parallel branches, but keep in mind that every branch must eventually connect to the converging gateway.
1. Add another **Parallel Gateway** node to the canvas
2. Connect the last node of each parallel branch to this converging gateway
3. Give this gateway a descriptive name (e.g., "Merge Parallel Branches")
Ensure that all parallel branches connect to the converging gateway. Missing connections will result in stuck processes.
1. Add any additional nodes that should execute after the parallel branches
2. Connect the converging gateway to the next node in your process
3. Ensure your process eventually reaches an **End Node**
4. Save your process definition
## Use cases for parallel gateways
Parallel gateways are ideal for the following scenarios:
Requesting multiple documents simultaneously from different systems or departments
Collecting approvals from multiple stakeholders at the same time
Performing multiple data operations or calculations in parallel
Running different validation or verification processes concurrently
## Best practices
**When implementing parallel branches:**
* **Use meaningful names** for parallel gateways to document their purpose
* **Keep branches independent** of each other to avoid deadlocks or race conditions
* **Balance work** across branches to optimize overall process execution time
* **Consider timeouts** for branches that might get stuck or take too long
* **Test all branches** thoroughly to ensure they can complete successfully
* **Use data scoping** carefully to prevent data conflicts between branches
* **Consider error handling** in each branch to prevent process deadlocks
## Common patterns
Basic pattern with a diverging and converging gateway
Nested parallel structures with gateways inside parallel branches
Parallel branches with timer events to handle potential delays
Parallel branches that gather different pieces of information for later consolidation
## Next steps
After implementing parallel branches in your process, you can:
Design the user interface elements that will interact with your actions