> ## Documentation Index
> Fetch the complete documentation index at: https://docs.flowx.ai/llms.txt
> Use this file to discover all available pages before exploring further.
# UI Flows
> Build reusable, multi-platform user interfaces that work across web, iOS, and Android without the overhead of BPMN processes.
## Overview
UI Flows are a project resource for use cases where full BPMN mapping is unnecessary. Full BPMN mapping for simple UI experiences introduces overhead and complexity. UI Flows also eliminate subprocesses that add layers to the main process for UI purposes only.

UI Flows support web (Angular/React), iOS, and Android. They separate UI definitions from process logic, providing an alternative to BPMN processes when business orchestration is not required.
Create UI once and deploy to web, iOS, and Android with platform-specific configurations
Launch FlowX processes from UI Flows when needed using the Start Process action
Manage Navigation Areas, pages, and scrolling within UI Flows Designer
Embed Task Manager as a UI component to display task lists
Add Chat components for conversational AI experiences powered by AI agents
### Key characteristics
| Characteristic | Description |
| ------------------------- | --------------------------------------------------------------------------------------------------- |
| **Project Resource** | Managed as independent project resources, separate from process definitions |
| **UI Designer** | Configure using UI Designer (navigation areas appear as UI assets instead of BPMN nodes) |
| **Navigation Areas** | Add navigation areas as UI assets to define the user journey |
| **Components** | Supports components, substitution tags, media items, and enumerations |
| **Theme Support** | Themes apply to UI Flows |
| **Data Model** | UI Flows have their own data model for localization and formatting |
| **FLX UI Flow Component** | The `flx-ui-flow` component renders UI Flows and can be embedded in any container app |
| **Custom Components** | Custom components can be added to UI Flows |
| **Experience Type** | UI Flows can be **Flow-Based** (default) or **Chat-Based** (connected to a conversational workflow) |
**Platform selection is permanent**: When creating a UI Flow, you select a platform (web or mobile). This cannot be changed later. Changing the project-level platform setting does not update existing UI Flow resources.
***
## Experience types
UI Flows support two experience types, selected when creating the UI Flow:
**Default.** Traditional UI flows with navigation areas, forms, and standard components. Use for structured user journeys.
Optimized for conversational experiences. Connected to a [conversational workflow](/5.9/ai-platform/conversational-workflows) that powers all Chat components in the UI Flow.
### Chat-Based UI Flows
When you select **Chat-Based** as the experience type:
* You must select an **AI Conversational Workflow** to connect to the UI Flow
* All Chat components in the UI Flow use this workflow by default
* The workflow can be changed later in the UI Flow **Settings** page (gear icon in the sidenav)
### UI Flow Settings
Chat-Based UI Flows have a **Settings** page accessible from the gear icon in the UI Flow editor sidenav. The Settings page includes:
| Tab | Description |
| ---------------- | -------------------------------------------------------------------- |
| **Variables** | Manage UI Flow variables (available for all UI Flows) |
| **Chat Options** | Select or change the conversational workflow for Chat-Based UI Flows |
The **Chat Options** tab is only enabled for Chat-Based UI Flows. Flow-Based UI Flows only show the Variables tab.
### Expiry time
UI Flow general settings include an **Expiry time** field that sets how long a UI Flow session stays valid. The field accepts either an **ISO 8601 duration** (for example `PT3M22S` for 3 minutes 22 seconds) or a **cron expression** (for example `0 0 9-17 * * MON-FRI`) for time-based expiry.
***
## When to use UI Flows
### Use UI Flows for
Use UI Flows when you need a user interface without BPMN process orchestration:
Dashboards, reports, and static content that doesn't require process orchestration
Task lists and task management interfaces with embedded Task Manager component
App navigation structures, home pages, and menu systems
Data entry forms that start processes but don't need their own process context
### Use processes for
Use processes when you need:
Complex workflows with business rules, approvals, and integrations
Applications requiring process state tracking and persistence
Multi-step operations with decision points and parallel execution
### Combine both approaches
Use UI Flows as the main app shell and **Start Process actions** to launch business processes when needed.
**Example:**
* UI Flow provides the home screen, navigation, and dashboard
* User clicks "Apply for Loan" → the Start Process action launches the loan process
* After process completion, user returns to the UI Flow dashboard
***
## How navigation works
A UI Flow behaves like a single-page app: one UI Flow session hosts a set of routable views, and moving between them updates the browser URL without leaving the session.
* **Root navigation areas are the routes.** Each root-level navigation area — a **Page**, root **Zone**, or root **Tab Bar** — is a routable view with its own URL. **Modals** are routed too, addressed through a `modalId` query parameter on top of the current view. This page also refers to routable views as *screens* or *root views* — they are the same thing.
* **One session, one data store.** All views in a UI Flow share the same session and its [session variables](#session-variables). Navigating between views never resets the session — data fetched on one view is available on every other view.
* **Navigate To actions define the navigation graph.** The [route map](#route-map-and-breadcrumbs) — shortest paths, breadcrumbs, and back navigation — is computed automatically from the Navigate To actions you configure.
* **URLs are real.** Views support query parameters, [deep linking](#deep-linking), browser back/forward, and refresh recovery through the [navigation stack](#navigation-stack).
Inside a single view, a Page or Zone additionally has a **layout mode**: **Single page** renders all child areas on one screen, while **Wizard** shows them one at a time with Next/Back navigation. Layout mode controls rendering *within* a view; it is separate from routing *between* views.
***
## Key features
**What you can build with UI Flows:**
* Create and render UI Flows for Web, iOS, and Android platforms
* Navigate between Navigation Areas with the Navigate To action
* Fetch and display data with the Start Workflow action
* Start FlowX processes via the Start Process action, or embed one with the Process Renderer component
* Embed the Task Manager and Chat components
* Configure the UI Flow data model for localization
### Navigation Areas management
In UI Flows Designer:
* Create pages and navigation flows
* Configure navigation areas (Page, Tabbar, Zone, Modal)
* Set up header and footer zones (web only)
* Define home pages with navigation icons
### Start Process action
Launch FlowX processes from UI Flows:
* Start processes on button clicks or events
* Pass data from UI Flow to process
* Return to UI Flow after process completion
### Navigate To action
Configure navigation within UI Flows:
* Navigate to specific Navigation Areas
* Scroll to Container elements
* Create multi-step wizards
### Task Manager component
Embed Task Manager in UI Flows:
* Display task lists
* Filter and search tasks
* Launch tasks in context
### Home page support
* Designate any page as the home page
* Automatic home icon in navigation
* Return to home from any screen
### Global components
Add persistent components that appear across all screens in a UI Flow:
* **Breadcrumbs** (web only) — show navigation path and enable click-to-navigate
* **Chat** (web + mobile) — embed AI-powered conversational interface
### Process Renderer component
Embed a full FlowX process inside a UI Flow screen (web only):
* Start any process from the current app
* Pass data from the UI Flow data store to the process
* Maintain consistent navigation with URL-based process tracking
### Export and import
You can export and import UI Flows to transfer them between projects or environments.
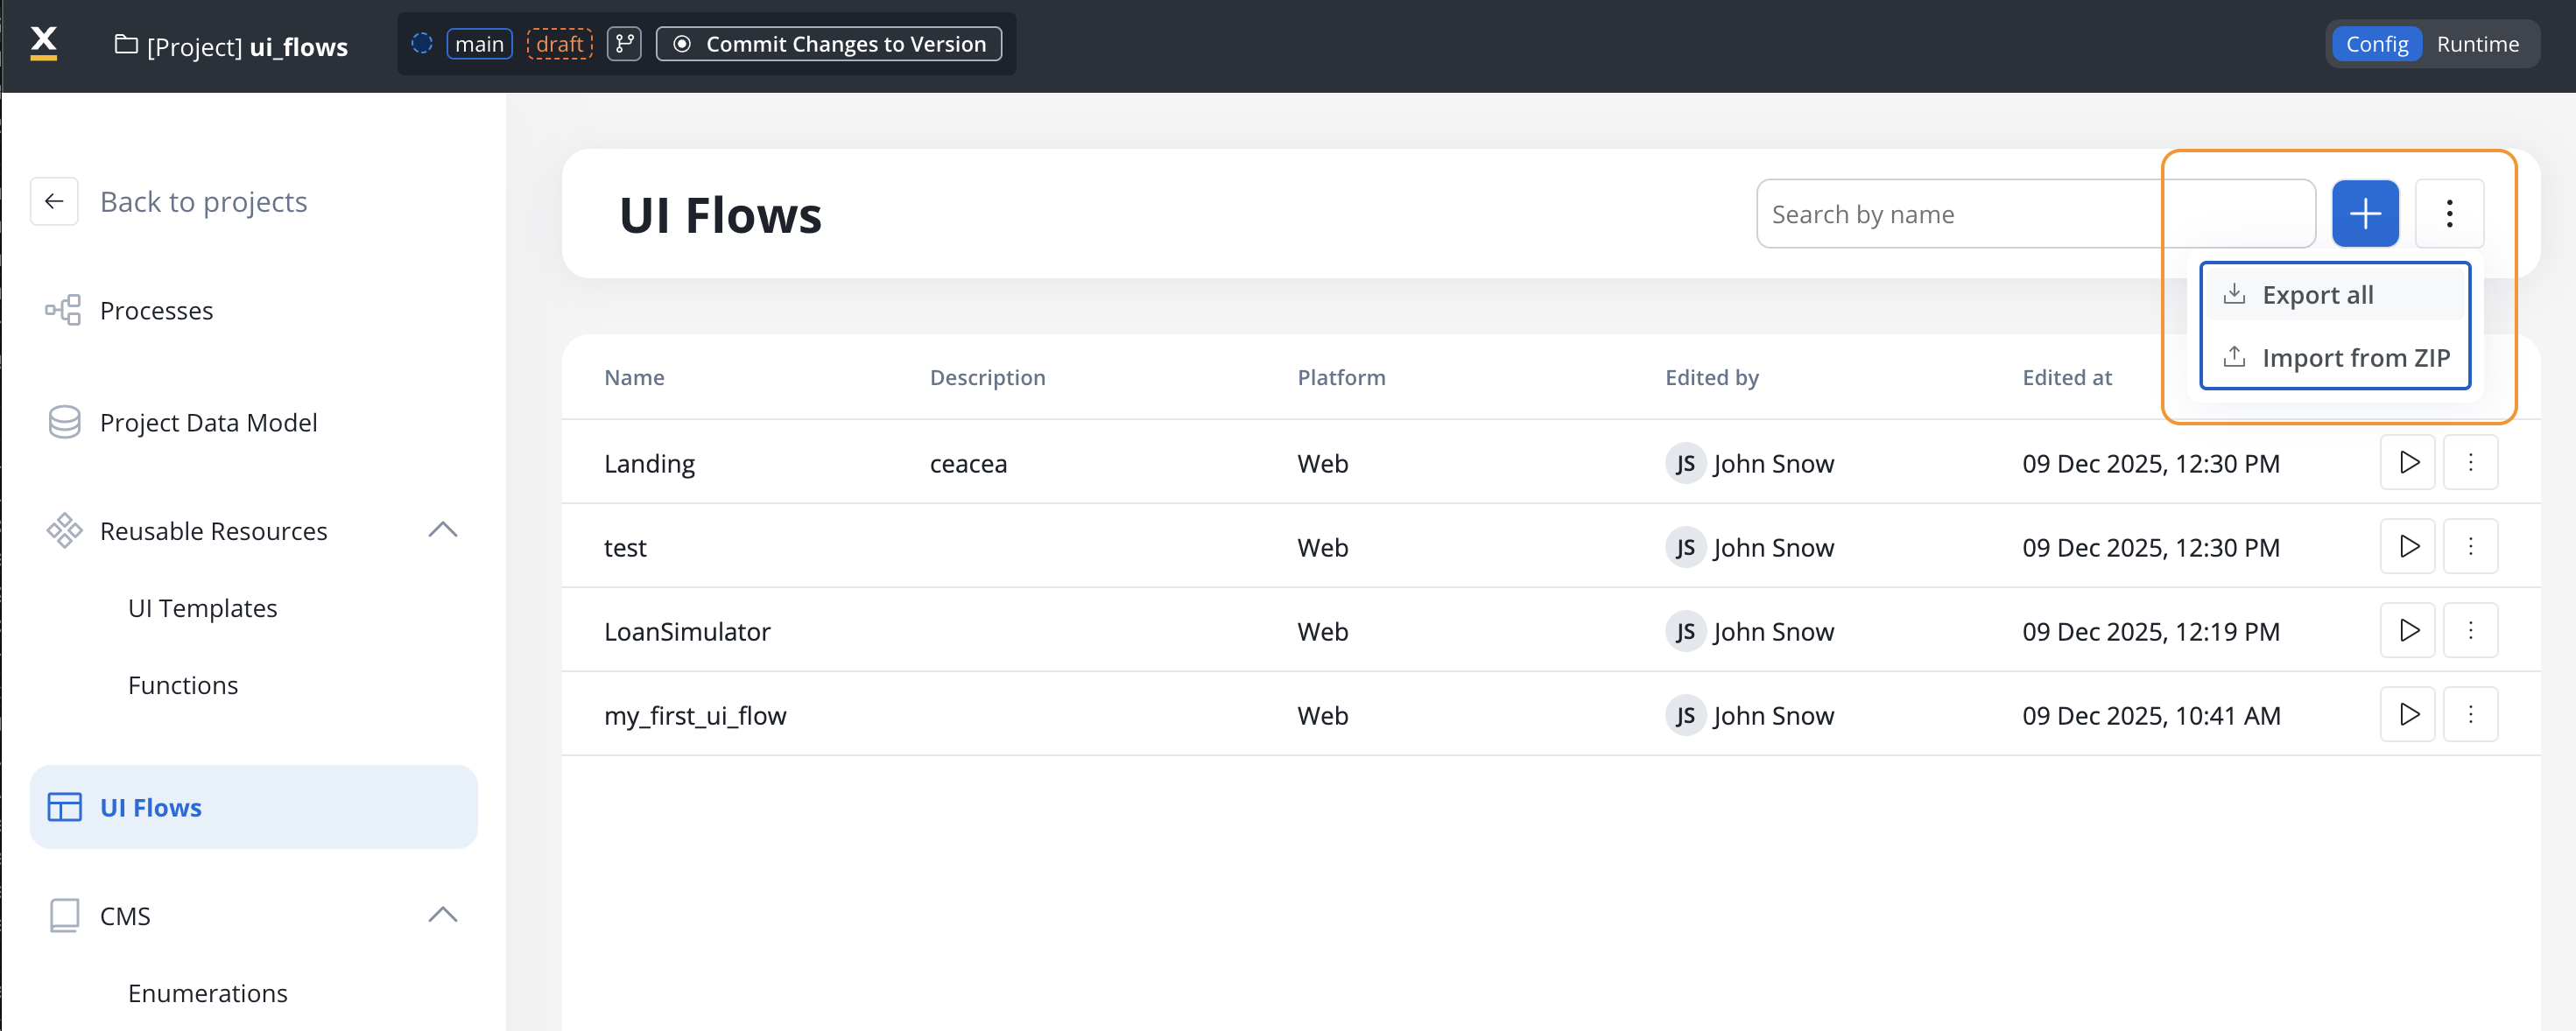
#### Exporting
1. Open the context menu on the UI Flows list page
2. Select **Export** for the UI Flow you want to export
3. The UI Flow is downloaded as a ZIP file
#### Importing
1. Open the context menu on the UI Flows list page and select **Import**
2. Select the ZIP file exported from another project or environment
3. If UI Flows with the same identifiers already exist, a **Review Resource Identifiers Conflicts** modal appears
4. Choose a strategy for each conflicting UI Flow (or use **Apply to all**):
* **Keep both** - imports the UI Flow as a new copy alongside the existing one
* **Replace** - overwrites the existing UI Flow with the imported version
* **Skip this one** - keeps the existing UI Flow unchanged
5. Click **Continue** to complete the import
Importing is only available for work-in-progress (WIP) project versions. You cannot import into a committed version.
***
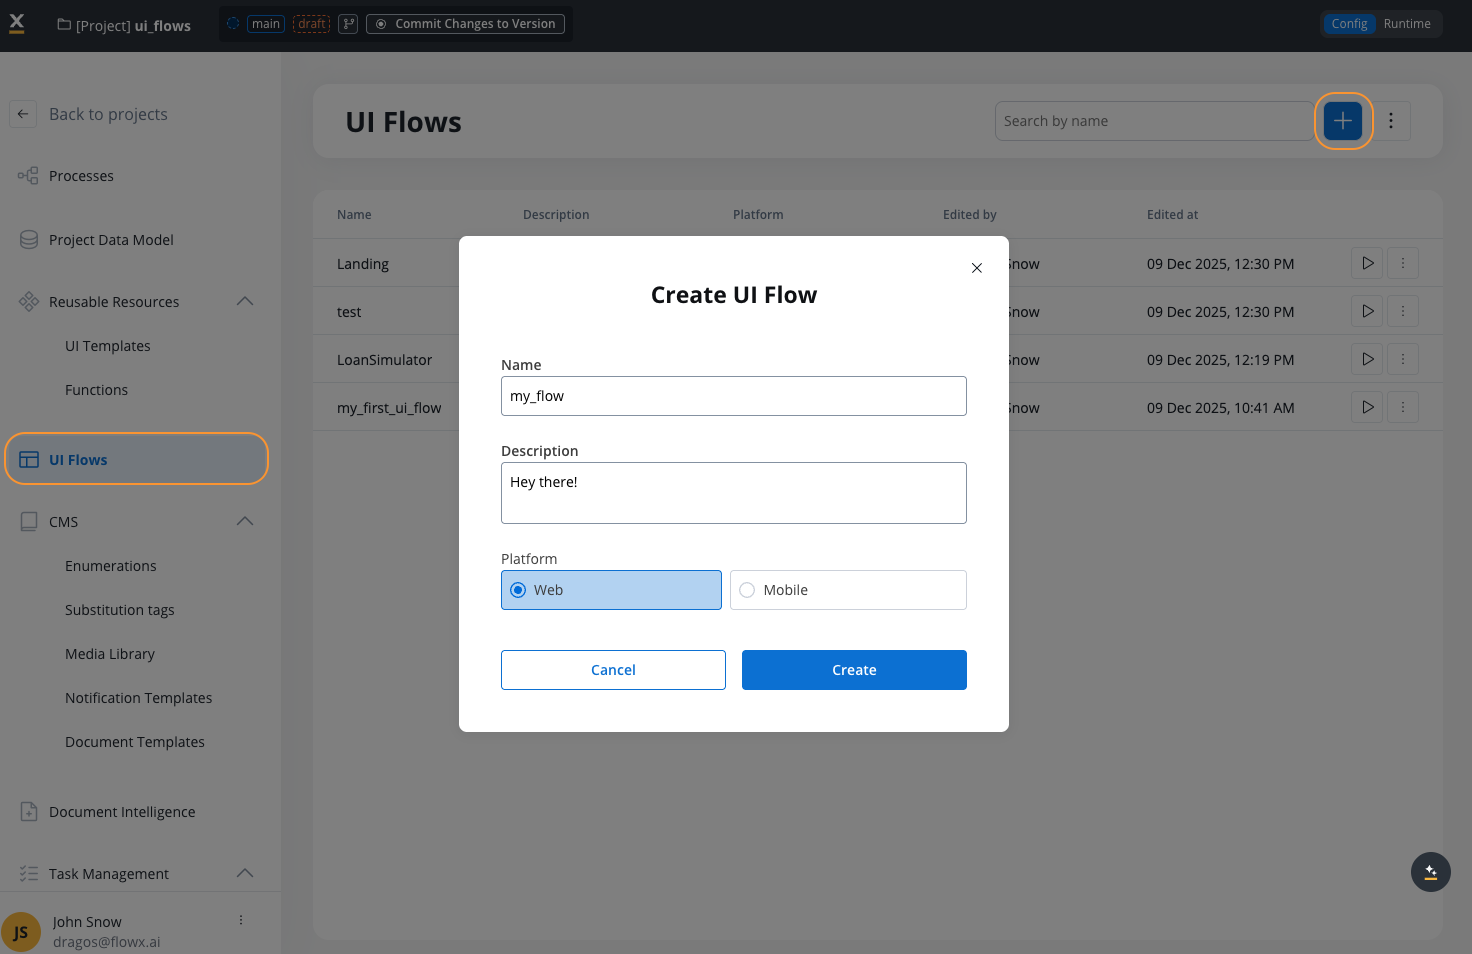
## Creating a UI Flow
In FlowX Designer, navigate to your project and create a new UI Flow as a project resource.
* Navigate to **UI Flows** tab
* Click **+ Add** button
* Enter a name and description
* Select platform (Web or Mobile)
* Select experience type: **Flow-Based** (default) or **Chat-Based**
* If Chat-Based, select the **AI Conversational Workflow** to connect
Open UI Flows Designer and manage Navigation Areas:
* Add Navigation Areas (pages)
* Configure navigation type (Single Page or Wizard)
* Setup zones (header, content, footer) for web
* Define navigation flow between areas
Build your interface using the component library:
* Drag and drop UI components
* Configure component properties
* Add Task Manager component if needed
* Setup data bindings
Setup interactivity and navigation:
* **Start Process**: Launch processes when needed
* **Navigate To**: Move between Nav areas or scroll to containers
* **External**: Open a link in a new tab
Designate a page as the home page:
* Select the Navigation Area
* Mark as "Home Page"
* Configure home icon appearance
Test your UI Flow:
* Preview across platforms
* Test navigation flow
* Verify Start Process actions work
* Check Task Manager integration
***
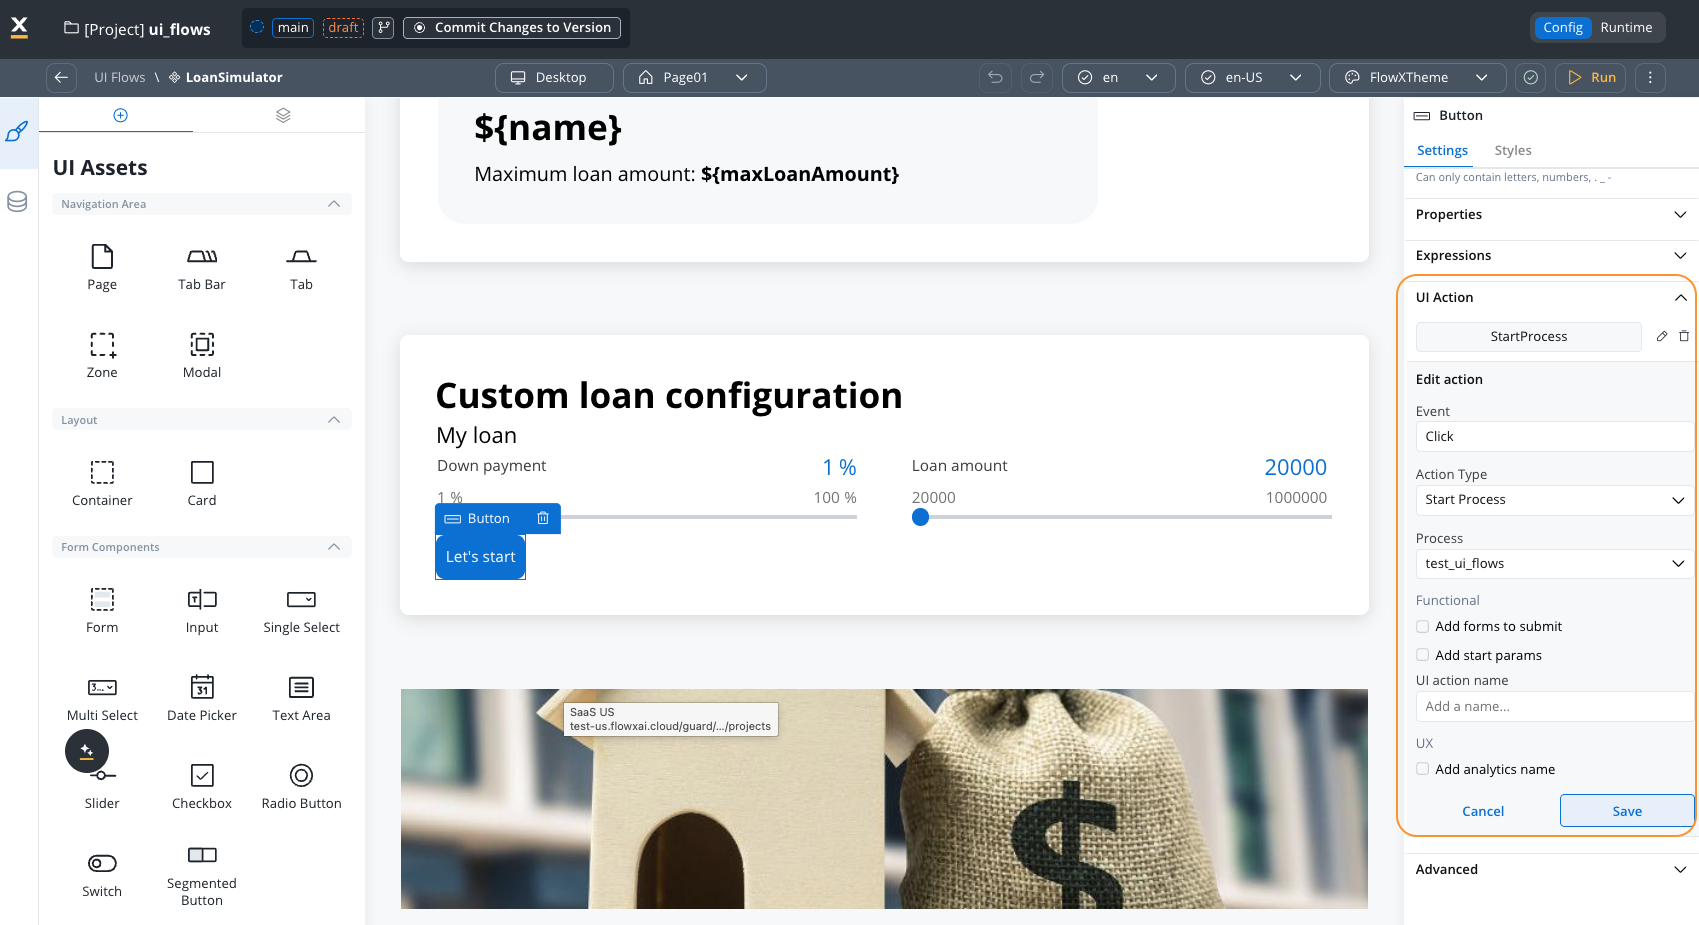
## Configuring the Start Process action
The Start Process action allows you to launch FlowX processes from UI Flows. Although UI Flows do not require a process and user tasks, they support actions for process initiation.
### How it works
When a process is started from a UI Flow:
1. The `FlxProcessRenderer` component is **dynamically added**, replacing the UI Flow content
2. The process renderer inherits configuration from the UI Flow and shares common stores:
* API URL and static assets path
* Workspace and project IDs
* Language and locale settings
* Build information
* Theme and fonts
* Substitution tags and media items
When configuring the `FlxUIFlow` component in your container app, ensure the `processApiPath` parameter is set to enable process starting capabilities.
### Configuration steps
Add a UI component that will trigger the process (typically a Button).
Configure the handler:
* In the **Event Handlers** section, add a handler
* Select **Start Process** as the action type
* Choose the process definition to start from the dropdown
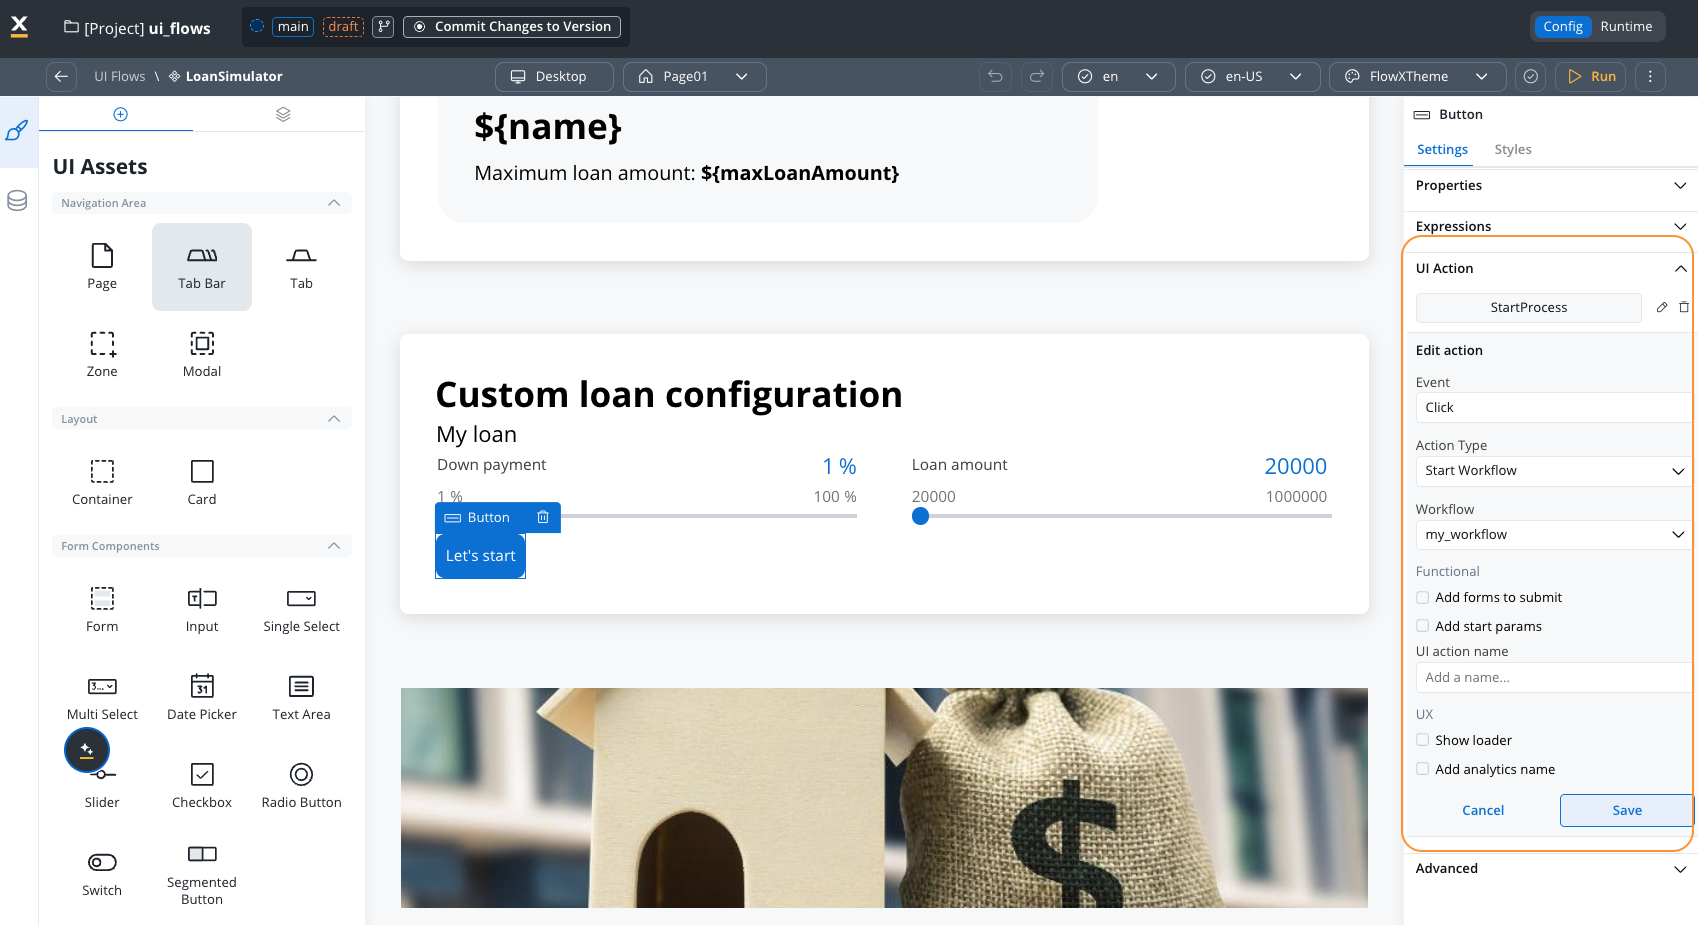
The Start Process action allows you to configure:
* **Process selection**: Select the process to start
* **Forms to submit**: Choose which forms to include with the start request
* **Custom body**: Define which data to send as start parameters
```json theme={"system"}
{
"customerId": "${uiData.customer.id}",
"applicationAmount": "${uiData.amount}"
}
```
Set what happens after process starts:
* Navigate to process UI
* Stay in UI Flow
* Show confirmation message
Configure analytics tracking:
* **Analytics name**: Set a name for tracking
* **Custom payload**: Add additional data for analytics
***
## Configuring the Start Workflow action
The Start Workflow action allows you to execute integration workflows directly from UI Flows. Unlike Start Process, which creates a full process instance with state management, Start Workflow executes lighter-weight integration workflows that return results immediately.
### When to use Start Workflow vs Start Process
| Use Case | Action Type | Description |
| ---------------------- | -------------- | -------------------------------------------------------- |
| **Data fetching** | Start Workflow | Retrieve data from APIs or databases |
| **Simple operations** | Start Workflow | Execute stateless operations (calculations, validations) |
| **Integrations** | Start Workflow | Call external services and return results |
| **Business processes** | Start Process | Multi-step processes requiring state management |
| **User journeys** | Start Process | Processes with multiple user interactions |
### How it works
When a workflow is started from a UI Flow:
1. The workflow is executed via the Runtime Manager API
2. Input parameters are mapped from UI Flow data
3. The API returns a `workflowInstanceUuid` for tracking
4. UI Flow subscribes to SSE events for workflow completion
5. Results are mapped back to UI Flow data for display
### API endpoint
```
POST /rtm/api/runtime/wks/{workspaceId}/app/{appId}/rdi/{resourceDefinitionId}/start-workflow
```
| Parameter | Type | Description |
| ---------------------- | ---- | --------------------------------------- |
| `workspaceId` | Path | Workspace identifier |
| `appId` | Path | Application identifier |
| `resourceDefinitionId` | Path | Resource definition ID for the workflow |
| Request body | JSON | Workflow input parameters |
**Response:**
```json theme={"system"}
{
"workflowInstanceUuid": "uuid-string",
"status": "started|pending|failed"
}
```
### SSE events
The UI Flow subscribes to Server-Sent Events (SSE) to receive workflow completion notifications.
**Event type:** `UI_FLOW_WORKFLOW_RESPONSE`
```json theme={"system"}
{
"eventType": "UI_FLOW_WORKFLOW_RESPONSE",
"workflowInstanceUuid": "uuid-string",
"status": "completed|failed|timeout",
"data": {},
"timestamp": "ISO-8601"
}
```
### Configuration steps
Add a component that will trigger the workflow — typically a **Button**, or use an **On Load** event on a Page to fetch data automatically when the screen opens.
Configure the handler:
* In the **Event Handlers** section, add a handler
* Select **Start Workflow** as the action type
* Choose the integration workflow to execute from the **Workflow** dropdown
If the workflow needs input data, check **Add start params** and provide a JSON body. Use `${}` expressions to pass current session data:
```json theme={"system"}
{
"customerId": "${customerId}",
"requestType": "balance_inquiry"
}
```
| Option | Description |
| ------------------------- | ---------------------------------------------------------------------- |
| **Show loader** | Display a loading indicator while the workflow executes |
| **Dismiss on completion** | Automatically close the modal when the workflow finishes (modals only) |
**Dismiss on completion** is a user-initiated dismiss: the user clicks the button with Start Workflow, the workflow runs, and the modal closes when the workflow finishes. The close is downstream of the user's action, so this pattern is compliant with the [modal lifecycle rule](../process/design-principles#modals-are-dismissed-only-by-user-interaction).
### How workflow output reaches your components
Unlike processes, there is no `responseKey` configuration for Start Workflow actions. When a workflow completes, its output is **automatically merged** into the UI Flow's session variables. Any component on any page in the same session can reference the returned data immediately.
The workflow's **End** node determines what data is returned. The output parameters configured on the workflow definition control the shape of the response.
The workflow must return a **named object**, not a raw array. For example, return `{"submissions": [...]}` instead of `[...]`. The auto-merge expects an object with keys — returning a bare array will cause an error.
When the workflow completes, its output is delivered via a real-time SSE event and deep-merged into the session's data store. Existing session variables are preserved — new keys are added and matching keys are updated.
Arrays in the output **replace** existing arrays with the same key (they are not appended). If you need to combine results from multiple workflow calls, handle the merge in the workflow itself.
Any component bound to the returned keys updates automatically. For example, if the workflow returns `{"foundSubmissions": [...]}`, a table with its source bound to `${foundSubmissions}` displays the data as soon as the workflow completes.
Use the **Variables** tab in the UI Flow session console to inspect what data is currently available. This is the fastest way to verify whether the workflow output arrived and what keys it contains.
### Example: Fetch and display a list
1. Create a workflow called `getSubmissions` that queries a database and returns output as a named object:
```json theme={"system"}
{
"foundSubmissions": [
{ "_id": "69c66a...", "submissionDetails": { "lineOfBusiness": "Property", ... } },
{ "_id": "69cb7c...", "submissionDetails": { "lineOfBusiness": "Casualty", ... } }
]
}
```
2. On your Page, add a **Table** component and bind its data source to `${foundSubmissions}`.
3. Add a **Start Workflow** action (triggered **On Load** or via a Button click) pointing to `getSubmissions`.
4. When the page loads (or the button is clicked), the workflow runs and the table populates automatically.
Start Workflow supports organization-aware execution with organization ID propagation from the workflow instance for proper multi-tenant isolation.
### Page parameters vs session variables
These are two separate concepts:
| Concept | Purpose | How data gets there |
| --------------------- | ------------------------------------------------------------------------------------------------------- | ------------------------------------------------------------------------- |
| **Page parameters** | Define URL query parameters for deep linking and navigation between pages | Configured via the **Parameters** gear icon on a Page or Modal |
| **Session variables** | Store workflow output, file upload responses, and start params — shared across all pages in the session | Populated **automatically** when workflows complete or files are uploaded |
Page parameters appear in the browser URL (e.g., `?userId=123`) and are passed via **Navigate To** actions. Session variables live in the session's data store and are the primary mechanism for getting workflow output into UI components.
In processes, a `responseKey` wraps the action output under a specific key in the process data model. UI Flows do not use `responseKey` — the workflow output object is merged directly into session variables. Make sure your workflow End node returns data with descriptive top-level keys (e.g., `foundSubmissions`, `accountDetails`) to avoid collisions with other session data.
***
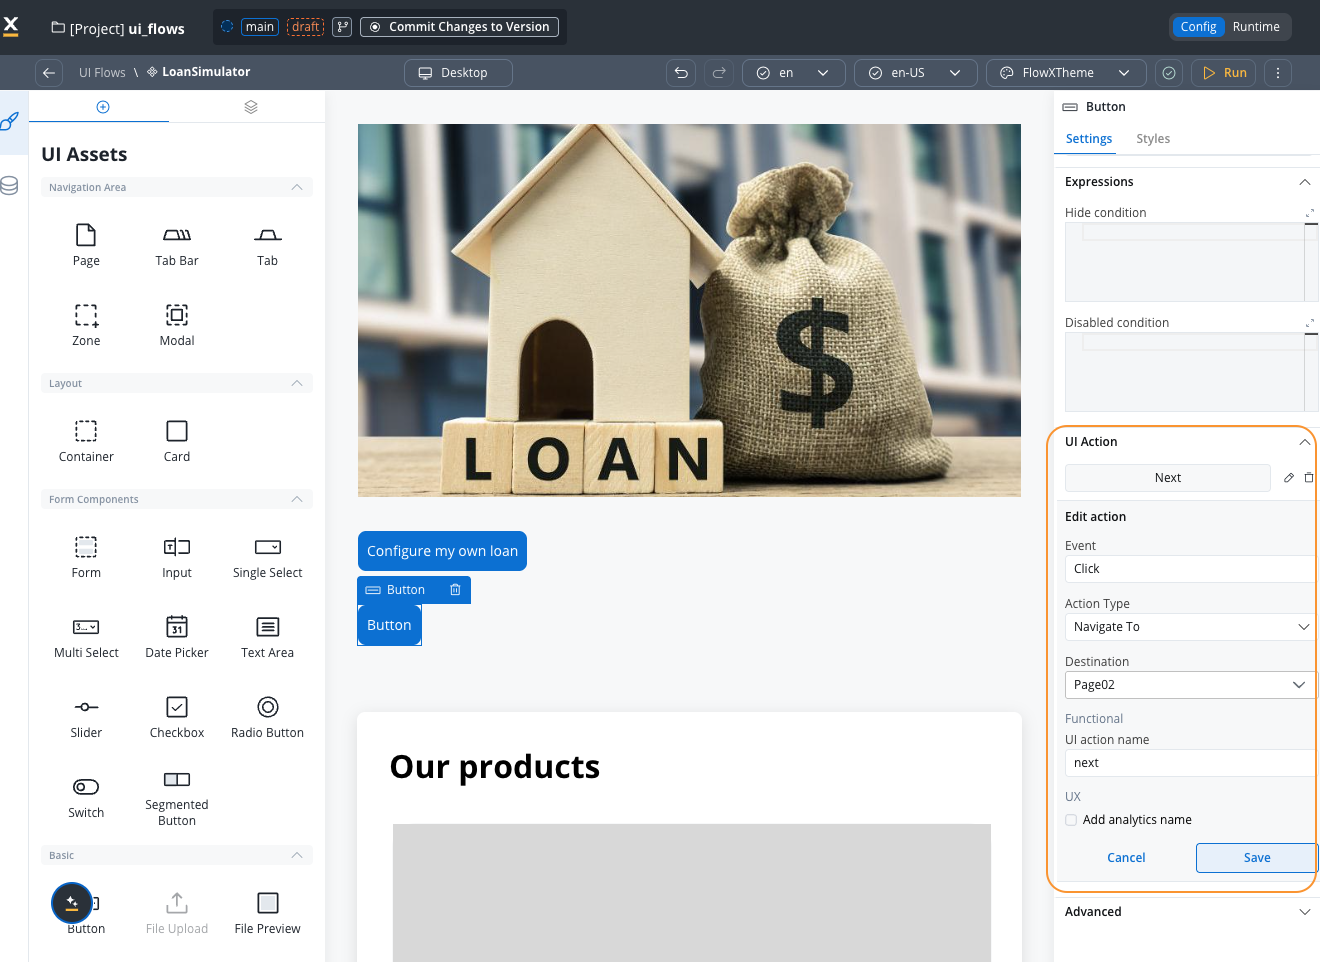
## Configuring the Navigate To action
The Navigate To action handles navigation within UI Flows and scrolling to specific elements.
### Navigation behavior: Route vs Scroll
The Navigate To action either **routes** (changes the URL/view) or **scrolls** (anchor navigation) depending on the destination and the area's [layout mode](#how-navigation-works) (single page vs wizard):
| Scenario | Behavior | Example |
| ------------------------------------------------------------ | ---------- | -------------------------------------------------------------- |
| Destination inside same Navigation Area (single page) | **Scroll** | Button in Card X scrolls to Card Y within the same Page |
| Destination inside same Navigation Area (wizard navigation) | **Route** | Button navigates to next step in a wizard Page |
| Destination outside Navigation Area, different root | **Route** | Button in Page 1 navigates to Page 2 |
| Destination outside Navigation Area, same root (wizard) | **Route** | Button in Zone 1 routes to Zone 2 within a wizard Page |
| Destination outside Navigation Area, same root (single page) | **Scroll** | Button in Zone 1 scrolls to Zone 2 within a single-page layout |
| Destination is a Modal | **Route** | Button opens Modal as a routed view |
**Example layout:**
```
Page 1 - Single page form
├── Zone - Header
│ └── Card 1 (Button 2)
├── Zone - Content
│ ├── Card 2 (Button 1)
│ ├── Modal
│ │ └── Card 8
│ ├── Card 9 (Button 3)
│ └── Card 10 (Button 4)
└── Zone - Footer
└── Card 3
Page 2 - Wizard navigation
├── Card 4
├── Card 5
└── Card 6
```
**Action outcomes:**
| Action | Destination | Result |
| -------- | --------------- | --------------------------- |
| Button 1 | Modal/Card 8 | **Route** to modal |
| Button 2 | Card 10 | **Scroll** to Card 10 |
| Button 3 | Card 4 (Page 2) | **Route** to Page 2, Card 4 |
Under the hood, every Navigate To updates the URL and pushes a browser history entry, then scrolls the destination element into view. **Route** vs **Scroll** in the table describes the visible outcome: whether the rendered view changes, or the current view scrolls to an anchor.
### Configuring the action
Add a Button or menu item that triggers navigation.
* Add an event handler → **Navigate To**
* Pick the destination from the **Destination** dropdown
Available destinations include all Navigation Areas in the hierarchy plus their first-level children (Card, Container, Custom). Selecting a child element scrolls to it when it is on the currently visible view, or navigates to its view and then scrolls to it.
If the destination root view defines [route parameters](#configuring-route-parameters), use the **Destination Parameters Mapping** field to pass values.
Scrolling is automatic — there is no separate scroll configuration on the action. The renderer smooth-scrolls the destination element into view after navigating.
***
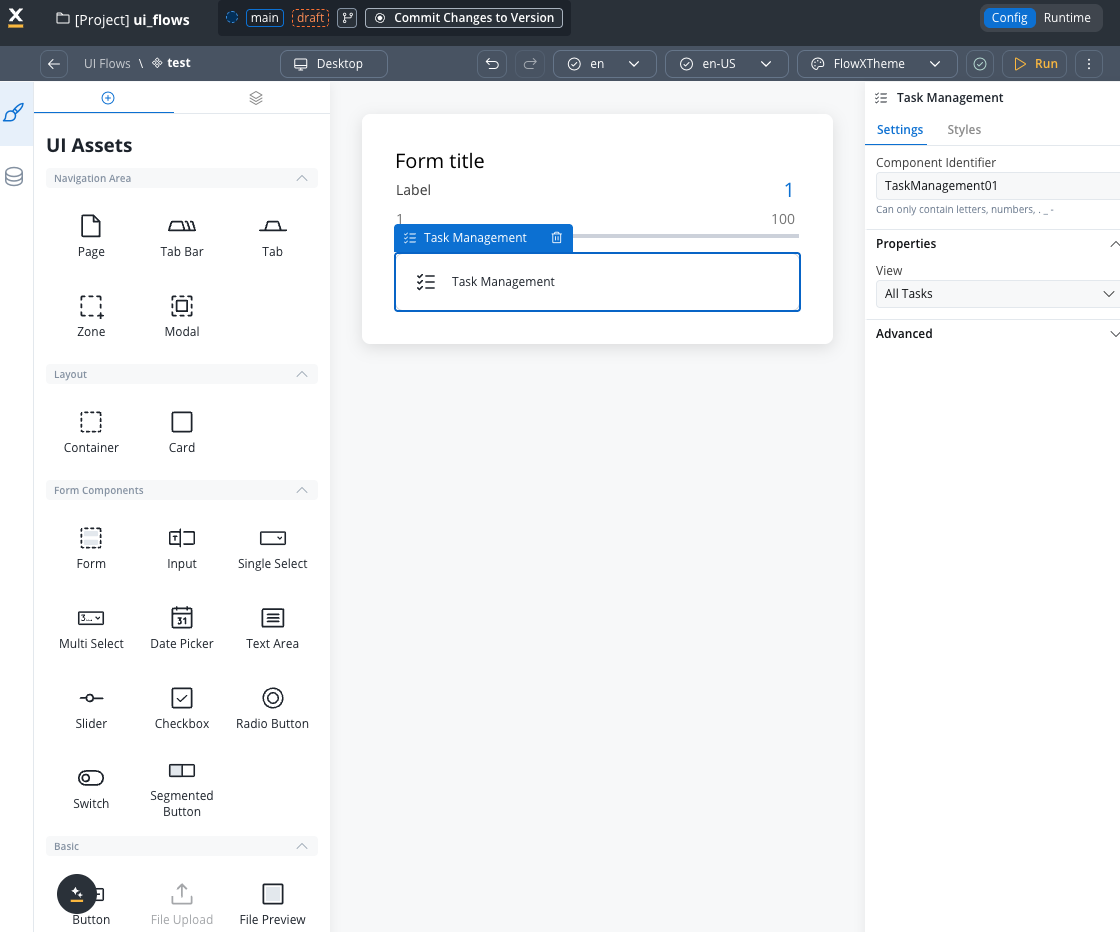
## Embedding Task Manager
Add Task Manager as a UI component in UI Flows to display task lists without requiring a process.
In UI Flows Designer, add the Task Manager component to a Container or Card.
Configure which view to display in the Task Manager:
* Select the view you want from your available views list
* Each view can have different columns, filters, and sorting options
***
## Embedding Chat component
The Chat component enables interactive conversations with AI agents directly within UI Flows. It provides a conversational interface for AI-powered workflows, supporting real-time message exchange, session persistence, and memory capabilities.
Connect to conversational workflows powered by AI agents
Automatic session handling across page refreshes
In UI Flows Designer, select **Chat** from the UI Assets panel and drag it onto the canvas.
In the Settings tab, specify the **Agent ID / Workflow Name** for the conversational workflow.
Only **conversational workflows** can be integrated with the Chat component. Task-oriented workflows cannot be used.
Use the Styles tab to configure header, messages, and input styling. Theme Admin provides comprehensive theming options.
View the complete Chat component documentation for detailed configuration, memory capabilities, SDK integration, and best practices.
***
## Process Renderer component
The Process Renderer component allows you to embed a full FlowX process directly inside a UI Flow screen. This enables hybrid apps that combine UI Flow navigation with traditional process-based screens. Available on **web only**.
### Configuration
In the UI Flows Designer, drag **Process Renderer** from the **Complex Components** category in the UI Assets panel onto a **Page** or **Modal**.
A container can have either a Process Renderer or other children, but not both. If the target container already has child components, the Process Renderer cannot be added.
In the **Settings** panel under **Properties**, use the **Process** dropdown to select the process to embed. The dropdown lists all processes in the current app.
Use the **Start Params** field to pass data from the UI Flow to the process. Enter a JSON object, optionally using `${keyName}` expressions to reference values from the UI Flow data store.
```json theme={"system"}
{ "name": ${app.name}, "loanAmount": ${app.loanAmount} }
```
### Properties
| Property | Type | Required | Description |
| ---------------- | ----------------- | -------- | ----------------------------------------------------------------------------------------------------------- |
| **Process** | Dropdown | Yes | The process to embed (selected by resource definition ID) |
| **Start Params** | JSON / expression | No | Data passed to the process on start. Supports `${keyName}` expressions resolved from the UI Flow data store |
### Style
| Property | Options | Default |
| ----------- | ------------------------ | ------- |
| **Width** | Fill, Fixed | `Fill` |
| **Height** | Auto, Fixed | `Auto` |
| **Margins** | Top, Right, Bottom, Left | — |
### Placement rules
* Can only be placed as a direct child of a **Page** or **Modal**
* A container with a Process Renderer cannot have other child components (mutual exclusivity)
* **Web only** — not available on iOS or Android
### Navigation behavior
When a process is started inside the Process Renderer, a `processUuid` parameter is added to the URL and mapped to the current view.
| Navigation method | Behavior |
| ----------------------------------- | ------------------------------------------------------------------ |
| **Browser back / Breadcrumb click** | Restores the previously started process instance from the view map |
| **Navigate To action** | Restarts the process and resets the view entry |
| **Modal context** | Skips URL parameter matching (process runs independently) |
***
## Global components
Global components persist across all screens in a UI Flow. They are rendered outside the normal navigation tree and remain visible as users navigate between screens. Currently two global component types are available: **Breadcrumbs** (web only) and **Chat** (web and mobile).
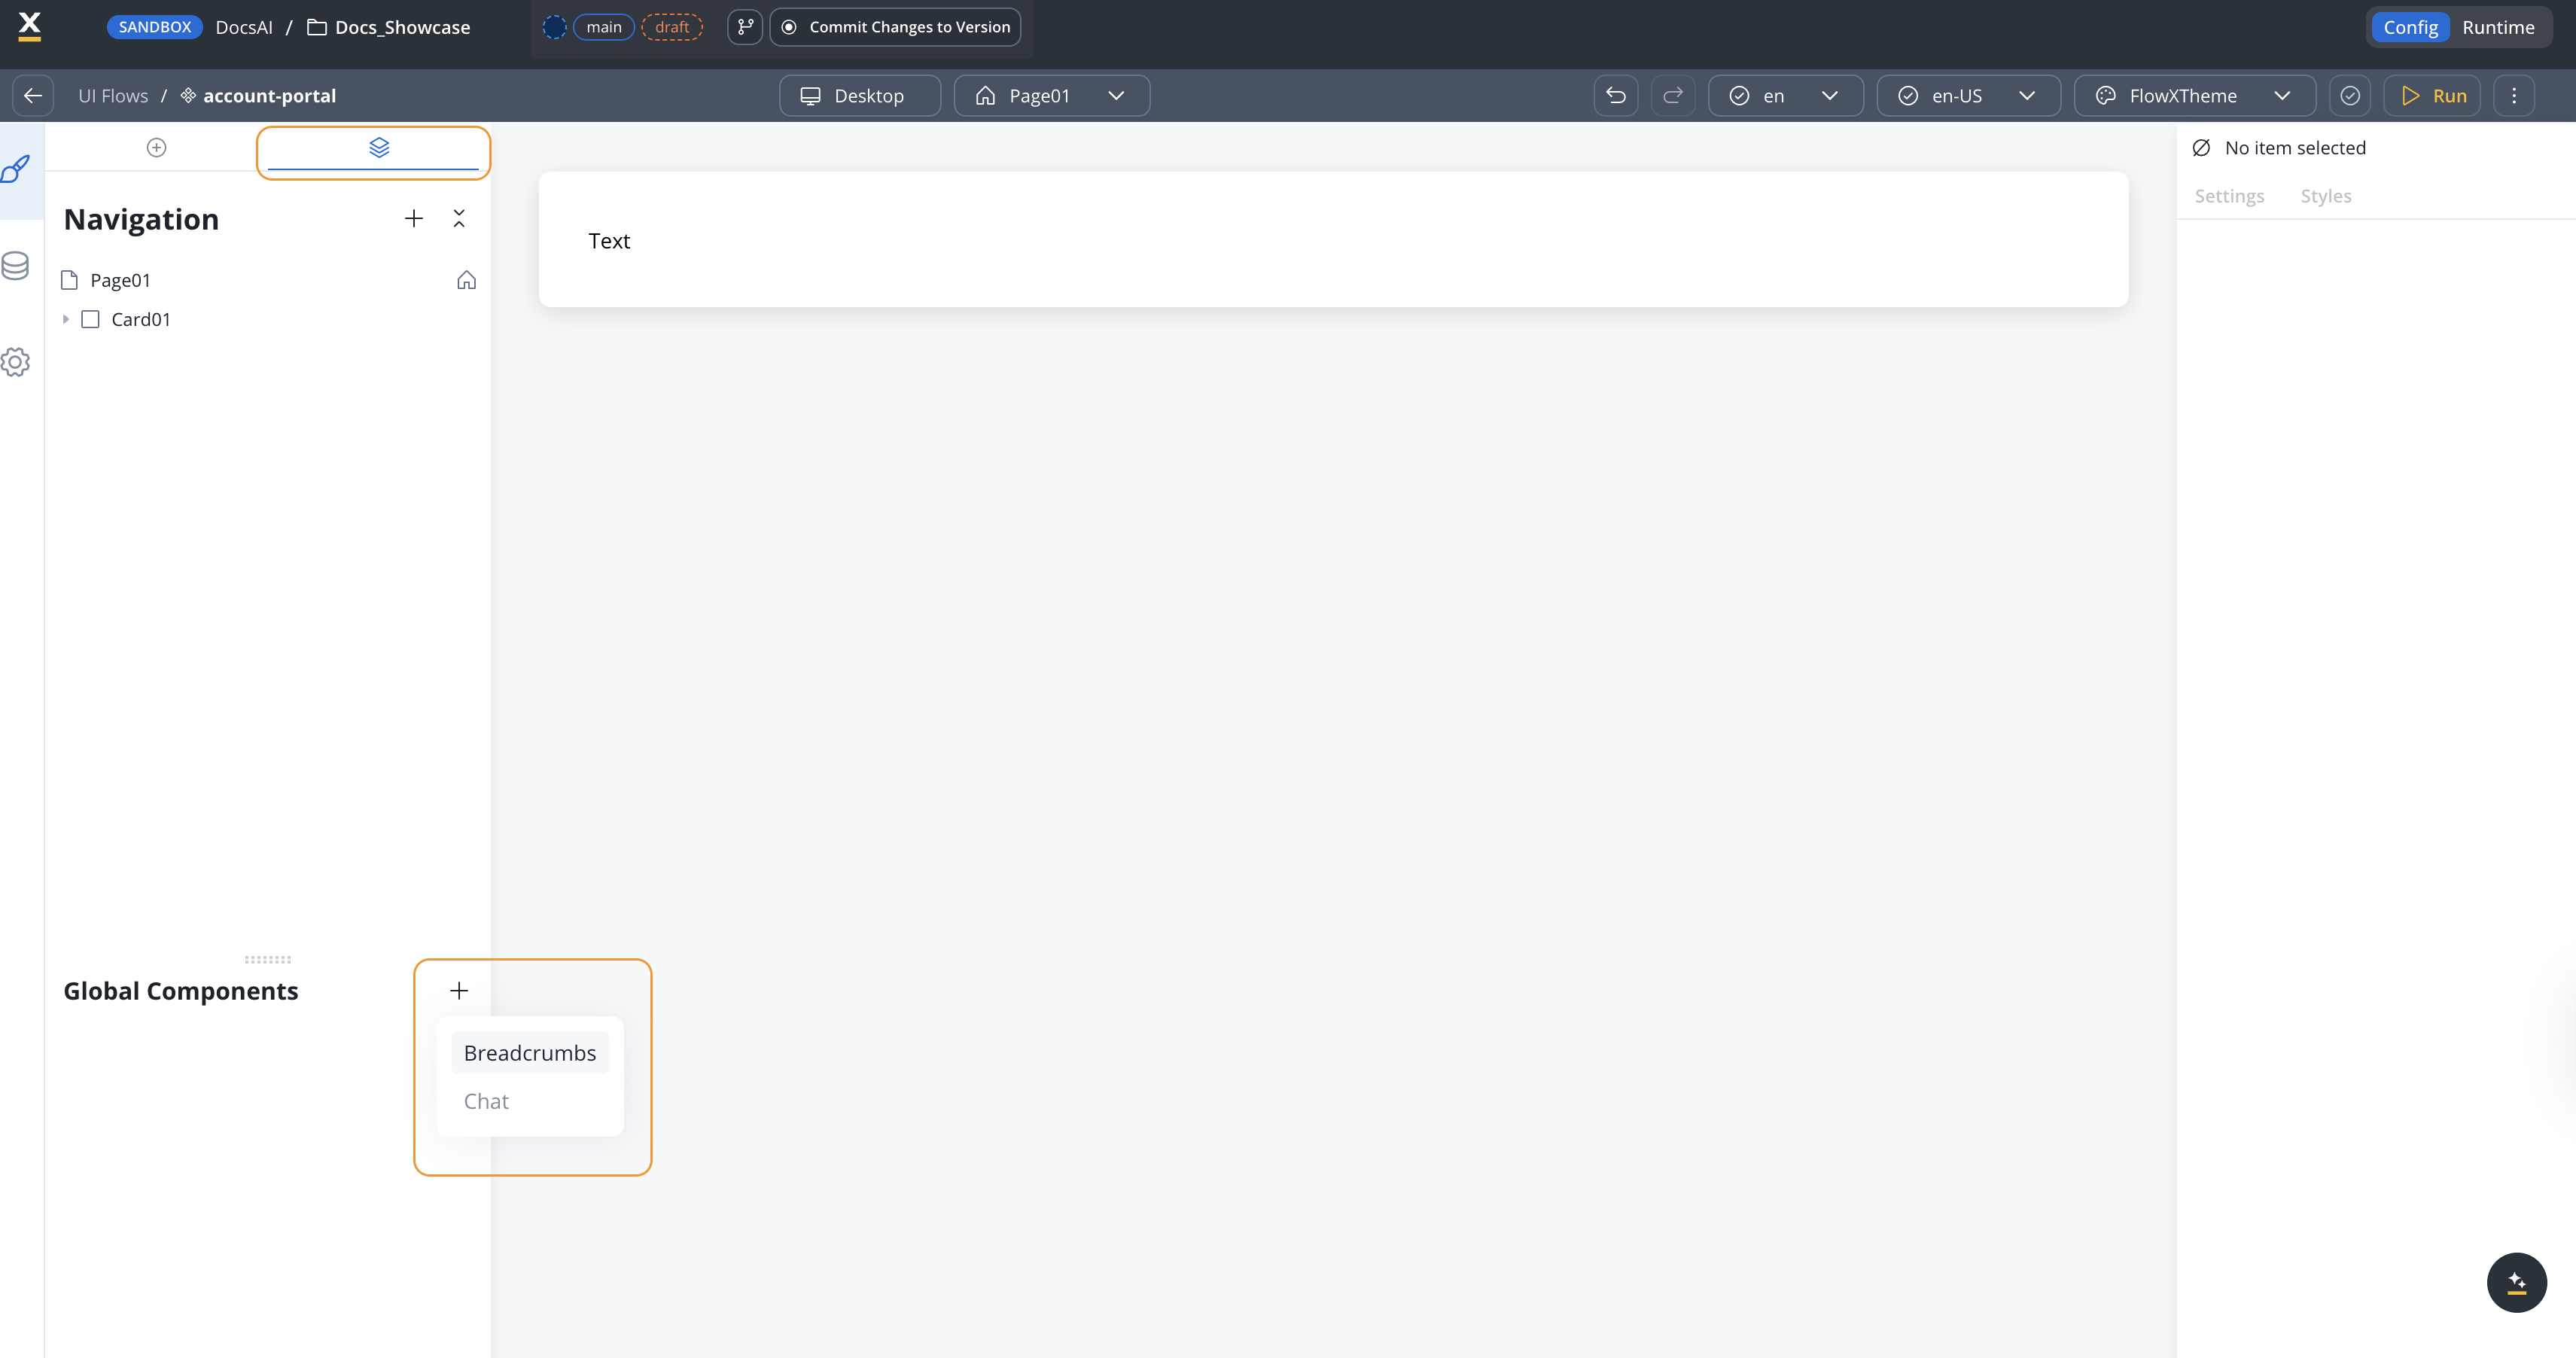
### Adding global components
In the UI Flows Designer, the left panel navigator shows a split view:
* **Navigation tree** (top) — the normal component hierarchy
* **Global Components** (bottom) — persistent components that appear across screens
To add a global component:
1. Click the **+** button in the Global Components section
2. Select **Breadcrumbs** or **Chat** from the dropdown
3. Only one instance of each type is allowed per UI Flow
When a new screen (Page, root Zone, or root Tab Bar) is added to the UI Flow, all existing global components are automatically **assigned** to it. To control which screens a global component appears on, right-click the component in the Global Components section and use **Apply To** to check or uncheck specific screens. Unassigned components appear grayed out in the navigator for that screen and are not rendered at runtime.
***
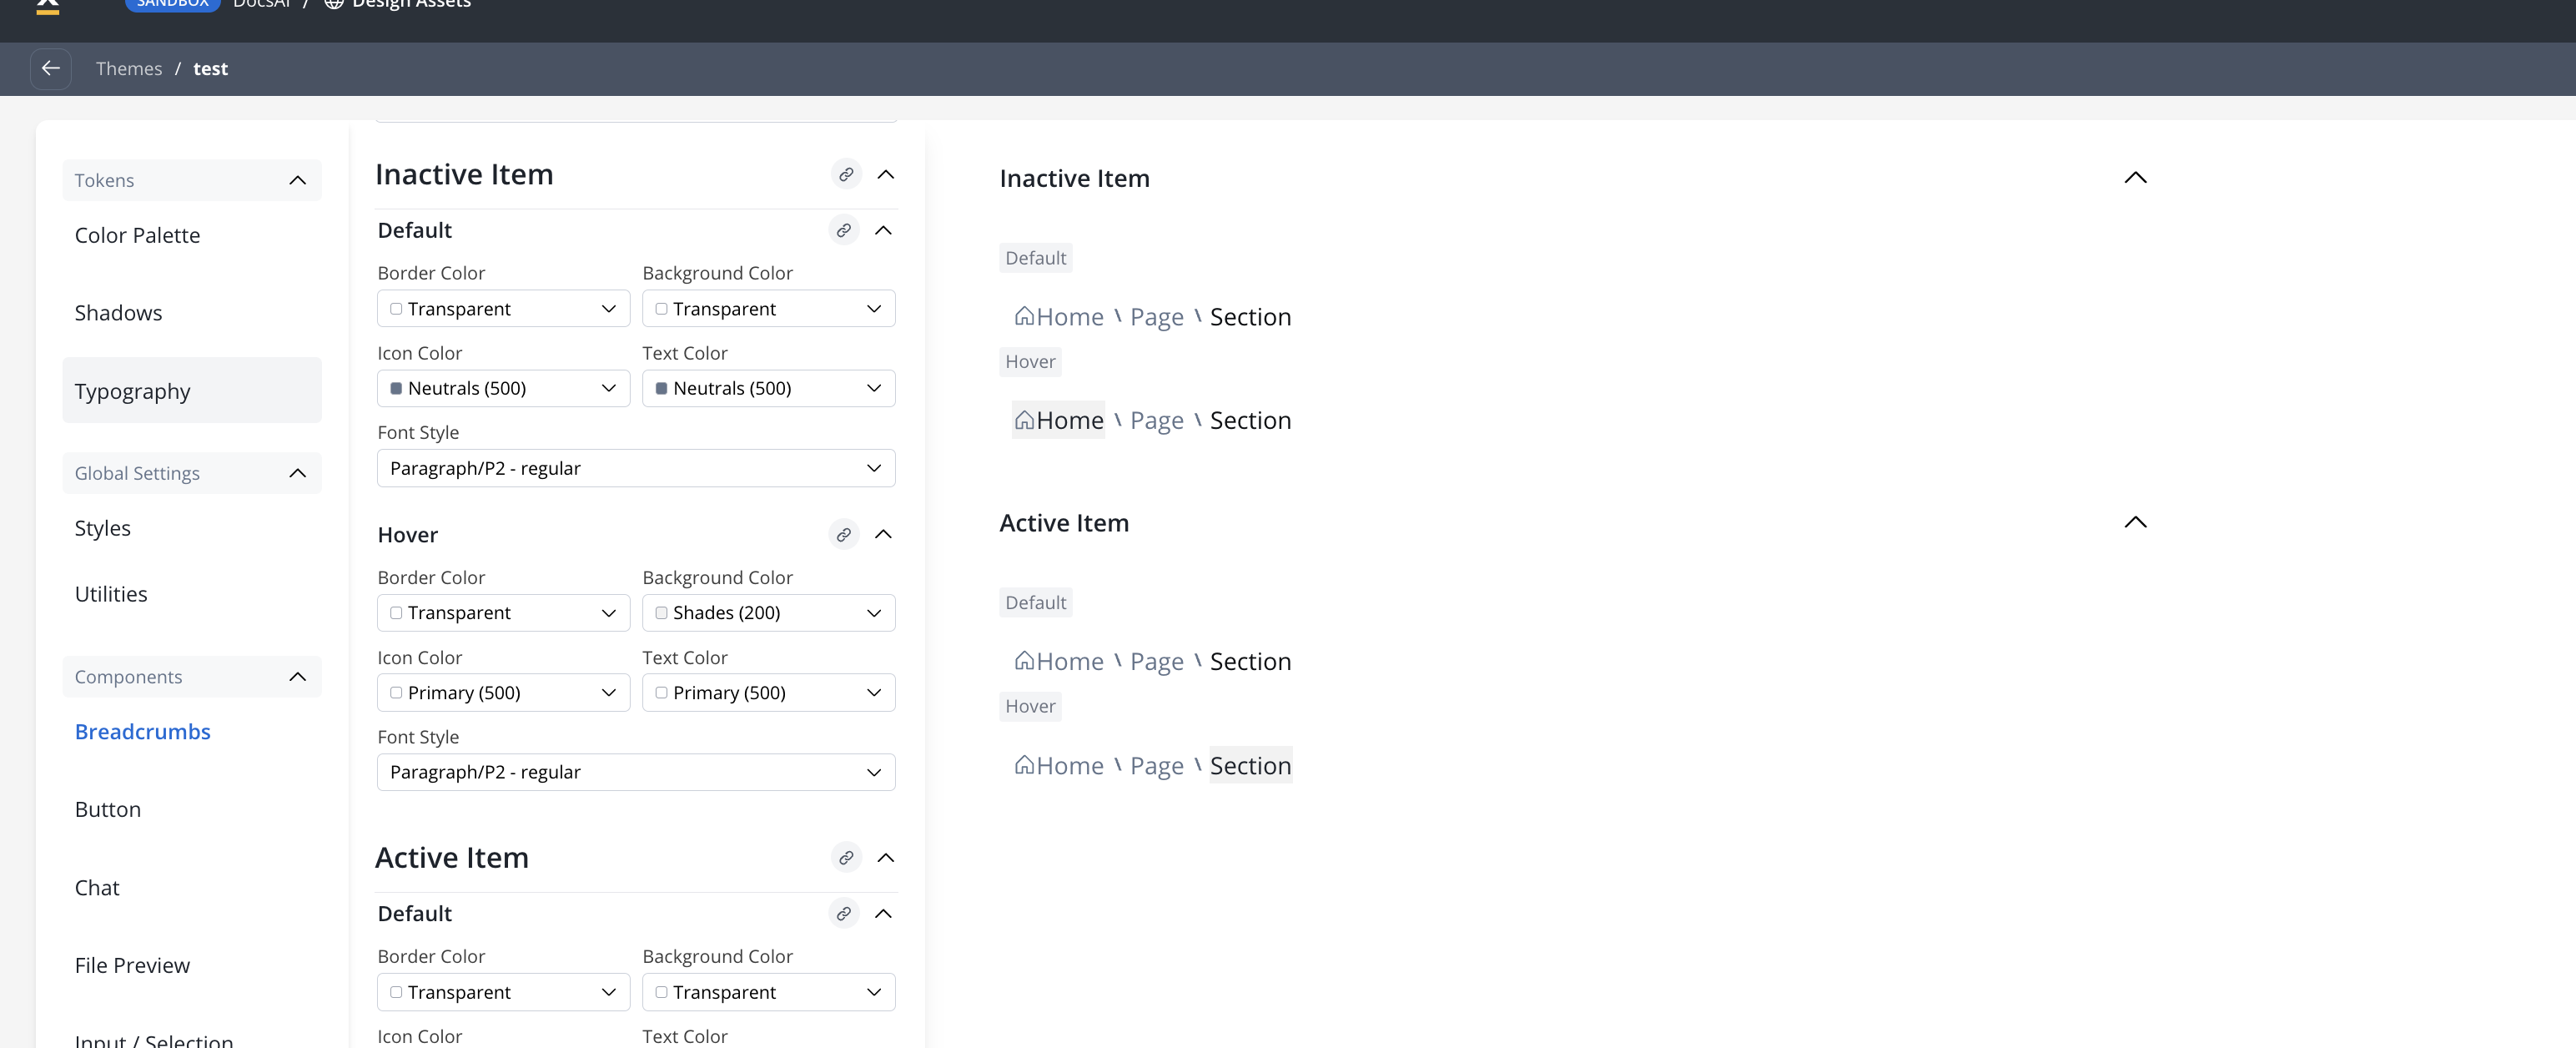
### Breadcrumbs
Breadcrumbs display the user's current navigation path within a UI Flow and provide click-to-navigate functionality. They are automatically generated from the navigation hierarchy.
| Feature | Description |
| --------------------- | ------------------------------------------------------------------------- |
| **Auto-generated** | Built from the navigation stack as users move between screens |
| **Click to navigate** | Click any breadcrumb item to navigate directly to that screen |
| **Dynamic updates** | Update automatically as users navigate deeper into the UI Flow |
| **Back navigation** | Support browser back button and breadcrumb click navigation |
| **Deep link support** | Breadcrumbs are correctly generated when accessing a screen via deep link |
#### Configuration properties
| Property | Description | Default |
| --------------------- | --------------------------------------------------------------------------------------------------------------------------------------- | ------- |
| **Collapse Mode** | Controls how breadcrumbs collapse when the path is long. `NONE` shows all items; `MIDDLE` collapses intermediate items into an ellipsis | `NONE` |
| **Max Visible Items** | Maximum number of breadcrumb items to display when collapse mode is `MIDDLE` (minimum 2) | `4` |
| **Show Home Icon** | Display a home icon as the first breadcrumb item | `true` |
#### Setting breadcrumb titles
Breadcrumb labels are populated from the **Title** property on root navigation areas. To configure:
1. Select a **Page**, root **Zone**, or root **Tab Bar** in the navigator
2. Open **Settings** → **Properties**
3. Set the **Title** field
Titles support dynamic values:
* **Substitution tags** — use `@@tag_name` syntax
* **Data store values** — use `${keyName}` syntax to reference values from the UI Flow data store
#### Navigation behavior
Breadcrumbs maintain a route hierarchy that avoids circular paths. For example, if a user navigates A → B → A, the breadcrumb trail resets to just A rather than showing a loop.
#### Theming
Breadcrumbs support theming through the Theme Admin with two theme elements:
* **Breadcrumbs** (container) — padding, gap
* **Breadcrumb Item** — border radius, padding, gap, with state modifiers for default, active, hover, and active hover (text style, text color, background color, border color, icon color)
Two system icons are used:
* `sys_BreadcrumbsHome` — the home icon
* `sys_BreadcrumbsSeparator` — the separator between items
#### Accessibility
| Element | HTML Tag | Attributes |
| -------------------- | -------- | --------------------------------------------------------------------- |
| Breadcrumb container | `nav` | `aria-label` (localized via `@@sys_a11y_breadcrumb` substitution tag) |
| Breadcrumb list | `ol` | — |
| Breadcrumb item | `li` | `aria-current="page"` on the active (last) item |
| Separator | `img` | `aria-hidden` |
***
### Chat as a global component
The Chat component can be added as a global component with three display modes:
* **Fill** — renders inline within a container
* **Floating** — renders as a floating action button (FAB)
* **Fullscreen** — renders as a fullscreen overlay
Floating and Fullscreen modes can be combined so the FAB expands to fullscreen on click.
To change the display mode, right-click the Chat component in the Global Components section and select **Edit Display Types**. Use **Apply To** to assign or unassign the Chat component from specific screens.
View the complete Chat component documentation for detailed configuration and best practices.
## Route management
Route management gives you control over URL structure, query parameters, and navigation paths within UI Flows. Define parameters on root views, pass data between screens via query strings, and let breadcrumbs auto-generate from the navigation graph.
URL-based route management (query parameters, `modalId`, deep linking, the session-storage navigation stack) applies to the **web** renderer. Mobile renderers manage navigation natively with their own navigation stack.
### Route types
| Route Type | Description |
| -------------------------- | ------------------------------------------------------------------------------------------------- |
| **UI Flow Route** | The base route defined by the UI Flow where the FLX UI Flow component is added |
| **Process Instance Route** | When a process is started, an additional route segment is added based on the process instance UID |
| **Deep Link Route** | Direct URL access to specific screens using route parameters and query strings |
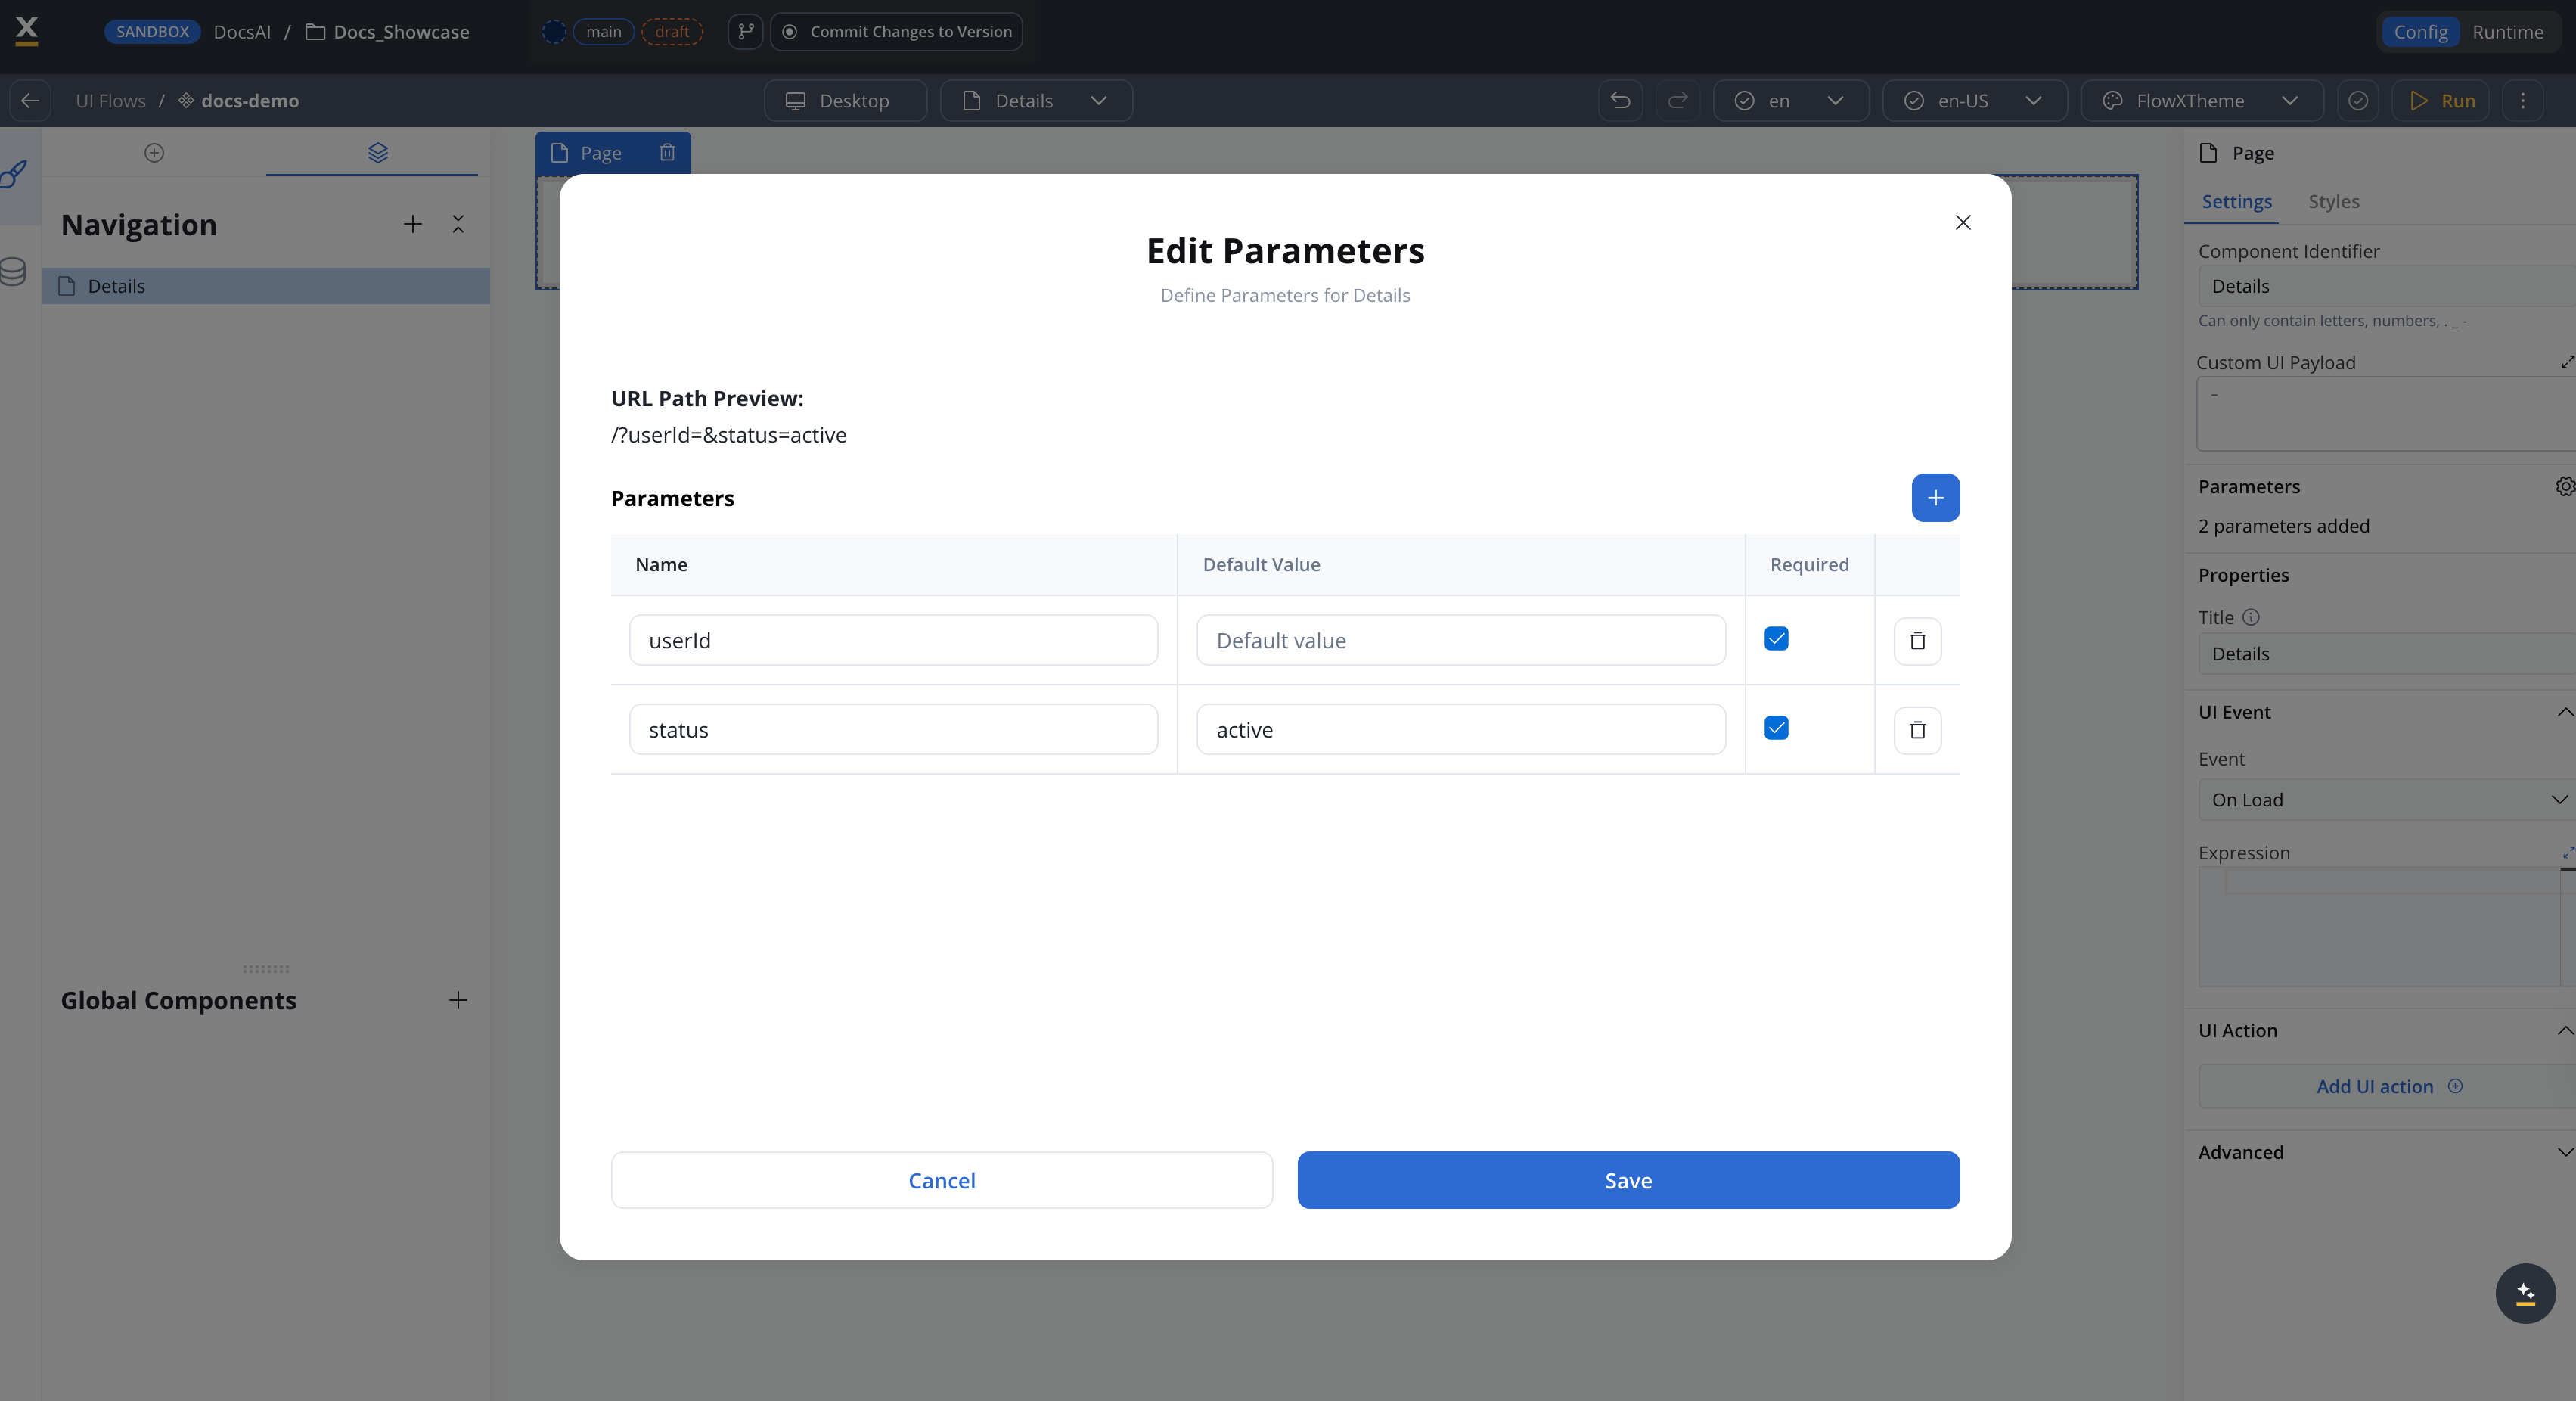
### Configuring route parameters
Root views (Pages, Modals) can define query parameters that control what data is available when that view loads.
In the UI Flows Designer, select a **Page** or **Modal** in the navigation tree.
In the config panel, click the **Parameters** gear icon to open the parameters modal.
Define parameters with the following properties:
| Property | Description |
| ----------------- | ----------------------------------------------------------------- |
| **Name** | The query parameter key (must be unique within the view) |
| **Default Value** | Value used if the parameter is not provided at navigation time |
| **Required** | Whether the parameter must be passed when navigating to this view |
The modal shows a URL path preview so you can see how the parameters will appear in the browser URL.
### Passing parameters with Navigate To
When configuring a **Navigate To** action that targets a root view with parameters, a **Destination Parameters** field appears. Enter a JSON mapping that resolves parameter values from the UI Flow data store:
```json theme={"system"}
{
"userId": "${user.id}",
"status": "${userData.status}"
}
```
When the destination view changes, the Designer auto-populates required parameters as a template so you know which values to provide.
### Route map and breadcrumbs
The route map is a navigation graph computed automatically from all **Navigate To** actions in the UI Flow. It determines:
* **Shortest paths** from the root view to any other view
* **Breadcrumb labels** generated from view titles
* **Back navigation** — clicking a breadcrumb navigates to that view with the correct query parameters preserved
When navigating, the system:
1. Evaluates the parameter mapping JSON against the UI Flow data store
2. Adds destination parameters to the URL
3. Removes parameters that belong only to the source view
4. Preserves parameters shared between source and destination
### Modal navigation
Modals integrate with route management through a `modalId` query parameter:
* Opening a modal adds `modalId={flowxUuid}` to the URL
* Closing a modal removes the `modalId` parameter
* On page reload, the `modalId` in the URL automatically re-opens the correct modal
* Modals on the same root open locally without triggering root navigation
### Navigation stack
UI Flows maintain a navigation stack that tracks the user's path through screens. The stack is persisted in the browser's **session storage**, enabling:
* **Browser back button support** — Users can navigate back through their history
* **Refresh recovery** — The stack survives page refreshes; it is cleared when the browser tab is closed
* **Programmatic navigation** — Use the `NAVIGATE_TO` action type to navigate to specific screens
* **Circular path prevention** — Navigating A → B → A resets the breadcrumb trail to just A
The stack is stored under a single session-storage key per browser tab. If two container apps hosting different UI Flows run on the same origin in the same tab, they overwrite each other's navigation history.
### Deep linking
Deep linking allows direct URL access to specific UI Flow screens. URLs are updated as users navigate, enabling:
* Sharing links to specific screens
* Bookmarking specific states
* Browser history navigation with meaningful URLs
### On Load event integration
When a Navigate To action targets a screen, the destination screen's [On Load event](./ui-designer/event-handlers#triggers) re-fires automatically. This ensures data initialization workflows run each time a user navigates to that screen, even if the screen was previously loaded in the session. Back/forward and breadcrumb navigation do **not** re-fire On Load — only an explicit Navigate To resets it.
The same behavior applies to [intent-based navigation](/5.9/ai-platform/conversational-workflows#navigate-in-ui-flow-node) triggered by AI chat agents — the destination screen's On Load event re-fires to initialize data for the new navigation context.
***
## Start parameters
Start parameters allow you to pass initial data when launching a UI Flow. Configure them in the Designer and provide values at runtime via the API request body or query strings in SaaS container apps.
### How start parameters work
Start parameters are an arbitrary JSON object passed when starting a UI Flow session. They are:
* Persisted on the `ui_flow_session` record in the database
* Returned in both start and status API responses
* Available to renderers throughout the session lifecycle
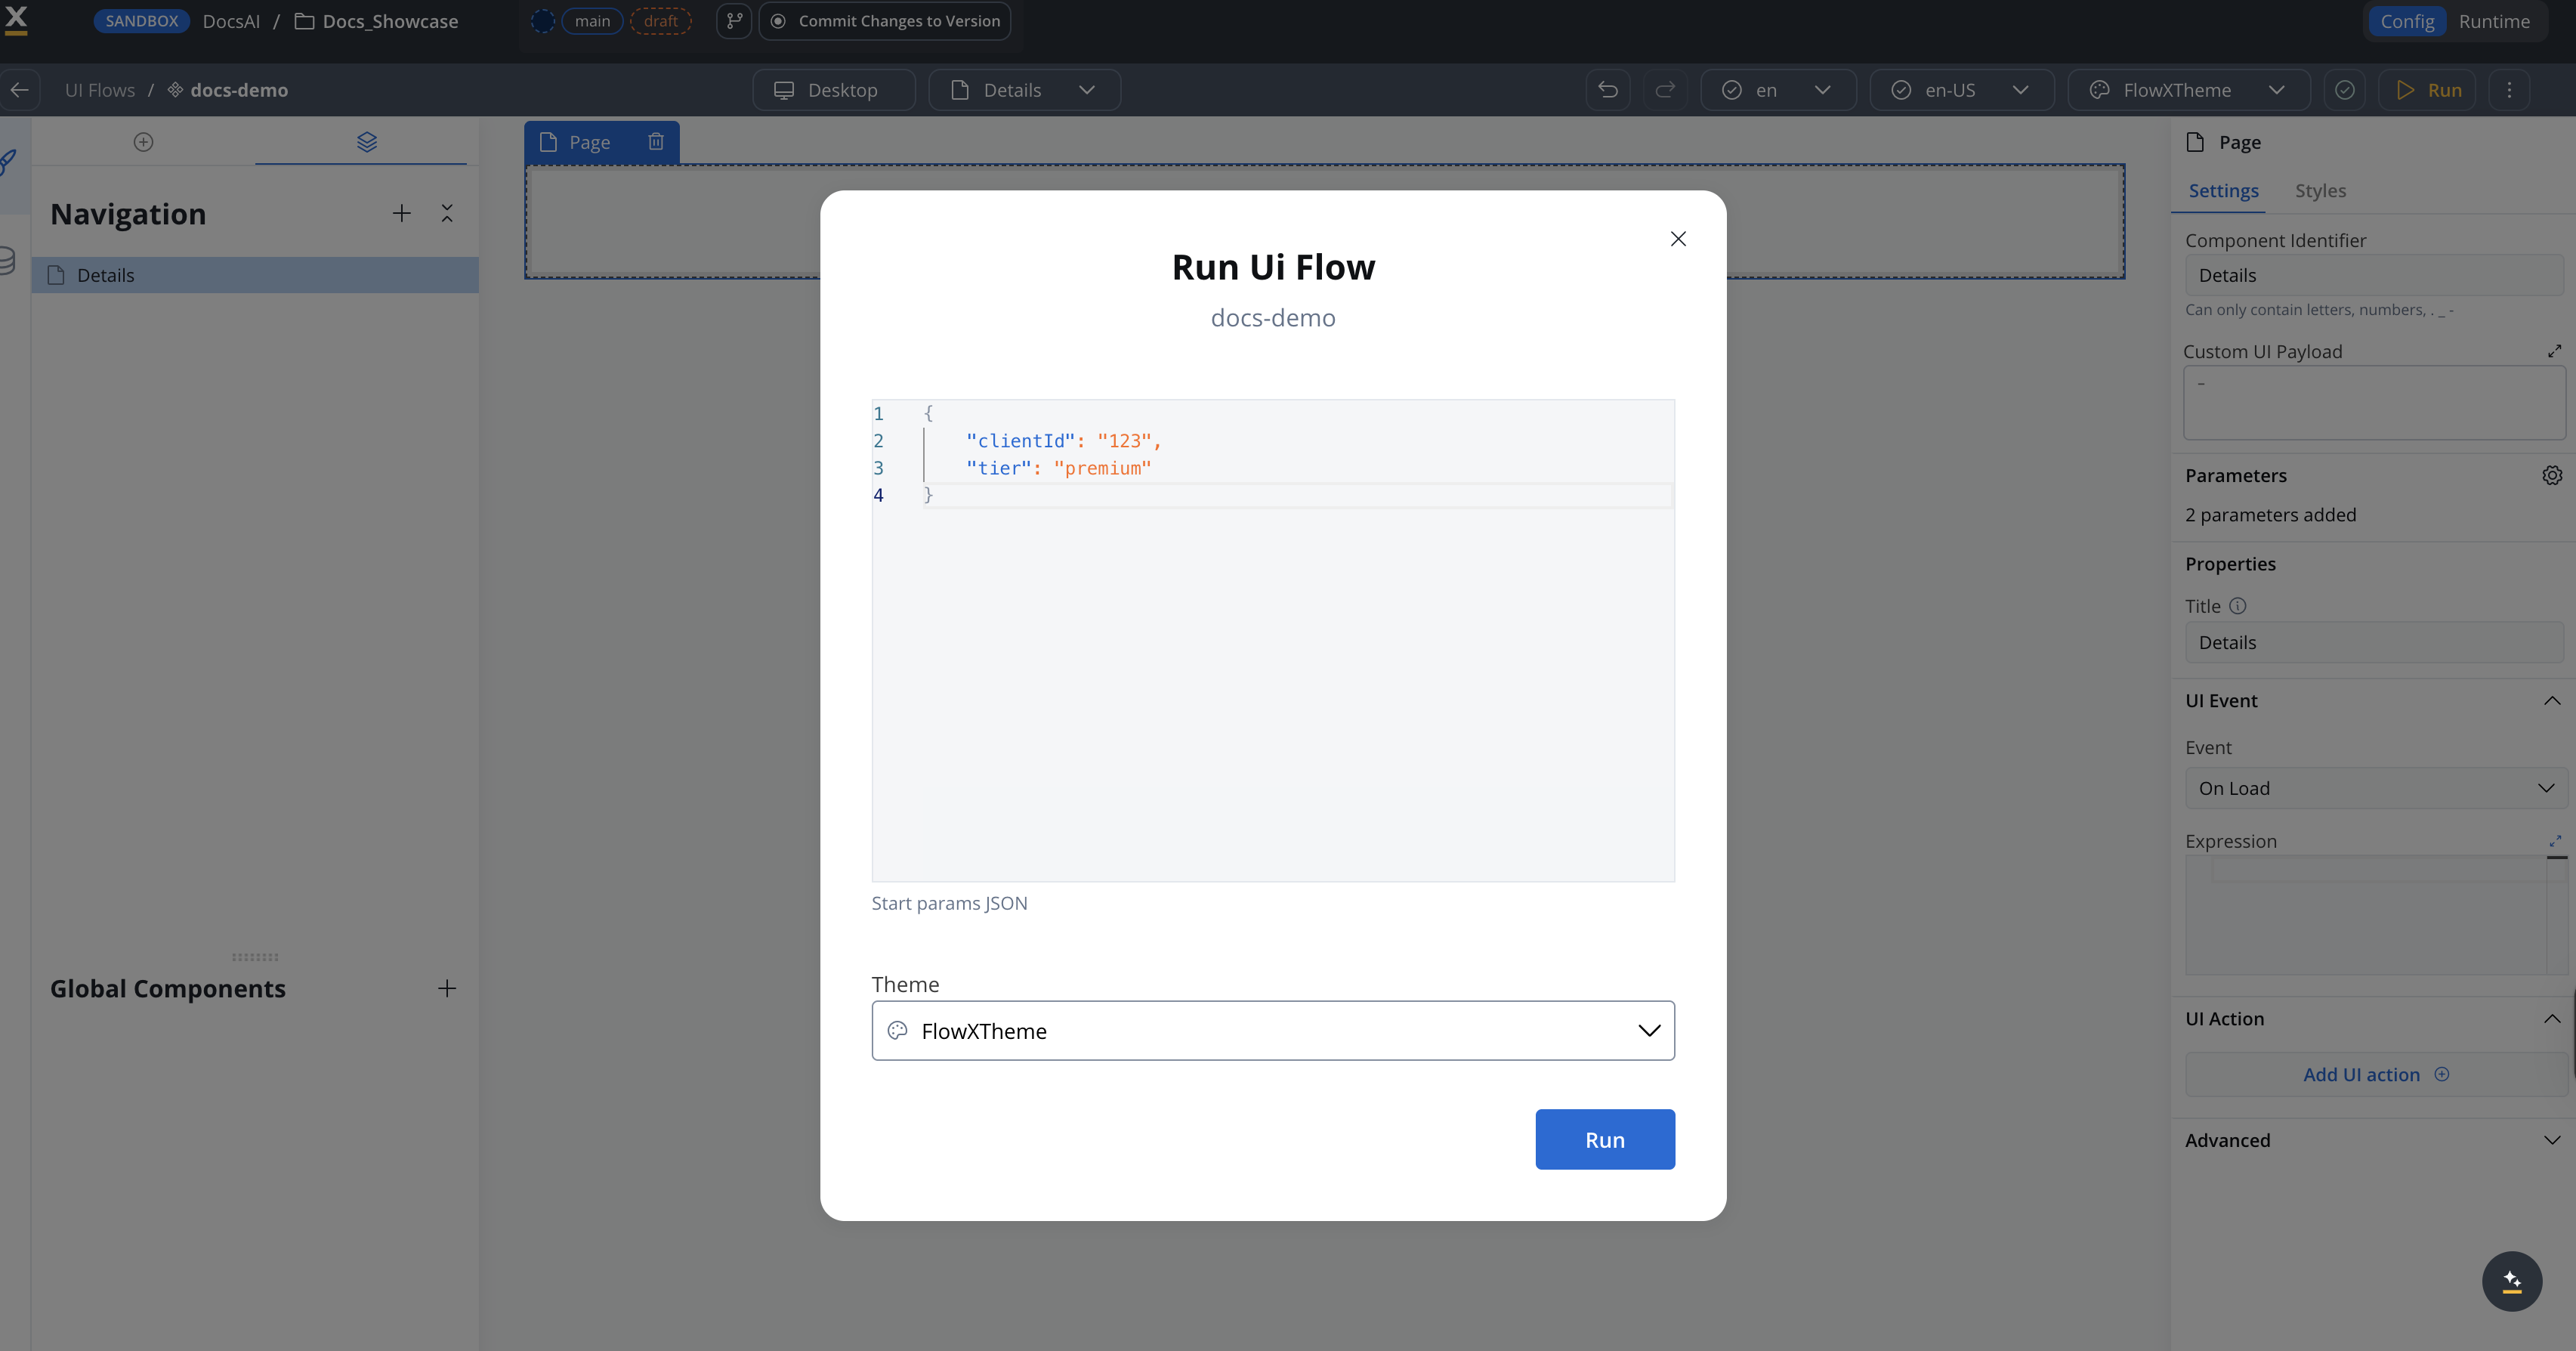
### Passing start parameters
When running a UI Flow from the Designer, a **Start params JSON** code editor appears in the Run dialog. Enter valid JSON to pass as start parameters:
```json theme={"system"}
{
"clientId": "123",
"tier": "premium"
}
```
The Run button is disabled until the JSON is valid. Default value is `{}`.
In a SaaS container app, start parameters are extracted from URL query strings. Reserved parameters (`projectId`, `workspaceId`, `processUuid`, `uiFlowSessionUuid`, `chatSessionId`, `language`, `locale`) are used for configuration; all other query parameters are passed as start parameters.
The `language` and `locale` query parameters are preserved across SDK navigation and page refreshes, so you don't need to manage them manually via session storage.
For example, this URL:
```
https://app.example.com/?projectId=xyz&clientId=123&tier=premium
```
passes `{"clientId": "123", "tier": "premium"}` as start parameters.
Configuration parameters are automatically scrubbed from the browser URL after initialization.
Pass start parameters in the request body when calling the start UI Flow endpoint:
```
POST /rtm/api/runtime/app/{appId}/build/{buildId}/ui-flows/{uiFlowName}
```
```json theme={"system"}
{
"clientId": "123",
"tier": "premium"
}
```
The `startParams` field is optional and defaults to an empty object.
***
## Session variables
Session variables persist data across all pages that share the same UI Flow session ID. They allow you to pass data between workflows, file uploads, and UI components within a single session without relying on process state.
### Variable sources
Variables are automatically collected from the following sources and merged into the session:
| Source | Description | Merge behavior |
| ------------------------ | -------------------------------------------------------------------------------------------------------- | ----------------------------------------------------------------- |
| **Start parameters** | JSON provided when starting the UI Flow session | Initial values, set once |
| **Workflow output** | Output from Start Workflow actions — must be a named object (e.g., `{"items": [...]}`, not a bare array) | Deep-merged with existing variables |
| **File upload response** | Document Plugin response from Upload actions | Stored under the **Response Key** configured on the Upload action |
Process output (from Process Renderer components) is handled separately and is not part of session variables.
### Using variables in components
Reference session variables in component configurations using `${}` syntax:
```text theme={"system"}
${clientId}
${uploadedDocument.fileId}
${workflowResult.status}
```
### Variables tab
The UI Flow session console in the Designer includes a **Variables** tab that displays all current session variables. This is useful for debugging and verifying that data flows correctly between workflows, file uploads, and UI components.

The session console tabs are:
| Tab | Description |
| ------------- | -------------------------------------------- |
| **Variables** | Current session variable values (read-only) |
| **Processes** | Process instances launched from the session |
| **Workflows** | Workflow instances launched from the session |
| **Audit Log** | Session activity log |
Session variables are **read-only** in the console — you cannot edit them directly. Variables are updated automatically when workflows complete or files are uploaded.
***
## Platform considerations
**Full Feature Support:**
* All UI component types available
* Navigation Areas with zones (header, content, footer)
* Full wizard and single-page navigation
* Task Manager component integration
**Excluded Navigation Areas:**
* Stepper & Step
**Available Root Navigation Areas:**
* Page
* Tabbar
* Zone
**Component Hierarchy:**
```
Page (multiple allowed)
├── Card
├── Container
├── Custom
├── Modal
├── Zone
└── Tabbar
Tabbar
└── Tab (multiple allowed)
├── Card
├── Container
├── Custom
├── Modal
├── Zone
└── Tabbar
Modal (multiple allowed)
├── Card
├── Container
└── Custom
```
**Mobile-Optimized (iOS & Android):**
* Preview selection via dropdown (iOS/Android)
* Basic Navigation Areas (Page, Tab Bar), no header/footer zones
* Platform-specific property overrides (copy to/from iOS/Android)
**Excluded Navigation Areas:**
* Zone
* Stepper & Step
**Excluded Components:**
* Task management
* Table
**Available Root Navigation Areas:**
* Page
* Tabbar (only as first root - not enforced in UI Designer)
**Component Hierarchy:**
```
Page (multiple allowed)
├── Card
├── Container
├── Custom
└── Modal
Tabbar
└── Tab (multiple allowed)
├── Card
├── Container
├── Custom
└── Modal
Modal (multiple allowed)
├── Card
├── Container
└── Custom
```
Use the platform selection subheader in UI Designer to switch between platforms and configure platform-specific behaviors.
***
## Best practices
### Architecture
Keep navigation, layout, and presentation in UI Flows
Delegate complex business operations to processes via Start Process action
Session variables last only for the session lifetime — pass data that must be durably persisted to processes
Design UI Flows for reuse across multiple apps
### Design
**DO:**
✅ Create clear navigation hierarchies\
✅ Use descriptive names for Navigation Areas\
✅ Test on all target platforms before deployment\
✅ [Configure accessibility properties](../platform-deep-dive/accessibility) for mobile
✅ Use Task Manager component for task-centric applications
**DON'T:**
❌ Duplicate business logic in UI Flows and Processes\
❌ Create overly complex navigation structures\
❌ Ignore platform-specific limitations\
❌ Skip [accessibility configuration](../platform-deep-dive/accessibility) for mobile apps
❌ Use UI Flows when you need process state management
***
## Migration from subprocess-based navigation
If you currently use subprocesses for UI-only scenarios, consider migrating to UI Flows:
Review your subprocesses and identify those that:
* Only display UI without business logic
* Act as navigation shells
* Could be replaced with simpler UI
Build a UI Flow that replicates the UI functionality:
* Create Navigation Areas matching subprocess pages
* Add UI components
* Setup navigation using Navigate To actions
Replace subprocess starts with Start Process actions:
* Keep actual business processes as processes
* Launch them from UI Flows when needed
Verify functionality across platforms:
* Navigation works correctly
* Process launches function properly
* Data flows as expected
Once validated, remove the unnecessary subprocess layers.
***
## UI Flow permissions
UI Flow permissions sit on top of the [runtime authorization model](../../setup-guides/access-management/roles-permissions-matrix). Each UI Flow has a list of allowed runtime roles. Users without one of those roles cannot start the UI Flow at runtime, and the UI Flow does not appear in the solutions list returned by the runtime API.
### Default role on creation
When a UI Flow is created, a default runtime role is assigned automatically so the UI Flow is reachable from day one. The default is the project-level **User** role; change it from the UI Flow Permissions page.
### Configuring permissions
Open **Settings → Permissions** in the UI Flow editor. The Permissions page lets you:
* Select one or more runtime roles allowed to start the UI Flow
* Remove the default role and replace it with a project-version-scoped role
* View the resulting permission set for each role
Role changes are saved as part of the UI Flow resource and travel with project export/import.
### Runtime enforcement
When a user starts a UI Flow:
1. The runtime checks the user's roles against the UI Flow's allowed roles list.
2. If the user has none of the allowed roles, the request is rejected and a permission toast is shown in the Designer-hosted runtime preview. In the deployed app, the UI Flow is not listed and the start endpoint returns 403.
3. Input parameters are validated against the UI Flow's input schema before the session is created.
Within a UI Flow session, individual components can be hidden or disabled via permission-based hide/disable rules. These evaluate at runtime against the user's permission set, the same way they evaluate JavaScript expressions today. See [Hide condition / Disabled condition](#hide-condition--disabled-condition).
### Migration from earlier versions
UI Flows created before 5.8.0 receive the project-level **User** role automatically as their default allowed role on upgrade. Review and tighten the role list per UI Flow as part of the 5.8.0 deployment checklist.
***
## Caching
UI Flow definitions are cached at runtime to speed up rendering — the flow definition, its name, allowed roles, templates, and custom-component data. The cache is populated lazily on first use and is invalidated automatically when a UI Flow's resources are overridden at runtime.
### Clearing the cache manually
If you need to force a refresh, use the **Clear cache** action in the UI Flow editor:
Open the UI Flow whose cache you want to clear.
Open the **⋮** (more) menu in the page header and select **Clear cache**. This clears the cached definition for that UI Flow.
**Clear cache** requires delete permission on the UI Flow. It clears the cache for the selected UI Flow only.
***
## Limitations and compatibility
### Current limitations
UI Flows have the following limitations:
* **Data Persistence**: Session variables persist only for the lifetime of the session — data that must outlive the session must be passed to processes for storage
* **Complex Conditionals**: For complex business rules, use processes instead
* **Reusable UI**: Reusable UI components are not yet supported in UI Flows
* **Undo-Redo**: Limited undo-redo support in UI Flows Designer
* **Multi-Instance (Concurrent)**: While a UI Flow can launch multiple process instances (for example, separate buttons for mortgage or credit card applications), it cannot yet have multiple instances running concurrently from the same page
### Future enhancements
Planned for future releases:
* **Reusable UI integration**: Integrate reusable UI components in UI Flows with input/output parameters and data mappers
* **Enhanced resource management**: Undo-redo, resource usages, merge conflicts, and audit logging
* **Advanced actions**: Start project with entrypoint, start process/project with mappings
* **Additional UI components**: Modal as UI element
* **AI integration**: Additional AI-powered features for UI Flows
***
## Troubleshooting
**Possible causes:**
* Process definition not published
* Missing required process parameters
* Insufficient permissions
**Solutions:**
* Ensure process definition is published in target environment
* Verify all required parameters are mapped in the action
* Check user has permission to start the process
* Review browser console for error messages
**Possible causes:**
* Target destination no longer exists (deleted or moved in the navigation tree)
* Destination not available on the current platform
* Navigation configuration error
**Solutions:**
* Verify the destination still exists in the navigation tree and reselect it in the handler
* Review navigation configuration in UI Designer
* Test navigation flow step by step
**Possible causes:**
* Task Manager not properly configured
* User doesn't have tasks
* Filter configuration too restrictive
**Solutions:**
* Verify Task Manager component configuration
* Check user has assigned tasks in Task Manager
* Review and adjust filter settings
* Ensure Task Manager service is running
**Possible causes:**
* Wrong platform selected in preview
* Configuration not saved
* Cache issues
**Solutions:**
* Switch platform tabs and verify configuration
* Save UI Flow and refresh browser
* Clear browser cache and reload
* Test on actual device if possible
***
## Related resources
Learn about UI Designer capabilities and interface
Understand navigation area types as used in BPMN processes
Configure event handlers including Start Process and Navigate To
Learn about Task Manager and task management capabilities
Add conversational AI experiences to your UI Flows
Explore AI capabilities in FlowX