> ## Documentation Index
> Fetch the complete documentation index at: https://docs.flowx.ai/llms.txt
> Use this file to discover all available pages before exploring further.
# Collection
> The Collection component functions as a versatile container element, allowing you to iterate through a list of elements and display them according to their specific configurations.
## Configurable properties
* `collectionSource`: This property specifies the process key where a list can be found. It should be a valid array of objects.
## Example usage
Here's an example of configuring a Collection component to display a list of products:
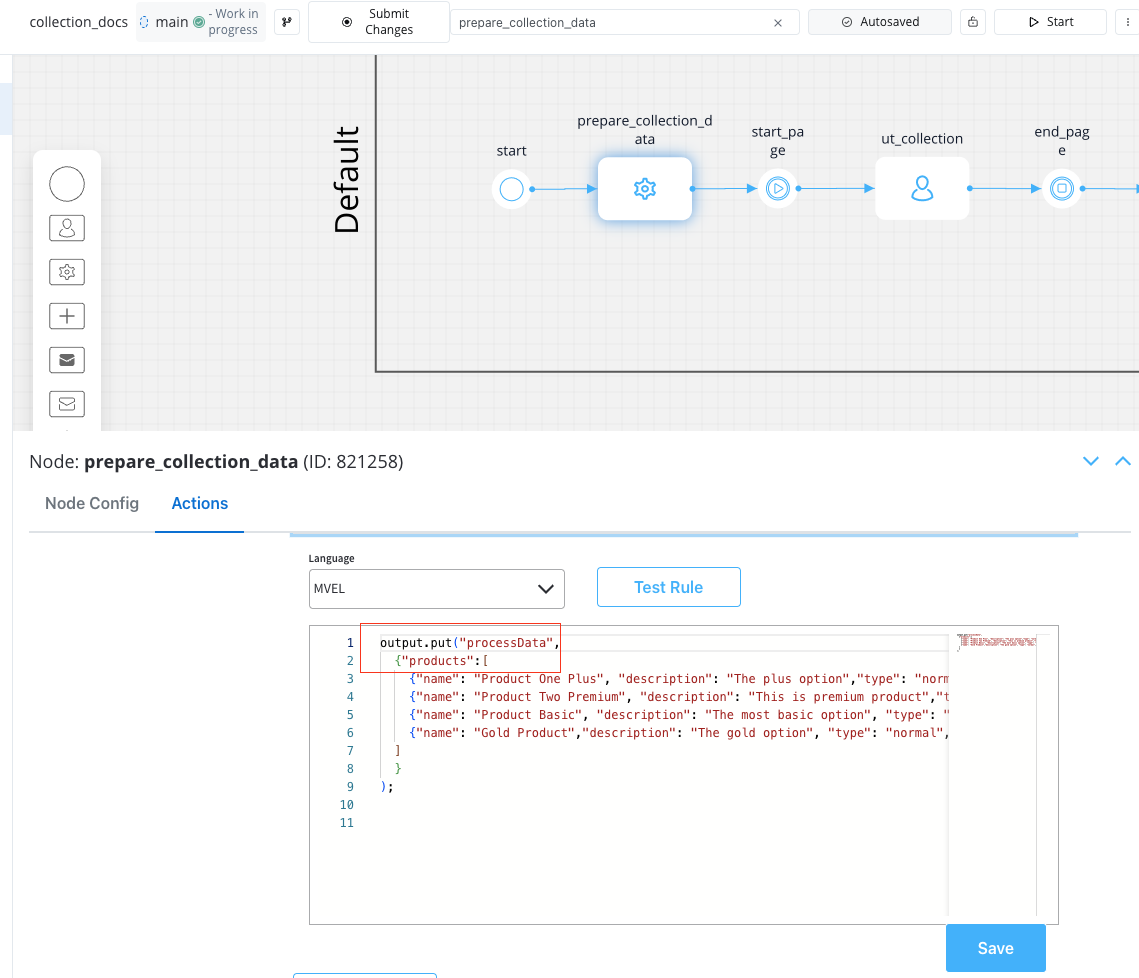
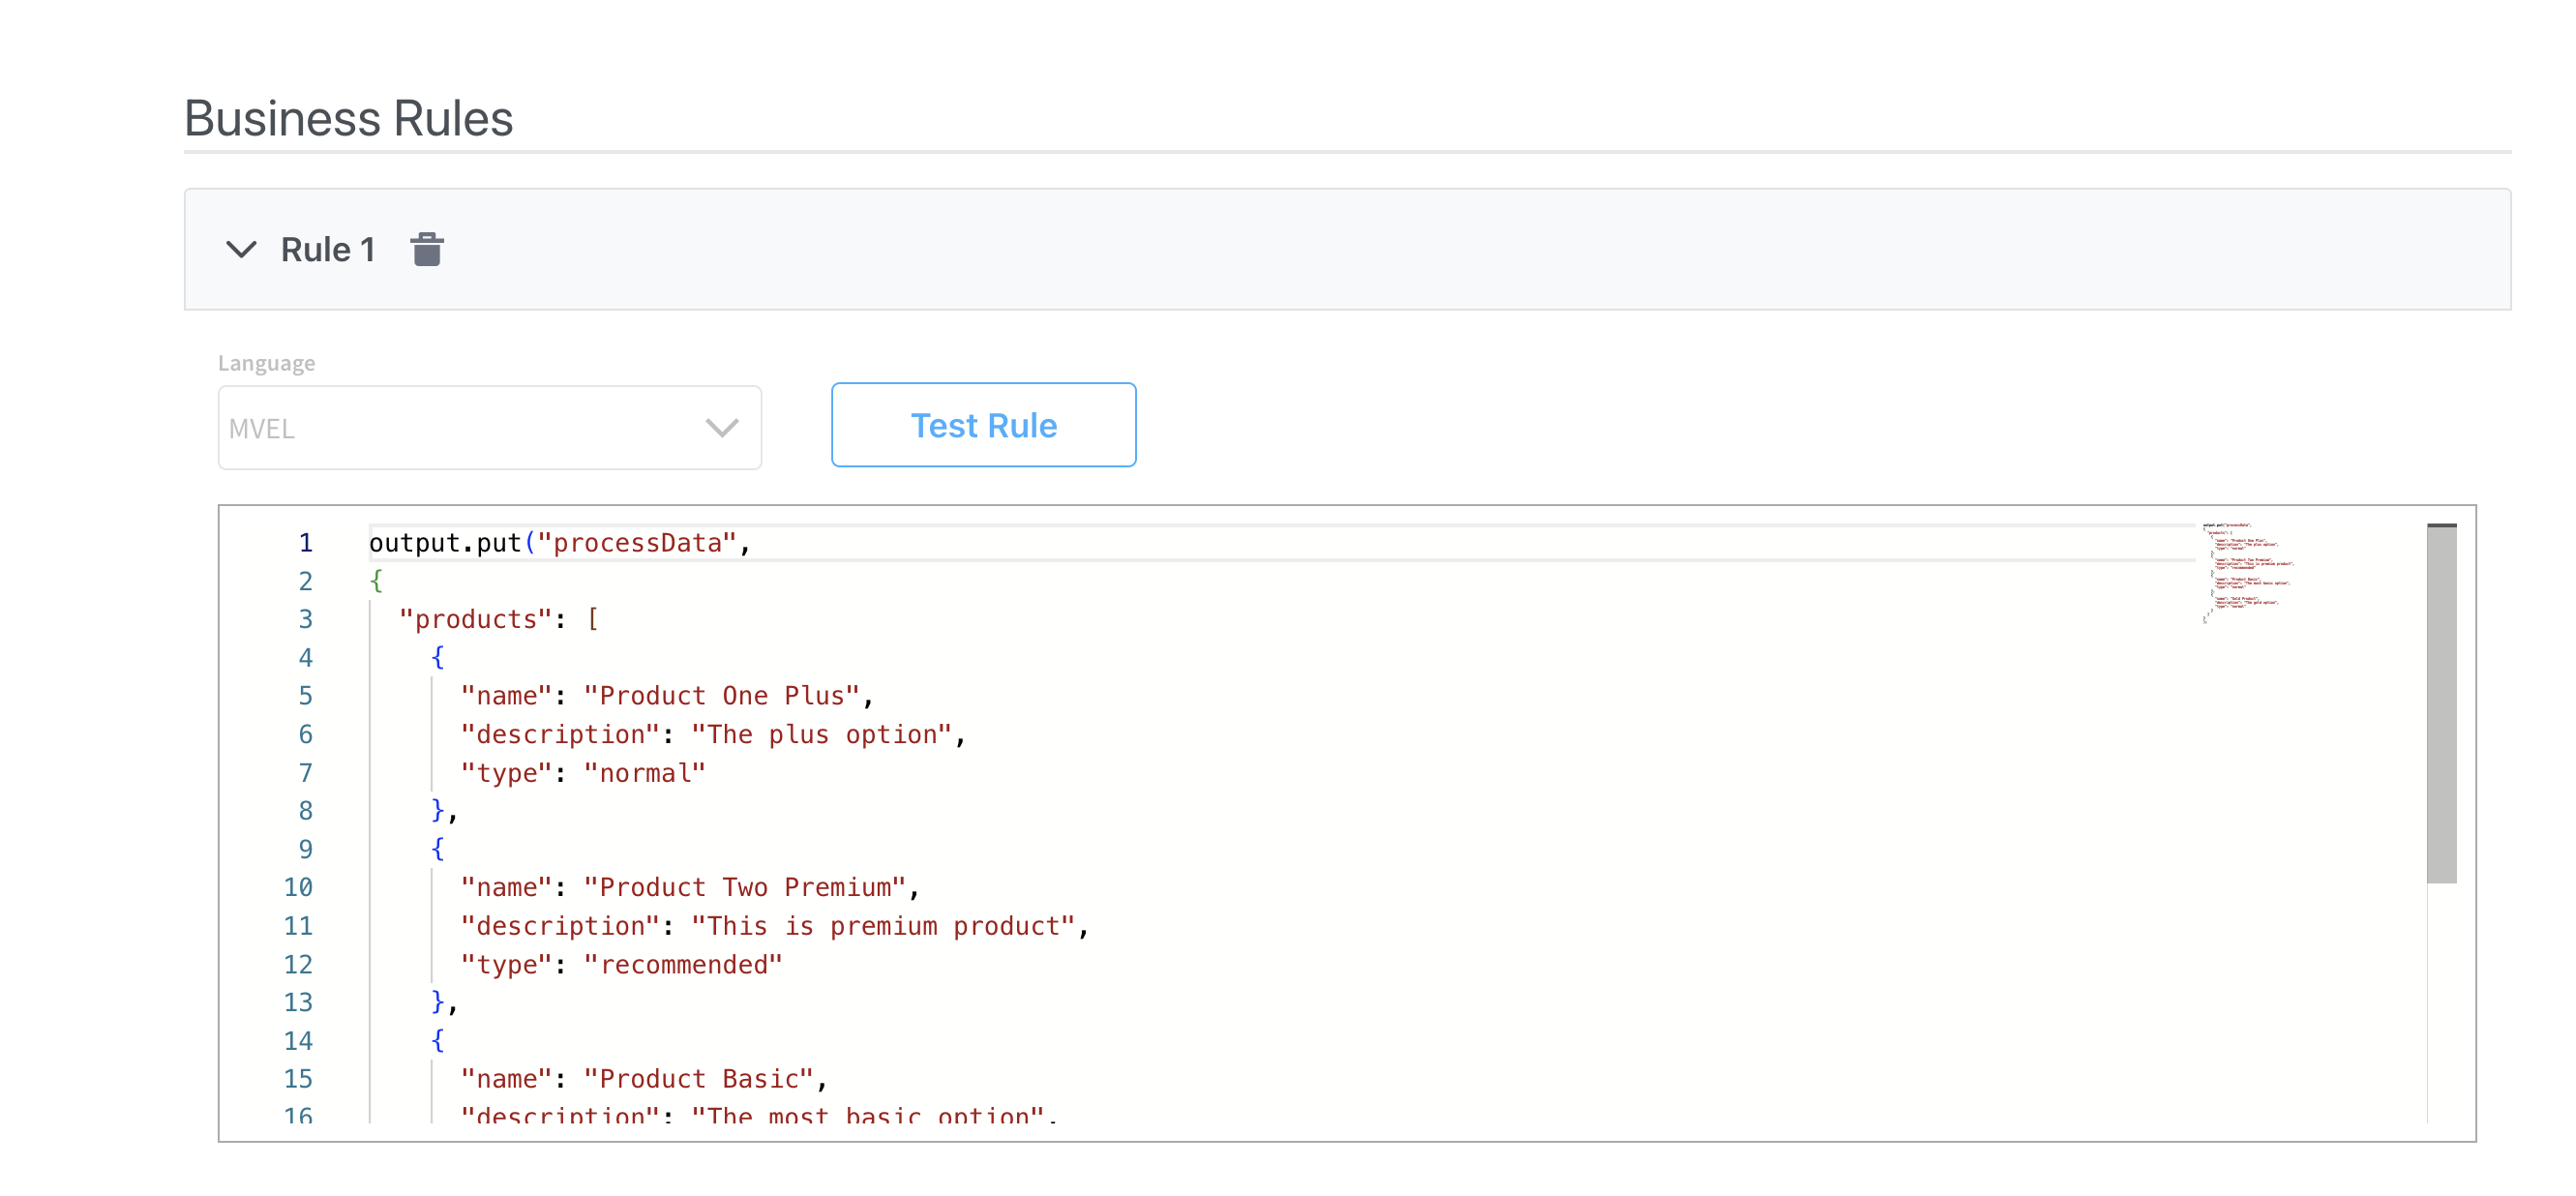
Source collection data example using an [**MVEL business rule**](../../../actions/business-rule-action/business-rule-action):

```java theme={"system"}
output.put("processData", //this is the key
{
"products": [ // this is the source that will populate the data on collection
{
"name": "Product One Plus",
"description": "The plus option",
"type": "normal"
},
{
"name": "Product Two Premium",
"description": "This is premium product",
"type": "recommended"
},
{
"name": "Product Basic",
"description": "The most basic option",
"type": "normal"
},
{
"name": "Gold Product",
"description": "The gold option",
"type": "normal"
}
]
}
);
```
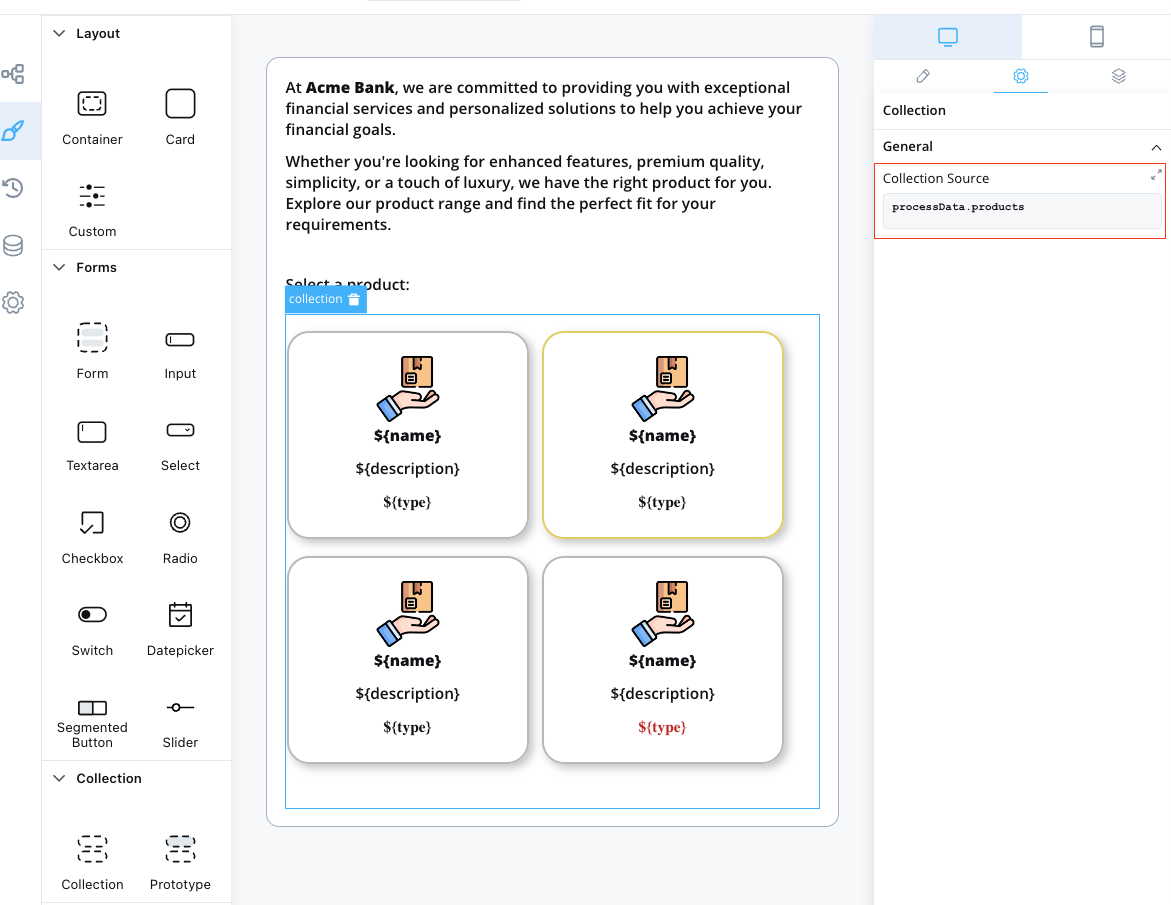
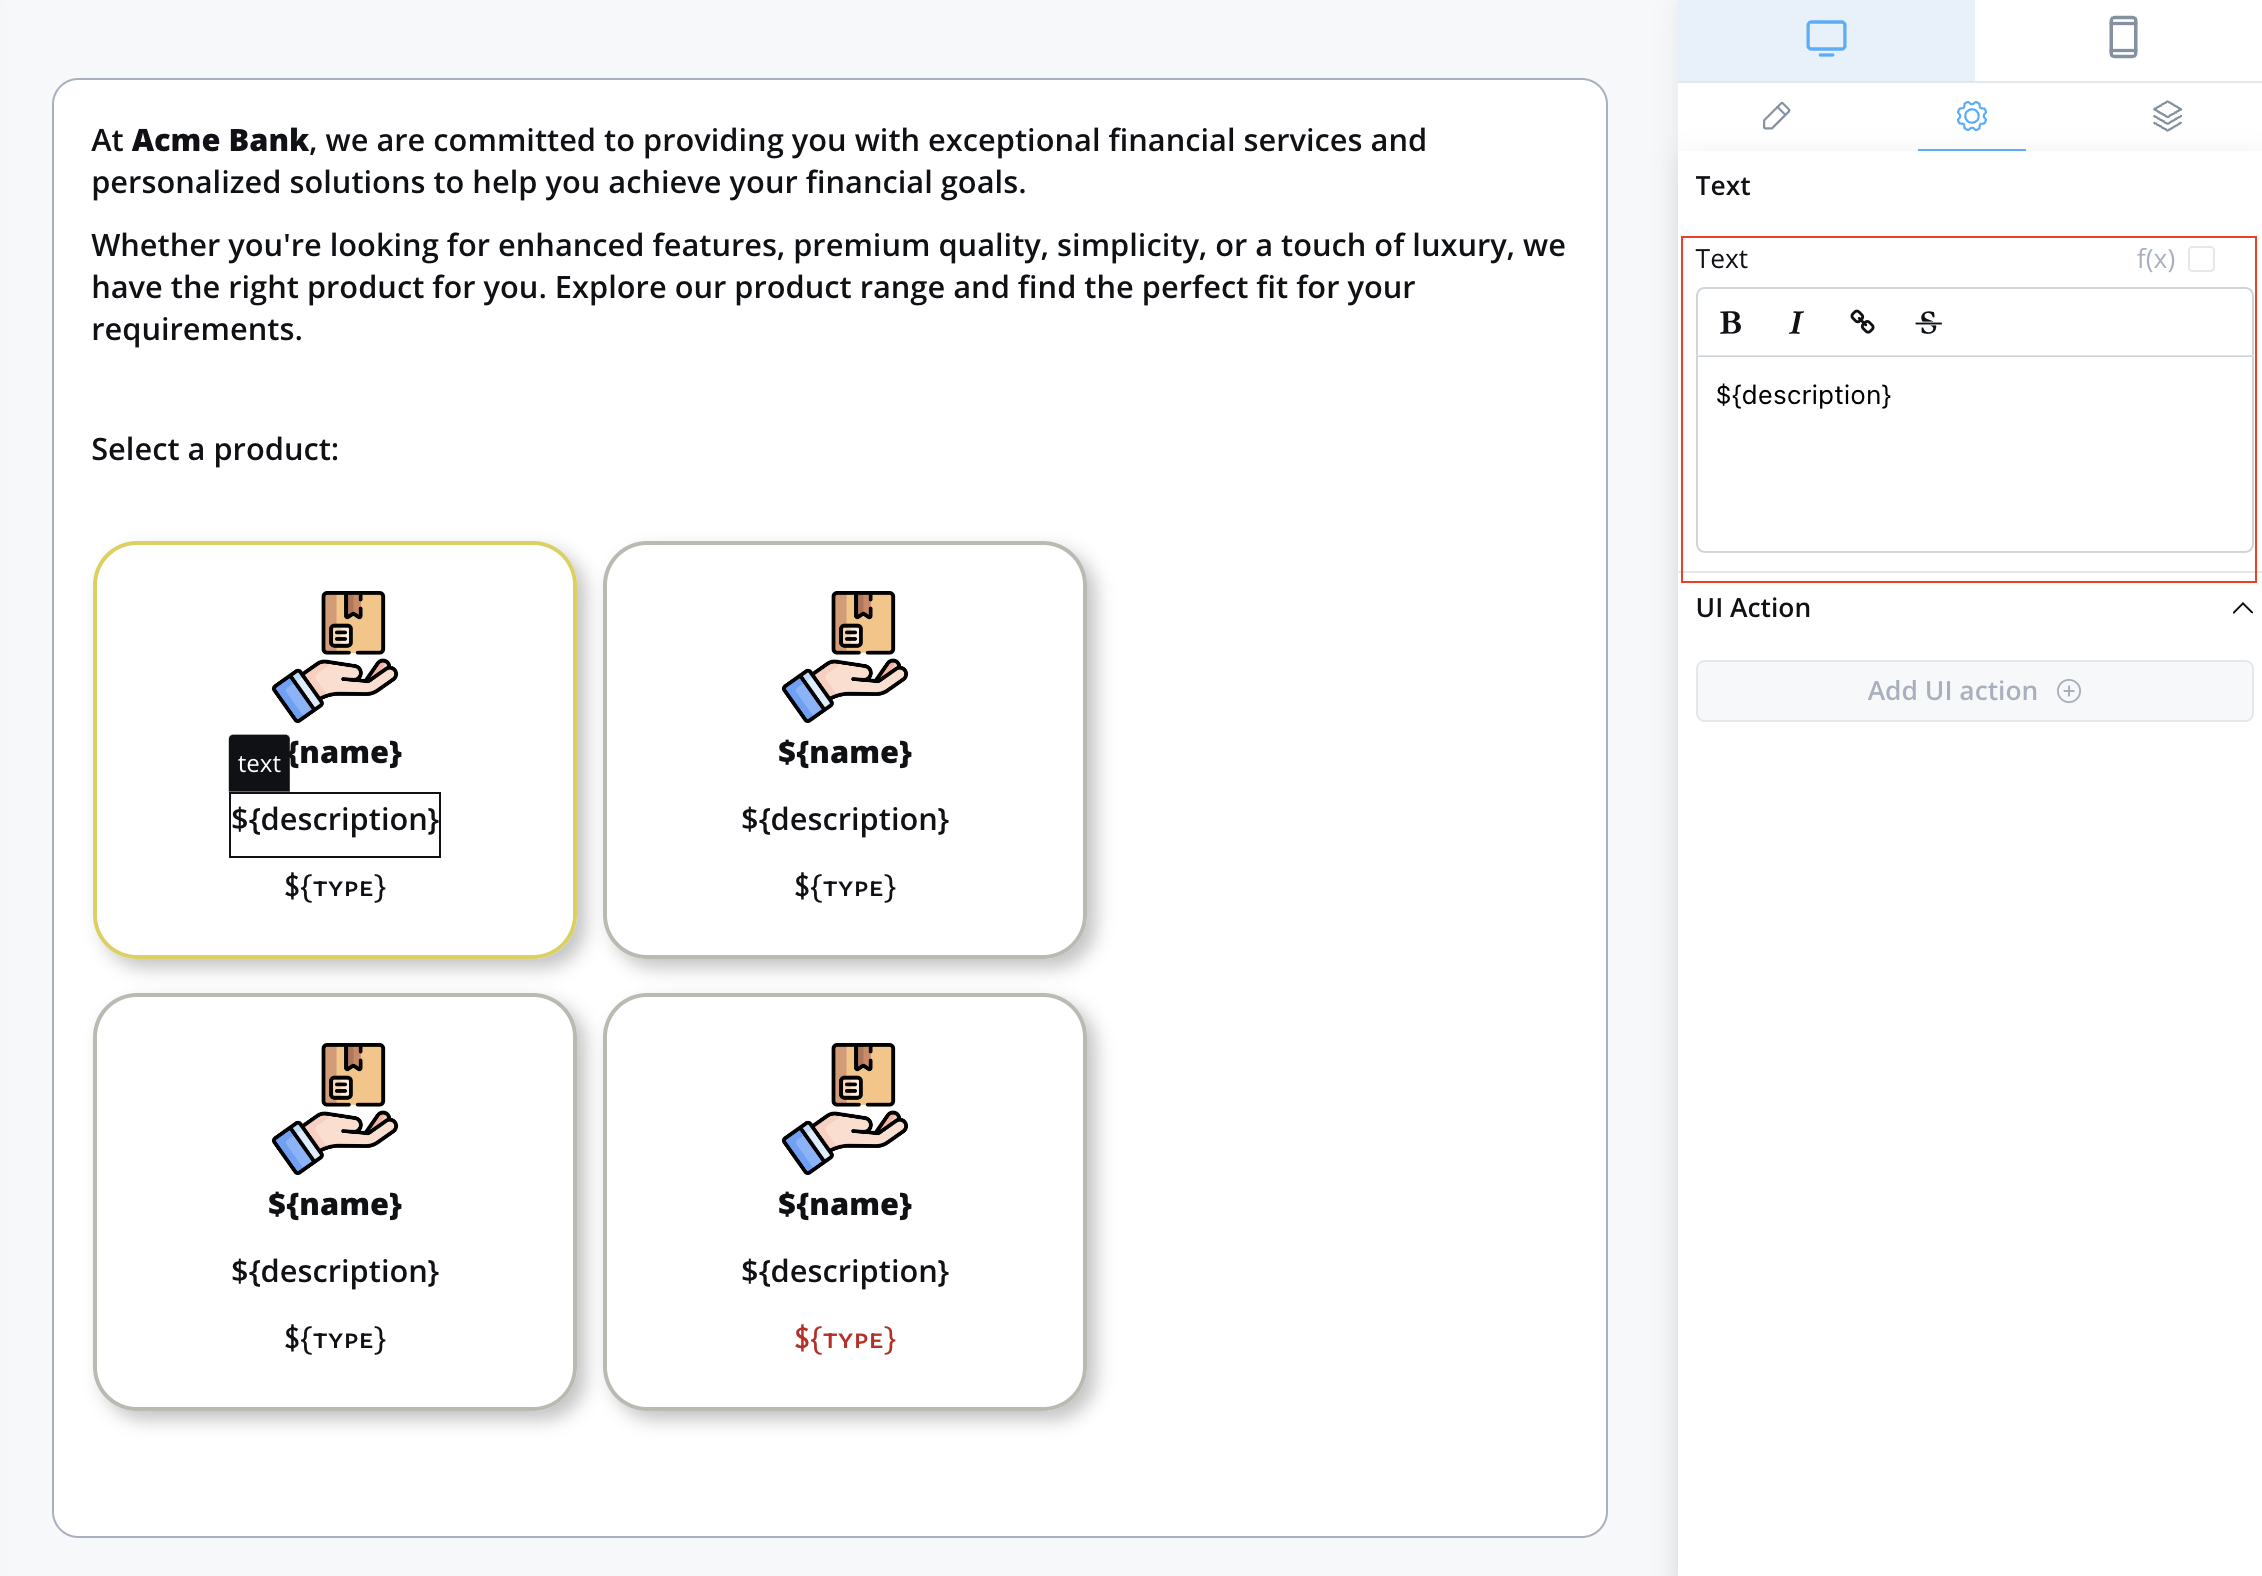
The above configuration will render the Collection as shown below:
Components within a collection use **relative paths** to the collection source. This means that wherever the collection is found inside the process data, the components inside the collection need their keys configured relative to that collection.
To send and display dynamic data received on the keys you define to the frontend, make sure to include the following data structure in your root UI element using Message parameters. For instance, if you want to include data for the `processData` key mentioned earlier, your configuration should resemble this:
```json theme={"system"}
{
"processData": ${processData}
}
```
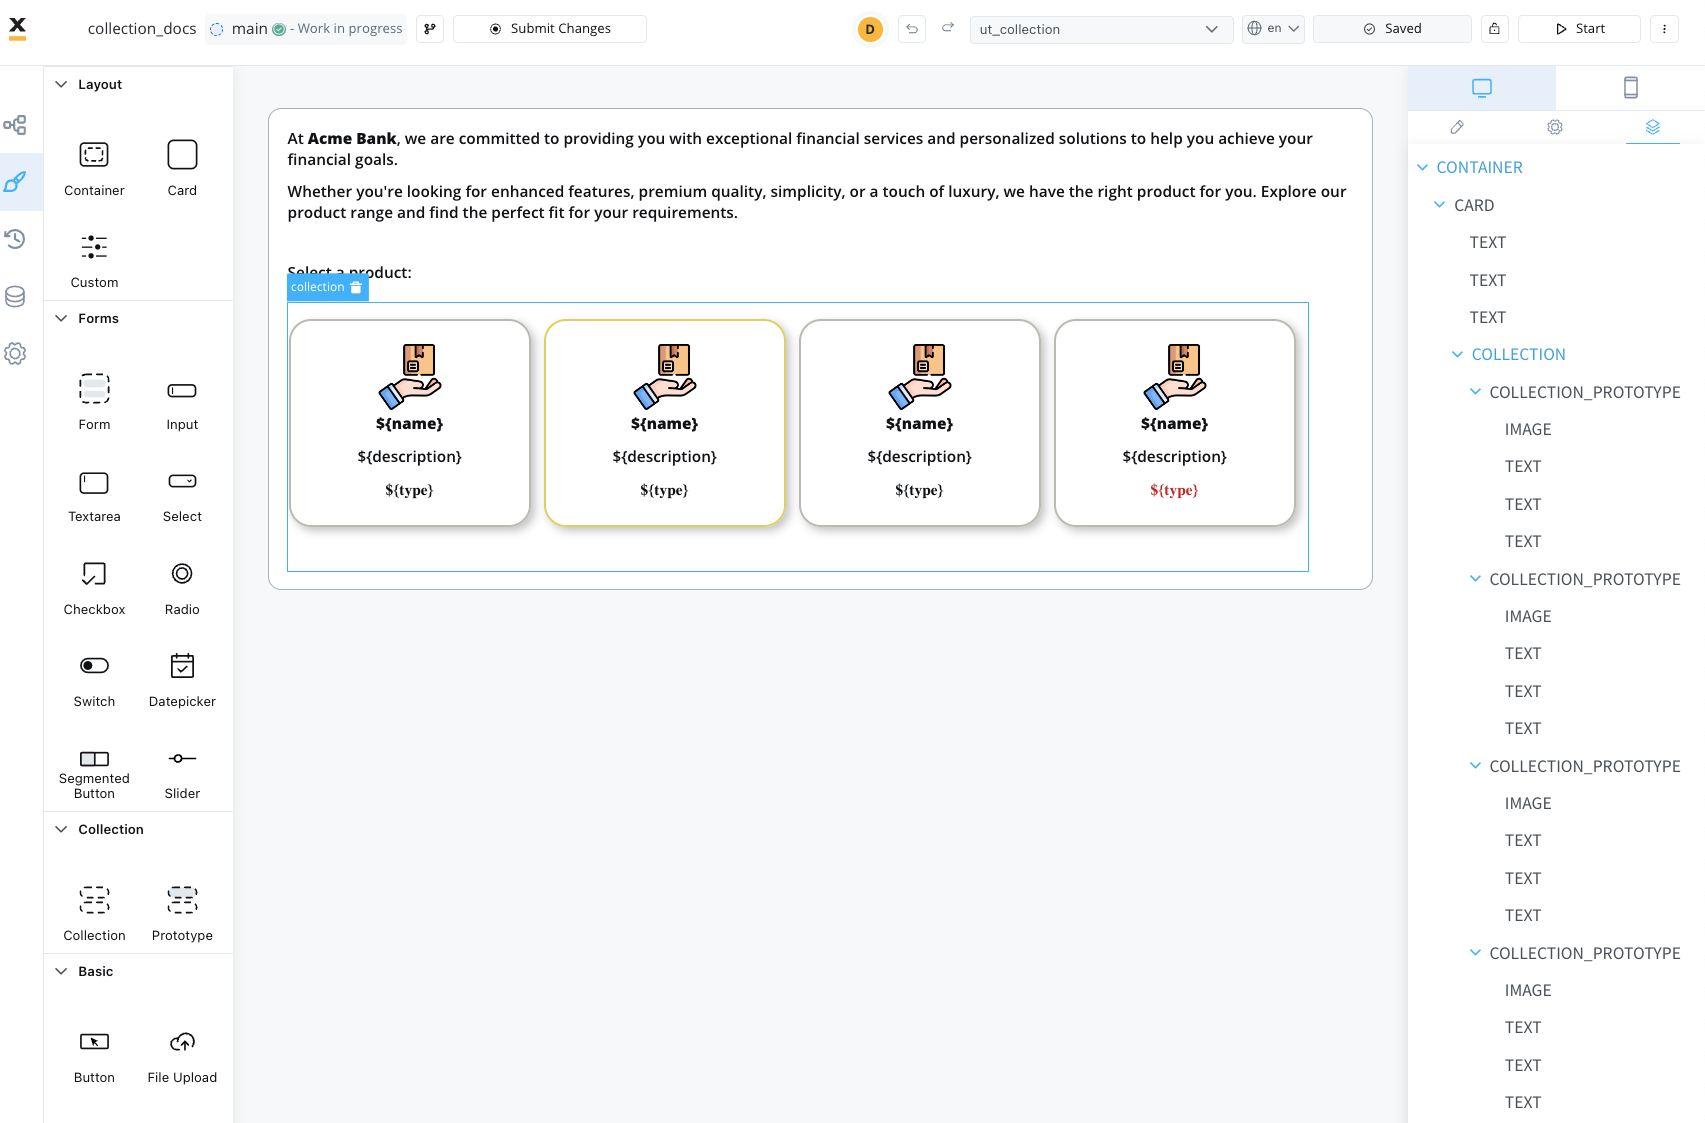
**When do you need Collection Prototypes?**
* **Single layout for all items**: If all items in your collection should display the same way, add one Collection Prototype and leave PIK/PIV empty
* **Multiple layouts based on item properties**: If items should display differently based on their data (like the `type` field in the example above), add multiple Collection Prototypes with PIK/PIV configured
For detailed configuration guidance, see the Collection Prototype documentation:
***
## Forms in collections
Forms in Collections is a feature that enables you to create dynamic, repeatable forms within collection prototypes. This eliminates the need for custom development when building forms with repeatable sections like adding multiple co-debtors or comment entries.
### Overview
Forms in Collections addresses common pain points in form design:
* **Dynamic Forms**: No longer need custom development to support dynamic forms that show different form elements based on certain conditions
* **Repeatable Sections**: Create forms with repeatable sections like adding co-debtors, comments, or any list of similar items
* **Flexible Validation**: Support both individual item validation and bulk validation scenarios
The feature allows you to drag Form components directly into Collection Prototypes, where they automatically repeat for each item in your data array.

Collection source rules remain the same as regular collections. Each key in collection prototypes uses a prefix computed from the collection source and the index of the object being displayed. At runtime, keys are constructed with the full object path (e.g., `application.clients[0].name`).
### How it works
When you add forms to a collection prototype:
1. **Data Structure**: Your process data contains an array of objects (e.g., `application.clients`)
2. **UI Configuration**: Collection component points to your array, and Form components are placed inside Collection Prototypes
3. **Key Generation**: Form field keys are automatically prefixed with the collection path and item index
4. **Runtime Behavior**: Each collection item gets its own form instance with properly scoped keys
### Implementation guide
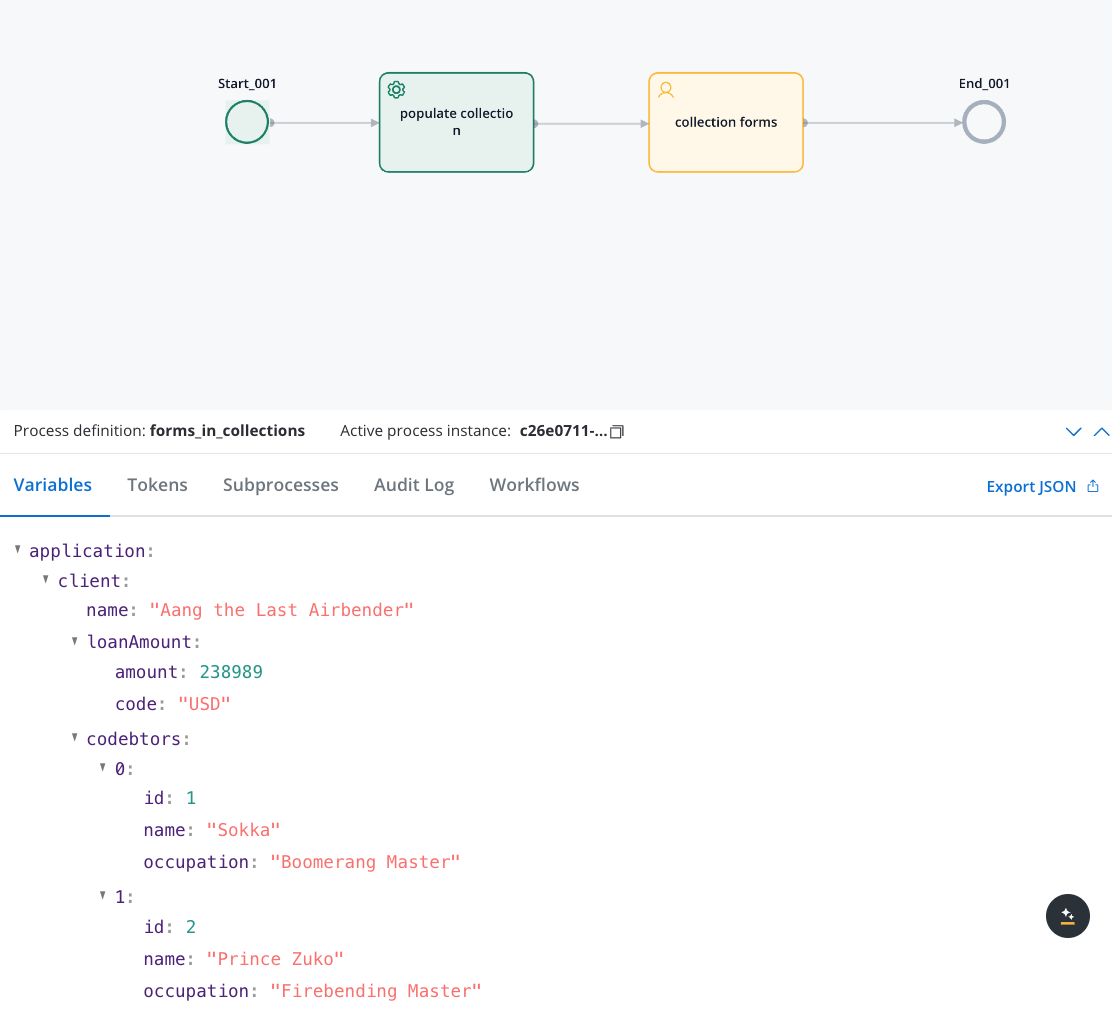
Set up your process data with an array to hold the repeatable items:
```javascript theme={"system"}
// Define an object named 'application' to store client information
var application = {
client: {
// Store the client's name
name: "Aang the Last Airbender",
// Store the loan amount details
loanAmount: {
amount: 238989, // The loan amount
code: "USD" // The currency code for the loan amount
},
// List of codebtors associated with the loan
codebtors: [
{
// First codebtor's name and occupation
id: 1,
name: "Sokka",
occupation: "Boomerang Master"
},
{
// Second codebtor's name and occupation
id: 2,
name: "Prince Zuko",
occupation: "Firebending Master"
}
]
}
};
// Output the client information from the application object
output.put("application", { "client": application.client });
```
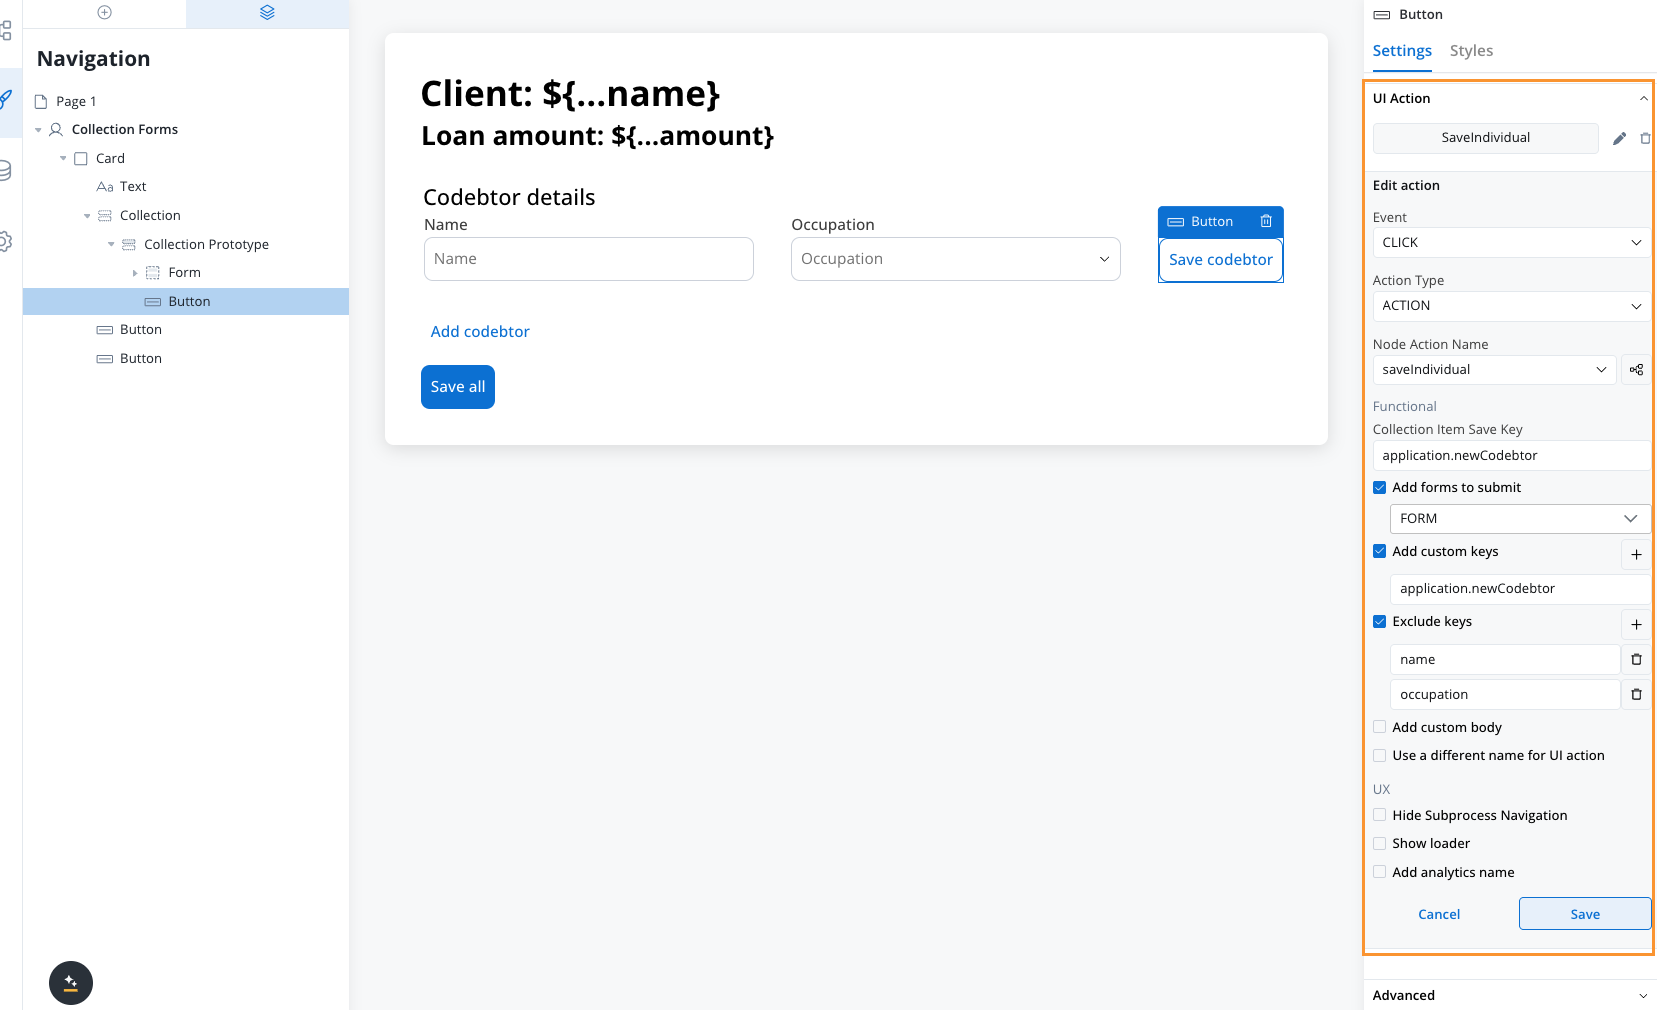
1. In the UI Designer, add a Collection component
2. Set the **Collection Source** to point to your array (e.g., `application.client.codebtors`)
3. The collection will iterate through each item in the array
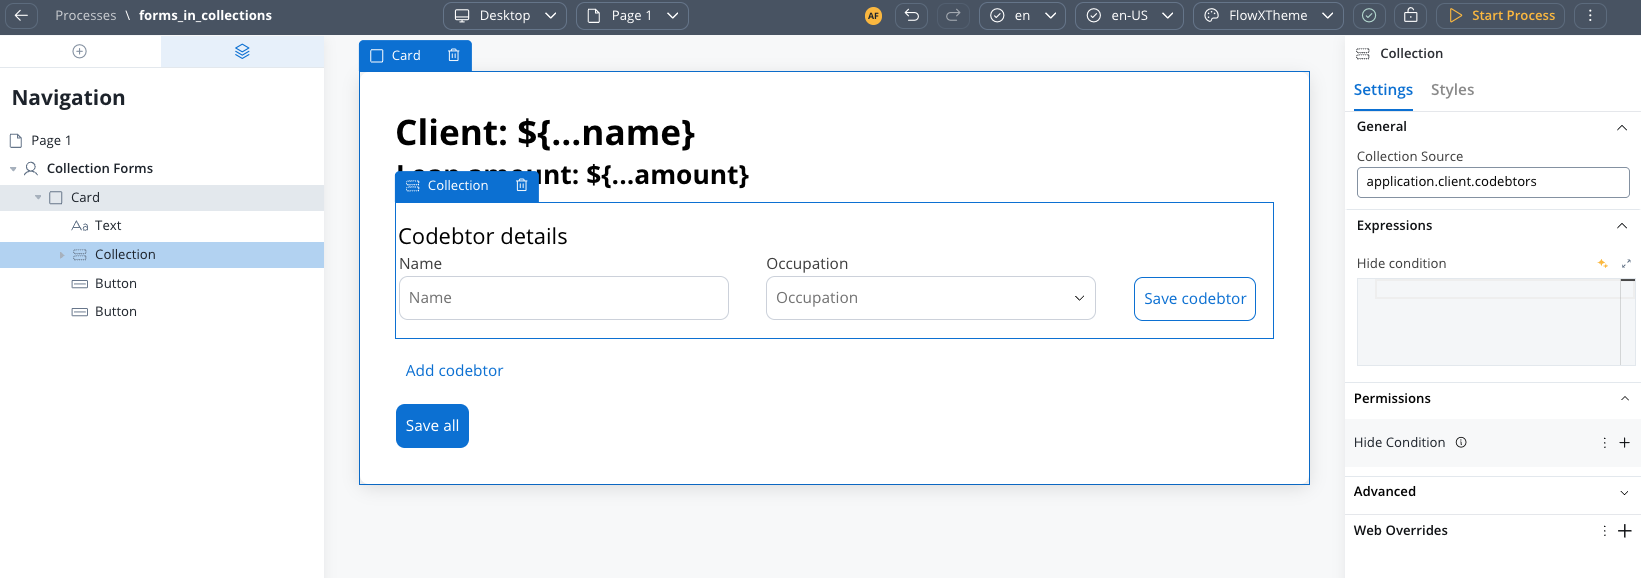
1. Add a **Collection Prototype** as a child of your Collection component
2. Configure prototype identifier. This is the key that will be used to identify the prototype.
3. **Drag Form components directly into the Collection Prototype**
4. Configure form fields with relative keys (e.g., `name`, `email`)
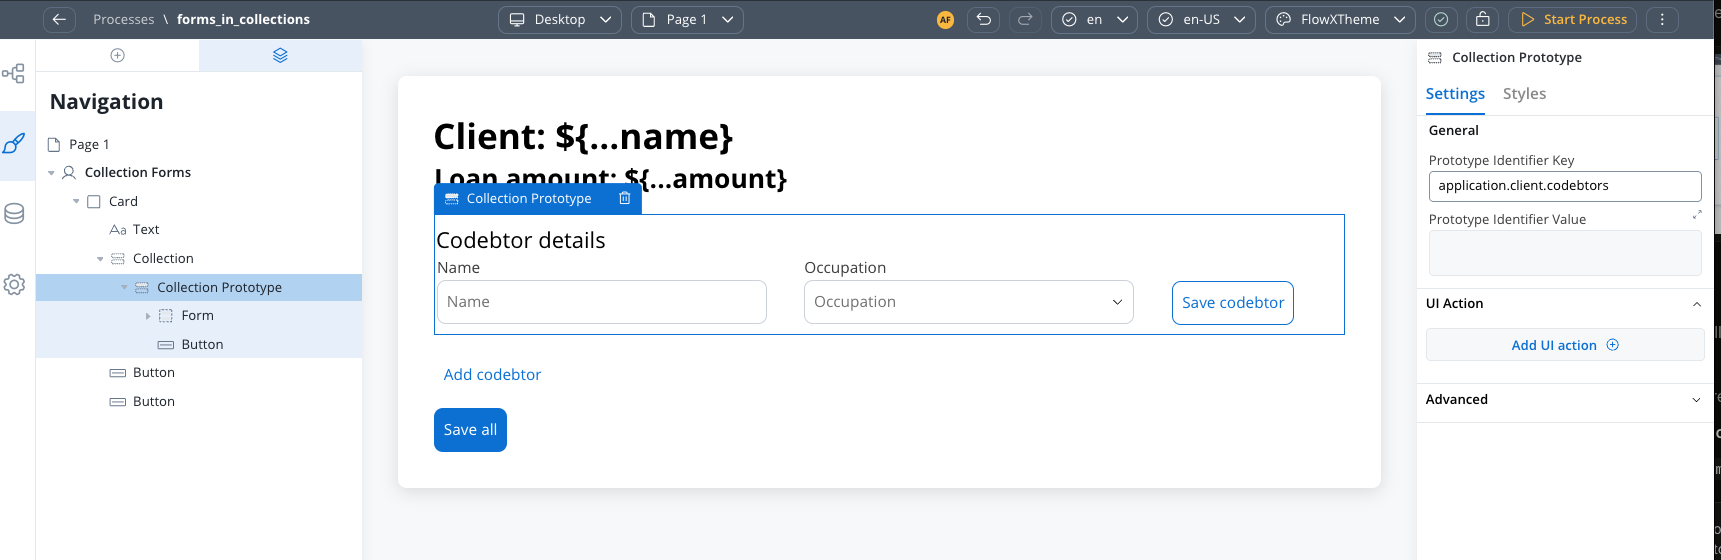
This is the key innovation: you can now place Form components directly inside Collection Prototypes, and they will automatically repeat for each collection item.
Configure each form field using relative paths to the collection item data:
* Use keys like `name`, `email`, `type` (not full paths)
* The system automatically constructs the full path at runtime
* Example: `name` becomes `application.client.codebtors[0].name` for the first item
### Saving scenarios
Forms in Collections supports two distinct saving approaches, each suited for different use cases:
**When to use**: Save one collection item at a time, with validation only for that specific item.
**Configuration**:
* Place your Save button **inside the Collection Prototype**
* Configure a **Collection Item Save Key** on the event handler
* The edited object will be saved to this key
* Add a business rule to update the original array and send it back to the frontend
**Behavior**:
* Validates only the forms for the specific collection index where the action is triggered
* Saves individual items as they are edited
* Requires business rule to sync changes back to the main array
You must configure a business rule to update the original array after individual saves to maintain data consistency.
#### Business rule Examples
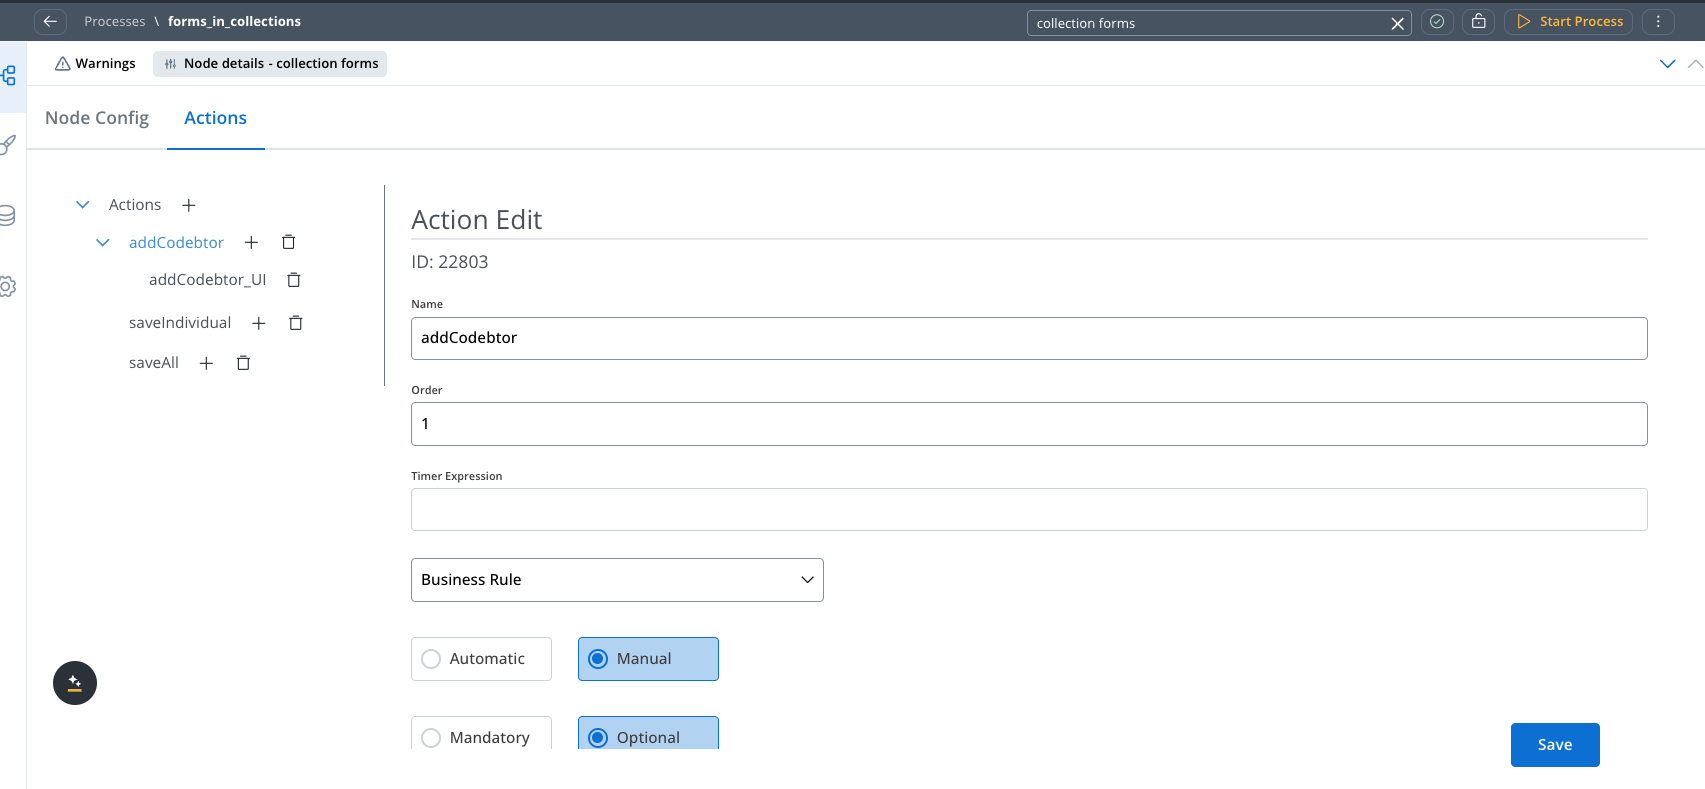
```javascript theme={"system"}
// This business rule is adapted to the runtime requirements of the FlowX.AI engine.
// ARGS
var application = null;
var client = null;
if (input["application"] != null) {
application = input["application"];
}
if (application != null && application["client"] != null) {
client = application["client"];
}
// Business Rule Code
if (client != null) {
if (!Array.isArray(client["codebtors"])) {
client["codebtors"] = [];
}
var newCodebtor = {"name": ""};
newCodebtor["id"] = client["codebtors"].length + 1;
client["codebtors"].push(newCodebtor);
}
// OUTPUT
if (client != null) {
output["application"] = { "client": client };
} else {
output["error"] = {
"type": "MISSING_FIELD",
"message": "Client is missing"
};
}
```
```javascript theme={"system"}
{ "application": ${application}}
```
**When to use**: Save all collection items at once with validation for all forms.
**Configuration**:
* Place your Save button **outside the Collection** (not in the prototype)
* Configure a **Custom Key** on the event handler to save the entire array
* All forms in the collection will be validated simultaneously
**Behavior**:
* Validates all forms across all collection prototype items
* Saves the entire modified array in one operation
* No additional business rules needed for array synchronization
```javascript theme={"system"}
// Bulk save configuration
{
"customKey": "updatedClients",
"formsToSubmit": ["clientForm"]
}
```
Bulk save is simpler to implement as it doesn't require additional business rules to maintain array consistency.
Demo:
### Key formation and validation
Understanding how keys work in Forms in Collections is crucial for proper configuration:
#### Runtime key construction
Keys are automatically constructed using the full object path:
```javascript Original Key theme={"system"}
// In your form field configuration
"name"
```
```javascript Runtime Key theme={"system"}
// What the system generates at runtime
"application.clients[0].name" // For first item
"application.clients[1].name" // For second item
```
#### Validation behavior
When using **Scenario 1** (action inside prototype):
* Only validates forms for the specific collection index
* Example: If action is triggered on item 2, only `clients[1]` forms are validated
* Other items in the collection are ignored during validation
When using **Scenario 2** (action outside collection):
* Validates all forms across all collection items
* All items must pass validation for the save to succeed
* Comprehensive validation ensures data integrity across the entire collection
### Configuration examples
#### Individual save example
```javascript Event handler configuration theme={"system"}
{
"event": "CLICK",
"actionType": "SAVE_DATA",
"nodeActionName": "saveClient",
"collectionItemSaveKey": "currentClient",
"formsToSubmit": ["clientDetailsForm"],
"excludeKeys": ["temporaryData"]
}
```
#### Bulk save example
```javascript Event handler configuration theme={"system"}
{
"event": "CLICK",
"actionType": "SAVE_DATA",
"nodeActionName": "saveAllClients",
"customKeys": ["allClients"],
"formsToSubmit": ["clientDetailsForm"]
}
```
### Troubleshooting
**Symptoms**: Validation errors not showing or validation not working as expected
**Solutions**:
* Ensure `formsToSubmit` includes the correct form identifiers
* Check that form fields have proper relative keys configured
* Verify the event handler is placed in the correct location (inside or outside prototype)
* For individual saves, confirm the Collection Item Save Key is configured
**Symptoms**: Form data not persisting or appearing in wrong location
**Solutions**:
* For individual saves: Ensure business rule updates the original array
* For bulk saves: Verify Custom Key configuration captures the full array
* Check key formation by examining the process data structure
* Confirm the Collection Source points to the correct array
**Limitation**: Form elements within collections cannot be hidden based on variables outside the collection
**Workaround**: Use keys from within the collection item object for conditional display. The mechanics of collections require using data from within the current collection item scope.
### Frequently asked questions
No, the mechanics of collections require using keys from within the collection item object. You cannot use variables outside the collection scope to control form element visibility within the collection.
You can configure **Exclude Keys** in the event handler to handle null values. This prevents null or empty values from being included in the saved data.
Keys are constructed with the full object path including array indices. For example, a field with key `name` becomes `application.clients[0].name` for the first collection item.
* **Individual Save (Scenario 1)**: Yes, you need a business rule to update the original array
* **Bulk Save (Scenario 2)**: No, the entire array is saved directly without additional business rules
### Best practices
Use Individual Save for real-time editing where users work on one item at a time. Use Bulk Save for form-completion workflows where all data is submitted together.
Use descriptive, relative keys in your form fields. Let the system handle path construction automatically for better maintainability.
Plan your validation approach early. Individual saves validate per item, bulk saves validate everything - choose based on your user experience goals.
Design your array structure to include all necessary fields from the start. Adding fields later may require updates to existing prototypes.
This feature significantly simplifies building dynamic forms with repeatable sections, eliminating the need for custom development while providing flexible validation and saving options.
***
## Common patterns
### Delete an item from a collection
Collections do not have a built-in delete mechanism. To remove an item, use a business rule triggered from within the collection prototype.
Place a button inside your Collection Prototype. Add an event handler with:
* **Event:** `CLICK`
* **Action Type:** `ACTION`
* **Node Action Name:** your delete business rule
* **Collection Item Save Key:** a temporary key (e.g., `itemToDelete`) — this saves the clicked item's data so the business rule knows which item to remove
Add a **manual, optional, repeatable** business rule on the User Task node.
**Delete by matching an attribute** (when items have no unique ID):
```javascript theme={"system"}
var clients = input.application.clients || [];
var itemToDelete = input.itemToDelete;
if (itemToDelete != null) {
for (var i = 0; i < clients.length; i++) {
if (clients[i].name === itemToDelete.name
&& clients[i].email === itemToDelete.email) {
clients.splice(i, 1);
break;
}
}
}
output.application = { "clients": clients };
```
**Delete by ID** (when items have a unique identifier):
```javascript theme={"system"}
var clients = input.application.clients || [];
var itemToDelete = input.itemToDelete;
var updated = clients.filter(function(item) {
return item.id !== itemToDelete.id;
});
output.application = { "clients": updated };
```
Add a **Send Data to User Interface** action to push the modified array back:
```json theme={"system"}
{
"application": ${application}
}
```
Always send the updated array back to the frontend after deletion. Without this step, the UI will still display the deleted item until the next page refresh.
***
### Add an item to a collection dynamically
To let users add new entries to a collection (e.g., an "Add" button), create a business rule that appends a new object to the source array.
```javascript theme={"system"}
var clients = input.application.clients || [];
var newClient = {
"id": clients.length + 1,
"name": "",
"email": ""
};
clients.push(newClient);
output.application = { "clients": clients };
```
Place the "Add" button **outside** the collection, and attach an event handler (type `ACTION`) pointing to this business rule. Then send the data back to the UI with a **Send Data to User Interface** action.
***
### Filter a collection using form controls
Collections do not have built-in filtering. To filter displayed items based on form selections, use the same pattern as [Table cross-component filtering](../table#filter-table-data-using-form-controls):
1. Keep the **original data** in one key (e.g., `application.clients`)
2. Store the **displayed data** in a separate key (e.g., `displayed.clients`)
3. Point the Collection's **Source** to the displayed key
4. On each filter dropdown's `CHANGE` event, trigger a business rule that filters the original data and writes the result to the displayed key
```javascript theme={"system"}
var allClients = input.application.clients || [];
var selectedStatus = input.filter.status;
var filtered = allClients.filter(function(item) {
if (selectedStatus && item.status !== selectedStatus) return false;
return true;
});
output.displayed = { "clients": filtered };
```
For simple client-side transformations (no server roundtrip needed), you can also use [Event Handlers](../../event-handlers) with an `onChange` expression instead of a business rule.
***
## Academy courses
Hands-on course covering collection configuration, service tasks, and business rules with collections
Learn to configure dynamic dropdowns and data-driven UI from process data
**Academy playground** — explore the [**Academy\_DynamicDataHandling**](https://designer-workshop-51x.playground.flowxai.dev/workspace/00000000-0000-0000-0000-000000000001/projects/bef76285-0c3e-4828-ad54-fffbbfcfbacf/config/50c00416-aa85-4264-a909-775ad75fcc30/processes) project for working examples of dynamic data in collections and dropdowns.