> ## Documentation Index
> Fetch the complete documentation index at: https://docs.flowx.ai/llms.txt
> Use this file to discover all available pages before exploring further.
# Configuring an IAM solution (Keycloak)
> This guide provides step-by-step instructions for configuring a minimal Keycloak setup to manage users, roles, and apps efficiently.
This guide walks through configuring a minimal Keycloak setup to efficiently manage users, roles, and apps. Keycloak is an open-source Identity and Access Management (IAM) solution that secures apps and services with little to no coding.
## Prerequisites
Before you begin, ensure you have the following:
* Keycloak installed
* Administrative access to the Keycloak server
* Basic understanding of IAM concepts
***
Recommended Keycloak version: **22.x**
**Note for Keycloak 26+**: If using Keycloak version 26 or above, additional email configuration is required in the realm settings to prevent bad request errors when creating users. See the realm configuration section for details.
## Recommended Keycloak setup
To configure a minimal required Keycloak setup, this guide covers the following steps:
Define available roles and realm-level roles assigned to new users.
Configure the client authentication, valid redirect URIs, and enable the necessary flows.
Set up **admin**, **task management**, **process engine**, **scheduler**, **integration designer**, **runtime manager**, **organization manager**, **email gateway**, and **license** service accounts.
Before starting, if you need further information or a broader understanding of Keycloak, refer to the official Keycloak documentation:
***
## Creating a new realm
**Fresh 5.7.0+ installations:** If you are deploying FlowX for the first time, the guided setup flow (via the Organization Manager) creates both the user realm and the service accounts realm automatically. You only need to follow this section if you are configuring Keycloak manually, or if you need to customize realm settings beyond the defaults.
**Upgrading from 5.1.x:** Your existing "flowx" realm is renamed automatically by Liquibase migrations. You do not need to create a new realm, but you should review the [Realm architecture](#realm-architecture) section to understand the changes.
A realm is a space where you manage objects, including users, apps, roles, and groups. Creating a new realm is the first step in setting up Keycloak manually. Follow the steps below to create a new realm in Keycloak:
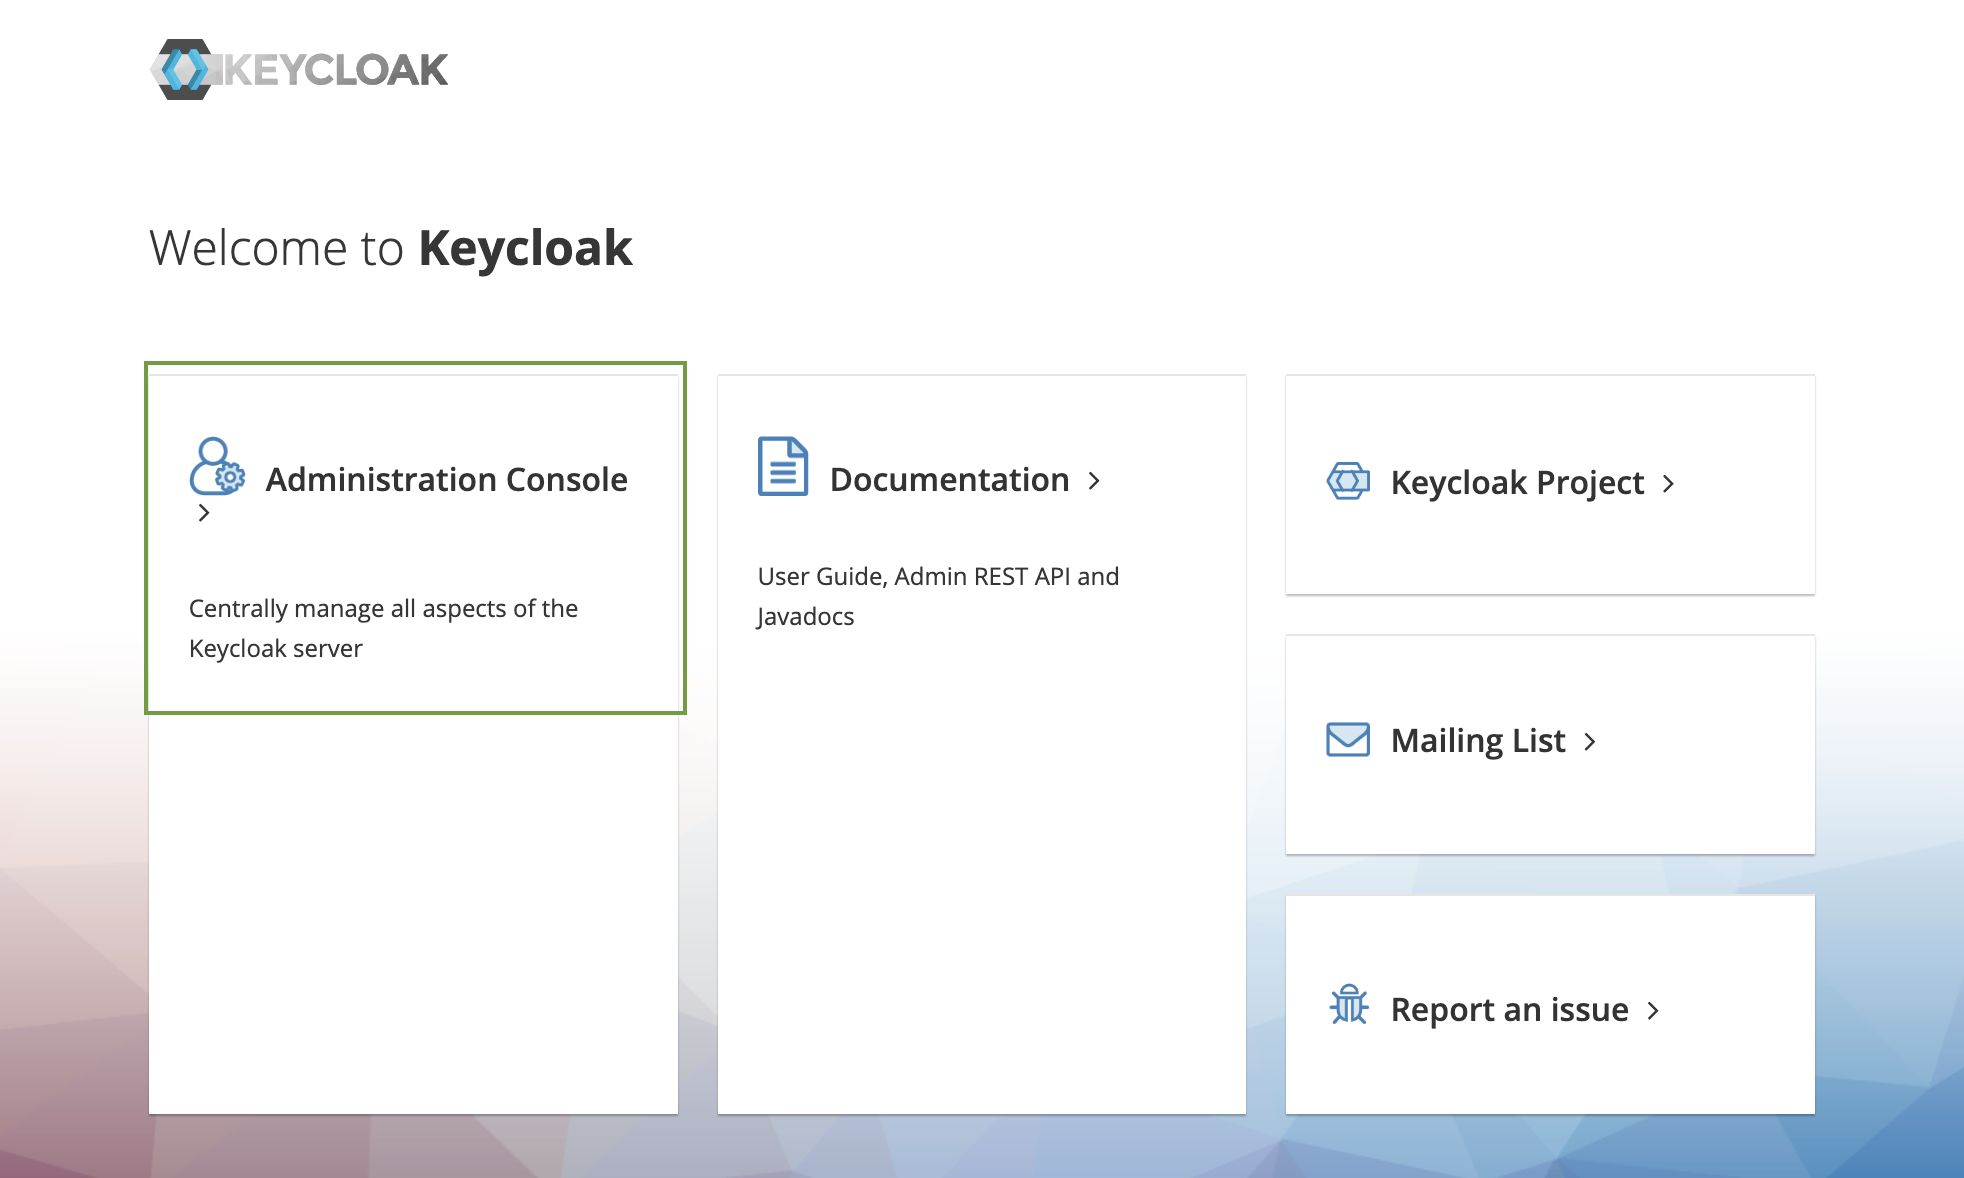
Log in to the Keycloak Admin Console using the appropriate URL for your environment (e.g., QA, development, production).
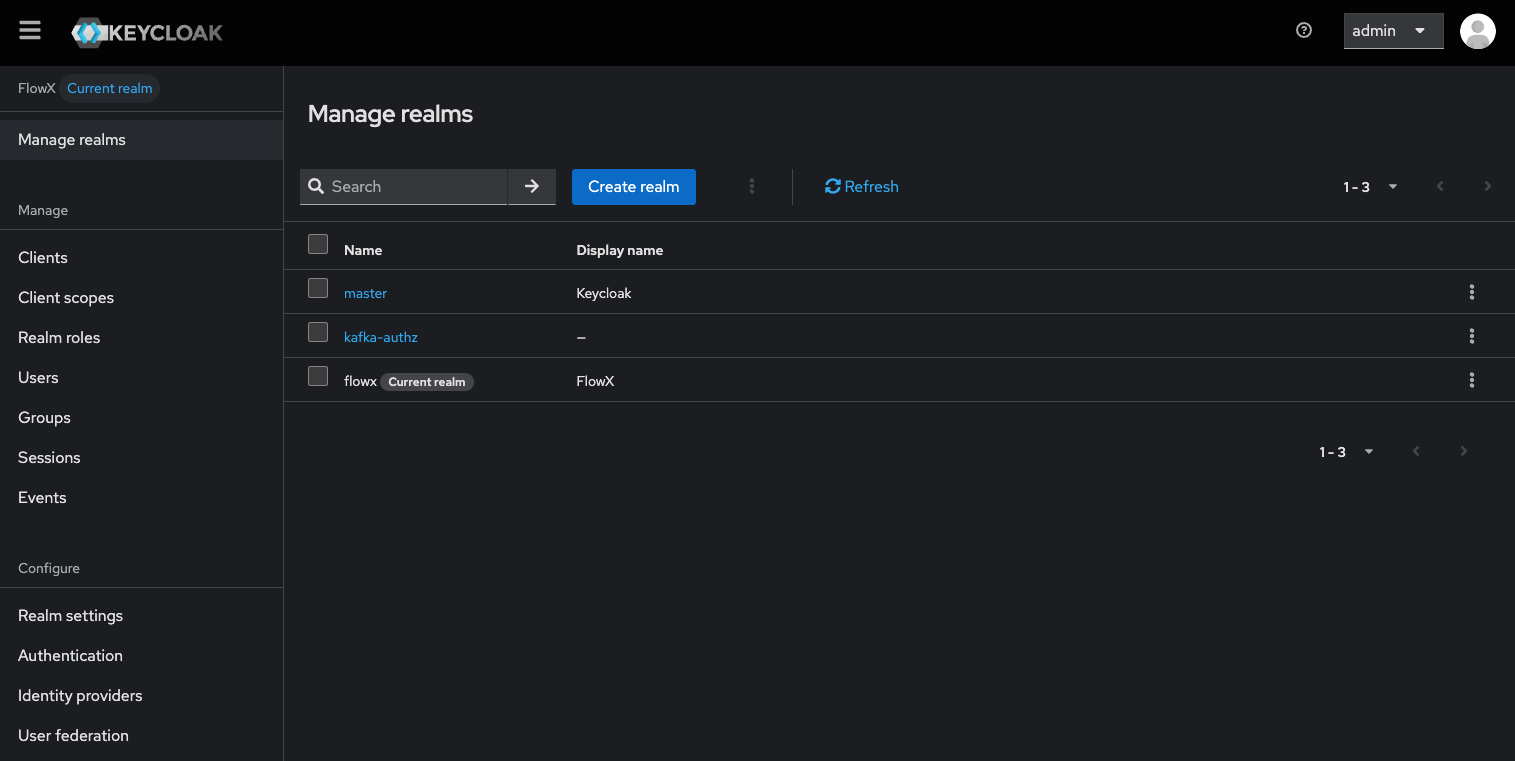
In the top left corner dropdown menu, click **Manage realms** then click **Create realm**.
If you are logged in to the master realm, this dropdown menu lists all the realms created.
Enter a realm name and click **Create**.
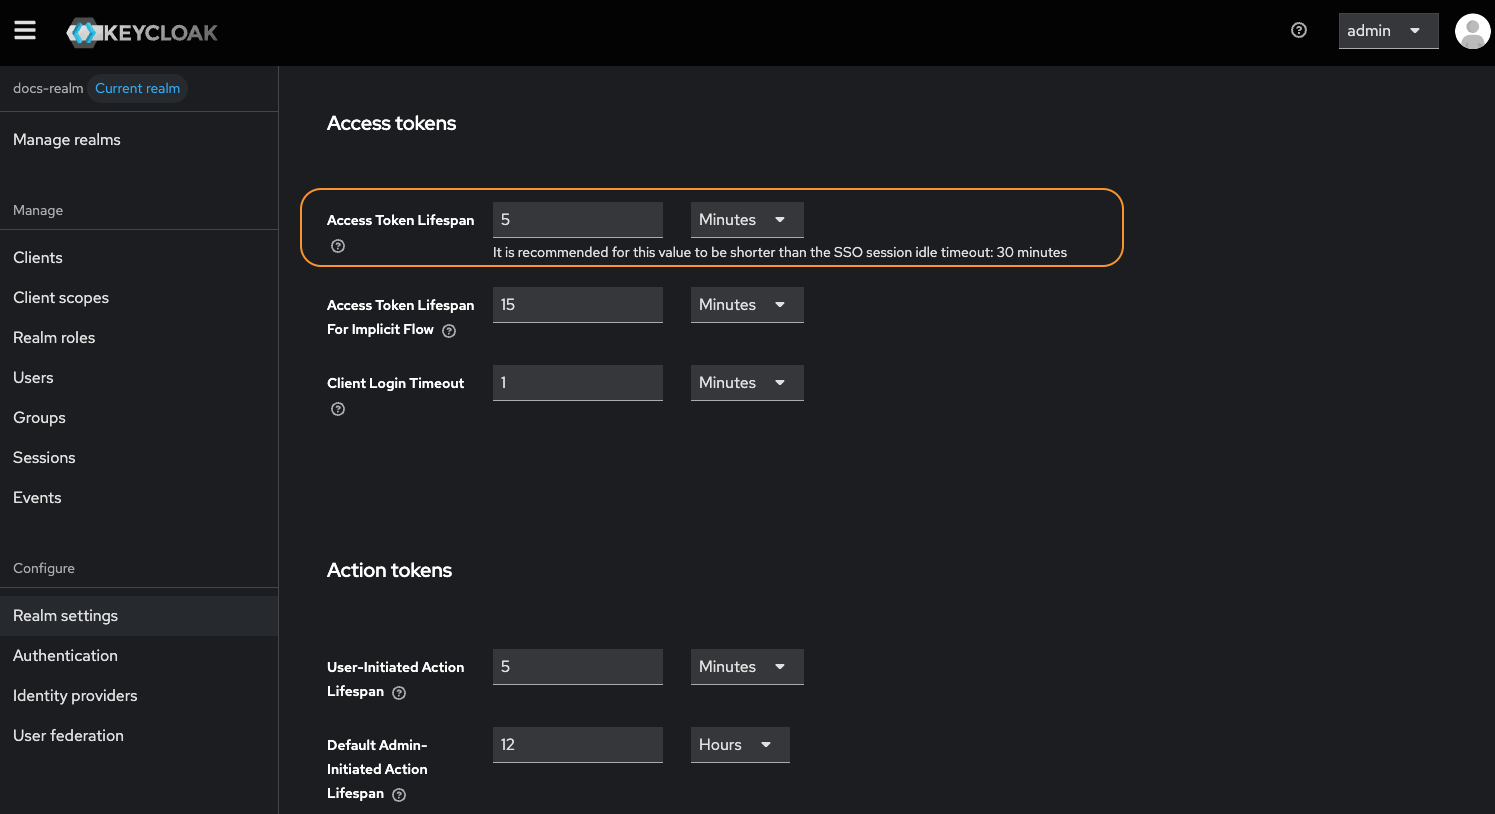
**Tokens** → **Access Token Lifespan**: Set to **30 Minutes** (recommended).
**Login** → **Email settings**: Configure email authentication settings.
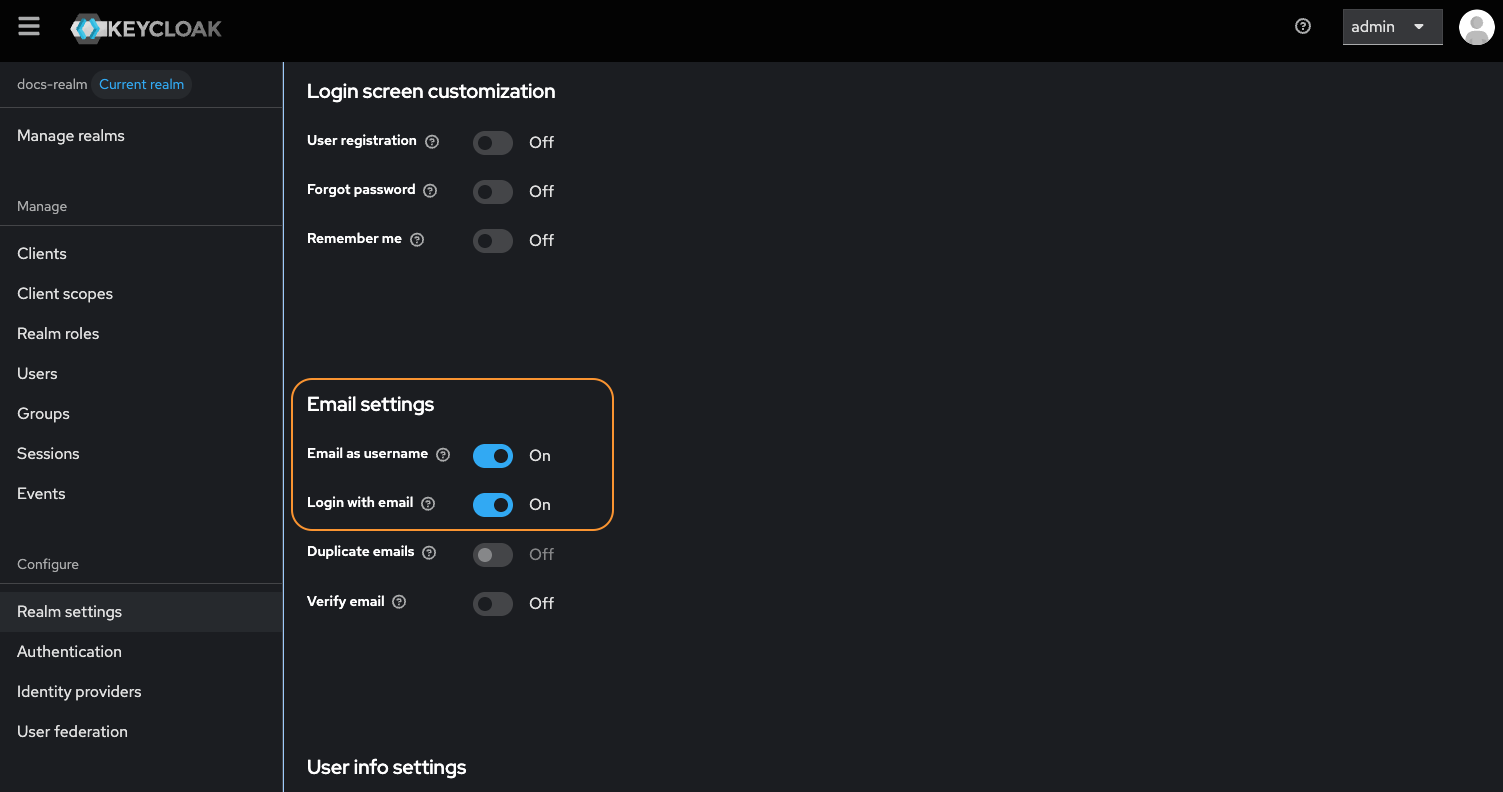
**For Keycloak versions 26 and above**: You must configure the email settings in the **Login** tab to avoid bad request errors when creating users in FlowX Designer. Make sure to enable **Email as username** and **Login with email** toggles as shown in the realm settings.
Verify your realm is created correctly: navigate to the realm selector dropdown in Keycloak and confirm your new realm appears in the list.
***
## Creating new users
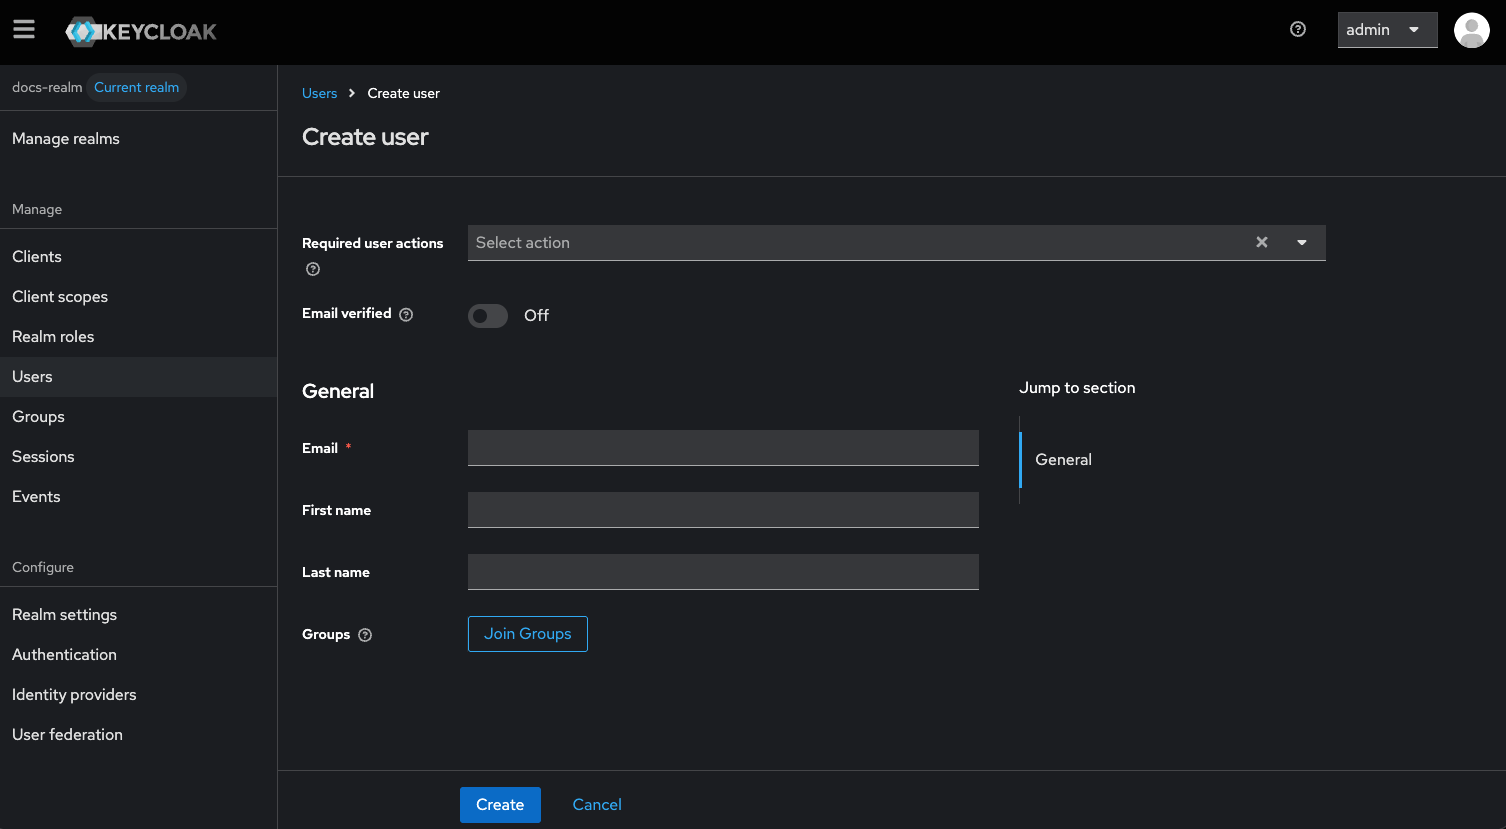
Creating new users is a fundamental part of managing access within Keycloak. Follow these steps to create a new user in a realm and generate a temporary password:
In the left menu bar, click **Users** to open the user list page.
Click **Create new user**.
Fill in the user details and set **Email Verified** to **Yes**.
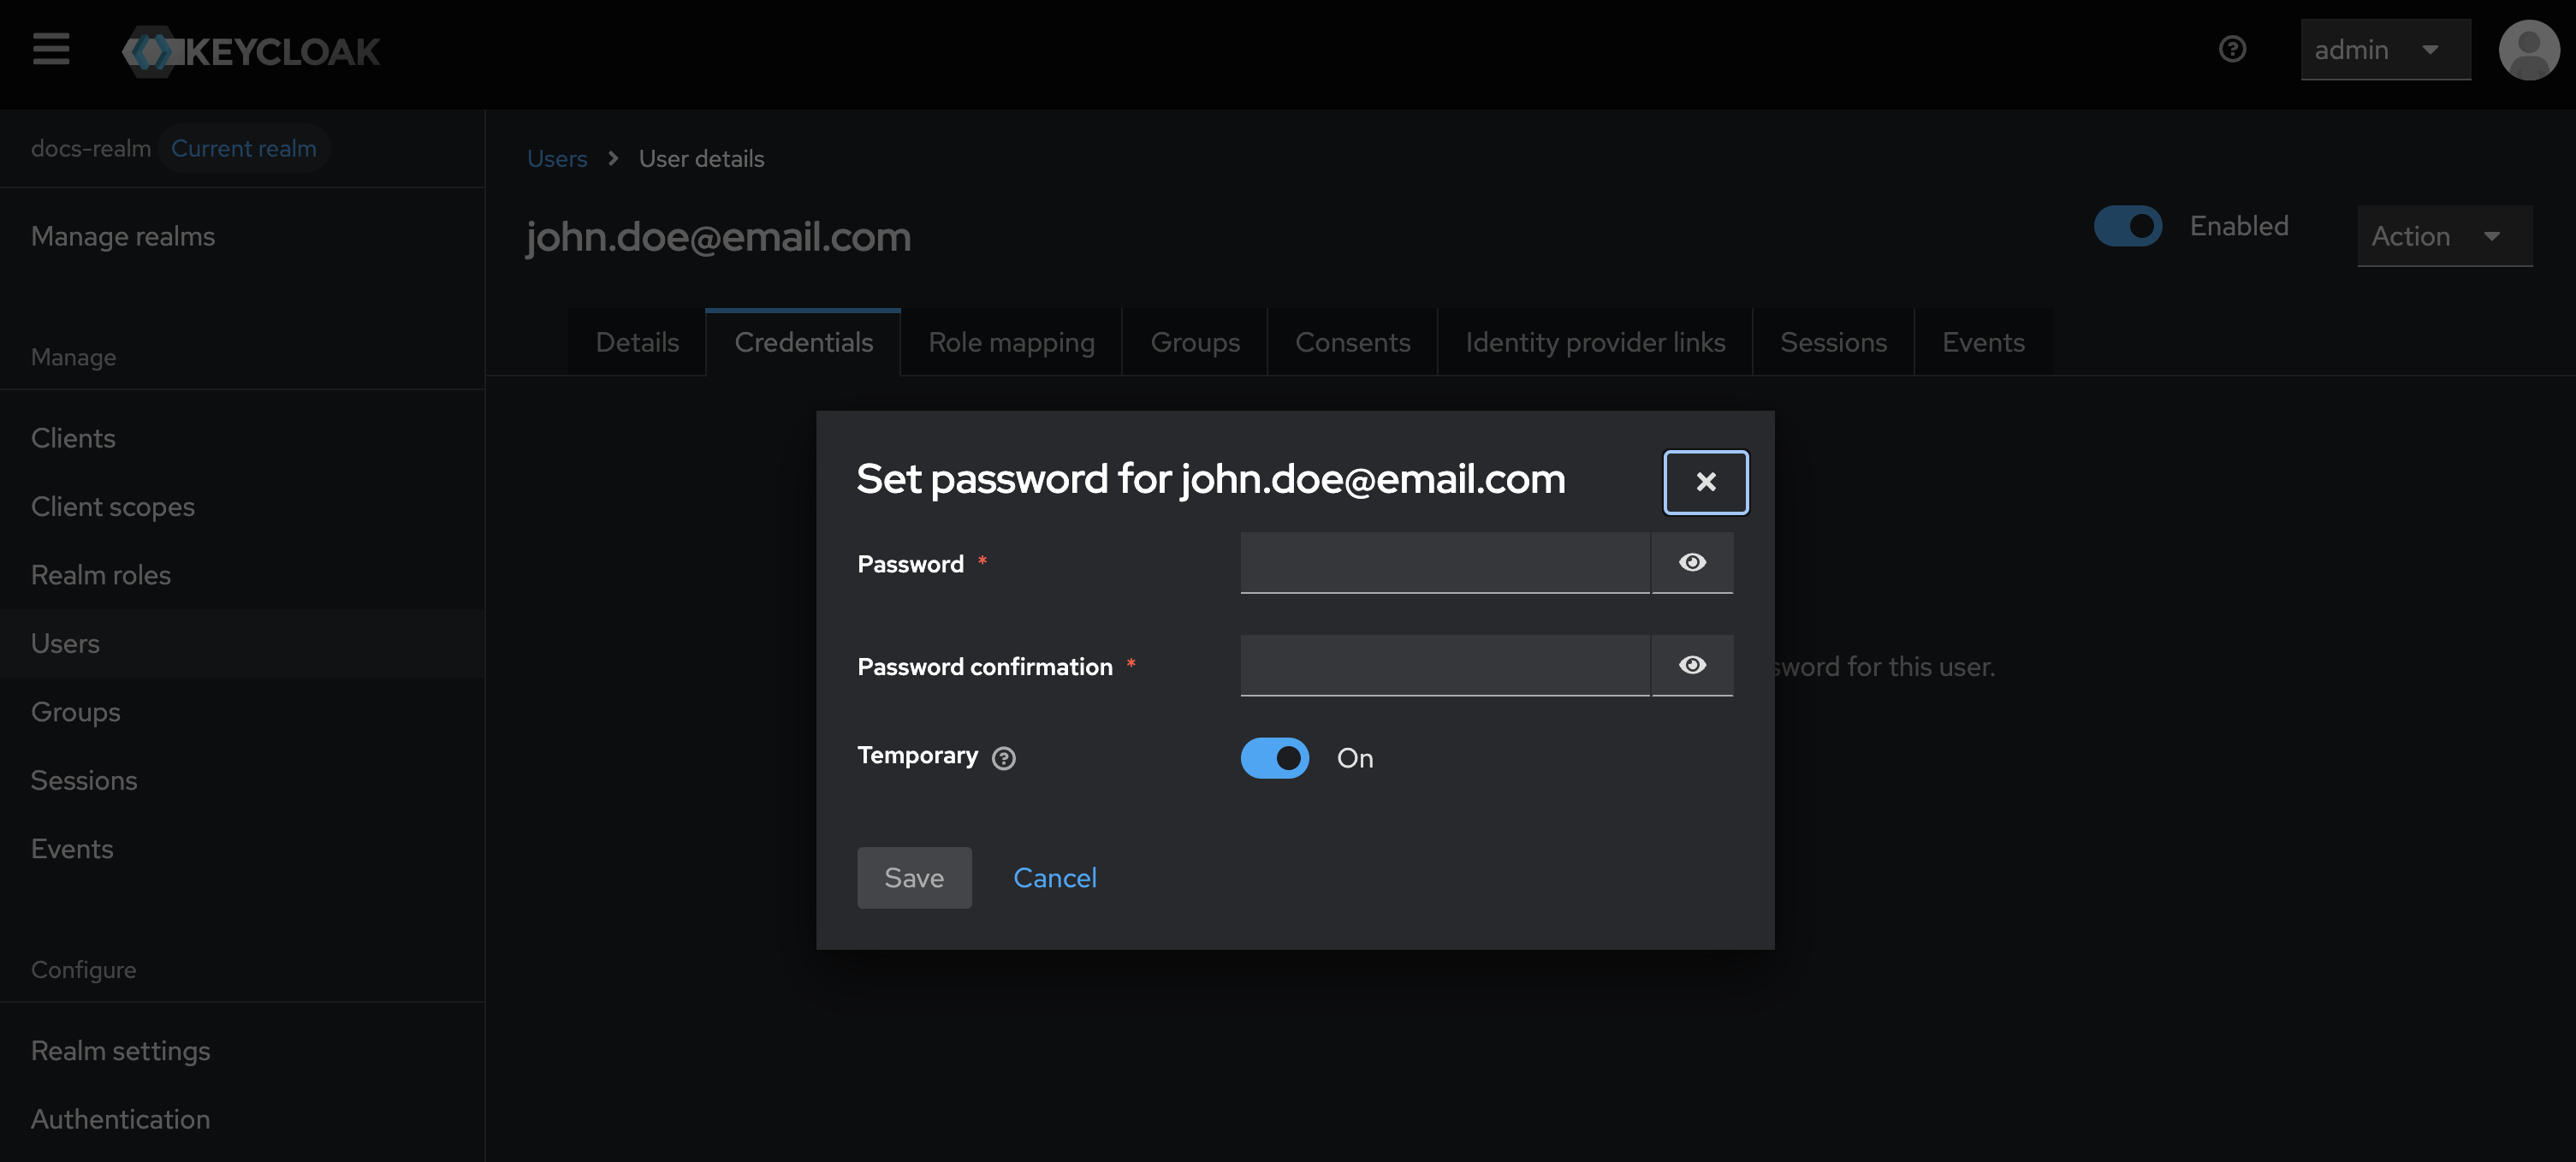
Save the user, go to the **Credentials** tab, and set a temporary password. Ensure the **Temporary** checkbox is checked.
Verify the user is created: navigate to **Users** and confirm the new user appears in the list with **Email Verified** set to **Yes**.
### Password policy
FlowX.AI enforces the following password policy for all user accounts:
| Rule | Requirement |
| ----------------- | ------------------------------------- |
| Minimum length | 8 characters |
| Maximum length | 64 characters |
| Uppercase | At least one uppercase letter |
| Lowercase | At least one lowercase letter |
| Number | At least one digit |
| Special character | At least one of `!@#$%^&*()_+-` |
| Additional | Cannot match the user’s email address |
Configure your Keycloak realm password policy to match these requirements. In Keycloak, go to **Authentication** → **Policies** → **Password Policy** and add the corresponding policy rules.
***
## Adding clients
A client represents an application instance that is associated with a specific realm.
### Adding an OAuth 2.0 client
Add a client named `flowx-platform-authenticate`, used for login, logout, and refresh token operations by web and mobile apps.
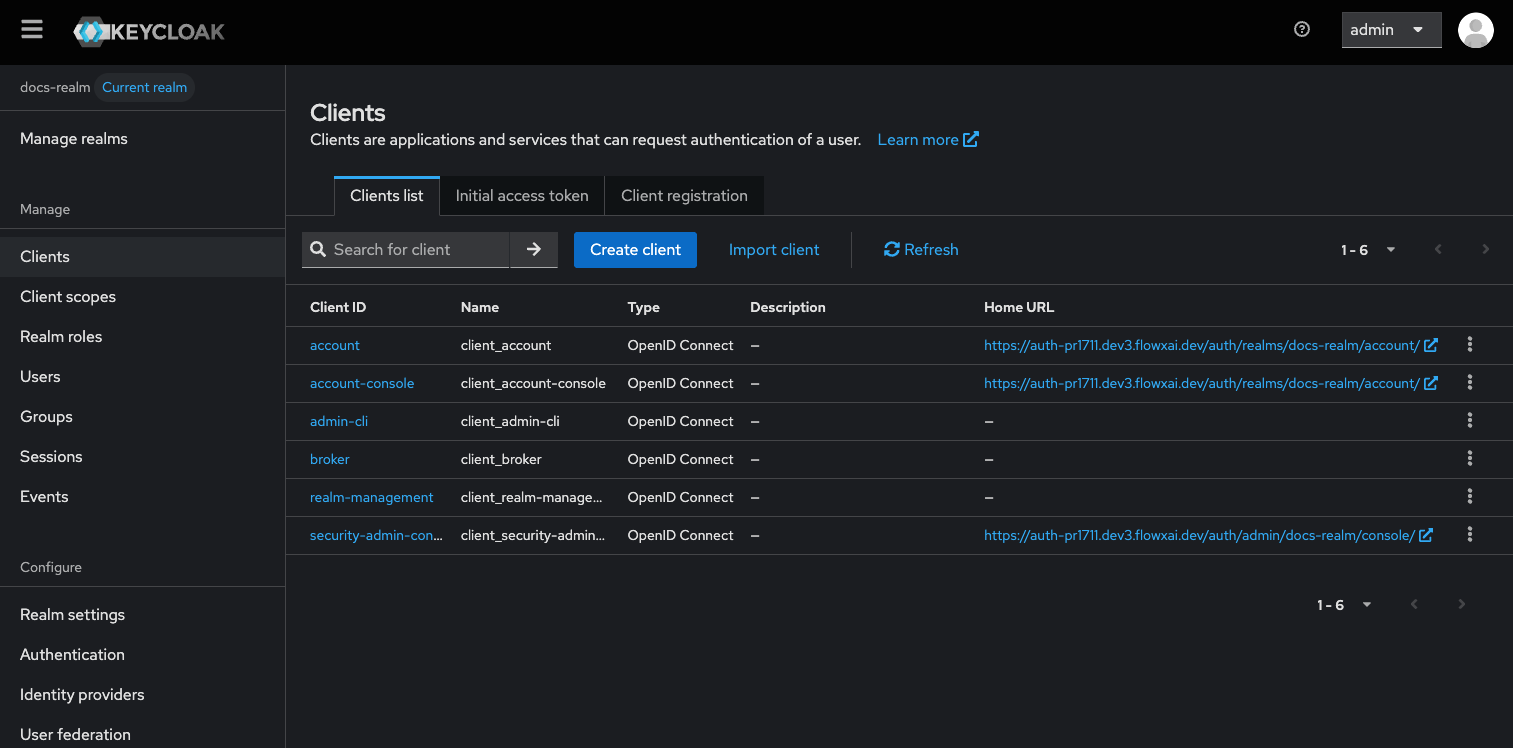
Click **Clients** in the top left menu, then click **Create client**.
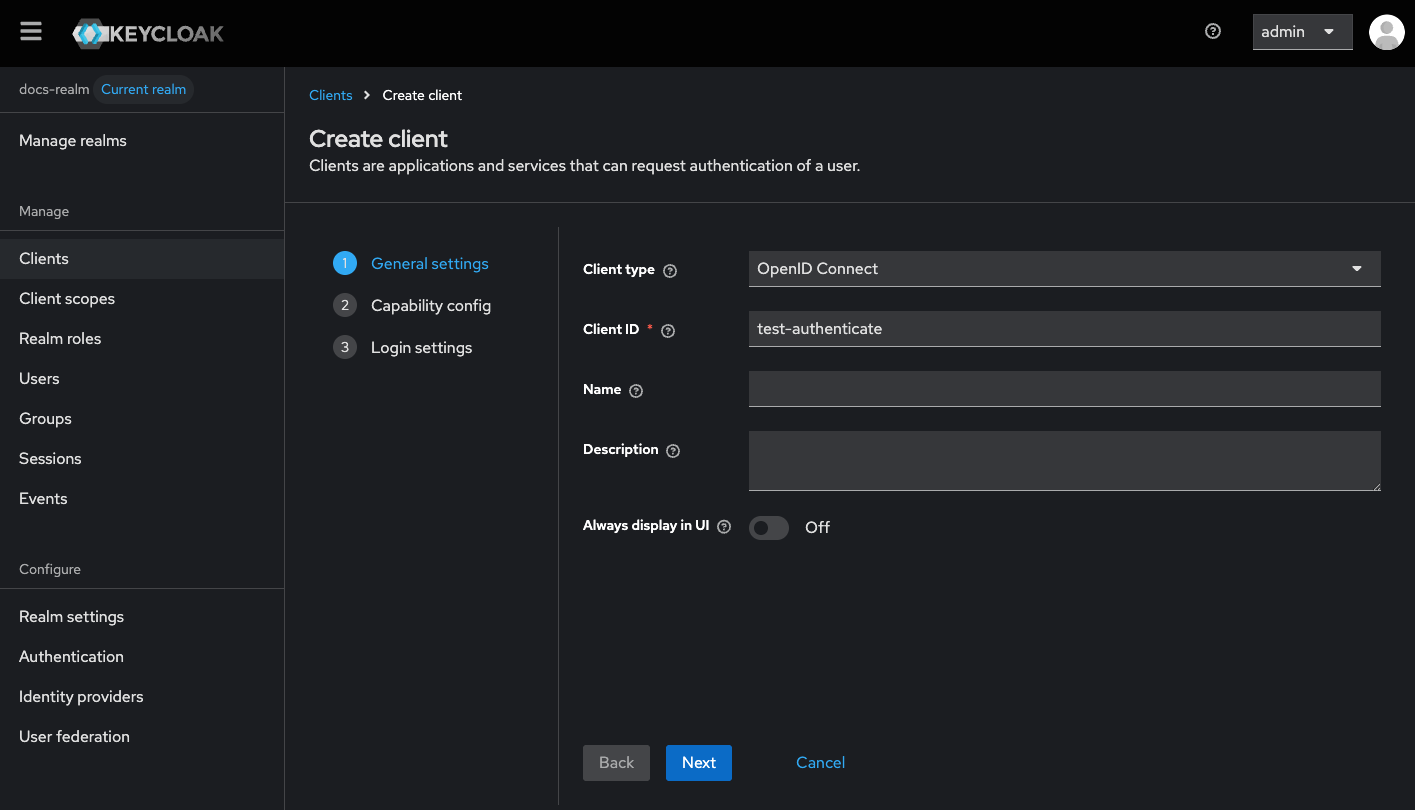
In the **General Settings** tab configure the following properties:
* Set a client ID to `{your-client-name}-authenticate`.
* Set the **Client type** to `OpenID Connect`.
Now click **Next** and configure the **Capability config** details:
* Enable **Direct Access Grants**.
* Enable **Implicit Flow Enabled**.
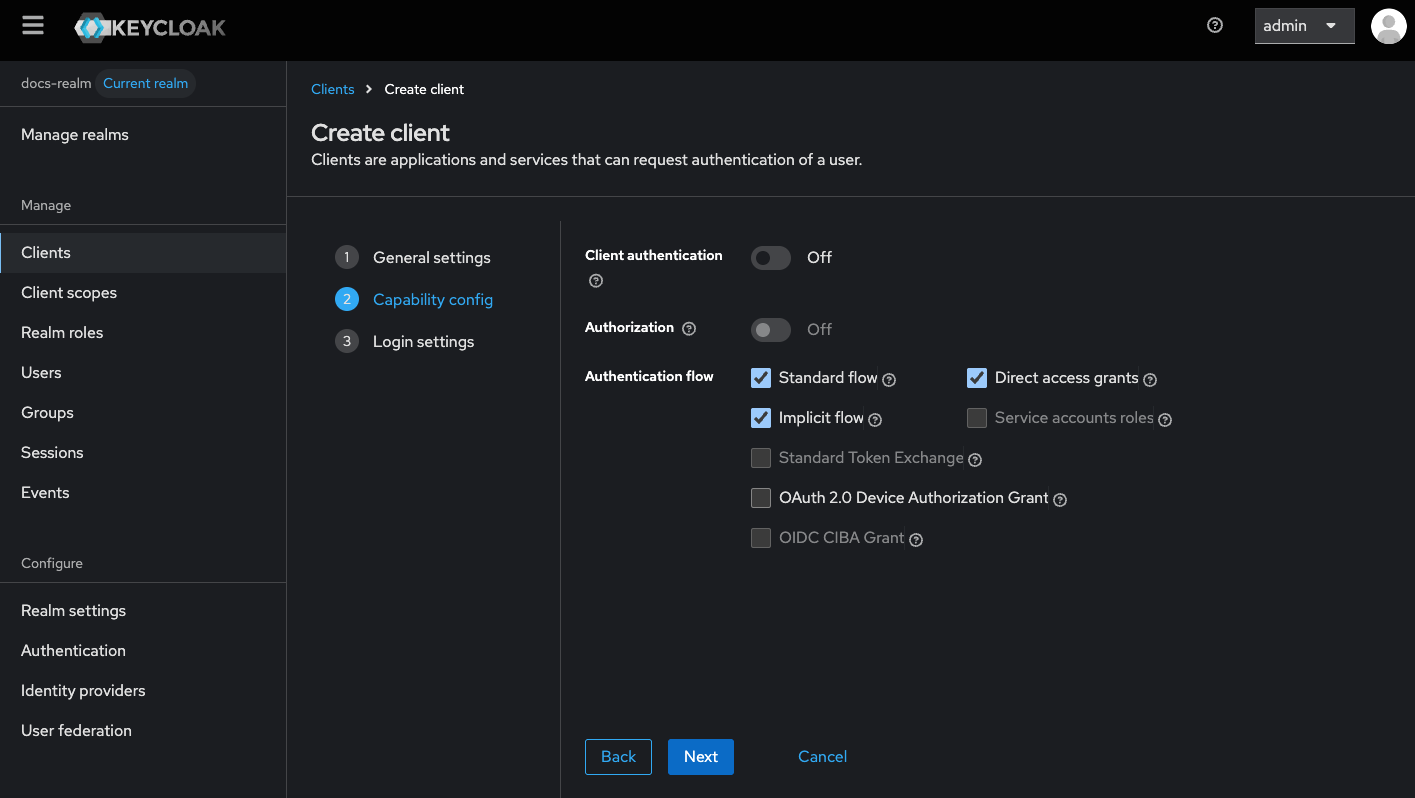
Click **Next** and configure **Login settings**:
* Set **Valid redirect URIs**, specifying a valid URI pattern that a browser can redirect to after a successful login or logout, simple wildcards are allowed.
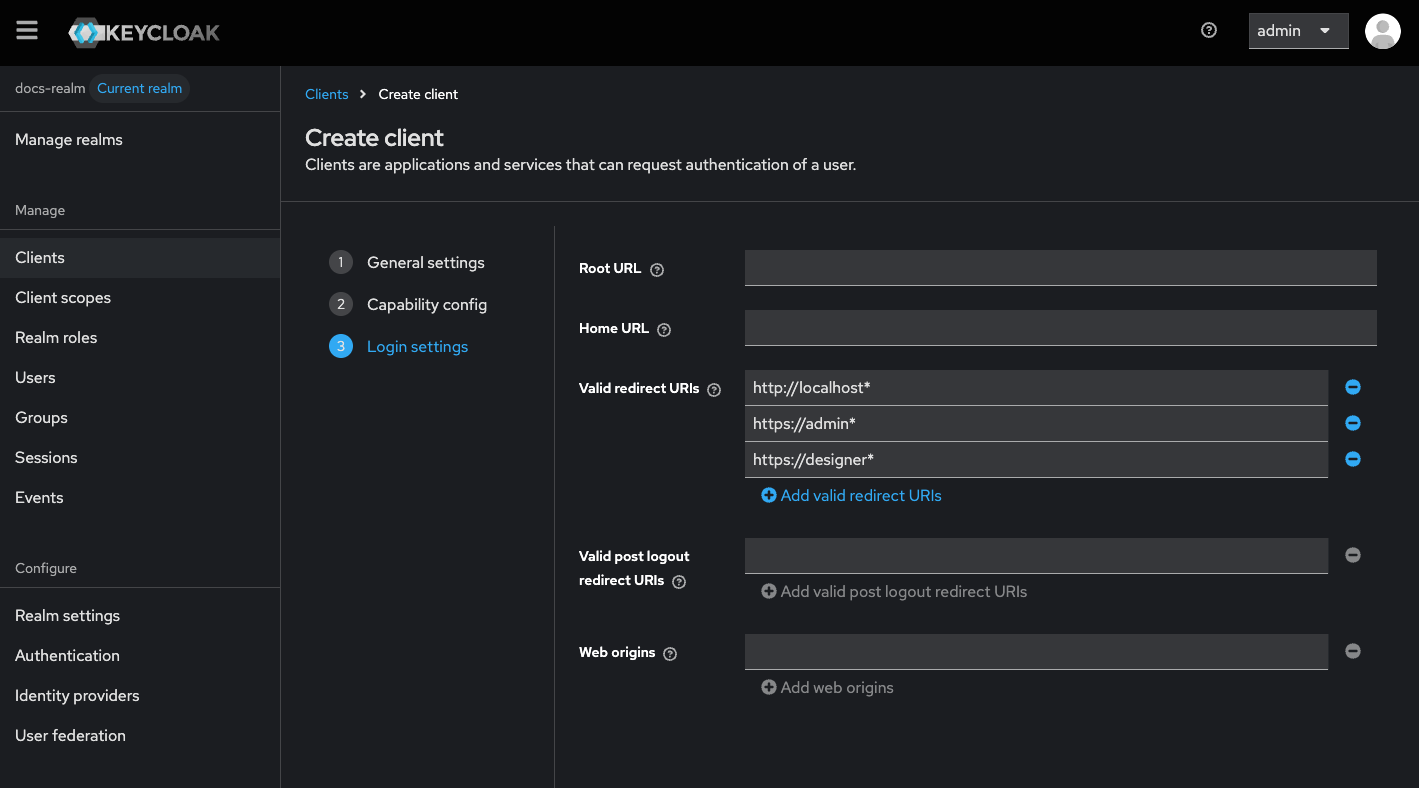
**Self-hosted (5.7.0+):** The Organization Manager can populate Keycloak redirect URIs for you. If you leave `FLOWX_DEFAULT_SECURITY_REALM_ALLOWED_REDIRECT_URIS` empty, the allowed list is derived from `FLOWX_DEFAULT_DESIGNER_HOME_URI` and `FLOWX_DEFAULT_RUNTIME_HOME_URI` with a `/*` suffix. See [Organization Manager setup — Self-hosted URL configuration](/5.1/setup-guides/organization-manager-setup#self-hosted-url-configuration).
After creating the client, scroll down in the **Settings** tab and configure additional settings - **Logout Settings**:
* **Front Channel Logout**: Toggle OFF.
* **Backchannel Logout Session Required**: Toggle OFF.
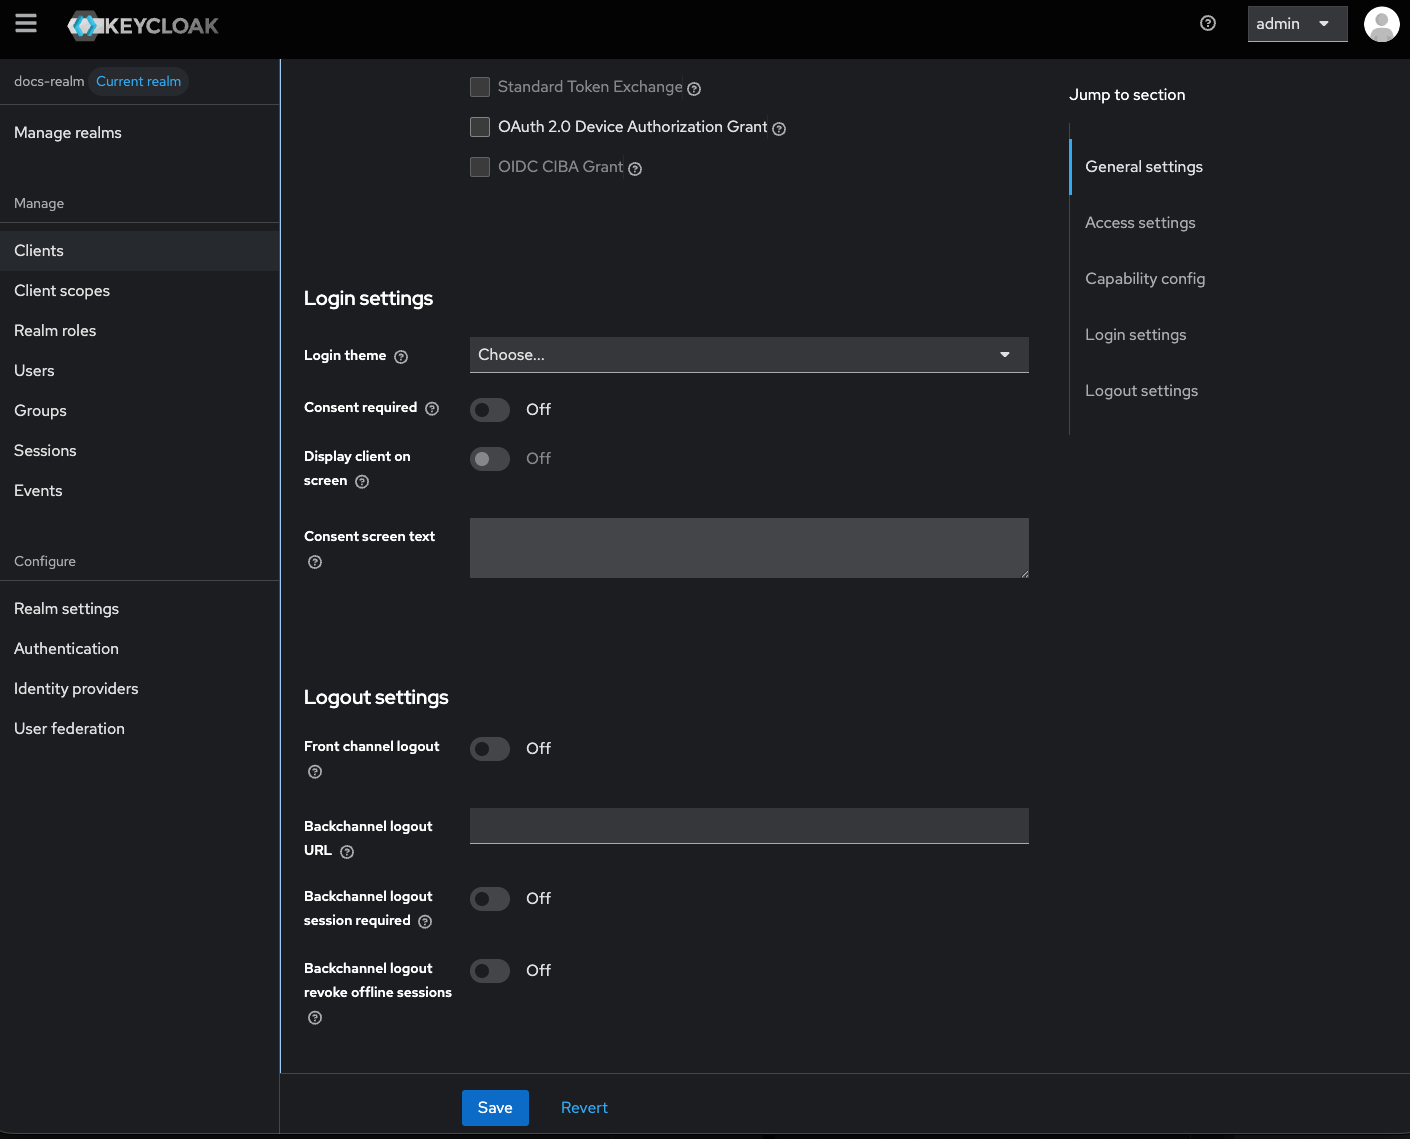
Add **mappers** to `{your-client-name}-authenticate` client.
For instructions on adding mappers and understanding which mappers to add to your clients, refer to the section on [**Adding Protocol Mappers**](#adding-protocol-mappers).
### Adding an Authorizing client
The `flowx-platform-authorize` client is used for opaque token introspection. In 5.1.x, all services validate tokens by calling the Keycloak introspection endpoint using this client's credentials.
**5.5.0 and later**: The `flowx-platform-authorize` client is **no longer required**. Token validation switches from opaque-token introspection to JWT public key validation (`security.type: jwt-public-key`). You can skip this section if you are running FlowX.AI 5.5.0 or later.
Create and configure the `{your-client-name}-platform-authorize` client to authorize REST requests to microservices and Kafka.
Enter the client ID (`{your-client-name}-platform-authorize`).
Set **Client type** to **OpenID Connect**.
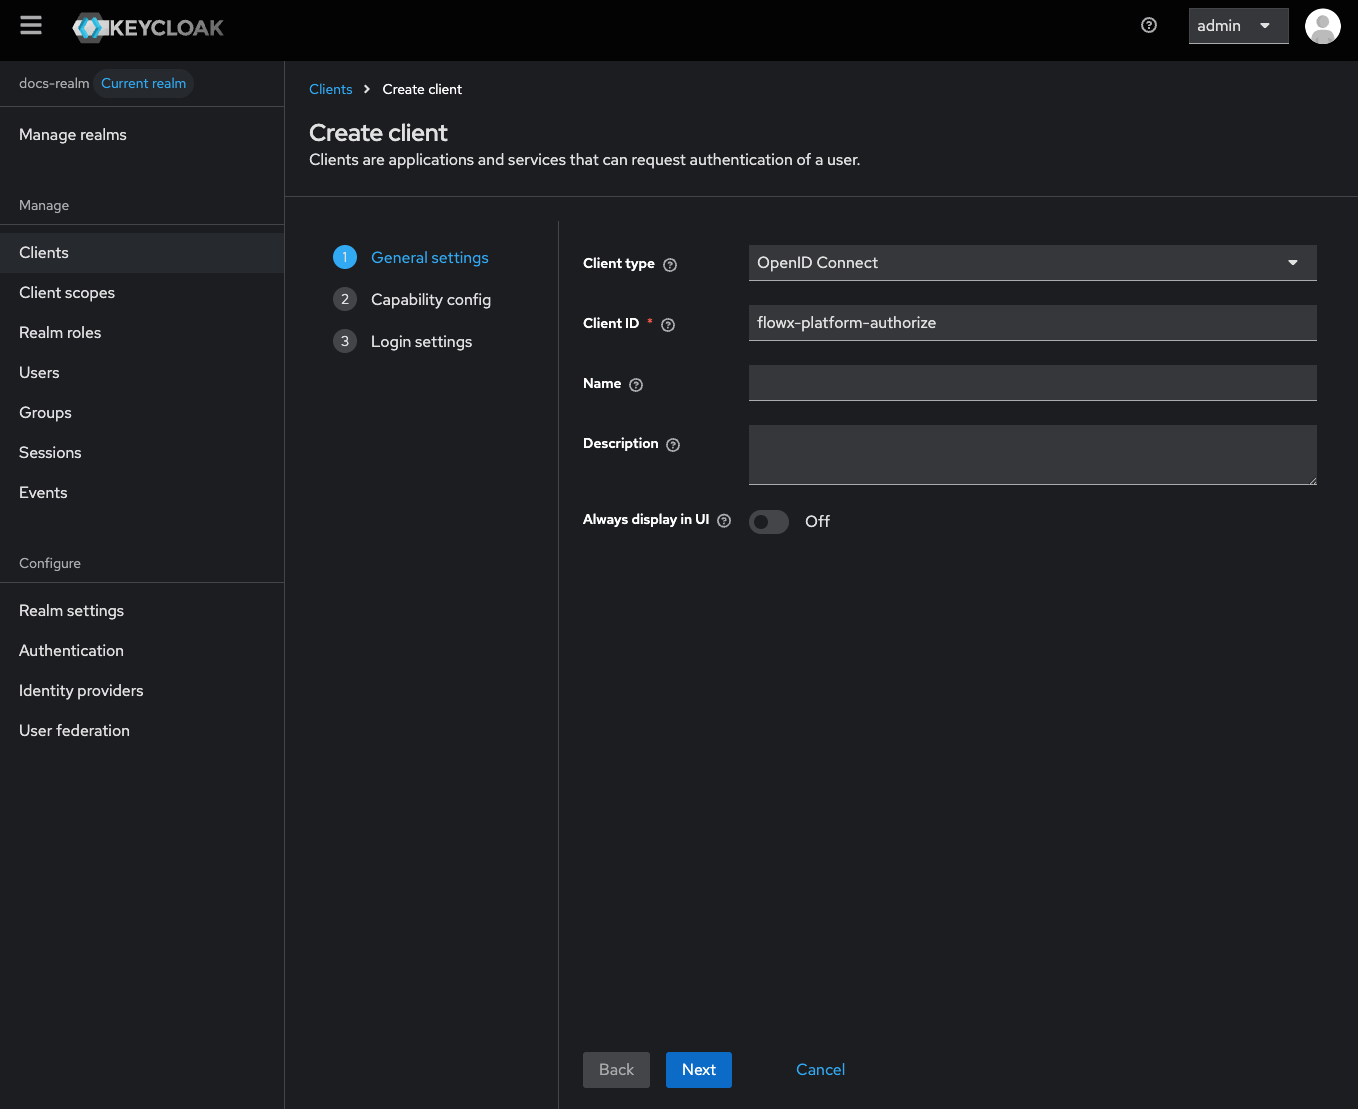
**Client Authentication**: Toggle ON
This setting defines the type of the OIDC client. When enabled, the client type is set to "confidential access." When disabled, it is set to "public access".
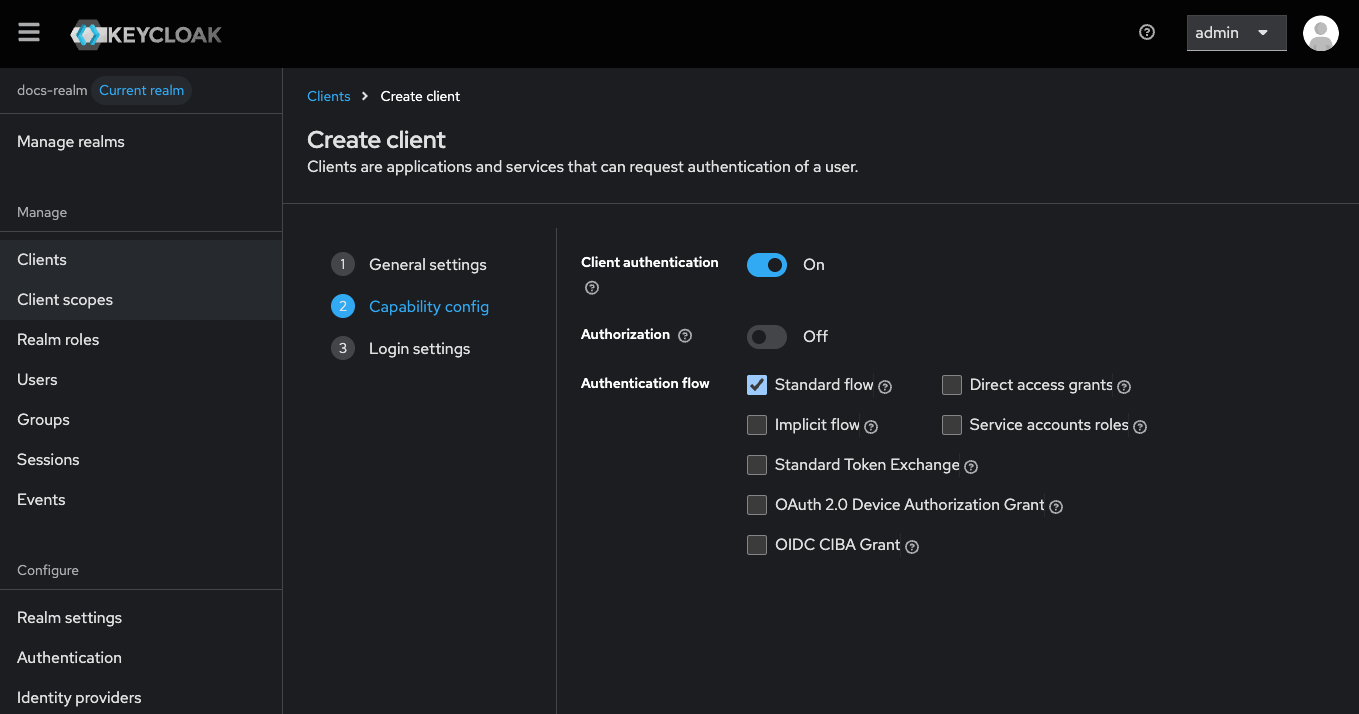
**Valid Redirect URIs**: Populate this field with the appropriate URIs.
Save the configuration.
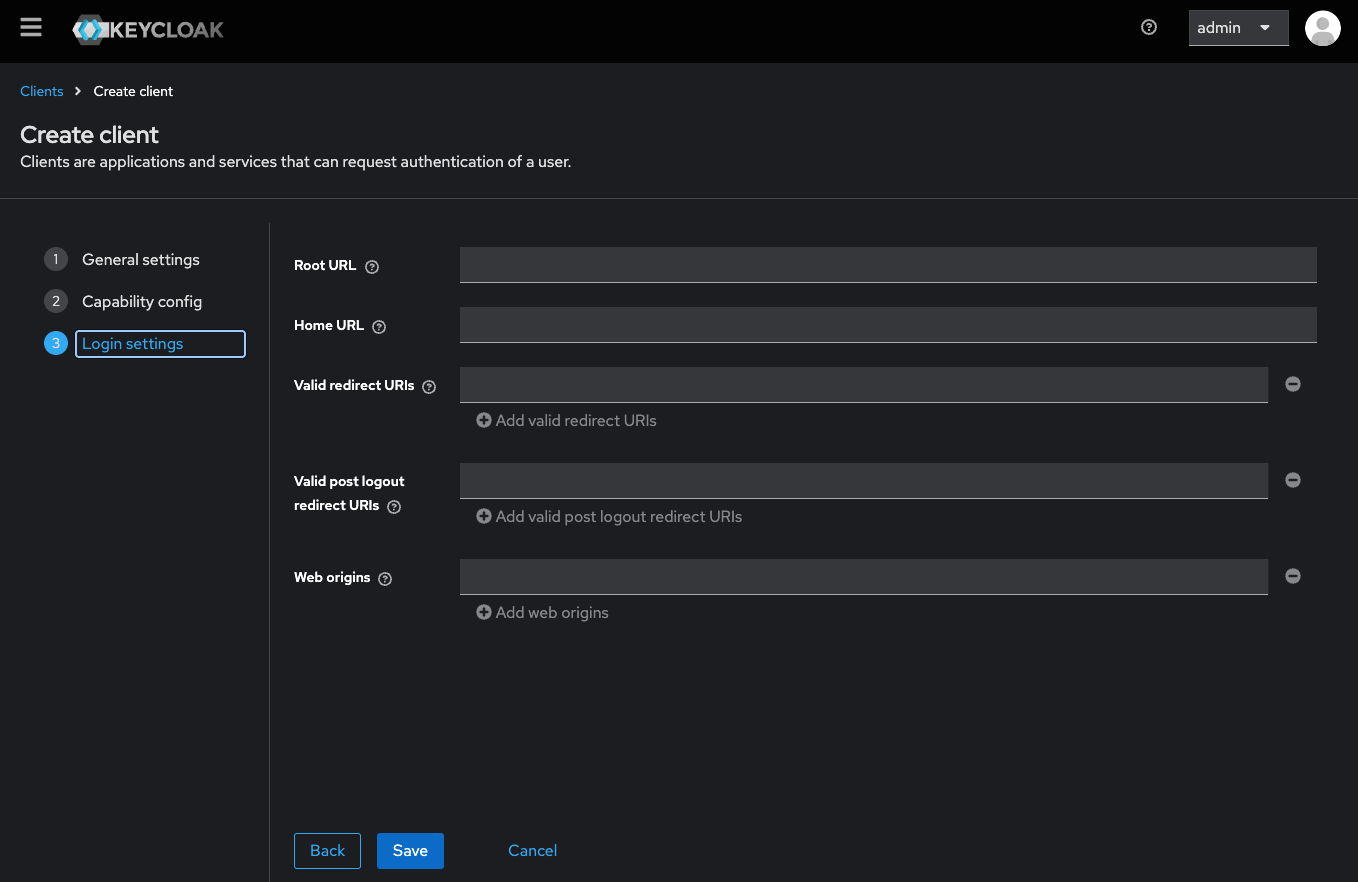
After creating the client, scroll down in the **Settings** tab and configure additional settings - **Logout Settings**:
* **Backchannel Logout Session Required**: Toggle OFF.
* **Front Channel Logout**: Toggle OFF.

Once you have configured these settings, the `{your-client-name}-platform-authorize` client will be created and can be used to authorize REST requests to microservices and Kafka within your app.
#### Example configuration for microservices
Starting with FlowX.AI 5.5.0, services validate incoming tokens using **JWT public key** validation. Opaque-token introspection and the `flowx-platform-authorize` client are no longer used. The shared security library (`application-security-client.yaml`) handles most configuration automatically.
```yaml theme={"system"}
security:
type: jwt-public-key # JWT public key validation (replaces oauth2)
oauth2:
base-server-url: https://keycloak.example.com # Base URL of the Keycloak server
sa-realm: 00000002-0002-4002-8002-000000000002 # Service accounts realm ID (fixed UUID)
# Organization manager is a required dependency for all services
flowx:
lib:
security:
services:
organization-manager:
base-url: http://organization-manager:80
```
| Configuration Key | Value/Example | Description |
| ----------------------------------------------------------- | -------------------------------------- | ------------------------------------------------------------------------- |
| `security.type` | `jwt-public-key` | Validates tokens using JWT public key (no introspection endpoint needed). |
| `security.oauth2.base-server-url` | `https://keycloak.example.com` | Base URL of the Keycloak server. |
| `security.oauth2.sa-realm` | `00000002-0002-4002-8002-000000000002` | Fixed UUID of the service accounts realm. |
| `flowx.lib.security.services.organization-manager.base-url` | `http://organization-manager:80` | Organization manager URL (required dependency for all services). |
The following properties from 5.1.x are **removed** in 5.5.0 and later:
* `security.oauth2.realm` — replaced by per-organization realm resolution
* `security.oauth2.client.client-id` / `client-secret` — introspection client no longer needed
* `spring.security.oauth2.resource-server.opaque-token.*` — entire opaque-token block removed
In 5.1.x, services validate incoming tokens using opaque-token introspection against the Keycloak introspect endpoint. Services that make outbound authenticated calls also configure a service account via the OAuth2 client registration.
```yaml theme={"system"}
security:
type: oauth2
oauth2-client: enabled # Only for services that make outbound calls
oauth2:
base-server-url: https://keycloak.example.com # Base URL of the Keycloak server
realm: your-realm-name # Keycloak realm name
client:
client-id: flowx-platform-authorize # Client for token introspection
client-secret: CLIENT_SECRET
service-account:
admin:
client-id: flowx-{service-name}-sa # e.g., flowx-process-engine-sa
client-secret: SA_CLIENT_SECRET
spring:
security:
oauth2:
resource-server:
opaque-token:
introspection-uri: ${security.oauth2.base-server-url}/realms/${security.oauth2.realm}/protocol/openid-connect/token/introspect
client-id: ${security.oauth2.client.client-id}
client-secret: ${security.oauth2.client.client-secret}
client:
registration:
mainIdentity:
provider: mainAuthProvider
client-id: ${security.oauth2.service-account.admin.client-id}
client-secret: ${security.oauth2.service-account.admin.client-secret}
authorization-grant-type: client_credentials
client-authentication-method: client_secret_post
provider:
mainAuthProvider:
token-uri: ${security.oauth2.base-server-url}/realms/${security.oauth2.realm}/protocol/openid-connect/token
```
| Configuration Key | Value/Example | Description |
| ------------------------------------------------------------------- | -------------------------------------------------------------------------------------------------- | ------------------------------------------------------------ |
| `security.type` | `oauth2` | Validates tokens via opaque-token introspection. |
| `security.oauth2-client` | `enabled` | Enables the OAuth2 client for service-to-service calls. |
| `security.oauth2.base-server-url` | `https://keycloak.example.com` | Base URL of the Keycloak server. |
| `security.oauth2.realm` | `your-realm-name` | The Keycloak realm name. |
| `security.oauth2.client.client-id` | `flowx-platform-authorize` | Client ID used for opaque-token introspection. |
| `security.oauth2.client.client-secret` | `CLIENT_SECRET` | Client secret for introspection. |
| `security.oauth2.service-account.admin.client-id` | `flowx-{service-name}-sa` | Service account client ID (e.g., `flowx-process-engine-sa`). |
| `spring.security.oauth2.client.provider.mainAuthProvider.token-uri` | `${security.oauth2.base-server-url}/realms/${security.oauth2.realm}/protocol/openid-connect/token` | Token endpoint in the realm. |
***
## Adding protocol mappers
Protocol mappers in Keycloak allow you to transform tokens and documents, enabling actions such as mapping user data into protocol claims and modifying requests between clients and the authentication server. This provides greater customization and control over the information contained in tokens and exchanged during authentication processes.
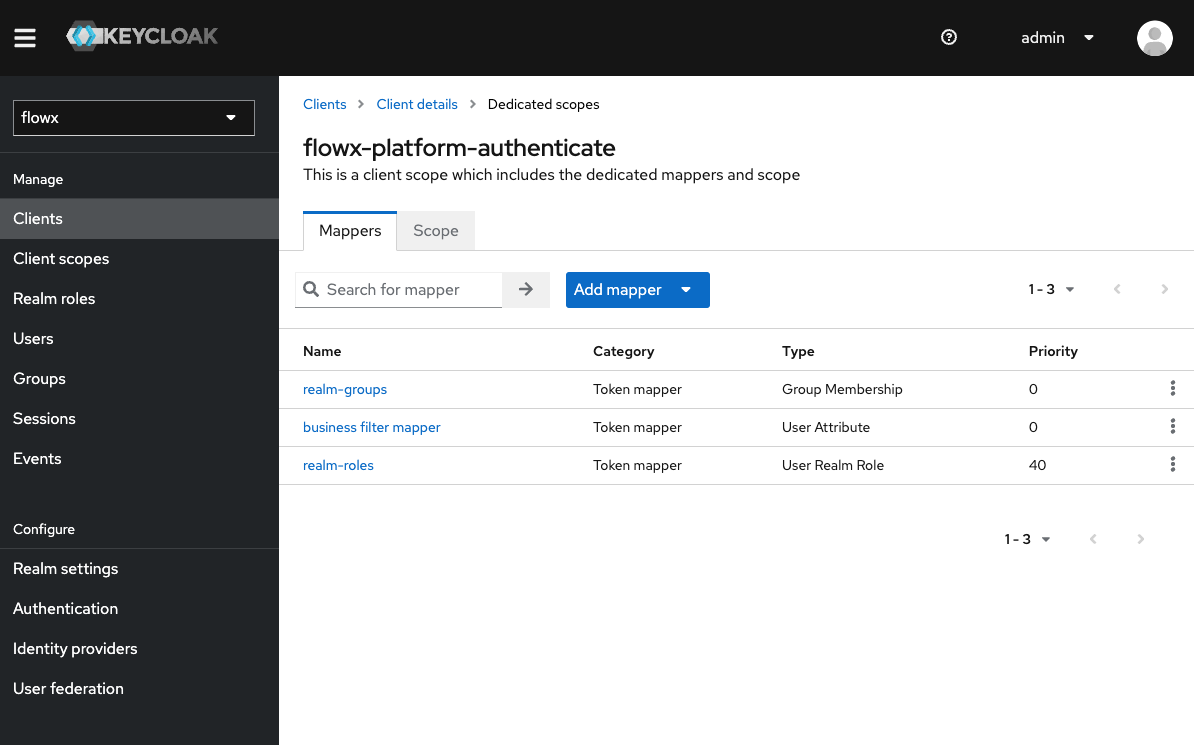
To enhance your clients' functionality, add the following common mappers:
* [Group Membership mapper ](#group-membership-mapper) (`realm-groups`)
* Maps user groups to the authorization token.
* [User Attribute mapper](#user-attribute-mapper) (`business filter mapper`)
* Maps custom attributes, for example, mapping the [businessFilters ](../../docs/platform-deep-dive/user-roles-management/business-filters) list, to the token claim.
* [User Realm role](#user-realm-role-mapper) (`realm-roles`)
* Maps a user's realm role to a token claim.
The mappers should be configured to be included in the **token introspection** response. Previously, mappers were primarily added to the `/userinfo` endpoint, but modern Keycloak versions support adding them to token introspection, which is the recommended approach for better security and performance.
By incorporating these mappers, you can further customize and enrich the information contained within your tokens, ensuring they carry the necessary data for your applications.
### Group membership mapper
Steps to add a Group Membership mapper:
From the Keycloak admin console, go to **Clients** and select your desired client.
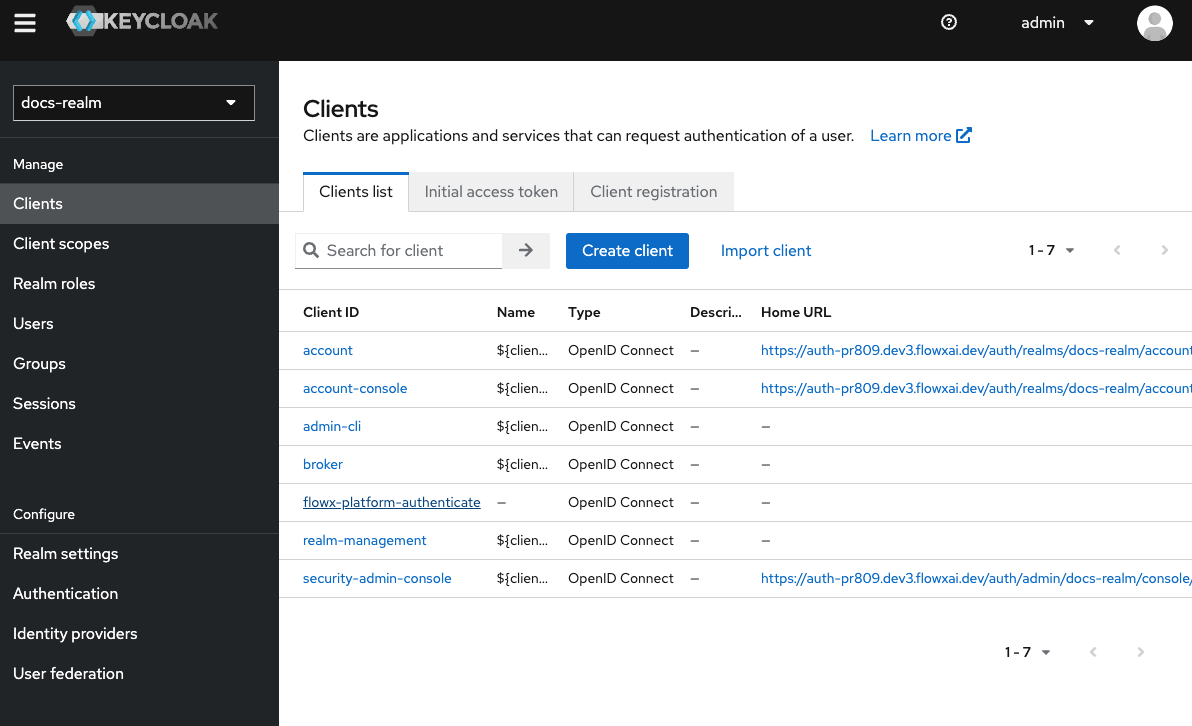
In the client settings, click on **Client Scopes**.
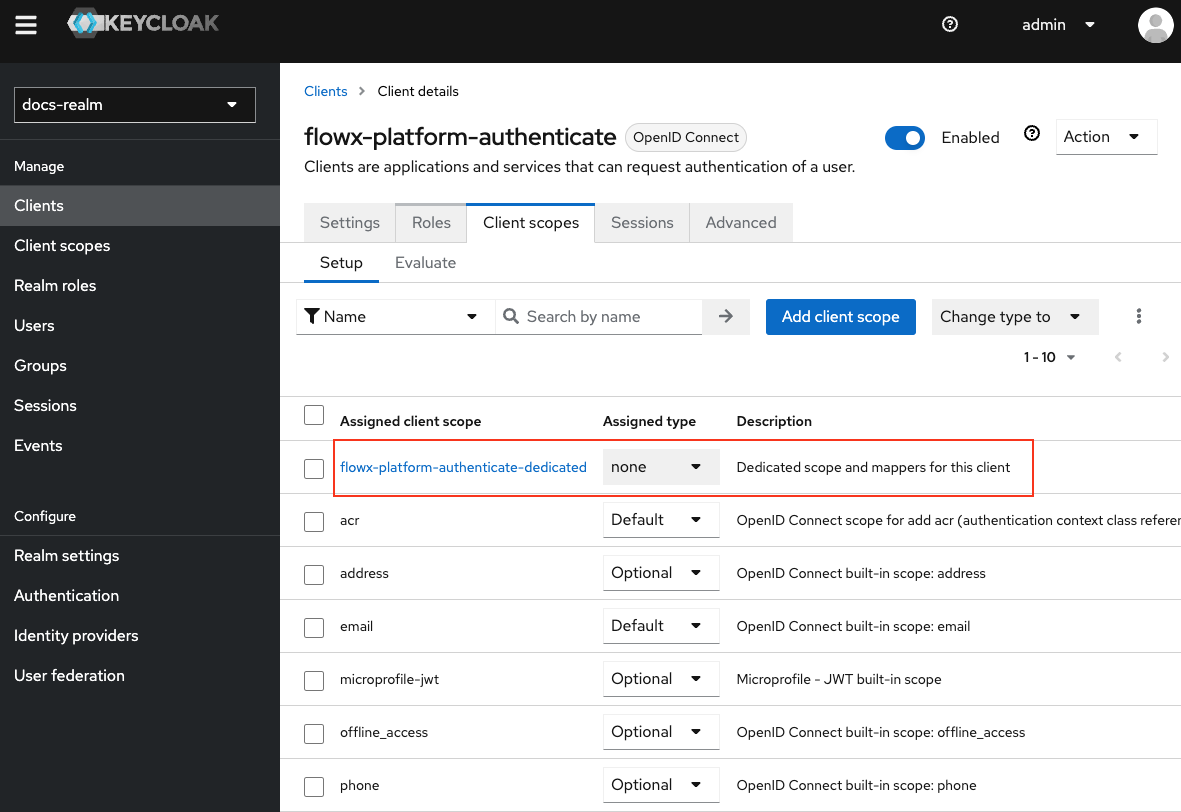
Select the **dedicated client scope**: `{your-client-name}-authenticate-dedicated` to open its settings.
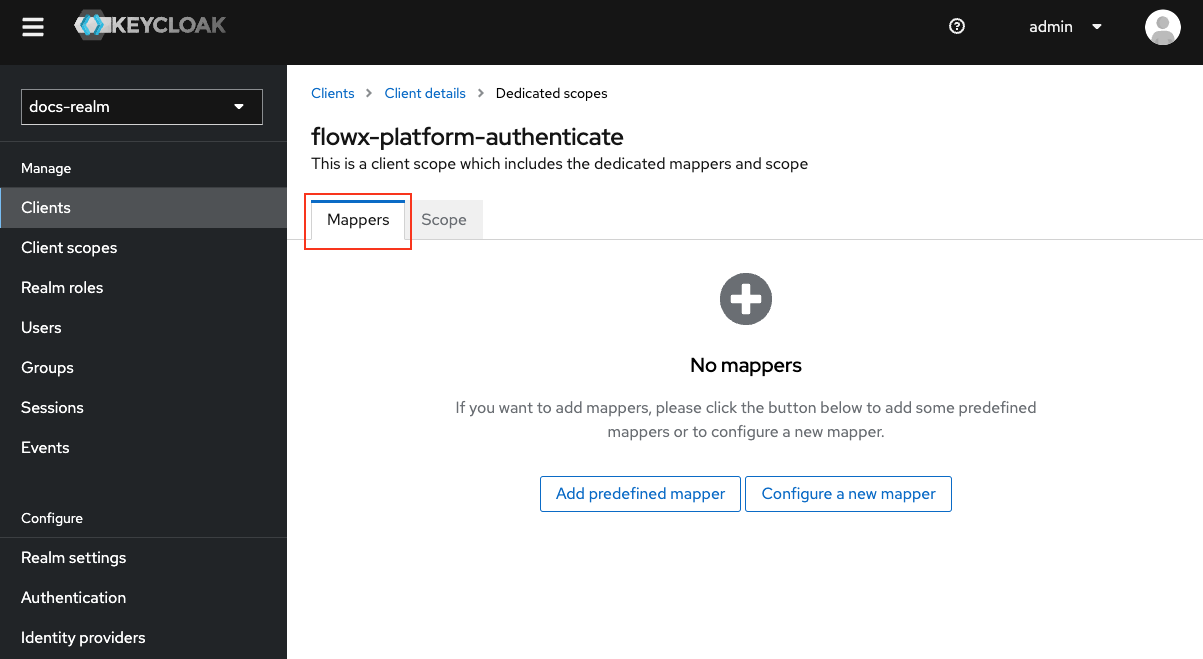
Make sure the **Mappers** tab is selected within the dedicated client scope.
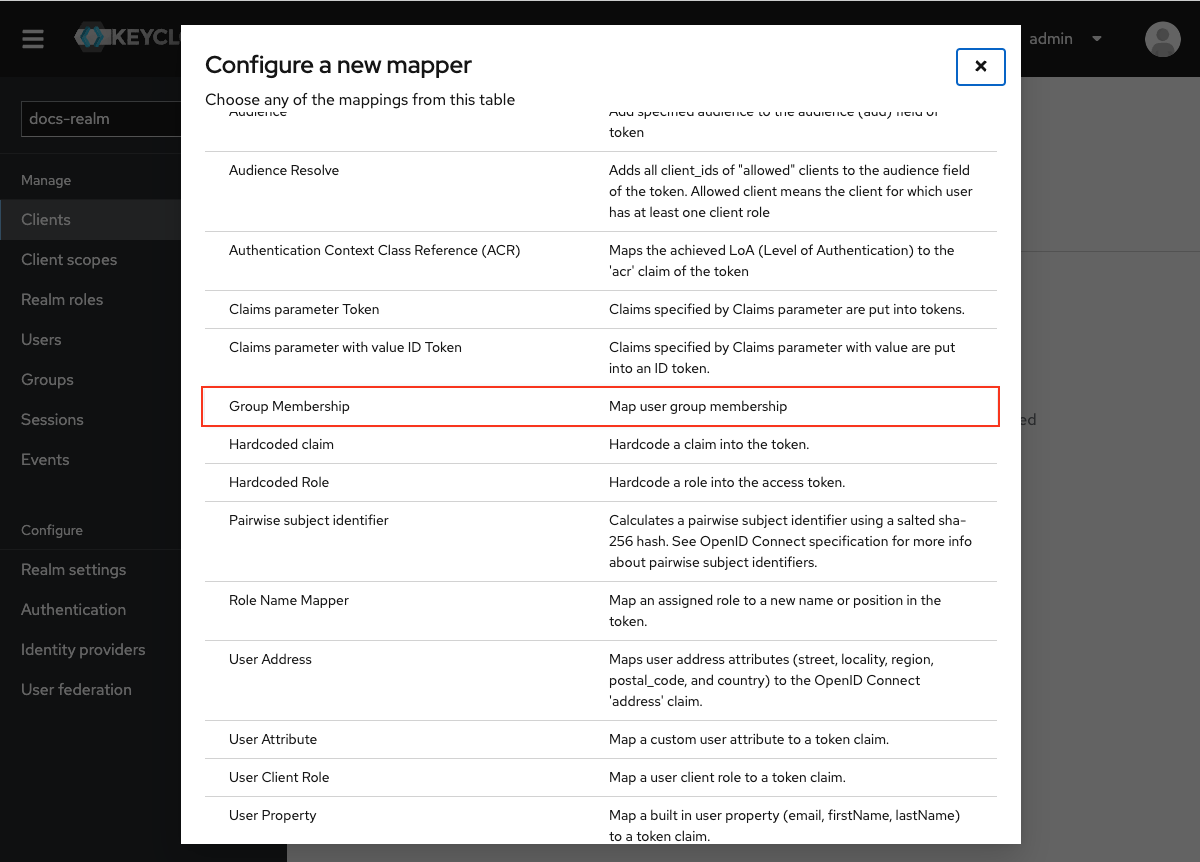
Click **Add Mapper**. From the list of available mappers, choose **Group Membership**.
**Name**: Enter a descriptive name for the mapper to easily identify its purpose, for example `realm-groups`.
**Token Claim Name**: Set the token claim name, typically as `groups`, for including group information in the token.
**Add to ID Token**: Toggle OFF.
**Add to token introspection**: Toggle ON.
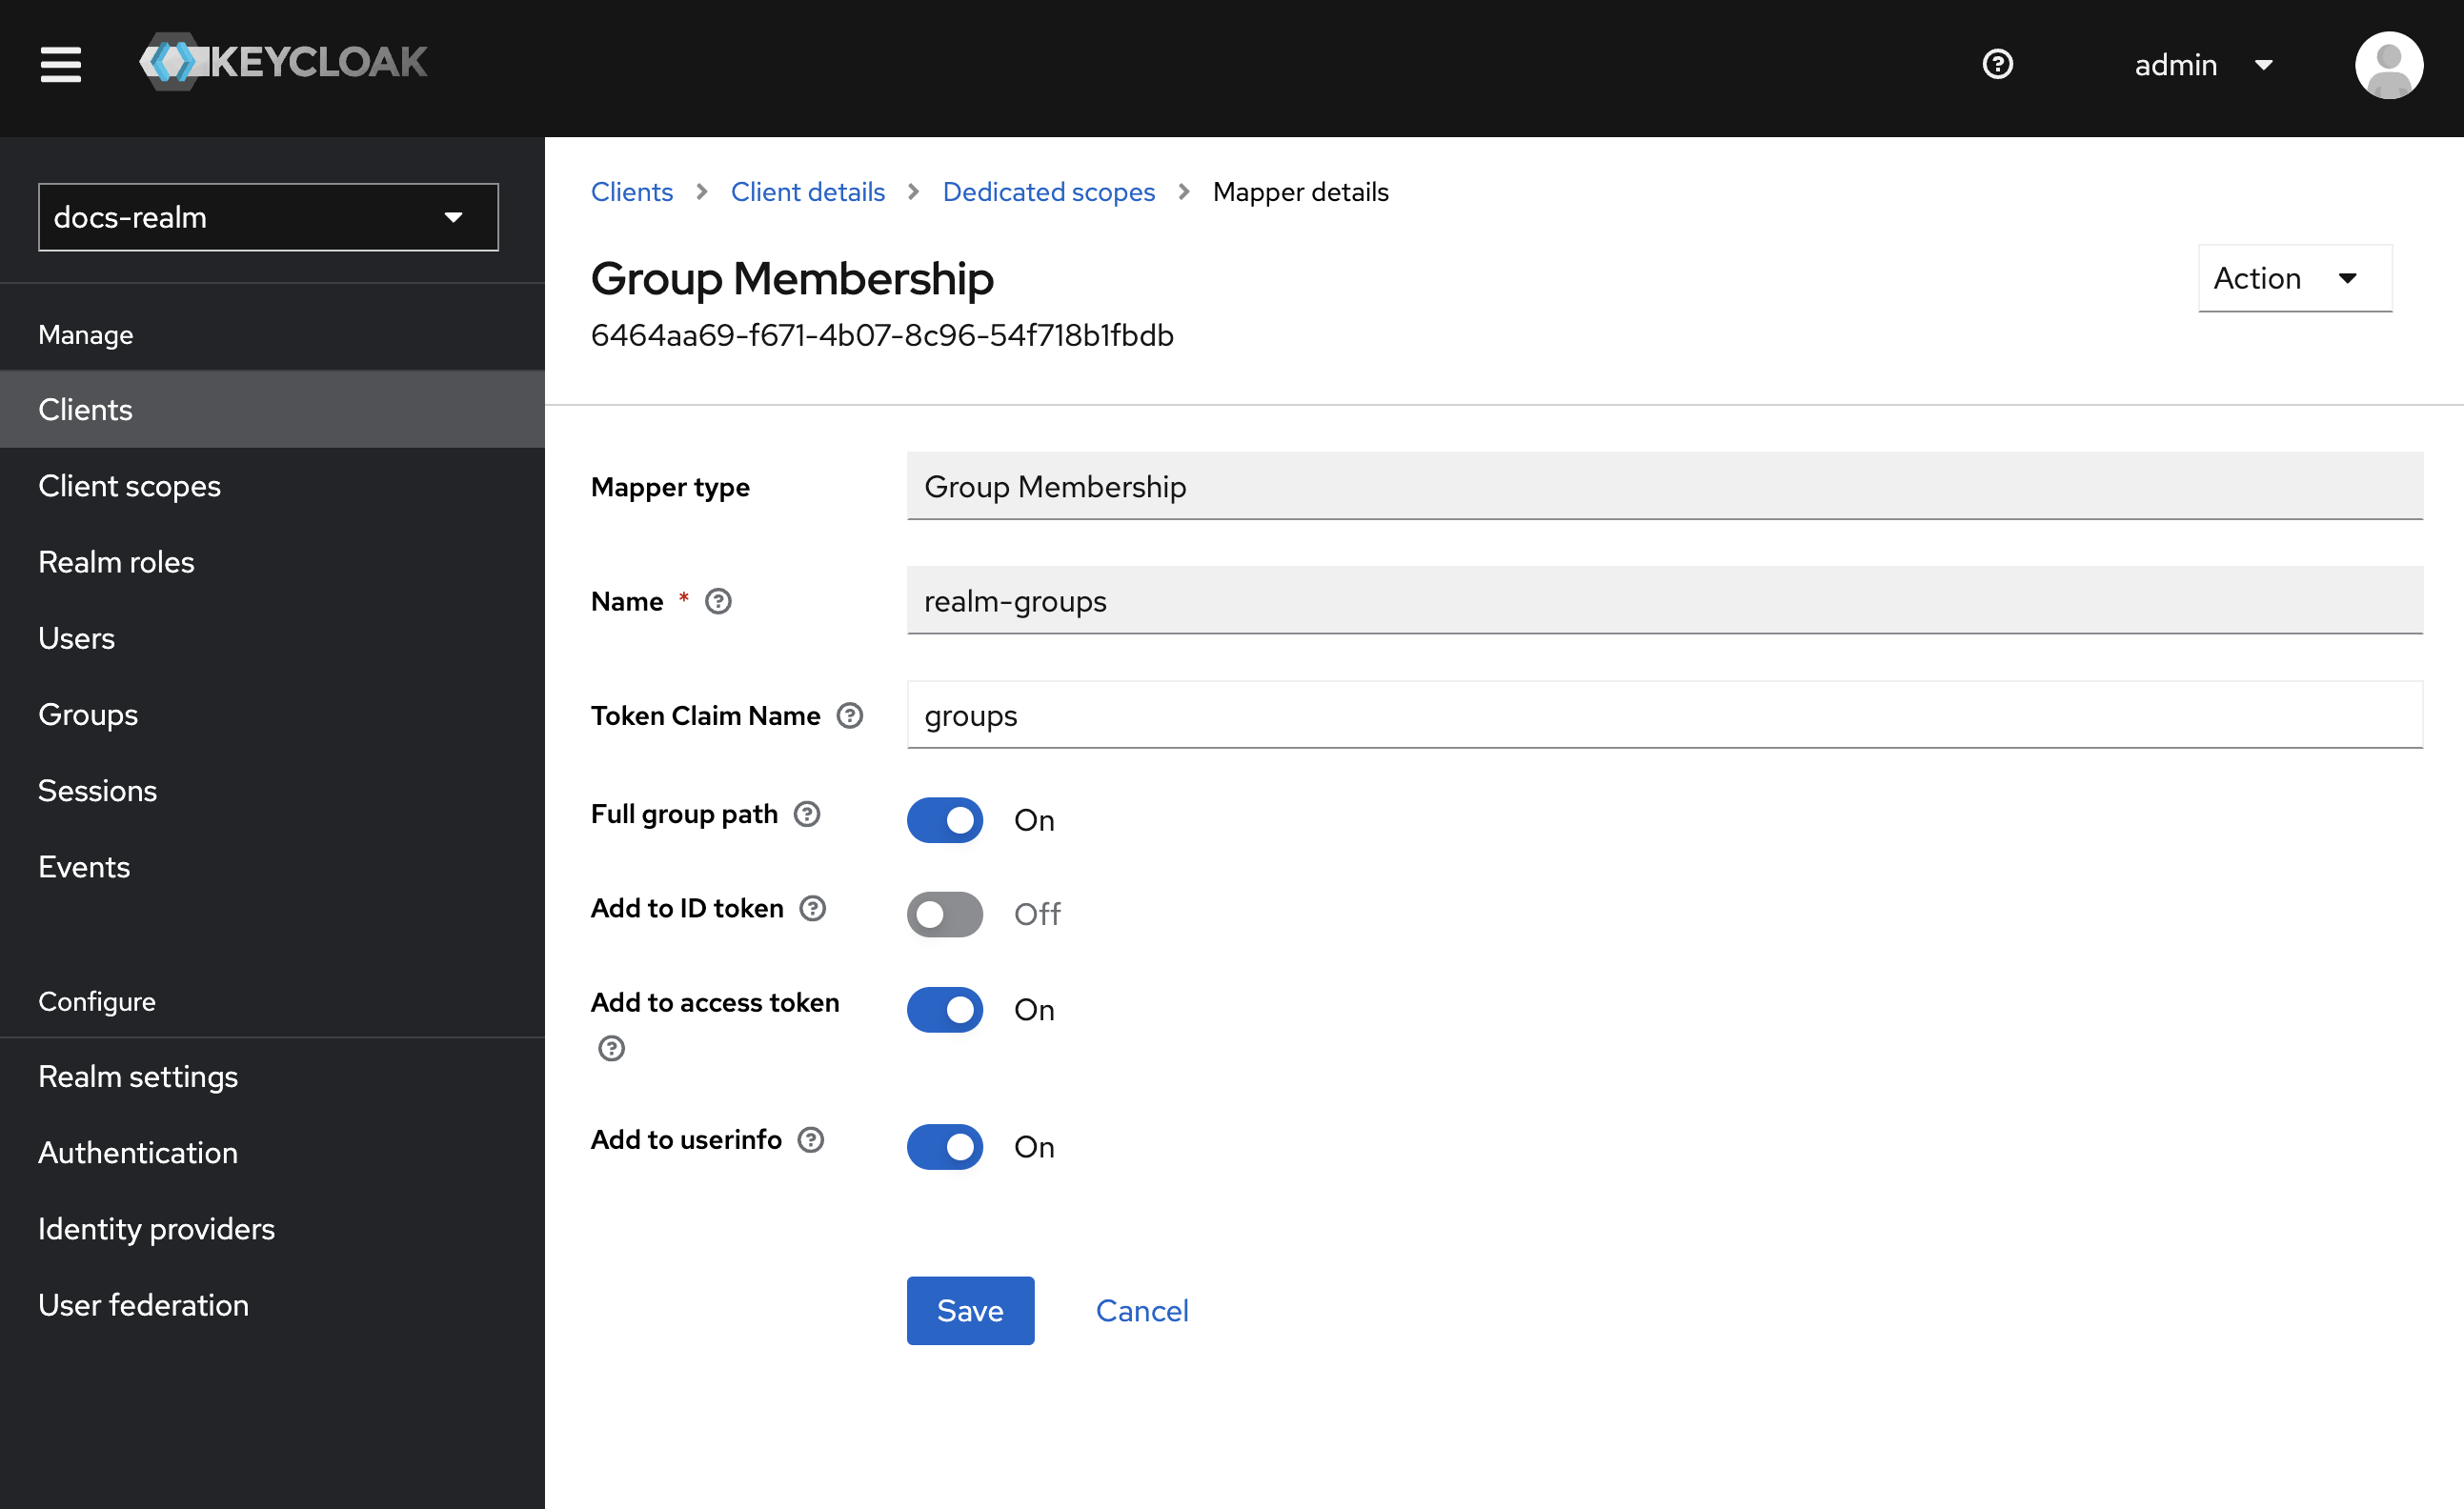
This group membership mapper includes the user's group information in the token for authorization purposes.
### User attribute mapper
To include custom attributes such as business filters in the token claim, follow these steps to add a user attribute mapper:
From the Keycloak admin console, go to **Clients** and select your desired client.
Click on **Client Scopes** and choose `{your-client-name}-authenticate-dedicated` to open its settings.
Ensure the **Mappers** tab is selected.
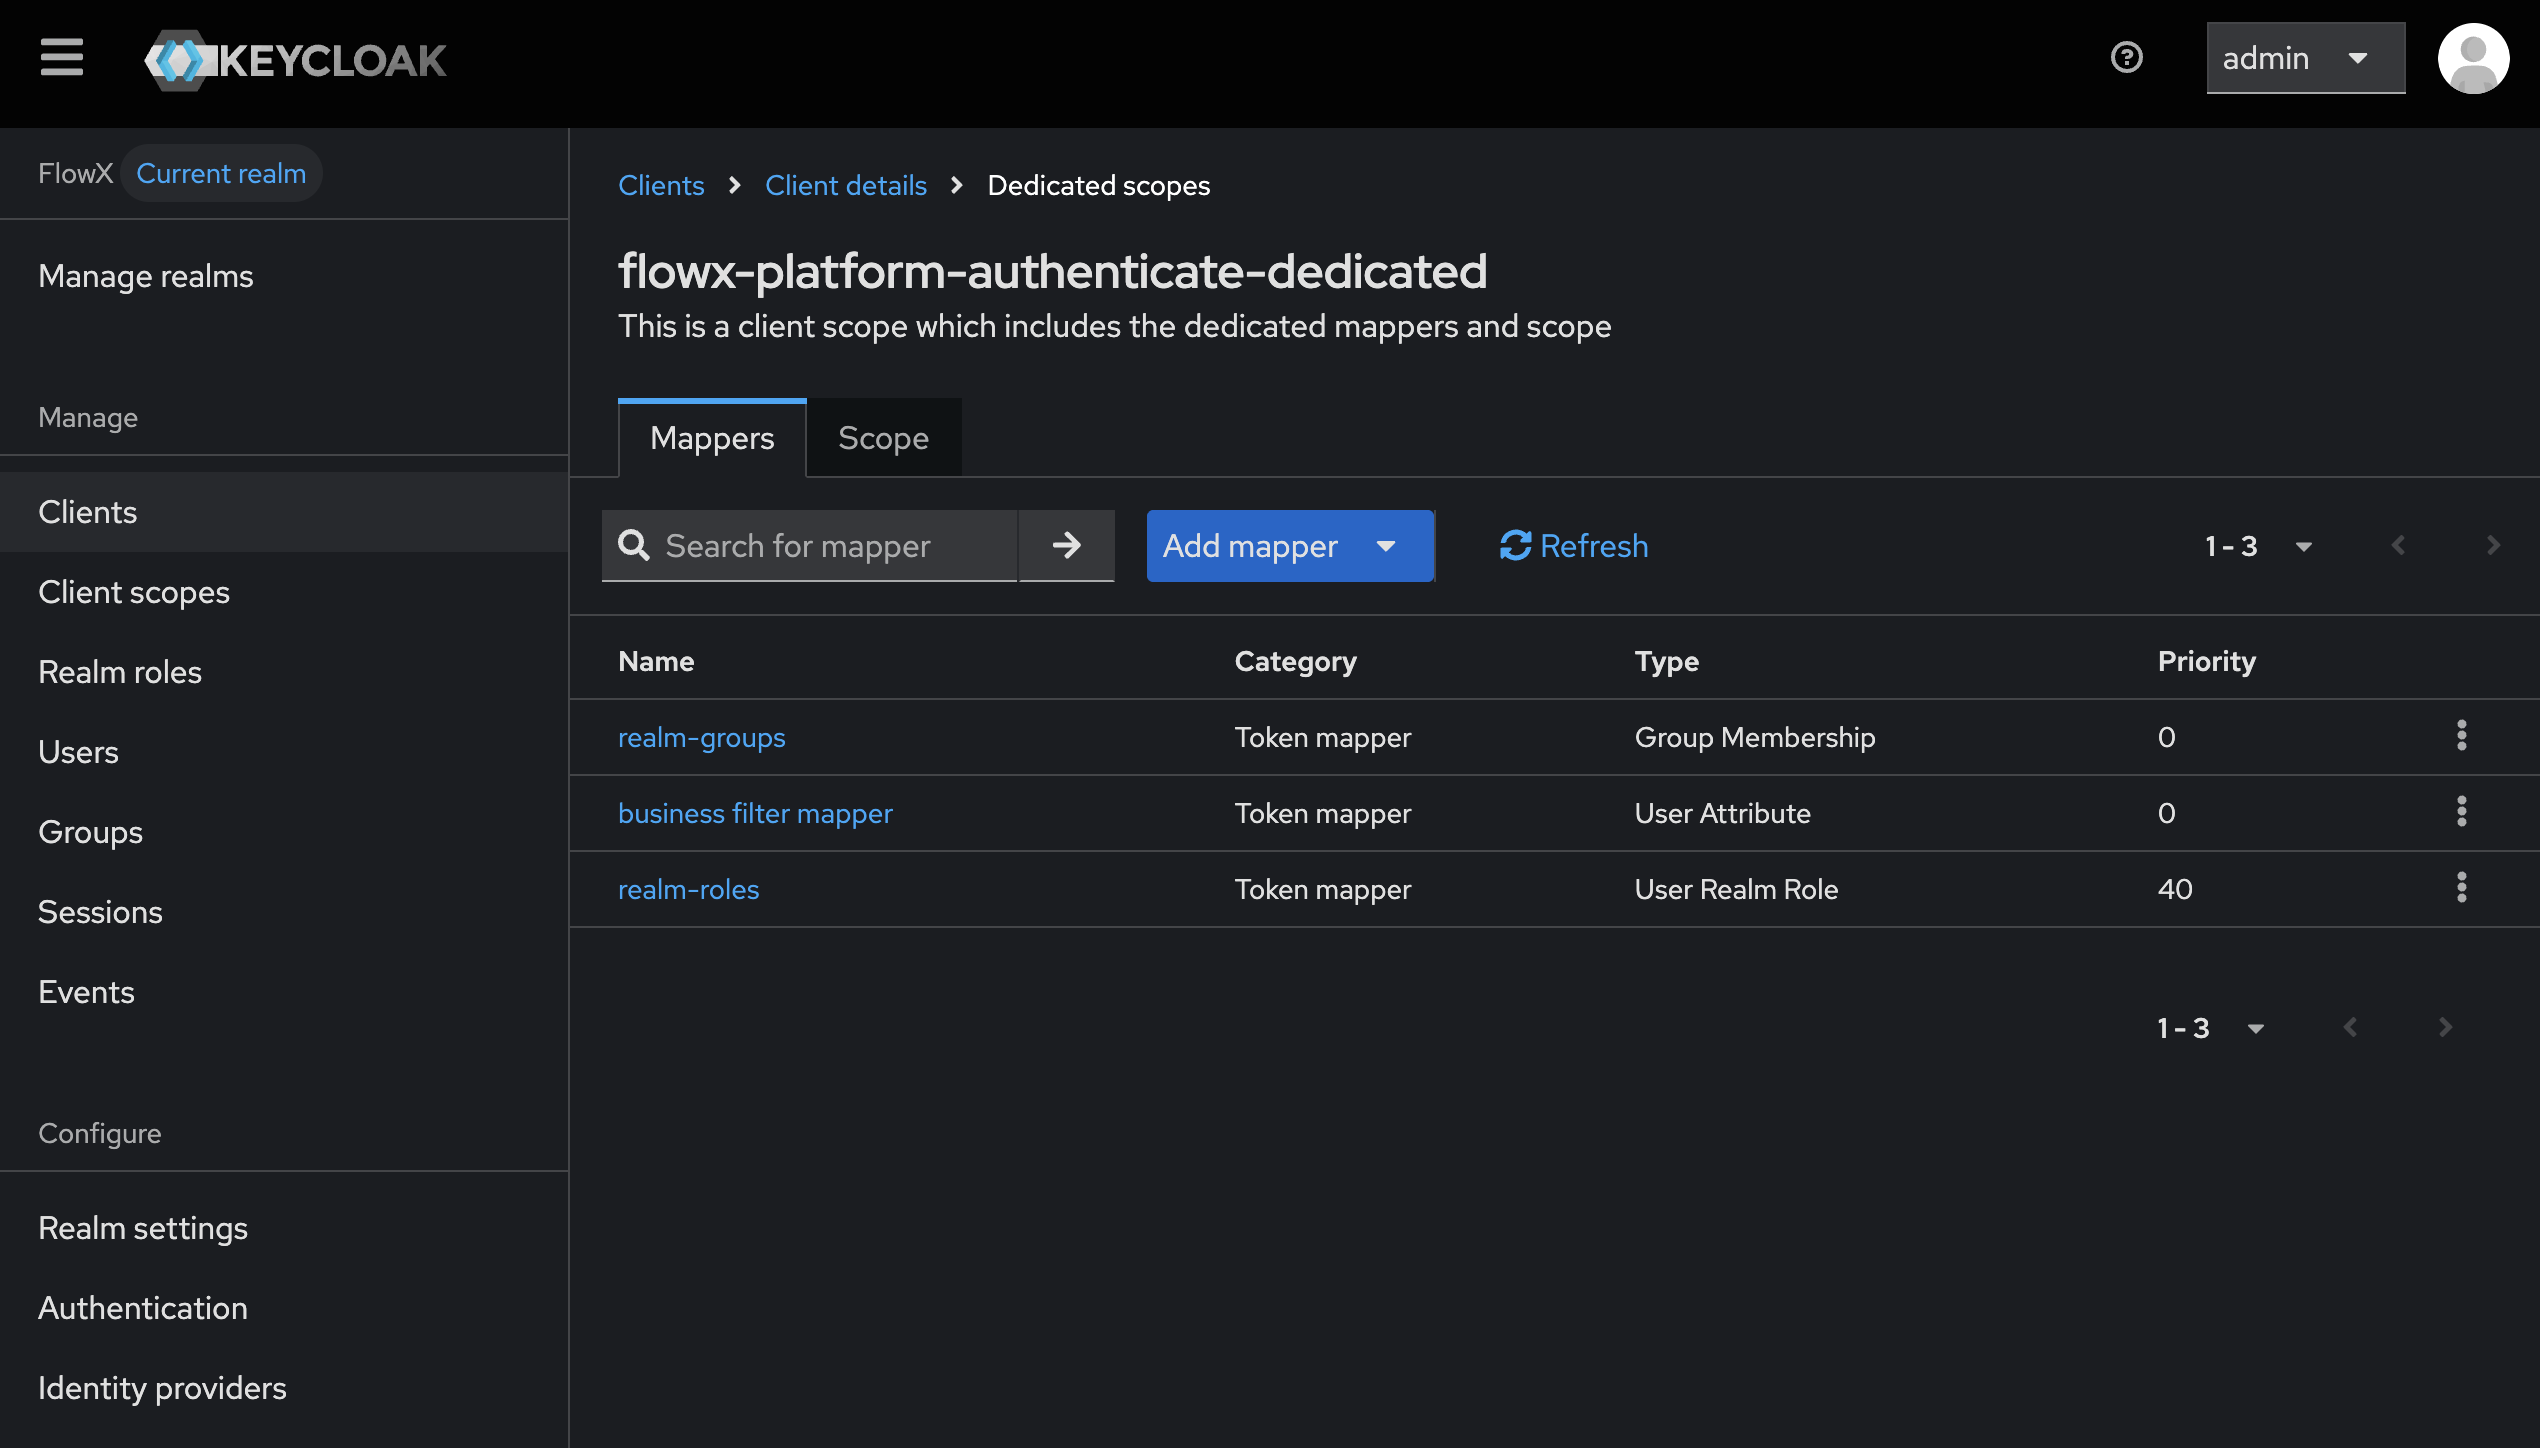
Click **Add mapper**. From the list of available mappers, select **User Attribute**.
* **Mapper Type**: Select **User Attribute**.
* **Name**: Enter a descriptive name for the mapper, such as "Business Filters Mapper".
* **User Attribute**: Enter `businessFilter`.
* **Token Claim Name**: Enter `attributes.businessFilters`.
* **Add to access token**: Toggle ON.
* **Add to token introspection**: Toggle ON (recommended).
* **Multivalued**: Toggle ON.
* **Aggregate attribute values**: Toggle ON.
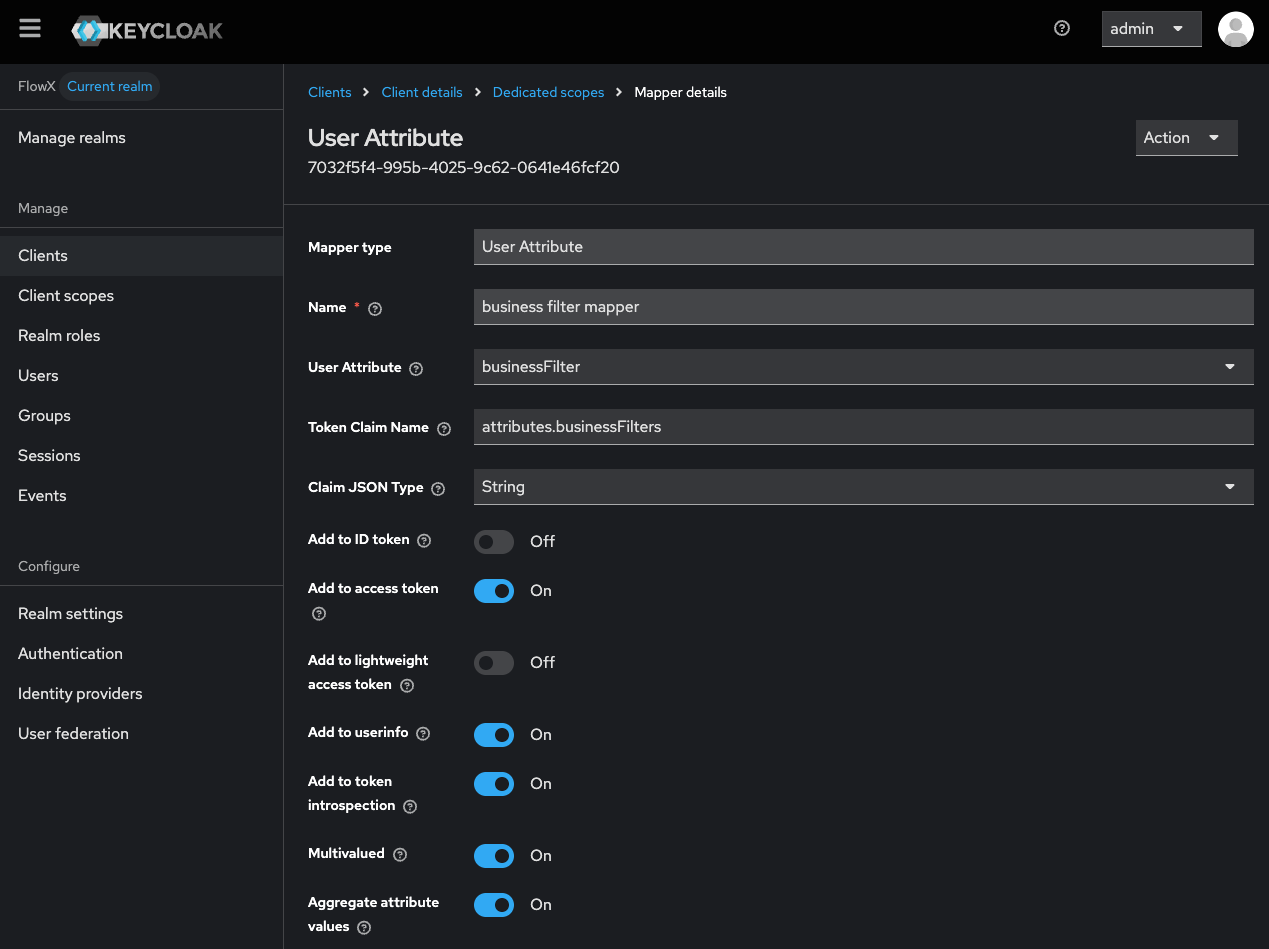
This user attribute mapper includes the custom attribute "businessFilters" in the token claim under the name "attributes.businessFilters", making business filter information available within your app.
For more information about business filters, refer to the following section:
### Runtime groups attribute mapper
The `flowxIdPGroups` user attribute carries the FlowX end-user group memberships for a user. The `flowx-platform-authenticate` client emits the value on the access token under `attributes.runtimeGroups` so the runtime authorization service can evaluate per-solution access in a single read.
In FlowX-managed Keycloak deployments this mapper ships with the standard client setup. Add it manually only when you operate Keycloak yourself or have regenerated the client without the standard mapper set.
From the Keycloak admin console, go to **Clients** and select `flowx-platform-authenticate`. Click **Client Scopes** and choose `flowx-platform-authenticate-dedicated`. Open the **Mappers** tab.
Click **Add mapper**. From the list of available mappers, select **User Attribute**.
* **Mapper Type**: Select **User Attribute**.
* **Name**: Enter a descriptive name, such as "Runtime Groups Mapper".
* **User Attribute**: Enter `flowxIdPGroups`.
* **Token Claim Name**: Enter `attributes.runtimeGroups`.
* **Add to access token**: Toggle ON.
* **Add to token introspection**: Toggle ON (recommended).
* **Multivalued**: Toggle ON.
* **Aggregate attribute values**: Toggle ON.
The values that appear in `attributes.runtimeGroups` must match the names of end-user groups defined in FlowX. Federated logins populate `flowxIdPGroups` automatically through the [external IDP federation mapper](#external-idp-federation-mapper) below.
### Designer user attribute
The `designerUser` user attribute is a boolean that flags whether a user has Designer access to the project. The `flowx-platform-authenticate` client exposes it on the access token as `attributes.designerUser`; the runtime authorization service reads the claim to skip role checks for designers running their own projects.
In FlowX-managed Keycloak deployments the attribute is set automatically at organization provisioning, and the mapper ships with the standard client setup. Add the mapper manually only when you operate Keycloak yourself.
From the Keycloak admin console, go to **Clients** and select `flowx-platform-authenticate`. Click **Client Scopes** and choose `flowx-platform-authenticate-dedicated`. Open the **Mappers** tab.
Click **Add mapper**. From the list of available mappers, select **User Attribute**.
* **Mapper Type**: Select **User Attribute**.
* **Name**: Enter a descriptive name, such as "Designer User Mapper".
* **User Attribute**: Enter `designerUser`.
* **Token Claim Name**: Enter `attributes.designerUser`.
* **Add to access token**: Toggle ON.
* **Add to token introspection**: Toggle ON (recommended).
* **Multivalued**: Toggle OFF.
* **Claim JSON Type**: Select **boolean**.
### External IDP federation mapper
This mapper reads the source IDP's group claim and writes the value into the FlowX-side `flowxIdPGroups` user attribute. The [Runtime groups attribute mapper](#runtime-groups-attribute-mapper) above then promotes that user attribute onto the FlowX access token as `attributes.runtimeGroups`.
From the Keycloak admin console, go to **Identity providers** and open the entry for the federated IDP. Click the **Mappers** tab.
Click **Add mapper**. From the **Mapper Type** list, select **Attribute Importer** (Keycloak's `oidc-user-attribute-idp-mapper`; some versions label it **OpenID Connect Attribute to User Attribute**).
* **Name**: Enter a descriptive name, such as "Source groups to flowxIdPGroups".
* **Sync Mode Override**: Select **Force** so subsequent logins re-import the value and pick up source-side group changes.
* **Claim**: Enter the name of the source IDP claim that carries the user's group memberships. The exact name depends on the source IDP — for example, FlowX-to-FlowX federation typically uses `groupsList`; Entra ID typically uses the `groups` claim or a custom extension; AD FS uses whatever the source-side claim emitter is configured to send.
* **User Attribute**: Enter `flowxIdPGroups`.
**Same recipe for business filters.** If the organization uses business filters, configure a second Attribute Importer mapper that reads the source IDP's business-filter claim and writes it into the `businessFilter` user attribute. The [User attribute mapper](#user-attribute-mapper) section above then exposes it on the token as `attributes.businessFilters`.
**Source-side claim shaping.** Most external IDPs do not emit a single multivalued claim that maps 1:1 to FlowX end-user group names. You typically need a chained mapper on the source IDP side, or on the federated IDP entry, to construct the multivalued array before this mapper imports it.
### User realm role mapper
To add a roles mapper to the `{your-client-name}-authenticate` client, so roles will be available in the OAuth user info response, follow these steps:
From the Keycloak admin console, go to **Clients** and select your desired client.
Click on **Client Scopes** and choose `{your-client-name}-authenticate-dedicated` to open its settings.
Ensure the **Mappers** tab is selected.
Click **Add Mapper**. From the list of available mappers, select **User Realm Role**.
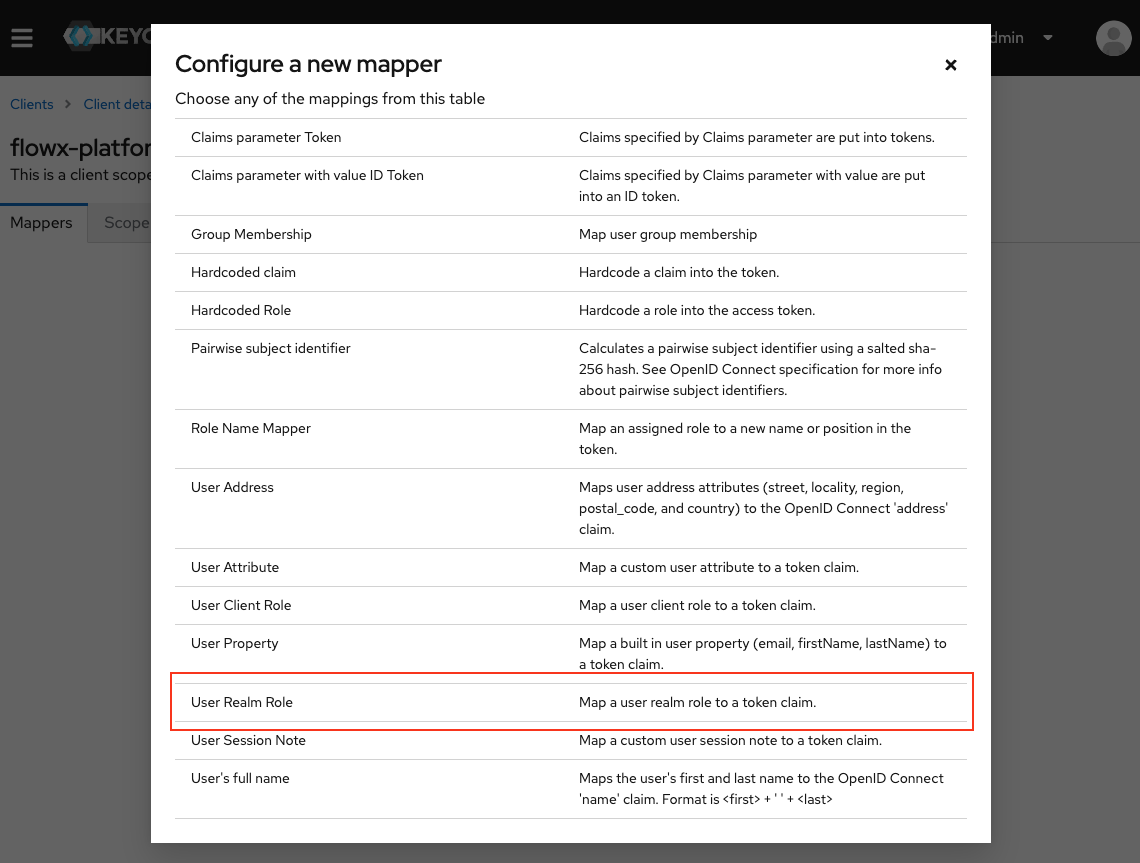
* **Name**: Enter a descriptive name for the mapper, such as "Roles Mapper".
* **Mapper Type**: Select **User Realm Role**.
* **Token Claim Name**: Enter `roles`.
* **Add to ID Token**: Toggle OFF.
* **Add to access token**: Toggle OFF.
* **Add to token introspection**: Toggle ON.
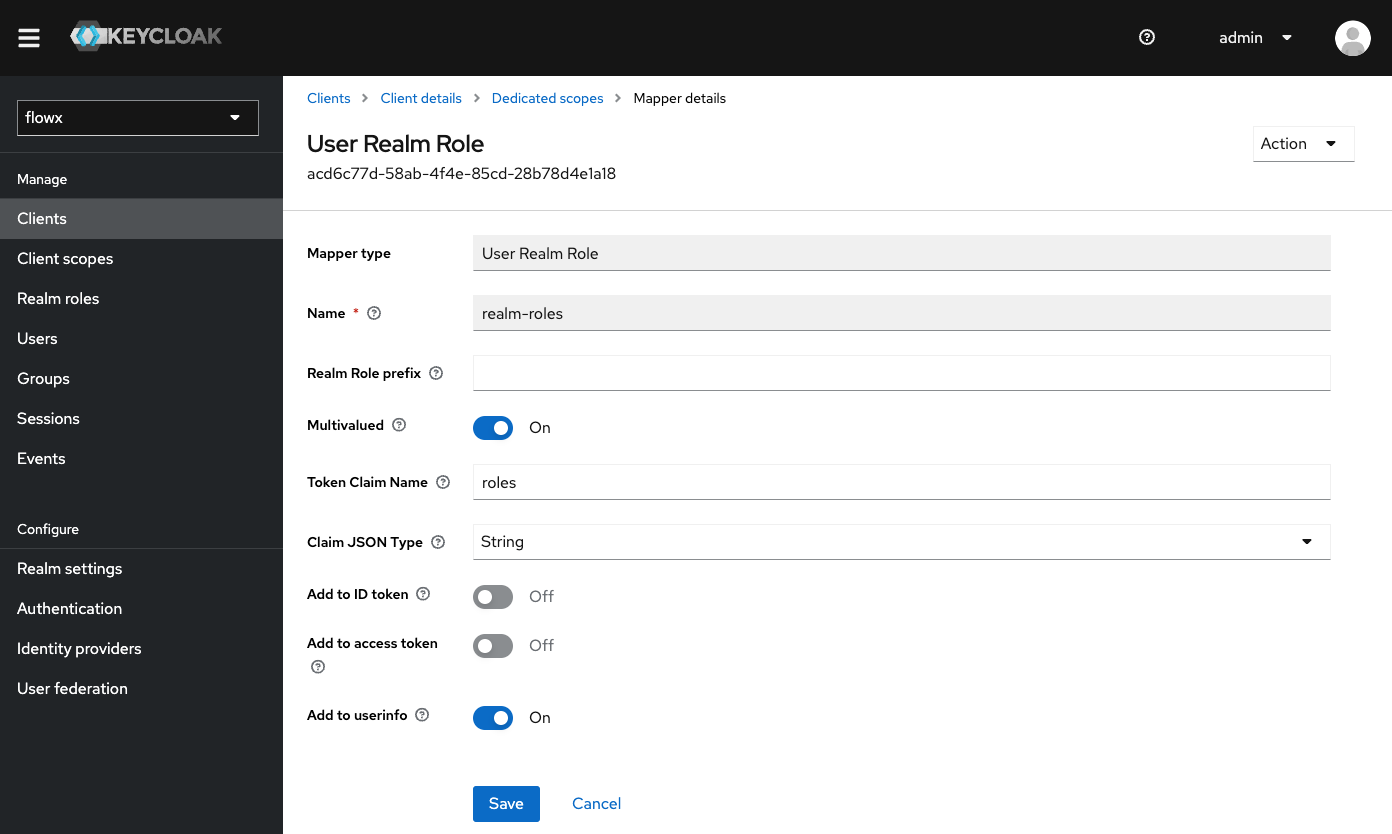
This roles mapper includes the user's assigned realm roles in the OAuth user info response under the claim name "roles".
You can repeat these steps to add multiple roles mappers if you need to include multiple realm roles in the token claim.
**Legacy realm roles.** Realms created from older FlowX realm exports may contain role families such as `ROLE_ADMIN_MANAGE_*`, `ROLE_TASK_MANAGER_*`, or `ROLE_CMS_*`, sometimes already assigned to users. FlowX services assign no built-in meaning to these roles — Designer and platform access is governed by workspace and organization roles plus permissions (see the [roles & permissions matrix](./roles-permissions-matrix)). Realm roles are only evaluated where your own configuration references them, such as swimlane access rules or business filters. Realms provisioned by current FlowX versions no longer include these legacy roles.
### Creating a basic client scope
To ensure consistent token configuration across all clients, you should create a default client scope named "basic" with predefined mappers.
From the Keycloak admin console, go to **Client Scopes** in the left menu.
Click **Create client scope**.
* **Name**: Enter `basic`.
* **Type**: Select **Default**.
* **Protocol**: Select **OpenID Connect**.
* **Display on consent screen**: Toggle OFF.
* **Include in token scope**: Toggle ON.
Click **Save**.
In the newly created **basic** client scope, navigate to the **Mappers** tab.
Add the following predefined mappers:
1. **sub** mapper:
* Click **Add mapper** → **From predefined mappers**
* Select **sub**
* Click **Add**
2. **auth\_time** mapper:
* Click **Add mapper** → **From predefined mappers**
* Select **auth\_time**
* Click **Add**
After creating the basic client scope, assign it to all your clients:
1. Navigate to **Clients** in the left menu
2. For each client (e.g., `flowx-platform-authenticate`, `flowx-platform-authorize`, and all service accounts):
* Open the client settings
* Go to the **Client Scopes** tab
* Click **Add client scope**
* Select **basic** from the list
* Choose **Default** as the assignment type
* Click **Add**
The **basic** client scope ensures that all clients have consistent token claims for subject identification (sub) and authentication time (auth\_time), which are essential for proper token validation and session management.
***
### Examples
#### Login
To request a login token:
```bash theme={"system"}
curl --location --request POST 'http://localhost:8080/realms/flowx/protocol/openid-connect/token' \
--header 'Content-Type: application/x-www-form-urlencoded' \
--data-urlencode 'grant_type=password' \
--data-urlencode 'username=admin@flowx.ai' \
--data-urlencode 'password=password' \
--data-urlencode 'client_id={your-client-name}-authenticate'
```
#### Refresh token
To refresh an existing token:
```bash theme={"system"}
curl --location --request POST 'http://localhost:8080/realms/flowx/protocol/openid-connect/token' \
--header 'Content-Type: application/x-www-form-urlencoded' \
--data-urlencode 'grant_type=refresh_token' \
--data-urlencode 'client_id={your-client-name}-authenticate' \
--data-urlencode 'refresh_token=ACCESS_TOKEN'
```
#### User info
To retrieve user information:
```bash theme={"system"}
curl --location --request GET 'localhost:8080/realms/flowx/protocol/openid-connect/userinfo' \
--header 'Authorization: Bearer ACCESS_TOKEN' \
```
***
## Adding service accounts
**What is a service account?**
A service account grants direct access to the Keycloak API for a specific component. Each client can have a built-in service account that allows it to obtain an access token.
To use this feature you must turn on **Client authentication** (access type) for your client. When you do this, the **Service Accounts Enabled** switch will appear.
### Realm architecture
Starting with FlowX.AI 5.5.0, Keycloak uses a **two-realm architecture** that separates user authentication from service-to-service communication:
| Realm | ID | Purpose |
| -------------------------- | ---------------------------------------------------------------- | ------------------------------------------------------------------------------------------------------------------------ |
| **User realm** | Organization UUID (e.g., `11111111-0001-4001-8001-111111111111`) | Human users, roles, groups, and the `flowx-platform-authenticate` client. Each organization gets its own realm. |
| **Service accounts realm** | `00000002-0002-4002-8002-000000000002` (fixed) | All backend service account clients (e.g., `flowx-admin-sa`, `flowx-process-engine-sa`). Shared across the installation. |
This separation improves security isolation — service accounts cannot access user tokens, and user realm changes do not affect service-to-service authentication.
**Where to create each client:**
* **User-facing clients** (`flowx-platform-authenticate`) go in the **user realm**
* **All service account clients** go in the **service accounts realm**
* The `flowx-platform-authorize` client is **no longer needed** (JWT public key validation replaces opaque-token introspection)
On **fresh installations** (5.7.0+), both realms are created automatically during the setup flow. On **upgrades from 5.1.x**, Liquibase migrations handle the realm split — the existing "flowx" realm is renamed to the organization UUID, and service accounts are moved to the new SA realm.
If your deployment does not grant Keycloak admin credentials to FlowX services, you must create the service accounts realm and move the service account clients manually. See [Manual Keycloak configuration](#manual-keycloak-configuration) below.
**Upgrading from 5.2, 5.3, or 5.4?** These versions may already have partial realm or organization changes from intermediate releases. Do **not** follow the 5.1.x upgrade path — it may conflict with your existing realm configuration. Contact your FlowX representative for a migration plan specific to your deployment.
**Authorization system master realm configuration**
The authorization-system service requires access to the Keycloak master realm for managing realms and running migrations. Configure the following properties on the authorization-system service only:
| Environment Variable | Description | Default Value |
| ------------------------------------- | ---------------------------- | ------------- |
| `SECURITY_MASTERREALM_CLIENTID` | Master realm admin client ID | `admin-cli` |
| `SECURITY_MASTERREALM_NAME` | Master realm name | `master` |
| `SECURITY_MASTERREALM_ADMIN_USERNAME` | Keycloak admin username | - |
| `SECURITY_MASTERREALM_ADMIN_PASSWORD` | Keycloak admin password | - |
These credentials grant full Keycloak administrative access. Store them securely using your secrets management solution (e.g., Vault, Kubernetes secrets). Never commit them to version control.
In 5.1.x, FlowX.AI uses a **single-realm architecture** in Keycloak. All clients — including user-facing clients (`flowx-platform-authenticate`, `flowx-platform-authorize`) and service account clients — are created in the same realm.
The service accounts described in this section should be created in the **user realm** (the realm you created in the [Creating a new realm](#creating-a-new-realm) section). Each service authenticates using the `client_credentials` grant type and references the realm via the `security.oauth2.realm` configuration property.
***
### Admin service account
The admin service account is used by the admin microservice to connect with Keycloak, enabling user and group management features within the FlowX.AI Designer.
Steps to add an Admin service account:
Navigate to **Clients** and select **Create client**.
Enter a **Client ID** for your new client.
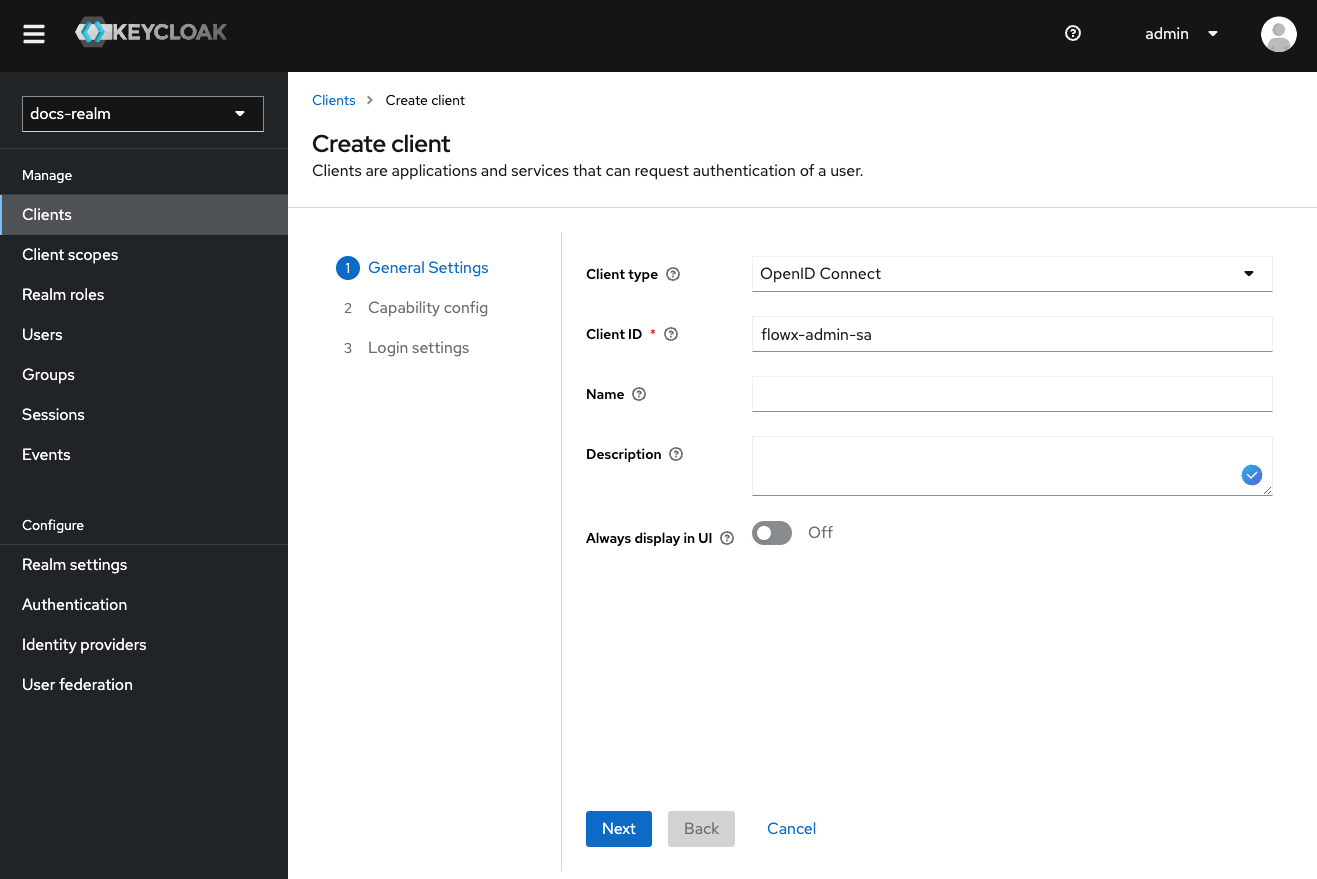
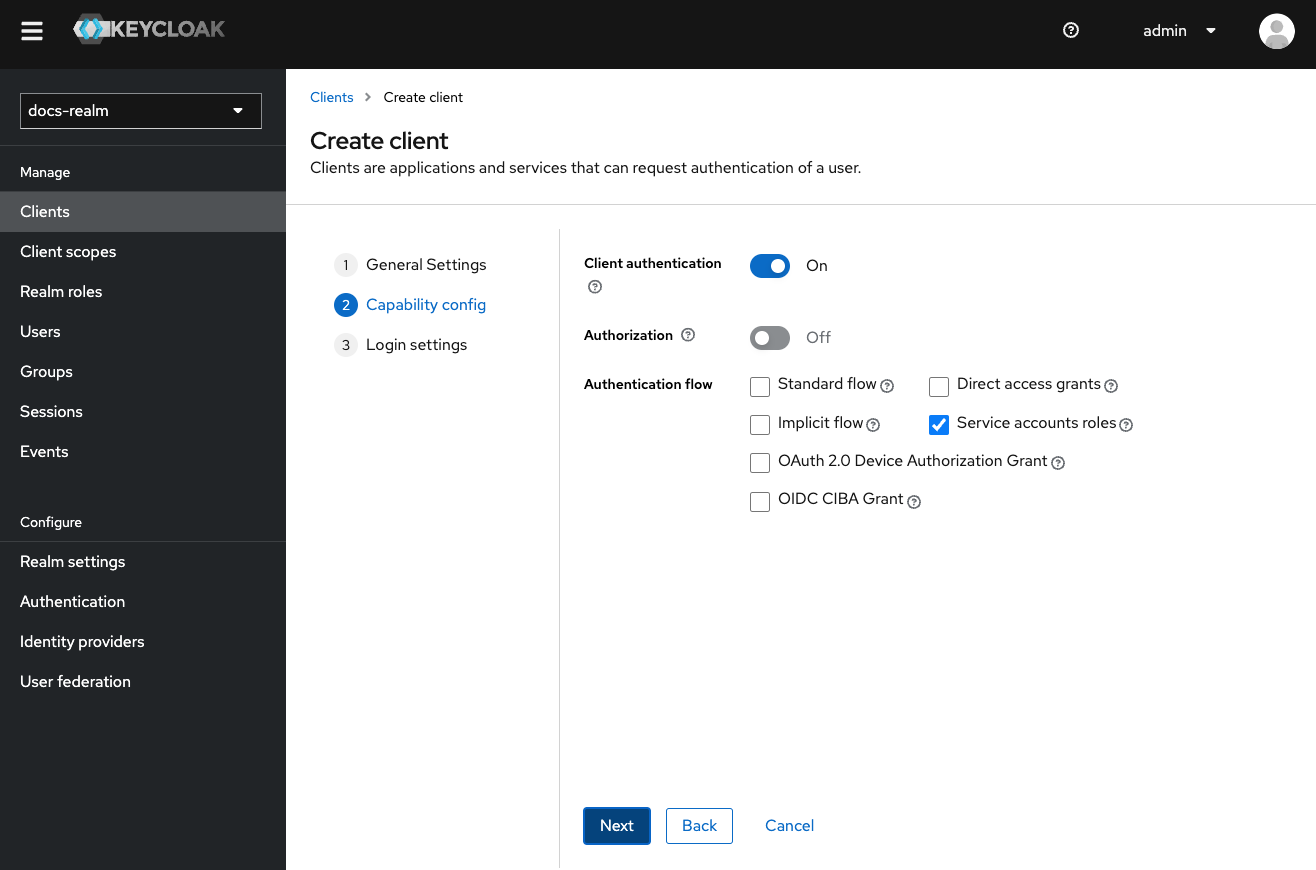
* Enable **Client authentication** (access type).
* Disable **Standard flow**.
* Disable **Direct access grants**.
* Enable **Service accounts roles**.
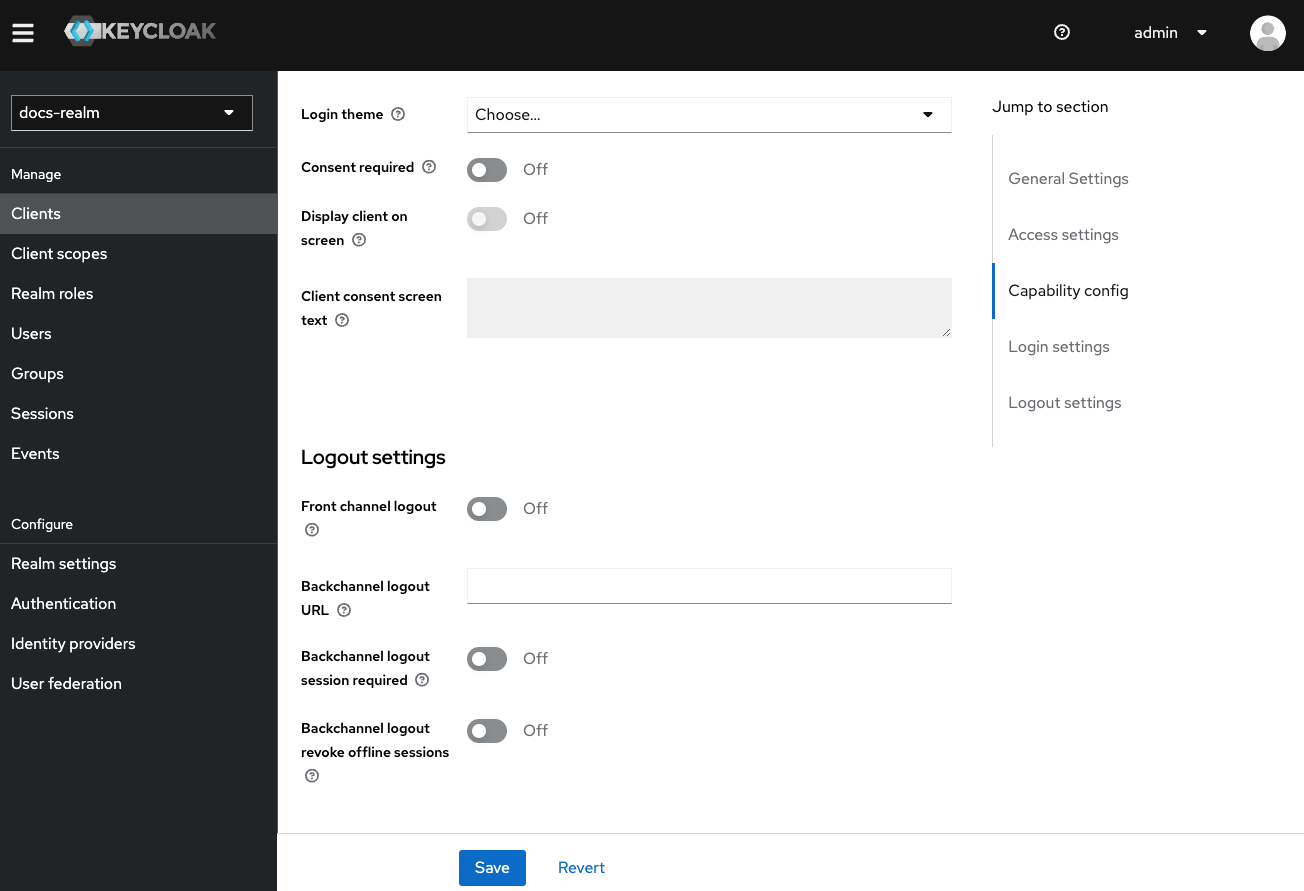
After creating the client, scroll down in the **Settings** tab and configure additional settings - **Logout Settings**:
* **Backchannel Logout Session Required**: Toggle OFF.
* **Front Channel Logout**: Toggle OFF.
In the newly created client, navigate to the **Service accounts roles** tab.
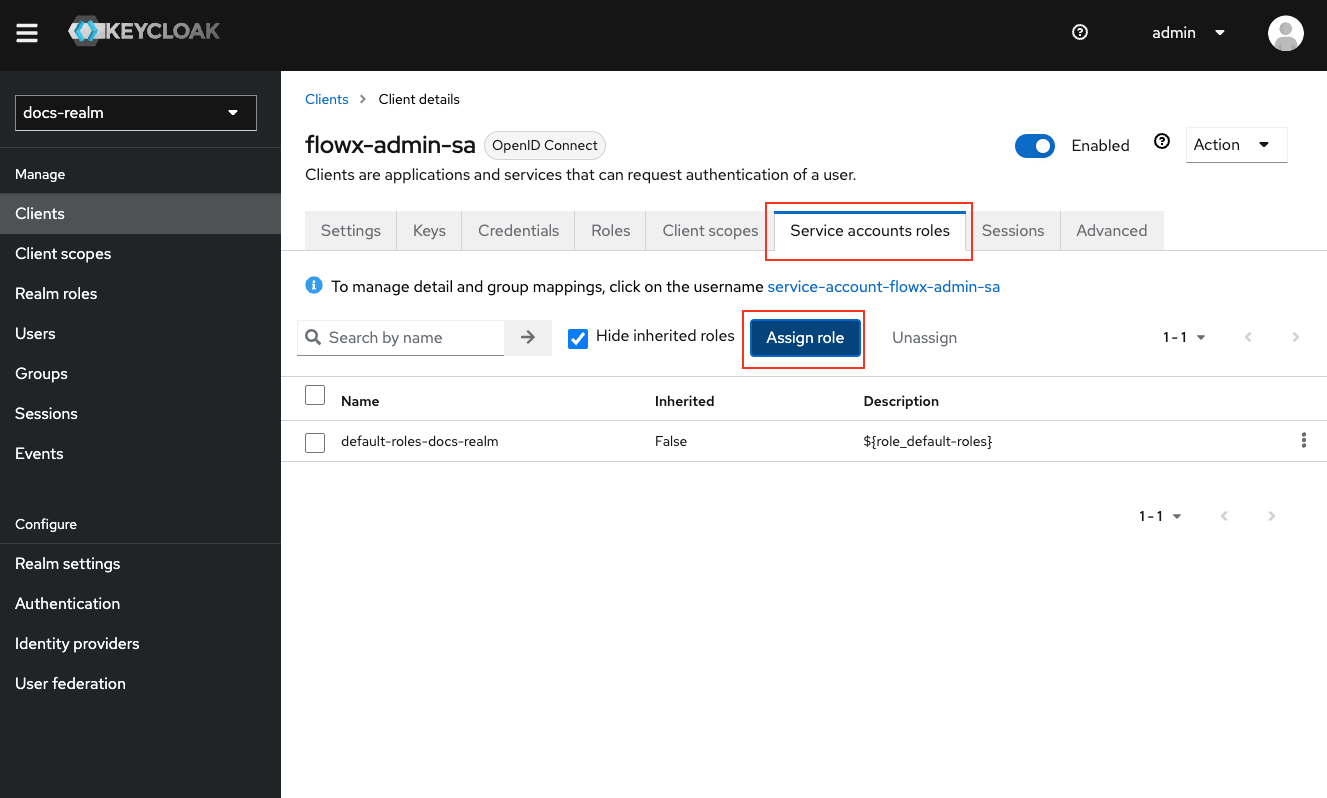
**Important**: The admin service account no longer requires client roles from realm-management. If you have existing roles assigned, remove them to follow the updated security model.
The admin service account is now configured to work without specific client roles. Authentication and authorization will be managed through the service account token itself.
The admin service account does not require mappers or specific client roles. Authentication is handled through the service account token itself.
### Task Management service account
The task management service account facilitates process initiation and enables the use of the task management plugin (requiring the `FLOWX_ROLE` and role mapper), and access data from Keycloak.
Steps to Add a Task Management service account:
Follow steps **1**-**3** as in the Admin Service account configuration: [Admin service account](#admin-service-account).
In the newly created client, navigate to the **Service accounts roles** tab.
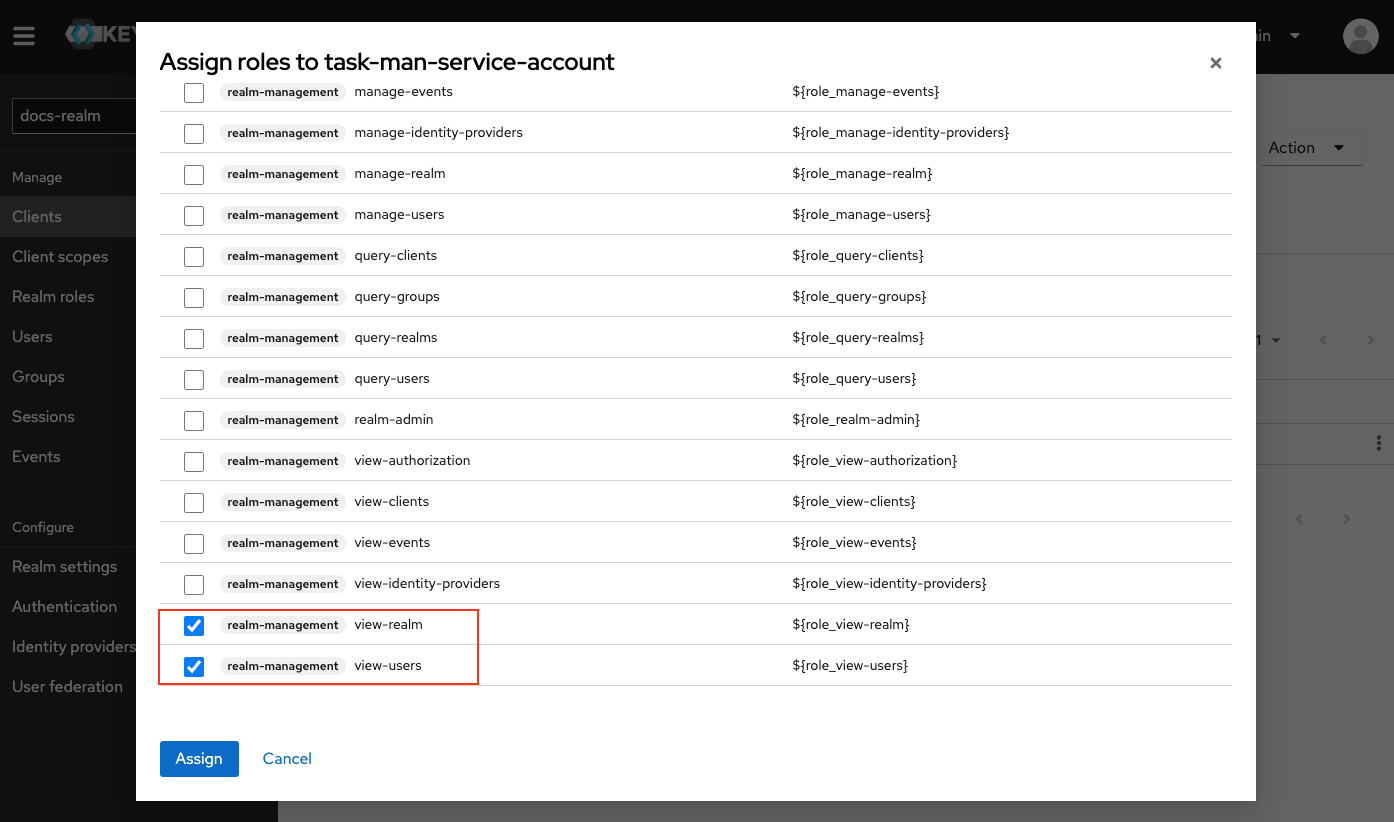
Click **Assign role** and in the Filter field, select **Filter by clients**.
Assign the following service account client roles from realm-management:
* **view-users**
* **query-users**
* **query-groups**
Remove any other roles if they are assigned (such as **view-realm**). The task management service account should only have these three client roles.
The task management plugin service account requires a realm roles mapper to function correctly. Make sure to configure this to ensure proper operation.
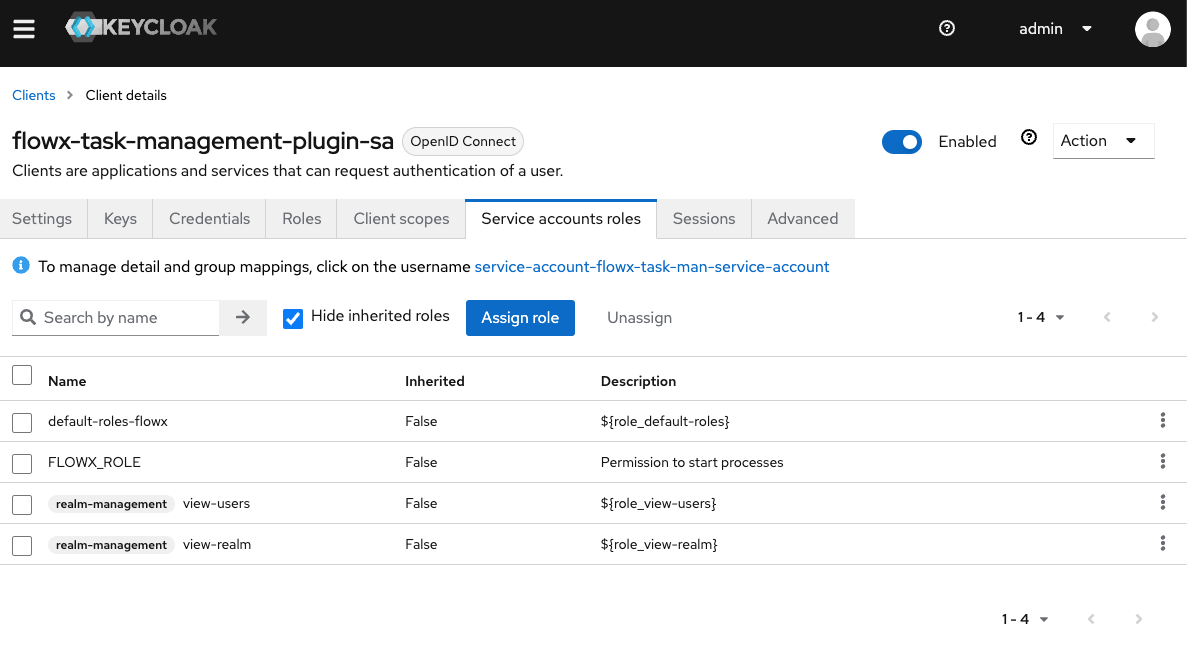
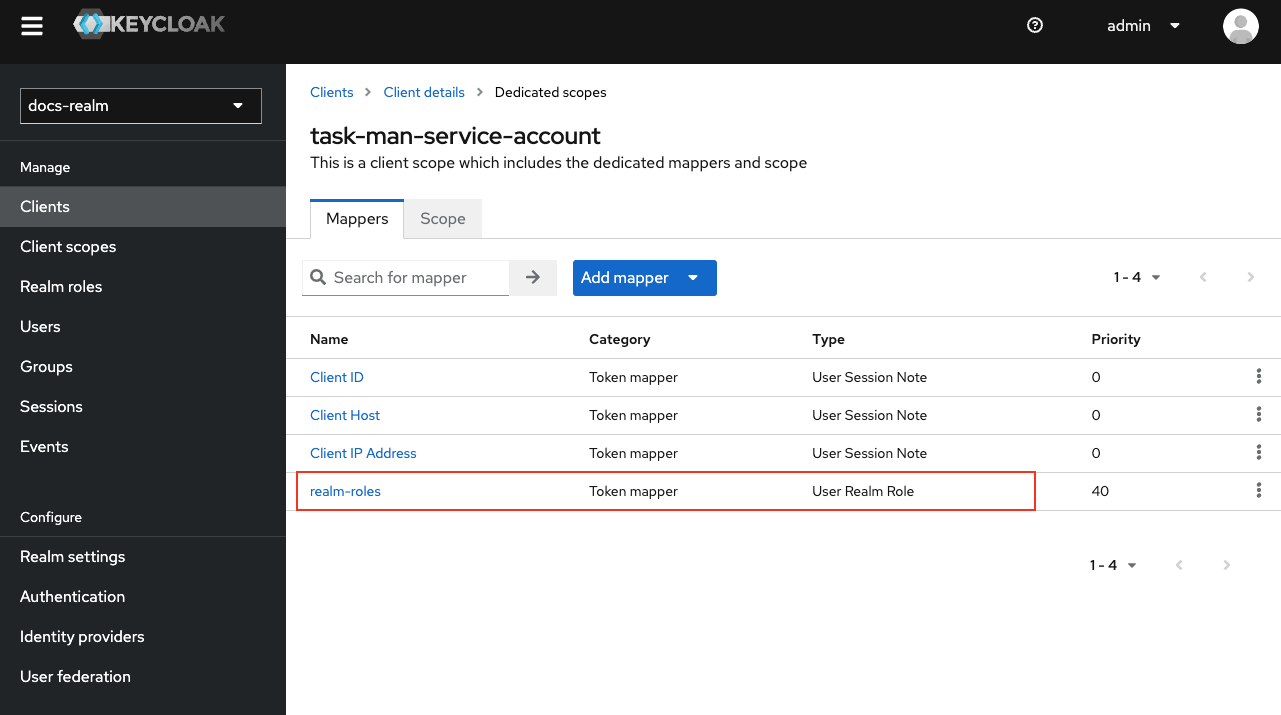
In the end, you should have something similar to this:
In the newly created task management plugin service account, select **Client Scopes**:
Click on `{your-client-name}-service-account` to open its settings.
Ensure the Mappers tab is selected within the dedicated client scope.
Click **Add mapper**. From the list of available mappers, select **User Realm Role**.
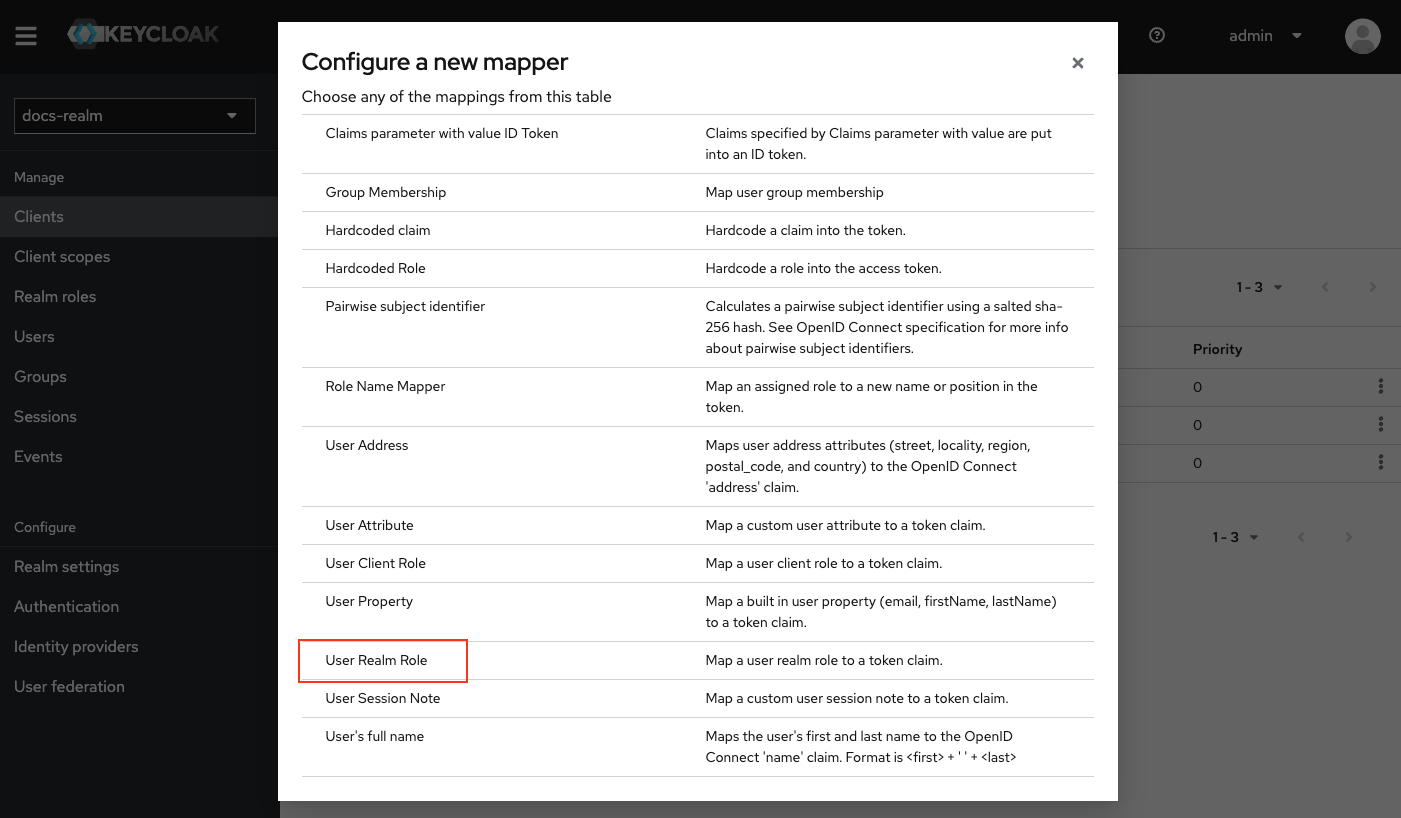
**Name**: Enter a descriptive name for the mapper to easily identify its purpose, for example `realm-roles`.
**Token Claim Name**: Set it to `roles`.
Disable **Add to ID token**.
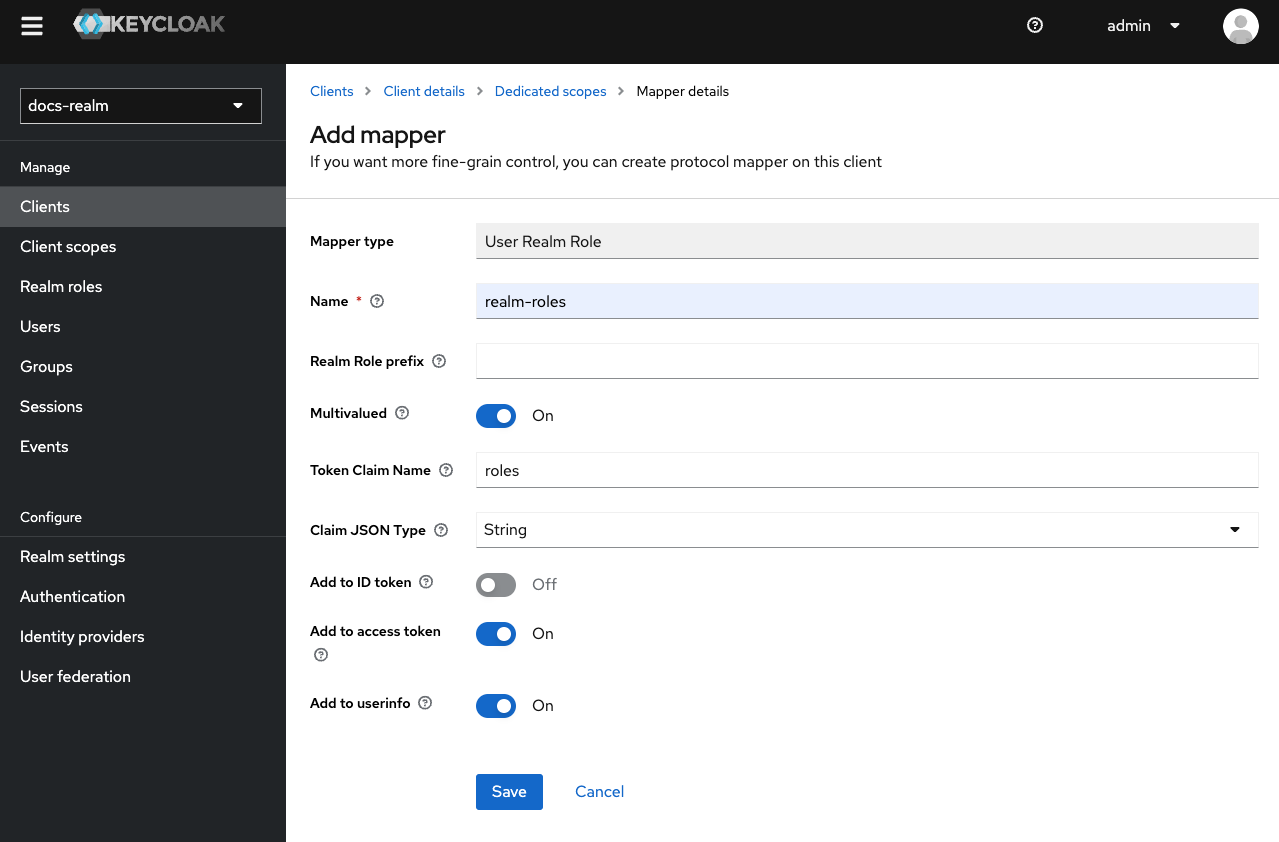
Click **Save**.
Assign the `FLOWX_ROLE` service account realm role (used to grant permissions for starting processes).
The `FLOWX_ROLE` is used to grant permissions for starting processes in the FlowX.AI Designer platform. By default, this role is named `FLOWX_ROLE`, but its name can be changed from the application configuration of the Engine by setting the following environment variable:
`FLOWX_PROCESS_DEFAULTROLES`
### Process engine service account
The process engine requires a service account for service-to-service authentication and authorization.
This service account is also needed to be able to use [**Start Catch Event**](../../docs/building-blocks/node/message-events/message-catch-start-event) node.
Follow steps **1-3** as in the Admin Service Account Configuration: [Admin service account](#admin-service-account).
In the newly created client, navigate to the **Service accounts roles** tab.
The process engine service account does not require client roles from realm-management. Authentication and authorization are managed through the service account token and the `SA_FLOWX` realm role.
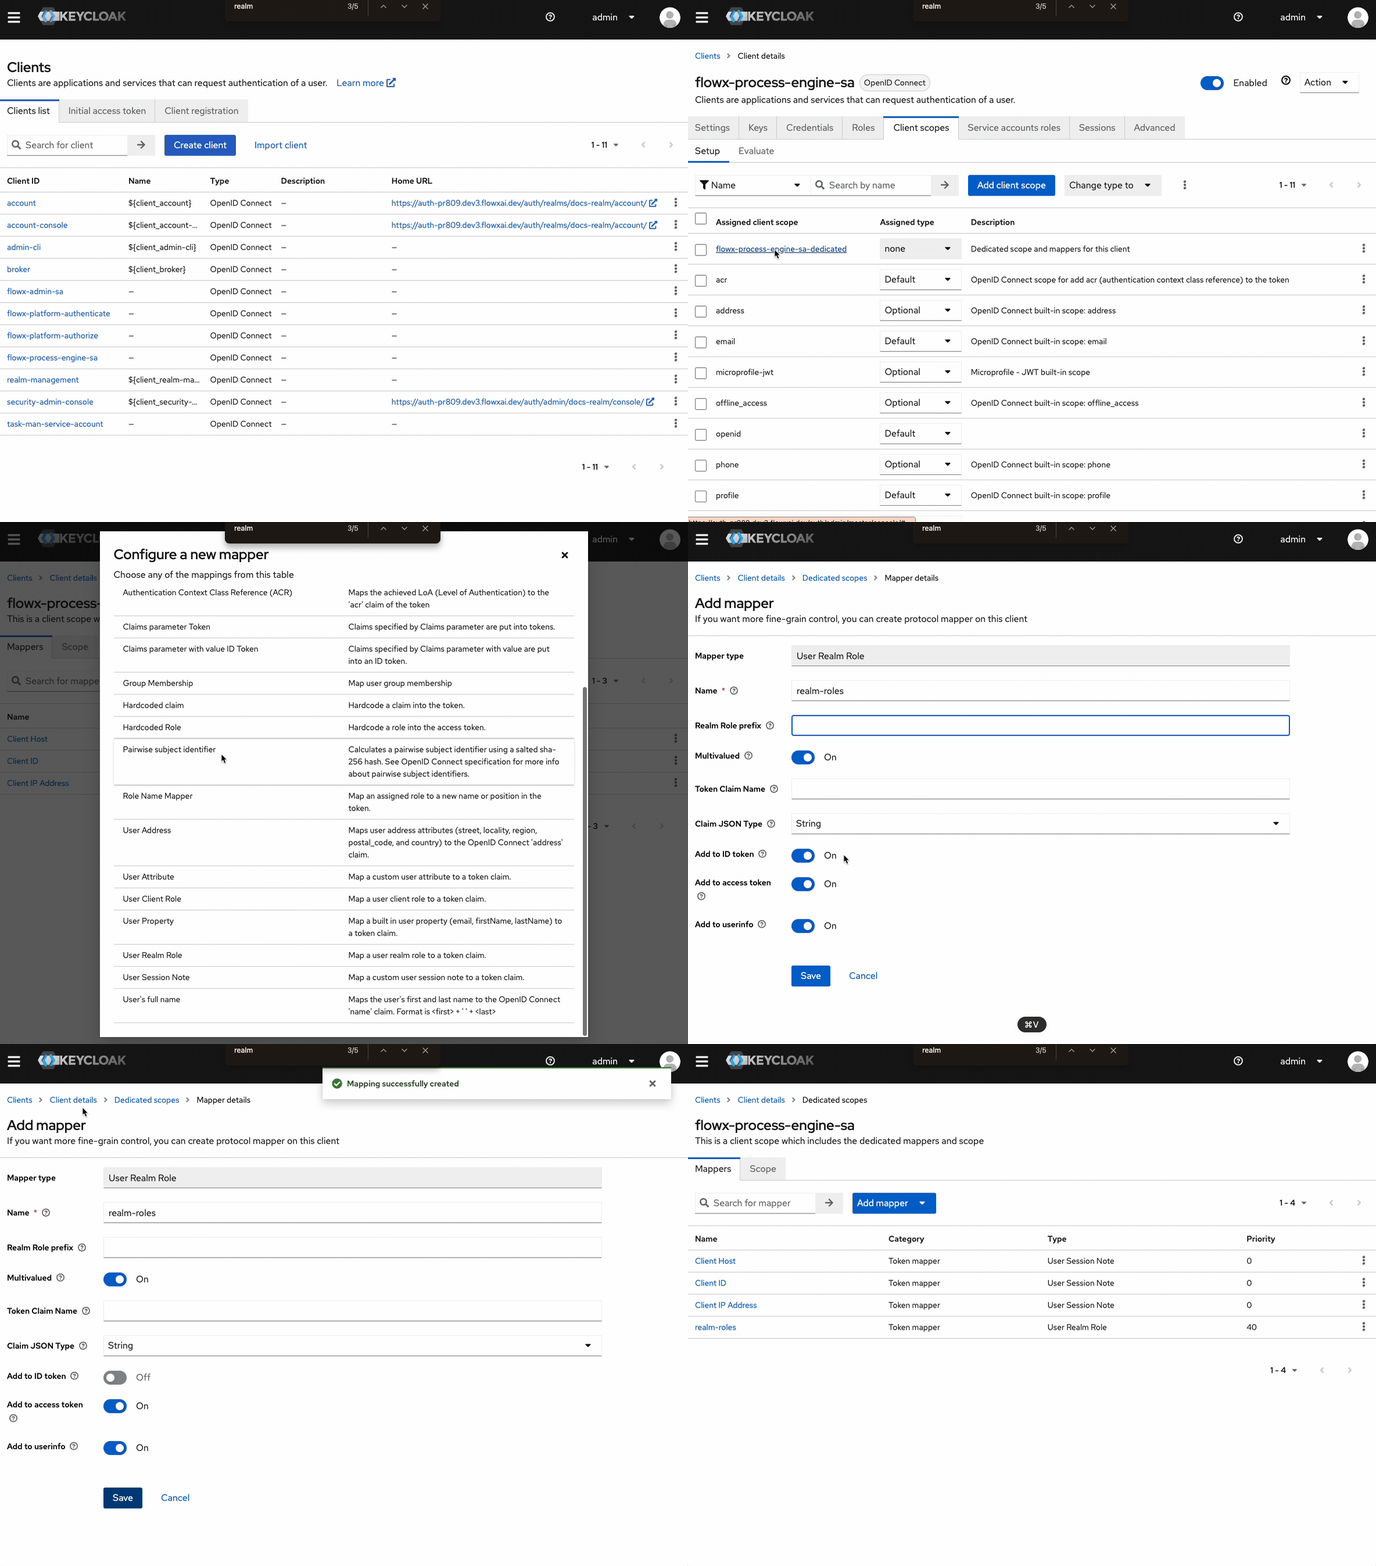
In the newly created process engine service account, select **Client Scopes**.
Click on `{your-client-name}-service-account` to open its settings.
Ensure the **Mappers** tab is selected within the dedicated client scope.
Click **Add mapper**. From the list of available mappers, select **User Realm Role**.
Configure the mapper:
* **Name**: Enter `realm-roles`
* **Token Claim Name**: Set it to `roles`
* **Add to ID token**: Toggle OFF
* **Add to token introspection**: Toggle ON
### Scheduler service account
This service account is used for [**Start Timer Event**](../../docs/building-blocks/node/timer-events/timer-start-event) node. The registered timers in the scheduler require sending a process start message to Kafka. Authentication is also necessary for this operation.
The configuration is similar to the **process engine service account**:
Follow steps **1-3** as in the Admin Service Account Configuration: [Admin service account](#admin-service-account).
In the newly created client, navigate to the **Service accounts roles** tab.
The scheduler service account does not require client roles from realm-management. Authentication and authorization are managed through the service account token and the `SA_FLOWX` realm role.
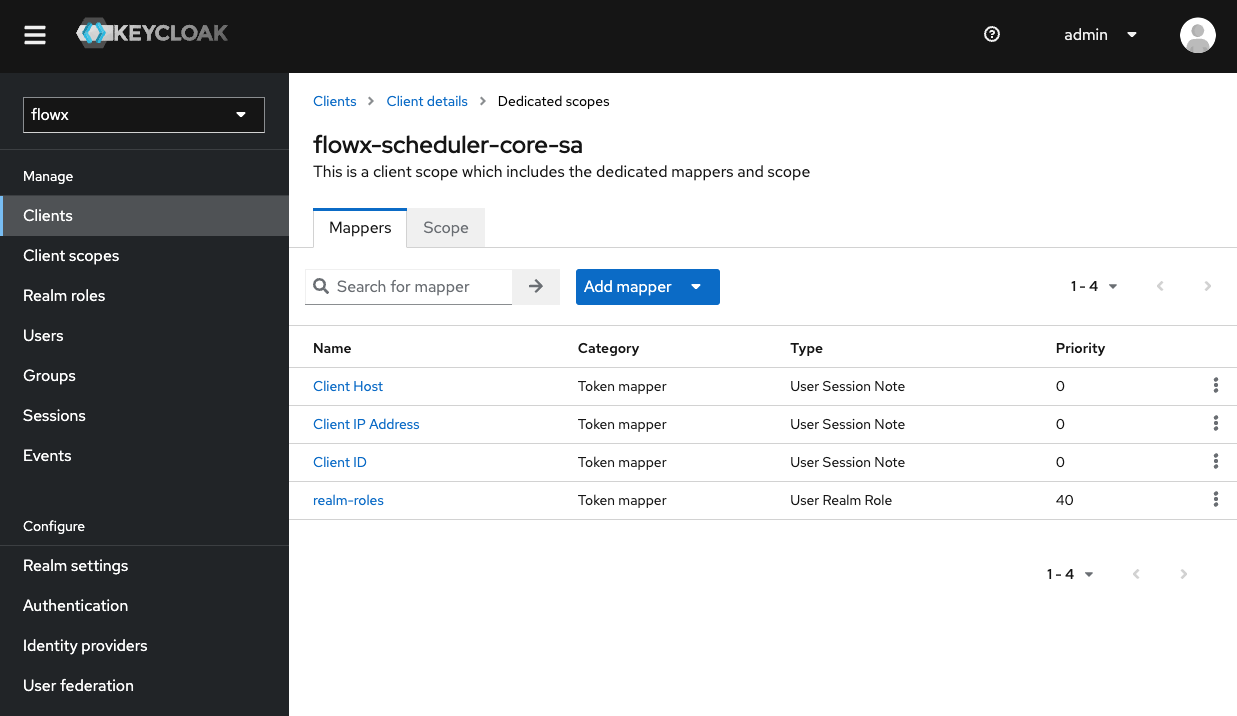
Add a **realm-roles** mapper (as shown in the example for process-engine service account):
In the scheduler service account, select **Client Scopes**.
Click on `{your-client-name}-service-account` to open its settings.
Ensure the **Mappers** tab is selected within the dedicated client scope.
Click **Add mapper**. From the list of available mappers, select **User Realm Role**.
Configure the mapper:
* **Name**: Enter `realm-roles`
* **Token Claim Name**: Set it to `roles`
* **Add to ID token**: Toggle OFF
* **Add to token introspection**: Toggle ON
### Integration Designer service account
The Integration Designer service account is used by the integration designer microservice to interact securely with Keycloak, enabling it to manage various integrations within the FlowX.AI platform.
Steps to set up an Integration Designer service account:
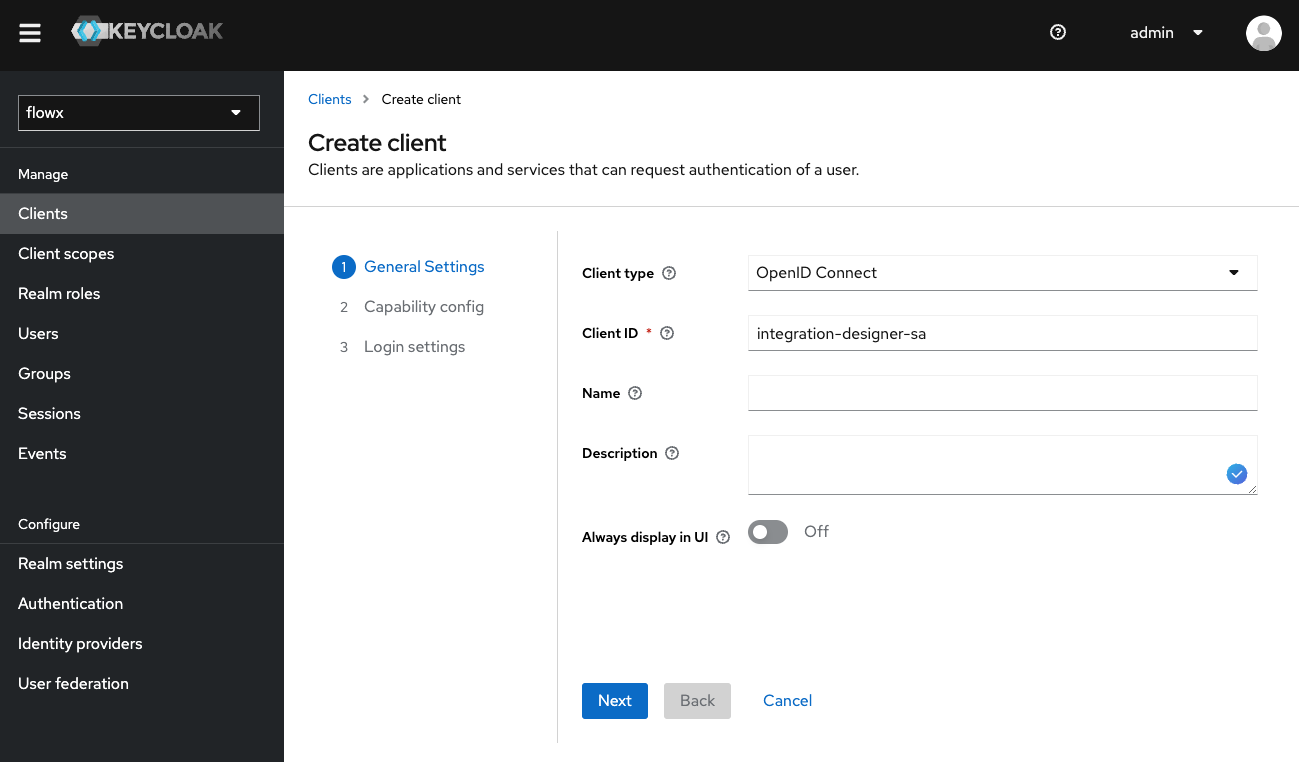
* In Keycloak, navigate to **Clients** and select **Create client**.
* Enter a **Client ID** for your new client (e.g., `flowx-integration-designer-sa`).
* Enable **Client authentication** under access type.
* Enable **Service accounts roles** to allow the account to manage integrations.
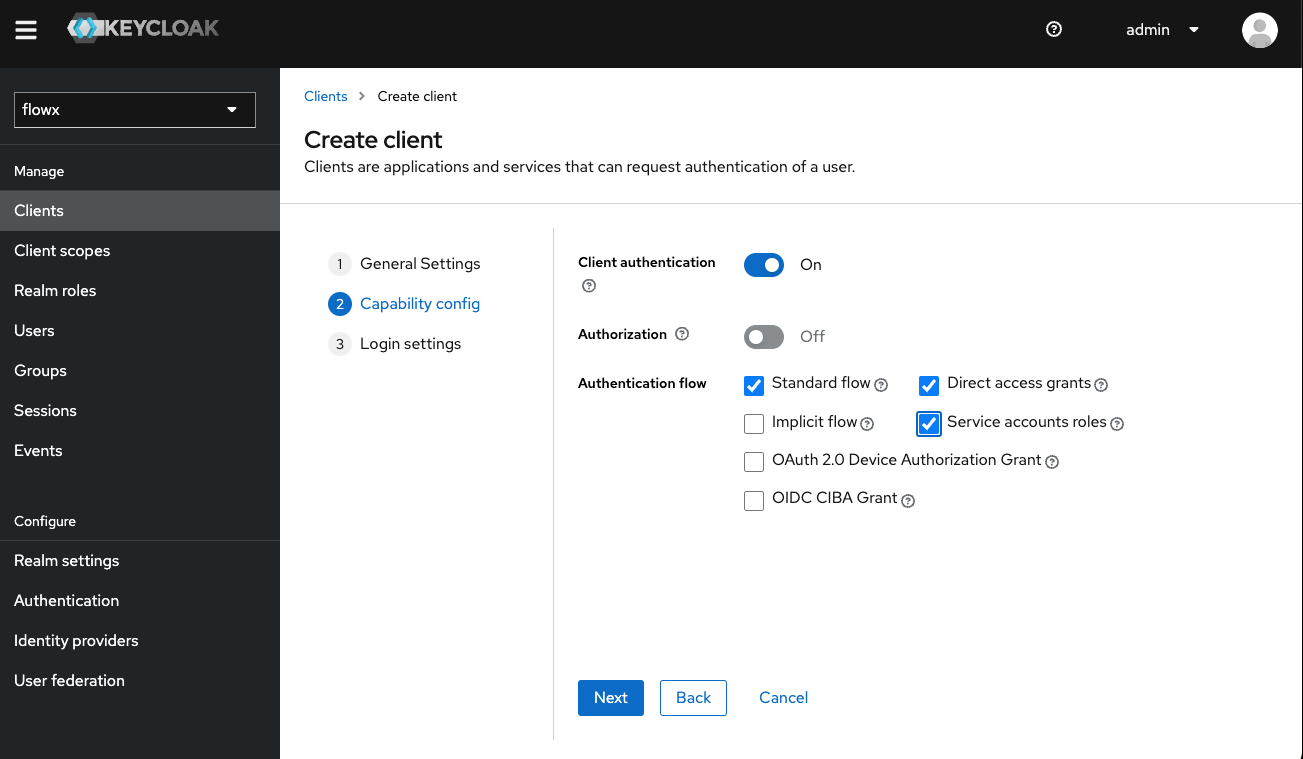
* Skip the **Login settings** page.
* Click **Save** to apply the configuration.
In the newly created client, navigate to the **Service accounts roles** tab.
Click **Assign role** and in the Filter field, select **Filter by clients**.
Assign only the **view-users** role from realm-management:
Remove any other roles if they are assigned. The integration designer service account should only have the **view-users** client role.
### Authorization System service account
The Authorization System service account is used for managing user authentication and authorization operations, including user management, realm configuration, and access control within the FlowX.AI platform.
Steps to set up an Authorization System service account:
Navigate to **Clients** and select **Create client**.
Enter a **Client ID** for your new client (e.g., `flowx-authorization-system-sa`).
* Enable **Client authentication** (access type).
* Disable **Standard flow**.
* Disable **Direct access grants**.
* Enable **Service accounts roles**.
After creating the client, scroll down in the **Settings** tab and configure additional settings - **Logout Settings**:
* **Backchannel Logout Session Required**: Toggle OFF.
* **Front Channel Logout**: Toggle OFF.
In the newly created client, navigate to the **Service accounts roles** tab.
Click **Assign role** and in the Filter field, select **Filter by clients**.
Assign the following service account client roles from realm-management:
* **view-users**
* **query-users**
* **manage-users**
* **manage-realm**
These roles are essential for the Authorization System service account to perform user and realm management operations within Keycloak.
### Runtime manager service account
The runtime manager service account is used by both Application Manager and Runtime Manager services to connect with Keycloak and perform export/import operations for builds, application versions, or other resource-specific tasks.
Steps to add a Runtime manager service account:
Navigate to **Clients** and select **Create client**.
Enter a **Client ID** for your new client.
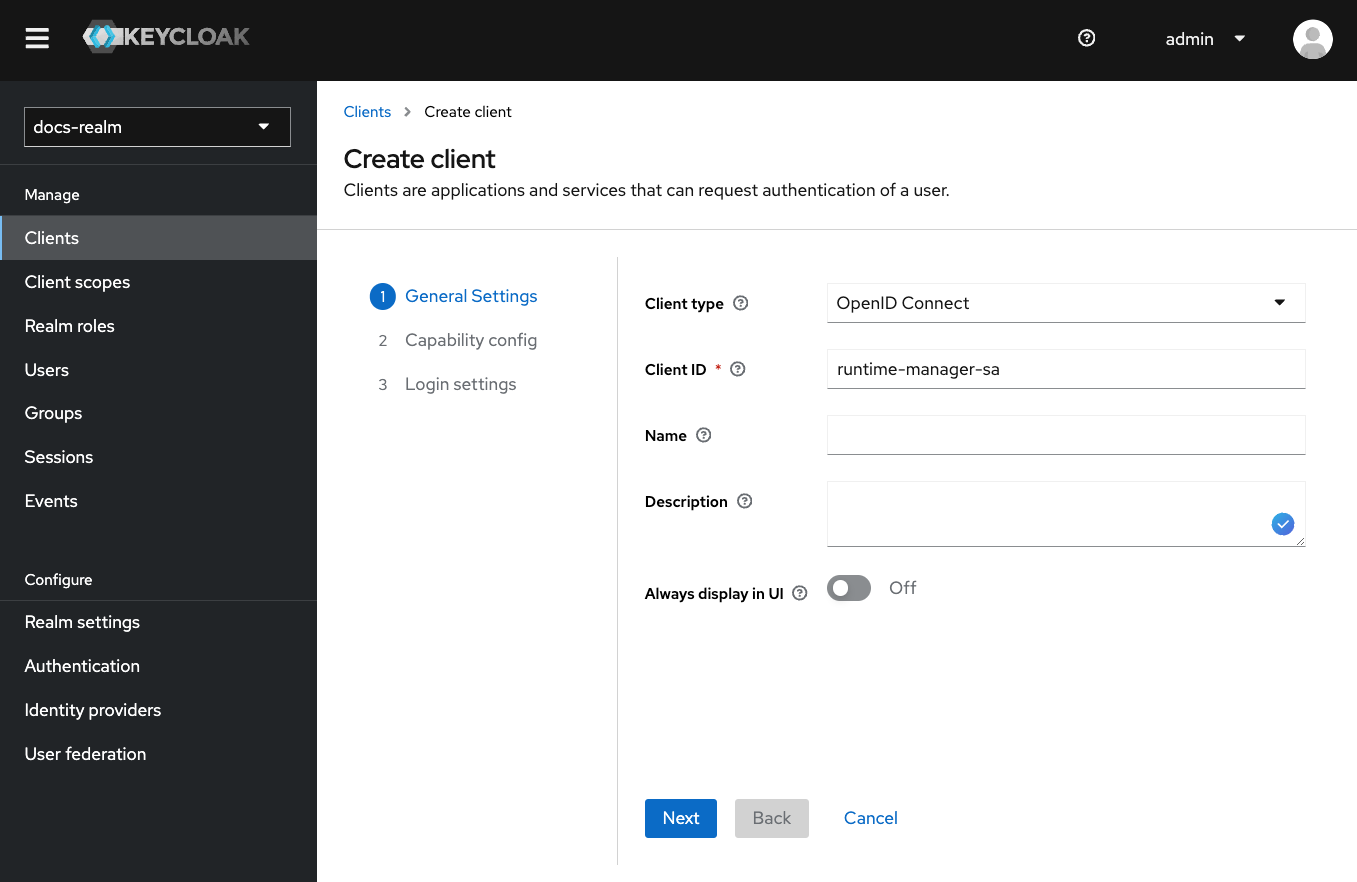
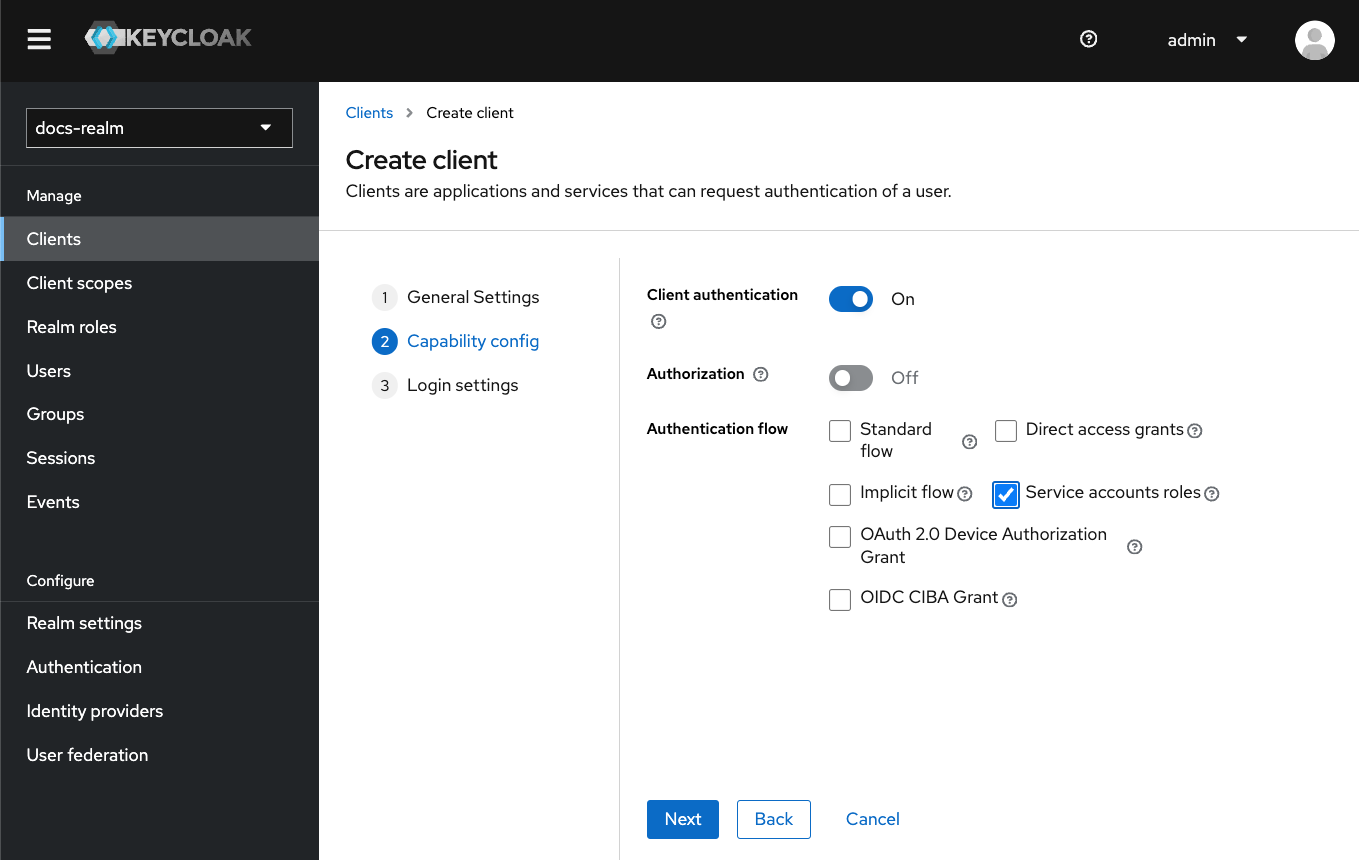
* Enable **Client authentication** (access type).
* Disable **Standard flow**.
* Disable **Direct access grants**.
* Enable **Service accounts roles**.
After creating the client, scroll down in the **Settings** tab and configure additional settings - **Logout Settings**:
* **Backchannel Logout Session Required**: Toggle OFF.
* **Front Channel Logout**: Toggle OFF.

In the newly created client, navigate to the **Service accounts roles** tab.

**Important**: The runtime manager service account no longer requires specific realm roles. If you have existing roles assigned (such as ROLE\_TASK\_MANAGER\_HOOKS\_ADMIN, ROLE\_ADMIN\_MANAGE\_PROCESS\_ADMIN, etc.), remove them to follow the updated security model.
The runtime manager service account is now configured to work without specific realm roles. Authentication and authorization for export/import operations will be managed through the service account token itself.
### Organization manager service account
The organization manager service account is used by the organization manager microservice to handle organization and workspace management within the FlowX.AI platform.
Follow steps **1**-**3** as in the Admin Service Account Configuration: [Admin service account](#admin-service-account).
Enter a **Client ID** of `flowx-organization-manager-sa`.
In the newly created client, navigate to the **Service accounts roles** tab.
The organization manager service account does not require specific client roles from realm-management. Authentication and authorization are managed through the service account token and the `SA_FLOWX` realm role.
### Email gateway service account
The email gateway service account is used by the email gateway microservice to manage email sending and receiving operations within the FlowX.AI platform.
Follow steps **1**-**3** as in the Admin Service Account Configuration: [Admin service account](#admin-service-account).
Enter a **Client ID** of `flowx-email-gateway-sa`.
In the newly created client, navigate to the **Service accounts roles** tab.
Click **Assign role** and in the Filter field, select **Filter by clients**.
Assign the following service account client role from realm-management:
* **view-users**
Remove any other roles if they are assigned. The email gateway service account should only have the **view-users** client role.
### License service account
The license service account is used by the license microservice to manage license validation and enforcement within the FlowX.AI platform.
Follow steps **1**-**3** as in the Admin Service Account Configuration: [Admin service account](#admin-service-account).
Enter a **Client ID** of `flowx-license-sa`.
In the newly created client, navigate to the **Service accounts roles** tab.
Click **Assign role** and in the Filter field, select **Filter by clients**.
Assign the following service account client role from realm-management:
* **view-users**
Remove any other roles if they are assigned. The license service account should only have the **view-users** client role.
***
## Configuring SA\_FLOWX realm role
The `SA_FLOWX` role is a realm-level role that should be assigned to all service accounts to ensure proper authentication and authorization across the FlowX.AI platform.
**5.5.0 and later**: Create the `SA_FLOWX` role in the **service accounts realm** (`00000002-0002-4002-8002-000000000002`), since that is where all service account clients reside. In 5.1.x, create it in the user realm.
1. In the Keycloak admin console, navigate to the appropriate realm:
* **5.1.x**: Your user realm
* **5.5.0+**: The service accounts realm (`00000002-0002-4002-8002-000000000002`)
2. Go to **Realm roles** in the left menu.
3. Click **Create role**.
4. Enter `SA_FLOWX` as the **Role name**.
5. Add a description: "Service account role for FlowX.AI platform services".
6. Click **Save**.
For each service account listed below, assign the `SA_FLOWX` realm role:
* **flowx-process-engine-sa**
* **flowx-admin-sa**
* **flowx-runtime-manager-sa**
* **flowx-integration-designer-sa**
* **flowx-scheduler-core-sa**
* **flowx-authorization-system-sa**
* **flowx-task-management-plugin-sa**
* **flowx-organization-manager-sa** (5.5.0+)
* **flowx-email-gateway-sa** (5.4.0+)
* **flowx-license-sa** (5.5.0+)
To assign the role to each service account:
1. Navigate to **Clients** and select the service account client.
2. Go to the **Service accounts roles** tab.
3. Click **Assign role**.
4. In the Filter field, select **Filter by realm roles**.
5. Find and select **SA\_FLOWX** from the list.
6. Click **Assign**.
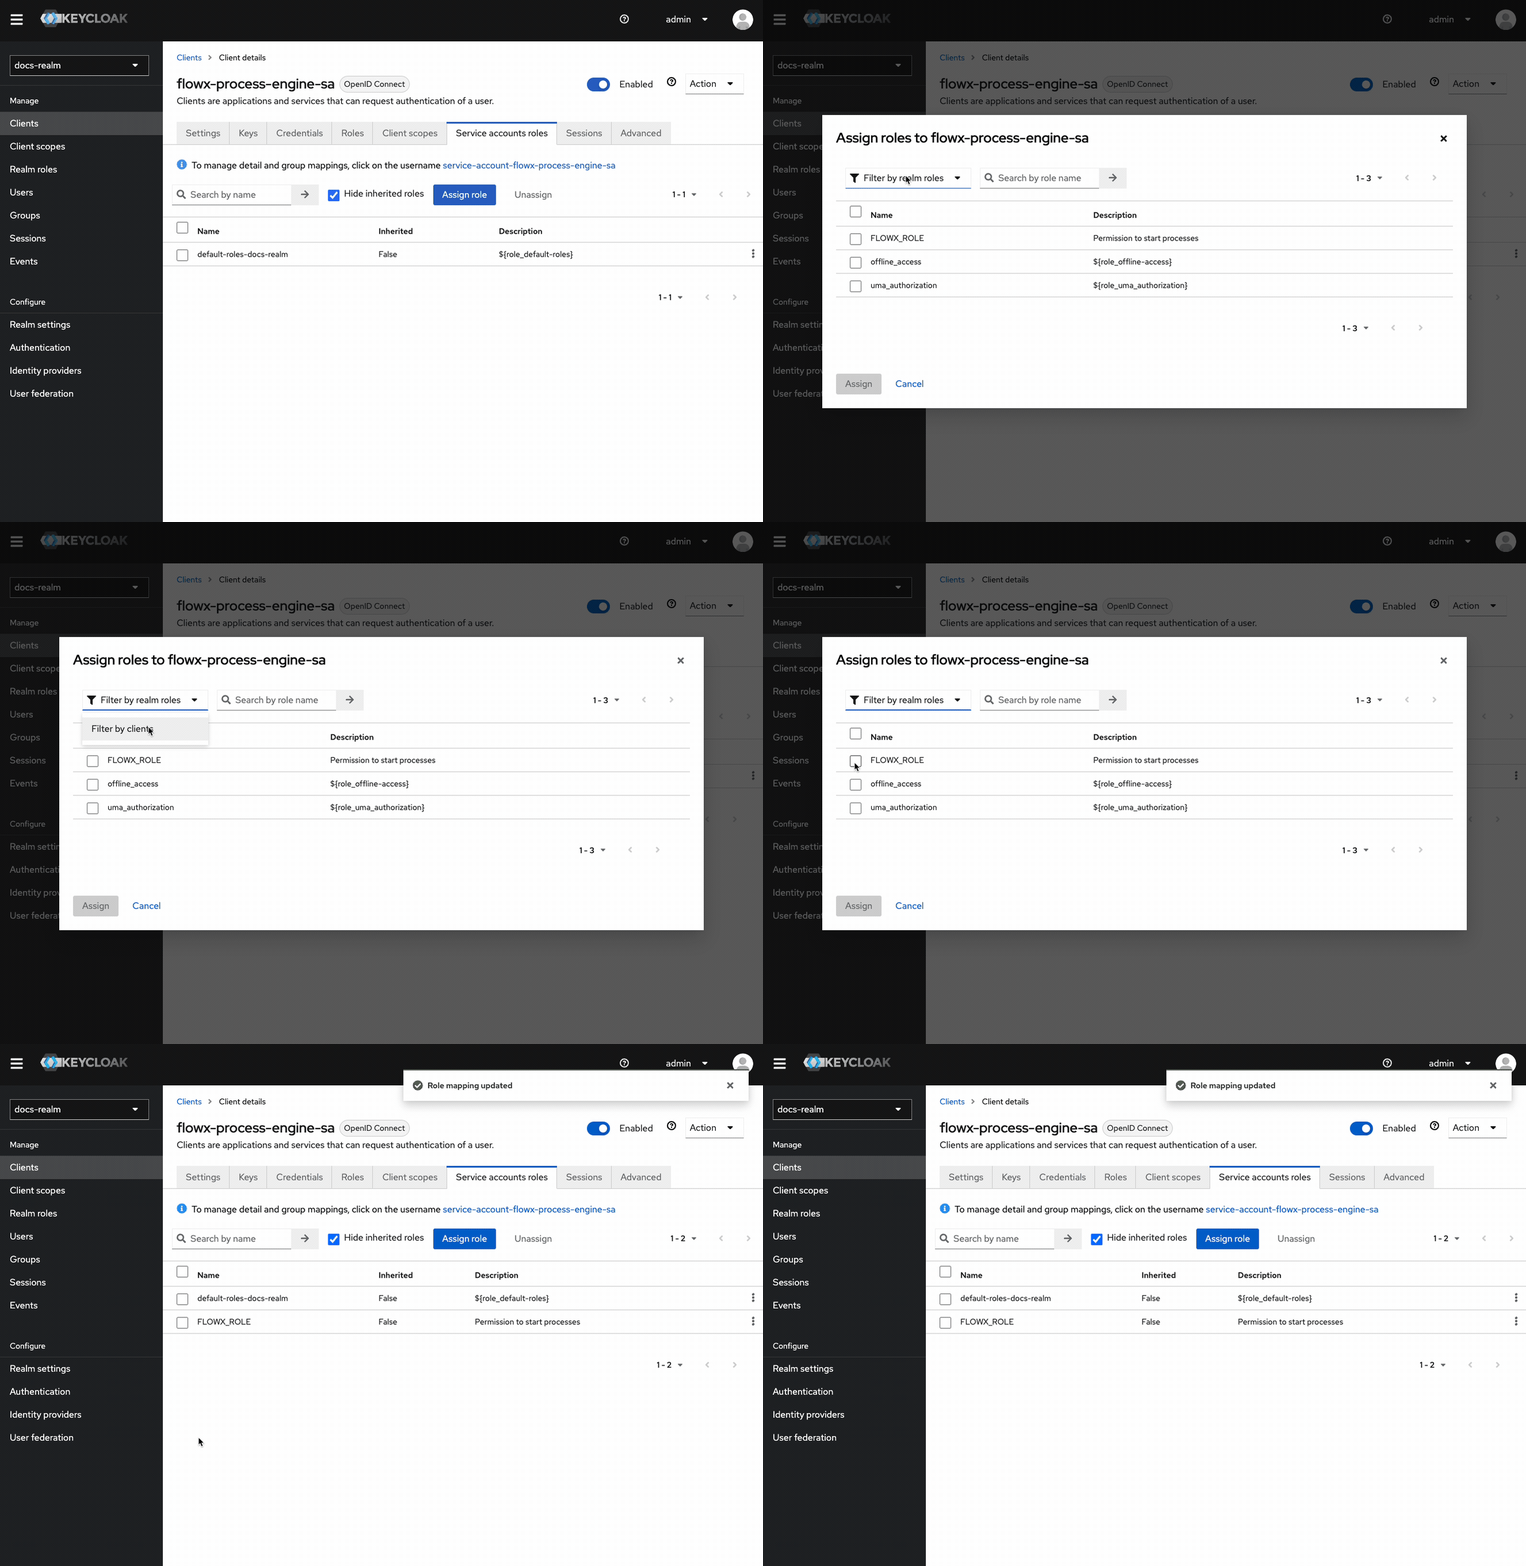
After assigning the role to all service accounts, verify that each service account has the `SA_FLOWX` role listed in its **Service accounts roles** tab.
The `SA_FLOWX` role ensures consistent authentication and authorization behavior across all FlowX.AI platform services. Make sure all service accounts have this role assigned for proper system operation.
***
## Email (SMTP) configuration
**Required for self-hosted deployments**
On self-hosted (self-hosted) deployments, SMTP must be configured by the client directly in Keycloak. This is required for password reset flows and user invitation emails sent from FlowX Designer.
To configure email delivery:
In Keycloak, go to your organization realm, then **Realm settings** → **Email**.
Fill in your SMTP server details:
| Field | Description |
| ------------------------------------ | ------------------------------------------------------ |
| **Host** | SMTP server hostname (e.g., `smtp.example.com`) |
| **Port** | SMTP port (typically `587` for TLS or `465` for SSL) |
| **From** | Sender email address (e.g., `noreply@example.com`) |
| **Enable SSL** / **Enable StartTLS** | Toggle **ON** based on your mail server requirements |
| **Authentication** | Toggle **ON** if your SMTP server requires credentials |
| **Username** / **Password** | SMTP authentication credentials |
Use the **Test connection** button in Keycloak to verify emails can be sent.
Without SMTP configured, the following features will not work:
* **Password reset** — users cannot reset their passwords via email
* **User invitations** — inviting new users from FlowX Designer will fail
***
## Manual Keycloak configuration
If FlowX services do not have Keycloak admin access, perform the following steps manually in the Keycloak Admin Console:
1. Log in to the Keycloak Admin Console.
2. Click **Create realm**.
3. Set the **Realm name** to `00000002-0002-4002-8002-000000000002`.
4. Set the **Display name** to `Flowx Administration Realm`.
5. Click **Create**.
Configure the realm settings:
* **Login** tab: Enable **Email as username** and **Login with email**
* **Authentication** → **Policies** → **Password Policy**: Add uppercase, digit, special character, and minimum length (8) rules
For each service account client listed in [Adding service accounts](#adding-service-accounts), create the client in the **service accounts realm** (not the user realm):
1. In the SA realm, go to **Clients** → **Create client**.
2. Enter the **Client ID** (e.g., `flowx-admin-sa`).
3. Enable **Client authentication** and **Service accounts roles**. Disable **Standard flow** and **Direct access grants**.
4. Configure **Logout Settings**: Toggle **OFF** both Backchannel Logout and Front Channel Logout.
5. Assign the `SA_FLOWX` realm role (create it first in the SA realm if it does not exist).
In the **user realm**, ensure the `flowx-platform-authenticate` client has a protocol mapper that adds the `org_id` claim to access tokens:
1. Go to **Clients** → `flowx-platform-authenticate` → **Client scopes** → dedicated scope.
2. **Add mapper** → **By configuration** → **Hardcoded claim**.
3. Set **Name** to `org_id`, **Token Claim Name** to `org_id`, **Claim value** to your organization UUID, and **Claim JSON Type** to `String`.
4. Enable **Add to access token** and **Add to token introspection**.
After creating the service account clients in the SA realm, delete the old service account clients from the user realm. Keep only user-facing clients (`flowx-platform-authenticate`) in the user realm.
If you skip manual configuration, service-to-service authentication will fail. All FlowX backend services expect service accounts to exist in the realm identified by `security.oauth2.sa-realm` (`00000002-0002-4002-8002-000000000002`).
***
## Troubleshooting
**Keycloak 26+ only**: You must configure email settings in the **Login** tab of realm settings. Toggle **ON** both **Email as username** and **Login with email**. Without this configuration, user creation requests from FlowX Designer fail with a bad request error.
Ensure the realm name is unique within your Keycloak instance. Duplicate realm names cause creation failures.
Verify the following:
* The service account client has **Client authentication** enabled and **Service accounts roles** toggled **ON**.
* The `SA_FLOWX` realm role is assigned to the service account.
* The client secret in your deployment matches the secret in Keycloak (**Clients** → select client → **Credentials** tab).
* **5.1.x**: The `security.oauth2.realm` configuration points to the correct realm.
* **5.5.0+**: The `security.oauth2.sa-realm` is set to `00000002-0002-4002-8002-000000000002` and the service account client exists in the SA realm (not the user realm).
Check that the required protocol mappers are configured on the correct client scope:
* **Group Membership** mapper with **Add to token introspection** toggled **ON**.
* **User Realm Role** mapper with **Add to token introspection** toggled **ON**.
* **User Attribute** mapper for business filters with **Multivalued** and **Aggregate attribute values** toggled **ON**.
**5.5.0+**: Also verify the `org_id` protocol mapper is configured on the `flowx-platform-authenticate` client in the user realm.
The task management service account requires `view-users`, `query-users`, and `query-groups` client roles from realm-management. Verify these are assigned in the **Service accounts roles** tab. In 5.5.0+, the task management SA is in the service accounts realm but still needs access to user realm data via the master realm configuration.
After upgrading from 5.1.x:
* Verify `security.type` is set to `jwt-public-key` (not `oauth2`).
* Remove any `spring.security.oauth2.resource-server.opaque-token.*` configuration.
* Remove the `security.oauth2.realm`, `security.oauth2.client.client-id`, and `security.oauth2.client.client-secret` properties.
* Ensure `security.oauth2.sa-realm` is set to `00000002-0002-4002-8002-000000000002`.
* Verify that `flowx.lib.security.services.organization-manager.base-url` is set and the organization-manager service is reachable.
***
## Summary
By following these steps, you have a minimal Keycloak setup to manage users, roles, and apps efficiently.
Your Keycloak setup should include:
* A **user realm** (named with your organization UUID) containing the `flowx-platform-authenticate` client, protocol mappers, users, roles, and groups
* A **service accounts realm** (`00000002-0002-4002-8002-000000000002`) containing all `flowx-*-sa` service account clients with the `SA_FLOWX` realm role
* **SMTP configured** in the user realm for password reset and user invitations (required for self-hosted deployments)
* **JWT public key validation** (`security.type: jwt-public-key`) on all services
* **Master realm credentials** configured on the authorization-system service
Your Keycloak setup should include:
* A **single realm** containing both user-facing clients and service account clients
* The `flowx-platform-authenticate` and `flowx-platform-authorize` clients with protocol mappers
* All service accounts with the `SA_FLOWX` realm role
* **Opaque-token introspection** (`security.type: oauth2`) on all services
For more detailed configurations and advanced features, refer to the official Keycloak documentation.
***
## Related resources
User roles, groups, and access control
Data-level access control using business filters
Official Keycloak documentation
## Related topics
- [Configuring an IAM solution (EntraID)](/5.1/setup-guides/access-management/configuring-an-iam-solution-entra.md)
- [IAM solution](/5.1/setup-guides/access-management/access-management-overview.md)
- [Authorization & access roles](/5.1/docs/platform-deep-dive/plugins/custom-plugins/reporting/access-and-authorization.md)
- [Deployment guidelines v5.7.0](/release-notes/v5.x/v5.7.0-april-2026/deployment-guidelines-v5.7.md)
- [FlowX Admin setup](/5.1/setup-guides/admin-setup-guide.md)