> ## Documentation Index
> Fetch the complete documentation index at: https://docs.flowx.ai/llms.txt
> Use this file to discover all available pages before exploring further.
# React SDK
> The FlowxProcessRenderer is a low code library designed to render UI configured via the Flowx.AI Process Editor.
## React project requirements
Your app MUST use SCSS for styling.
To install the npm libraries provided by FlowX.AI you will need to obtain access to the private FlowX.AI Nexus registry. Please consult with your project DevOps.
The library uses React version **react\~18**, **npm v10.8.0** and **node v18.16.9**.
## Installing the library
Use the following command to install the **renderer** library and its required dependencies:
Installing `react` and `react-dom` can be skipped if you already have them installed in your project.
```bash theme={"system"}
npm install \
react@18 \
react-dom@18 \
@flowx/core-sdk@ \
@flowx/core-theme@ \
@flowx/react-sdk@ \
@flowx/react-theme@ \
@flowx/react-ui-toolkit@ \
air-datepicker@3 \
axios \
ag-grid-react@32
```
Replace `` with the correct version corresponding to your platform version.
To find the right version, navigate to: **Release Notes → Choose your platform version → Deployment guidelines → Component versions**.
## Initial setup
Once installed, `FlxProcessRenderer` will be imported in the from the `@flowx/react-sdk` package.
### Theming
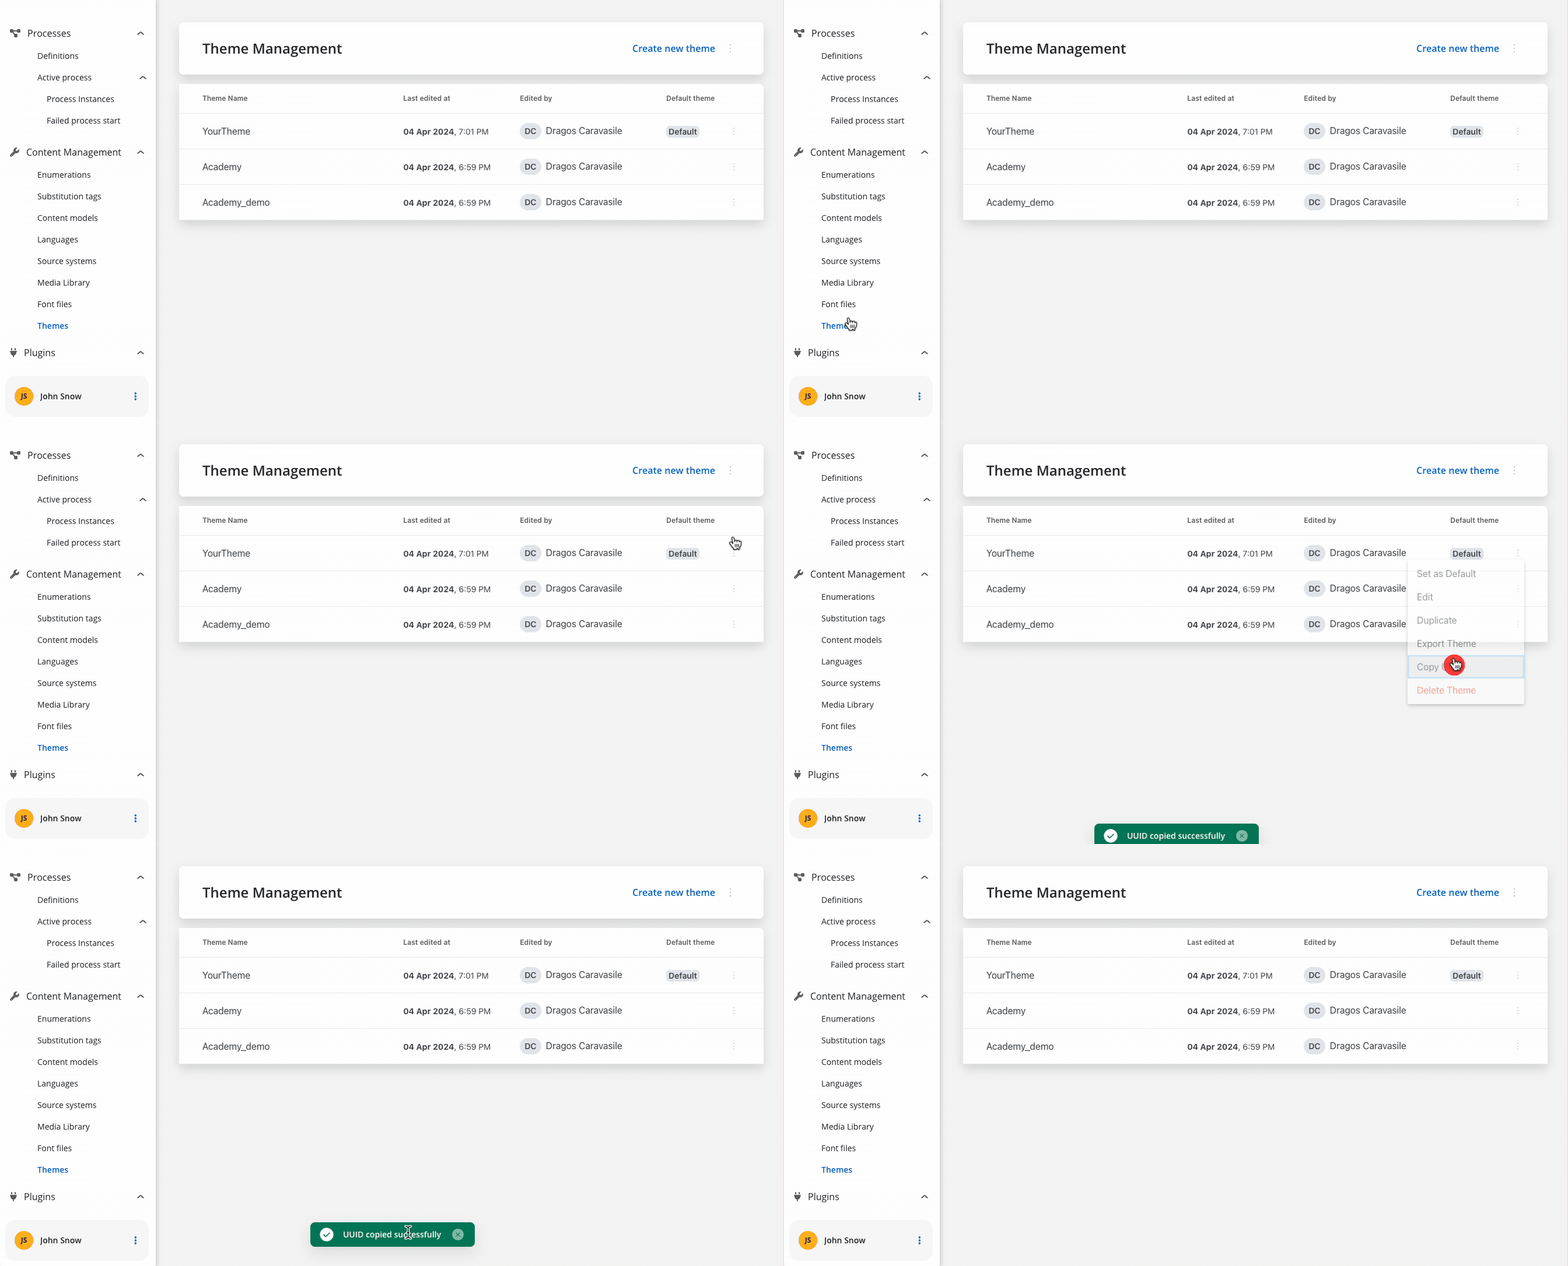
Component theming is done through the `@flowx/react-theme` library. The theme id is a required input for the renderer SDK component and is used to fetch the theme configuration. The id can be obtained from the admin panel in the themes section.
### Authorization
It's the responsibility of the client app to implement the authorization flow (using the **OpenID Connect** standard). The renderer SDK will expect the authToken to be passed to the `FlxProcessRenderer` as an input.
```typescript.tsx theme={"system"}
import { FlxProcessRenderer } from '@flowx/react-sdk';
export function MyFlxContainer() {
return
}
```
The `FlxProcessRenderer` component is required in the application module where the process will be rendered. The component accepts a props where you can pass extra config info, register a **custom component** or **custom validators**.
**Custom components** will be referenced by name when creating the template config for a user task.
**Custom validators** will be referenced by name (`customValidator`) in the template config panel in the validators section of each generated form field.
```typescript.tsx theme={"system"}
import { FlxProcessRenderer } from '@flowx/react-sdk';
export function MyFlxContainer() {
return (v: string) => v === '4.5'}}
staticAssetsPath={...}
locale="en-US"
language="en"
projectInfo={{
projectId: ...
}}
/>
}
```
The entry point of the library is the `` component. A list of accepted inputs is found below:
```tsx theme={"system"}
```
**Parameters**:
| Name | Description | Type | Mandatory | Default value | Example |
| ---------------- | ---------------------------------------------------------------------------------------------------------------------------------------------------------------- | ------- | --------- | ------------- | ------------------------------------------------------------------- |
| apiUrl | Your base url | string | true | - | [https://yourDomain.dev](https://yourdomain.dev) |
| processApiPath | Process subpath | string | true | - | onboarding |
| authToken | Authorization token | string | true | - | 'eyJhbGciOiJSUzI1NiIsIn....' |
| themeId | Theme id used to style the process. Can be obtained from the themes section in the admin | string | true | - | '123-456-789' |
| processName | Identifies a process | string | true | - | client\_identification |
| processStartData | Data required to start the process | json | true | - | `{ "firstName": "John", "lastName": "Smith"}` |
| workspaceId | Workspace id | string | true | - | '8f52744-8403-4e8d....' |
| language | Language used to localize the enumerations inside the application. | string | false | ro | - |
| isDraft | When true allows starting a process in draft state. \*Note that isDraft = true requires that processName be the **id** (number) of the process and NOT the name. | boolean | false | false | - |
| locale | Defines the locale of the process, used to apply date, currency and number formatting to data model values | boolean | false | ro-RO | - |
| projectInfo | Defines which FlowX Project will be run inside the process renderer. | json | true | - | `{ "projectId": "111111-222222-333333-44444"}` |
| customLoader | Custom loader components for different loading scenarios. | object | false | - | `{ startProcess: , saveData: }` |
### Analytics
The SDK provides a mechanism for collecting analytics events through a unified `CustomEvent` system. These events can be used to track screens and action events.
To use analytics features, make sure you've imported the necessary SDK module:
```ts theme={"system"}
import {
ANALYTICS_EVENTS,
AnalyticsData,
pushAnalyticsData,
} from '@flowx/core-sdk';
```
#### Emitting Analytics Events
Analytics events are dispatched using the `pushAnalyticsData(payload: AnalyticsData)` method. The SDK defines two event types:
```ts theme={"system"}
enum ANALYTICS_EVENTS {
SCREEN = 'SCREEN',
ACTION = 'ACTION',
}
```
Each analytics event should be an object of type AnalyticsData:
```ts theme={"system"}
type AnalyticsData = {
type: ANALYTICS_EVENTS;
value: string;
screen?: string;
component?: string;
label?: string;
customPayload?: object;
}
```
The value property represents the identifier set in the process definition.
For ACTION type events there are some additional properties provided:
* component - The type of component triggering the action
* label - The label of the component
* screen - The identifier of the screen containing the component, if set
#### Listening for Analytics Events
You can subscribe to analytics events using the standard CustomEvent API:
```ts theme={"system"}
const analyticsListener = (event: CustomEvent) => {
console.log('Received flowx:analytics event:', event.detail);
}
useEffect(() => {
document.addEventListener('flowx:analytics', analyticsListener)
return () => {
document.removeEventListener('flowx:analytics', analyticsListener)
}
}, [])
```
Ensure that you remove the event listener on component destruction to avoid memory leaks.
#### Custom Payload
This functionality, allowing you to capture and send custom data alongside standard analytics events.
When analytics custom payload is configured in FlowX Designer, the renderer automatically processes variable substitution and includes the resulting data in analytics events.
The renderer receives the analytics configuration as a JSON string with variable placeholders:
```json theme={"system"}
"analyticsCustomPayload": "{\n \"name\": ${app.input}\n}"
```
The SDK replaces variables with actual values from the process data store:
```json Template theme={"system"}
{
"name": "${app.input}",
"client": "${app.client}",
"amount": "${app.amount}"
}
```
```json Result theme={"system"}
{
"name": "john",
"client": { "id": "123", "name": "John Doe" },
"amount": 1500
}
```
The processed payload is included in the analytics event under the `customPayload` property:
```typescript theme={"system"}
// Analytics event structure with custom payload
{
type: 'ACTION', // or 'SCREEN'
info: {
value: 'Save personal data',
screen: 'Personal Data',
component: 'BUTTON',
label: 'Save',
customPayload: {
name: "john",
client: { id: "123", name: "John Doe" },
amount: 1500
}
}
}
```
## Starting a process
### Prerequisites
* **Process Name**: You need to know the name of the process you want to start. This name is used to identify the process in the system.
* **FlowX Project UUID**: You need the UUID of the FlowX Project that contains the process you want to start. This UUID is used to identify the project in the system.
* **Locale**: You can specify the locale of the process to apply date, currency, and number formatting to data model values.
* **Language**: You can specify the language used to localize the enumerations inside the application.
### Getting the project UUID
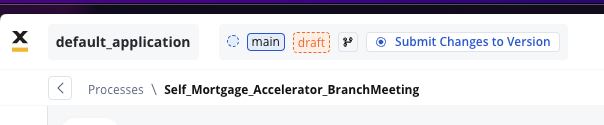
The project UUID can be obtained from the FlowX Dashboard. Navigate to the Projects section and select the project you want to start a process in. The UUID can be copied from the project actions popover.

### Getting the process name
The process name can be obtained from the FlowX Designer. Navigate to the process you want to start and copy the process name from the breadcrumbs.
### Initializing the process renderer
To start a process, you need to initialize the `FlxProcessRenderer` component in your application. The component accepts various props that define the process to start, the theme to use, and other configuration options.
```typescript.tsx theme={"system"}
import { FlxProcessRenderer } from '@flowx/react-sdk';
export function MyFlxContainer() {
return
}
```
## Custom components
Custom components will be hydrated with data through the data input prop which must be defined in the custom component.
Custom components will be provided through the `components` parameter to the `` component.
The object keys passed in the `components` prop **MUST** match the custom component names defined in the FlowX process.
Component data defined through an `inputKey` is available under `data` -> `data`
Component actions are always found under `data` -> `actionsFn` key.
```typescript.tsx theme={"system"}
export const MyCustomComponent = ( {data }) => {...}
```
```typescript theme={"system"}
# data object example
data: {
data: {
input1: ''
},
actionsFn: {
action_one: () => void;
action_two: () => void; }
}
```
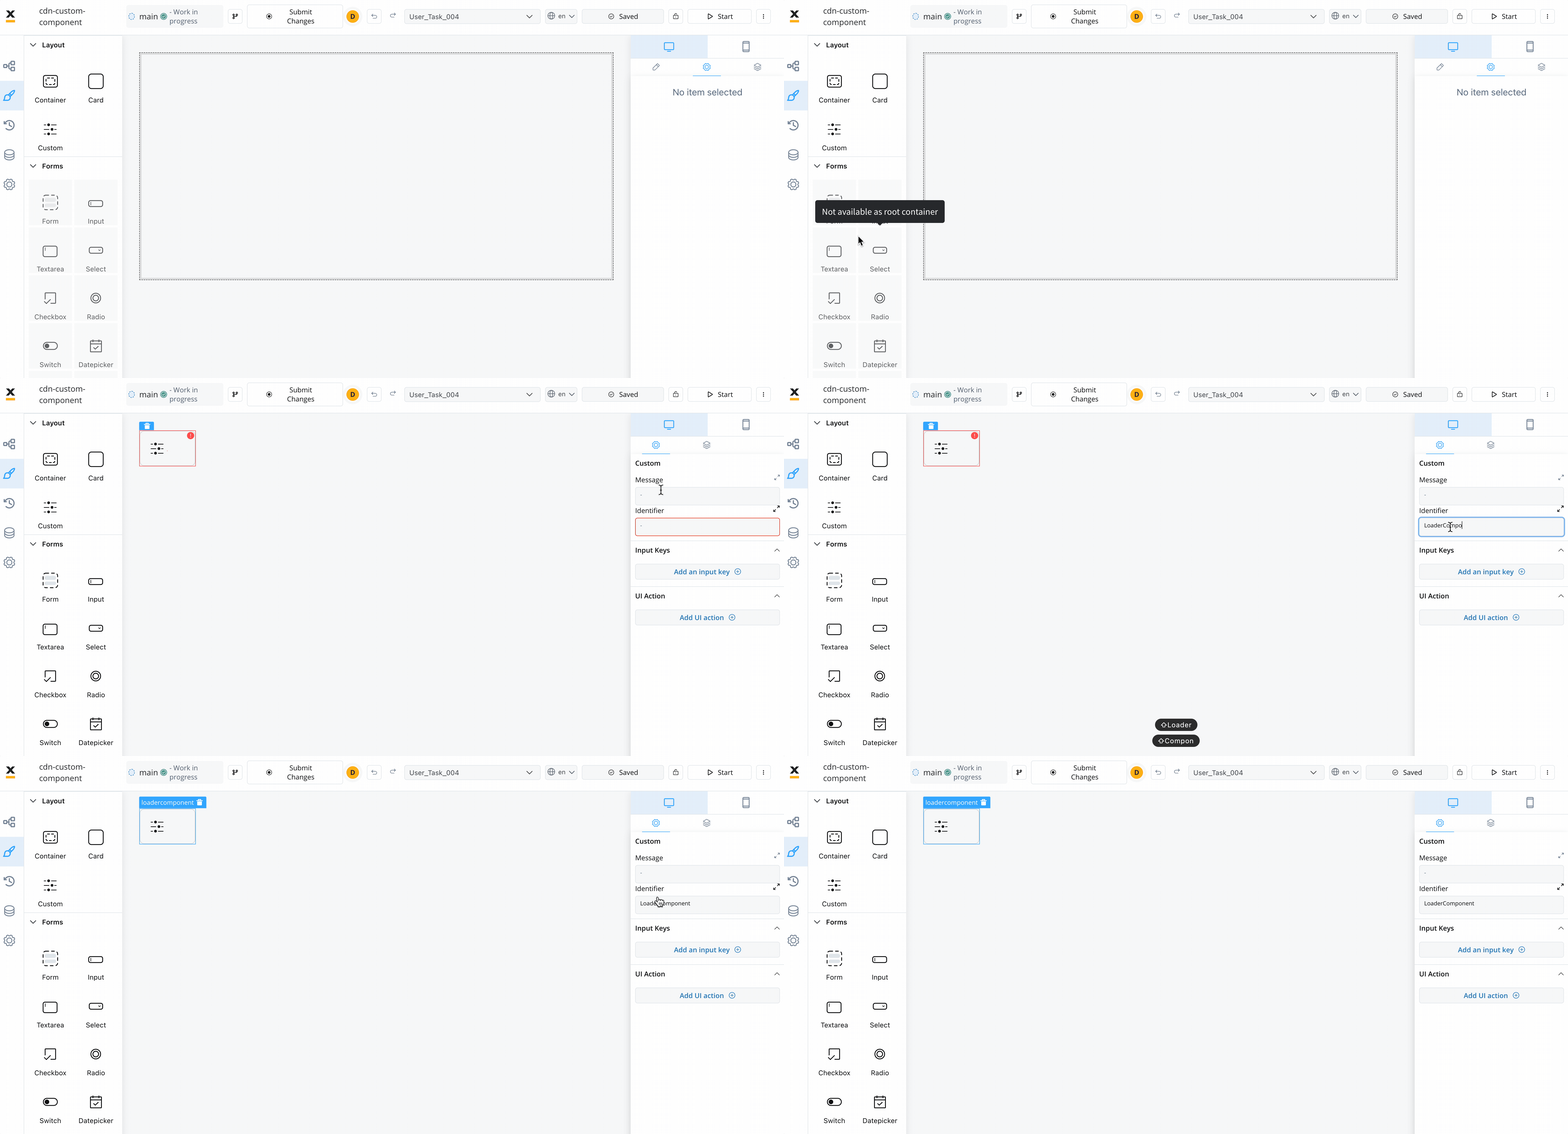
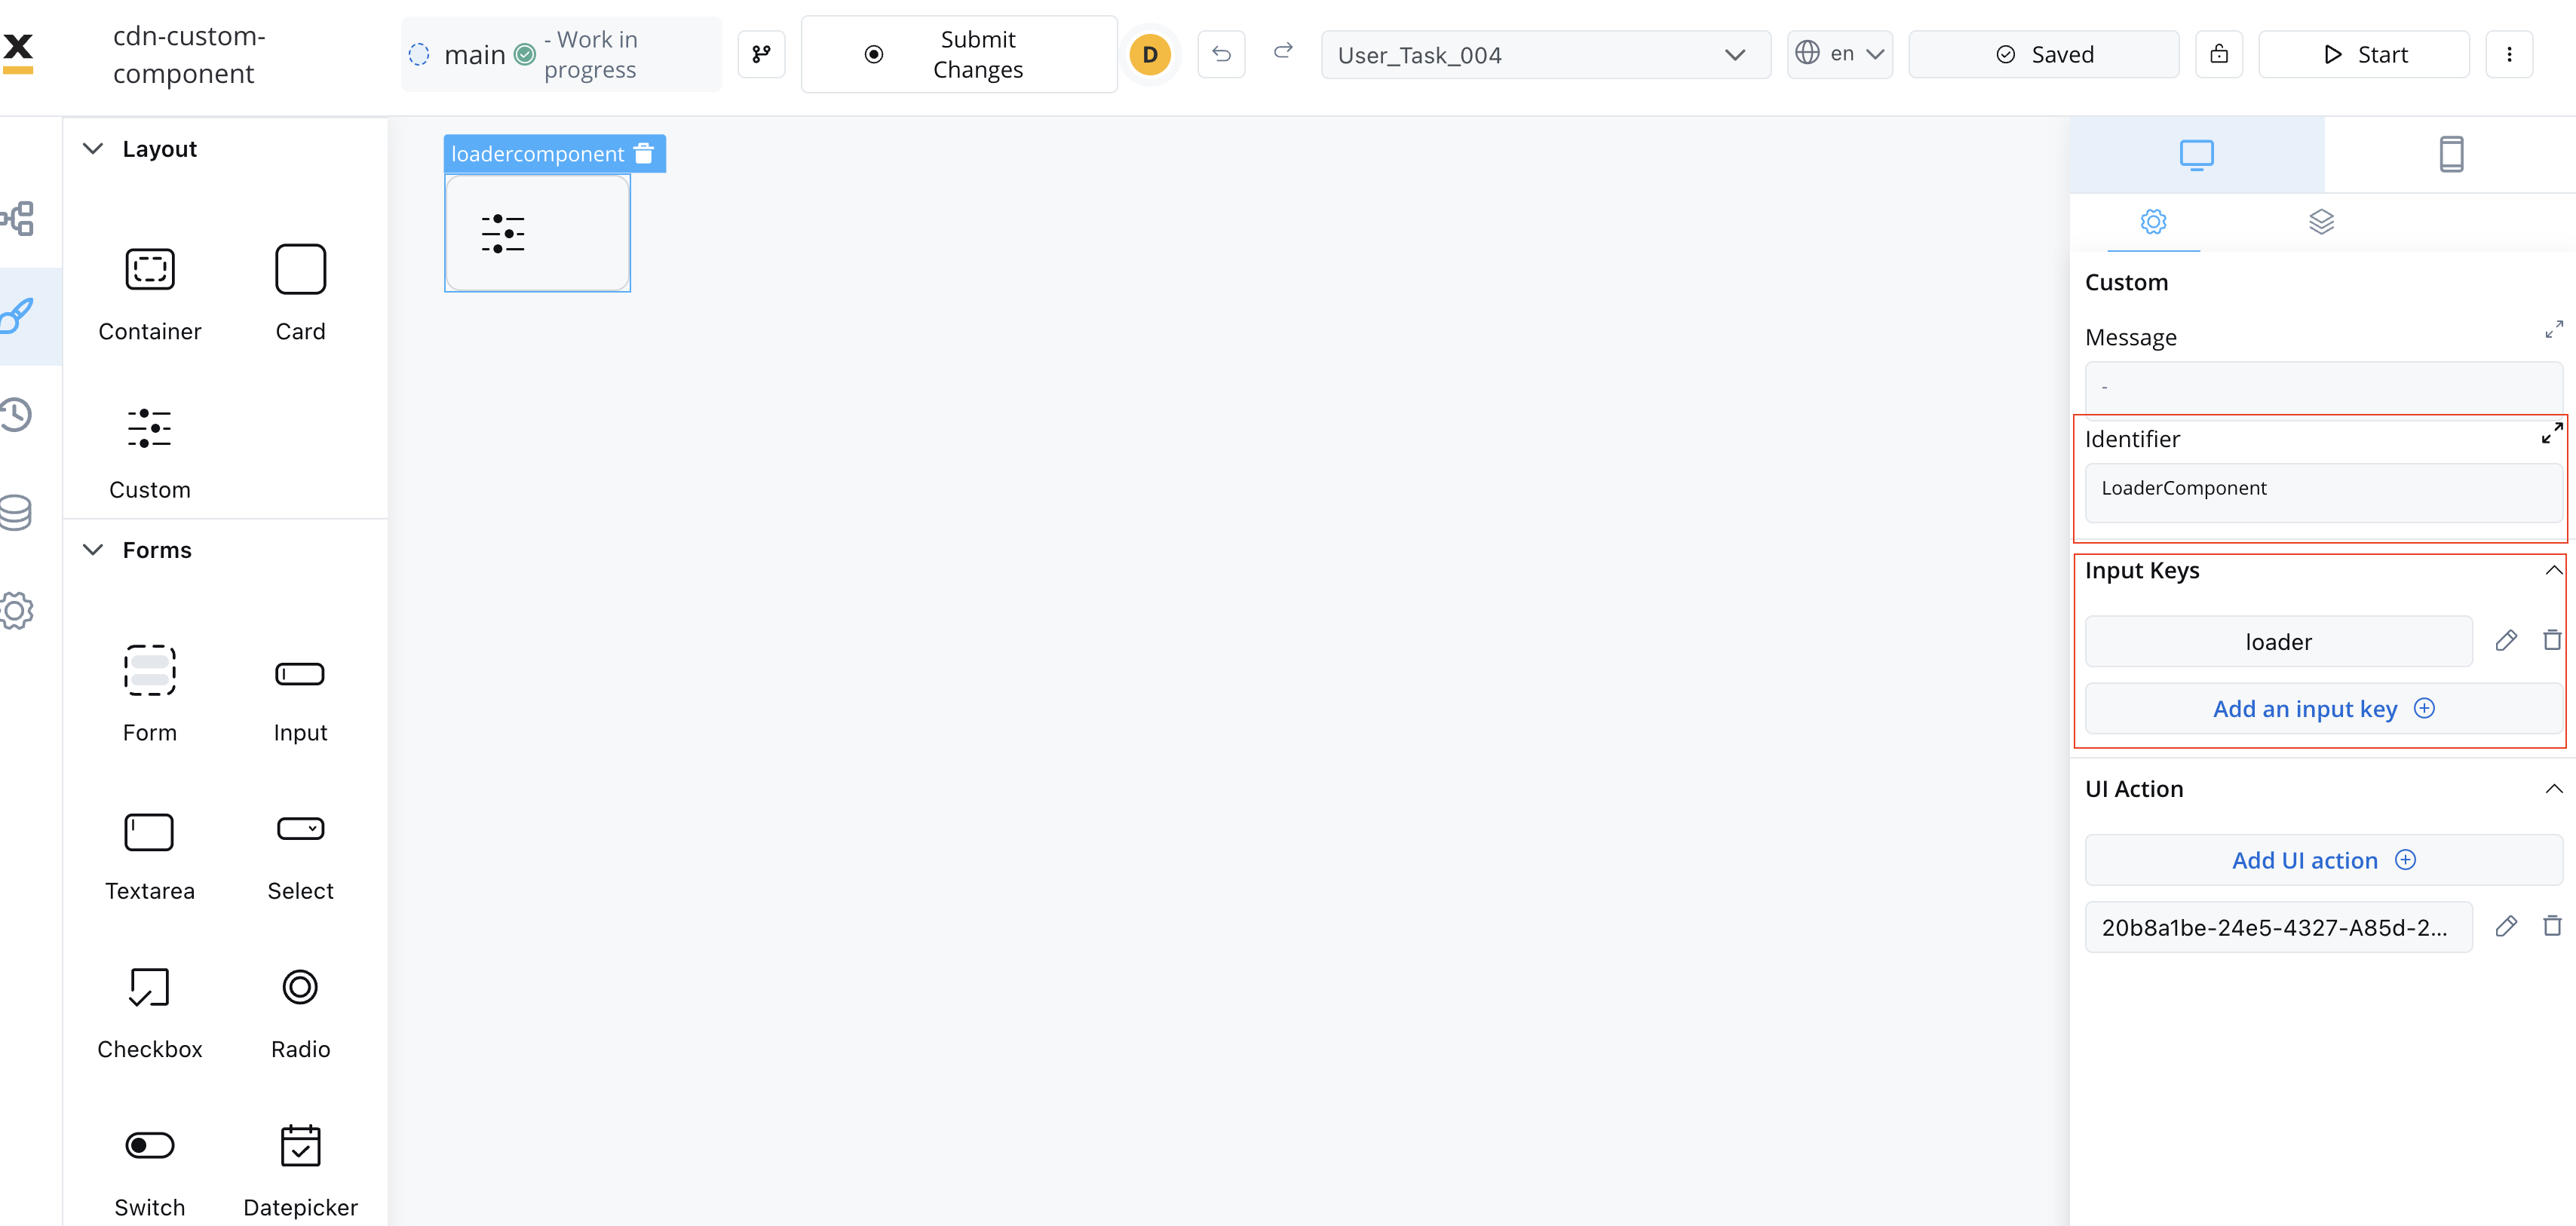
To add a custom component in the template config tree, we need to know its unique identifier and the data it should receive from the process model.
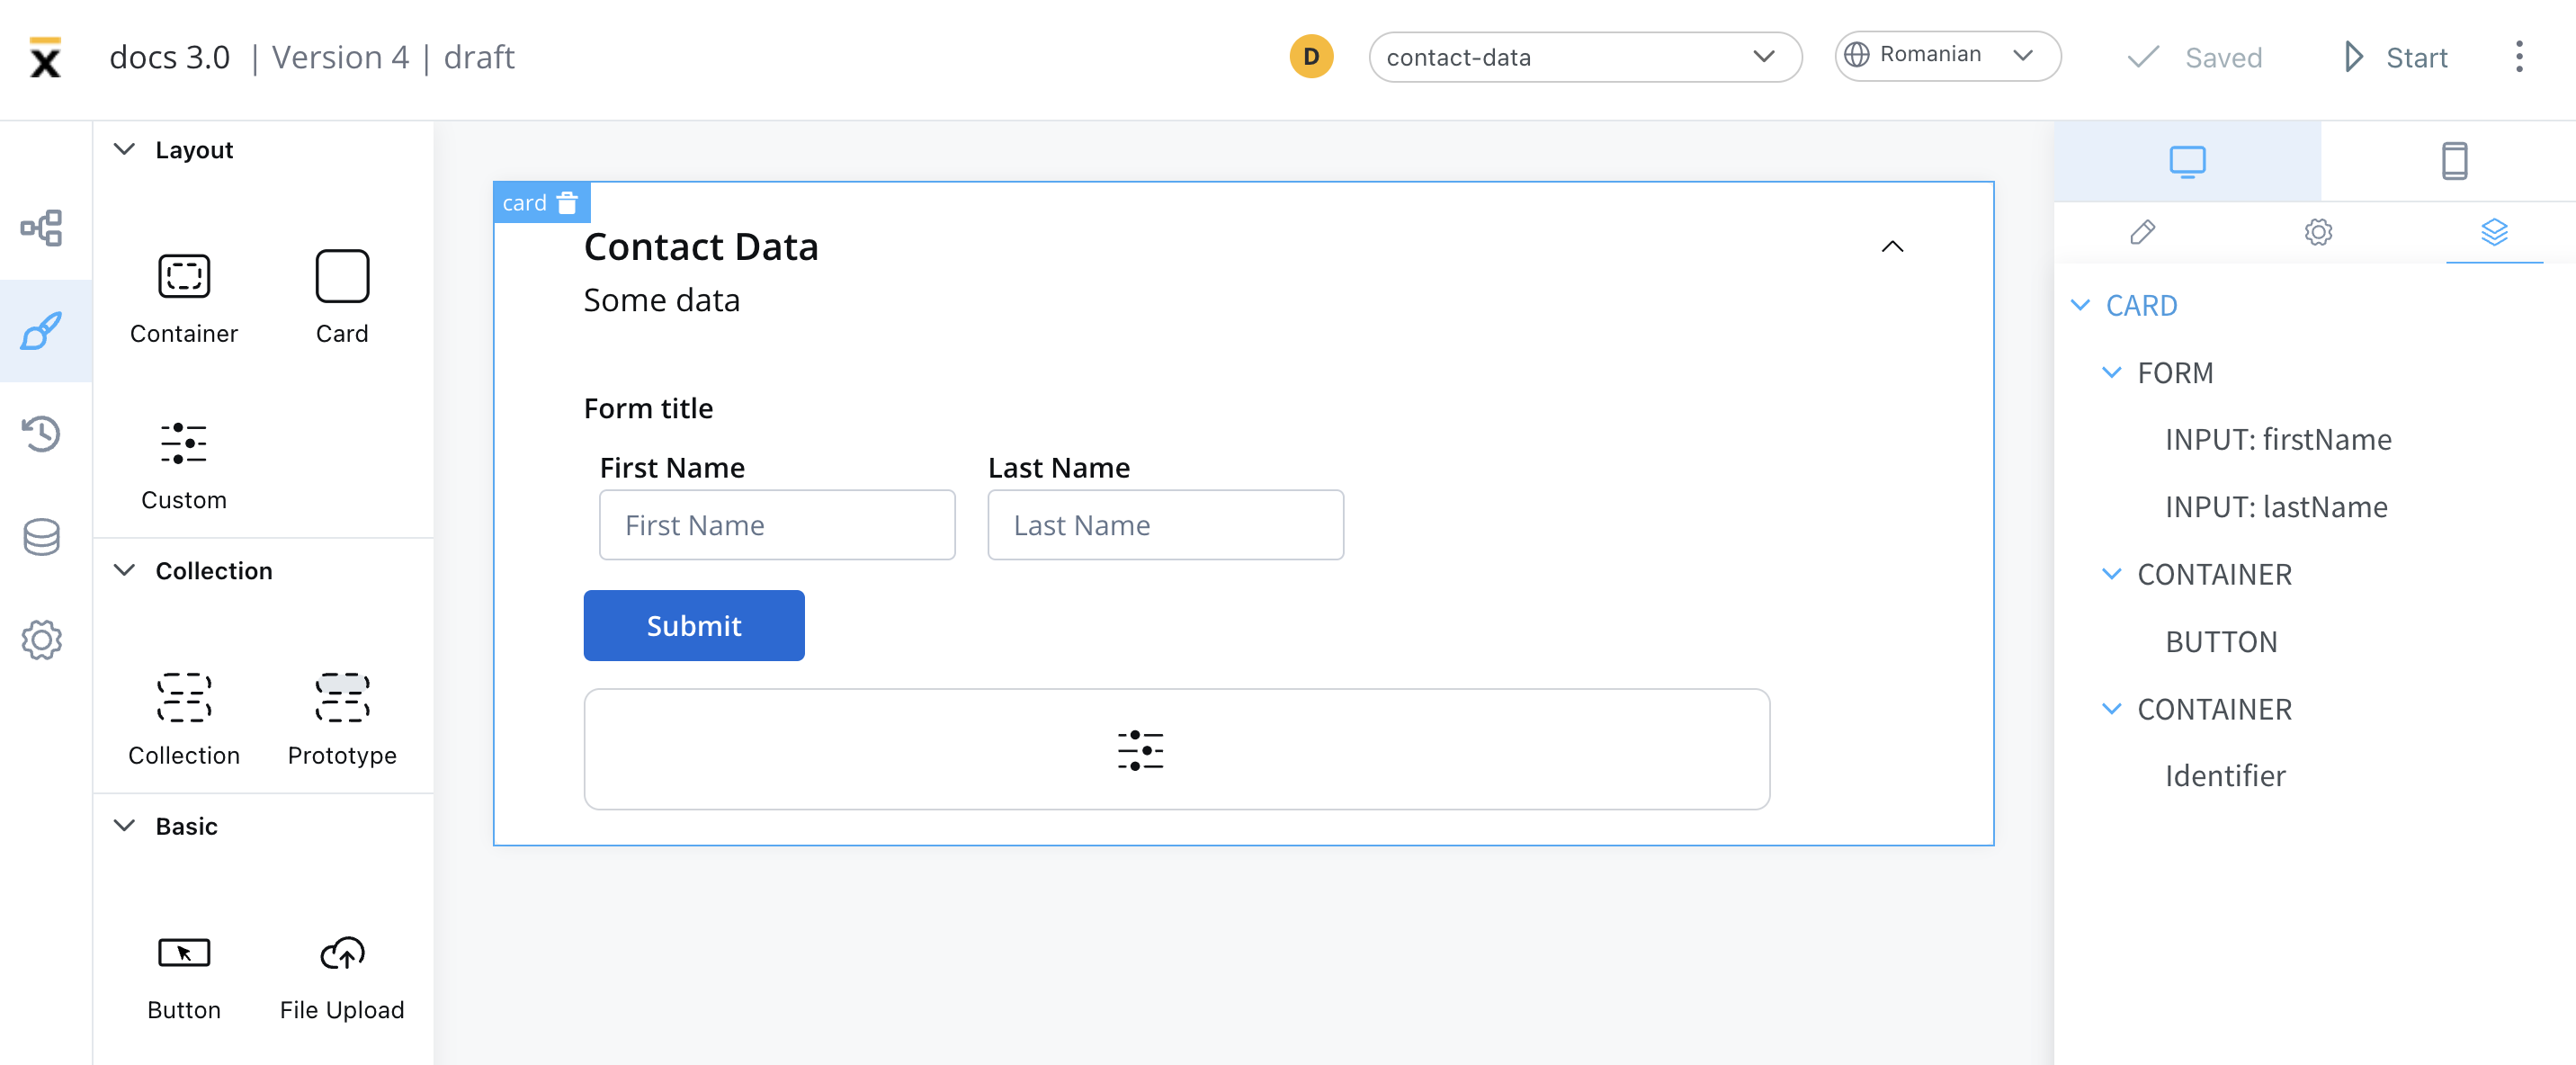
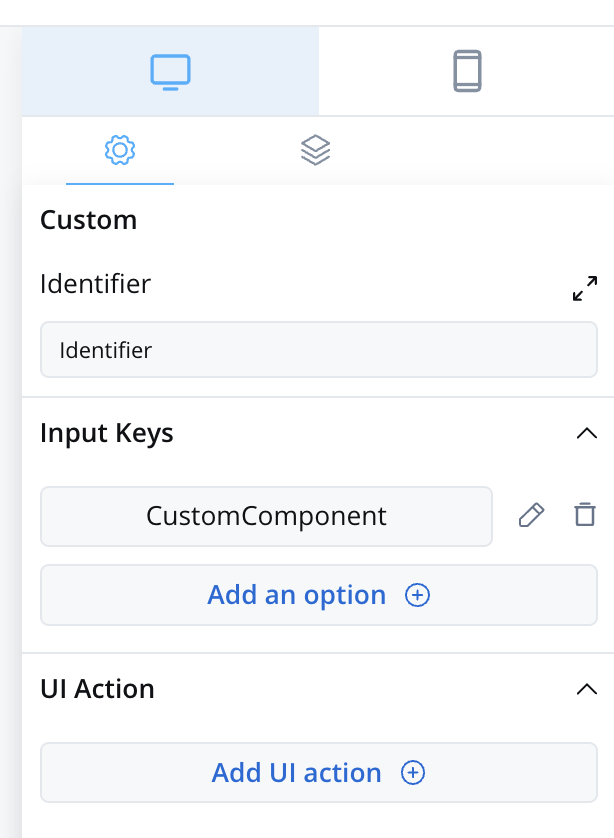
The properties that can be configured are as follows:
* **Identifier** - This enables the custom component to be displayed within the component hierarchy and determines the actions available for the component.
* **Input keys** - These are used to specify the pathway to the process data that components will utilize to receive their information.
* [**UI Actions**](../docs/building-blocks/ui-designer/ui-actions) - actions defined here will be made available to the custom component
### Prerequisites (before creation)
* **React Knowledge**: You should have a good understanding of React, as custom components are created and imported using React.
* **Development Environment**: Set up a development environment for React development, including Node.js and npm (Node Package Manager).
* **Component Identifier**: You need a unique identifier for your custom component. This identifier is used for referencing the component within the application.
### Creating a custom component
To create a Custom Component in React, follow these steps:
1. Create a new React component.
2. Implement the necessary HTML structure, TypeScript logic, and SCSS styling to define the appearance and behavior of your custom component.
### Importing the component
After creating the Custom Component, you need to import it into your application.
In your `` component, add the following property:
```tsx theme={"system"}
```
### Using the custom component
Once your Custom Component is declared, you can use it for configuration within your application.
### Data input and actions
The Custom Component accepts input data from processes and can also include actions extracted from a process. These inputs and actions allow you to configure and interact with the component dynamically.
### Extracting data from processes
There are multiple ways to extract data from processes to use within your Custom Component. You can utilize the data provided by the process or map actions from the BPMN process to Angular actions within your component.
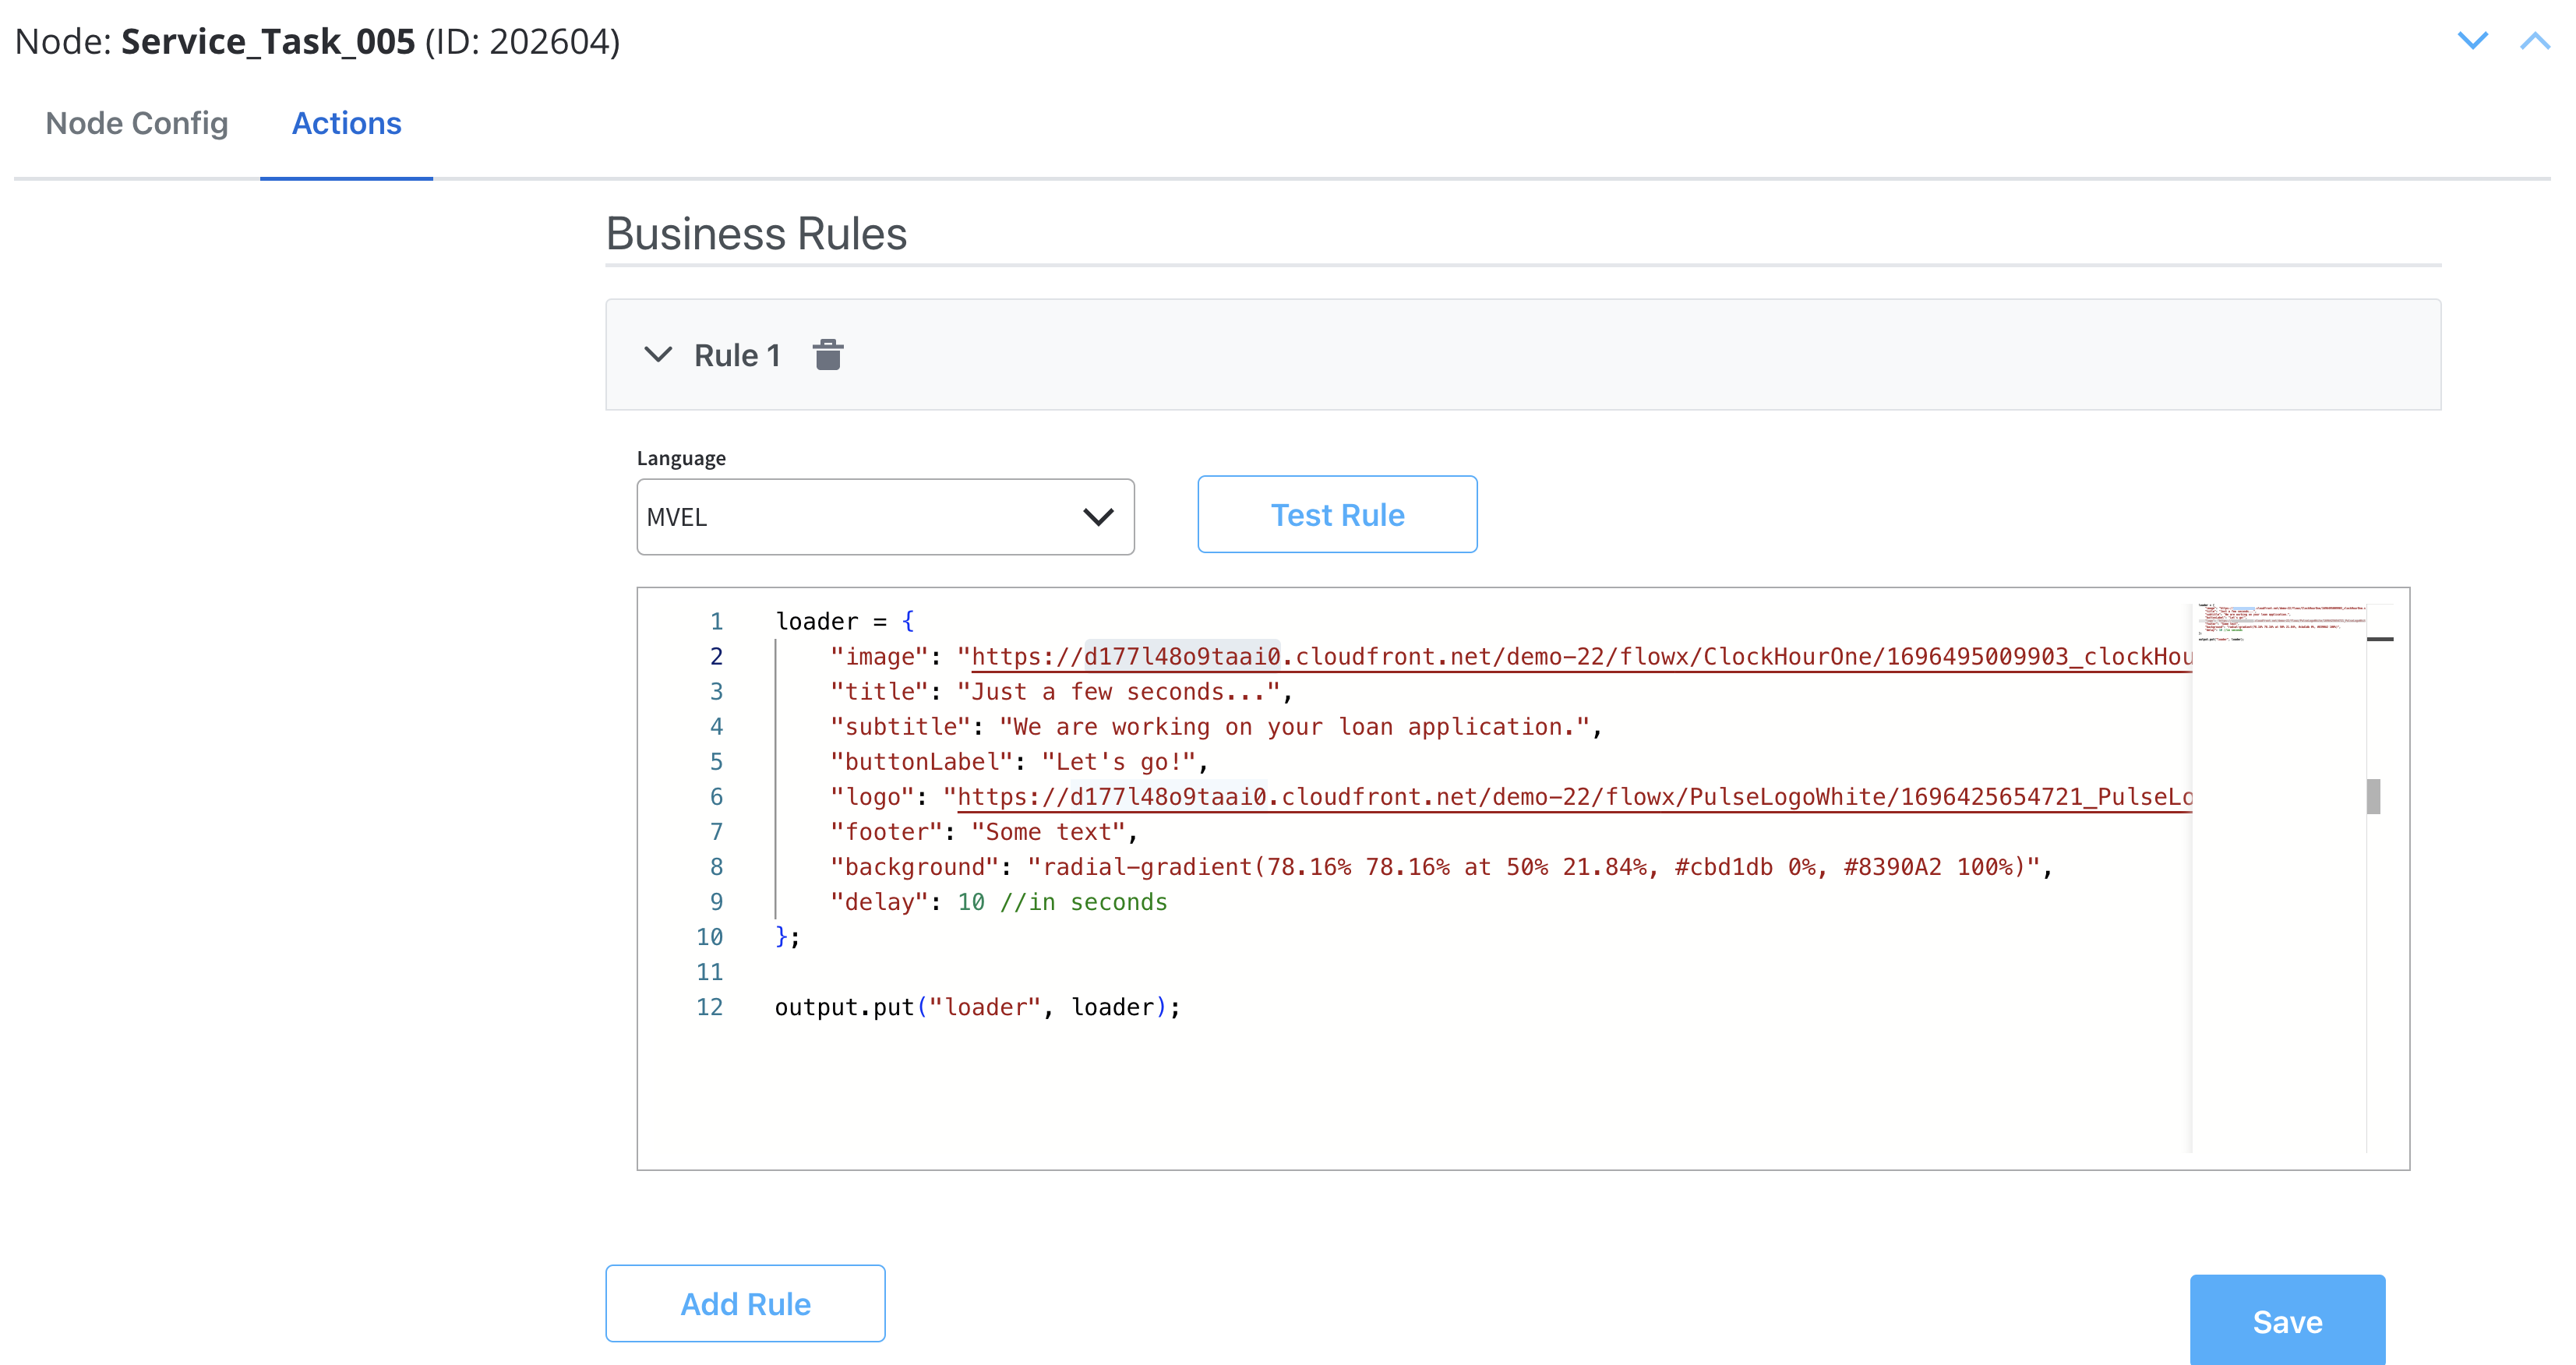
Make sure that the React actions that you declare match the names of the process actions.
### Styling with CSS
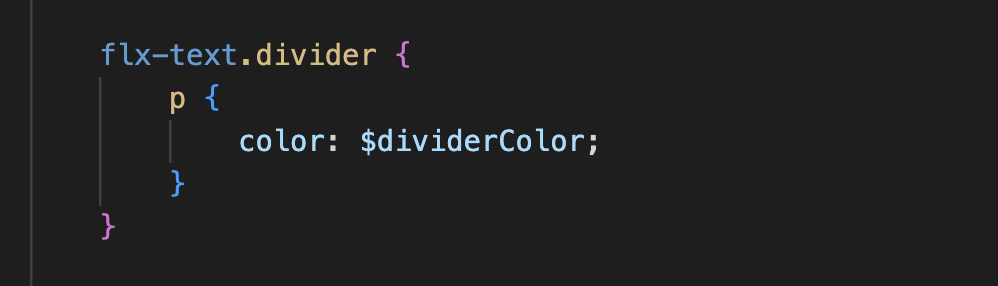
To apply CSS classes to UI elements within your Custom Component, you first need to identify the UI element identifiers within your component's HTML structure. Once identified, you can apply defined CSS classes to style these elements as desired.
Example:
### Additional considerations
* **Naming Conventions**: Be consistent with naming conventions for components, identifiers, and actions. Ensure that Angular actions match the names of process actions as mentioned in the documentation.
* **Component Hierarchy**: Understand how the component fits into the overall component hierarchy of your application. This will help determine where the component is displayed and what actions are available for it.
* **Documentation and Testing**: Document your custom component thoroughly for future reference. Additionally, testing is crucial to ensure that the component behaves as expected in various scenarios.
* **Security**: If your custom component interacts with sensitive data or performs critical actions, consider security measures to protect the application from potential vulnerabilities.
* **Integration with FLOWX Designer**: Ensure that your custom component integrates with FLOWX Designer, as it is part of the application's process modeling capabilities.
## Custom validators
You may also define custom validators in your FlowX processes and pass their implementation through the `validators` prop of the `` component.
The validators are then processed and piped through the popular [React Hook Form](https://www.react-hook-form.com/api/useform/register/) library, taking into account how the error messages are defined in your process.
A validator must have the following type:
```typescript theme={"system"}
const customValidator = (...params: string[]) => (v: any) => boolean | Promise
```
The object keys passed in the `validators` prop **MUST** match the custom validator names defined in the FlowX process.
## Process end handling
The SDK provides a mechanism for container applications to handle process completion events through the `onProcessEnded` callback. This allows you to implement custom logic when a main process reaches an end state, such as redirecting users or triggering cleanup operations.
The `onProcessEnded` callback is triggered when the **main process** (not subprocesses) reaches any terminal state:
* `FINISHED` - Process completed successfully
* `FAILED` - Process encountered an error
* `ABORTED` - Process was manually terminated
* Other terminal states
Only the main process triggers this callback. Subprocess completions do not trigger the callback to avoid unnecessary interruptions during complex process flows.
### Implementation
To handle process end events, pass a function to the `onProcessEnded` prop of the `` component:
```tsx theme={"system"}
import { FlxProcessRenderer } from '@flowx/react-sdk';
export function MyFlxContainer() {
const handleProcessEnd = () => {
// Your custom logic here
console.log('Process has ended');
// Example: Redirect to home page
window.location.href = '/dashboard';
};
return (
);
}
```
## Custom loader
The SDK provides a mechanism for container applications to customize the loader UI displayed during process execution. This allows you to replace the default FlowX loader with your own custom implementation based on different loading scenarios.
### Configuration
To configure custom loaders, pass them through the `customLoader` prop of the `` component:
```tsx theme={"system"}
import { FlxProcessRenderer } from '@flowx/react-sdk';
// Define your custom loader components
const StartProcessLoader = () => (
Starting process...
);
const SpecificActionLoader = () => (
Executing specific action...
);
// Register the custom loaders in your component
export function MyFlxContainer() {
return (
,
// reloadProcess: ,
// defaultAction: ,
// defaultUpload: ,
actions: {
action1: ,
// action2: ,
},
}}
/>
);
}
```
### API Specification
The `customLoader` prop accepts an object of type `CustomLoader`:
```typescript theme={"system"}
type CustomLoader = {
actions?: Record
startProcess?: ReactNode
reloadProcess?: ReactNode
defaultAction?: ReactNode
defaultUpload?: ReactNode
}
```
#### Loader Types
* **`startProcess`** - Displayed when starting or resuming a process
* **`reloadProcess`** - Displayed when reloading a process
* **`defaultAction`** - Default loader for actions when `loaderType` is `'action'`. Used when no specific action loader is found in the `actions` record
* **`defaultUpload`** - Default loader for file uploads when `loaderType` is `'upload'`
* **`actions`** - Record mapping specific action identifiers to custom loaders. When an action is executed, the SDK will first check for a matching entry in this record before falling back to `defaultAction`
### Fallback behavior
If no custom loader is provided for a specific type, the SDK will automatically fall back to the built-in FlowX loader. This ensures your application continues to function even with partial custom loader configuration.
You can use any React components, including those with animations, styled components, or media assets, to create rich loading experiences that match your application's design system.
## Chat component
To use the `FlxChatRenderer` component, import the module in your project:
```tsx theme={"system"}
import { FlxChatRenderer } from '@flowx/react-sdk';
```
#### Usage
Include the component in your template:
```tsx theme={"system"}
```
Parameters:
| Name | Description | Type | Mandatory | Example |
| ------------------ | --------------------------------------------- | --------- | --------- | --------------------------------- |
| `apiUrl` | Your base API URL | `string` | ✅ | `https://yourDomain.dev` |
| `authToken` | Authorization token | `string` | ✅ | (retrieved from auth provider) |
| `staticAssetsPath` | Path for static resources | `string` | ❌ | (set via environment) |
| `language` | Language used to localize the chat interface | `string` | ❌ | `en` |
| `locale` | Locale setting for date and number formatting | `string` | ❌ | `en-US` |
| `themeId` | Theme identifier for styling | `string` | ❌ | (retrieved dynamically) |
| `projectId` | The FlowX project ID | `string` | ✅ | (retrieved dynamically) |
| `workspaceId` | The workspace ID | `string` | ✅ | (retrieved dynamically) |
| `source` | Source object with type and id | `object` | ✅ | `{ type: 'WORKFLOW', id: '...' }` |
| `chatConfig` | Chat configuration object | `object` | ❌ | `{ welcomeMessage: '...', ... }` |
| `cache` | Enable caching for chat responses | `boolean` | ❌ | `true` |
#### chatConfig parameters
The `chatConfig` object accepts the following properties:
| Name | Description | Type | Default value |
| ------------------ | -------------------------------------------- | --------- | ------------------------ |
| `welcomeMessage` | Message displayed when chat is first opened | `string` | `'Welcome to the chat!'` |
| `thinkingMessage` | Message displayed while waiting for response | `string` | `'Thinking...'` |
| `title` | Chat window title | `string` | `'Chat'` |
| `subtitle` | Chat window subtitle | `string` | `'Chat subtitle'` |
| `showChatIcon` | Whether to display the chat icon | `boolean` | `true` |
| `showSeparator` | Whether to show separator between messages | `boolean` | `true` |
| `newChatLabel` | Label for the new chat button | `string` | `'New chat'` |
| `inputPlaceholder` | Placeholder text for the message input field | `string` | `'Enter your message'` |
| `maxInputRows` | Maximum number of rows for the input field | `number` | `10` |
| `historyTitle` | Title displayed on the chat history panel | `string` | — |
## Task management component
To use the `FlxTaskManager` component, import the module in your project:
```tsx theme={"system"}
import { FlxTaskManager } from '@flowx/react-sdk';
```
#### Usage
Include the component in your template:
```tsx theme={"system"}
```
Parameters:
| Name | Description | Type | Mandatory | Example |
| ------------------ | ----------------------------------------------- | -------- | --------- | ------------------------------ |
| `apiUrl` | Endpoint where the tasks are available | `string` | ✅ | `https://yourDomain.dev/tasks` |
| `authToken` | Authorization token | `string` | ✅ | (retrieved from local storage) |
| `appInfo` | Application information object containing appId | `object` | ✅ | `{ appId: "app-123" }` |
| `viewId` | The view configuration identifier | `string` | ✅ | (retrieved dynamically) |
| `workspaceId` | The workspace ID | `string` | ✅ | (retrieved dynamically) |
| `themeId` | The theme identifier | `string` | ❌ | (retrieved dynamically) |
| `language` | The selected language | `string` | ❌ | (retrieved dynamically) |
| `locale` | The localization setting | `string` | ❌ | (retrieved dynamically) |
| `buildId` | The current build identifier | `string` | ❌ | (retrieved dynamically) |
| `staticAssetsPath` | Path for static resources | `string` | ❌ | (set via environment) |
## Task management public API
The React SDK provides a comprehensive public API for building custom task management interfaces.
This API allows you to fetch tasks, manage comments, handle task actions, and interact with task data programmatically.
### Importing the API
To use the task management public API, import the functions and types from `@flowx/react-sdk`:
```typescript theme={"system"}
import {
// Functions
getTaskManagerResources,
fetchView,
fetchViewTasks,
fetchTaskComments,
fetchTaskHistory,
fetchTaskAssignees,
updateTaskAction,
saveComment,
removeComment,
updateTaskPriority,
updateBulkTaskAction,
fetchBulkAssignees,
getEnumerationOptions,
initSseConnection,
// Types and Interfaces
TaskManagerSetupOptions,
View,
ViewTask,
ViewColumn,
ViewFilter,
TaskActions,
TaskComment,
TaskHistory,
Assignees,
TaskManagerEnumeration,
SseConnection,
SseEventData,
SseMessageType,
SseTaskMessageType,
} from '@flowx/react-sdk'
```
### Initialization
Before using the task management API, you need to initialize the task manager resources. This fetches the view configuration, enumerations, and filter operators.
```typescript theme={"system"}
const { view, enumerations, filterOperators } = await getTaskManagerResources({
apiUrl: 'https://yourDomain.dev/tasks',
authToken: 'your-auth-token',
appInfo: { appId: 'app-123' },
viewId: 'view-456',
workspaceId: 'workspace-789',
themeId: 'theme-012', // Optional
language: 'en', // Optional
locale: 'en-US', // Optional
buildId: 'build-345', // Optional
staticAssetsPath: '/static', // Optional
})
```
**Parameters:**
| Name | Description | Type | Mandatory | Example |
| ------------------ | ----------------------------------------------- | ------------------- | --------- | ------------------------------ |
| `apiUrl` | Endpoint where the tasks are available | `string` | ✅ | `https://yourDomain.dev/tasks` |
| `authToken` | Authorization token | `string` | ✅ | (retrieved from local storage) |
| `appInfo` | Application information object containing appId | `{ appId: string }` | ✅ | `{ appId: "app-123" }` |
| `viewId` | The view configuration identifier | `string` | ✅ | (retrieved dynamically) |
| `workspaceId` | The workspace ID | `string` | ✅ | (retrieved dynamically) |
| `themeId` | The theme identifier | `string` | ❌ | (retrieved dynamically) |
| `language` | The selected language | `string` | ❌ | `"en"` |
| `locale` | The localization setting | `string` | ❌ | `"en-US"` |
| `buildId` | The current build identifier | `string` | ❌ | (retrieved dynamically) |
| `staticAssetsPath` | Path for static resources | `string` | ❌ | (set via environment) |
**Returns:** Promise resolving to an object containing:
* `view`: The view configuration object
* `enumerations`: Available enumeration options for filters
* `filterOperators`: Available filter operators for each column
### Fetching tasks
#### `fetchViewTasks`
Fetches tasks for a specific view with support for sorting, filtering, pagination, and search.
```typescript theme={"system"}
const response = await fetchViewTasks(
sort, // Array of sort configurations
filters, // Array of filter configurations
searchTerm, // Search string
view, // View object from getTaskManagerResources
pagination, // Pagination object { page: number, size: number }
enumerations // Enumerations from getTaskManagerResources
)
```
**Parameters:**
| Name | Description | Type | Mandatory | Example |
| -------------- | -------------------------------- | -------------------------------- | --------- | --------------------------------------------- |
| `sort` | Array of sort configurations | `ViewTasksSort[]` | ✅ | `[{ keyName: "priority", direction: "ASC" }]` |
| `filters` | Array of filter configurations | `ViewTasksFilter[]` | ✅ | See filter examples below |
| `searchTerm` | Search string for task search | `string` | ✅ | `"urgent"` |
| `view` | View object from initialization | `View` | ✅ | (from `getTaskManagerResources`) |
| `pagination` | Pagination configuration | `{ page: number, size: number }` | ✅ | `{ page: 0, size: 10 }` |
| `enumerations` | Enumerations from initialization | `TaskManagerEnumerations` | ✅ | (from `getTaskManagerResources`) |
**Returns:** Promise resolving to a paginated response containing:
* `content`: Array of `ViewTask` objects
* `totalElements`: Total number of tasks
* `totalPages`: Total number of pages
* Other pagination metadata
**Example:**
```typescript theme={"system"}
const sort = [{ keyName: 'priority', direction: 'ASC' }]
const filters = [
{
keyName: 'status',
operator: 'EQUALS',
value: ['PENDING'],
keyType: 'enumType',
columnType: 'status',
},
]
const pagination = { page: 0, size: 10 }
const response = await fetchViewTasks(
sort,
filters,
'', // searchTerm
view,
pagination,
enumerations
)
const tasks = response.content // Array of ViewTask objects
```
#### `fetchView`
Fetches a specific view configuration by ID.
```typescript theme={"system"}
const view = await fetchView(viewId)
```
### Task details
#### `fetchTaskComments`
Fetches all comments for a specific task.
```typescript theme={"system"}
const comments = await fetchTaskComments(taskId)
```
**Parameters:**
| Name | Description | Type | Mandatory | Example |
| -------- | ------------------ | -------- | --------- | ------------ |
| `taskId` | The unique task ID | `string` | ✅ | `"task-123"` |
**Returns:** Promise resolving to an array of `TaskComment` objects.
**Example:**
```typescript theme={"system"}
const comments = await fetchTaskComments(selectedTask.id)
// Returns: [
// {
// commentId: "comment-1",
// message: "This task needs attention",
// author: { username: "john.doe", ... },
// createdAt: "2024-01-15T10:30:00Z"
// }
// ]
```
#### `fetchTaskHistory`
Fetches the history/audit trail for a specific task.
```typescript theme={"system"}
const history = await fetchTaskHistory(taskId)
```
**Parameters:**
| Name | Description | Type | Mandatory | Example |
| -------- | ------------------ | -------- | --------- | ------------ |
| `taskId` | The unique task ID | `string` | ✅ | `"task-123"` |
**Returns:** Promise resolving to an array of `TaskHistory` objects.
**Example:**
```typescript theme={"system"}
const history = await fetchTaskHistory(selectedTask.id)
// Returns: [
// {
// historyId: "history-1",
// events: [
// {
// type: "STATUS_CHANGED",
// description: "Status changed from PENDING to IN_PROGRESS"
// }
// ]
// }
// ]
```
#### `fetchTaskAssignees`
Fetches available assignees for a task, with optional search filtering.
```typescript theme={"system"}
const assignees = await fetchTaskAssignees(
taskId,
tokenUuid,
options
)
```
**Parameters:**
| Name | Description | Type | Mandatory | Example |
| ----------- | ----------------------------------- | -------- | --------- | --------------------- |
| `taskId` | The unique task ID | `string` | ✅ | `"task-123"` |
| `tokenUuid` | The token UUID associated with task | `string` | ✅ | `"token-uuid-456"` |
| `options` | Search options | `object` | ❌ | `{ keyword: "john" }` |
**Returns:** Promise resolving to an array of `Assignees` objects.
**Example:**
```typescript theme={"system"}
const users = await fetchTaskAssignees(
selectedTask.id,
selectedTask.tokenUuid,
{ keyword: 'john' }
)
// Returns: [
// {
// username: "john.doe",
// firstName: "John",
// lastName: "Doe",
// email: "john.doe@example.com"
// }
// ]
```
#### `fetchBulkAssignees`
Fetches available assignees for multiple tasks in bulk.
```typescript theme={"system"}
const assignees = await fetchBulkAssignees(
taskIds,
options
)
```
**Parameters:**
| Name | Description | Type | Mandatory | Example |
| --------- | ----------------- | ---------- | --------- | ---------------------- |
| `taskIds` | Array of task IDs | `string[]` | ✅ | `["task-1", "task-2"]` |
| `options` | Search options | `object` | ❌ | `{ keyword: "john" }` |
**Returns:** Promise resolving to an array of `Assignees` objects.
### Task actions
#### `updateTaskAction`
Executes an action on a specific task (e.g., assign, complete, cancel).
```typescript theme={"system"}
await updateTaskAction(
action,
taskId,
tokenUuid,
username
)
```
**Parameters:**
| Name | Description | Type | Mandatory | Example |
| ----------- | ------------------------------------- | -------------------- | --------- | -------------------- |
| `action` | The action to execute | `ExecuteTaskActions` | ✅ | `TaskActions.ASSIGN` |
| `taskId` | The unique task ID | `string` | ✅ | `"task-123"` |
| `tokenUuid` | The token UUID associated with task | `string` | ✅ | `"token-uuid-456"` |
| `username` | Username for assign action (optional) | `string` | ❌ | `"john.doe"` |
**Available Actions:**
* `TaskActions.ASSIGN` - Assign task to a user
* `TaskActions.COMPLETE` - Mark task as complete
* `TaskActions.CANCEL` - Cancel the task
* `TaskActions.CHANGE_PRIORITY` - Change task priority
* `TaskActions.VIEW` - View task details
**Example:**
```typescript theme={"system"}
// Assign task to a user
await updateTaskAction(
TaskActions.ASSIGN,
selectedTask.id,
selectedTask.tokenUuid,
'john.doe'
)
// Complete a task
await updateTaskAction(
TaskActions.COMPLETE,
selectedTask.id,
selectedTask.tokenUuid
)
```
#### `updateBulkTaskAction`
Applies an action to multiple tasks at once.
```typescript theme={"system"}
await updateBulkTaskAction(
action,
taskIds,
options
)
```
**Parameters:**
| Name | Description | Type | Mandatory | Example |
| --------- | --------------------- | -------------------- | --------- | -------------------------- |
| `action` | The action to execute | `ExecuteTaskActions` | ✅ | `TaskActions.COMPLETE` |
| `taskIds` | Array of task IDs | `string[]` | ✅ | `["task-1", "task-2"]` |
| `options` | Additional options | `object` | ❌ | `{ username: "john.doe" }` |
**Example:**
```typescript theme={"system"}
await updateBulkTaskAction(
TaskActions.COMPLETE,
['task-1', 'task-2', 'task-3']
)
```
#### `updateTaskPriority`
Updates the priority of a specific task.
```typescript theme={"system"}
await updateTaskPriority(taskId, priority)
```
**Parameters:**
| Name | Description | Type | Mandatory | Example |
| ---------- | ------------------ | -------- | --------- | ------------ |
| `taskId` | The unique task ID | `string` | ✅ | `"task-123"` |
| `priority` | New priority value | `number` | ✅ | `5` |
**Example:**
```typescript theme={"system"}
await updateTaskPriority(selectedTask.id, 10)
```
### Comments management
#### `saveComment`
Adds a new comment to a task.
```typescript theme={"system"}
await saveComment(taskId, commentData)
```
**Parameters:**
| Name | Description | Type | Mandatory | Example |
| ------------- | ------------------- | -------- | --------- | --------------------------------- |
| `taskId` | The unique task ID | `string` | ✅ | `"task-123"` |
| `commentData` | Comment data object | `object` | ✅ | `{ message: "New comment text" }` |
**Example:**
```typescript theme={"system"}
await saveComment(selectedTask.id, {
message: 'This task requires immediate attention'
})
// Refresh comments after saving
const updatedComments = await fetchTaskComments(selectedTask.id)
```
#### `removeComment`
Removes a comment from a task.
```typescript theme={"system"}
await removeComment(taskId, commentId)
```
**Parameters:**
| Name | Description | Type | Mandatory | Example |
| ----------- | --------------------- | -------- | --------- | --------------- |
| `taskId` | The unique task ID | `string` | ✅ | `"task-123"` |
| `commentId` | The unique comment ID | `string` | ✅ | `"comment-456"` |
**Example:**
```typescript theme={"system"}
await removeComment(selectedTask.id, comment.commentId)
```
### Enumerations
#### `getEnumerationOptions`
Retrieves enumeration options for a specific enumeration name.
```typescript theme={"system"}
const options = await getEnumerationOptions(enumName)
```
**Parameters:**
| Name | Description | Type | Mandatory | Example |
| ---------- | -------------------- | -------- | --------- | ---------- |
| `enumName` | The enumeration name | `string` | ✅ | `"Status"` |
**Returns:** Promise resolving to an array of `TaskManagerEnumeration` objects.
### Real-time Updates (SSE)
#### `initSseConnection`
Initializes a Server-Sent Events (SSE) connection for real-time task updates.
```typescript theme={"system"}
const sseConnection = initSseConnection(
resourceId,
eventHandler
)
```
**Parameters:**
| Name | Description | Type | Mandatory | Example |
| -------------- | -------------------------------------- | ------------------------------------------------------------------------- | --------- | ----------------- |
| `resourceId` | The resource ID from the view | `string` | ✅ | `"resource-123"` |
| `eventHandler` | Callback function to handle SSE events | `(event: MessageEvent<string>, data: SseEventData \| null) => void` | ✅ | See example below |
**Returns:** `SseConnection` object with a `close()` method.
**Example:**
```typescript theme={"system"}
const handleSseEvent = (event: MessageEvent, eventData: SseEventData | null) => {
if (event.type === SseMessageType.Data) {
if (eventData?.eventType === SseTaskMessageType.VIEW_UPDATED) {
// Reload tasks when view is updated
loadTasks()
}
}
}
const sseConnection = initSseConnection(view.resourceId, handleSseEvent)
// Cleanup on component unmount
useEffect(() => {
return () => {
if (sseConnection) {
sseConnection.close()
}
}
}, [])
```
**SSE Event Types:**
* `SseTaskMessageType.VIEW_UPDATED` - View configuration has been updated
* `SseTaskMessageType.TASK_CREATED` - A new task has been created
* `SseTaskMessageType.TASK_UPDATED` - A task has been updated
* `SseTaskMessageType.TASK_DELETED` - A task has been deleted
## Custom CSS
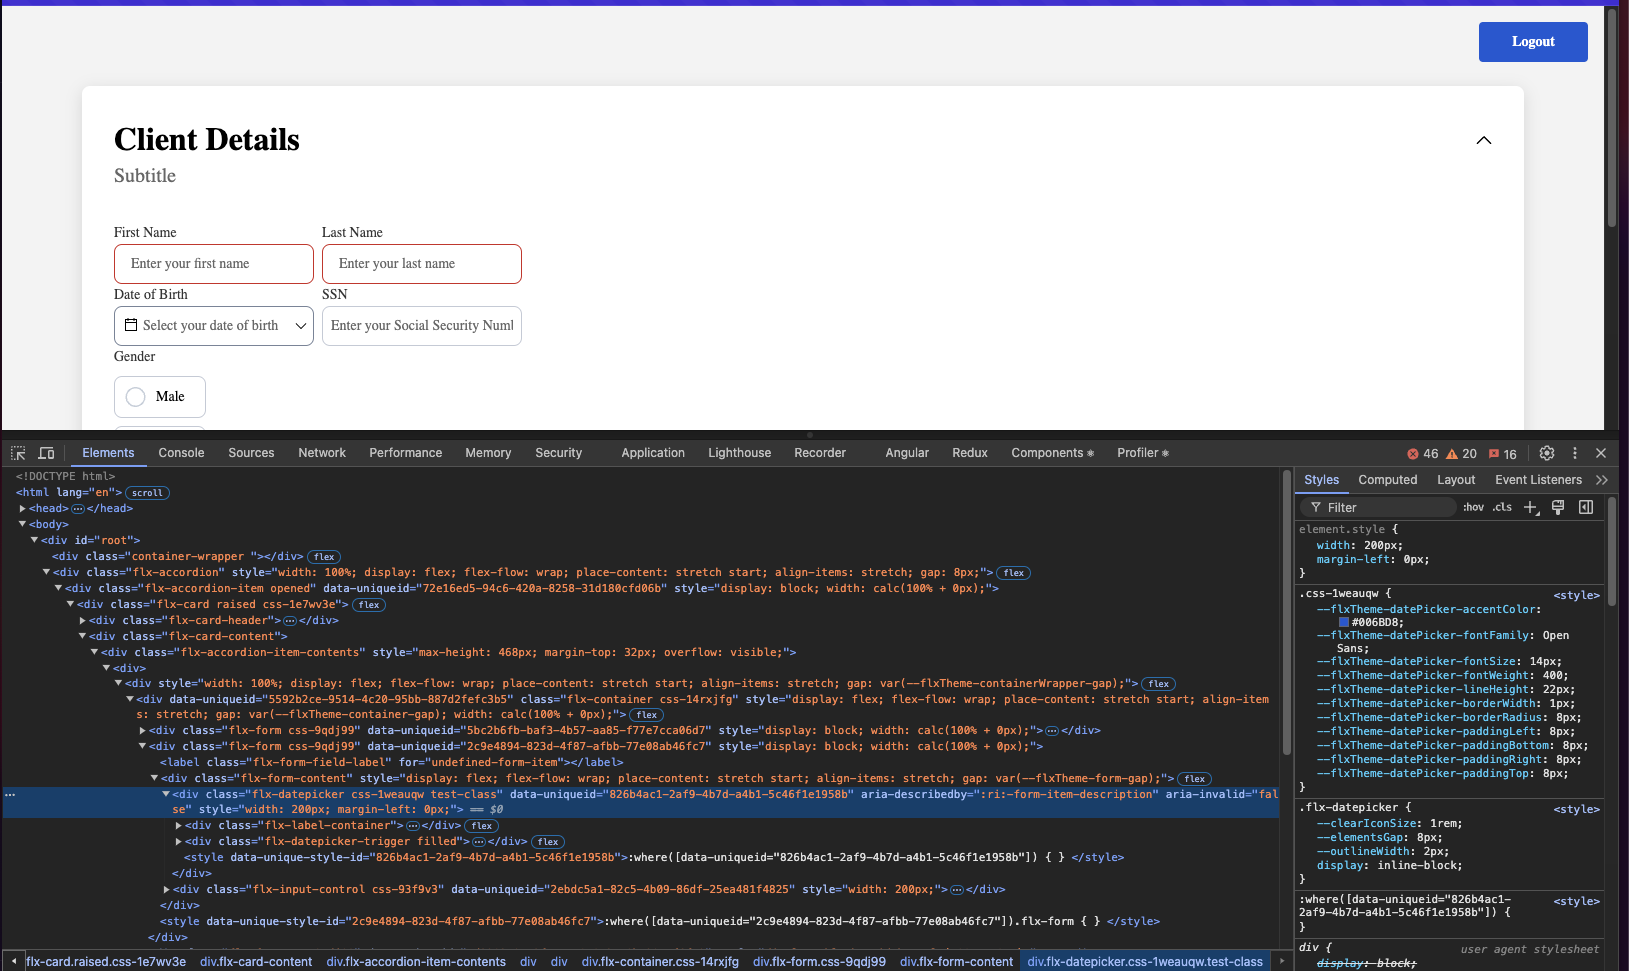
The renderer SDK allows you to pass custom CSS classes on any component inside the process. These classes are then applied to the component's root element.
To add a CSS custom class to a component, you need to define the class in the process designer by navigating to the styles tab of the component, expanding the Advanced accordion and writing down the CSS class.
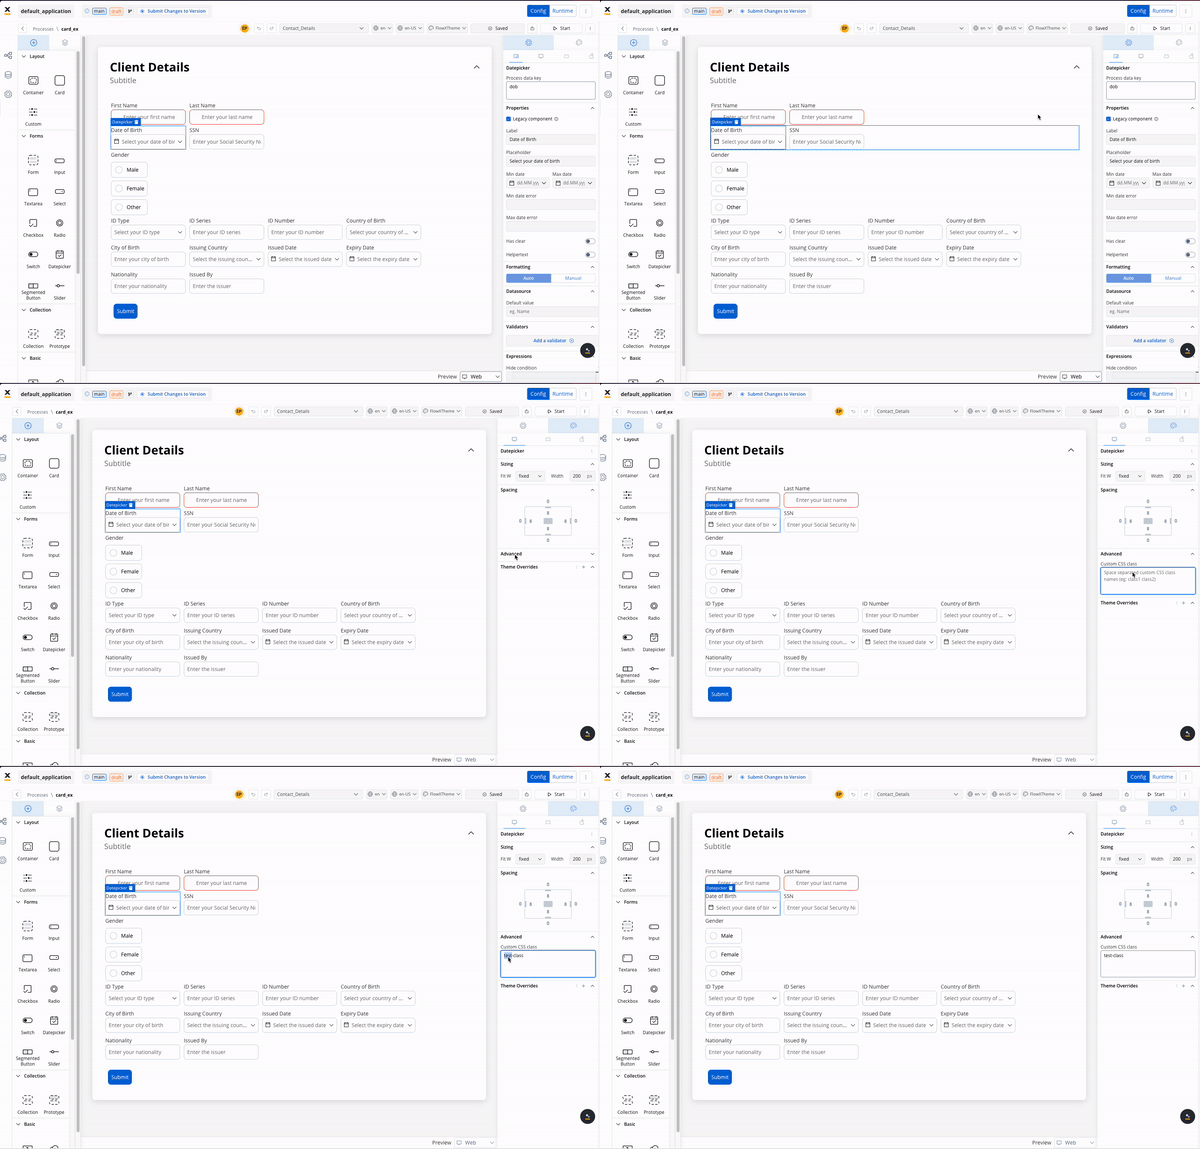
The classes will be applied last on the element, so they will override the classes already defined on the element.
## Storybook
Below you find a Storybook which demonstrates how components behave under different states, props, and conditions, it allows you to preview and interact with individual UI components in isolation, without the need for a full-fledged application:
## Related topics
- [FlowX.AI 4.6.0 Release Notes](/release-notes/v4.x/v4.6.x/v4.6.0-january-2025/v4.6.0-january-2025.md)
- [FlowX.AI 5.1.1 Release Notes (LTS)](/release-notes/v5.x/v5.1.x-lts/v5.1.1-november-2025.md)
- [SDKs overview](/5.1/sdks/sdks-overview.md)
- [Renderer SDKs](/release-notes/v5.x/v5.0.0-july-2025/migrating-from-v4.7.x-to-5.0/renderers.md)