> ## Documentation Index
> Fetch the complete documentation index at: https://docs.flowx.ai/llms.txt
> Use this file to discover all available pages before exploring further.
# Configuring an IAM solution
## Recommended Keycloak setup
To configure a minimal required Keycloak setup, follow these steps:
* [Create a new realm](#creating-a-new-realm)
* Define available roles and realm-level roles assigned to new users.
* [Create/import user roles and groups](#creatingimporting-user-groups-and-roles)
* [Create new users](#creating-new-users)
* [Add clients](#adding-clients)
* Configure access type, valid redirect URIs, and enable necessary flows.
* [Add role mappers](#adding-protocol-mappers)
* [Add service accounts](#adding-service-accounts)
* Set up **admin**, **task management**, and **process engine** service accounts.
Recommended keycloak version: **18.0.x**
For more detailed information, refer to the official Keycloak documentation:
## Creating a new realm
A realm is a space where you manage objects, including users, applications, roles, and groups. To create a new realm:
1. Log in to the **Keycloak Admin Console** using the appropriate URL for your environment (e.g., QA, development, production).
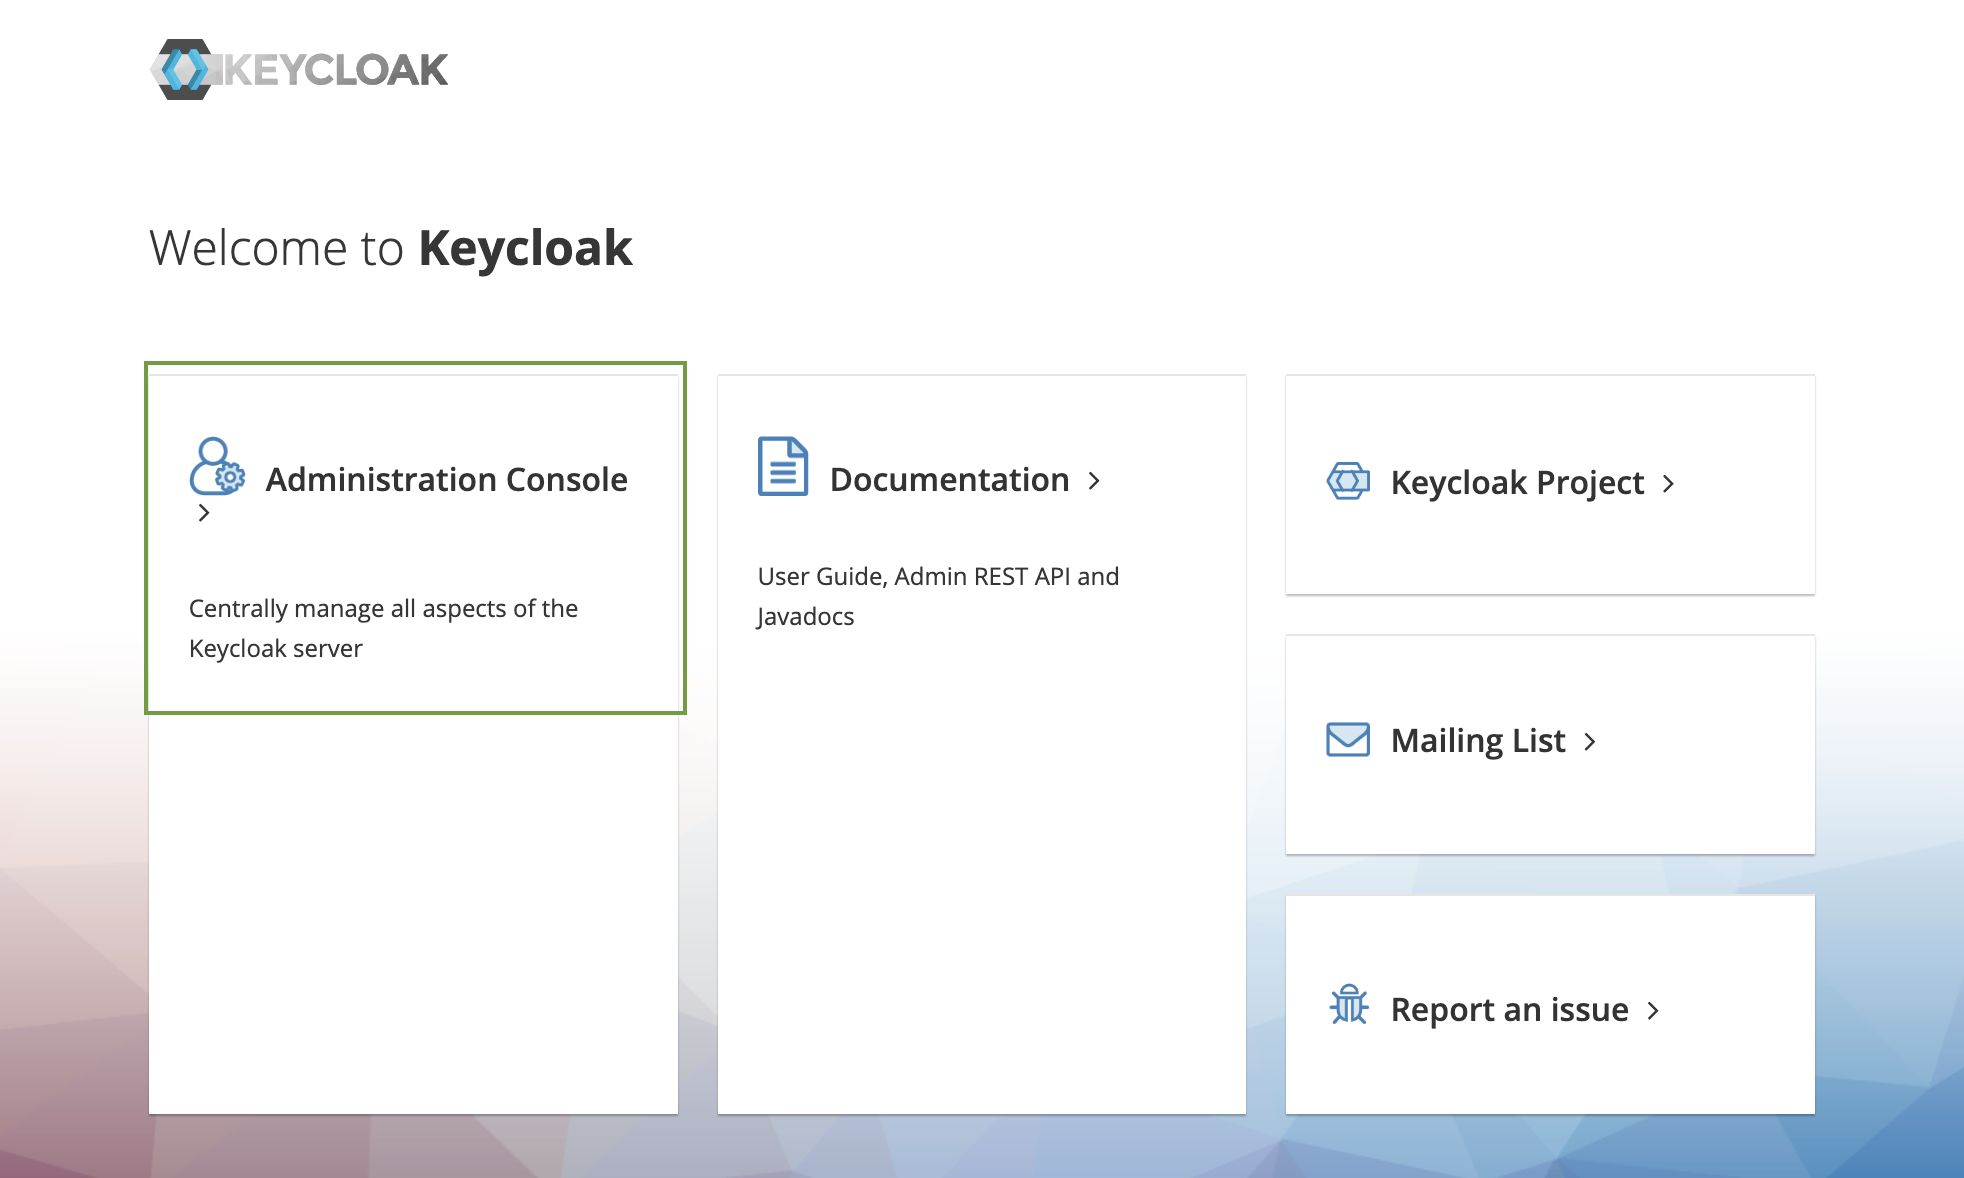
2. In the top left corner dropdown menu, click **Add Realm**.
If you are logged in to the master realm this dropdown menu lists all the realms created. The **Add Realm** page opens.
3. Enter a realm name and click Create.

4. Configure the realm settings (**Realm Settings → Tokens**), such as SSO session idle and access token lifespan, according to your organization's needs:
* **SSO Session idle** - suggested: **30 Minutes**
* **Access Token Lifespan** - suggested: **30 Minutes**

## Creating/importing user groups and roles
You can either create or import a user group into a realm. We prepared a [script](https://s3.eu-west-1.amazonaws.com/docx.flowx.ai/release40/importUsers.zip) that helps you to import a **super admin group** provided with the necessary **default user roles**.
You can create or import user groups into a realm. If you choose to import, follow the provided script to import a **super admin group** (`SUPER_ADMIN_USERS`) with **default user roles**. After importing, add an admin user to the group and assign the necessary roles.
Make sure to validate the imported roles by checking the following section:
## Creating new users
To create a new user in a realm and generate a temporary password:
1. In the left menu bar, click **Users** to open the user list page.
2. On the right side of the empty user list, click **Add User**.
3. Fill in the required fields, including the **username**, and ensure **Email Verified** is set to **ON**.
4. In the **Groups** field, choose a group from the dropdown menu, in our case: `FLOWX_SUPER_USERS`.

5. Save the user, go to the **Credentials** tab, and set a temporary password.

## Adding clients
A Client represents an instance of an application. A client is attached to a specific realm. First, add `platform-authenticate` client - will be used for login/logout/refresh token by web and mobile apps.
1. Click **Clients** in the top left menu, then click **Create**.
2. Set a client ID as `{example}-authenticate`, which will be used for login, logout, and refresh token operations.
3. Set the **Client Protocol** type as `openid-connect`.

3. Open the newly created **client** and edit the following properties:
* Set **Access type** to **public** (this will not require a secret).
* Set **Valid redirect URIs**, specifying a valid URI pattern that a browser can redirect to after a successful login or logout, simple wildcards are allowed.
* Enable **Direct Access Grants** and **Implicit Flow Enabled** by setting them to **ON**.

4. Add **mappers** to `{example}-authenticate` client.
Refer to the next section on how to add mappers and which mappers to clients.
## Adding protocol mappers
Protocol mappers in Keycloak allow for the transformation of tokens and documents, enabling actions such as mapping user data into protocol claims or modifying requests between clients and the authentication server.
To enhance your clients, consider adding the following mappers:
* [Group Membership mapper ](#group-membership-mapper) - `realm-groups`: This mapper can be utilized to map user groups to the authorization token.
* [User Attribute mapper](#user-attribute-mapper) - `business filter mapper`: Use this mapper to map custom attributes, for example, mapping the [businessFilters ](../../docs/platform-deep-dive/user-roles-management/business-filters) list, to the token claim.
* [User Realm role](#user-realm-role) - `realm-roles`: This mapper enables mapping a user's realm role to a token claim.
By incorporating these mappers, you can further customize and enrich the information contained within your tokens.
### Group Membership mapper
To add a group membership mapper:
1. Navigate to **Clients** and select your desired client, in our case, `{example}-authenticate`
2. Go to the **Mappers** tab and click **Create** to create a new mapper.
3. Provide a descriptive **Name** for the mapper to easily identify its purpose.
4. Select **Group Membership** as the mapper type.
5. Set the token claim name for including groups in the token. In this case, set it as `groups`.

By configuring the group membership mapper, you will be able to include the user's group information in the token for authorization purposes.
### User Attribute mapper
To include custom attributes such as **business filters** in the token claim, you can add a user attribute mapper with the following settings:
1. Go to the desired client, `{example}-authenticate`, and navigate to the Mappers section.
2. Click on **Create** to create a new mapper.
3. Configure the following settings for the user attribute mapper:
* **Mapper Type**: User Attribute
* **User Attribute**: businessFilters
* **Token Claim Name**: attirubtes.businessFilters
* **Add to ID token**: OFF
* **Multivalued**: ON

By adding this user attribute mapper, the custom attribute "businessFilters" will be included in the token claim under the name "attributes.businessFilters". This will allow you to access and utilize the business filters information within your application.
You can find more information about business filters in the following section:
### User realm role
Add **roles** **mapper** to `{example}-authenticate` client - so roles will be available on the OAuth user info response.
To add a roles mapper, follow these steps:
1. Go to the desired client, `{example}-authenticate`, and navigate to the Mappers section.
2. Click on **Create** to create a new mapper.
3. Configure the following settings for the user attribute mapper:
* **Mapper Type**: User Realm Role
* **Token Claim Name**: role
* **Add to userinfo**: ON
By adding this roles mapper, the assigned realm roles of the user will be available in the OAuth user info response under the claim name "roles". This allows you to access and utilize the user's realm roles within your application.
Please note that you can repeat these steps to add multiple roles mappers if you need to include multiple realm roles in the token claim.

### Examples
#### Login
```curl theme={"dark"}
curl --location --request POST 'http://localhost:8080/realms/flowx/protocol/openid-connect/token' \
--header 'Content-Type: application/x-www-form-urlencoded' \
--data-urlencode 'grant_type=password' \
--data-urlencode 'username=admin@flowx.ai' \
--data-urlencode 'password=password' \
--data-urlencode 'client_id= example-authenticate'
```
#### Refresh token
```curl theme={"dark"}
curl --location --request POST 'http://localhost:8080/realms/flowx/protocol/openid-connect/token' \
--header 'Content-Type: application/x-www-form-urlencoded' \
--data-urlencode 'grant_type=refresh_token' \
--data-urlencode 'client_id= example-authenticate' \
--data-urlencode 'refresh_token=ACCESS_TOKEN'
```
#### User info
```
curl --location --request GET 'localhost:8080/realms/flowx/protocol/openid-connect/userinfo' \
--header 'Authorization: Bearer ACCESS_TOKEN' \
```
### Authorizing client
Add `{example}-platform-authorize` client - it will be used to authorize rest requests to microservices and Kafka
* set **Client Protocol** to **openid-connect**
* set **Access type** as **confidential**
* disable **Direct Access Grants Enabled** - OFF
* **Valid Redirect URIs** - mandatory
* disable **Backchannel Logout Session Required** - OFF
Once you have configured these settings, the `{example}-platform-authorize` client will be created and can be used to authorize REST requests to microservices and Kafka within your application.

### Minimal auth config for microservices
```yaml theme={"dark"}
security:
type: oauth2
basic:
enabled: false
oauth2:
base-server-url: http://localhost:8080
realm: flowx
client:
access-token-uri: ${security.oauth2.base-server-url}/realms/${security.oauth2.realm}/protocol/openid-connect/token
client-id: example-authorize
client-secret: CLIENT_SECRET
resource:
user-info-uri: ${security.oauth2.base-server-url}/realms/${security.oauth2.realm}/protocol/openid-connect/userinfo
```
## Adding service accounts
**What is a service account?**
A service account is an account that grants direct access to the Keycloak API for a specific component.
Each client has a built-in service account which allows it to obtain an access token. To use this feature you must set the **Access Type** of your client to **confidential**. When you do this, the **Service Accounts Enabled** switch will appear.
### Admin service account
The admin service account is employed by the admin microservice to establish a connection with Keycloak for the purpose of utilizing user and group management features within the designer.
Follow these steps to add an **admin service account**:
1. Add a new client by selecting **Clients** then click **Create**.

2. Next, set **Access type** as **confidential** and enable **Service Accounts**.

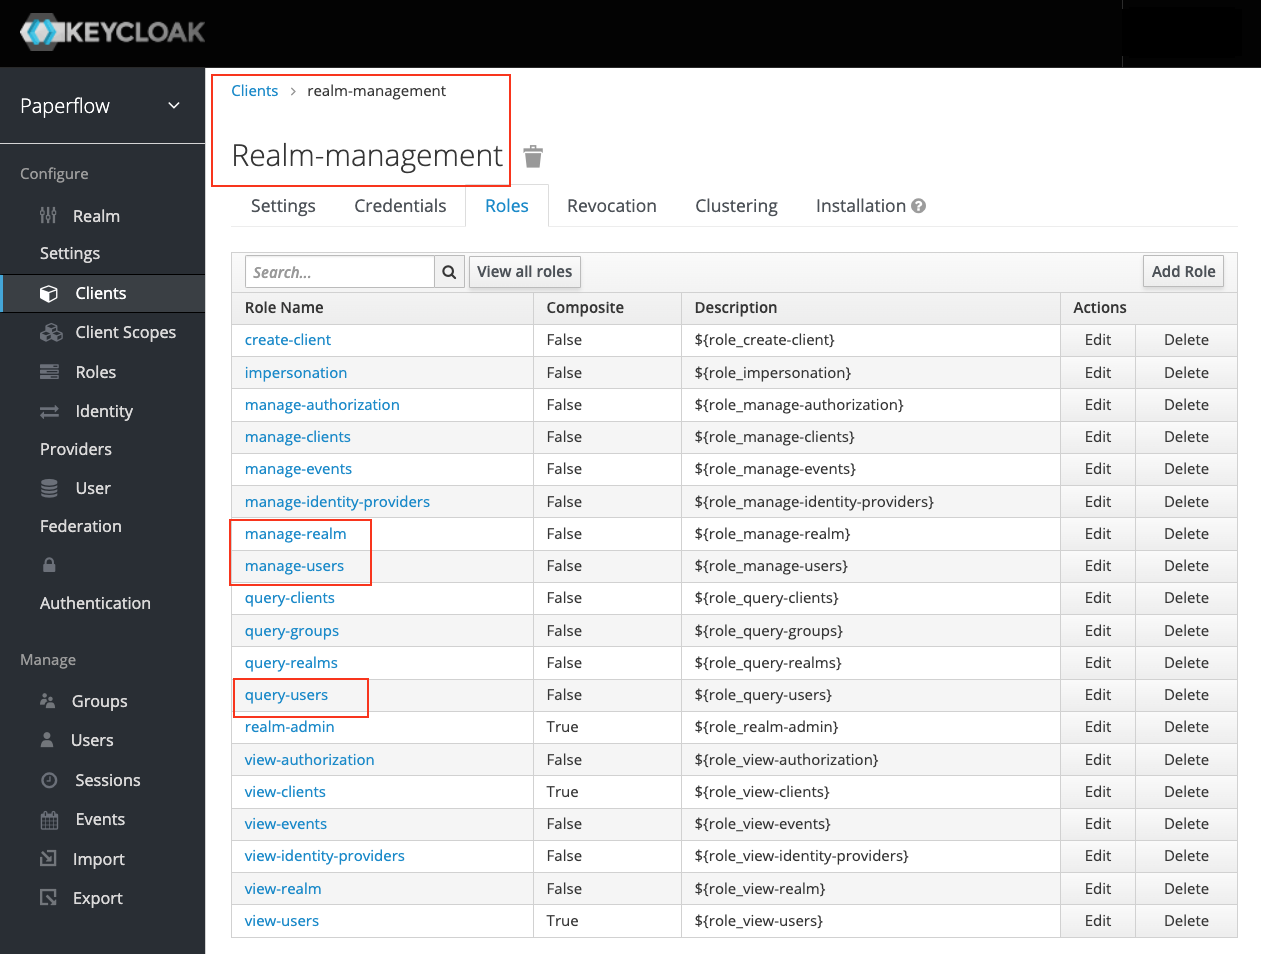
3. Go to **Clients → realm-management → Roles** and add the following **service account client roles** under **realm-management**:
* **manage-realm**
* **manage-users**
* **query-users**
Make sure first that you created a realm-management client with the following client roles:
4. Assign the necessary **service account roles**:
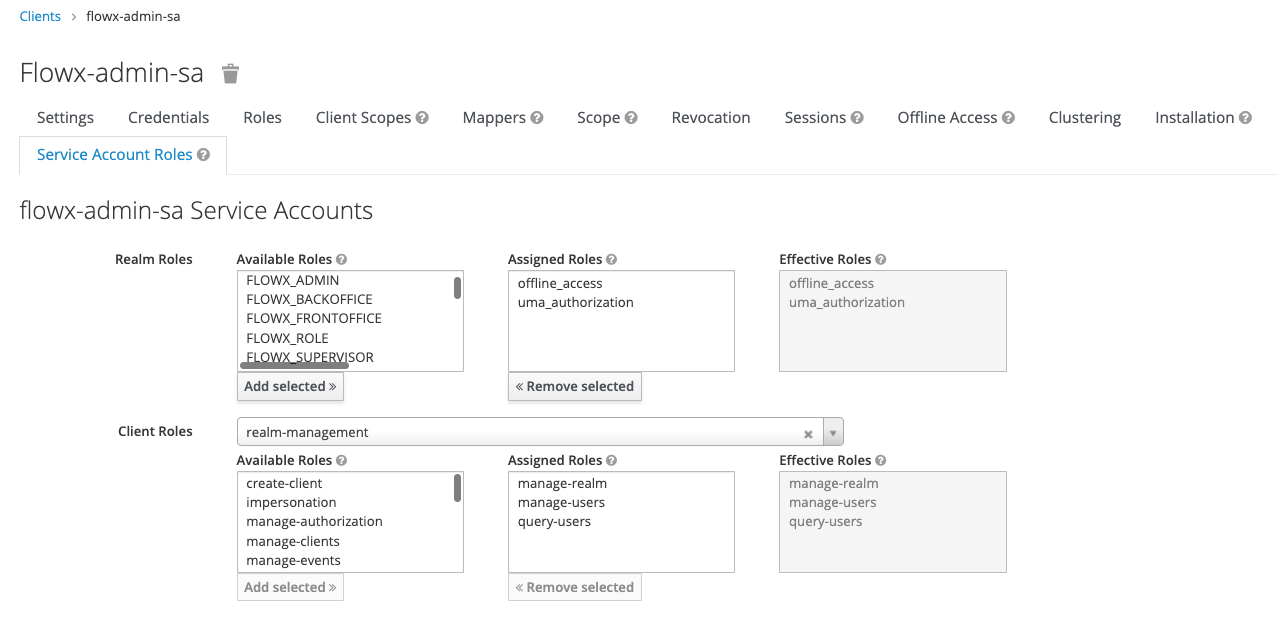
In the provided example, the **admin service account** can have the following assigned roles, depending on the required access scopes:
* **manage-users**
* **query-users**
* **manage-realm**
The admin service account does not require mappers as it doesn't utilize roles. Service account roles include client roles from the `realm-management`.
For detailed information, refer to the following section:
### Task management service account
The task management service account is utilized to facilitate process initiation, enable the use of the task management plugin (requiring the `FLOWX_ROLE` and role mapper), and access data from Keycloak."
The task management microservice requires a service account to make direct calls to the Keycloak API. Follow these steps to add a task management service account:
1. Add a new client by selecting **Clients** then click **Create**.

2. Next, set the following properties:
* **Access type** - confidential
* **Service Accounts Enabled** - ON

3. Go to **Clients → realm-management → Roles** and add the following **service account client roles**:
* **view-users**
* **query-groups**
* **query-users**
Example for **view-users**:

4. Configure a **realm roles mapper**:

5. Assign the necessary service account roles, including `FLOWX_ROLE`.
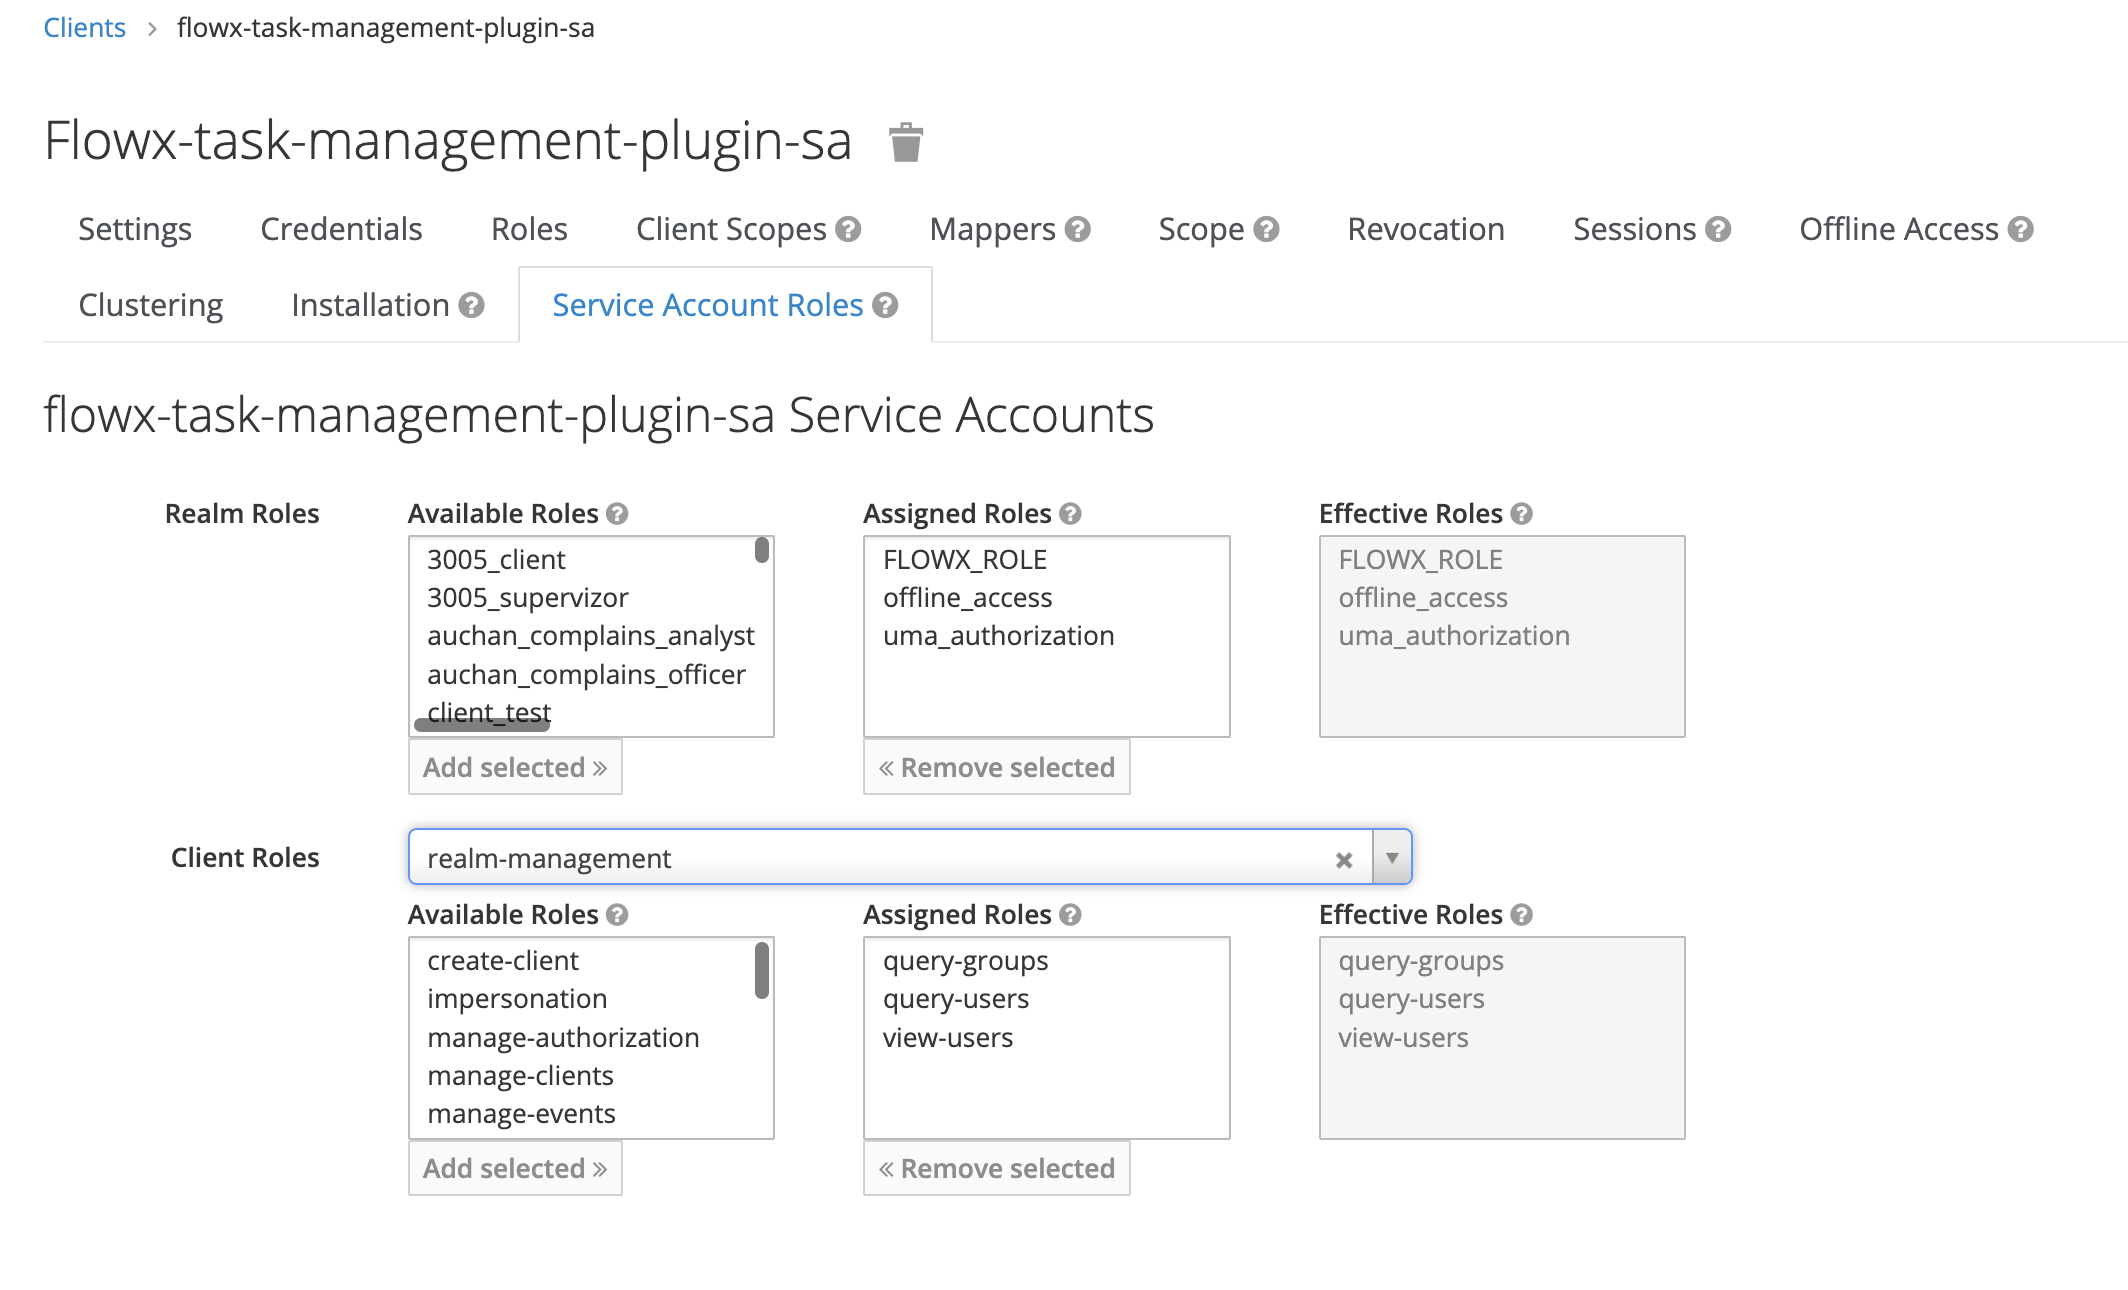
In the provided example, the **task management service account** can have the following assigned roles, depending on the required access scopes:
* **view-users**
* **query-groups**
* **query-users**
For more information, check the following section:
### Process engine service account
The process engine requires a process engine service account to make direct calls to the Keycloak API.
This service account is needed so the use of Start Catch Event node is possible.
Follow these steps to add a **process engine service account**:
1. Add a new client by selecting **Clients** then click **Create**.
2. Next, set **Access type** as **confidential** and enable **Service Accounts**.

This service account does not require client roles.
3. Assign the `FLOWX_ROLE` (this is needed to run process instances).

4. Add a realm-roles mapper:

### Scheduler service account
This service account is used for Start Timer Event node. The registered timers in the scheduler require sending a process start message to Kafka. Authentication is also necessary for this operation.
Follow these steps to add a **scheduler service account**:
1. Add a new client by selecting **Clients** then click **Create**.
2. Next, set **Access type** as **confidential** and enable **Service Accounts**.
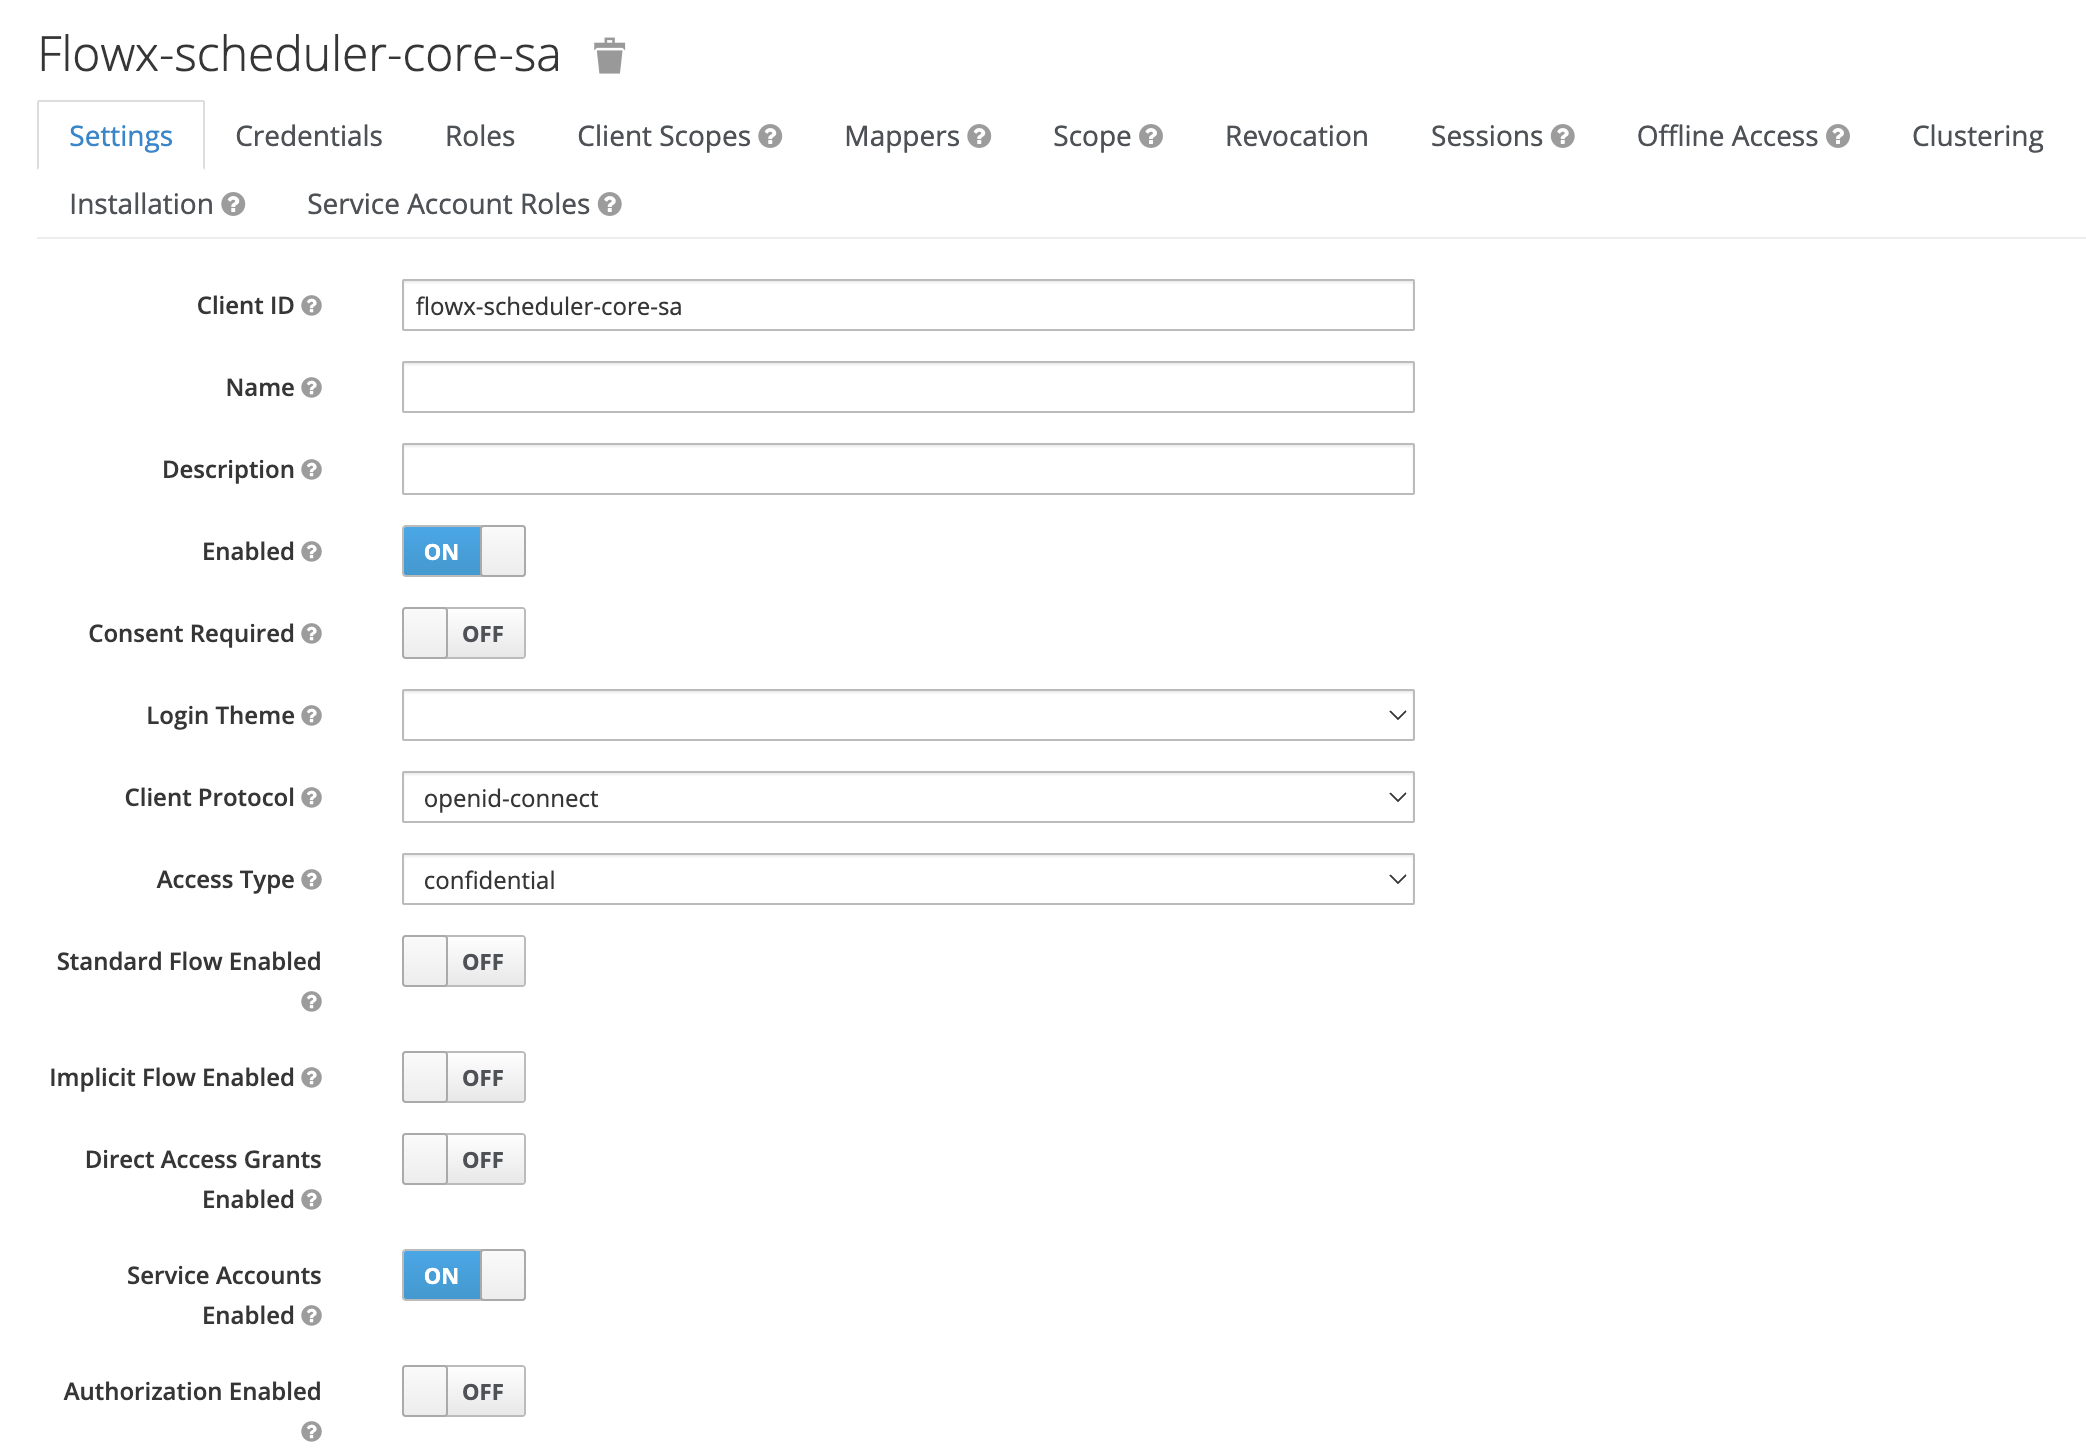
3. Assign the `FLOWX_ROLE` as service account role (this is needed to run process instances).
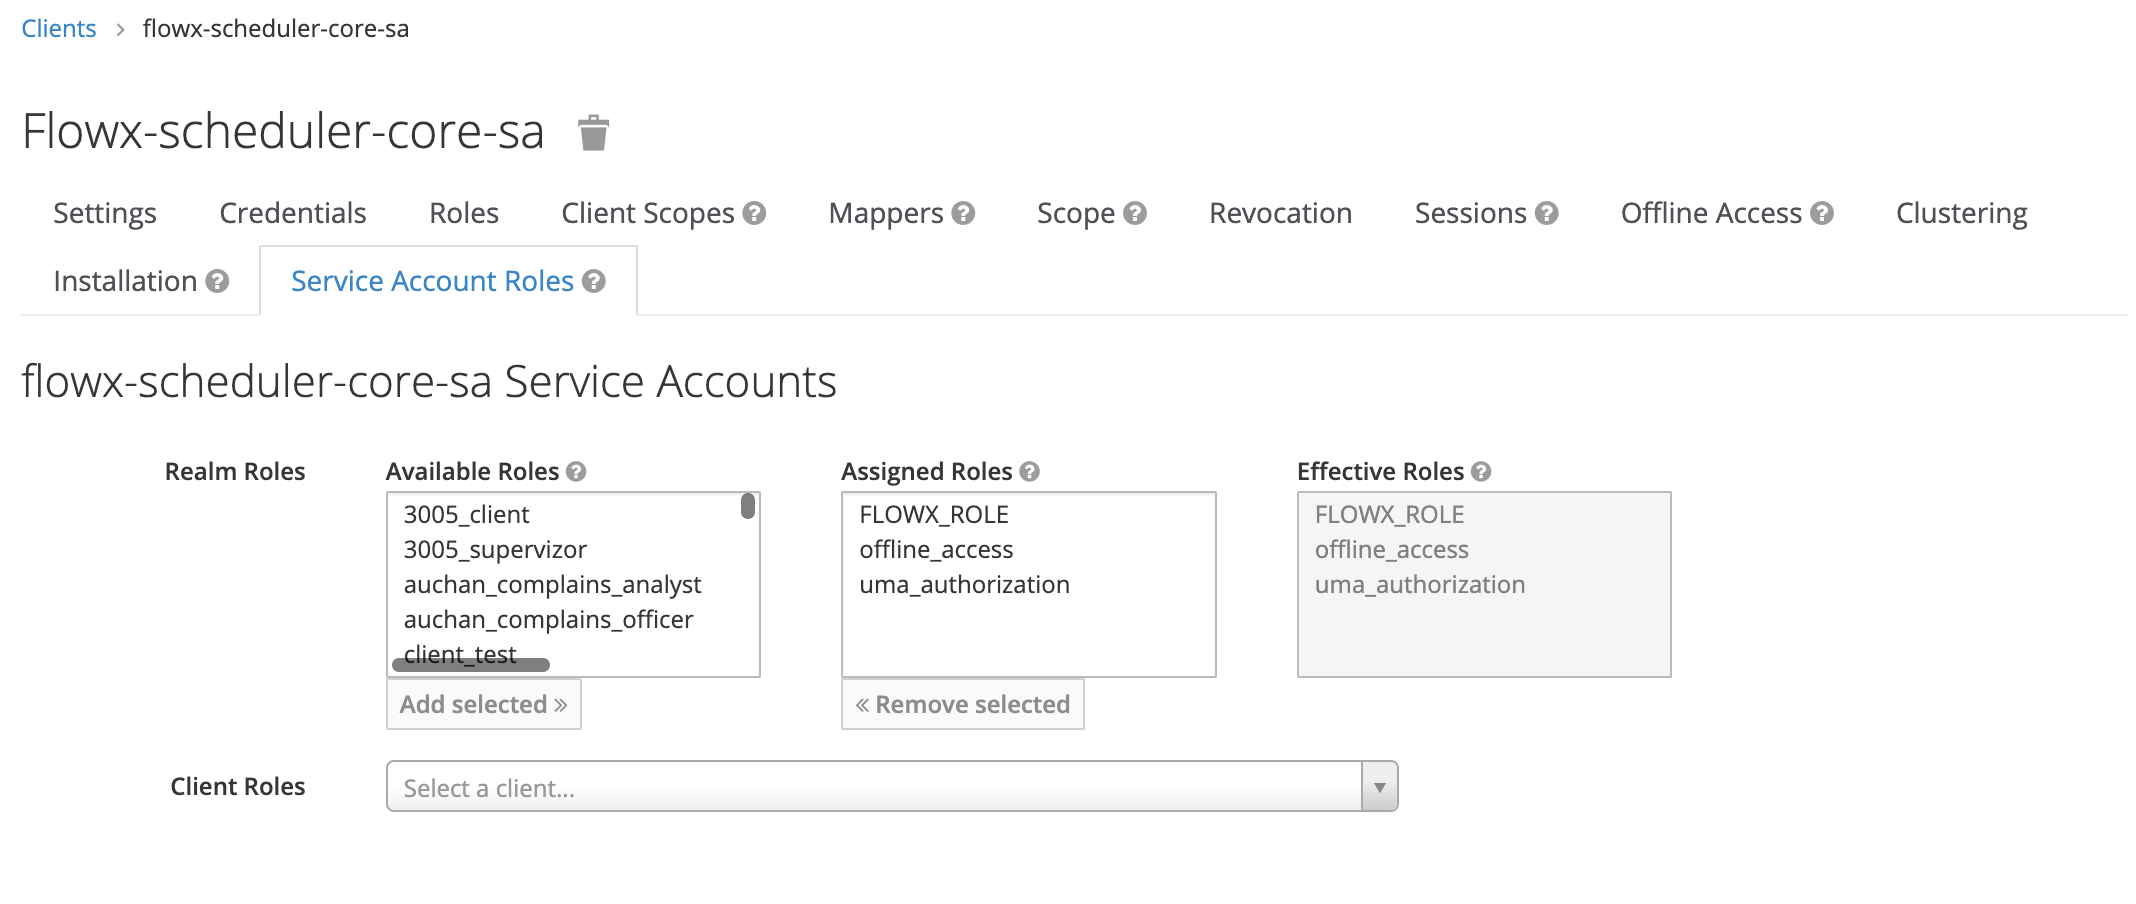
4. Add a realm-roles mapper (as shown in the example for **process-engine service account**).
## Related topics
- [Deployment guidelines v5.7.0](/release-notes/v5.x/v5.7.0-april-2026/deployment-guidelines-v5.7.md)
- [Overview](/release-notes/v5.x/v5.5.0-february-2026/migrating-from-v5.4-to-v5.5/migration-overview.md)
- [Deployment guidelines v5.5.0](/release-notes/v5.x/v5.5.0-february-2026/deployment-guidelines-v5.5.md)
- [FlowX.AI 5.8.0 Release Notes](/release-notes/v5.x/v5.8.0-may-2026/v5.8.0-may-2026.md)
- [FlowX.AI 5.5.0 Release Notes](/release-notes/v5.x/v5.5.0-february-2026/v5.5.0-february-2026.md)