> ## Documentation Index
> Fetch the complete documentation index at: https://docs.flowx.ai/llms.txt
> Use this file to discover all available pages before exploring further.
# Overview
> The FlowX platform offers a variety of ready-to-use [UI components](./ui-designer#ui-component-types) that can be used to create rich web interfaces. These include common form elements like [input fields](./ui-component-types/form-elements/input-form-field), [dynamic dropdown menus](./ui-component-types/form-elements/select-form-field#example---dynamic-dropdowns), [checkboxes](./ui-component-types/form-elements/checkbox-form-field), [radio](./ui-component-types/form-elements/radio-form-field), and [switch buttons](./ui-component-types/form-elements/switch-form-field), as well as other UI elements like image, text, anchor links, etc. The properties of each component can be customized further using the details tab, and [design flexibility](./#styling) is achieved by adding styles or CSS classes to the pre-defined components. The UI templates are built in a hierarchical structure, with a root component at the top.
## Using UI designer
The FlowXplatform includes an intuitive **UI Designer** for creating diverse UI templates. You can use various elements such as basic buttons, indicators, and forms, as well as predefined [collections](./ui-component-types/collection/collection) and [prototypes](./ui-component-types/collection/collection_prototype). To access the UI Designer, follow these steps:
1. Open **FlowX Designer** and select **Definitions** from the **Processes** tab.
2. Select a **process** from the process definitions list.
3. Click the **Edit** **process** button.
4. Select a **node** then click the **brush icon** in the Process Designer navigation menu to open the **UI Designer**.
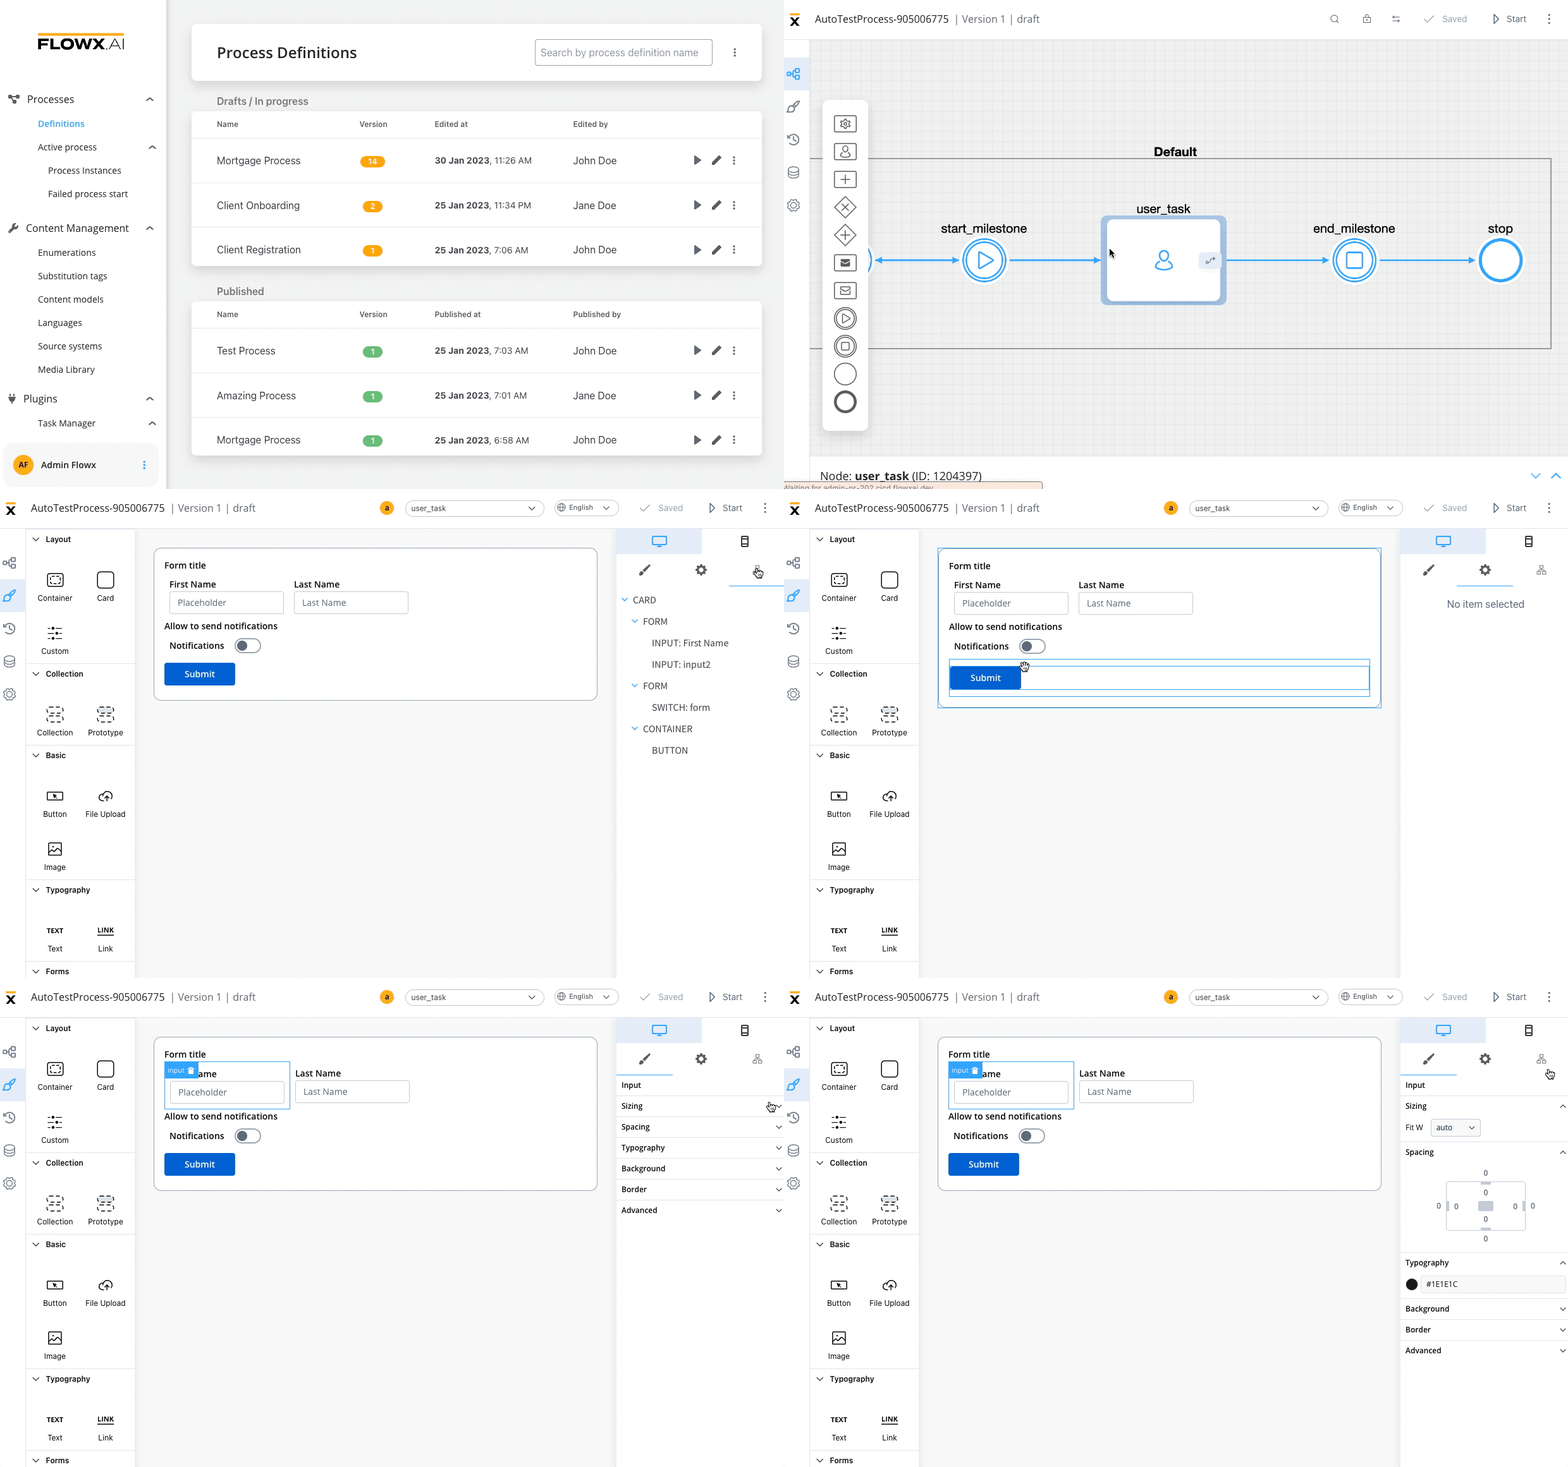
The UI designer is available for [**User task**](../node/user-task-node) nodes and [**Milestone**](../node/milestone-node) nodes (nodes that require human interaction).
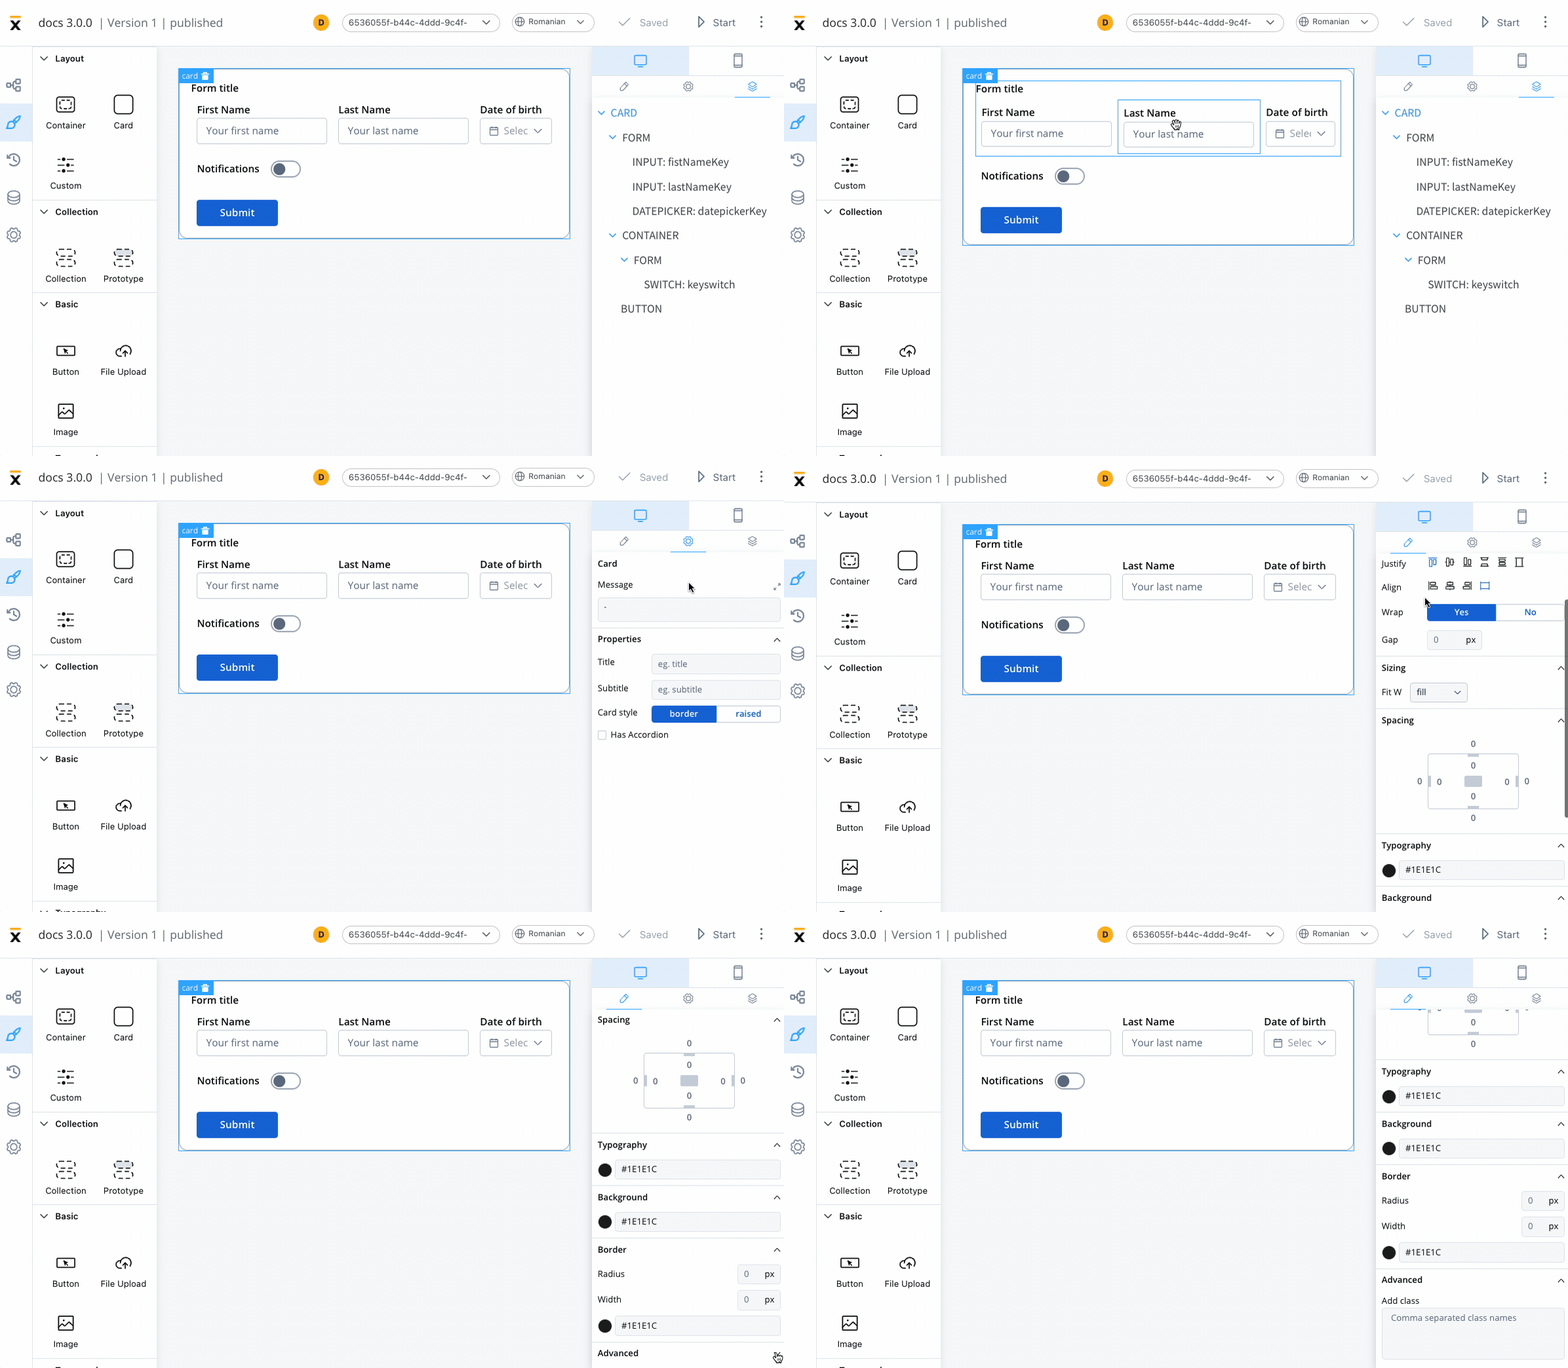
After adding a specific component to the node, the right-side menu will display more configuration options.
For more flexibility, undo or redo actions are available within the UI Designer. This includes tasks such as dragging, dropping, or deleting elements from the preview section, as well as adjusting settings within the styling and settings panel.
To undo or redo an action, users can simply click the corresponding icons in the UI Designer toolbar, or use the keyboard commands for even quicker access.
## UI components
FLOWX.AI offers a wide range of [UI components](./ui-designer#ui-components) that can be customized using the UI Designer. For example, when configuring a [card](./ui-component-types/root-components/card) element (which is a root component), the following properties can be customized:
#### Settings
* **Message** - a valid JSON string that is pushed to the frontend application when the process reaches [user task](../node/user-task-node); this property is only available for [Root components](./ui-component-types/root-components/root-components)
* **Properties** - custom properties that vary depending on the component type
* **Has Accordion** (available only for **Card** component) - a Bootstrap accordion is a component that organizes content within collapsible items, allowing only one collapsed item to be displayed at a time

By utilizing the UI Designer, users can easily create rich web interfaces with customizable UI components.
## Styling
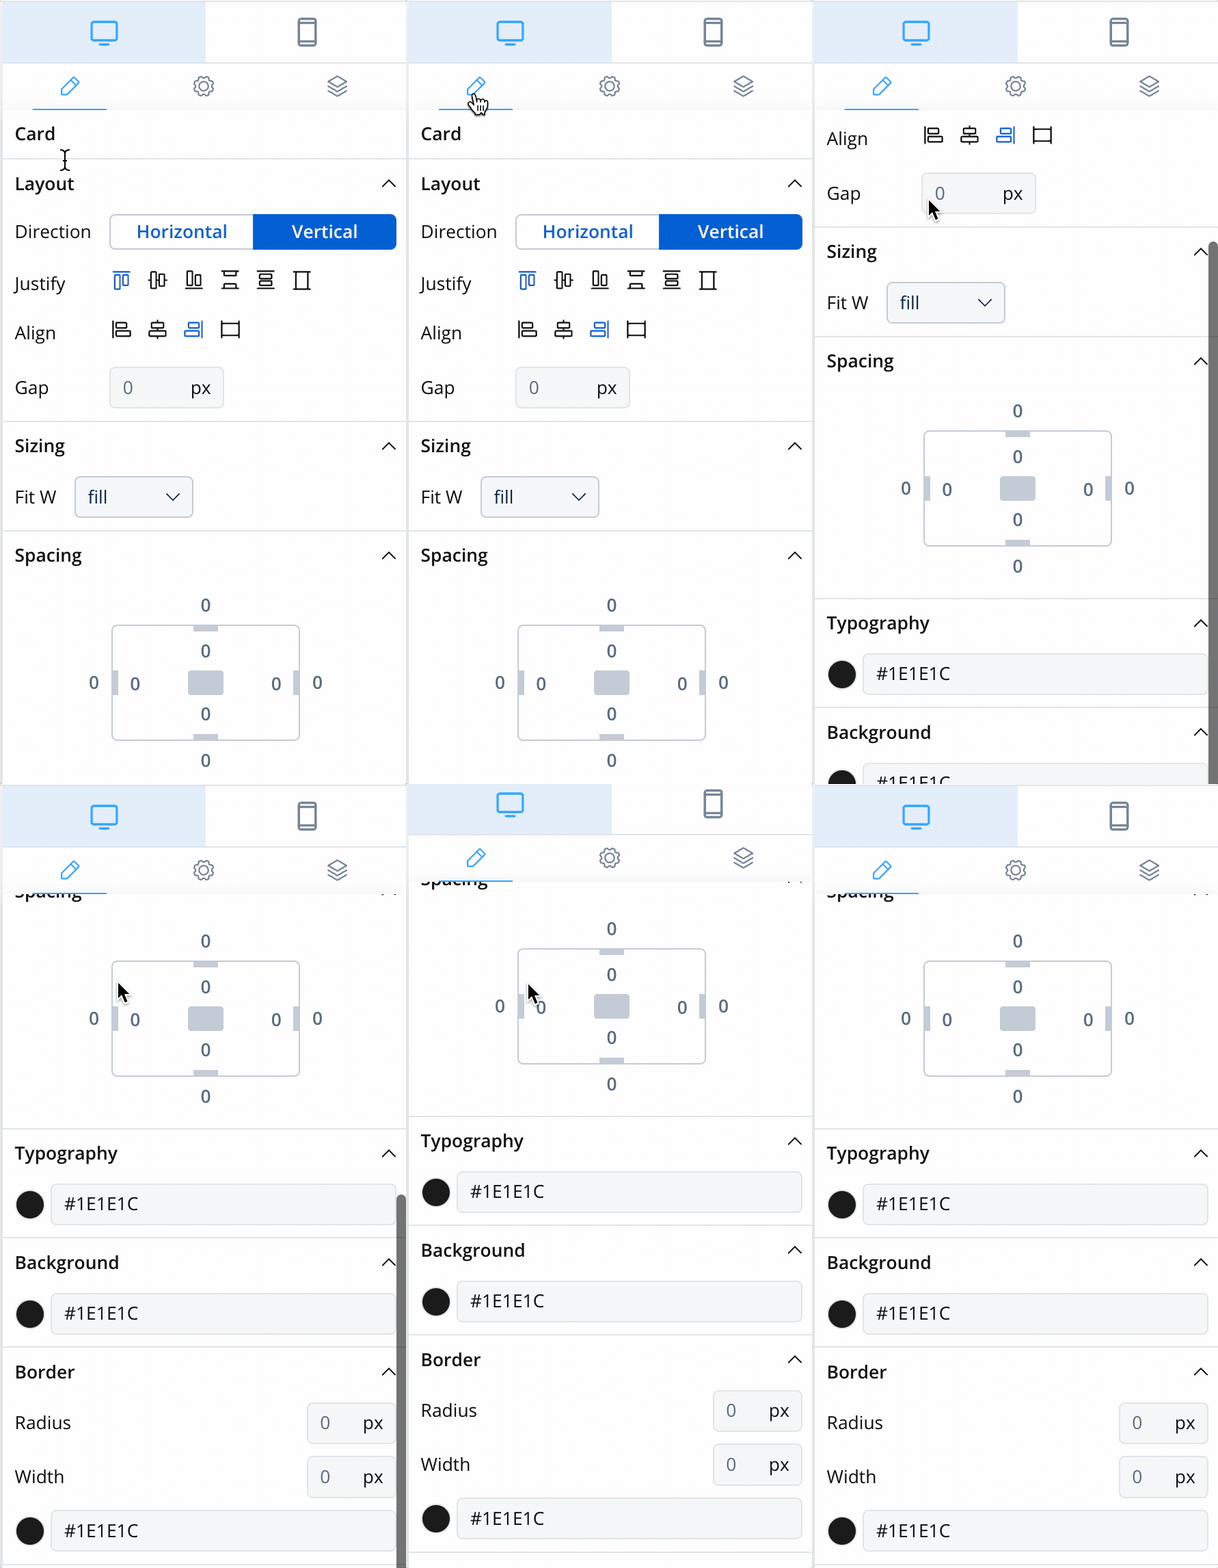
In FLOWX.AI, styling options are available for components that group children, which can be found under the styling section.
Users can customize the direction, alignment, gap, sizing, and spacing of their layout. These properties help to create well-organized and visually pleasing user interfaces.
### Layout
Layout configuration is available for components that group children: [root components](./ui-component-types/root-components/) and [forms](./ui-component-types/form-elements) (more details about layouts can be found [here](https://tburleson-layouts-demos.firebaseapp.com/#/docs)):
* Direction - horizontal or vertical
* Alignment - start, center, end, stretch
* Wrap - content will wrap to the next line when it reaches the end of a line within the element
* Gap - the gap property defines the size of the gap between the rows and between the columns

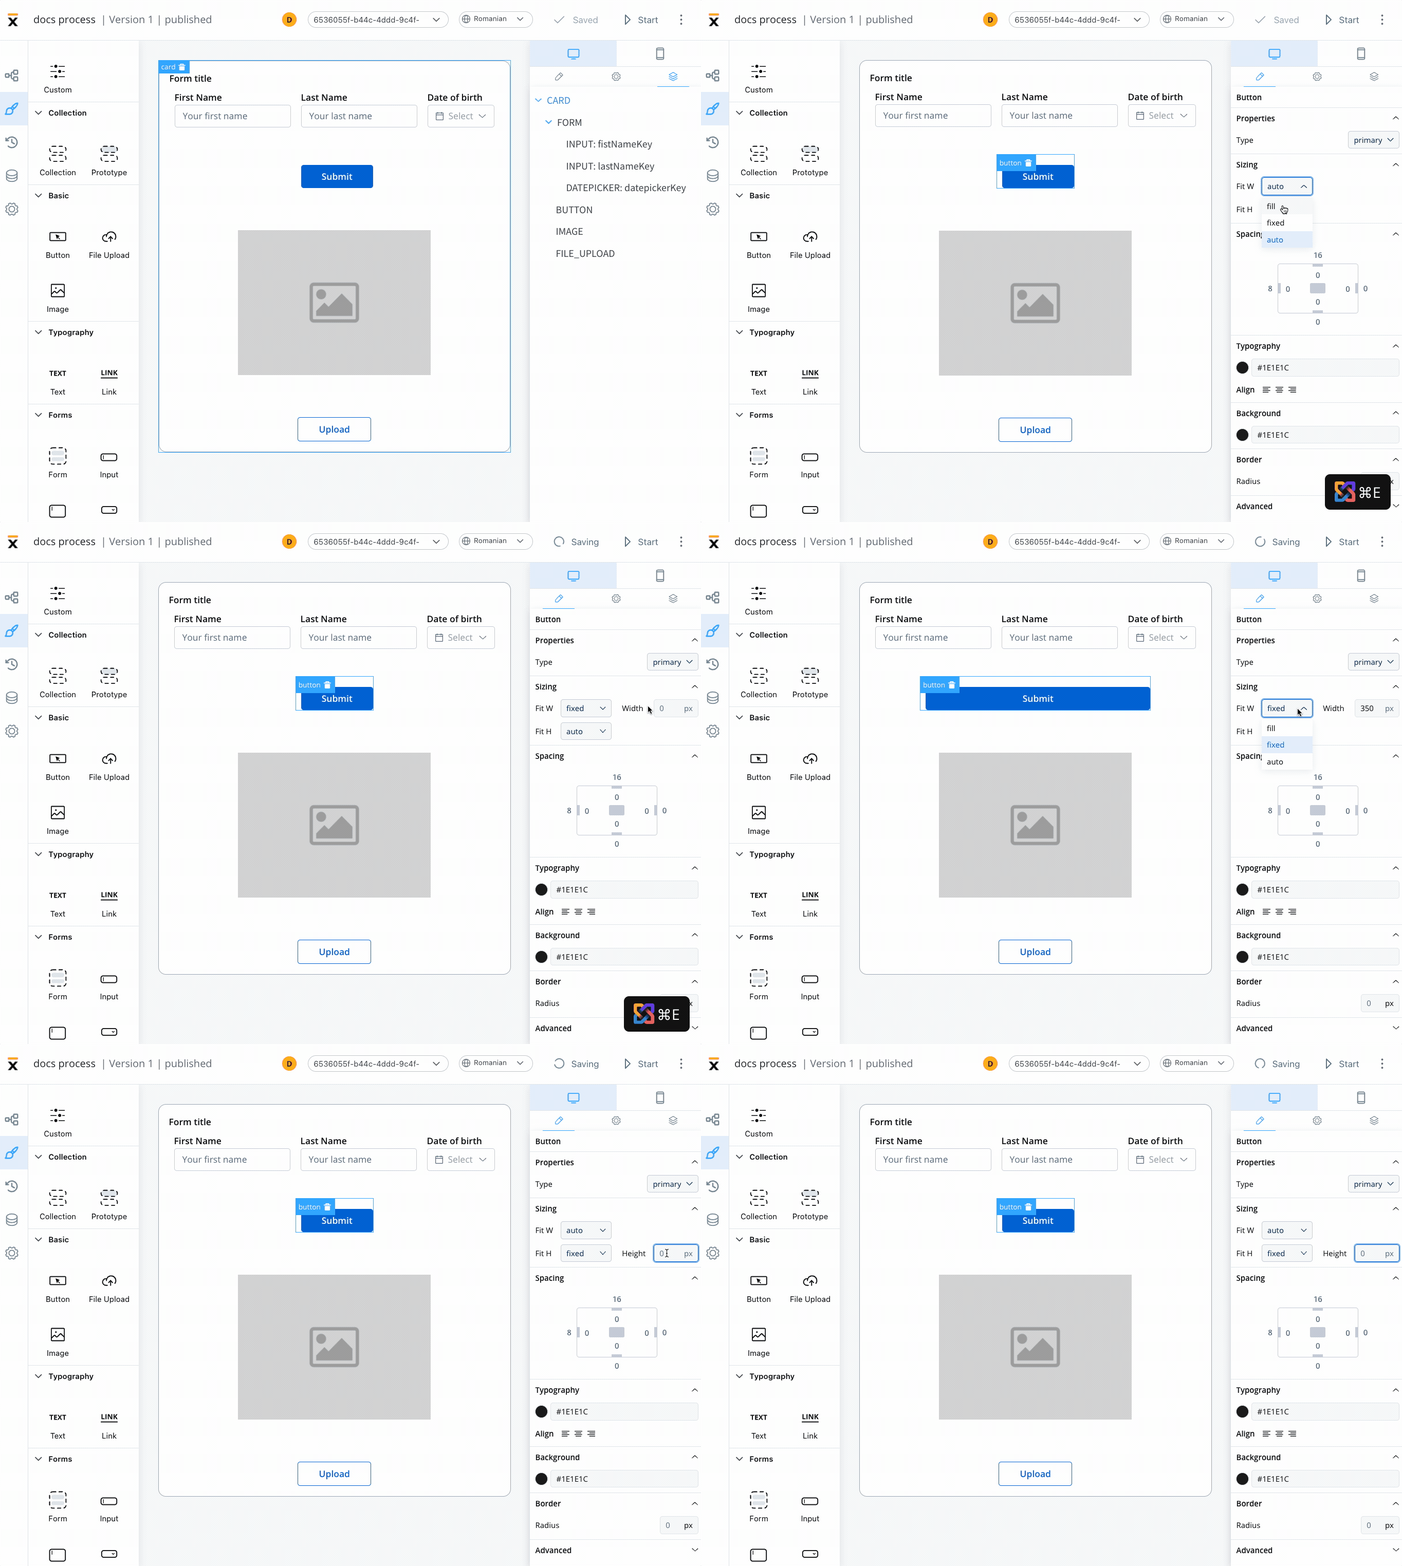
### Sizing
By setting desired values for these props, you can ensure that all UI elements on the interface are the desired size and perfectly fit with each other.
When adjusting the Fit W and Fit H settings, users can control the size and shape of the elements as it appears on their screen:
* Fit W: fill, fixed or auto
* Fit H: fill, fixed or auto
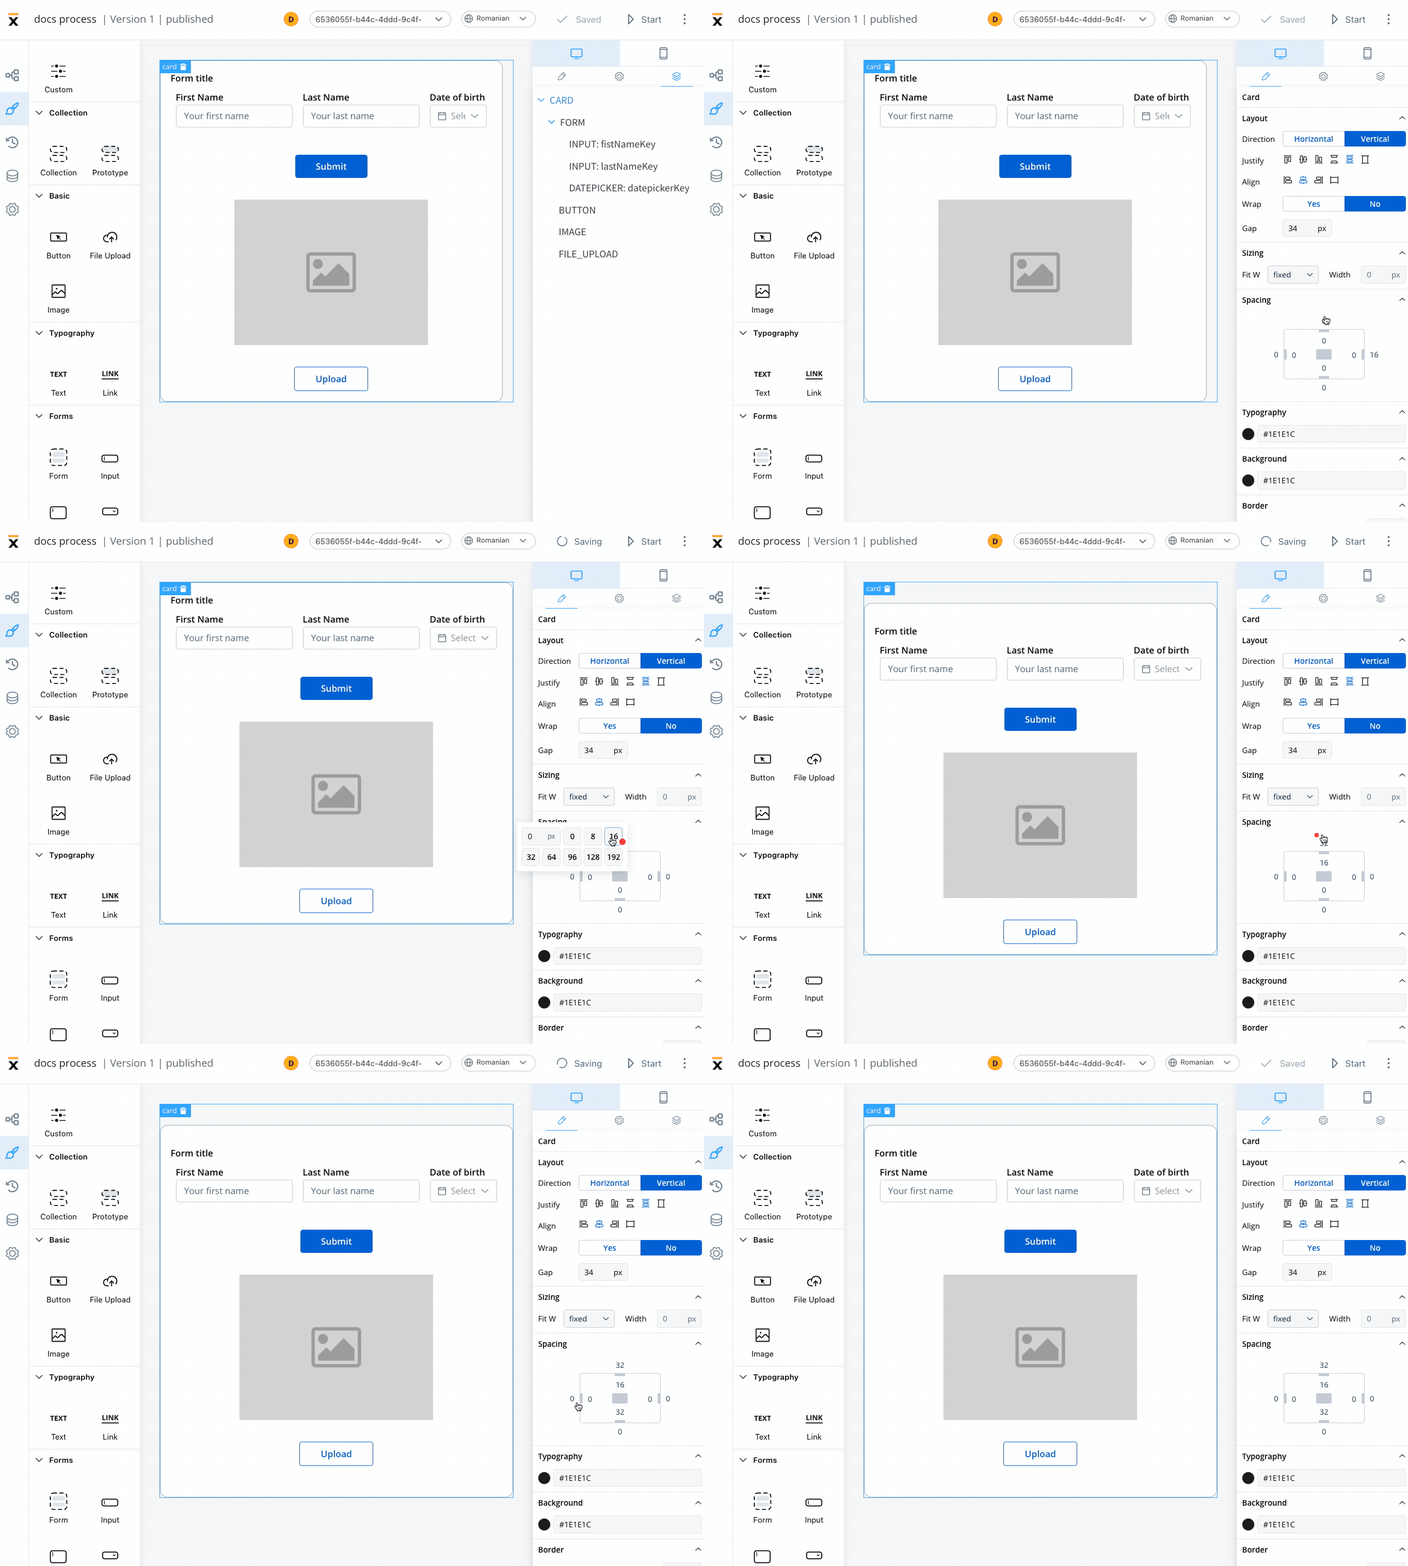
### Spacing
Margin and padding are CSS properties used to create space between elements in a web page:
* margin - the space outside an element
* padding - the space inside an element
### Typography
* **Typography** - typography options allow users to set font styles, colors, text indentation, and other formatting options; these properties can be found under the **Typography** section

To learn how to upload custom font files, check the [**Font Management**](../../platform-deep-dive/core-extensions/content-management/font-files) section.
### Background
**Background** - the Background section allows users to set the background color for their components, accepted values:
* a valid color name - like `red`
* a HEX value - like `#ff0000`
* an RGB value - like `rgb(255,0,0)`
### Border
**Border** - border properties can be customized under the **Border** section, users can set the radius, width, or color of their component's borders
### Advanced
* **Advanced** - for advanced customization, users can add CSS classes to pre-defined components, this option is available under the **Advanced** section
By utilizing these styling options in FLOWX.AI, users can create unique and visually appealing interfaces that meet their design requirements.
## Tree view
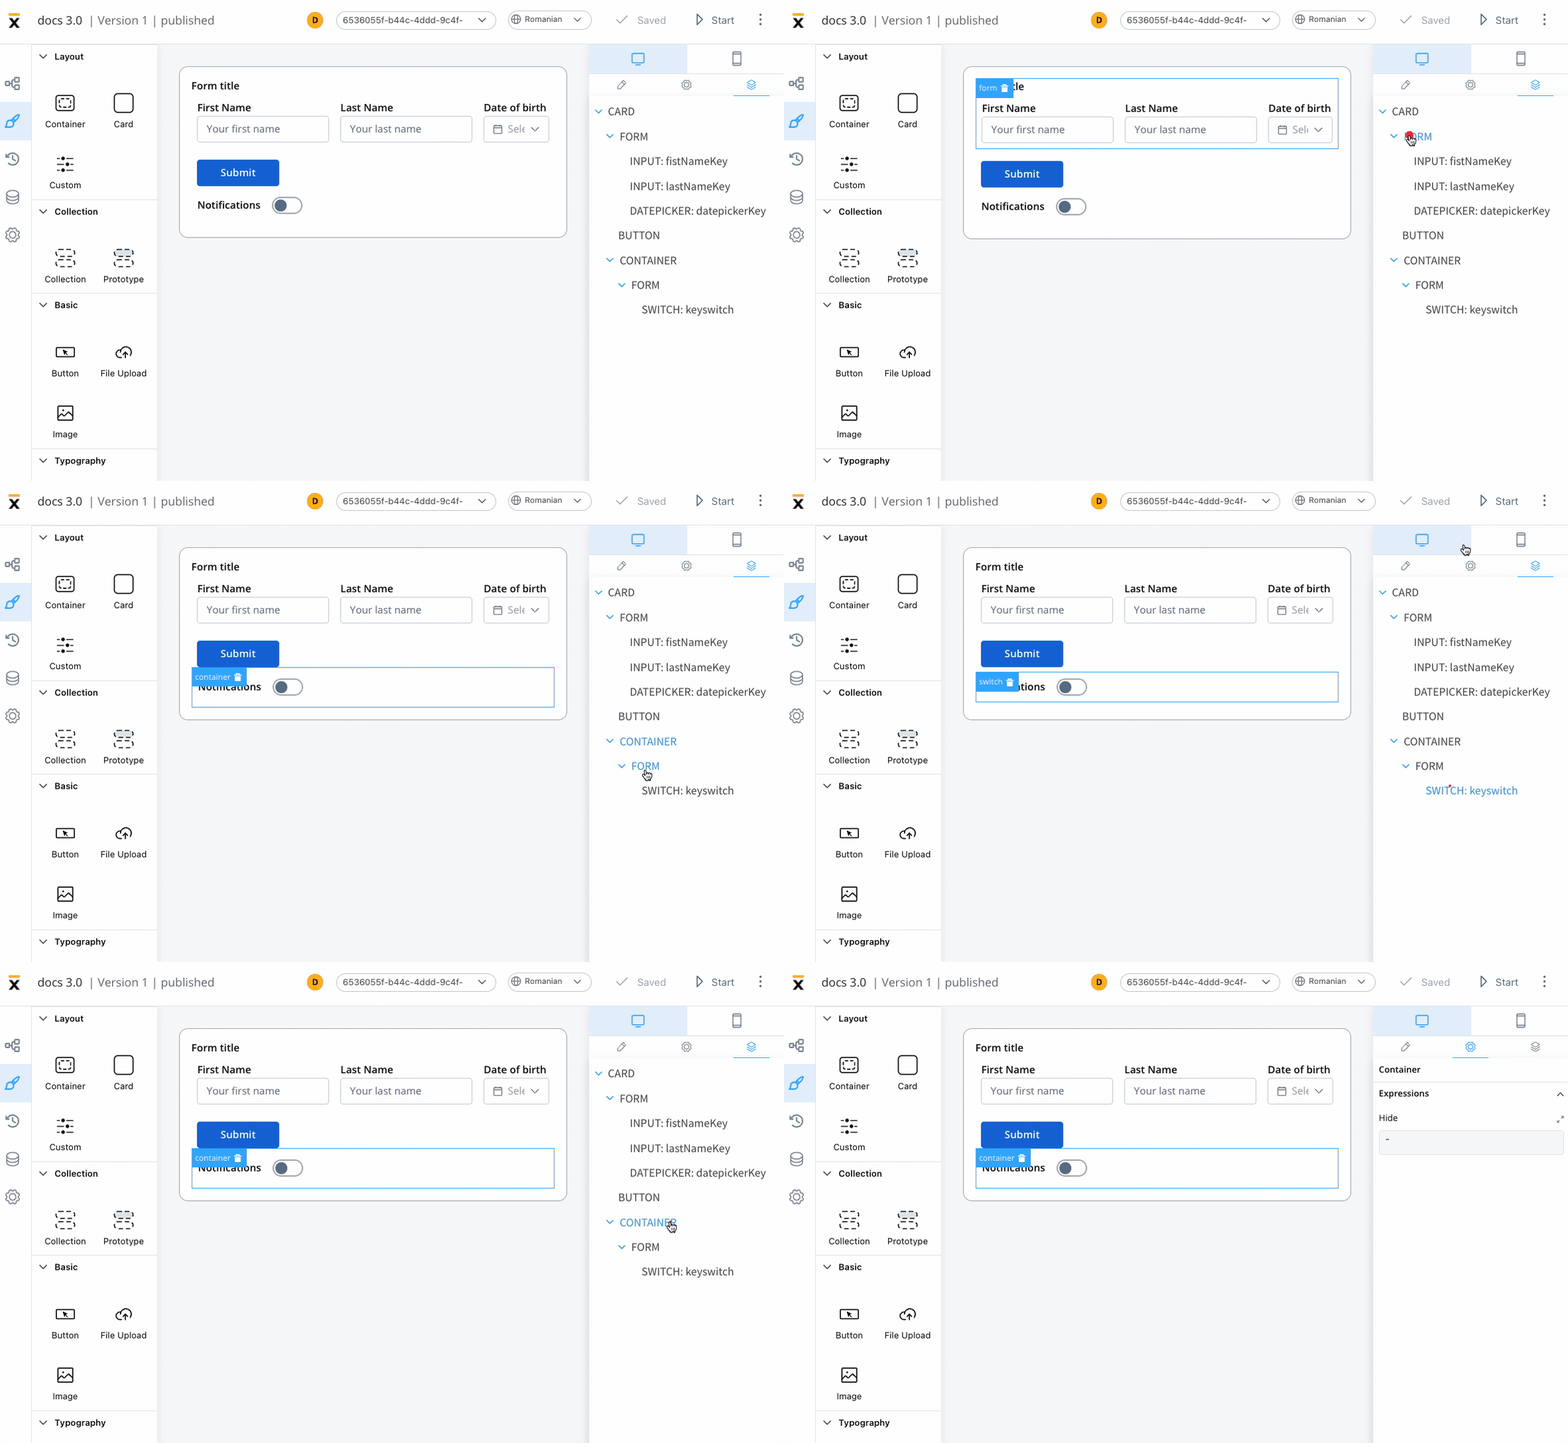
The Tree View panel displays the component hierarchy, allowing users to easily navigate through the different levels of their interface.
Clicking on a specific component in the tree will highlight the selection in the editor, making it easy to locate and modify.
## UI component types
Different UI component types can be configured using UI Designer. The components can be configured only using user task nodes or milestone nodes.
Depending on the [component type](./ui-designer#ui-component-types) different properties are available for configuration.
Understanding these component types will help you to better utilize the UI Designer tool and create rich web interfaces efficiently.
# UI component types
Different UI component types can be configured using UI Designer. The components can be configured only using [user task](/3.x/docs/building-blocks/node/user-task-node) nodes or [milestone](/3.x/docs/building-blocks/node/milestone-node) nodes.
Understanding these component types will help you to better utilize the UI Designer tool and create rich web interfaces efficiently.
* [Container](./ui-component-types/root-components/container)
* [Card](./ui-component-types/root-components/card)
* [Custom](./ui-component-types/root-components/custom)
* [Collection](./ui-component-types/collection/collection)
* [Collection Prototype](./ui-component-types/collection/collection_prototype)
* [Button](./ui-component-types/buttons)
* [File Upload](./ui-component-types/buttons#file-upload)
* [Image](./ui-component-types/image)
* Text
* Link
Form elements are a crucial aspect of creating user interfaces as they serve as the means of collecting information from the users. These elements come in various types, including simple forms, [inputs](./ui-component-types/form-elements/input-form-field), [text areas](./ui-component-types/form-elements/text-area), drop-down menus ([select](./ui-component-types/form-elements/select-form-field)), [checkboxes](./ui-component-types/form-elements/checkbox-form-field), [radio buttons](./ui-component-types/form-elements/radio-form-field), toggle switches ([switch](./ui-component-types/form-elements/switch-form-field)), [segmented buttons](./ui-component-types/form-elements/segmented-button), [sliders](./ui-component-types/form-elements/slider) and [date pickers](./ui-component-types/form-elements/datepicker-form-field). Each of these form elements serves a unique purpose and offers different options for capturing user input.
* [Form](/3.x/docs/building-blocks/ui-designer/ui-component-types/form-elements)
* [Input](./ui-component-types/form-elements/input-form-field)
* [Textarea](./ui-component-types/form-elements/text-area)
* [Select](./ui-component-types/form-elements/select-form-field)
* [Checkbox](./ui-component-types/form-elements/checkbox-form-field)
* [Radio](./ui-component-types/form-elements/radio-form-field)
* [Switch](./ui-component-types/form-elements/switch-form-field)
* [Segmented button](/3.x/docs/building-blocks/ui-designer/ui-component-types/form-elements/segmented-button)
* [Slider](./ui-component-types/form-elements/slider)
* [Datepicker](./ui-component-types/form-elements/datepicker-form-field)
* [Message](./ui-component-types/indicators)
### Milestone node UI components
* Page
* Stepper
* Step
* Modal
* Container
For more information about Milestone node UI components, click [here](/3.x/docs/building-blocks/node/milestone-node).
## Related topics
- [Overview](/release-notes/v5.x/v5.0.0-july-2025/migrating-from-v4.7.x-to-5.0/migration-overview.md)
- [FlowX.AI 5.8.0 Release Notes](/release-notes/v5.x/v5.8.0-may-2026/v5.8.0-may-2026.md)
- [FlowX.AI 5.10.0 Release Notes](/release-notes/v5.x/v5.10.0-july-2026/v5.10.0-july-2026.md)